1
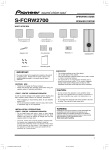
MONITOR SPEAKER
MSP3
Owner’s manual
Mode d’emploi
Bedienungsanleitung
Manual de instrucciones
LOW
HIGH
1
LINE
2
M
• Explanation of Graphical Symbols
The lightning flash with arrowhead symbol
within an equilateral triangle is intended to
alert the user to the presence of uninsulated
“dangerous voltage” within the product’s
enclosure that may be of sufficient magnitude
to constitute a risk of electric shock to persons.
CAUTION
RISK OF ELECTRIC SHOCK
DO NOT OPEN
The exclamation point within an equilateral
triangle is intended to alert the user to the presence of important operating and maintenance
(servicing) instructions in the literature
accompanying the product.
CAUTION: TO REDUCE THE RISK OF
ELECTRIC SHOCK, DO NOT REMOVE
COVER (OR BACK). NO USER-SERVICEABLE
PARTS INSIDE. REFER SERVICING TO
QUALIFIED SERVICE PERSONNEL.
The above warning is located on the rear
of the unit
IMPORTANT SAFETY INSTRUCTIONS
1
2
3
4
5
6
7
Read these instructions.
Keep these instructions.
Heed all warnings.
Follow all instructions.
Do not use this apparatus near water.
Clean only with dry cloth.
Do not block any ventilation openings. Install in
accordance with the manufacturer’s instructions.
8 Do not install near any heat sources such as
radiators, heat registers, stoves, or other apparatus (including amplifiers) that produce heat.
9 Do not defeat the safety purpose of the polarized or grounding-type plug. A polarized plug
has two blades with one wider than the other. A
grounding type plug has two blades and a third
grounding prong. The wide blade or the third
prong are provided for your safety. If the provided plug does not fit into your outlet, consult
an electrician for replacement of the obsolete
outlet.
10 Protect the power cord from being walked on or
pinched particularly at plugs, convenience
11
12
13
14
receptacles, and the point where they exit from
the apparatus.
Only use attachments/accessories specified by
the manufacturer.
Use only with the cart, stand,
tripod, bracket, or table specified by the manufacturer, or
sold with the apparatus.
When a cart is used, use caution when moving the cart/
apparatus combination to
avoid injury from tip-over.
Unplug this apparatus during lightning storms
or when unused for long periods of time.
Refer all servicing to qualified service personnel. Servicing is required when the apparatus
has been damaged in any way, such as powersupply cord or plug is damaged, liquid has been
spilled or objects have fallen into the apparatus,
the apparatus has been exposed to rain or moisture, does not operate normally, or has been
dropped.
WARNING
TO REDUCE THE RISK OF FIRE OR ELECTRIC SHOCK,
DO NOT EXPOSE THIS APPARATUS TO RAIN OR MOISTURE.
IMPORTANT
Please record the serial number of this unit in the space below.
Model:
Serial No.:
The serial number is located on the bottom or rear of the unit.
Retain this Owner’s Manual in a safe place for future reference.
IMPORTANT
THE WIRES IN MAINS LEAD ARE COLOURED
ACCORDANCE WITH THE FOLLOWING CODE:
BLUE :
BROWN :
IN
NEUTRAL
LIVE
As the colours of the wires in the mains lead of this apparatus
may not correspond with the coloured markings identifying the
terminals in your plug proceed as follows:
The wire which is coloured BLUE must be connected to the
terminal which is marked with the letter N or coloured BLACK.
The wire which is coloured BROWN must be connected to the
terminal which is marked with the letter L or coloured RED.
Making sure that neither core is connected to the earth terminal of
the three pin plug.
* This applies only to products distributed by YAMAHA KEMBLE
MUSIC (U.K.) LTD.
2
Thank you for purchasing the Yamaha MSP3 monitor speaker system. The
MSP3 features a compact bass reflex cabinet, with a 10 cm two-way cone speaker
and a 2.2 cm dome speaker. This powered bi-amplifier speaker system faithfully
reproduces sound and can be used for a wide range of applications, from personal home recordings to serious professional use. Please read this Owner’s
Manual thoroughly to make the best use of the MSP3’s quality functions for the
longest period of time, and keep the manual in a safe place.
Precautions
Warning
Cautions
• Connect this unit's power cord only to an AC outlet of
the type stated in this Owner's Manual or as marked on
the unit. Failure to do so is a fire and electrical shock
hazard.
• Do not allow water to enter this unit or allow the unit to
become wet. Fire or electrical shock may result.
• Do not place heavy objects, including this unit, on top
of the power cord. A damaged power cord is a fire and
electrical shock hazard. In particular, be careful not to
place heavy objects on a power cord covered by a carpet.
• Do not insert or drop metal or flammable objects into
the port of this unit. Fire or electrical shock may result.
• Do not place a container with liquid or small metal
objects on top of this unit. Liquid or metal objects
inside this unit are a fire and electrical shock hazard.
• Do not scratch, bend, twist, pull, or heat the power
cord. A damaged power cord is a fire and electrical
shock hazard.
• Do not modify the unit. Doing so is a fire and electrical
shock hazard.
• If lightning begins to occur, turn off the power switch of
the unit as soon as possible, and unplug the power cable
plug from the electrical outlet.
• If there is a possibility of lightning, do not touch the
power cable plug if it is still connected. Doing so may be
an electrical shock hazard.
• Do not remove the unit’s cover. You could receive an
electrical shock. If you think internal inspection, maintenance, or repair is necessary, contact your dealer.
• If the power cord is damaged (i.e., cut or a bare wire is
exposed), ask your dealer for a replacement. Using the
unit with a damaged power cord is a fire and electrical
shock hazard.
• If you notice any abnormality, such as smoke, odor, or
noise, or if a foreign object or liquid gets inside the unit,
turn it off immediately. Remove the power cord from the
AC outlet. Consult your dealer for repair. Using the unit
in this condition is a fire and electrical shock hazard.
• Should this unit be dropped or the cabinet be damaged,
turn the power switch off, remove the power plug from
the AC outlet, and contact your dealer. If you continue
using the unit without heeding this instruction, fire or
electrical shock may result.
• Keep this unit away from the following locations:
– Locations exposed to oil splashes or steam, such as
near cooking stoves, humidifiers, etc.
– Unstable surfaces, such as a wobbly table or slope.
– Locations exposed to excessive heat, such as inside a
car with all the windows closed, or places that receive
direct sunlight.
– Locations subject to excessive humidity or dust accumulation.
• Do not place the power cord close to a heater. It may
melt, causing fire or electrical shock.
• Hold the power cord plug when disconnecting it from
an AC outlet. Never pull the cord. A damaged power
cord is a potential fire and electrical shock hazard.
• Do not touch the power plug with wet hands. Doing so
is a potential electrical shock hazard.
• When rack-mounting the unit, allow enough free space
around the unit for normal ventilation. This should be:
10 cm at the sides, 20 cm behind, and 30 cm above.
For normal ventilation during use, remove the rear of
the rack or open a ventilation hole.
If the airflow is not adequate, the unit will heat up
inside and may cause a fire.
• A speaker system placed on top of a table may move
gradually due to vibration and may eventually fall off
the table, causing damage or injury. In such an installation, fix the speaker system to the table and check it
occasionally.
3
• To relocate the unit, turn the power switch off, remove
the power plug from the AC outlet, and remove all connecting cables. Damaged cables may cause fire or electrical shock.
• Turn off all musical instruments, and audio equipment
when connecting to this unit. Use the correct connecting cables and connect as specified.
• Always lower the volume control to minimum before
turning on the power to this unit. A sudden blast of
sound may damage your hearing.
• Do not output distorted sounds for long periods of
time, as this will cause the speaker to heat up, leading to
a fire hazard.
• Do not raise the volume of speakers to a level that
makes you feel uncomfortable. Listening to loud music
for long periods can damage your hearing.
• If you know you will not use this unit for a long period
of time, such as when going on vacation, remove the
power plug from the AC outlet. Leaving it connected is a
potential fire hazard.
• To prevent electrical shock when cleaning the unit,
remove the power plug from the AC outlet.
• XLR-type connectors are wired as follows: pin 1:
ground, pin 2: hot (+), and pin 3: cold (–).
• This speaker is magnetically shielded. However, if a
nearby monitor displays any uneven colors, place it further away from the monitor.
• Using a mobile telephone near this unit may induce
noise. If noise occurs, use the telephone away from the
unit.
4
Front panel/Rear panel
5 LINE 2 level control
This control knob enables you to adjust the volume
level of the signal input at one of the INPUT LINE 2
jacks (8) on the rear panel. Turning the knob counterclockwise lowers the volume level, and turning it clockwise raises the level.
6
8
7
POWER
INPUT
ON
LINE 1
(–10dB)
OFF
LINE 2
(+4dB)
PARALLEL
LOW
HIGH
1
2
1
3
4
LINE
2
5
1 LOW control
This control knob enables you to adjust the bass in the
range of –3dB to +3dB based on a reference value of
100Hz. The bass range is flat with the knob set at 12
o’clock, boosted when the knob is turned clockwise,
and cut when the knob is turned counter-clockwise.
2 HIGH control
This control knob enables you to adjust the treble in
the range of –3dB to +3dB based on a reference value
of 10kHz. The treble range is flat with the knob set at
12 o’clock, boosted when the knob is turned clockwise,
and cut when the knob is turned counter-clockwise.
6 POWER switch
This switch turns the power to the MSP3 on and off.
When you turn this switch on, the power indicator
(3) lights up green.
7 INPUT LINE 1 jack
This input jack is used to connect an RCA pin plug.
8 INPUT LINE 2 jacks
These balanced jacks are used to connect an XLR-3-31
type connector or a TRS phone plug to input line-level
signals from a mixing console.
3 Power indicator
This indicator lights up green when you turn the
POWER switch on the rear panel ON.
4 LINE 1 level control
This control knob enables you to adjust the volume
level of the signal input at the INPUT LINE 1 jack (7)
on the rear panel. Turning the knob counter-clockwise
lowers the volume level, and turning it clockwise raise
the level.
CAUTION
TO PREVENT ELECTRIC SHOCK,
MATCH WIDE BLADE OF PLUG TO
WIDE SLOT, FULLY INSERT.
5
Specifications
● Amp.unit
Maximum Output Power ..........20W
Input Sensitivity/Impedance
LINE 1: –10 dB/10 kΩ (RCA phono, Unbalanced)
LINE 2: +4 dB/10 kΩ (XLR, phone Balanced)
Level control
LINE 1
LINE 2
Tone control
HIGH
● Speaker unit
LOW
Speaker Unit
Power
Indicator ..........................Green LED
LF: 10 cm cone (4Ω, magnetic shielded)
Power
Requirement
HF: 2.2 cm dome (4Ω, magnetic shielded)
USA and Canada: .................AC120 V, 60 Hz
Enclosure
Europe:..................................AC230 V, 50 Hz
Type: Bass Reflex
Others: ..................................AC240 V, 50 Hz
Power Consumption ..................30 W
Option ........................................BWS20-190 (Ceiling/
wall Bracket)
Specifications and appearance are subject to change without notice.
● General specifications
Type............................................ 2-way Bass Reflex
Powered Speaker
Crossover Frequency ................. 4 kHz
Frequency Range ....................... 65 Hz–22 kHz
Maximum Output Level ........... 98 dB (1 m on Axis)
Dimensions (W × H × D) ......... 144 × 236 × 167 mm
Weight ........................................ 4.4 kg
Magnetic shielded...................... EIAJ
236
Dimensions
LOW
1
HIGH
LINE
2
(6)
155
(6)
167
44
144
60
2-M5
Unit: mm
6
Block Diagram
LINE 1
LINE 1
HF
TONE CONTROL
P. AMP
LF
LINE 2
LINE 2
LOW
HIGH
Phone Jack
Performance graph
+10
RESPONSE (dB)
0
–10
–20
–30
–40
20
100
1k
10k
FREQUENCY (Hz)
7
MSP3
Mode d’emploi
Nous vous remercions d’avoir porté votre choix sur l’enceinte d’écoute Yamaha
MSP3. Cette enceinte comporte un coffret bass reflex avec un haut-parleur conique à deux voies de 10 cm et un haut-parleur à dôme de 2,2 cm. Ce système actif
bi-amplifié reproduit le son avec une grande fidélité et peut servir à de nombreuses fins, allant des enregistrements à domicile à un usage professionnel
sérieux. Veuillez lire attentivement ce Mode d’emploi afin de tirer parti de toutes
les possibilités offertes par le MSP3 durant de longues années.
Précautions
Avertissements
• Ne branchez le cordon d’alimentation de cet appareil
qu’à une prise secteur qui répond aux caractéristiques
données dans ce manuel ou sur l’appareil, faute de quoi,
il y a risque d’incendie.
• Evitez de mouiller l’appareil ou de laisser pénétrer de
l’eau dans son boîtier. Il y a risque d’incendie ou d’électrocution.
• Ne posez pas d’objets pesants (à commencer par l’appareil lui-même) sur le cordon d’alimentation. Un cordon
d’alimentation endommagé peut provoquer un incendie ou une électrocution. Cette précaution est notamment valable lorsque le cordon d’alimentation passe
sous un tapis.
• N’insérez pas d’objets métalliques ou inflammables
dans les orifices d’aération l’entrée de cet appareil. Il y a
risque d’incendie ou d’électrocution.
• Ne posez pas de récipient contenant des liquides ou de
petits objets métalliques sur l’appareil. Si un liquide ou
des objets métalliques pénètrent dans l’appareil, il y a
risque d’incendie ou d’électrocution.
• Evitez de griffer, tordre, plier, tirer ou chauffer le cordon
d’alimentation. Un cordon d’alimentation endommagé
constitue un risque d’incendie ou d’électrocution.
• N’ouvrez jamais le boîtier de cet appareil. Il y a risque
d’électrocution. Si vous pensez que l’appareil doit subir
une révision, un entretien ou une réparation, veuillez
contacter votre revendeur.
• Cet appareil ne peut pas être modifié par l’utilisateur. Il
y a risque d’incendie ou d’électrocution.
• En cas d’orage, veillez à mettre l’unité hors tension dès
que possible et à débrancher le cordon d’alimentation
de la prise murale.
• En cas d’orage avec des risques de foudre, évitez tout
contact avec le cordon d’alimentation si ce dernier est
toujours connecté à une prise murale. Vous éviterez
ainsi une électrocution.
1
• Si le cordon d’alimentation est endommagé (s’il est
coupé ou si un fil est à nu), veuillez en demander un
nouveau à votre revendeur. L’utilisation de l’appareil
avec un cordon d’alimentation endommagé constitue
un risque d’incendie ou d’électrocution.
• Si vous remarquez un phénomène anormal tel que de la
fumée, une odeur bizarre ou un bourdonnement ou,
encore, si vous avez renversé du liquide ou des petits
objets à l’intérieur, mettez l’appareil immédiatement
hors tension et débranchez le cordon d’alimentation.
Consultez votre revendeur pour faire examiner l’appareil. L’utilisation de l’appareil dans ces conditions constitue un risque d’incendie ou d’électrocution.
• Lorsque l’appareil tombe ou si le boîtier est endommagé, coupez l’alimentation, débranchez le cordon de
la prise secteur et contactez votre revendeur. L’utilisation de l’appareil dans ces conditions constitue un risque d’incendie ou d’électrocution.
Français
Deutsch
• Evitez de placer l’appareil dans les endroits suivants:
– Les endroits soumis à des éclaboussures d’huile ou à
de la vapeur (à proximité de cuisinières, d’humidificateurs, etc.).
– Des surfaces instables, telles un table mal balancée ou
une surface inclinée.
– Les endroits soumis à une chaleur excessive (à l’intérieur d’un véhicule toutes fenêtres fermées) ou en
plein soleil.
– Les endroits particulièrement humides ou poussiéreux.
• Ne placez jamais le cordon d’alimentation à proximité
d’un dispositif de chauffage. Il pourrait fondre, ce qui
constitue un risque d’incendie ou d’électrocution.
• Débranchez toujours le cordon d’alimentation en tirant
sur la prise et non sur le câble. Un cordon d’alimentation endommagé constitue un risque d’incendie ou
d’électrocution.
• Ne touchez pas la prise d’alimentation avec des mains
mouillées. Il y a risque d’électrocution.
• Lors d’un montage en rack, laissez un espace libre
autour de l’appareil pour une bonne aération. Cet
espace doit être de 10 cm sur les côtés, 20 cm derrière et
de 30 cm sur le dessus.
Pour garantir une bonne aération durant l’utilisation,
ouvrez l’arrière du rack ou les orifices de ventilation.
Si la circulation d’air est insuffisante, il y a accumulation de chaleur ce qui peut provoquer un incendie.
• Des enceintes placées sur une table peuvent se déplacer
progressivement suite aux vibrations et tomber, ce qui
peut provoquer des dommages et des blessures. Il vaut
donc mieux fixer les enceintes à la table et en vérifier
régulièrement l’emplacement.
• Avant de changer cet appareil de place, coupez l’alimentation, débranchez le cordon d’alimentation de la prise
secteur et débranchez tous les câbles de connexion. Des
câbles endommagés constituent un risque d’incendie ou
d’électrocution.
• Coupez tous les instruments de musique et les appareils
audio avant de les brancher à cet appareil. Utilisez les
câbles de connexion adéquats et branchez-les selon les
consignes données.
• Réglez le volume en position minimum avant de mettre
cet appareil sous tension. Une explosion sonore brutale
risque d’endommager votre ouïe.
• Evitez de reproduire des signaux saturés pendant de
longues périodes. Cela peut provoquer l’échauffement
des hauts-parleurs et éventuellement un incendie.
• Ne choisissez jamais un niveau inconfortable pour le
volume du casque ou des enceintes. L’écoute de musique à un volume élevé durant de longues périodes peut
endommager votre ouïe.
• Si vous pensez ne pas utiliser cet appareil durant une
longue période (si vous partez en vacance, par exemple), débranchez le cordon d’alimentation pour éviter
tout risque d’incendie.
• Pour éviter toute électrocution durant le nettoyage de
l’appareil, débranchez le cordon d’alimentation au
préalable.
• Le câblage des connexions XLR est le suivant: broche 1=
masse, broche 2= chaud (+), broche 3= froid (–).
• Cette enceinte dispose d’un blindage magnétique. Toutefois, si un écran placé à proximité affiche des couleurs
inégales, éloignez l’enceinte.
• L’usage d’un téléphone mobile à proximité de l’appareil
peut provoquer des interférences. Dans ce cas, éloignez
le téléphone mobile.
Español
Précautions
2
Panneau avant/panneau arrière
5 Commande de niveau de ligne 2 (LINE 2)
Ce bouton de commande permet de régler le niveau de
volume du signal d’entrée de l’une des prises INPUT
LINE 2 (8) du panneau arrière. Si vous tournez le
bouton dans le sens anti-horaire, le niveau du volume
diminue, et si vous le tournez dans le sens horaire, le
niveau du volume augmente.
6
8
7
POWER
ON
INPUT
LINE 1
(–10dB)
OFF
LINE 2
(+4dB)
PARALLEL
LOW
HIGH
1
2
1
3
4
LINE
2
5
1 Commande de grave (LOW)
Ce bouton de commande permet de régler le grave
dans la plage de –3 dB à +3 dB sur la base d’une valeur
de référence de 100 Hz. La plage du grave est linéaire
lorsque vous réglez le bouton sur 12:00, elle est accentuée lorsque vous tournez le bouton dans le sens
horaire, et elle est coupée lorsque vous tournez le bouton dans le sens anti-horaire.
2 Commande d’aigu (HIGH)
Ce bouton de commande permet de régler l’aigu dans
la plage de –3 dB à +3 dB sur la base d’une valeur de
référence de 10 kHz. La plage de l’aigu est linéaire lorsque vous réglez le bouton sur 12:00, elle est accentuée
lorsque vous tournez le bouton dans le sens horaire, et
elle est coupée lorsque vous tournez le bouton dans le
sens anti-horaire.
6 Interrupteur d’alimentation (POWER)
Cet interrupteur permet de mettre la MSP3 sous et
hors tension. Lorsque vous enclenchez cet interrupteur,
l’indicateur d’alimentation (3) s’allume en vert.
7 Prise d’entrée de ligne 1 (LINE INPUT 1)
Cette prise d’entrée permet de raccorder une fiche à
broche RCA/Cinch.
8 Prises d’entrée de ligne 2 (LINE INPUT 2)
Ces prises équilibrées permettent de raccorder un connecteur de type XLR-3-31 ou une fiche phono TRS
pour l’entrée des signaux de niveau de ligne d’une console de mixage.
3 Indicateur d’alimentation
Cet indicateur s’allume en vert lorsque vous enclenchez
(ON) l’interrupteur POWER du panneau arrière.
4 Commande de niveau de ligne 1 (LINE 1)
Ce bouton de commande permet de régler le niveau de
volume du signal d’entrée de la prise INPUT LINE 1
(7) du panneau arrière. Si vous tournez le bouton
dans le sens anti-horaire, le niveau du volume diminue,
et si vous le tournez dans le sens horaire, le niveau du
volume augmente.
3
ATTENTION
POUR ÉVITER LES CHOCS ÉLECTRIQUES, INTRODUIRE LA LAME LA
PLUS LARGE DE LA FICHE DANS LA
BORNE CORRESPONDANTE DE LA
PRISE ET POUSSER JUSQU’AU FOND
Fiche technique
● Section d’amplification
Puissance de sortie maximum .. 20 W
Sensibilité d’entrée/Impédance
LINE 1: –10 dB/10 kΩ (RCA/Cinch asymétrique)
LINE 2: +4 dB/10 kΩ (XLR, Jack symétrique)
Commande de niveau
LINE 1
LINE 2
Commande de d’aigu/grave
D’aigu (HIGH)
Grave (LOW)
Témoin de mise sous tension ... Diode verte
Alimentation
USA et Canada: ................... AC120 V, 60 Hz
Europe:................................. AC230 V, 50 Hz
Autres: .................................. AC240 V, 50 Hz
Consommation ......................... 30 W
Option........................................ BWS20-190 (attache
mur/plafond)
● Caractéristiques générales
Type............................................ Enceinte active Bass
Reflex à deux voies
Fréquence de transfert............... 4 kHz
Bande passante .......................... 65 Hz~22 kHz
Niveau de sortie maximum....... 98dB (1 m dans l’axe)
Dimensions (L × H × P)............ 144 × 236 × 167 mm
Poids........................................... 4,4 kg
Blindage magnétique................. EIAJ
● Section haut-parleur
Haut-parleurs
Graves: conique, 10 cm (4Ω, blindage magnétique)
Aigus: 2,2 cm, dôme (4Ω, blindage magnétique)
Coffret:
Type: Bass Reflex
Les caractéristiques et l’aspect extérieur peuvent être modifiés sans avis préalable.
236
Dimensions
1
HIGH
LINE
2
(6)
155
(6)
167
44
144
2-M5
60
LOW
Unité: mm
4
Schéma
LINE 1
LINE 1
HF
TONE CONTROL
P. AMP
LF
LINE 2
LINE 2
LOW
HIGH
Phone Jack
Graphique de performance
+10
RESPONSE (dB)
0
–10
–20
–30
–40
20
100
1k
FREQUENCY (Hz)
5
10k