1
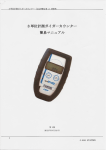
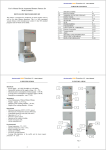
RADIOACTIVITY DETECTOR
RADEX RD1008
User manual
2011
The radioactivity detector RADEX RD1008 (hereinafter – the product) is designed to
detect the presence of ionizing radiation and estimate the values of the ambient dose
equivalent, the ambient equivalent of photon (gamma and X-ray) ionizing radiation dose
rate and the flux density of beta particles.
The product can be used for estimating the radiation level on the ground and in the
residences, for estimating the contamination of products, objects, money, materials, food
and others with the sources of gamma - and beta - radiation.
The product has the following features:
¾ simultaneous evaluation of the ambient dose equivalent of the photon ionizing radiation and the flux density of beta-particles;
¾ evaluation of the ambient dose equivalent values for the two users;
¾ the continuous estimation with the result adjustment;
¾ fast, automatic restart after a sudden change in dose or radiation flux density;
¾ display message of the received background values;
¾ display message of the measured dose rate or flux density excess above the
background values;
¾ time of measuring is reduced as the dose rate increases;
¾ increasing the number of measurement cycles leads to an increase in data
precision;
¾ change the alarm threshold for gamma- and beta- radiation;
¾ measuring gamma-radiation dose with registration of measurement time;
¾ in the alarm a sound or a vibra-call signal is used;
Application conditions: the ambient temperature from minus 20 to +50°C and relative
humidity of 80% at +25°C.
Results obtained using this product can not be used for official conclusions about the
radiological situation and the extent of contamination.
2
CONTENTS
1. Description and operation of the Product
4
1.1 Application of the Product
4
1.2 Technical specification
4
1.3 Structure and principle of operation
5
1.4 Marking and sealing
21
1.5 Packaging
21
2. Utilization
22
2.1 Utilization restrictions (safety measures)
22
2.2 Preparation of the Product for operation
24
2.3 Utilization of the Product
25
2.4 Possible malfunctions and their elimination
27
2.5 Actions under extreme conditions
27
3. Maintenance
27
4. Repair
28
5. Transportation and storage
28
3
1. DESCRIPTION AND OPERATION OF THE PRODUCT
1.1 Application of the Product
Radioactivity detector RADEX RD1008 evaluates the radiological situation according
to the value of the ambient dose equivalent H * (10) of ionizing photon (gamma - and X-ray)
radiation (hereinafter - the dose rate), the value of the flux density of beta- radiation (hereinafter
referred to as the flux density) and acumulates the ambient dose equivalent of gammaradiation (hereinafter - the dose).
1.2 Technical specifications
Range of dose rate, µSv/h ….…………………………..……..……………..from 0,1 to 999
Range of flux density measurement, 1/(cm2 * min) …..……….……………. from 6 to 999
Range of dose measurement ................................................. from 0,01 µSv to 350 mSv
Range of energies of registered:
1) photon ionizing radiation, MeV ………………………….………….. from 0,05 to 3,0
2) beta radiation, MeV……………………………….……….…..………from 0,05 to 3,5
o Random error at a confidence probability of 0,95 (reproducibility of results)
1) dose rate, not more,% ……………………………………….…………...... ± (15+3/H)
where H - the dose rate in µSv/h.
2) flux density, not more,% ………………………………………………… ± (20+200/P)
where P - the flux density, 1/cm2 * min.
3) the dose, not more,% ………………………..……………………………………..... 15
o Range of audio alarm thresholds
1) dose rate, µSv/h …….……………………………..…………………. from 0,2 to 1,20
2) flux density, 1/(cm2 * min) ….……………………..…………………... from 10 to 120
o Time of measurement:
1) dose rate, s …………………………………………………..…………..…from 2 to 21
2) flux density, s..…………………….……………………….…….……………..…….. 21
o Power supply: battery «AA» type …………………….…………….…….…………….. 1 pc.
o Time of continuous work h, minimum ………….……..…………..….….………………..950
o Prouct dimensions height x width x thickness, mm, ……………………………140x64x26
o Weight (without batteries), kg, max ……………….……….……………….…….........0,175
¾
The measurement time depends on the dose rate. Increase of the number of
measurement cycles leads to the increase of reliability of indications.
¾
Time of continuous operation of the product specified for the battery with a capacity
of 3100mAh, with the natural background level not more than 0,30 µSv/h, not more than
5 1/(cm2 * min), and factory settings of the product.
Factory settings:
o
o
o
o
Profile - «MEASURE»;
Dose rate threshold – «0,30 µSv/h»;
Flux density threshold – «10 1/cm2 * min»;
Background –«OFF»;
Options: AUDIO – «QUIET»;
VIBRA-CALL– «OFF»;
DOSE – «OFF».
¾
¾
¾
¾
¾
¾
¾
¾
¾
¾
1.2.1 Customization tools:
«MEASURE» or «SEARCH» modes
setting of the alarm threshold, above which the alarm call or vibra signal turns on;
calculation of the background values of dose rate of gamma-radiation and the flux
density of beta-particles;
indication of background values on the display;
indication on the display of excess of the measured values above background;
accumulation of gamma-radiation dose during the observation period for two users;
turning on / off the alarm;
turning on/off audio;
turning on/off vibra signal;
turning on/off the display backlighting.
4
1.3 Structure and Operation
1.3.1 Exterior of the Product
The product is designed as a portable handheld device with autonomous power supply.
The buttons and icon fields of these buttons on the display are shown below.
1. LCD display.
2. Button A and the icon of its function on the display.
The button has the next options:
¾ «MENU» - entering the «MENU»;
¾ «SELECT» - the selection of section in the «MENU»;
¾ «CHANGE» – changing the settings in different modes;
¾ «RESET» - resetting the accumulated dose value;
¾ «+5», «+10» - increasing the threshold value with the fixed step;
¾ «EVALUATE» - background evaluation;
¾ «▲» - in calibration for the coefficients setting.
3. Button B and the icon of its function on the display.
The button has 4 main functions:
¾ turning off the display backlighting in the modes «MEASURE» and «SEARCH».
Pressing the button makes the backlighting activate for 2 seconds. There is no
icon of the backlight function on the display;
¾ « » - Move the cursor « ». Each press moves the cursor one position down,
from the bottom-most position the cursor returns to the top;
¾ «-5», «-10» - reduction of the threshold with a fixed step;
¾ «MAX» - the maximum threshold value.
4. Button C and the icon of its function on the display.
The button has 7 functions:
¾ switching on the product;
¾ «OFF» - switching off the product with a long press in «MEASURE» or
«SEARCH» modes;
¾ «RETURN» - exit from the «MENU»; a return to the previous screen;
¾ «DOSE» – switching on the accumulated dose indication;
¾ «BKGND» - exit from the background evaluation;
¾ «SAVE»- saving in the threshold;
¾ «ENTER» - enter the calibration code.
5
5. Slot for the audio alarm. It is located in the upper part of the product.
Functions of the buttons in various modes and settings sections change, the button
icons on the same display fields change accordingly. The icons prompt the user the
functions of the buttons, thereby making the use of the product more convenient. The
instruction to press a button with a particular icon means pressing the respective button on
the product’s cover.
On the back side of the product there are:
¾ beta - detector window, which is closed with a rolling shutter;
¾ cross marked center of gamma-detector;
¾ battery compartment cover;
¾ battery compartment;
¾ shutter latch, using which you can move the shutter.
6
1.3.2 Display formats
1.3.2.1 When switching the product on, the «screen RD1008» with icons of the
buttons, manufacturer’s or individual settings opens on the display, and in some time the
detection of gamma-ray or beta-particle (hereinafter - the quantum) icon appears.
RD1008
1
2
■
●MENU
3
6
OFF●
4
5
1. Symbol marking of the product;
2. « » – The icon of gamma-quantum or beta-particle detection;
3. The icon of the button A - the «MENU» (see art. 1.3.1.2);
4. « » – The icon of vibra signal. If the vibra signal is off, there is no icon.
5. «
» – The call icon. If the call is off, there is no icon.
6. The icon of the button C: «OFF» or «DOSE», if dose accumulation function is
switched on (see art. 1.3.1.4);
1.3.2.2. The display format in the mode «MEASURE»
After the first measurement cycle (21 seconds) the screen «MEASURE» with the
measurement results appears on the display.
The two variants of the mode «MEASURE» are possible: tacking the background into
account without the background. The picture of the display below shows the location of the
18 fields and the icons appearance of which is possible in these fields for two variants of
the mode «MEASURE».
Note - Not all of the icons shown on the picture may appear on the display simultaneously.
18
15
::: GAMMA:
1
8.88
2
3
4
5
6
■
:::: BETA :::: BKG
888
B
●MENU
7
1.
¾
¾
¾
¾
2.
BKG 0,20
B 0,30
10
10
17
16
14
13
12
OFF●
8
9
10
11
Battery indication icon:
«
» - full charge of the battery;
«
» - partially discharged battery;
» - low battery;
«
«
» - completely discharged battery.
– Digital readout of dose rate in µSv/h;
– Digital readout of the dose excess above background values, in µSv/h (only in
«MEASURE» taking the background into account;
7
3. «
» – Indication of the number of cycles of gamma-radiation measurement
carried out (the full glass» equals to 8 cycles of measurements -« »). Cycle
duration of gamma-and beta-radiation measurement may not be identical, so this
icon of gamma- radiation may not coincide with an icon of beta- radiation
according to the number of cycles.
4. « » – The icon of quantum registration.
5. « » – Indication of the number of measurements cycles of beta-radiation carried
out (the full «glass» corresponds to 8 cycles of measurements -« »). Cycle
duration of gamma-and beta-radiation measurement may not be identical, so this
icon of beta- radiation may not coincide with an icon of gamma-radiation
according to the number of cycles.
6. «MENU» – The icon of button A function (see art.1.3.1.2). Pressing the button
takes you to the mode «MENU».
7. – Digital readout of the flux density in 1/cm2* min;
– Digital readout of the flux density excess above the background values,
in 1/cm2 * min (only in the «MEASURE» taking the background into account;
8. «
»- The turned on vibra signal icon. If the vibra signal is not off, there is no
icon.
9. «
» – The turned on call signal icon. If the call is not off, there is no icon;
10. « » – Icon of exceeding the upper limit of flux density range (999). There is no
icon if the limit is not exceeded.
« » – The icon indicates that the measured flux density is less than the flux
density of the background (only in the mode «MEASURE» taking into account the background). In this case, the value «0» is shown in the field 6 on
the display.
11. «OFF» – The icon of button C function (see p.1.3.1.4). In this field the icon
«DOSE» is possible, if you've enabled the «DOSE» function. A short pressing the button takes you to the screen with the indication of the accumulated dose. A long pressing the button of about 4 seconds (until the display
becomes dim) results in switching the product off.
12. « B 10 » – The icon of alarm threshold and its value for beta radiation in the
«MEASURE» taking the background into account. The threshold in this
mode is set for the difference between the measured value and the value
of the background. If the alarm threshold for a given type of radiation is
disabled, there is no icon.
« 10 » – The icon of alarm threshold and its value for beta radiation. For example, «10» means that the threshold alarm is 10 1/cm2 * min. The alarm
threshold can be set within the range of 5 to 120 1/cm2* min. If the alarm
threshold is off there is no icon.
13. «BKG 10» – The value of the background flux density in 1/cm2* min (only in the
mode «MEASURE» taking the background into account).
14. «BETA» – Type of radiation indicator.
15. « » – The icon of the upper limit of measured dose rate range excess. If the
range limit is not exceeded, there is no icon.
« » – The icon indicates that the measured dose rate is less than the dose rate
of the background (only in the mode «MEASURE» taking the background
into account). In this case, the value «0,00» is shown in the field 2 on the
display.
16. « B 0,30» – The icon of the set alarm threshold in the mode «MEASURE»
taking the background into account and its value for gamma-radiation.
The threshold in this regime is set for the difference between the
measured value and the value of the background. If the alarm for a given
type of radiation is off, there is no icon.
8
«0,30» – The icon of the alarm threshold for gamma-radiation. For example,
« 0,30», if the alarm threshold is 0,30 µSv/h. The threshold can be set in a
range from 0,05 to 1,20 µSv/h. If the threshold is off, there is no icon.
17. «BKG 0,20» – The value of the background dose rate in µSv/h. (Only in the
mode «MEASURE» taking the background into account).
18. «GAMMA » – Type of radiation indicator.
1.3.2.3 The display format in the mode «SEARCH»
In the mode «SEARCH» the total number of particles detected with gamma-detector
and the beta-detector (hereinafter - the number of particles) for the measurement period
and the threshold set for this profile are indicated on the display.
Execution of the mode «SEARCH» is possible in two variants: without the
background and taking the background into account.
The figure of the display below shows the location of the 6 fields and the icons
appearance of which is possible in these fields for two variants of the mode «SEARCH».
Note - Not all the icons shown on the picture may appear on the screen simultaneously.
1
2
3
::: SEARCH
::::::::::::::::::::::::::::: BKG 0,20
■
0,12
6
5
B 0,30
4
●MENU
OFF●
1. «SEARCH» – The mode index.
2. The total number of particles detected with gamma-detector and the beta-detector
divided by 100.
» – Indication of the number of cycles of gamma and beta radiation evaluation
3. «
carried out (the full « glass » corresponds to 8 cycles of measurement – «
»).
4. « » – The icon of the upper limit of measurement range excess (999). If the limit
is not exceeded, there is no icon.
« » – The icon indicates that the evaluated value is less than the background
(only in the mode «MEASURE» taking the background into account). In this
case, in the value «0» in the field 2 appears on the display.
5. «
0,30» – The icon of the alarm threshold. The threshold can be set in a range
from 0,05 to 1,20. If the threshold is off, there is no icon.
«B
0,30» – The icon of the set alarm threshold in the mode «SEARCH» taking
the background into account. The threshold in this profile is set for the
difference between the measured value and the value of the background. If
the alarm threshold for a given type of radiation is off, there is no icon.
6. « BKG 0,20» – The value of the background.
The meaning of the remaining icons is explained above (see art. 1.3.2.2).
9
1.3.2.4 The display when executing the «DOSE» function.
A short pressing the button «DOSE» in the modes «MEASURE» and «SEARCH»
makes the accumulated dose values appear an the display.
1
:: DOSE 1 :::::::::::::::::
2
8,29
■
3
4
1.
2.
3.
4.
●RESET
µSv
MONTHS:
0
DAYS:
HOURS:
10
12
DOSE ●
The indicator of one of two accumulated doses: «DOSE1 » or «DOSE 2»;
The value of the accumulated dose of gamma-radiation in µSv or mSv;
the period of dose accumulation: months, days, hours;
«RESET» - the icon of button A function - clearing the accumulated dose value;
The meaning of the remaining icons is explained above (see art. 1.3.2.2).
1.3.2.5 The display in the mode «MENU».
1
2
3
4
►
РЕЖИМ
MODE
ПОРОГ
THRESHOLD
ФОН
BACKGROUND
НАСТРОЙКИ
SETTINGS
ПОВЕРКА
CALIBRATION
●ВЫБОР
ВЫХОД●●
●SELECT
RETURN
● ▼
5
1. The list of the MENU sections.
2. «►» – the cursor icon. The current cursor position indicates the pre-selection of
the menu section.
3. «SELECT» – the icon of button A function – entering the section indicated by the
cursor.
4. « » - the icon of button B function. When you press the button the cursor moves
down the ring.
5. «RETURN» – the icon of button C function. When you press the button the product enters the mode «MEASURE»
1.3.3 Operation modes and the function
The product has three modes: «MEASURE», «SEARCH», «MENU» and the
«DOSE» function.
The mode «MEASURE» is set automatically when switching the product on, the
screen «RD1008» appears on the display. In this profile the evaluation of dose rate, flux
density and appearance of the data on the display is executed. Each detected quantum of
radiation displayed as an icon « ». The «MEASURE» profile has two options: evaluation
without the background and evaluation, taking the background into account.
10
In the mode «SEARCH» the calculation of particles detected with the gammadetector and the beta-detector is carried out and the total number of impulses, calculated
during the measurement period appears on the display. The «SEARCH» profile allows you
to locate the source of radiation according to the change of the detected particles frequency and the indications on the display. The «SEARCH» has the twice smaller evaluation cycle than the «MEASURE».
In the mode «MENU» you can set the mode «MEASURE» or «SEARCH», select
one of two variants of these modes, set the alarm threshold value, carry out the
background evaluation, to turn on the audio alarm or vibra signal, to set the calibration
coefficients for the gamma- and beta-detectors. All individual settings made in the menu
get saved after switching the product off.
When the function «DOSE» is on, the product accumulates and memorizes the
dose received by one of the two users.
1.3.3.1 The mode «MEASURE»
The simultaneous evaluation of gamma-radiation and flux density of beta particles,
and averaging with the results of previous cycles, the output of the data on the display is
executed in this mode.
The time of measurement cycle depends on the dose and can vary from 21 seconds
to 2 seconds. For the dose values from 0,005 to 100 µSv/h the measurement time is
21 seconds, for the values more than 100 µSv/h the measurement time gradually
decreases and reaches the minimum equal to 2 seconds for the value of 999 µSv/h.
The time of the flux density measurement cycle does not change and equals to
21 seconds.
In the mode «MEASURE» the button B (see p.1.3.1.4) performs the function of the
display backlighting turning on. When you press it shortly the backlighting turns on for 2 s.
The backlight allows you to see the measurement results in the twilight and darkness.
Under bright lighting the backlighting effect is invisible.
Note - You should remember that the turning on the backlight greatly reduces the
time of the product continuous one battery operation.
Your product provides two versions of the mode «MEASURE», they are: evaluation
without taking the background into account and evaluation, taking the background into
account
A) In the mode «MEASURE» without the background the dose rate and flux density
evaluation is executed and the results for each type of radiation appear on the display.
::: GAMMA ::::: ::::::::::::
0,12
0,30
■
::: BETA ::::::::::::::::::::::
9
●MENU
10
OFF●
The icons of the completed measurement cycles « » (see art. 1.3.2.2, fields 3, 5)
allow us to visually determine the number of measurement cycles and are very useful for
locating the place and the moment of a fast change in dose or flux density of betaradiation, as in this case the icon « » changes into the icon, « » what is easy to notice. In
this case the measurement starts automatically from the first cycle and there is no averaging of the results with the previous measurement cycles` results. The subsequent data are
averaged according to the accepted method.
11
B) In the mode «MEASURE» taking the background into account the dose rate and
flux density evaluation is executed. But the display for each type of radiation output at the
same time shows two indications: for gamma radiation - the dose excess above the
background dose rate and the background dose rate value for beta-radiation – this is the
flux density excess over the flux density of the background and the flux density of the
background value.
Dose rate of the background and the background flux density are calculated in advance during the evaluation of the background (see art.). In other respects these variants
are the same.
::: GAMMA:: BKG 0,10
0,12
B
0,30
■
::: BETA :::BKG
30
9
10
B
●MENU
OFF●
This variant is very convenient during performing the inspection inside premises
when you need to know how much the measurements results inside differ from the ones
outdoors or how much the results of the target differ from the natural radiation background
in the workplace, for example, during the radiation control of money.
The mode «MEASURE» with the background is turned on in the section
«BACKGROUND» (see art. 1.3.3.3) of the «MENU». This option can be off and on again,
and the background values get saved and can be used in the future.
We remind once again, that the display shows not the absolute values in this mode,
but the excess of the background value.
1.3.3.2 The mode «SEARCH»
In the mode «SEARCH» the summary evaluation of gamma- and beta-radiation, and
the averaging with the results of previous cycles and the output of the results onto the
display are conducted.
The display shows the total number of particles detected with the gamma-detector
and the beta-detector during the evaluation and threshold set for this mode.
Execution of the mode «SEARCH» is possible in two variants: without the
background and taking the background into account.
a) In the mode «SEARCH» without the background the summary gamma- and betaradiation evaluation is executed and the output of one result onto the display - the
summary amount of particles detected with the gamma-detector and the beta-detector
during the evaluation period.
b) In the mode «SEARCH» with the background the summary evaluation of gammaand beta-radiation is executed. But the display shows two results: – the excess of the dose
rate above the background dose rate and the summary amount of particles detected with
the gamma-detector and the beta-detector during the background evaluation.
This option is useful when you carry out the inspecting of premises when you need to
know how much the measurements results inside the building differ from the results in the
open space or how much results of the controlled target differ from the natural radiation
background in the workplace, for example, during the radiation control of money.
12
The mode «SEARCH» with the background is switched on in the section
«BACKGROUND» (see art. 1.3.3.3) of the «MENU». This option can be switched off and
on again, and the background values get saved and can be used in the future.
We remind once again, that the display shows not the absolute values in this mode,
but the excess of the background value.
The mode «SEARCH» should be used for the locating the radiation contamination
source.
1.3.3.3 The mode «MENU»
The mode «MENU» is used when it is necessary to change the settings and set the
new calibration coefficients.
¾ In the «MENU» you can:
¾ Switch on the «MEASURE» or «SEARCH»
¾ Set the alarm threshold value for each type of radiation,
¾ Turn on the alarm and adjust its volume
¾ Activate the vibra signal,
¾ To measure the background,
¾ Switch on the function of gamma-radiation accumulation for the one of the two
independent users.
When you enter the «MENU», the accumulation of dose is not interrupted, and the
dose rate and flux density evaluation stops until the return to the mode «MEASURE».
To switch from «MEASURE» or «SEARCH» to the «MENU», press and release the
button «MENU» (see art. 1.3.1.3). The «main» screen » of the menu appears on the display.
::: GAMMA :::::::::::::::::::
0.12
0,30
■
►
:::: BETA ::::::::::::::::::::::
0
●MENU
10
MODE
THRESHOLD
BACKGROUND
SETTINGS
CALIBRATION
●SELECT
● ▼
OFF●
RETURN●
When any of the menu screen appears the icon « » is always placed in the top line, in
this case it is pointed to the section «MODE».
Move around the screen can be executed with the button B (see art. 1.3.1.4,), its icon
on the «MENU» screen corresponds to « ». Pressing the button « » moves the cursor
down with switching to the upper line from the lowest position.
Selection of the desired section of the menu can be executed by pressing «SELECT».
Return to the previous menu screen can be executed by pressing the «RETURN» (see
art. 1.3.1.2).
The switching from the «MENU» to the «MEASURE» or «SEARCH» can be executed
by pressing «RETURN». In this case the radiation evaluation starts from the first cycle.
All individual settings made in the menu get saved even after switching the product off
and they are automatically used next time.
13
a) Section «MODE»
The section allows you to choose either «MEASURE» profile or evaluative
«SEARCH» profile.
►
MODE
THRESHOLD
BACKGROUND
SETTINGS
CALIBRATION
●SELECT
● ▼
► √
RETURN●
MEASURE
SEARCH
● CHANGE
● ▼
RETURN ●
Move the cursor by pressing « ». Switch on the mode with the button «SELECT»
and it is accompanied by the setting of a tick « » in front of the desired line.
Press of «RETURN» returns you to the main «screen» of the menu.
b) Section «THRESHOLD»
The section «THRESHOLD» allows you to set the value of dose rate and flux
density above which the alarm gets activated.
The threshold alarm should be switched on if the call signal or vibra signal required only after exceeding a specified value of measurement. The user sets the alarm
threshold within the range of the threshold value from 0,05 to 1,20 µSv/h and from
5 to 120 1/cm2*min personally.
Note-The factory settings are:
dose threshold – « 0,30 µSv/h»,
flux density threshold - «10 1/cm2* min»
MODE
THRESHOLD
BACKGROUND
SETTINGS
CALIBRATION
►
● SELECT
● ▼
►
GAMMA
BETA
→
RETURN ●
● SELECT
● ▼
1
►
√
RETURN ●
● CHANGE
● ▼
SAVE ●
√
RETURN●
√
●+5
● -5
SAVE ●
6
OFF
ON
2
120 1/cm *min
● RESET
● - 10
7
SAVE●
8
14
RETURN ●
OFF
ON
2
10 1/cm *min
5
OFF
ON
2
50 1/cm *min
● + 10
● - 10
● SELECT
● ▼
3
OFF
√ ON
2
10 1/cm *min
►
4
√
RETURN ●
2
OFF
ON
2
10 1/cm *min
● CHANGE
● ▼
GAMMA
BETA
►
√
OFF
ON
2
0 1/cm *min
●+5
● МАХ
SAVE ●
9
To set the threshold enter the «MENU», select the section of «Threshold» (screen 1),
choose the type of radiation, for which the set threshold (screens 2, 3), and enter the
screen setup of the threshold value (screen 4).
The threshold is set by pressing «5» and «-5» (screen 6). Each press of the respective
button increases or decreases the set value by 5. Starting from the threshold value 50, a
change step increases to 10, and buttons icons are changed to «+10» (screen 7).
When the maximum threshold value (120 1/cm2*min) is set, the button A icon is
changed to «RESET» (screen 8). Pressing the «RESET» resets the threshold to 0, and
buttons icons are changed to «+5» and «MAX» (screen 9).
Pressing the «MAX» sets the maximum threshold of 120.
When you press «SAVE» the set threshold value is saved and you return to the
threshold control screen (screen 4).
The setting of the alarm threshold for gamma radiation can be executed in the same
way. The difference lies in the fact that, in accordance with the maximum possible value of
a threshold equal to 1,20 µSv/h, a threshold change step is 0,05 µSv/h or 0,10 µSv/h, and
button icons« +5 », « -5 »,« +10 »,« -10 » remain unchanged.
Double pressing «RETURN» executes a return to «main screen» menu.
To exit the «MENU» press the button «RETURN». The «screen RD1008» appears,
after the first cycle the screen «MEASURE» or «SEARCH» appear with the set icons and
thresholds values.
In the mode «SEARCH» (see art.1.3.3.2) the alarm threshold value can be set independently of the thresholds set in the «MEASURE» mode. When switching the profiles the
set threshold values are saved and used when re-activate the selected profile.
The selection of alarms: a call and / or a vibrating alert is carried out in
«SETTINGS» (see art.1.3.9.4). If the dose or flux density rate recorded during one
monitoring exceed the set alarm threshold, one of two things or both alarms are switched
on:
- If AUDIO is on, the registration of each of the next gamma-ray will be accompanied
with a single beep that signals the threshold excess, when the threshold is exceeded for
beta-radiation there will be one beep at the end of the measurement cycle.
- If the VIBRO-CALL is on, then the registration of each of the next gamma-ray will be
accompanied with a vibrating alert, which signals the threshold excess, when the threshold
is exceeded for beta-radiation there will be one vibra signal at the end of the measurement
cycle.
If the threshold is off the sound call or vibra signal accompanies each detected
gamma quantum. Detection of the beta particles is accompanied by a call or vibra signal at
the end of the measurement cycle.
The example of changing the alarm threshold for the beta - radiation from
10 1/cm2 * min to 70 1/cm2 * min is shown below.
• To change the threshold from the «MEASURE» switch to the «MENU». The display
shows «main screen» of the menu - (screen 1).
• Press « », cursor moves to the line «THRESHOLD» (screen 2).
►
MODE
THRESHOLD
BACKGROUND
SETTINGS
CALIBRATION
● SELECT
● ▼
RETURN●
1
►
MODE
THRESHOLD
BACKGROUND
SETTINGS
CALIBRATION
● SELECT
● ▼
2
15
RETURN●
►
GAMMA
BETA
● SELECT
● ▼
RETURN●
3
GAMMA
BETA
►
OFF
√ ON
►
● SELECT
● ▼
RETURN ●
10 1/cm2*min
● CHANGE
● ▼
4
OFF
ON
2
√
10 1/cm *min
RETURN ●
●+5
● -5
5
OFF
ON
2
√
50 1/cm *min
SAVE ●
6
OFF
ON
2
√
70 1/cm *min
►
OFF
√ ON
2
70 1/cm *min
→
● + 10
● -5
SAVE ●
7
● + 10
● - 10
SAVE ●
8
● CHANGE
● ▼
RETURN ●
9
• Press «SELECT», the screen 3 appears on the display, where you choose the type of
radiation, in our example - «BETA» for which the alarm threshold is set.
• Press the button « » once, the cursor is directed to the appropriate line (screen 4);
• Press «SELECT». The screen for setting the threshold for beta radiation (screen 5)
appears on the display.
• Double-press of the button « » makes the cursor move to the line of the threshold
value setting.
• Press the button «CHANGE» to confirm the selection (screen 6), which is accompanied by the installation of a tick « » in front of the selected line.
• When setting the threshold, its value is set by pressing «+5» and «-5» (screen 6),
each pressing of these buttons increases (decreases) the set value by 5. By pressing
«+5» for 8 times we set the threshold value equal to 50 1/ cm2*min (screen 8). Starting
from the threshold value 50, a change step increases to 10, and the button icon changes
to «+10» (screen 7). By pressing the «+10» for 2 times we set the threshold value equal to
70 1/ cm2 * min (screen 8).
• To memorize the set value press the button «SAVE».
When you press «SAVE», the set threshold value is memorized and you return to the
screen of thresholds control (screen 9).
Twofold pressing the button «RETURN» returns you to the «MENU».
c) Section «BACKGROUND»
In this section you can control the options of the mode «MEASURE»: taking the
background into account or not and determine the value of the background dose rate and
the flux density of the background.
In the mode «MEASURE» the background values are calculated for both gamma - and
beta-radiation, in the mode «SEARCH» the background value is calculated for the
cumulative effect of gamma - and beta-radiation. To set up a mode «MEASURE» taking
the background into account, you must first carry out the background level evaluation.
• To enable the evaluation of the background level you should switch from
«MEASURE» to «MENU», to do this press the «MENU» button (screen 1). The display
shows the «main screen» menu - the screen 2.
16
►
::: GAMMA :::::::::::::::::::
0,12
0,30
■
:::: BETA ::::::::::::::::::::::
0
10
●MENU
OFF●
MODE
THRESHOLD
BACKGROUND
SETTINGS
CALIBRATION
●SELECT
● ▼
1
●SELECT
● ▼
RETURN ●
2
► √ OFF
ON
EVALUATE
● CHANGE
● ▼
RETURN ●
● CHANGE
● ▼
:::: GAMMA:::::::::: BETA::
1
1
2
2
3
3
4
4
5
5
■
● EVALUATE
:::: GAMMA :::::::::: BETA::::::
1 0,13
1 0
2
2
3
3
4
4
5
5
:::: BETA ::::::::::::::::::::::
0
10
RETURN ●
7
RETURN
●
● EVALUATE
8
::::EVALUATE::
■
RETURN ●
10
●SELECT
● ▼
RETURN ●
13
BKGND ●
9
►
:::: GAMMA :::::::::: BETA::::::
1 0,13
1 0
2 0,12
2 7
3 0,11
3 11
4 0,12
4 9
5 0,12
5 0
RETURN ●
●CHANGE
● ▼
BKGND ●
● EVALUATE
OFF
√ ON
EVALUATE
11
MODE
THRESHOLD
BACKGROUND
SETTINGS
CALIBRATION
BKGND ●
6
::: GAMMA :::::::::::::::::::
0,13
0,30
■
→
RETURN ●
5
:::::EVALUATE ::::::
RETURN ●
3
√ OFF
ON
► EVALUATE
4
►
►
MODE
THRESHOLD
BACKGROUND
SETTINGS
CALIBRATION
12
a
::: GAMMA ::: BKG 0,11
0,02
B 0,30
■ ::: BETA ::::: BKG
0
●MENU
B
10
OFF
14
17
b
c
0
●
d
• Press « » twice, the cursor « » move to the section «BACKGROUND» (Screen 3).
• Press «SELECT», the screen of background control appears on the display (screen 4).
Button « » moves the cursor « » to the position «OFF», «ON», «EVALUATE». The
«CHANGE» button switches on the appropriate function, what is shown by the «tick» « ».
• To carry put the background estimation you need to move the cursor to « » to the line
«EVALUATE» and press the «CHANGE» button (screen 5). The screen 6 with an empty
table appears, where the figures «1», «2», «3», «4», «5» determine the number of observation points, where you need to estimate the background.
Now you need to choose the first observation point and place the product there, in
accordance with the instructions given in the art. 2.3.3 and 2.3.4.
• Press the «EVALUATE» button, the screen 7 appears on the display and the
background measurement cycle starts. After the first cycle the screen will conform to the
mode «MEASURE» (screen 8). To get the accurate results of the background
measurement you need to carry out 8 cycles of measurement with averaging of the
results. After about 4 min. the background estimation in the first point is complete. The
display shows the screen 9 with the results in the first line: in the left – column the value
of the background dose rate in the first measuring point, in the right column – the flux
density value.
Note - You can stop the cycle of background measuring. To do this, press «RETURN»,
and the background measurement cycle is interrupted, the screen 6 appears.
• Move the product to the second point of measurement.
Press «EVALUATE» and wait the completion of the cycle «EVALUATE». The numbers
in the second line – are the results in the second point of measurement.
To obtain the accurate results of the background you need to perform the similar
observations at 5 points (screen 11).
Note - You can reduce the number of measurement points, for this you should press
the «BKGND» without waiting for the fifth cycle of measurement. But this reduces the
results accuracy.
• Get 5 readings, press «BKGND» the screen 12 appears on the display.
• To return to the «main screen» of «MENU» press «RETURN», the screen 13 appears
on the display.
• Press «RETURN», the screen RD1008 appears on the display and the «MEASURE»
taking the background into account.
• After completing the first cycle of the mode «MEASURE» taking the background into
account the, screen 14 appears on the display, where
a) background dose rate, calculated on the points of the background evaluation;
b) the difference between the dose rate and dose rate of the background;
c) the background flux density, calculated on points of the background estimation.
d) the difference between the current flux density and flux density of the background;
In the subsequent cycles, the current values are averaged in accordance with the
algorithm of the product operation.
If the background evaluation was carried out under the mode «SEARCH», then instead
of the screen 6 the screen 15 will appear turn with an empty table for the estimation results,
but there will be one column with the numbers in it, not two ones. This table will be filled
during the background evaluation (screen 16).
:::::::::: BACKGROUND :::
1
2
3
4
5
● EVALUATE
BKGND ●
:::::::: BACKGROUND:::
1 0,09
2 0,12
….
3 0,10
4 0,10
5 0,12
● EVALUATE
15
16
18
BKGND●
To switch the «BACKGROUND» off and turn the product to the mode «MEASURE»
without the background it is necessary to switch to the «MENU» (screens 1, 2), select the
section «BACKGROUND» (screen 3), enter the background control screen, set the icon
« » approximately there nearby «OFF» (screen 4).
To return to the «main screen» of the «MENU» press the button «RETURN» 2 times,
the screen «MENU» appears on the display.
Press «RETURN». The «screen RD1008» appears and the mode «MEASURE»
starts. After completing the measurement cycle the display shows the absolute results
regardless of the background.
When you switch off the mode «MEASURE» with the background, the values
obtained during the background evaluation get saved and are reused when switch to the
mode «MEASURE» with the background, if a new background evaluations was not
performed.
The rules and procedure of background dose evaluation are described in the articles
2.3.3., 2.3.4.
d) Section «SETTINGS»
In the «SETTINGS» there are three options: «AUDIO», «VIBRA-CALL» and
«DOSE», which can be turned on or off.
• OPTION «AUDIO»
The option «AUDIO» is intended to regulate the volume and to mute the ringer – the
signaling.
In the option «AUDIO» you can set the ringer volume to the «QUIET», «MEDIUM»,
«LOUD» or switch it off.
Below you see an example of call switching from «QUIET» into «OFF».
►
MODE
THRESHOLD
BACKGROUND
SETTINGS
CALIBRATION
●SELECT
● ▼
EXIT●
1
►
MODE
THRESHOLD
BACKGROUND
► SETTINGS
CALIBRATION
●SELECT
● ▼
RETURN●
►
AUDIO
VIBRA-CALL
DOSE
●SELECT
● ▼
2
OFF
√ QUIET
MEDIUM
LOUD
RETURN
3
► √ OFF
QUIET
MEDIUM
LOUD
RD1008
■
●CHANGE
● ▼
RETURN●
4
●CHANGE
● ▼
RETURN●
5
●MENU
OFF●
6
In the «MENU» press « » 3 times, the cursor « » move to the section
«SETTINGS» (screen 2).
Press «SELECT», the screen 3 appears on the display.
Press «SELECT», the screen 4 appears on the display.
Press «CHANGE», the screen 5 appears on the display, where the tick « » will be
placed next to the line « OFF ».
To return to the screen «MENU» press «RETURN».
To return from the «MENU» to «MEASURE» press «RETURN», the display will show
«RD1008» screen (screen 6), and then the screen «MEASURE» with the icon« », and
the icon «
» will be off.
19
When the call is switched on and the threshold off the call will accompany each
registered quantum.
In the modes «MEASURE» and «SEARCH» the turned on alarm is displayed as the
icons on the display.
«
» - The call is on
If you turn the call off, there is no icon.
Notes:
1) The «LOUD» call is usually switched on in noisy places or on the street.
2) In the quiet places, in the office or in an apartment we recommended you to use
«QUEIT» call with the set up threshold value.
• Option «VIBRA-CALL »
The option «VIBRA-CALL» is used to turn on and off the vibra call signal.
The control algorithm is similar to that described above the call control algorithm.
If VIBRA-CALL is on, then the registration of each of the next gamma-quantum will
switch on the vibrating alert, which signals the threshold is exceeded; when the threshold
is exceeded for beta-radiation the vibrating alert will be switched one time at the end of the
measurement cycle.
If the alarm threshold is off the vibra signal accompanies each detected gamma
quantum. Beta particles detection is accompanied by one vibra signal at the end of the
measurement cycle.
In the modes of «MEASURE» and «SEARCH» the switched on vibra signal is indicated on the display as the icon - « ».
When the vibra signal is off, there is no icon.
Notes:
1) In the quiet places, office or apartment we recommend you to use the vibr a signal
with the set threshold value.
2) You should remember that the use of vibra signal greatly reduces the time of
continuous operation of the product.
• Option «DOSE».
The option «DOSE» is used for the control of the «DOSE» function: the switching on
of the accumulated dose of gamma radiation counting and the measuring of the period
during which it was accumulated, selection of one of two options «DOSE 1» or «DOSE 2»
or switching off this function. Your product provides for the accumulation and saving of the
doses for two independent users
To enable the accumulation of gamma-radiation dose it is necessary to enter the
«MENU», go to «SETTINGS», place the cursor in front of the line «DOSE» and press
«SELECT». The screen of the «DOSE» control function appears: switching the profile off
and selection of one of two possibilities of accumulation «DOSE 1» and «DOSE 2».Next,
you need to move the cursor to the desired line «DOSE 1» or «DOSE 2» and click
«CHANGE». The icon « » confirms the setting.
Exit from the control screen: double click «RETURN» to return to «MENU» and
«RETURN» to switch to «MEASURE».
When selecting one of the doses its value is accumulated and the value of the other
dose is saved. When you specify a previously saved dose, its value is added to the
previously memorized result. This option allows you to estimate the doses accumulated in
different conditions, at different time, for different people, etc.
20
► √
OFF
DOSE 1
DOSE 2
●CHANGE
● ▼
OFF
DOSE 1
DOSE 2
► √
RETURN ●
●CHANGE
● ▼
RETURN ●
When the dose accumulation is switched in the field of button C in the «MEASURE»
and «SEARCH» profiles the icon «DOSE» is set, it indicates that the accumulation is being
executed.
e) Section «CALIBRATION».
The mode «CALIBRATION» should be used only by trained personnel in certified organization, when in the process of checking the product the new calibration coefficients
should be set up.
In a «CALLIBRATION» mode it is possible to set up a default settings by entering a
code < 050 >.
1.3.3.4 Output of the accumulated dose readings.
When the dose accumulation function is on, in the field of the button C in the modes
«MEASURE» and «SEARCH» the icon «DOSE» is set, it indicates that dose accumulation
is being executed.
Pressing the «DOSE» calls the screen onto the display, where the title («DOSE 1» or
«DOSE 2»), the value of the accumulated dose and the period during which the
accumulation was carried out are shown. Dose value is updated every minute.
DOSE 1
8,29
■
µSv
MONTHS:
12
DAYS:
HOURS:
8
12
● RESET
DOSE ●
Pressing the button «RESET», when the screen «DOSE» is indicated, clears the
accumulated dose.
Closing the screen «DOSE» is automatic, when the new evaluation data is ready, i.e.
the time of the «DOSE» indication is not permanent and may vary.
1.4 Marking and sealing
1.4.1 On the main body of the detector are shown:
¾ the trademark of the manufacturer;
¾ the trademark – RADEX.
¾ The identification marking of the product – RD1008 is displayed when you switch the
product on.
1.4.2 Serial number of the detector is displayed when you switch the detector on.
1.4.3 The manufacturer does not seal the detector.
1.5 Packaging
1.5.1 Packaging provides safety of the detector during transportation.
1.5.2 Packaging of the detector should be conducted in closed ventilated rooms at an
ambient temperature from +15 up to +40 0C and relative humidity to 80%, out of
corrosive contaminants and dust in the environment.
21
2 Utilization
2.1 Utilization restrictions (safety measures)
Before using this product make sure to read and understand the following safety
measures. Strictly follow the rules of the product handling.
The following safety precautions allow you to ensure the safe and correct operation
of the product in order to prevent injury of the user, as well as to avoid damaging of the
product.
2.1.1 Precautions
Keep the product out of reach for small children. Accidental damage to the product or
the battery can cause serious injury to a child.
Be especially careful of preventing a child to have access to the battery of the
product. If a child swallows a battery, immediately consult a doctor.
Do not disassemble or modify your product. Disassembly or modification of the
product may cause an electric shock of high voltage. Checking, modification and repair
should be performed only by personnel of «Quarta - Rad» Ltd.
To avoid electric shock, do not touch the internal parts, access to which was opened
as a result of damage to the product case. At the first opportunity, consult the customer
support of the «Quarta - Rad» Ltd.
Immediately stop using the product if it emits smoke or noxious fumes. Violation of
this rule may cause fire or electric shock. Consult the customer support of the company
«Quarta - Rad» Ltd.
Stop using the product if it is dropped or its case is damaged. Violation of this rule
may cause fire or electric shock. Immediately remove from the product all batteries.
Consult the customer support of the company «Quarta - Rad» Ltd.
Do not expose the product to water or other liquids. Do not spill liquids inside the
product. The product is not waterproof. In case of outside contact of the products with
liquids or salt air, wipe the product with soft, absorbent cloth. In the event that water or
other extraneous matter got inside the product, immediately remove the batteries from the
product. Continuation of use can cause fire or electric shock. Consult the customer support
of the company «Quarta - Rad» Ltd.
Do not use substances containing alcohol, petrol, solvents and other flammable
substances for cleaning and maintenance of the product. The use of these substances can
cause a fire.
Use of other power supply other than those specifically recommended for this
product may cause it to overheat and distort, fire and electrical shock, and the emergence
of other hazards. Use only the recommended power supplies.
Do not place the batteries near heat sources or expose them to direct flame or heat.
Do not immerse them in water. Such actions could damage the battery and leak corrosive
liquids, which may cause fire, electric shock, explosion or serious injury.
Do not disassemble, modify, or expose batteries to heat: this can lead to injury due to
an explosion. If this happens, immediately rinse the area of the body with water, especially
the eyes and mouth, and clothes to wash down the contents of the battery. In case of
contact with these substances of the eyes or mouth, rinse immediately with water and
consult a doctor.
Do not drop the battery or subject it to significant mechanical loads that can damage
the case. This can lead to electrolyte leakage and injury.
Do not short-circuit battery terminals with metallic objects. This can lead to
overheating, burns and other injuries.
Before you discard a battery, cover the terminals with tape or other insulators to
prevent direct contact with other objects. Contact with metal and other items in waste
containers may cause fire or explosion. Batteries should be disposed of in specially
designated areas, if there are any in your area.
When the product is not used, remove the batteries to prevent fire and other hazards.
22
2.1.2 Safety measures
You should not use, keep or store the product in locations exposed to intense
sunlight or high temperatures, such as the dashboard or in the trunk of the car. The impact
of sunlight or heat may cause leakage of electrolyte from the batteries, overheating, or
explosion, and as a consequence of fire, burns and other injuries. High temperatures can
also cause deformation of the product case.
Do not store the equipment in humid or dusty areas. This may cause fire, electric
shock or other damage.
Do not expose your product to strong impacts and mechanical stresses that may
damage the product.
2.1.2.1 Prevention of malfunctions.
1) Avoid exposure to strong magnetic fields.
Do not keep the product in close proximity to electric motors and other
equipment generating strong electromagnetic fields. Exposure to strong magnetic
fields may cause a malfunction of the product.
2) Do not allow condensation.
Moving the equipment rapidly from high-temperature zone to low temperature and
vice versa can cause condensation (water droplets) on the outer and inner surfaces of the
product. To prevent this effect, you can place the product inside a sealed plastic bag and
wait for the slow temperature equalization, and then remove the product from the
package.
3) The formation of condensation inside the product.
If you notice condensation immediately stop using the product. Continued use can
lead to product malfunction. Remove the batteries and wait until the moisture before
resuming work with the product.
4) Long-term storage.
If the product is not used for a long time, remove batteries and store the product in a
cool, dry place. The prolonged storage of the product with the installed batteries reduces
battery life and there is the risk of damage to the product of the electrolyte from the
batteries.
2.1.2.2 Safety measures when handling the product
1) The product is a precision instrument. Do not drop the product and avoid
mechanical action on it.
2) The product is not waterproof; it can not be used under high humidity or
underwater. If the product gets wet, immediately switch off the product and contact at
«Quarta - Rad» Ltd. If the product has a small amount of water or it has been exposed to
salty air, switch off the product, wipe it dry with a clean cloth and place in a warm dry room
and dry to completely remove moisture from the interior volume of the product.
3) Do not leave the product near devices that generate strong magnetic fields, such
as near magnets or electric motors. Do not use or leave the product in the places of strong
electromagnetic signals, such as near the radio transmitters towers. Strong
electromagnetic signals can cause problems with the product.
4) Do not leave the product in places with high temperatures, such as a car under
direct sunlight. High temperatures can cause damage to the product.
5) Do not attempt to disassemble or repair the product.
6) The dust from the LCD should be carefully removed with a soft cloth. Do not use
for cleaning of the case and LCD of the product cleaners containing organic solvents. If the
product is heavily polluted, visit the customer support of the company «Quarta - Rad» Ltd.
7) Do not place the product in a microwave oven and do not conduct surveys when
the air ionizer-ozonizers are switched on.
8) Do not allow extraneous objects into this product through the perforations.
9) You should be particularly cautious when the shutter is open (see art. 1.3.1), since
the detector window is closed with a very thin plate of mica, which can easily be damaged
by extraneous objects.
23
10) Do not leave the device for a long time under direct sunlight and fluorescent light.
This can cause damage to LCD display and detector.
11) Do not touch the electrical contacts of the battery compartment. This can lead to
corrosion of contacts and disrupt the normal operation of the product.
12) The rapid transfer of product from the cold into a warm room on it and on the
internal parts can cause condensation. To prevent it place the product in a closed plastic
bag. Do not remove the product from the package until it warms to ambient temperature.
13) To avoid damaging the product, do not use it there is condensation on it. In this
case, remove the batteries from the product and wait until condensation evaporates.
Product can be used only after the evaporation of condensation.
14) If you do not plan to use the product for a long time, remove the batteries from it
and store the product in a cool, dry place.
15) Do not store the product in places where chemicals potentially causing corrosion
are used, for example, in the laboratory.
16) If the product has been stored for a long time before its use make sure it works.
2.1.2.3 Safety measures when handling the LCD display.
1) The LCD display is manufactured using precision technology. Nevertheless, the
LCD can have one unworkable pixel (picture element) in place of which a black dot is
constantly displayed, it is not considered a defect and does not affect the image.
2) Do not press the LCD screen and do not knock on it, since it can lead to cracks
and damage the display.
3) When the LCD is dirty switch off the product and gently wipe the LCD with a soft
cloth to avoid scratching it.
Do not leave the device for a long time under direct sunlight and fluorescent light.
4) Do not allow the contact of LCD display with aggressive chemicals such as acids,
alkalis, solvents, etc. and do not store the product in places where there are aggressive
chemicals.
5) Response time of the LCD increases at low temperatures, and at high
temperatures, the LCD screen may become dark. At room temperature, the usual display
properties are restored.
2.1.2.4 Safety measures when handling batteries.
1) Keep batteries out of reach of children. Chemical substances contained in
batteries, are very great dangerous if accidentally swallowed. In this case, consult a doctor
immediately.
2) Do not pick up the battery with metal instruments such as pliers – this will cause
a short circuit.
3) Do not disassemble or heat the battery – it can be destroyed.
2.2 Preparation the product for operation
2.2.1 Before switching on of the product read this manual and the purpose of its
control elements (see art. 1.3).
2.2.2 Battery Installation:
1) Carefully insert a flat, solid object (such as - a coin) into the slot at the bottom of
the case and push forward to open the battery compartment cover.
2) Install battery size «AA» into the battery compartment, observing the polarity
(+and -);
3) Place the battery cover onto the case.
Note - For a long survey, we recommend you to install a new battery.
2.2.3 Prior to the survey customize the product (Section «SETTINGS» – art.1.3.9.4).
24
2.2.4 Recommendations on targets inspection.
2.2.4.1 When evaluating the radiation environment remember, that the ionizing
radiation has a statistical stochastic nature, so even in the same conditions the readings of
the product for a short measurement period will be slightly different from each other. For
more accurate determination of dose rate and flux density, we recommend to carry out not
less than 8 cycles of observations without switching the product off (until the icon « » –
the full «glass» appears).
2.2.4.2 Since the case of the product absorbs beta particles, to estimate the betaradiation you should place the switched on product with the back side (with open window
of the beta-detector (see art. 1.3.1)) in the direction of the radiation source, so that both
detectors are over the scanned target. When the location of the radiation source is
unknown, carry out the evaluation in different directions to achieve maximum values.
2.2.4.3 When determining the radioactive contamination of foodstuffs, household
items, etc. you should move the product to the object of study at a distance of 3 to 5 mm,
switch it on and carry out a survey.
2.2.4.4 In detecting the radioactive contamination of the liquids dose the dose rate
evaluation is carried out over the open surface of the liquid. To protect the product in such
cases we recommend using a plastic bag, but no more than one layer. Remember that any
material is a filter for beta radiation and the readings may be distorted. Do not allow liquid
to the surface and inside the unit.
2.2.4.5 The estimation results exceeding the level of the natural radiation
background, which is characteristic for the area, evidence of radiation contamination of the
object being surveyed. For the convenience of the survey there is an estimation of the
background and the mode «MEASURE» taking the background into account in this
product (art.1.3.3.1).
2.2.4.6 To determine the location of the source of ionizing radiation you should move
the product over the surface of the object being surveyed, focusing on the increasing of
the sound signals frequency. Remember that the signals frequency will increase sharply
as the product approaches the source, and as the product moves from the source it will as
sharply decrease. To implement the source detection according to the sound frequency
switch on the ring in the «MENU» or switch off the threshold.
2.3 Utilization of the product
2.3.1 Switching on the product.
Before switching the product on you must push the shutter closing the beta-detector
window with the runner up to the stop.
To switch the product on, press C (see art. 1.3.1.4), then will «screen RD1008»
appears on the display.
RD1008
■
●MENU
OFF●
25
2.3.2 Inspection procedure.
During the inspection you should use the «Guidelines for objects survey» (see art.
2.2.4).
After switching on the product the radiological situation estimation starts. During the
measurement period each detected quantum of radiation is indicated on the display with
the icon « » and a short beep if the sound is turned on and the threshold is off.
Frequency of this icon indication is proportional to the dose rate or flux density of beta
particles. In 21 s after switching the product the result of the first cycle is displayed.
::: GAMMA ::::: ::::::::::::
0,12
0,30
■
::: BETA ::::::::::::::::::::::
9
●MENU
10
OFF●
The following cycles are accompanied by the icon change, and the averaging of the
results.
The icon « » corresponds to one measurement cycle;
« » - corresponds to eight or more measurement cycles
The second result is displayed as the average of the first two measurement cycles,
the third – as the average of three measurement cycles and then every subsequent result
is the average of eight previous measurements.
By averaging the result the product analyzes the current value error with regard to
outcome of the previous measurement. If the difference exceeds a certain value, the
display shows the current result and not the average. For example, based on several
observations made the average result is 0,20 µSv/h, and in the current cycle
registers 0,80 µSv/h, then the result will not be
averaged and you will see the 0,80
µSv/h and the icon « » on the display. This algorithm allows to measure the sharp
changes in the gamma- and beta-radiation intensity.
Searching for the radiation source can be carried out in the mode «SEARCH» or and
in the «MEASURE», but the «SEARCH» is more convenient, since the cycle in this profile
is twice shorter.
During searching for the radiation source switch off the threshold, switch on the ring
and pay attention not only to the digital readout, but also to the frequency of the sound
signals and the frequency of the icon « » appearance. The frequency of their occurrence
is proportional to the flux density or rate of beta-particles, the higher the frequency, the
closer you are to the source.
2.3.3 Carrying out the radiation inspections of residential and public buildings.
Evaluation of radiation dose in open area (of background) is carried out near the
surveyed building is not less than on 5 points located at a distance of from 30 to 100 m
from the existing buildings and no closer than 20 m from each other. Measuring points
should be chosen on a site area with natural ground, with no man-made changes (gravel,
sand, asphalt) and radioactive contamination. During the estimation the product should be
at a height of 1 m above the ground.
The total time of the background radiation dose evaluation is 20 - 25 minutes, but if
you want to get reliable results, it is necessary to carry out a survey in its entirety.
For the survey convenience the product has the additional mode «BACKGROUND»
(art. 1.3), which facilitates the survey.
26
2.3.4 Methods of radiation monitoring and estimation procedures of controlled values
Before starting the radiation monitoring of currency the natural background radiation
in the workplace is measured. Estimation of natural radiation background in the workplace
shall be carried out not less than in 5 points located at a distance of from 0, 5 to 1,0 m
from the money taking point and not closer than 0,2 m from each other. Measuring points
should be chosen in the workplace without radioactive contamination. During the
estimation the product should be at a height of 1 m above the ground.
The total estimation period of the radiation dose rate and flux density of the
background is 20 - 25 minutes, but if you want to get the precise results, it is necessary to
carry out a survey in its entirety.
For the inspection convenience the product has the procedure «EVALUATE» which
facilitates the inspection significantly.
2.3.5 Switching off the product.
To switch the product off press the C (art.1.3) and hold it until the messages
disappear. Close the counter window with the shutter on the backside of the product.
2.4 Possible malfunctions and their elimination
Type of fault
Likely cause
Elimination Method
After switching on the detector there is no information on the display
The icon « »appeared
on the display
Batteries has not been Set the batteries observing
set or set in violation of the polarity.
the polarity
The battery is discharged Change the battery.
below the acceptable
level
2.5 Actions under extreme conditions
WARNING!
IF THE PRODUCT HAS FIXED DOSE MORE THAN 1.20 µSV/H YOU
SHOULD LEAVE THIS AREA IMMEDIATELLY and CONTACT THE
STATE SANITARY- EPIDEMIOLOGICAL SERVICE.
3. Maintenance
Maintenance of the product provides for:
1) Removing dust from the outer surface of the product;
2) When there is an icon « » on the display, replace the battery;
3) In case of a long pause of detector usage (more than one month) power supply
elements must be removed from the battery compartment. In case of a long period of
indicator storage with power supply elements battery life gets reduced and there is the
possibility of detector damage by electrolyte from the battery;
4) Wipe the screen with a soft cloth. During wiping the product should be off.
5) Do not allow extraneous objects into this product through the window of the betadetector.
27
4. Repair
Repair of the detector can be performed at the factory «Quarta - Rad» Ltd. at:
2 Building, 3, Podol'skikh Kursantov,
Moscow, 117545, Russia
tel / fax +7(495) 316-96-33
E-mail: [email protected]
http://www.quarta-rad.ru
5. Transportation and storage
a. Transportation of the product in the manufacturer's packaging may be performed by all
types of transport and for any distance.
Arrangement and fastening of a shipping container with the packed detector in vehicles
should ensure the steady position of the transport container and eliminate the movement
of containers during transportation.
During transportation of the product protect it from precipitation.
b. the conditions of the product transportation in a package must comply with:
-temperature range ... ... ... ... ... ... ... ... ... ... ... ... ... ... ... ... .... from minus 20 to +40°C
-the relative humidity at 25°C, max ... ... ... ... ... ... ... .............................................. .80%
c. Before putting the detector into operation it should be stored in a warehouse in the
manufacturer’s packaging at an ambient temperature from +5 to 40 °C and relative
humidity up to 80% at +25 °C.
d. Storage of the detector without packaging is not allowed.
e. If the product was at a temperature below 0° C, it should be kept at room temperature
for 2 hours before opening of the packaging and putting it into operation.
28