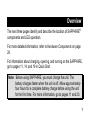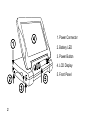
1
SAPPHIRE Portable Video Magnifier ® User’s Guide Freedom Scientific, Inc. 440411-001 Rev. E PUBLISHED BY Freedom Scientific, Inc. 11800 31st Court North St. Petersburg, Florida 33716-1805 USA www.FreedomScientific.com Information in this document is subject to change without notice. No part of this publication may be reproduced or transmitted in any form or any means electronic or mechanical, for any purpose, without the express written permission of Freedom Scientific. Copyright © 2012 Freedom Scientific, Inc. All Rights Reserved. SAPPHIRE® is a trademark of Freedom Scientific, Inc. in the United States and other countries. Federal Communications Commission Notice This equipment has been tested and found to comply with the limits for a Class B digital device, pursuant to Part 15 of the FCC Rules. These limits are designed to provide reasonable protection against harmful interference in a residential installation. This equipment generates, uses, and can radiate radio frequency energy and, if not installed and used in accordance with the instructions, may cause harmful interference to radio communications. However, there is no guarantee that interference will not occur in a particular installation. If this equipment does cause harmful interference to radio or television reception, which can be determined by turning the equipment off and on, the user is encouraged to try to correct the interference by one or more of the following measures: Increase the separation between the equipment and receiver. Connect the equipment into an outlet on a circuit different from that to which the receiver is connected. Reorient or relocate the receiving antenna. Consult the dealer or an experienced radio or television technician for help. Table of Contents Overview .......................................................................................... 1 LED Descriptions .......................................................................... 4 Introduction ..................................................................................... 5 What’s in the Box .......................................................................... 6 Safety and Maintenance ............................................................... 7 Quick Start ..................................................................................... 11 Charging the Battery ................................................................... 11 Opening SAPPHIRE ................................................................... 14 Turning SAPPHIRE On and Off .................................................. 19 Battery Icon Status ...................................................................... 20 Reading with SAPPHIRE .............................................................. 21 Reading Positions ....................................................................... 23 Writing with SAPPHIRE ................................................................ 25 Opening the Writing Stand .......................................................... 26 Hardware Components ................................................................. 29 1 – Power Button (Green) ........................................................... 33 2 – Power Connector .................................................................. 33 3 – Battery Indicator LED ............................................................ 34 4 – Recessed Thumb Grip Area.................................................. 34 5 – TV Connector (Yellow) .......................................................... 35 6 – Color Select Button (Blue) .................................................... 35 7 – Magnification Slider (Yellow) ................................................. 36 8 – Freeze Frame Button (Red) .................................................. 37 9 – Writing Stand ........................................................................ 38 10 – Camera Window.................................................................. 38 11 – LCD Screen......................................................................... 38 Connecting SAPPHIRE to a TV .................................................... 39 Using SAPPHIRE ........................................................................... 42 What is a Video Mode? ............................................................... 42 Making Video Modes Active ........................................................ 43 Selecting a Video Mode .............................................................. 46 Resetting Video Modes ............................................................... 46 Viewing All Video Modes ............................................................ 46 Zooming In and Out .................................................................... 47 Freezing an Image ...................................................................... 47 Using the Reading Line ............................................................... 48 Using Reading Masks ................................................................. 49 Video Modes .................................................................................. 51 Service and Support ..................................................................... 54 Troubleshooting .......................................................................... 56 Overview The next three pages identify and describe the location of SAPPHIRE® components and LED operation. For more detailed information, refer to Hardware Components on page 29. For information about charging, opening, and turning on the SAPPHIRE, go to pages 11, 14, and 19 in Quick Start. Note: Before using SAPPHIRE, you must charge the unit. The battery charges faster when the unit is off. Allow approximately four hours for a complete battery charge before using the unit for the first time. For more information, go to pages 11 and 20. 1 1. Power Connector 2. Battery LED 3. Power Button 4. LCD Display 5. Front Panel 2 1. Color Select Button 2. Magnification Slider 3. Freeze Frame Button 4. TV Connector 3 LED Descriptions 4 LED State Description Green – Solid Battery charged – power adapter connected Green – Flashing Battery charging – power adapter connected Red – Flashing Battery low Red – Solid Error – unplug power adapter, wait a few seconds, and plug in again No LED Battery charge ok, power adapter not connected; or the unit is off Introduction Congratulations on your purchase of SAPPHIRE! SAPPHIRE is a portable video magnifier that lets you magnify printed text from 3.4 to 16 times its actual size. It has been designed with special attention to the practical needs of those with macular degeneration, glaucoma, retinitis pigmentosa, cataracts, and other causes of low vision. The SAPPHIRE is easy to use, even for those unfamiliar with assistive technology. You turn the power on with one button, place it over an object, and adjust the magnification to your preference with the yellow Magnification slider. The magnified image appears on the unit’s display window. 5 SAPPHIRE features a bright, high-contrast seven-inch LCD screen with, 23 color video modes, rechargeable battery, and writing stand. You can even connect SAPPHIRE to a television if you need a larger viewing area. Its ergonomic design makes it portable and easy to use. What’s in the Box Before using SAPPHIRE, take out all the items that are included in the box. Identify and set aside each component. The following items are included with SAPPHIRE: SAPPHIRE portable video magnifier AC power adapter and power cord Video cable for connection to a television 6 Carrying case and shoulder strap Lens cleaning cloth SAPPHIRE User’s Guide Safety and Maintenance To keep your SAPPHIRE in good condition, observe the following guidelines: Read the instructions in this user’s guide before attempting to use SAPPHIRE. Do not attempt to repair SAPPHIRE or open its case. This product contains no user serviceable parts. 7 Keep SAPPHIRE away from wet areas, rain, and other sources of liquids. Do not submerge SAPPHIRE. Always operate SAPPHIRE in a place where the temperature is between 10° and 40° C (50° and 104° F). Do not store in places subject to temperature extremes such as a parked car. Do not attempt to force any connector into the unit’s power or video ports. All appropriate connectors fit easily into the port. Use only the power adapter that came with your SAPPHIRE to charge the battery. Other adapters may damage the unit. 8 When cleaning the screen or camera window, turn off the unit, unplug the power cord, and apply a small amount of non-abrasive cleanser, such as the following, to a soft, lint-free cloth (not a paper towel) and gently wipe: Water Isopropyl alcohol (not ethyl alcohol) Vinegar mixed with water at a concentration of no more than 10 percent vinegar 9 CAUTION: Do not apply excessive pressure to the screen. Do not spray cleanser directly on the screen. Also, do not use any cleanser that contains the following agents: acetone, ethyl alcohol, ethyl acid, ammonia, or methyl chloride. When cleaning the rest of the SAPPHIRE, make sure the unit is unplugged. Use a lightly dampened, soft, clean cloth with water or mild detergent. Do not use alcohol, solvents, abrasives, or aerosol sprays. 10 Quick Start Charging the Battery Note: Before using SAPPHIRE for the first time, you must charge the unit. The battery charges faster when the unit is off. To charge the unit, do the following: 1. Plug the small end of the power adapter into the Power port. The port is located on the same side of the unit as the green Power button and LED as shown in the following illustration. 11 Plugging the power adapter into the SAPPHIRE 12 2. Plug the other end of the power adapter into a standard AC outlet. The battery indicator LED, which is next to the Power port, blinks green to show that the battery is charging. For more about the different LED states, go to LED Descriptions on page 4. 3. Once the battery is charged, the LED stops blinking and glows a steady green. Unplug the power adapter from the SAPPHIRE. The battery indicator LED turns off. You can now use your SAPPHIRE, for up to four hours of continuous use. When the battery is low, the battery indicator LED flashes red. Connect the power adapter and plug it in to recharge the battery. 13 Opening SAPPHIRE To open the SAPPHIRE, do the following: 1. Hold the SAPPHIRE with one hand, or place it on a flat level surface. 2. With your other hand, place your thumb into the large recessed area on the side of the unit, and lift the LCD screen as shown in the following illustration. 14 Use thumb and large recessed area to open SAPPHIRE 15 3. Raise the LCD screen and continue to rotate it around as shown in the following illustrations. SAPPHIRE shown with raised LCD screen 16 Rotating the LCD screen 17 SAPPHIRE shown in reading position 18 Turning SAPPHIRE On and Off 1. Make sure the unit is charged as previously described in Charging the Battery on page 11. 2. Press and hold the green Power button on the side of the unit until the Freedom Scientific screen appears. 3. After a few seconds, the LCD displays the current view as seen through the camera window. 4. The battery icon appears in the upper right corner of the LCD screen for approximately 10 seconds. If the battery is equal to or less than 20 percent charged, the icon remains visible on the screen. If the battery has a charge greater than 20 percent, the icon goes away. 19 Battery Icon Status If the battery has a charge of 20 percent or less, the following icon remains visible on the screen. If the battery has a charge greater than 20 percent, the following icon appears on the screen for approximately 10 seconds after turning on the SAPPHIRE. 20 Reading with SAPPHIRE After you have charged the battery, you are ready to begin reading with SAPPHIRE. With the unit’s power magnification features, you can read or view letters, menus, maps, photos, labels, bus and train schedules, television listings, receipts, ingredients, and much more. To read documents with SAPPHIRE, do the following: 1. Open and place the SAPPHIRE into a reading position as shown in the Reading Positions section on page 23, and make sure that the unit is turned on. 2. If you are reading a book, letter, or other printed item, place it on a flat surface, such as a table or desk. 21 3. Next, place the SAPPHIRE over the text you want to read. Anything under the unit is magnified and shown on the screen. 4. Adjust the zoom using the yellow Magnification slider, and select a color mode by pressing the round, blue Color Select button Tip: 5. 22 . These features are discussed in detail in Hardware Components on page 29. Slide the unit gradually to the right to read to the end of the line. Slide the unit down and back to the left to read the next line of text. Continue reading with SAPPHIRE until you feel comfortable using it. Reading Positions The following illustrations show various SAPPHIRE reading positions. Reading position with SAPPHIRE on top of reading material 23 Place item above the camera window Reading position for items such as pill bottles or hobbies 24 Writing with SAPPHIRE You can also use the SAPPHIRE to sign checks and other documents, complete forms, write notes, and more. A writing stand is incorporated in the SAPPHIRE. It elevates part of the unit, leaving enough space for your fingers and a pen, pencil, or other small tool. As you write or work, you can see what you are doing on the unit’s screen. 25 Opening the Writing Stand To use the writing stand, do the following: 1. Make sure that the SAPPHIRE is open as previously described in Opening SAPPHIRE on page 14. 2. Place your thumbs under the front corners of the SAPPHIRE, and your index fingers in the small recessed areas on either side of the unit. 3. Push up with your thumbs and lift the top section, with the LCD screen, until it snaps into position as shown in the following illustrations. 26 Place index finger in small recessed area and push up with thumb to open the writing stand 27 Place item below the camera window Note: The space between the top and bottom sections is exaggerated to show the writing area. SAPPHIRE with writing stand open 28 Hardware Components Use the illustrations and item numbers to identify SAPPHIRE parts. To learn more, refer to the descriptions that begin on page 33. 1 – Power button; 2 – power connector; 3 – LED 29 4 – Recessed area for opening the unit 5 – TV connector located behind cover 30 6 – Color Select button; 7 – Magnification slider; 8 – Freeze Frame button 31 9 – Writing stand; 10 – camera window; 11 – LCD screen 32 1 – Power Button (Green) Press the green Power button to turn the power on. To turn the power off, press the green Power button again. 2 – Power Connector Plug in the supplied power cable adapter into the small, circular port on the side of SAPPHIRE. Only connect the supplied power adapter to this port. For information about charging the battery, see page 11. 33 3 – Battery Indicator LED The battery indicator LED is located next to the power connector on the side of the unit. When the battery is low, the LED blinks red and the battery icon shows in the upper right corner of the LCD screen. When the battery is charging, the LED blinks green. The LED stops blinking when the battery is fully charged. When you unplug the unit from the power adapter, the LED turns off. For more about LED operation, refer to LED Descriptions on page 4. 4 – Recessed Thumb Grip Area Use the large recessed area to lift the LCD screen and open the SAPPHIRE. Use the small recessed area to open the writing stand. 34 5 – TV Connector (Yellow) Use this RCA video connector to connect the SAPPHIRE to a TV. Use the supplied cable with the yellow plugs. 6 – Color Select Button (Blue) Select the contrasting colors that best suit your vision needs for reading text. Press the blue Color Select button to cycle through the various choices. There are five default video modes: Normal, Black on White, White on Black, Yellow on Blue, and Yellow on Black. The first three modes are system colors and cannot be changed. For a list of video modes, go to Video Modes on page 51. 35 7 – Magnification Slider (Yellow) Use this slider, located on the front panel, to increase or decrease screen magnification. High level of magnification can help you see small text or detailed illustrations. Low level of magnification allows you to see more on the screen. Move the yellow Magnification slider right to increase the magnification level. Move the yellow Magnification slider left to decrease the magnification level. Use the Magnification slider with the red Freeze Frame button to turn on the reading line or the reading masks. See Using the Reading Line (page 48) or Using Reading Masks (page 49) for more information. Use the Magnification slider with the blue Color Select button to cycle through all video modes. See Viewing All Video Modes (page 46) for more information. 36 8 – Freeze Frame Button (Red) Press the red Freeze Frame button to freeze the current image that appears on the screen. Press it again to turn off Freeze Frame mode. See Freezing an Image on page 47 for more about freeze frame operation. The red Freeze Frame button can be used with the yellow Magnification slider to turn on the reading line or the reading masks. See Using the Reading Line (page 48) or Using Reading Masks (page 49) for more information. 37 9 – Writing Stand Open the writing stand to write on or work with items that you are magnifying. See Opening the Writing Stand on page 26 for more information. 10 – Camera Window This window protects the unit’s camera lens, which magnifies items underneath it. 11 – LCD Screen The unit has a seven-inch, flat, liquid crystal display (LCD). Text or other items placed in front of the camera window display on the screen. 38 Connecting SAPPHIRE to a TV For greater magnification, you can connect the unit to a television using the supplied video cable. To connect your SAPPHIRE to a television, do the following: 1. Insert the yellow RCA plug that is on one end of the supplied video cable into the unit’s TV connector port as shown in the following illustration. 39 Plugging RCA plug into SAPPHIRE 40 2. Insert the RCA plug on the video cable into one of your television’s yellow video input connectors. Refer to your television owner’s manual for information on locating these connectors. 3. Turn on the television. If necessary, switch your television to the appropriate input channel. Items that you magnify now appear on the television screen and the unit’s LCD screen. 41 Using SAPPHIRE What is a Video Mode? A video mode is a pre-defined color combination (for example, yellow text on a blue background) that you can select when viewing items with the SAPPHIRE. The unit has a total of 23 different video modes. The first three video mode positions – Normal (full color), Black on White, and White on Black – cannot be changed and are always available. Using the procedures in this section, you can activate and choose from a variety of 20 other video modes. Once a video mode is active (see Making Video Modes Active on page 43), you can switch to it by pressing the Color Select button . 42 To quickly scroll through and see all SAPPHIRE colors and video modes, refer to Viewing All Video Modes on page 46, or go to the video mode list on page 51. Making Video Modes Active By default, the SAPPHIRE has five preconfigured video modes that are ready for use. A video mode must be active before you can select it for use. To activate video modes, do the following: 1. Press and hold both the blue Color Select and red Freeze Frame buttons for approximately eight seconds until you see a check mark or in the lower left corner. 43 2. Push the blue Color Select button to cycle through all video modes until you find the one you want to activate. Note: If a check mark appears next to the position number in the lower left corner of the screen, it means that the video mode is active and can be selected during normal operation. An indicates that the video mode is inactive. During normal operation, you cannot switch to an inactive mode when you press the Color Select button. 3. 44 Press Freeze Frame to active the video mode. A check mark now appears on the screen. Note: To deactivate the video mode, press Freeze Frame again until the appears. 4. To activate other video modes, repeat steps 2 and 3 as necessary. Note: You cannot change or disable the video modes that occupy the first three positions: Normal, Black on White, and White on Black. 5. When you are finished loading video modes, press and hold both the blue Color Select and red Freeze Frame buttons for approximately eight seconds until the check mark or disappear. 45 Selecting a Video Mode To switch to an active video mode during normal operation, press the blue Color Select button until the desired mode appears on the screen. Resetting Video Modes To restore the five default video configurations, press and hold the green Power button for approximately 10 seconds Viewing All Video Modes To quickly view all video modes available on the SAPPHIRE, press and hold the blue Color Select button while moving the yellow Magnification slider. 46 Zooming In and Out To zoom in, move the yellow Magnification slider to the right. To zoom out, move the yellow Magnification slide to the left. Freezing an Image Freezing an image on the LCD screen can be useful for reading labels on items on a store shelf. By holding the SAPPHIRE close to the item and capturing the image, you can then hold the unit close enough for you to read. To freeze the current image on the LCD screen, do the following: 1. Press the red Freeze Frame button on the front panel. 2. Press the button again to turn off Freeze Frame mode. 47 Using the Reading Line The reading line is a horizontal line that displays on the screen to help you locate your place while reading a document. To use the reading line, do the following: 1. Press and hold the red Freeze Frame button on the front panel, and then move the yellow Magnification slider. A single reading line displays on the screen. Move the slider left or right to adjust its position on the screen. 2. Release the red Freeze Frame button in its new position on the screen. 48 to leave the reading line 3. To turn off the reading line, press and hold the red Freeze Frame button , and move the yellow Magnification slider to the far left position. Using Reading Masks Reading masks block part of the screen to show only a horizontal slice of the screen. The distance between masks can be adjusted as described below. 1. Press and hold the red Freeze Frame button on the front panel, and then move the yellow Magnification slider all the way to the right and back. Two masks display on the screen. Move the slider left or right to increase or decrease the distance between the masks. 49 2. Release the red Freeze Frame button place on the screen. 3. To turn off the masks, press and hold the red Freeze Frame button , and move the yellow Magnification slider to the far right position. 50 to leave the masks in Video Modes A total of 23 video modes are available on the SAPPHIRE. Use the following list of video modes to try out and select the best color combination for you. To learn how to turn on various video modes go to Making Video Modes Active on page 43 or Selecting a Video Mode on page 46. To restore the unit to its initial video configuration, see Resetting Video Modes on page 46. The SAPPHIRE can use the following video modes: Normal – full color mode. It is always available. Black on white – enhanced positive color mode. It is always available. 51 White on black – enhanced negative color mode. It is always available. Yellow on black – restored when video color modes are reset. Yellow on blue – restored when video color modes are reset. Blue on yellow Black on yellow and Black on red Red on black and Black on green Green on black and Black on blue Blue on black 52 Magenta on black Red on white Green on white Blue on white Magenta on white and Black on magenta and White on red and White on green and White on blue and White on magenta 53 Service and Support Note: This device has no user-serviceable components. Any unauthorized attempt to service or replace internal components will void the product warranty. You can contact Freedom Scientific Technical Support to receive technical assistance with SAPPHIRE. Before contacting Technical Support, it is recommended that you refer to Troubleshooting on page 56 to try to resolve your problem quickly. If you cannot resolve your issue, visit www.FreedomScientific.com, choose the Support link, and search the Knowledge Base. It contains articles that address many common questions and technical issues concerning Freedom Scientific products. 54 To contact Freedom Scientific Technical Support by telephone, customers in the United States can call (727) 803-8600, Monday through Friday, from 8:30 AM to 7:00 PM (Eastern Time). Alternatively, you can receive support by e-mail. Send your questions and problems to [email protected]. When you call, have your documentation ready and be prepared to provide the following information: Product name What you were doing when the problem occurred How you tried to solve the problem 55 Troubleshooting Problem Solution The screen is blank. Ensure that the power is on. Verify that the item you want to magnify is positioned correctly under the camera window. Reduce the magnification level. Charge the battery. The unit does not turn on. 56 Charge the battery. Problem Solution The image on the screen is dark or distorted. Make sure that SAPPHIRE is positioned flat on the page you are reading. The battery indicator LED is flashing red. Charge the battery. The battery icon remains on the LCD screen. Charge the battery. 57 Problem Solution The battery LED is solid red while the power adapter is connected to the SAPPHIRE. A battery error has occurred. Unplug the power adapter from the SAPPHIRE and plug it in again. Charge the battery for at least 4 hours. If the problem continues, disconnect the power adapter and call Freedom Scientific Technical Support. 58 Problem Solution The battery indicator LED does not flash green, even though the power adapter is connected and plugged into a wall socket. Ensure that the small end of the power adapter is properly plugged into the unit’s power port. Ensure that the outlet has power and is not malfunctioning. If the outlet is connected to a wall switch, make sure that the switch is on. 59 Problem Solution The battery is not charging. Ensure that the small end of the power adapter is properly plugged into the unit’s power port. Ensure that the outlet has power and is not malfunctioning. If the outlet is connected to a wall switch, make sure that the switch is on. 60 Problem Solution There are smudges or blemishes Clean the LCD screen and on the screen. camera window (located on the bottom of the unit) as described in Safety and Maintenance on page 7. 61 Problem Solution Text is too small to read. Move the yellow Magnification slider to the right to increase the magnification level. Connect SAPPHIRE to a television using the supplied video cable. The text will be easier to read on the larger screen. Text is too large to read. 62 Move the yellow Magnification slider left to decrease the magnification level. Problem Solution SAPPHIRE is connected to a television, but no magnified image appears on the television screen. Ensure that the television is on. Switch to the appropriate video input channel on your television. Ensure that the video cable is securely connected to the TV connector on the SAPPHIRE and plugged into the correct video input (yellow) on your television. 63