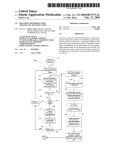
1
 Lex VisionAid International
Speech
LexSoftwareUserManual
Version1.1.xRevA
English
Speed Shift+‐/= and Shift+Numpad‐/+
A slider to adjust the speed of both the reading and interface voices. The shortcut keys are “Shift” and “Minus” to decrease the speed and “Shift” and “Equals” to increase it. Volume
Ctrl+Shift‐/=
and Shift+Numpad‐/+
A slider to adjust the volume of both the reading and interface voices. The shortcut keys are “Ctrl” and“Shift” and “Minus” to decrease the volume and “Ctrl” and “Shift” and “Equals” to increase it. Defaultreadinglanguage
When reading multi‐language documents, if the language is unknown for a particular sentence then it will be read in the default reading language. Automaticallyselectreadingvoiceforlanguage
Default: Enabled When reading multi‐language documents, the reading voice will automatically change, on a per sentence basis, to match the language of the document. Readingvoice
E/Shift+E
Allows you to select the default reading voice for a particular language. When in document mode, the letter “E” cycles through your available reading voices. “Shift” and “E” together cycles backwards. Readwhenrecognitioncomplete
Default: On Automatically begins reading your document out loud as soon as recognition is complete. Turning this off means you have to manually start the document reading. FAQandTroubleshooting
Below are a list of common questions and problems with their solutions: Q. I start the Lex software with the LexCam connected but the camera doesn’t seem to do anything and I can’t capture any documents. A. Make sure that the camera is plugged in correctly to a USB 2.0 compatible port Q. How do I stop Lex from reading automatically every time I capture a document? A. Disable “Read when recognition complete”. For instructions on this, please see page 40. Q. I’m trying to import a Word, Powerpoint or Excel documents directly into Lex and its not working. A. Firstly, you must have the Office application installed on your system for the document type you are trying to import. Secondly, ensure the document you’re trying to import is not open in the Office application. Canadian Distributor
Thirdly, ensure all Windows Updates have been installed for your system. Copyright (C) 2008‐2012, VisionAid International Ltd, all rights reserved.
Page 40 Lex Lex
VisionAid International
TableofContents
VisionAid International
TIP: Table of Contents .............................................................................................................................................................. 1 If a larger menu text size is required, then your computer’s DPI setting should be increased. Simply type “Change Windows DPI Setting” into Google for a how‐to guide on this. Introduction ...................................................................................................................................................................... 4 Lex improvement program ............................................................................................................................................... 4 System requirements ........................................................................................................................................................ 5 Ownership and intellectual property ................................................................................................................................ 5 Software installation ......................................................................................................................................................... 6 Starting / Exiting Lex Software .......................................................................................................................................... 7 Activating Lex Application and Voice Packs ...................................................................................................................... 7 Using Lex Software ............................................................................................................................................................ 9 Virtual X/Y Mode (for LexCam only) ............................................................................................................................ 10 Camera Mode controls ................................................................................................................................................ 10 Reading Guides ........................................................................................................................................................ 11 Capturing Documents ..................................................................................................................................................... 12 Capture Options ...................................................................................................................................................... 12 Document Mode ......................................................................................................................................................... 14 Visualisations ......................................................................................................................................................... 14 Scroll Bars .................................................................................................................................................................... 17 Image controls ............................................................................................................................................................. 19 IconSize
Allows the size of the Toolbar icons to be adjusted. Please see page 35 for information on the Toolbar and its functions. Scrollbarsize
Allows the size of the scroll bars to be adjusted. Usestandardfiledialogs
Default: Off Lex features custom sized and spoken file dialog Windows. If you wish to use the standard Windows ones, simply turn this on. Usesystemcolours
Default: On When on, the interface and menus will be displayed in your standard Windows operating system colours. When turned off, they will use your chosen two colour combination. Language
Allows you to select from the available interface languages. Additional interface languages become available when a Voice Pack for a particular language is installed. Navigation controls .................................................................................................................................................... 20 Copy to Clipboard ........................................................................................................................................................ 22 Annotations ................................................................................................................................................................. 23 Speech ......................................................................................................................................................................... 24 Dictionary ............................................................................................................................................................. 26 Bookmarks ............................................................................................................................................................. 27 Editing your documents (Pages dialog) ................................................................................................................... 28 Saving documents ........................................................................................................................................................... 29 Opening documents ........................................................................................................................................................ 30 Importing documents ...................................................................................................................................................... 30 Exporting documents ...................................................................................................................................................... 31 Export ..................................................................................................................................................................... 31 Quick Export ......................................................................................................................................................... 31 Quick Export Options .................................................................................................................................................. 31 Key Help ..................................................................................................................................................................... 32 Touch screen support ...................................................................................................................................................... 33 Virtual X/Y and Document Mode Toolbar ....................................................................................................................... 35 Please contact your local distributor for information on obtaining additional voice packs. Voice
Allows you to select from the available interface voices. SpeechVerbosity
Default: High There are three options: Very High, High, Medium and Low: VeryHigh
Highest level of speech alerts which includes announcing the types of controls in dialogs. High
High level of speech alerts with most menus, dialogues and navigation boundaries being announced audibly. Medium
Turns off audio alerts for main menus – this can be useful if you wish your screen reader to read the menus to you rather than Lex. Low
Disables all speech alerts except for navigation boundaries. Off
Disables all speech. Virtual X/Y Mode Toolbar ............................................................................................................................................ 35 Document Mode Toolbar ............................................................................................................................................ 35 Page 2 Page 39 Lex Lex
VisionAid International
CharacterSpacing
Default: 1 Options VisionAid International
..................................................................................................................................................................... 36 Navigating Options using the keyboard ...................................................................................................................... 36 Allows the spacing between characters to be adjusted between 1 and 2 in 0.1 increments. This can help with the legibility of text with certain eye conditions. Recognition ................................................................................................................................................................. 37 Visualisations ............................................................................................................................................................... 37 Cyclablevisualisations
When using the letter “V” to cycle through visualisations, Lex will only cycle through visualisations that are enabled here. Appearance ................................................................................................................................................................. 38 Controls ....................................................................................................................................................................... 38 Interface ...................................................................................................................................................................... 38 Appearance
Speech ......................................................................................................................................................................... 40 Options for setting your preferred colour combinations and highlighting. Colours
FAQ and Troubleshooting ............................................................................................................................................... 40 Colourcombination
Allows you to select your preferred two colour text colour combination from 10 presets. CustomColourCombination
When enabled, allows you to create your own custom colour combination from 8 foreground and 8 background colours. Highlight
CustomhighlightColour
Select from 8 custom (rather than automatic) colours for highlighting. Highlightshape
Default: Rectangle Select the way your text is highlighted: None, Line, Rectangle, Inverse Controls
Allows customisation of Cursor – size, colour etc. Cursor
CustomColour
Allows you to select a custom colour for your cursor rather than an automatic one. There are 8 possible colours to choose from. Size
A slider to adjust the size of your cursor. Sensitivity
A slider to adjust the sensitivity of the mouse within the Lex software. This is separate to the standard Windows operating system mouse sensitivity. Interface
Allows you to alter dialogue text size, colours, language, voice etc. Fontsize
Default: 8.25 pt Select from 3 different font sizes: 8.25, 12 and 16 pt. Please note, that at some resolutions, a high font size may not allow you to see all of the menu text. Page 38 Page 3 Lex Lex
VisionAid International
VisionAid International
Recognition
Introduction
Congratulations on choosing the Lex software. This user manual will provide you with full instructions in using the Lex software both with and without the use of its portable camera add‐on, LexCam. Leximprovementprogram
Users are the best people to help us improve and develop our products so if you have any ideas or suggestions, no matter how small, please do contact us. Suggestionscontactinformation
Please use the following methods to contact us regarding your suggestions: This contains the same settings as “Capture Options” detailed in on page 12 together with “Layout Analysis” and “Languages”. Layoutanalysis
Default: Accurate This alters how Lex analyses each page. For most documents, the default “Accurate” setting is best. However, occasionally “Balanced” may yield better results. Languages
Lists the available recognition languages which are determined by the installed Voice Packs. Selecting multiple languages can slow down recognition slightly and also increase the likelihood of recognising a sentence in the incorrect language so it advisable to select as few languages as possible for your document capture. Email:
suggestions@visionaid‐international.com If more languages are required, please contact your local distributor to purchase them. Post:
Visualisations
Allows you to fine tune how captured documents are displayed. Behaviour
Centreonword
Default: Disabled VisionAid International Ltd. Bridge Lodge, Spalding, Lincolnshire PE11 3AU United Kingdom When enabled, the word being read aloud is always centred on the screen. When disabled, the screen position is only updated when the word being read aloud is not completely within the screen boundary. Phone:
+44 (0) 1775 711 977 Drawparagraphboundaries
Default: Enabled Thank you and we wish you many hours of enjoyment with your Lex software / camera system. When enabled, Column, Horizontal and Vertical visualisations display a horizontal or vertical line to denote a paragraph boundary. This can aid in visualising the document’s layout. Retaintypeface
Default: Enabled This determines whether the typeface is preserved within your document. Disabling this setting allows access to a drop down list where you can choose to have your font changed to, Serif, Sans‐serif or Monospace. Retainfontstyles
Default: Enabled Allows the style of the font in your document to be retained (bold, italic, underlined etc). LineSpacing
Default: 1 Enables the line spacing when in Column and Vertical Visualisations to be altered from 1 to 2 in 0.1 increments. Increasing the line spacing can greatly help the legibility of text for certain eye conditions. WordSpacing
Default: 1 Allows the spacing between words to be adjusted between 1 and 2 in 0.1 increments. This can help with the legibility of the text. Page 4 Page 37 Lex Options
Lex
VisionAid International
F10 VisionAid International
Systemrequirements
To access Lex Scholar’s options, simply press “F10” or go to Tools ‐> Options in the menu. The Lex software requires the following operating systems and hardware in order to run: Options allow you complete control of Lex’s settings. It is made up of 6 tabs, each containing different settings: Operatingsystems
Lex software is supported on the following operating systems: Windows XP (all versions) 32bit only Windows Vista (all versions) 32 and 64 bit Windows 7 (all versions) 32 and 64 bit Mac OS X 10.6 (Snow Leopard) or newer with VMware Fusion 4.0 or newer with Windows 7. Hardware
NavigatingOptionsusingthekeyboard
The tabbed Options dialog operates in exactly the same way as any other Windows tabbed dialog. The controls are as follows: Ctrl+Tab: Ctrl+Shift+Tab: Tab: Shift+Tab:
Space: Up,LeftArrow: Down,RightArrow: Next Options tab Previous Options tab Next item in the current Options Tab Previous item in the current Options Tab Select / Deselect current option Previous list item of current option Next list item of current option Minimum
Processor Single Core Intel Atom or AMD Athlon 3000+ RAM XP: 512MB, Vista / 7: 1GB Hard Drive 2GB Free Space, 4MB per page Graphics Card 32MB Shared graphics Sounds Card Windows compatible sound card for speech USB Ports 1 x USB 2.0 Please note, Lex will run on lower specification hardware, but the time taken to read a document will increase accordingly. Recommended
Processor RAM Hard Drive Graphics Card Sounds Card USB Ports Intel Core 2 Duo 1.6 GHz or greater XP: 1.5GB, Vista / 7: 2GB 2GB Free Space, 4MB per page 128MB dedicated graphics card Windows compatible sound card for speech 1 x USB 2.0 Ownershipandintellectualproperty
The software makes use of third party software libraries that are redistributed under their own respective licenses. LAME is distributed under the terms of the GNU Lesser General Public License (LGPL), a copy of which can be found at http://www.gnu.org/licenses/lgpl.html and is included in the software’s program directory. OpenCV is distributed under the terms of the Berkeley Software Distribution (BSD) license, a copy of which is included in the software’s program directory. Copyright (C) 2000‐2008, Intel Corporation, all rights reserved. Copyright (C) 2009, Willow Garage Inc., all rights reserved. Third party copyrights are property of their respective owners. Page 36 Page 5 Lex Lex
VisionAid International
VisionAid International
Softwareinstallation
VirtualX/YandDocumentModeToolbar
The software installation is divided into two parts – the Lex software itself and Voice Packs. Voice Packs provide you with the available voices for that language, allow you to OCR text in that language and allow you to change the menu into that language, (providing translations have been completed). An easy access toolbar allows quick mouse access to frequently used controls. To alter the icon sizes on the toolbar, go to “Tools” ‐> “Options” ‐> “Interface” ‐> “Icon Size”. VirtualX/YModeToolbar
IMPORTANT: 1. Administrative rights are required in order to install the Lex software. If you are on a business network with limited access permissions, you will have to speak to your IT support department for them to temporarily provide you with admin rights to install the software. 2. Your computer should meet the minimum system requirements as previously detailed. For the best experience, they should meet the recommended requirements. 3. We strongly recommend that you run Windows Update before installing the Lex software to ensure you have the latest patches for your operating system and for Microsoft Office. 1
1
2
3
Part1
LexSoftwareInstallation
Insert the installation CD in to your CD / DVD drive, then: 1.
2.
3.
4.
5.
6.
Click the “Start” button in the bottom left corner of your screen Click “Computer” or “My Computer” Double click on your CD / DVD drive letter (often D:) Navigate to the “Lex” folder Double click “setup.exe” Follow the on screen instructions IMPORTANT: 4,5
6
7
8
9
10
11
12
23
4
5
6
7 8910
1112
Toggle Camera / Document Mode: Switches between Camera mode, (for real‐time viewing and capturing of documents) and Document mode, (for viewing and reading your captured documents). Change Colour Mode: Allows you to change between colour, advanced greyscale and binary viewing modes. Invert colour: When in greyscale or binary modes, invert colour swaps the colours of the image. Please note that this does not invert the colour of recognised text, only the colour of the image. Zoomout/in: Decreases and increases the magnification. A3/A4(notWand): Allows you to zoom directly between A3, (double letter paper) and A4, (letter paper) sizes. Camera Target (not Wand): Allows you to change camera target between documents, (on the desk), distance (e.g. a whiteboards) or self, (a mirrored view for personal grooming). Refocus(notWand): Refocuses the camera. Capture: Captures a single page to your current document. SplitScreen: Enables or disables split screen (if a screen reader is running). SplitPosition: Changes split position from top, bottom, left or right. ViewAnnotation:Displays the annotation window in Document Mode.
DocumentModeToolbar
Do not run “Lex 1.x.x.msi”. You must run “setup.exe” to install the Lex software correctly as this will install other necessary components automatically. Part2
VoicePackinstallation
Once the Lex application has installed, you will need to install at least one Voice Pack: 1.
2.
3.
4.
5.
6.
Click the “Start” button in the bottom left corner of your screen Click “Computer” or “My Computer” Double click on your CD / DVD drive letter (often D:) Navigate to the “Voice Packs” folder Double click on the voice pack you wish to install This will take several minutes. When complete, the Voice Pack installation window will disappear. TIP: Your Lex software and voice packs can be installed and activated on up to three machines for your own personal use. Page 6 1
2
3
4
5 6 7 8910
11
12
1
2
3
4,5
6
7
8
9
10
11
12
Toggle Camera / Document Mode: Switches between Camera mode, (for real‐time viewing and capturing of documents) and Document mode, (for viewing and reading your captured documents). Change Colour Mode: Allows you to change between colour, advanced greyscale and binary viewing modes. Invert colour: When in greyscale or binary modes, invert colour swaps the colours of the image. Please note that this does not invert the colour of recognised text, only the colour of the image. Zoomout/in: Decreases and increases the magnification. Visualisation: Allows you to choose between the 6 different visualisations. PreviousScreen: Navigates backwards one screen of text. Play/Pause: Starts and stops reading of your document. NextScreen:Navigates forwards one screen of text. SplitScreen: Enables or disables split screen, (if a screen reader is running). SplitPosition: Changes split position from top, bottom, left or right. ViewAnnotation:Displays the annotation window in Document Mode. Page 35 Lex Lex
VisionAid International
VisionAid International
Starting/ExitingLexSoftware
RunningLexSoftware
Once Lex has installed, you can either run the program from its program folder, (Start ‐> All Programs ‐> Lex ‐> Lex), or double left click the Lex shortcut on the desktop. Zoomin/out
To decrease the magnification, use your index finger and thumb to make a pinching movement on the screen. ExitingLexSoftware
There are three ways to exit Lex: To increase the magnification, move your closed finger and thumb apart. You can also do the pinching and stretching motion with two fingers on separate hands. Some people can find this easier. 1. Press and hold Alt and then press F4. 2. Go to File ‐> Exit on the menu. To access the menu if you’re in a document, press Alt. The menu can then be navigated using the arrow keys and Enter, or the mouse. 3. If running in Windowed Mode, left click on the “X” in the top right corner with your mouse. You will be prompted to save or discard any unsaved documents before exiting. ActivatingLexApplicationandVoicePacks
The Lex software license allows you to install and run the software and voice packs on up to three machines. They will run for 30 days without activation. Caringforyourtouchscreen
Your touch screen will attract finger marks over time. Please follow your particular touch screen’s guidelines for cleaning. TIP: When using touch screens make sure that at most two of your fingers come in contact with the screen at once. Also, make sure sleeves or other clothing items are not touching the screen as this will cause it to behave erratically. You will need an internet connection in order to activate online using our remote server or e‐mail. Alternatively, for users without an internet connection on their machine, you can telephone your distributor or email the required information from another machine to receive your activation keys for both the Lex Application and Voice Packs. On start‐up, Lex will inform you if you have any non‐permanent licenses: Simply select the relevant “Activate” button or alternatively go to Tools ‐> Application or Voice Licenses on Lex’s menu. LexApplicationActivation
OnlineActivation
1. Select “Online Activation”. 2. You simply require your product’s serial number. Enter this, (including dashes), when prompted and select “Activate”. 3. You will be informed if activation is successful and of the number of activations you have remaining. Page 34 Page 7 Lex Lex
VisionAid International
VisionAid International
Touchscreensupport
ManualActivation
1. Select “Manual Activation”. 2. You will need to provide your software version, hardware ID and product serial number. 3. Follow the on‐screen instructions and either contact VisionAid International Ltd by phone on +44 (0) 1775 711 977, email activation@visionaid‐international.com or contact your distributor. 4. Once you have your activation key, enter it into the Activation key field and press Activate. To get the best from touch screen support, it is advised that you set up a custom “flick” to replicate an Alt key press. A flick is a quick single finger drag in a particular direction on the touch screen. VoiceLicensesActivation
Setting up this flick will allow you to change your focus from the main viewing area to the toolbar and menu without having to use the Alt key on the keyboard. OnlineActivation
1. Select the voice pack you wish to activate and then choose “Online Activation” 2. Enter your product’s serial number, (including dashes), when prompted and select “Activate”. 3. You will be informed if activation is successful and of the number of activations you have remaining. 4. Repeat this procedure for all voice packs you wish to activate. Lex supports Multi‐Touch touch screens when running Windows 7. Settingupacustomflick
To do this: 1.
2.
3.
4.
5.
6.
7.
ManualActivation
1. Select “Manual Activation”. 2. For manual activation, you will need to provide your software version, hardware ID and serial number. 3. Follow the on‐screen instructions and either contact VisionAid International Ltd by phone on +44 (0) 1775 711 977, email activation@visionaid‐international.com or contact your distributor. 4. Once you have your activation key, enter it into the Activation key field and press Activate. 8.
9.
Go to Start ‐> Control Panel Where is says “View by:” in the top right corner of Control Panel, ensure that “Large Icons” is selected. Find and select “Pen and Touch.” Change to the “Flicks” tab. Ensure “Use flicks to perform common actions quickly and easily” is selected, together with “Navigational flicks and editing flicks” and click “Customize”. You can pick any one of the 8 directional flicks to be mapped to “Alt” but we recommend the up direction, which is “Drag Up” by default. Select the “Drag Up” flick and then select “(add)” from the drop down list. At the bottom of the screen you can now give the flick a name – we suggest “Alt” and in the “Keys:” box underneath, select the box and press the Alt key. The word “ALT” should appear in the box. Click “Save”, then “OK”, then “OK” again to exit the settings. You can now try the flick out in the Lex software. Fingercontrols
Rather than tracking a cursor around the screen, you can simply use your fingers on the screen to directly manipulate your documents. The specific touch screen controls are detailed below. Startreading
Pressing twice on a word, (double tapping), will start your document reading from that word. IMPORTANT: 1. Once a voice pack has been activated, you will manually have to change your interface and reading voice. To do so, please see the Interface and Speech sections on pages 39 and 40. 2. Lex’s software license allows up to 3 separate installs of the software and voice packs for the licensed user. Each install is tied to a unique Hardware ID, so a different software and voice pack activation key is required for each machine that it is installed on. 3. If additional licenses are required, they can be purchased through your local distributor. 4. If you need to re‐activate the Lex software or any voice packs on a machine, for example after formatting your hard drive, it will not use up an additional activation. Stopreading
Single tapping on the screen will stop Lex from reading. Navigatearoundyourdocument
To move around your document, simply place one finger on the screen and maintain contact as you move your finger around.
Page 8 Page 33 Lex Destinationfolder
Choose where you wish to save your Quick Export documents to. Format
Choose the type of document you wish to save to. These include: PDF, RTF, txt, Word 97‐2003, Word (latest format) and MP3. Layoutretention
This is as described in the Export section on page 31. Openwithdefaultapplicationwhenexportcompletes
Once quick export has finished, if this option is selected, your exported document will automatically be opened with your computer’s default application for the particular document type. KeyHelp F1 You can access help when in Camera or Document mode by simply pressing “F1” or going to Help ‐> Keys. This provides a complete list of all available keyboard shortcuts for Lex. Lex
VisionAid International
UsingLexSoftware
Lex is designed to be used with a keyboard and mouse, touchpad or trackball and its optional dedicated keypad. If you have a system with Windows 7 and a multi‐touch monitor, additional multi‐touch features can also be used. Lex has two main “modes”. They are Virtual X/Y mode and Document mode. To change between these modes, simply press “Tab”. Virtual X/Y mode is available only with the optional LexCam camera. It enables you to view documents in a high resolution, low frame rate real‐time view with optional magnification and colour enhancements. This mode can be scrolled around using your mouse. Document mode is used to read your captured documents in many enhanced ways with speech output as well as for importing and exporting documents. If the software is started and LexCam, (Lex’s optional camera), is connected, you will automatically be in Virtual X/Y Mode. If the camera is connected and turned on after the Lex software is started you will automatically be taken to Virtual X/Y mode. AccessingtheMenu
Alt
Lex’s menu is permanently located at the top of screen. This can be navigated in the same way as standard Windows’ application menus (using the “Alt” key), including key accelerators, which are underlined in the menu and arrow keys. VisionAid International
Page 32 Page 9 Lex VirtualX/YMode(forLexCamonly)
Tab
This can be panned around with your pointing device and rotated. Keyboard:
Ctrl+‐/=orCtrl+Numpad‐/+
Mouse:
Ctrl+Mousewheel
Press and hold the “Ctrl” and “dash” or “equals” sign or “Ctrl” and Numpad “minus” or “plus” key on the keyboard to zoom out and in. You can also use “Ctrl” and your mouse‐wheel if you have one. Cyclefullcolour,tint,advancedgreyscale&binarycolourmodes
Pressing “C” cycles full colour, tint, greyscale and binary modes. Portable Document Format (PDF), Rich Text Format (RTF), text (txt), Word (doc and docx) and MP3. Ctrl+T
To export a document, ensure you have the document you wish to export open within Lex, then go to File ‐> Export on the menu, (shortcut key “Ctrl” and “T” together). This will bring up a standard Windows dialog box where you can select what type of export you require and enter the location and filename of the document. CameraModecontrols
Lex allows you to export your documents into the following formats: Export
If you are not already in Virtual X/Y mode, simply press “Tab” to take you there. TogglebetweenVirtualX/YandDocumentMode Changes between Virtual X/Y and Document Mode VisionAid International
Exportingdocuments This allows you to view, magnify and colour enhance documents in a low frame rate, high resolution real time view. Zoomout/in:
Lex
VisionAid International
TAB
C
MP3 documents are created with your current reading voice and speed. A folder is created with the document name and each page of your document is saved into that folder as a separate numbered MP3 file. Depending on the chosen export format selected, you may be asked to select from up to 5 “Layout retention” options. These are: Default
This will retain pictures, fonts and formatting as closely to the original document as possible and can choose any of the other options automatically. None
This exports pictures and unformatted text to the document. Text comes before or after pictures and not placed on top of them. This is an ideal format for creating large print documents. Full colour is ideal for looking at photographs. Tint is designed for dyslexic users and enhances the colour of the document in a way that is similar to coloured overlays. Colours can be chosen as detailed below. Advanced Greyscale is the standard two‐colour way of viewing documents. Binary is an enhanced two colour algorithm that can even distinguish multiple colour texts and backgrounds in your chosen two colour combination. Cycletwocolourcombinationsandtints L/Shift+L
Pressing “L” cycles through 12 popular two colour‐combinations. “Shift” and “L” cycles backwards. Custom colour combinations can also be created in “Tools” ‐> “Options” ‐> “Appearance”, as detailed on page 38. Invertcolours
I
When in advanced greyscale and binary modes, pressing “I” allows you to quickly invert your chosen two colour combination which may be necessary for certain coloured texts and backgrounds. RotateVirtualX/Y R/Shift+R
To rotate Virtual X/Y mode in 90 degree increments simply press “R”. This is ideal if you want to look at something quickly, as you can position it under the LexCam, then simply enhance it and move it around with your pointing device. Formattingonly,ExactandFlowing
It is best to experiment with these settings depending on your captured document type to see which one results in the best exported document format for your requirements. QuickExport
Ctrl+Q
To quickly export a document to a previously selected location and format, (chosen in Quick Export Options), use Quick Export, (shortcut key “Ctrl” and “Q” together). This is ideal if you regularly need to convert documents to a particular format. QuickExportOptions
This enables you to choose your settings for the Quick Export feature. The options dialog is accessed from the File menu. The options include: Adjustcoloursaturationandgreyscale/binarybrightness
Numberstrip8and9,Numpad–/+and0
When in colour mode you can decrease and increase the saturation of the image using the number strip “8” and “9”. Numpad “minus“and “plus” can also be used. To reset the levels to default, press number strip “0”. In advanced greyscale and binary mode, you can decrease and increase the brightness of the image, using the same controls. This can help to sharpen the edges and colours of the text you are viewing. Page 10 Page 31 Lex Lex
VisionAid International
VisionAid International
Openingdocuments
ReadingGuides When you open a document, the position you were last at is restored. When viewing documents in real‐time, horizontal lines and blinds, (reading guides) can be turned on and adjusted, to aid reading text across your documents. Letter “G” on the keyboard cycles between horizontal lines, vertical lines, horizontal blinds, vertical blinds and off. You can open documents in two ways, through standard Windows Explorer by double‐clicking on the document or using the Open option within the Lex software. Open To open an existing document, go to “File” ‐> “Open” on the menu, (shortcut key “Ctrl” and “O” together). This displays a standard Windows dialog box that lets you select your document to open. G
Guide2position
G+left/right
Holding down “G” and the left or right arrow alters the position of the second line or guide. Recentdocuments
IMPORTANT: Reading guides only work in Virtual X/Y mode. A list of your last 10 documents can be found in the “File” ‐> “Recent documents” menu.
Guide1position
G+up/down
Holding down “G” and the up or down arrow alters the position of the first line or guide. Ctrl+O
Importingdocuments
IMPORTANT: To import files other than PDFs or images, you must have Microsoft Office 2003 or later installed on your machine. Lex allows you to import documents of the following types: Excel (xls and xlsx), OpenDocument Spreadsheets, Powerpoint presentations (ppt) OpenDocument presentations, text (txt), Rich Text Format (RTF), Word documents (doc and docx), OpenDocument text, Portable Document Format (PDF) and images (JPEG, BMP, TIFF, PNG). ImportingfromwithinLex
Ctrl+I
If you are in Lex, you can import a document by going to File ‐> Import on the menu, (shortcut key “Ctrl” and “I” together). This brings up either a standard Windows file dialog box, or Lex’s custom one depending on your settings, that you can select your document from. Simply locate it and Open it and Lex will import your document with the current recognition settings. Once import is complete, you will be able to treat the document in exactly the same way as one that you have captured. ImportingdirectlyfromWindowsExplorer
Lex features direct shell integration. This means that you can right click on a file in Windows Explorer or use the keyboard Menu button to access “Open with” and then simply choose “Lex” to import. TIP: Lex can effectively read any document on your PC. If it is not in a supported format, simply print your document to a PDF before importing it. If you do not have a PDF printer installed, we suggest CutePDF Writer (Freeware) from http://www.cutepdf.com Page 30 Page 11 Lex Lex
VisionAid International
VisionAid International
CapturingDocuments
LexCam’s main feature is its ability to photograph documents, recognise the words on them, and automatically reformat those words to your preferred visualisation, text colour and size, together with the ability to read them out loud at the push of a key. Capturingasingledocument(Appending) Enter
With your document positioned under your camera simply press “Enter” to take a picture. This will initialise Lex’s motion detection which means after two seconds of no movement being detected, a picture will be taken. If motion is detected, an audible beep will be emitted. This is ideal if you need to hold the pages of a book down before capturing. If you wish to override the motion detection and timer, (for reduced capture time or if some particular motion is preventing the picture being taken), press Enter again. If you have not created a document to capture to or have no document open, using Enter will automatically create a new document for you. Using “Enter” for subsequent captures will simply add pages to the end of your current document (append). As soon as the capture is complete, you will be taken to Document mode, where you can view your captured document in many enhanced visualisations and also have it read out loud. Please see Document Mode on page 14 for more information. CaptureNew(Quickcapturetoanewdocument)
Ctrl+Shift+N
To perform a single page capture to a brand new document, press “Ctrl” and “Shift” and “N” together.
MultipleCapture(append)
AppendFile
Providing you have an open Lex document, you also have the ability to append a file to it. This will import the file and join it onto your current document, using the currently selected capture options. Alt,R
There are different settings to control the way your document is recognised. These are found under the Recognition menu (Alt, R). Shift+O
OCR
This enables and disables text recognition. This should only be disabled if you are capturing a document with no printed text, such as a photograph or hand written document. The shortcut key is “Shift” and “O” together. PageStraightening Default: Enabled Splitpages
This tells Lex to attempt to split the selected page into a left and a right page. This can be useful if a document has been captured that should have had the “Split Book Pages” option selected in Document ‐> Split Book Pages. Recognize
This tells the Lex software to recognise the selected pages. This is useful if you wish to re‐recognise a page to try and get different results or if recognition was disabled on a page when captured that should not have been. Saveimage
Allows you to save an image of a particular page. Formats include JPEG, TIFF, PNG and BMP. SelectallandClearselection
Selects and de‐selects all the pages in your document.
Shift+Enter
Lex then waits to detect enough motion to signify a page turn, (denoted by a page turning noise), then waits for your document to be still for two seconds before taking the next picture. This repeats until you stop Auto‐Capturing by pressing “Escape” or “Shift” and “Enter” again or toggle to Document Mode using “Tab”. RecognitionEnabled Default: Enabled Simply select the rotation you require and click “OK”. The page will then be rotated. If text needs to be re‐
recognised, simply select “Recognize”. Delete
Deleted the selected page from your document. Multiple pages can be selected and deleted at once. To capture more than one page at once, press “Shift” and “Enter” together. After your first page has been captured (denoted by the camera sound), you will be asked to turn the page. CaptureOptions
Savingdocuments
The default location for your saved documents is “My Documents / Lex”. Save Ctrl+S
To save your currently open document, go to File ‐> Save on the menu, (shortcut key “Ctrl” and “S” together). This displays a standard Windows dialog box that lets you type your document name and select where you want to save it. SaveAs
Ctrl+Shift+S
To save a copy of your document, go to File ‐> Save As on them menu, (shortcut key “Ctrl” and “Shift” and “S” together”. This either displays a standard Windows dialog box or Lex’s custom one, depending on your settings, that lets you type your document name and select where you wish to save it. Shift+P
Page 12 Documents are saved as a single file in the VisionAid Document format (VAD). This enables and disables Lex’s automatic straightening. It is highly recommended that this should be left on for most documents to achieve the best recognition results. The shortcut key is “Shift” and “P” together. Page 29 Lex Editingyourdocuments(Pagesdialog)
Lex
VisionAid International
Ctrl+E
SplitBookPages
Default: Disabled Lex allows you to edit the pages of your documents. In the document you wish to edit, simply press “Ctrl” and “E” together or go to Edit ‐> Pages. VisionAid International
Shift+B
12
When enabled, Lex attempts to intelligently identify page splits. This should be disabled for single page captures (such as letters or single pages of magazines) but should be left on for double spread captures of books or magazines. The shortcut key is “Shift” and “B” together. CropToText
Default: Disabled When enabled, Lex attempts to remove any excess background from the image of your document. This can be useful if you wish to then export he document as a Word or PDF file, as it can help improve the export results. Please note, crop to text will only function if the background colour is very white in colour. SingleColumnRecognition Default: Disabled Shift+S
Enabling this forces Lex to read across columns of text, treating the whole page as just one column where possible. This is ideal for reading bank statements or other multi‐column documents where text needs to be read across columns. The shortcut key is “Shift” and “S” together. The Edit pages window displays a colour thumbnail image of each page. These can be selected using the standard Windows modifier keys, (arrow keys plus “Ctrl” and “Shift”) and mouse controls. PageInformation Shift+I
This provides information on the currently selected page. This includes things such as the original page orientation, heading, number of words and which settings were used when recognition was carried out on the particular page. MovePagesupandDown
With at least one page selected, choose either “Move Up” or “Move Down” to re‐order your selected pages within your document. Collateodd/even
This is extremely useful when capturing a book or magazine in A4 (or Letter) capture size. It enables you to capture all of the pages on one side of the spine first, then all of the pages on the other. Once this has been done, select all the pages of your document and press “Collate odd/even”. This joins the pages together in the correct order. This saves you having to physically rotate the document 180 degrees and re‐position it after every capture. Rotate
If you need to alter the rotation of a page, you can simply select the pages you wish to rotate in Edit Pages and click the “Rotate” button. After accepting a message informing you that any recognition results will be deleted on rotate, you will be presented with a drop down list with three 90 degree rotation options: Page 28 Page 13 Lex Lex
VisionAid International
DocumentMode
TAB
Bookmarks
Document mode allows you to read your captured documents and re‐format them to your preferred visualisation. VisionAid International
Ctrl+B
Lex features the ability to add sentence level bookmarks into your document. In your document, press “Ctrl” and “B” together or go to Edit ‐> Bookmarks to bring up the bookmarks window: Once you’ve captured a document, using “Enter”, you will automatically be taken to Document mode. If you wish to change to Document Mode directly from Camera mode, simply press “TAB”. Visualisations
1‐6andV/Shift+V
Lex offers 6 different enhanced ways to see your documents that make them much faster and easier to read. These can be cycled through using the letter “V”, or selected directly using 1 to 6 on your keyboard. 1. Image 1
Add
Adds a bookmark at the beginning of the current sentence. Delete
Deletes the currently selected bookmark. Go
Navigates directly to the selected bookmark. This displays the unenhanced original image of your document. It is perfect for looking at handwritten documents or photographs. Page 14 Page 27 Lex Dictionary Lex
VisionAid International
Ctrl+D
2. Overlay
VisionAid International
2
This allows you to look up words in Lex’s integrated dictionary which doesn’t require online access. This currently supports UK and US English only. To launch the dictionary, press “Ctrl” and “D” together. Alternatively, right click on the word you wish to define and choose “Define” in the context sensitive menu or use the menu button on your keyboard to display the context sensitive menu before selecting “Define”. Dictionary can also be accessed from Tools ‐> Dictionary. This visualisation preserves the formatting, layout and pictures of your document but replaces the recognised words with fonts of your chosen two colour combination. This makes it ideal for looking at documents with pictures, tables and diagrams. 3. Column
3
You can choose to display all found word types or limit the results to nouns, verbs, adjectives or adverbs. This view repaginates the text across your screen. No matter what size you magnify your document, the text will automatically flow from one line to the next. Text can be scrolled vertically and screen‐by‐screen (see page 20). Page 26 Page 15 Lex 4. Horizontal
Lex
VisionAid International
VisionAid International
Add
Adds a new speech replacement. This brings up the following dialog box with self‐explanatory controls for the adding of your replacement: 4
Edit
Allows to you edit an existing speech replacement. This visualisation repositions all of the text in the document onto a single line. The text can be scrolled left to right and screen‐by‐screen (see page 20). 5. Vertical
5
Delete
Deletes the currently selected speech replacement. Import
Allows you to import a previously saved list of speech replacements. Export
Allows you to export your speech replacements to a file which can be used as a backup or imported onto a different machine that has the Lex software installed. Ideal for some users with Retinitis Pigmentosa, the Vertical visualisation displays one word per line. Text can be scrolled vertically and screen‐by‐screen (see page 20). Page 16 Page 25 Lex Lex
VisionAid International
Speech
Stopannouncements
6. Word VisionAid International
6
LeftCtrl
If Lex is speaking a menu option or dialog to you, simply press the Left Ctrl key to stop it. Speakpunctuation Default: Disabled U
To enable or disable speak punctuation, press “U”. This is useful for users needing punctuation of a document to be read aloud. This is currently only available in British and US English but more languages will support this feature soon. PauseAtLineBreaks
Default: Disabled Forces speech to pause at the end of every line as detected by Lex. This can be useful when reading bank statements or lists. CycleReadingVoice E
To cycle through all available voices for your current reading language, press the letter “E”. Speed:
Slower/Faster:
Shift+‐/=
and Shift+Numpad‐/+
To decrease the reading and interface voice speed, press the “Shift” and “Minus” or “Shift” and “Numpad minus” keys together. To increase it, press the “Shift” and “Plus” or “Shift” and “Numpad plus” keys together. Volume:
Decrease/Increase: Ctrl+Shift+‐/=andCtrl+Shift+Numpad‐/+
To decrease the volume, press “Ctrl” and “Shift” and “Minus” or “Ctrl” and “Shift” and “Numpad minus” together. To increase it, press “Ctrl” and “Shift” and “Equals” or “Ctrl” and “Shift” and “Numpad plus” together. Displays one word on screen at a time. Users can advance the text using screen‐by‐screen (see page 20). ScrollBars
Lex features standard horizontal and vertical scroll bars. These can be clicked and dragged to move the view port area around.
SpeechReplacements
Ctrl+R
To enter Speech Replacements, press “Ctrl” and “R” together. These can be useful if Lex is not pronouncing a particular word or place name correctly, as you can manually change the letters used to pronounce a particular word. In many cases this will allow you to improve the pronunciation. Page 24 Page 17 Lex Lex
VisionAid International
Mouse / Pointing Device Controls VisionAid International
Annotations
DirectPan
Leftclickdrag
In any of the visualisations, left click dragging will directly pan your document around on screen. Start/stopreading Doubleleftclickonaword/singleleftclick
Double left clicking on a word will begin reading from that word. The selection point is at the very tip of the cursor. To stop reading, single left click anywhere Contextsensitivemenu
Rightclickonword
Right clicking on a particular word brings up a context sensitive menu allowing users to copy particular parts of the text, lookup the word in a dictionary, (supported languages only), add a bookmark or make an annotation. Continuouspanning/scrolling
Middleclickdrag
Middle click and dragging will start the document continually scrolling in the direction you drag. This works for all visualisations except Word. Left clicking when the document is scrolling will halt it. Scrollup&down/left&right
MouseWheel/Shift+MouseWheel
To scroll in all Visualisations except Word, use your mouse wheel and to scroll left and right, use “Shift” and mouse wheel. This allows you to make notes within your documents on a particular sentence. These can be ideal for revision purposes or simply if you need to note something important down that relates to the sentence you’re reading. AnnotationWindow Ctrl+J To shows / hide the annotation window, either press “Ctrl” and “J”, access it from the menu, Edit ‐> Annotations ‐> Annotation Window, or use the menu button on your keyboard and choose “Annotate”. When shown, the annotation window appears below the document window. This is made up of the annotation toolbar with a text box area immediately below it. ResizingtheAnnotationWindow
The annotation window can be resized using the mouse in a normal window resizing manner. Press “Alt” to release the mouse, position the cursor just above the annotation toolbar and then left‐click drag the annotation toolbar until it is your desired size. AnnotationToolbar
There are 6 icons on the annotation toolbar. Their icons and functions are described below. Zoom Ctrl+MouseWheel
To zoom in and out, simply press Ctrl and move your mouse wheel. Nextandpreviousscreenoftext Mousebuttons4and5
th
th
If your mouse features 4 and 5 buttons, these can be used to control forward and backwards a screen of text within Document Mode. 1
4
5
6
1
2
3
4
5
6
2 3
Addannotation:Adds an annotation at your current location. Deleteannotation: Deletes your current annotation. Speakannotation: Reads your current annotation out loud. Decreasetextsize: Reduces your annotation text size. Increasetextsize: Increase your annotation text size. Hide: Hides the annotation window. AllAnnotations
Ctrl+Shift+J
To view all of your annotations either in the current page or entire document, press “Ctrl” and “Shift” and “J” together. Alternatively access it from the menu via Edit ‐> Annotations ‐> All Annotations. Add/EditAnnotation
Ctrl+Ins
To add an annotation at your current location, press the “Ctrl” and “Ins” buttons together. If the annotation window is not shown, this will automatically display it. Alternatively, access it from the menu via Edit ‐> Annotations ‐> Add / Edit Annotation. You can then immediately start typing or editing your annotation in the annotation window with standard text box controls. DeleteAnnotation Ctrl+Del
To delete your current annotation, press the “Ctrl” and “Del” keys together. Alternatively access it from the menu via Edit ‐> Annotations ‐> Delete Annotation. SpeakAnnotation Shift+Space
To have your current annotation read out in full from the beginning press “Shift” and “Space” together. Alternatively access it from the menu via Edit ‐> Annotations ‐> Speak Annotation. Page 18 Page 23 Lex Lex
VisionAid International
CopytoClipboard
Imagecontrols
Lex features several ways to copy text information to the clipboard ready to be pasted into other applications. Zoomout/in:
Mouse users can right click on a word and choose “Copy” before selecting their desired copy size. Keyboard users can navigate to Edit ‐> Copy in the menu or press the menu key on the keyboard from Document Mode. CopySentence
Copies the current sentence to the clipboard. VisionAid International
Keyboard:Ctrl+‐/=orCtrl+Numpad‐/+
Mouse:Ctrl+Mousewheel
Press and hold the “Ctrl” key with “dash” or “equals” key on the keyboard to zoom out and in or use “Ctrl” with Numpad “plus” and “dash”. Alternatively use the “Ctrl” key together with your mouse wheel, if you have one. Overview
O
Overview is ideal for quickly selecting a different area of the page to view or start reading. CopyParagraph
Copies the current paragraph to the clipboard. Pressing “O” turns on Overview mode. This enables the whole document to be viewed on screen. A highlighted rectangle can be moved around the document using the mouse. This denotes the area to be zoomed back into when Overview mode is left. CopyPage
Ctrl+C
Copies the current page to the clipboard. The shortcut key for this is “Ctrl” and “C” together. Pressing “O” again or left clicking the mouse returns to the last used visualisation before Overview was enabled. The closest full word to the top left corner of the Overview rectangle is the word that is selected on exit. CopyDocument
Copies the entire document to the clipboard. Cyclefullcolour,greyscaleandbinarycolourmodes
C
Pressing “C” cycles full colour, advanced greyscale and binary modes. Full colour is ideal for looking at photographs. Advanced Greyscale is the standard two‐colour way of viewing documents. Binary is an enhanced two colour algorithm that even distinguishes multiple colour texts and backgrounds in your chosen two colour combination. Cycletwocolourcombinationsforwards/backwards L/Shift+L
Pressing “L” cycles through 5 common two colour‐combinations and their inverse: Black / White, Black / Yellow, Blue / Yellow, Black / Green, Black / Cyan. Pressing “Shift” and “L” together cycles backwards. TIP: An additional custom colour combination can be set in Tools ‐> Options ‐> Appearance: Custom colour combination. A total of 64 different combinations are available. SaturationandContrastadjustmentNumberstrip8/9orNumpad‐/+,0reset
When in Image View, with Colour Mode enabled, you can decrease and increase the saturation of the image using 8 and 9 on the number strip or “minus” and “plus” on the Numpad. 0 on the number strip resets the level to default. When in Enhanced Greyscale mode, the two colour threshold level can be adjusted using the same controls. Invertcolours
I
When in advanced greyscale and binary modes, pressing “I” allows you to quickly invert your chosen two colour combination which may be necessary for certain coloured texts and backgrounds. Page 22 Page 19 Lex Lex
VisionAid International
Navigationcontrols(Alt,N)
Start/stopreading SpacebarandCtrl+Alt+Spacebar
To start and stop the speech read back of your document, press the “Space Bar”. VisionAid International
Deletecurrentpage Del
To delete the current page, simply press the “Del” key. For background reading (when another application has focus), using “Ctrl” and “Alt” and “Space bar” together allows you to start and stop reading of your document without having to change back to Lex first. Find Ctrl+F The Lex software enables you to search for and find particular words within your documents. In your document, simply press “Ctrl” and “F” together or go to Navigation ‐> Find to bring up the find window: LetterNavigation
Left/Rightarrow
To navigate one letter backwards and forwards, use the left and right arrow. Options include searching the current page or entire document, the recognised text of the document or any document annotations, matching the case or searching backwards (up) through your document. PhoneticAlphabetNavigation
Shift+Left/Rightarrow
To navigate backwards and forwards one phonetically pronounced letter at a time, use the “Shift” key, together with the left and right arrow. WordNavigation
Ctrl+Left/Rightarrow
To navigate backwards and forwards a word at a time, press and hold the “Ctrl” and the left or right arrow. SentenceNavigation Up/Downarrow
Use the up and down arrows to navigate backwards and forwards a sentence. ParagraphNavigation
Ctrl+Up/Downarrow
To navigate backwards and forwards a paragraph, press and hold the “Ctrl” and the up or down arrow. PageNavigation
Pageup/Pagedown
Use the “Page Up” and “Page Down” keys on your keyboard to navigate between the pages of your document. FindAgain F3
If there is more than one occurrence of the word you are looking for, simply press the “F3” key or go to Navigation ‐> Find again to take you to its next occurrence in your document. Beginning/Endofdocumentnavigation Ctrl+Home/End
To instantly jump to the beginning or end of your document, press and hold the “Ctrl” and “Home” or “End” keys. Gotopage
Ctrl+G
To instantly navigate to a particular page number, simply press “Ctrl” and “G” together or go to Navigation ‐> Go to. Cycleopendocuments
Ctrl+Tab
To cycle through your currently open documents, press and hold the “Ctrl” key and press “Tab”. Screen‐by‐screennavigation
,/.andAlt+,/.
One of Lex’s best reading functions is screen‐by‐screen navigation. This greatly reduces eye strain and speeds up reading. Use “Comma” and “Full stop” to go backwards and forwards a screen of text at a time. For background reading (i.e. when another application has focus e.g. MS Word), use “Alt” and “Comma” and “Alt” and “Full stop” together. Documentinformation
Ctrl+Shift+I This provides information on the current document. This includes file name, title, number of pages and words, when it was created, last modified and its size. Type the page number you wish to navigate to and press “Enter” or click “OK”. Pageinformation
Shift+I
This provides information on the currently selected page. This includes the original page orientation, heading, number of paragraphs and words and which settings were used when recognition was carried out on the particular page. Positioninformation
Ctrl+I
This provides information on your current sentence position relative to the entire document. Page 20 Page 21