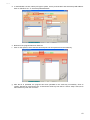
1
Form No: MM1501A-0110 Products that perform...By people who care OPERATOR'S GUIDE VISION 2020i CONTROLLER FOR ROTARY SCREW COMPRESSOR PACKAGES Rev.03 REVISION LIST NO 1 2 3 Date 15 Dec 2007 11 June 2008 24 April 2009 Revision By Won MF Won MF Won MF Revision Changes Preliminary copy Preliminary copy – distribute for internal use only Released version 2 Rev.03 TABLE OF CONTENTS DESCRIPTION PAGE NO 1.0 INTRODUCTION 1.1 General Description …..………………6 2.0 VISION 2020i 2.1 2.2 2.3 2.4 2.5 2.6 Precautions ..…………………………….6 Vision2020i Controller Board ..……….7 2.2.1 Instrument Elements ...………….7 2.2.2 Meaning Of The Terminals ...…..8 General Characteristics ...…………....10 2.3.1 Power Supply …………………..10 2.3.2 Add-on Card Options – Field Bus Devices & BMS Communication ..………………10 2.3.2.1 Field Bus Options ...…10 2.3.2.2 BMS Communication Options ...………...…..10 2.3.2.3 Connectors ..………...11 Technical Specifications 2.4.1 Mechanical Characteristic ..…..11 2.4.2 Plastic Case ...………………….11 2.4.3 Electrical Specifications ……...11 2.4.4 Digital Inputs ...…………………11 2.4.5 Analogue Inputs ...……………..12 2.4.6 Analogue Outputs ..……………12 2.4.7 Digital Outputs ...……………….12 2.4.8 Relation Between AWG and Wire Cross-Section ...………………..13 2.4.9 DBLAN Network/User Terminal Connection ...…………………...13 2.4.10 Other Specifications ………..…14 2.4.11 Preliminary Notes For the Installer: Comparison Between DB3 and DB2 ..……………………………14 Vision2020i Display and User Terminal ..……………………………….15 2.5.1 DBG1 Semi-Graphical Display ..………………………..15 2.5.2 DBG2/3 Graphical Display ..………………………..17 Smart Key For Vision2020i Controllers ...……………………………18 2.6.1 Technical Specifications ..…….19 3.0 USER INTERFACE 3.1 DBG1 Panel - Operator Keypad ...…..20 3.1.1 The Fifteen Polycarbonate Buttons ..………………………..20 3.1.2 Status Reading ...………………20 3.1.2.1 Input Status Key ..…..20 3.1.2.2 Output Status Key .....21 3.1.2.3 Compressor Status Key ..………………….21 3.1.2.4 Setpoint Key …………21 3.1.2.5 Clock Key ...………….22 3.1.2.6 Alarm History Key .....22 3.1.3 Authorization …..………………22 3.1.3.1 Authorization Key ..…22 DESCRIPTION PAGE NO 3.1.4 Advanced User Key and MENU …......……………………22 3.1.4.1 User Key……………...22 3.1.5 Technician Key and MENU ..…………………………23 3.1.5.1 Technician Status Key…………………….23 3.1.5.2 Technician Status Key – Main Menu……………23 3.1.5.3 Compressor FLA Calibration……………23 3.1.5.4 To Perform Sensor Calibration……………23 3.1.5.5 Manual Control………24 3.1.5.6 Compressor Control...24 3.1.5.7 Sensors Override……25 3.2 DBG3 Panel - Operator Keypad……..26 3.2.1 Touch Screen Terminal Display…………………………..26 3.2.2 The Fourteen Touch Keys…….26 3.2.3 The Seven Physical Keys…..…26 3.2.4 Status Reading…………………27 3.2.4.1 Input Status Key……..27 3.2.4.2 Output Status Key…...27 3.2.4.3 Compressor Status Key…………………….27 3.2.4.4 Setpoint Key…………28 3.2.4.5 Clock Key…………….28 3.2.4.6 Alarm History Key…...29 3.2.5 Authorization……………………29 3.2.5.1 Authorization Key……29 3.2.6 Advanced User Key and MENU …..………………………29 3.2.6.1 User Key……………...29 3.2.7 Technician Key and MENU……………………………30 3.2.7.1 Technician Status Key…………………….30 3.2.7.2 Technician Status Key – Main Menu……………30 3.2.7.3 Compressor FLA Calibration……………30 3.2.7.4 To Perform Sensor Calibration……………30 3.2.7.5 Manual Control………30 3.2.7.6 Compressor Control...31 3.2.7.7 Sensors Override……32 3.3 Addressing the Vision2020i Controller and Terminal……………………………32 3.3.1 Vision2020i Controller With DBG1 Display…………………………..32 3.3.2 Vision2020i Controller With DBG2/DBG3 Display…………..33 3.3.2.1 Description Of The Menu………………….34 3 Rev.03 DESCRIPTION 4 PAGE NO DESCRIPTION 4.2.4 4.2.5 4.2.6 CONTROL & OPERATIONS 4.1 4.2 Control Functions……………………...37 4.1.1 Chilled Water Pump Interlock And Flow Switch……………………..37 4.1.2 Customer Control Interlock /Unit Enable…………………………...37 4.1.3 Compressor Start Delay Timer…………………………….37 4.1.4 Compressor Stage Delay Timer…………………………….37 4.1.5 Compressor Off-Cycle Delay Timer…………………………….37 4.1.6 Compressor Anti-Recycle Timer…………………………….38 4.1.7 Load Control…………………….38 4.1.8 Ramp Control…………………...38 4.1.9 Capacity Control Of Screw Compressors……………………38 4.1.9.1 Automatic Control……38 4.1.9.2 Calibration of Screw Compressor Capacity Amps At Full Load & Minimum Load Percentage…………...39 4.1.9.3 Manual Control………39 4.1.10 Staging Of Compressors………39 4.1.11 Compressor Current Limiting…40 4.1.12 Modmotor Setback Control……40 4.1.13 Suction/Discharge Pressure Differential Control (SDD Control)………………………….40 4.1.14 Automatic Or Manual Lead/Lag………………………..40 4.1.15 Liquid Injection Solenoid Control…………………………..40 4.1.16 Second Liquid Injection Solenoid Control (Optional)………………40 4.1.17 Condenser Fan Control (AirCooled Only)……………………41 4.1.18 Pumpdown Control (DX Only)……………………………..42 4.1.19 Liquid Line Solenoid Control (DX Only) …………………………….42 4.1.20 Chilled Water Reset (Optional)………………………..42 4.1.21 Demand Limit Input (Optional)………………………..42 4.1.22 Hot Gas Bypass Control (Optional)………………………..42 4.1.23 Hot Gas Injection Control (R134a Units)…………………………….42 4.1.24 Electronic Expansion Valve (EEV) Control (Optional)………………43 4.1.25 Vapor Injection Solenoid Control (Optional)………………………..43 4.1.26 Anti-Freeze Control (Circulating Pump and Heater Control) (Optional)………………………..43 Safety and Alarms……………………..43 4.2.1 Low Pressure Limiting…………43 4.2.2 High Pressure Limiting………...43 4.2.3 Amps Limiting………………..…43 PAGE NO 4.3 5 DBLAN & MASTER-SLAVE CONTROL 5.1 5.2 6 DBLAN Network………………………..46 5.1.1 General Descriptions…………..46 5.1.2 DBLAN Electrical Connections…………………….46 Master-Slave Control………………….47 5.2.1 General Descriptions…………..47 5.2.2 Principle of Operation via DBLAN Communication Bus……………47 5.2.3 Sequence of Operation………..48 WINLOAD 32 & DATALOGGING 6.1 6.2 7 Low Pressure Safety…………..44 High Pressure Safety…………..44 Low Differential Pressure Alarm…………………………….44 4.2.7 Evaporator Freeze Safety……..44 4.2.8 Low Oil Safety…………………..44 4.2.9 Sensor Failure Alarm…………..44 4.2.10 No-Stop Alarm………………….44 4.2.11 External Shutdown Indication (No Run Alarm) ……………………..44 4.2.12 Compressor Starter Alarm…….44 4.2.13 Low Chilled Water Flow Alarm…………………………….44 4.2.14 Power Loss Reset……………...45 External Control Function and Safety Protections………………………………45 4.3.1 High Oil Temperature Thermostat……………………...45 4.3.2 Overload Protector……………..45 4.3.3 Phase Control Relay (PCR)…..45 WINLOAD 32…………………………….49 6.1.1 Introduction……………………..49 6.1.2 Connection Of Converters To Vision2020i Controller…………49 6.1.3 Uploading Program/Datalog File To Controller……………………49 DataLogging…………………………….52 6.2.1 Reading From Terminal Display Using Keypad…………………..52 6.2.2 Reading From WINLOAD Using A Local Connection……………….53 6.2.3 Reading From WINLOAD Using A Remote Connection……………55 SMART KEY 7.1 7.2 7.3 7.4 7.5 Smart Key For Vision2020i Controllers………………………………57 Smart Key Programming By Personal Computer………………………………..57 Use When Connected To The Vision2020i………………………………57 Meanings Of The Buttons/Symbols……………………….57 7.4.1 Error Before Pressing “START”…………………………58 7.4.2 Error After Pressing “START”…………………………58 pCO Manager……………………………59 4 Rev.03 DESCRIPTION 8 TROUBLE-SHOOTING GUIDE 8.1 8.2 9 PAGE NO General Servicing Procedures………61 Trouble-shooting guide……………….61 APPENDIXES 9.1 9.2 Alarm List ..……………………………..63 Signals For Pressure Transducer (0200psi, 0.5-4.5Vdc) ..……………….….65 9.3 Signals For Pressure Transducer (0500psi, 0.5-4.5Vdc) ..…………….…….66 9.4 Signals For Pressure Transducer (0200psi, 4-20ma) ..………………………67 9.5 Signals For Pressure Transducer (0500psi, 4-20ma ..……………………….68 9.6 Signals For Current Transducer (0250a, 0-20ma) ..………………………...69 9.7 Signals For Current Transducer (0500a, 0-20ma) ..………………………...70 9.8 Signals For Voltage Transducer (0500v, 0-20ma) ..………………………...71 9.9 Signals For NTC Temperature Sensor (Wp Type) ..……………………………..72 9.10 Signals For NTC Temperature Sensor (Hp Type) ..……………………………...73 9.11 Flow Chart – Master-Slave Control Sequence ...………………..……………74 5 Rev.03 1.0 INTRODUCTION 1.1 GENERAL DESCRIPTION Dunham-Bush compressorized product lines and Integrated Chiller Plantroom and Ice-Thermal storage system are now being controlled by an advance and flexible Vision2020i controller system. The Vision2020i system is composed of a main controller, semi-graphical display terminal and various sensors. Three sizes of main controller boards are provided to handle different number of input and output requirements: DB3-S small board, DB3-M medium board and DB3-L large board. Up to five additional DB1 expansion boards can be added for larger packages contain more Input and Output requirements. The display terminal is connected with controller through telephone cable. All the versions of these controls feature a 16-bit microprocessor and up to 4 MByte of Flash memory, guaranteeing high performance in terms of speed and available memory. The unit algorithm program for the Vision2020i and the unit operating parameters are stored in FLASH-MEMORY that does not require a back-up battery. The program can be loaded through PC or programming key. There are two types of inputs that the controller uses to determine control functions. The first is the digital input. A digital input indicates that a contact is open or closed. Such contacts may be is Flow Switch or Unit Control. The other type of input is called an analog input. This type of input is used to measure temperature, pressure, current, voltage, or anything that has a value analog in nature. The Vision2020i takes this analog value and converts it to a digital value through its built-in analog to digital converter so that the computer can process this information. The Vision2020i uses mechanical relays to make or break a circuit that controls devices such as compressor contactors/starters, fan contactors, solenoids and etc. Vision2020i also allows connection to the DBLAN (DB Local Area Network). Up to six individual Vision2020i controllers can be configured and connected through twisted pair wires to form as a DBLAN that allows multiple units sequencing control without additional hardware. With various optional add-on cards, Vision2020i controller can be interfaced directly and easily to the BMS, or the Dunham-Bush remote monitoring software. BMS protocols supported by Vision2020i are ModBus RTU, LonWorks FTT10, BACnet MSTP Over IP. With an optional RS485 communication card, the Vision2020i can be interfaced to Dunham-Bush ModBus Poll software for simple remote monitoring and controlled from a local PC terminal through RS485 to USB converter. With optional RS232 or RS485 communication cards, the Vision2020i can be interfaced to Dunham-Bush NetVisor software for full graphical remote monitoring and controlled from a PC terminal and optional phone modem or internet connection through local PC server. 6 Rev.03 2.0 VISION 2020i 2.1 PRECAUTIONS The following precautions must be taken while working with the Vision2020i system. 1) Cover the controller components completely when drilling sheet metal near the Vision2020i and Expansion boards. 2) Strip wires away from Vision2020i boards to prevent strands from falling on components. 3) Do not allow Vision2020i boards to get wet. 4) Disconnect power to the Vision2020i before changing the wiring connection or inserting the I/O terminal connector to the controller. 5) Route communication cables and sensor wires away from control and power wires. 6) Handle boards with care. 2.2 VISION2020I CONTROLLER BOARD The Vision2020i boards are available in three different versions, differentiated according to the number of inputs and outputs: • • • DB3-S Vision2020i Small board part number 4030003381 DB3-M Vision2020i Medium board part number 4030003382 DB3-L Vision2020i Large board part number 4030003383 • • • DB-EXP Vision2020i Expansion board part number 4030003396 DB1-S Vision 2020i Small board part number 4030003378 DB1-M Vision 2020i Medium board part number 4030003377 Figure 2.2.1 outlines the Vision2020i large board with set of terminals required for various I/O connections. The plastic case of this controller is to be mounted on DIN rail in the control panel. 2.2.1 Instrument Elements 1. 2. 3. 4. 5. 6. 7. 8. 9. 10. 11. 12. 13. 14. 15. 16. Power supply connector [G(+), G0 (-)] Yellow power LED and 3 LEDs for the DBLan networks Additional power supply (max. 200mA) for the terminal and 0-5V ratiometric probes Universal analog inputs, NTC, 0-1V, 05V ratiometric, 0-10V, 0/4-20mA Passive analog inputs, NTC, PT1000, ON/OFF Analog outputs, 0-10Vdc Digital inputs, 24Vac/Vdc Digital inputs, 230Vac, or 24Vac/Vdc Connector for terminal display (external panel with direct signal) Connector for all standard DB series terminals and for uploading the application software Digital outputs Connector for expansion board DBLan connector Cover for inserting the optional supervisor serial board Cover for inserting the optional field board Cover for inserting the optional service board Figure 2.2.1 : Outline of DB3-L Board 7 Rev.03 2.2.2 Meaning of the terminals The following table summaries the meaning of Vision2020i board input and output terminals and provides a brief description of each connection. Connector No J1-1 J1-2 Signal G Go Power Supply 24Vac Power Supply Reference J2-1 B1 J2-2 B2 J2-3 B3 J2-4 J2-5 GND +VDC Analog Input 1 –Universal Type Analog Input 2 –Universal Type Analog Input 3 –Universal Type Common for analog inputs 21Vdc power for active probes (maximum current 150mA) J3-1 B4 J3-2 J3-3 BC4 B5 J3-4 BC5 J4-1 VG J4-2 VGo J4-3 Y1 J4-4 Y2 J4-5 Y3 J4-6 Y4 J5-1 J5-2 J5-3 J5-4 J5-5 J5-6 J5-7 J5-8 J5-9 ID1 ID2 ID3 ID4 ID5 ID6 ID7 ID8 IDC1 J6-1 B6 J6-2 B7 J6-3 B8 J6-4 GND J7-1 J7-2 ID9 ID10 J7-3 ID11 J7-4 ID12 J7-5 IDC9 J8-1 ID13H Description Analog Input 4 –Passive Type Analog Input 4 –common Analog Input 5 –Passive Type Analog Input 5 –common Power supply 24Vac for Analog Outputs Power supply Reference for Analog Outputs Analog Output 1, 0 to 10Vdc Analog Output 2, 0 to 10Vdc Analog Output 3, 0 to 10Vdc Analog Output 4, 0 to 10Vdc Digital Input 1, 24Vac / Vdc Digital Input 2, 24Vac / Vdc Digital Input 3, 24Vac / Vdc Digital Input 4, 24Vac / Vdc Digital Input 5, 24Vac / Vdc Digital Input 6, 24Vac / Vdc Digital Input 7, 24Vac / Vdc Digital Input 8, 24Vac / Vdc Common for digital Inputs 1 to 8 Analog Input 6 –Universal Type Analog Input 7 –Universal Type Analog Input 8 –Universal Type Common for analog inputs Digital Input 9, 24Vac / Vdc Digital Input 10, 24Vac / Vdc Digital Input 11, 24Vac / Vdc Digital Input 12, 24Vac / Vdc Common for digital Inputs 9 to 12 Digital Input 13, 230Vac Connector No J8-2 Signal Description ID13 J8-3 IDC13 J8-4 ID14 J8-5 ID14H Digital Input 13, 24 Vac / Vdc Common for Digital Inputs 13 and 14 Digital Input 14, 24 Vac / Vdc Digital Input 14, 230Vac J9 8-way Telephone Connector for connection to a synoptic terminal J10 6-wayTelephone Connector for connection to standard user terminal J11-1 TX- J11-2 TX+ J11-3 GND J12-1 J12-2 C1 NO1 J12-3 NO2 J12-4 NO3 J12-5 C1 J13-1 J13-2 C4 NO4 J13-3 NO5 J13-4 NO6 J13-5 C4 J14-1 J14-2 C7 NO7 J14-3 C7 J15-1 NO8 J15-2 J15-3 C8 NC8 J16-1 J16-2 C9 NO9 J16-3 NO10 J16-4 NO11 J16-5 C9 RX- / TX- Connector for RS485 Connection to pLAN RX+/ TX+ Connector for RS485 Connection to pLAN GND Connector for RS485 Connection to pLAN network Common Relay: 1, 2, 3 Normally-Open Contact Relay 1 Normally-Open Contact Relay 2 Normally-Open Contact Relay 3 Common Relay: 1, 2, 3 Common Relay: 4, 5, 6 Normally-Open Contact Relay 4 Normally-Open Contact Relay 5 Normally-Open Contact Relay 6 Common Relay: 4, 5, 6 Common Relay 7 Normally-Open Contact Relay 7 Common Relay 7 Normally-Open Contact Relay 8 Common Relay 8 Normally-Closed Contact Relay 8 Common Relay: 9, 10, 11 Normally-Open Contact Relay 9 Normally-Open Contact Relay 10 Normally-Open Contact Relay 11 Common Relay: 9, 10, 11 Rev.03 Connector No J17-1 Signal J17-2 J17-3 C12 NC12 J18-1 NO13 J18-2 J18-3 C13 NC13 J19-1 J19-2 ID15H ID15 J19-3 IDC15 J19-4 ID16 J19-5 ID16H J20-1 J20-2 J20-3 J20-4 J20-5 J20-6 J20-7 Y5 Y6 B9 BC9 B10 BC10 ID17 J20-8 ID18 J20-9 IDC17 J21-1 NO14 J21-2 J21-3 C14 NC14 J21-4 NO15 J21-5 J21-6 C15 NC15 J22-1 J22-2 C16 NO16 J22-3 NO17 J22-4 NO18 J22-5 C16 J23-1 E- J23-2 E+ J23-3 GND NO12 Description Normally-Open Contact Relay 12 Common Relay 12 Normally-Closed Contact Relay 12 Normally-Open Contact Relay 13 Common Relay 13 Normally-Closed Contact Relay 13 Connector No J24-1 Signal J24-2 GND J24-3 +5Vref +Vterm Description Additional Power Supply (max. 200mA) for the terminal GND terminal for the supply 5Vdc power supply for ratiometric probe Digital Input 15, 230 Vac Digital Input 15, 24 Vac / Vdc Common Digital Inputs 15 and 16 Digital Input 16, 24 Vac / Vdc Digital Input 16, 230 Vac Analog Output 5, 0 to 10 V Analog Output 6, 0 to 10 V Passive Analog Input 9 Common Analog Input 9 Passive Analog Input 10 Common Analog Input 10 Digital Input 17, 24 Vac / Vdc Digital Input 18, 24 Vac / Vdc Common Digital Inputs 17 and 18 Normally-Open Contact Relay 14 Common Relay 14 Normally-Closed Contact Relay 14 Normally-Open Contact Relay 15 Common Relay 15 Normally-Closed Contact Relay 15 Common Relay 16 Normally-Open Contact Relay 16 Normally-Open Contact Relay 17 Normally-Open Contact Relay 18 Common Relay 16 E- Terminal for RS485 Connection to I / O Expansion E+ Terminal for RS485 Connection to I / O Expansion GND Terminal for RS485 Connection to I / O Expansion 9 Rev.03 2.3 GENERAL CHARACTERISTICS Vision2020i is a microprocessor-based electronic control system provides by Dunham Bush in compliance with the European RoHS directives, as dedicated control system for Dunham-Bush compressorized product lines, Integrated Chiller Plantroom and Ice-Thermal storage system. The Vision2020i system is composed of a main controller DB3, several types of expansion boards DB1, and various sensors. The DB3 main controller runs the control program, and is fitted with the set of terminals required for connection to the devices (compressors, fans…) The program and the parameters are saved to FLASH-MEMORY and E2prom, ensuring they are stored even in the event of power failures (without requiring a backup battery). The program can be loaded using a PC (28.8 kbps and 115.2 kbps) or the special programming key. DB3 also allows connection to the DBLAN (DB Local Area Network) and can be connected, as well as to other DB3 main controllers, to all the other controllers in the DB system and all the DBG family display terminals. All the controllers in the DBLAN can exchange information (variables, digital or analogue, depending on the application software used) at high transmission speed. Up to 6 units can be connected, including DB controllers and terminals, so as to share the information effectively. The connection to the supervisor/ tele-maintenance serial line, via the Modbus™ communication protocol over the RS485 standard, is performed by inserting an optional serial board in the DB3. Other optional cards can be used to connect to a supervisor via standards other than RS485. Finally, the serial field bus interface, using the optional board, ensures connection to the field devices controlled (for example: valves, DB-EXP I/O expansions, electronic valve drivers, DB Link, NetVisor...). DB3 controller is available with three different version; SMALL, MEDIUM, LARGE Note: the application software can be uploaded to the flash memory using the smart key (P/N: 4030004388), see section 2.6; or a PC using the USB-485 adapter (P/N: 4030001028) and the “WINLOAD32” program, see section 6.1, to be ordered from Dunham Bush. 2.3.1 Power supply A Class II safety transformer with a minimum rating of 50 VA must be used in the installation to supply just one DB3 controller. The power supply to the DB3 controller and terminal (or DB3 controllers and terminals) should be separated from the power supply to the other electrical devices (contactors and other electromechanical components) inside the electrical panel. If the secondary of the transformer is earthed, make sure that the earth wire is connected to terminal G0. This is true for all the devices connected to the DB3. If powering more than one DB3 board connected in the DBLAN network, make sure that the references G and G0 are observed (the reference G0 must be maintained for all the boards). If using the DBLAN network and for further explanations and information, please refer to the DunhamBush. 2.3.2 Add-On Card Options – Field Bus Devices & BMS Communication 2.3.2.1 Field Bus Options Optically Isolated RS485 4030003439 tLAN 4030003447 Modem 4030003440 2.3.2.2 BMS Communication Options RS485/Modbus 4030003436 Modem 4030003219 BACnet MSTP 4030003404 Ethernet board 4030003319 LonWorks FTT10 4030003438 10 Rev.03 2.3.2.3 Connectors Controller / Expansion Board Connectors Part Number DB3-Large Board V2020i-DB3-L-CON 4030004386 DB3-Medium Board V2020i-DB3-M-CON 4030004385 DB3-Small Board V2020i-DB3-S-CON 4030004384 DB-EXP Expansion Board V2020i-DB3-EXP-CON 4030004397 DB1-Small Board V2020i-DB1-S-CON 4030004229 DB1-Medium Board V2020i-DB1-M-CON 4030004230 2.4 TECHNICAL SPECIFICATIONS 2.4.1 Mechanical Characteristics Dimensions Installation 2.4.2 Plastic Case • • • • • • 2.4.3 DB3 MEDIUM and DB3 LARGE boards fitted on 18 DIN modules, 110x315x60mm DB1 and DB3 SMALL boards fitted on 13 DIN modules, 110x227.5x60mm DB-EXP board fitted on 4 DIN modules, 110x70x60mm DIN rail fitted on DIN rail according to DIN 43880 and CEI EN 50022 standards; material: technopolymer; flame retardancy: V0 (UL94) and 960°C (IEC 695); ball pressure test: 125°C; resistance to creeping current: ≥250 V; colour: grey RAL7035; Electrical Specifications Power Supply (controller with terminal connected) Terminal block CPU Memory (FLASH MEMORY) Data memory (static RAM) Parameter data memory Working cycle duration 2.4.4 28 to 36 Vdc +10/-20% and 24 Vac +10/-15% 50 to 60 HZ maximum power input P= 15 W (24 Vdc power supply), P= 40 VA (24 Vac) with plug-in male/female connectors, max voltage 250 Vac; 2 2 cable cross-section: min. 0.5 mm - max 2.5 mm H8S2320, 16bit, 24 MHz 2+2 MB; in the extended versions further memory of 32 MB or higher 512 kB at 16 bit (296 kB BIOS; 216 application software) 13 kB at 16 bit (max. limit: 400,000 writes per memory location) and a further 32 kB E2prom (not available to the DBLAN) (applications of average complexity) 0.2 s (typical) Digital Inputs Type Maximum number optically-isolated 8, 14, 18, respectively on the SMALL, MEDIUM and LARGE boards, according to the combinations shown below: Optoinsulated input no. to Optoinsulated input no. to 24 Vac/Vdc or 230 Vac Inputs 24 Vac 50/60 Hz or 24 (50/60 Hz) Vdc SMALL 8 none 8 MEDIUM 12 2 14 LARGE 14 4 18 Classification of the measuring circuits (CEI EN 61010-1) Category I (J5, J7, J20) 24 Vac/Vdc Category III (J8, J19) 230 Vac 11 Rev.03 WARNINGS: • • • 230 Vac 50/60 Hz (10/-15%); The two 230/24 Vac inputs present on J8 and J12 have the same common pole and consequently will be both 24 Vac/Vdc or both 230 Vac. Basic insulation between the two inputs. For DC inputs, connect the negative pole to the common terminal. Note: separate as much as possible the probe and digital input signal cables from the cables carrying the inductive loads and the power cables, to avoid possible electromagnetic disturbance. 2.4.5 Analogue Inputs Analogue Conversion 10 bit A/D converter in the CPU Universal: (inputs B1, B2, B3, B6, B7, B8) Dunham-Bush NTC-WP temperature sensor (50 To 90°C; R/T 10 k Ω at 25°C), NTC-HT 0 To 150°C, voltage: 0 to 1 Vdc, 0 to 5 V ratiometric or 0 to 10 Vdc, current: 0 to 20 mA or 4 to 20 mA, selectable via software. Input resistance in 0 to 20 mA= 100Ω Passive: (inputs B4, B5, B9, B10) Dunham-Bush NTC temperature sensor (see universal type), PT1000 (-100 To 200°C; R/T 1000Ω at 0°C) or voltage-free digital input (5 mA), selectable via software Type Maximum number Time onstant for each input 5, 8, 10, on the SMALL, MEDIUM and LARGE boards respectively 0.5 s Input precision ± 0.3 % of full scale Classification of the measuring circuits (CEI EN 61010-1) Category I WARNING: The 21 Vdc available at the +Vdc terminal (J2) can be used to power any active probes, the maximum current is 150 mA, thermally protected against short-circuits. To supply the ratiometric 0 to 5 V probes, use the +5VREF (Imax: 60 mA) present at terminal J24. 2.4.6 2.4.7 Analogue outputs Type 0 to 10 Vdc optically-isolated Maximum number 4, 4, 6, on the SMALL, MEDIUM and LARGE boards respectively Power supply external 24 Vac/Vdc Resolution 8 bit Maximum load 1 k Ω (10 mA) Precision ± 3 % of full scale Digital outputs Type relay Maximum number 8, 13, 18, 27, 29, on the SMALL, MEDIUM, LARGE boards respectively Note the presence of outputs with changeover contacts kept separately (that is, without the poles shared between different outputs). Groups from 2 to 5 outputs have 2 “common” poles for easy assembly. Make sure that the current running through the common terminals does not exceed the rated current of each individual terminal that is 8A. 12 Rev.03 Insulation distance Makeup of the groups The outputs can be divided by groups with basic insulation and double insulation. Note: the relays in the same group with basic insulation must have the same power supply (24 or 230 Vac). version relays with same insulation SMALL 1…7 8 - - MEDIUM 1…7 8 9…13 - LARGE 1…7 8 9…13 14…18 Note: the relays in the individual cells of the table have basic insulation between them, while between groups (cell-cell) there is double insulation. Changeover contacts Switchable power SSR outputs operating voltage 2.4.8 2.4.9 1, 3, 5, on the SMALL, MEDIUM and LARGE boards respectively Warning: the relay outputs have different characteristics according to the model of DB3 relay outputs from 1 to 13 type of relay: 2000 VA, 250 Vac, 8 A and from 14 to 18 LARGE resistive version certification: UL: 8 A resistive, 2 A FLA, 12 A LRA, 250 Vac, C300 (30000 cycles) EN 60730-1: 2 A resistive, 2 A inductive, cosφ= 0,4, 2(2) A (100000 cycles) 1: SMALL (output 7); 2: MEDIUM (outputs 7, 12); 3: LARGE (OUTPUTS 7, 12, 14) 24 Vac/Vdc; maximum power: 10 Relation between AWG and wire cross-section 2 AWG Cross-section (mm ) Current (mA) 20 15 14 0.5 1.5 2.5 2 6 8 DBLAN network/user terminal connection Type RS485 half-duplex asynchronous Transmission speed 62.5 Kbps or 115.2 Kbps, selectable via software Terminal connector 6 pin telephone (J10) DBLAN network/graphic terminal/aria terminal connector 3 pin plug-in connector (J11) The maximum distance between the DB and user terminal is shown in the following table. Cable Type telephone AWG24 shielded cable AWG20/22 shielded cable Power Supply Distance Power supply 50 m taken from the pCO (150 mA) 200 m taken from the pCO (150 mA) 500 m separate power supply via T-Connector (part number : 4030004446) The maximum distance between two DB3 controllers with AWG20/22 shielded cable is 500 m. 13 Rev.03 Note: • A maximum of one terminal (DBG1) can be connected, or two terminals but without using use the backlighting on display. One version of the DB3 features optically-isolated connection to the DBLAN network. • The terminal should be always powered with a separate power supply. • The 21 Vdc present at +Vterm (J24) can be used to power an external terminal with a maximum input of 2 W. Only one terminal can be connected in addition to the one connected to terminal J10 2.4.10 Other Specifications storage conditions -20 To 70 °C, 90% RH non-condensing operating conditions -10 To 60 °C, 90% RH non-condensing index of protection IP20, IP40 front panel only environmental pollution normal class according to protection against electric shock to be incorporated into Class I and/or II appliances PTI of the insulating materials 250 V period of stress across the insulating parts long type of action 1C type of disconnection or microswitching category of resistance to heat and fire microswitching category D (UL94 - V0) immunity against voltage surges category 1 ageing characteristics (operating hours) 80,000 no. of automatic operating cycles 100,000 (EN 60730-1); 30,000 (UL 873) software class and structure Class A category of immunity to voltage surges (CEI EN 61000-4-5) Category III The device is not designed to be hand-held WARNING • • • • • • For applications subject to strong vibrations (1.5 mm pk-pk 10/55 Hz), secure the cables connected to the DB3 using clamps placed around 3 cm from the connectors If the product is installed in industrial environments (application of the EN 61000-6-2 standard) the length of the output connections must be less than 30 m. Installation must be performed according to the standards and legislation in force in the country where the appliance is used; For safety reasons the appliance must be housed inside an electrical panel, so that the only accessible part is the display and the control keypad; All the very low voltage connections (analogue and digital inputs at 24 Vac/Vdc, analogue outputs, serial bus connections, power) must have reinforced or double insulation from the mains; In the event of malfunctions do not attempt to repair the appliance, but rather contact the DunhamBush service centre. 2.4.11 PRELIMINARY NOTES FOR THE INSTALLER: COMPARISON BETWEEN DB3 AND DB2 • The DB3 family controllers do not have the connector using the programming key code (P/N: 4030022234). To program the controller, use the new Smart Key (P/N: 4030004388) available from September 2005. Otherwise use WinLoad version 3.35 and higher: 14 Rev.03 • • Figure 2.4.1 : Smart Key Please take note that an application cannot be run from the Smart Key. • Unlike the DB2, there is no fuse between J1 and J2. All DB3 family controllers have an internal thermal protector on the power supply. No external fuse is required; • • A further terminal J24 (in place of the fuse) is provided for the power supply to the ratiometric probes (+5 VREF), as well as 20 Vdc to supply a secondary terminal, such as the aria terminal, in alternative to the standard one; The terminal J11 (connection to the DBLAN network) in the first prototypes of the DB3 only has a pitch of 3.81, rather than the 5.08 on the DB2; The LEDs near the dipswitches for setting the DBLAN address have been moved between connectors J3 and J4; The red probe power supply overload LED has been removed. DB3 simulator: If testing the DB3 with a simulator, note that the DB2 simulator cannot be used in place of the DB3 simulator. Contact Dunham-Bush for the availability of the latter. 2.5 Vision2020i Display and User Terminal The Vision 2020i controller comes with a user friendly back-lit 128 by 64 pixels DBG1 Semi-Graphic Display panel connected with controller through a telephone cable. This terminal allows carrying out all program operations, displaying the unit working conditions, component run times, alarm history and modifying the parameters. The display also has an automatically self-test of the microprocessor during the system start-up. Multiple messages will be displayed by automatically scrolling from each message to the next. All of these messages are spelled out in English language on the display terminal. There are 15 dedicated buttons; consists of 15 polycarbonate buttons. These buttons enable user to access information, base on the security level of the password. For detail operation of the DBG1 Display Terminal, please refer to the Unit Operation Manual. Optional Graphical Display (DBG2 & DBG3) DBG2 and DBG3 are the latest Dunham-Bush state of art user interfaces, featuring a 5.7inch touch screen display with ¼ VGA resolution, and a 32-bit microprocessor that allows the management of complex graphic images up to 320x240 pixels in size and with up to 256 colors (DBG3 only), various animated icons, non-proportional fonts in Unicode format, trend graphs of alarms, temperature, and pressure values. A keypad is always fitted to the side of the display for use in all those applications where the touch screen is not the preferred solution. Following are the part number for the user terminals. User Terminal Part Number DBG1 Semi-Graphic Display 4030003312 DBG2 Graphical Display (Blue & White) 4030003338 DBG3 Graphical Display (256 colors) 4030003340 DBG3 graphical display will replace DBG1 semi-graphical display as standard terminal display for all watercooled screw chillers beginning April 2008. 2.5.1 DBG1 Semi-Graphic Display These terminals have been designed for panel installation (Figure 2.5.1); the drilling template must measure 173x154 mm. For installation, follow the instructions provided below: • • • Remove the click-on decorative frame; Insert the plastic part containing the display and electronic boards on the drilled front face of the panel, making sure that the gasket on the lower edge of the front panel rests correctly against the front of the panel; Make 4 holes, diameter 2.5 mm, in the panel, in exact correspondence with the holes present on the instrument. Insert the fastening screws supplied, choosing the self-tapping or thread-cutting screws, according to the material the panel is made from (plastic or metallic). 15 Rev.03 Make the envisaged electrical connections. Figure 2.5.1 : Dimensions (DBG1) Technical Specifications Display Type: Backlighting: Graphic resolution: FSTN graphic Greed LEDs (controlled by “application software”) 132x64 pixels Text mode: 8 rows x 22 columns (font sizes 5x7 and 11x15 pixels) 4 rows x 11 columns (font size 11x15 pixels) Character height: 3.5 mm (font size 5x7 pixels) 7.5 mm (font size 11x15 pixels) 66x32 mm 72x36 mm Size of active area: Size of display area: Power Supply Voltage: Maximum power input: Power supply from DB3 controller through telephone cable or external source 18/30 Vdc protected with a 250 mA fuse 1.8 W Maximum distances Maximum DBLAN length: DB3 terminal distance: Materials Case: Keypad: Self-extinguishing rating: 500 m with AWG22 twisted pair cable 50 m with telephone cable 500 m with AWG22 twisted pair cable and T-Connector Note: to reach the maximum length, use a bus layout, with branches not exceeding 5 m Combination of ABS and polycarbonate silicon rubber + ABS V0 Other Index of protection: Operating conditions: Storage conditions: Software class and structure: Classification according to protection against electric shock: PTI of insulating materials: Period of electric stress across insulating parts: Category of resistance to fire and heat: Category (immunity against voltage surges): Environmental pollution: IP55 UL type 1 -20 to 60 °C, 90% r.H. non-condensing -20 to 70 °C, 90% r.H. non-condensing A To be integrated into class 1 or 2 devices 250 V long D I normal 16 Rev.03 2.5.2 DBG2/3 Graphical Display DBG2 and DBG3 are electronic devices designed as the user interface for the DB3 controllers. DBG2 is a monochromatic (blue/white) LCD graphic terminal with 320x240 pixel resolution and LED backlighting. DBG3 is a 256-colour LCD graphic terminal with 320x240 pixel resolution and CCFL backlighting. These terminals have been designed for panel installation; the drilling template must measure 194.5x128 mm + 6 circular holes, diameter 4 mm, as shown in Figure 2.5.2. For installation, proceed as follows: • Connect the power and RS845 serial interface cables; • Insert the terminal, without the front frame, into the opening in the panel, and using the 6 countersunk screws supplied in the packaging, secure the device to the panel as shown in Figure 5, then check the correct positioning of the front rubber gasket; • Finally, install the click-on frame. Important: Installation must be performed so that the operator may access the rear cover of the instrument only using a tool. Figure 2.5.2 : Dimensions (DBG2 & DBG3) Figure 2.5.3 : Installation of DBG2 & DBG3 display Installation Warnings • • • • • • • • • • • Avoid assembling the devices in environments with the following characteristics: Relative humidity greater than the value specified in the technical specifications; Strong vibrations or knocks; Exposure to continuous water sprays; Exposure to corrosive or pollutant gases (e.g. sulphur or ammonia fumes, saline mist, smoke) so as to avoid corrosion and oxidisation; Strong magnetic and/or radio interference (therefore avoid installing the unit near transmitting antennae); Exposure to direct sunlight or the elements in general; Large and rapid fluctuations in ambient temperature; Environments where explosives or mixes of flammable gases are present; Exposure to dust (formation of corrosive patina with possible oxidation and reduction of insulation). Avoid touching or nearly touching the electronic components fitted on the boards, so as to avoid electrostatic discharges (extremely dangerous) from the operator to the components. Further Warnings 1. 2. 3. 4. 5. 6. Using a different power supply from the one specified may seriously damage the system. Use cable ends suitable for the terminals. Loosen each screw and insert the cable ends, and then tighten the screws. When completed, lightly tug the cables to check that they are tight. The touch screen is a sensitive device. Exerting excessive pressure or using sharp objects may cause irreparable damage. Use a dry soft cloth to clean the screen and never use water. Operation at particularly low temperatures may cause a visible decrease in the response speed of the display. This is normal and does not signify a malfunction. To improve the visual performance of the application, use full colors and images that do not feature dithering (wirings). Otherwise, especially at high temperatures, flickering (display flashing) may be visible. 17 Rev.03 Technical Specifications Power supply 24 Vac ±15%, 50/60 Hz or 30 Vdc ± 25%; Use a class 2 safety transformer with a rating of least 15VA Rated power 10 W Power supply connections to the DBG2/3: Observe the following rules: • The power supply terminals on the DBG2/3 are called G and G0. The connection is made using 2-pin 2 removable terminals. Possible cross-section of the wires: 0.5 to 1.5 mm ; • A dedicated 800 mA fuse must be installed externally between the power supply and terminal G; • If the transformer that supplies the DBG2/3 is the same that also supplies Vision 2020i controllers, then terminal G0 on the DBG2/3 must be connected to terminal G0 on the Vision 2020i controller; • Important: if the secondary of the power supply transformers needs to be earthed, then terminal G0 must be earthed (and NOT the terminal G), both on the Vision 2020i controller and the DBG. Interfaces: RS485 serial for communication with Vision 2020i controllers, via 3-pin removable terminals. Use a shielded twisted pair cable, AWG20-22, maximum length 200 m. The total length of the network must not exceed 500 m. The capacitance between the wires must not exceed 90 pF/m. Note: to reach the maximum length use a bus layout with branches that do not exceed 5 m. Functional characteristics Protocols supported DBLAN protocol, “Point-Point” protocol (text mode only). Backlighting With two levels of brightness, “high” and “normal”. General characteristics Operating conditions DBG2: 0T50°C, 0 to 85% rH non-condensing DBG3: 0T45°C, 0 to 85% rH non-condensing Storage conditions -10T70°C, 0 to 85% rH non-condensing Index of protection (IP) IP20 Dimensions (mm) See Figure 2.5.2 Environmental pollution normal Category of resistance to heat D and fire Class and structure of the A software Duration of the backlighting lamp 30,000 hours at 20 °C and “normal” brightness 2.6 SMART Key For Vision 2020i Controllers The SMART key (P/N: 4030004388) is an electronic device used to program and service the Vision 2020i controllers. The SMART key simplifies the transfer of data between the controllers installed and a personal computer by exploiting the high capacity flash memory for storing software applications, Bios and variable logs. The Vision 2020i controller is connected directly via the telephone connector using cable supplied, while to transfer the data to a personal computer, the USB adapter (P/N: 4030004389) is required. The power supply comes either via the USB port on the PC or from the controller, therefore no external power supply is needed. 18 Rev.03 Figure 2.6.1 : Dimensions For Smart Key 2.6.1. Technical Specifications Power Supply Power input (max) Max. transmission speed Buttons LED Maximum cable length between key and Vision2020i Operating conditions Storage conditions Dimensions (mm) Connections Index of protection Environment pollution Immunity against voltage surges Software class and structure Category of resistance to heat and fire PTI of insulating materials Period of electric stress across insulating parts 4.5 to 35V (via telephone connector from the Vision2020i or via the USB converter). No batteries or external power supplies are required 0.25W USB; 0.60W Vision2020i 460kb/s 2 backlit silicone rubber 4 green, 1 yellow, 1 red <3m; <1.8m for use in domestic environments (EN55014-1) o 0 To 55 C; <80% RH non-cond o 0 To 70 C; <80% RH non-cond 63x102x35 Serial via RJ11 telephone connector IP20 Normal Category I Class A Category D (UL94 Vo) >250V Long 19 Rev.03 3.0 USER INTERFACE 3.1 DBG1 PANEL – OPERATOR KEYPAD b) The DBG1 panel operator keypad consists of 15 polycarbonate buttons: Eight polycarbonate buttons at bottom row Button Figure 3.1.1 : Vision 2020i keypad The top right ‘Authorization’ button is for password log in to gain authorization, to the access setting menu. The top left six operator buttons functions are to view status only, except the ‘Setpoint’ button also allows setting changes after gained authorization. User User Control Changeable Settings. Technician Technician Control Changeable Settings. Factory Factory Control Changeable Settings. Menu Unit information / Compressor Information. Alarm Reset The three buttons at the bottom left are to access different level of setting changes. These are 'User', 'Technician' and 'Factory' levels, from left. It can only be access depend on the password level. The higher password can access the lower password level's setting and not vice versa. 3.1.1 Up The fifteen polycarbonate buttons: a) Seven polycarbonate buttons at top row Button Input Status Output Status Compressor Status Description Displays the analog inputs and digital inputs status measured by the probes/sensors. Displays the relay outputs and analog outputs status. Displays the status of Compressor 1, 2 and so on. Setpoint Displays the status of set points. Clock/ Schedule Displays the date, time and day. Alarm History Display the alarm history. Authorization To log in the level of passwords. 3.1.2 Description Display the active alarms and to perform alarm manual resets. Scroll the various screens when the cursor is in the top left of the display. If the cursor is inside a numeric field, the button increases or decreases the corresponding value. If the field is a selection, pressing the button displays the available options. Down See the UP arrow Enter To move the cursor around the screens and to save the values of the set parameters STATUS READING 3.1.2.1 Input status key To read inputs status press input status key: The display is showing the data as follows: ANALOG INPUTS Supply Temp Return Temp Suction Pres Disch Press 044.8 °F 055.6 °F 073 PSI 179 PSI 20 Rev.03 Press down arrow key or input key to go to next screen: The display is showing the data as follows: ANALOG INPUTS C1 Amps C2 Amps C1 Disch T C2 Disch T 112A 118 A 128.5 °F 131.2 °F Repeat the same steps to go to other sensor inputs screen. COMPRESSOR 1 STATUS Comp 1 OK Amps = 100A FLA1 = 230A Target = 087.5% Capacity = 065.5% Status = ON-LOAD Press down arrow key or press compressor key to go to next screen: The display is showing the data as follows: COMPRESOR 1 HISTORY 3.1.2.2 Output status key To read relay outputs status press output status key: Run Hour Cycle Today 05 02 Total 000076 00006 Last On Last Off 04/24 04/24 19:06 19:03 The display is showing the data as follows: 3.1.2.4 Setpoint key: RELAY OUTPUTS Comp 1 ON-LOAD Comp 2 ON-LOAD Alarm Status Control Power SDD Control Setback To read the setpoint value press setpoint key OFF ON OFF OFF The display is showing the data as follows: SETPOINT 1 Press down arrow key or output key to go to next screen: Supply Water Temp Set point= Dead band= 44.0 °F 0.8 °F The display is showing the data as follows: RELAY OUTPUTS C1 Liq Inj Sol C2 Liq Inj Sol CW Pump Hotgas Relay ON OFF ON OFF To alter setpoint data, you must be authorized. See the authorization procedure and you must be authorized at least as user level. Press enter key to select the setpoint to alter and use the up-down arrow key to change the value and press enter key to confirm. Repeat the same steps to go to other relay outputs screen. 3.1.2.3 Compressor status key To read compressor status press compressor status key: The display is showing the data as follows: Press down arrow key or press setpoint key to go to next screen: Repeat the same steps to go to other setpoints screen and perform setpoint modification. 21 Rev.03 3.1.3.1 Authorization key 3.1.2.5 Clock key: To read the current day, time and date, unit scheduling and ice-cel mode scheduling (optional), press the clock key To get authorization authorization key: REAL TIME CLOCK > > > press The display is showing the current access level as view only: The display is showing the data as follows: Day Time Date level, AUTHORIZATION MONDAY 16:10 05/12/05 Please Enter your Password PASSWORD = 0000 Status = View To set the date and time, you must be authorized. See the authorization procedure and log in at least as user level. Press enter key to select the date or time to alter and use the up-down arrow key to change the value and press enter key to confirm. Press enter key and use the up-down arrow key to change the password settings and press enter key to confirm. Now the authorization status changes to different access level. 3.1.4 3.1.2.6 Alarm history key: To view the unit alarm history press alarm history key: ADVANCED USER KEY AND MENU 3.1.4.1 User Key User key is use to view and change the pressure, ampere safety limits and liquid injection temperature setpoints, unit of measurements. In order to gain access to this button, you must be authorized and log in at least as user level. The display is showing the data as follows: ALARM HISTORY 001 - C1 Starter 19:03 05/12/05 TR: 030.2 LWT: 64.3 DP: 191 SP: 076 C1 AMP: 000 C2 AMP: 154 Press down arrow key or press alarm key to go to next screen for other alarm history: To clear alarm history, press input key and authorization key together and then press the alarm key again. Now the display should be showing “No alarm” Press the user key and display is showing the data as follows: USER SETPOINT 1 High Pressure Safety Limits Hold = 360PSI Unload = 370PSI Cutout = 400PSI Press down arrow key or user key to go to next screen for other setpoint: To alter setpoint data, press enter key to select the setpoint to alter and use the updown arrow key to change the value and press enter key to confirm. 3.1.3 AUTHORIZATION 22 Rev.03 Technician Setpoint 1 Repeat the above steps for others setpoints. 3.1.5 TECHNICIAN KEY AND MENU 3.1.5.1 Technician status key This key is use to view and change the compressor FLA setpoint, sensors calibration, manually control digital inputs and outputs, manually control compressor. In order to gain access to this button, you must be authorized and log in at least as user level. See the authorization section about this procedure. Comp 1 FLA CALIBRATION 200x00.66+97.80 FLA = 237A Capacity C1 = 075.6% Min Percent Cal = 025.0% Max Percent Cal = 00A Press enter key to move the cursor to calibrate the comp FLA and use the up-down arrow key to change the value and press enter key to confirm. 3.1.5.2 Technician status key – main menu Press technician key to go to technician setpoints main menu: 3.1.5.4 To perform Sensor Calibration: Press technician key to go to technician setpoints main menu and press enter key twice to move the cursor to the sensor calibration sub-menu: The display is showing the data as follows: Technician Setpoints The display is showing the data as follows: Main Menu Comp FLA Calibration Sensor Calibration Manual Control Compressor Control Sensors Override Technician Setpoints Press enter key to move the cursor to the sub-menu. Main Menu Comp FLA Calibration Sensor Calibration Manual Control Compressor Control Sensors Override ■ The display is showing the data as follows: Technician Setpoints Main Menu Comp FLA Calibration Sensor Calibration Manual Control Compressor Control Sensors Override Use up or down arrow key to move the cursor to the desired 'Sensor Calibration', ■ 3.1.5.3 Compressor FLA Calibration: To calibrate compressor FLA, press down arrow key to go the sub-menu 'Comp FLA Calibration', The display is showing the data as follows: The display is showing the data as follows: Sensor Offset 1 Suction Press Current = 076PSI Average = 187PSI 24Hrs MAX = 200PSI 24Hrs MIN = 074PSI Calibration = 00PSI Press enter key to move the cursor to calibrate the desired sensor and use the updown arrow key to change the value and press enter key to confirm. Repeat the above steps for others sensors calibrations. 23 Rev.03 Press enter key to confirm the change. 3.1.5.5 Manual Control: A digital input sensor or relay output can be controlled manually with the keypad. Digital input sensor or relay output can be turned on, off manually and placed back to auto mode. To place a digital input or relay output in manual control, the operator must be authorized at technician level or higher. Press technician key to go to technician setpoints main menu and press enter key three times to move the cursor to the manual control sub-menu: The display is showing the data as follows: 3.1.5.6 Compressor Control: Screw compressors can be controlled manually with the keypad. A compressor can be turned on, off, or placed in computer control. When a compressor is controlled manually, it can be commanded to load, hold, or unload. If safety limiting condition is active, it will not accept a load command. To place a compressor in manual control, the operator must be authorized and log in as technician level and higher. Press technician key to go to technician setpoints main menu and press enter key four times to move the cursor to the manual control sub-menu: Technician Setpoints Main Menu Comp FLA Calibration Sensor Calibration Manual Control Compressor Control Sensors Override The display is showing the data as follows: ■ Technician Setpoints Use up or down arrow key to move the cursor to the desired digital input or relay output, The display is showing the data as follows: Digital Inputs Manual Control C1 Starter = Auto C2 Starter = Auto C1 Oil Lvl = Auto C2 Oil Lvl = Auto Unit Enable = Auto Flow Switch = Auto Press enter key to move the cursor to the desired point for manual control and use the up or down arrow key to change the status of the digital input or relay output to AUTO/CLOSE/OPEN or AUTO/ON/OFF. The display is showing the data as follows: Relay Outputs Manual Control Alarm Relay SDD Relay Setback Relay Liquid Inj C1 Liquid Inj C2 Auto Auto Auto Auto Auto Main Menu Comp FLA Calibration Sensor Calibration Manual Control Compressor Control Sensors Override ■ Use down arrow key to move the cursor to the desired compressor control screen, then press enter key to move the cursor to compressor status position, AUTO /MAN/OFF The display is showing the data as follows: Compressor Control Manual Override COMPRESSOR 1=AUTO St= 0005 Amps = 071.8 Capacity = 025.0% Status =OFF Use up or down arrow key to select MAN and press enter key to confirm the change. The compressor will start or continue to run in hold state. Press the user key to continue hold, press the technician key to load and factory key to unload. Manual Hold Manual Load Manual Unload 24 Rev.03 If a safety condition is exceeded while operating manually, the compressor will shutdown. CAUTION: Anti-recycle timer is bypassed by manual control. DO NOT start a compressor more than once every 15 minutes. NOTE: All compressors will revert back to automatic control if the computer is the computer is not given a load, unload, or hold command at least once every 15 minutes. A command can be repeated to meet the 15 minute requirement for manual control. To the change the settings of compressor load/Unload, follow the above steps and go to compressor control. Use down arrow key to move the following and press to change the settings. Load/Unload Control Manual Pulse Settings Pulse Rate= 001sec Pulse Width= 001sec Sensors Manual Override Supply Water Temp o Man Reading = 45.0 F Manual Override = NO Press enter key to move the cursor to the “Man Reading” and use the up or down arrow key to change the value of the analog reading, press enter key move the cursor to the “Manual Override” to enable, or disable the manual override control. Repeat the above steps for other sensors override. Caution: Sensors override require continuous monitoring and observation by the field service personnel at all time during the unit operation. Faulty sensor shall be replaced as soon as possible in order to allow the unit to be running in automatic mode. 3.1.5.7 Sensors Override: Value of analog readings can be temporary override during sensor failure. To override the analog readings, the operator must be authorized at technician level or higher. Press technician key to go to technician setpoints main menu and press enter key five times to move the cursor to the ‘Sensors Override’ sub-menu: The display is showing the data as follows: Technician Setpoints Main Menu Comp FLA Calibration Sensor Calibration Manual Control Compressor Control Sensors Override ■ Use up or down arrow key to move the cursor to the desired analog reading, The display is showing the data as follows: 25 Rev.03 3.2 DBG3 PANEL – OPERATOR KEYPAD 3.2.2 Key Vision 2020i controller is equipped with user friendly 5.7” touch screen display with 256 colors and 320 × 240 pixel on graphic resolution. It is connected with controller through twisted pair shielded cable. The graphic display terminal allows carrying out all program operations. The user terminal allows displaying the unit working conditions, component run times, alarm history at any time and modifying the parameters. The terminal also has an automatically self-test of the controller on system start-up. Multiple messages will be displayed by automatically scrolling from each message to the next. All of these messages are spelled out in English language on the screen. 3.2.1 The Fourteen Touch keys: Description MAIN Display the main screen USER User Control Changeable Settings. TECHNICIAN Technician Control Changeable Settings. FACTORY Factory Control Changeable Settings. SETPOINT Displays the status of set points. AUTHORIZATION To log in the level of passwords MENU Unit information / Compressor Information. CLOCK/SCHEDULE Displays the date, time and day. ALARM RESET Display the active alarms and to perform alarm manual resets. The touch screen keypad consists of 14 touch keys, and 7 physical keys: LEFT Scroll the various screens when the cursor is in the top left of the display. If the cursor is inside a numeric field, the button increases or decreases the corresponding value. If the field is a selection, pressing the button displays the available options. Model RIGHT See the LEFT arrow INPUT STATUS Displays the analog inputs and digital inputs status measured by the probes/sensors. OUTPUT STATUS Displays the relay outputs and analog outputs status. COMPRESSOR STATUS Displays the status of Compressor 1, 2 and so on. Touch Screen Terminal Display E0000 Unit No : 01 Date : 09/06/08 Time : 03:33 Program Date : 09/05/08 3.2.3 Figure 3.2.1.1 Vision 2020i keypad The Seven Physical Keys: Key Description The top right ‘Authorization’ button is for password log in to gain authorization, to the access setting menu. UP The three buttons at the top row which is to access different level of setting changes. These are 'User', 'Technician' and 'Factory' levels. Scroll the various screens when the cursor is in the top left of the display. If the cursor is inside a numeric field, the button increases or decreases the corresponding value. If the field is a selection, pressing the button displays the available options. ENTER To move the cursor around the screens and to save the values of the set parameters DOWN See the UP arrow MENU Unit information / Compressor Information. ALARM RESET Display the active alarms and to perform alarm manual resets. AUTHORIZATION To log in the level of passwords INPUT STATUS Displays the analog inputs and digital inputs status measured by the probes/sensors. It can only be access depend on the password level. The higher password can access the lower password level's setting and not vice versa. 26 Rev.03 3.2.4 STATUS READING 3.2.4.1 Input status key OUTPUT STATUS 1 To read inputs status, touch on input status key: The display is showing the data as follows: ANALOG SENSORS 1 Supply Temperature 44.6°F [7.0°C] Suction Pressure Discharge Pressure Comp 1 ON-HOLD Comp 2 ON-LOAD Alarm Status Control Power SDD Control OFF ON OFF Touch on right arrow key or output key to go to next screen: 68PSI[4.7BAR] 195PSI[13.4BAR] The display is showing the data as follows: OUTPUT STATUS 2 Touch on right arrow key or input key to go to next screen: Setback Control C1 Liquid Injection Sol C2 Liquid Injection Sol OFF ON OFF The display is showing the data as follows: ANALOG SENSORS 2 Compressor 1 Amps Compressor 2 Amps 125 A 135 A Repeat the same steps to go to other relay outputs screen: 3.2.4.3 Compressor status key To read compressor compressor status key: Repeat the same steps to go to other sensor inputs screen: 3.2.4.2 Output status key To read relay outputs status, touch output status key: The display is showing the data as follows: status, touch on The display is showing the data as follows: COMPRESSOR 1 STATUS Comp 1 OK Amps = 125 A FLA1 = 125 A Target = 100.0% Capacity = 100.0% Status = ON-HOLD Touch on right arrow key or compressor key to go to next screen: 27 Rev.03 The display is showing the data as follows: COMPRESSOR 1 HISTORY Run Hour Cycle Today 12 01 Total 156 20 Last On Last Off 05/23 05/22 07:00 22:15 3.2.4.4 Setpoint key: Repeat the same steps to go to other setpoints screen and perform setpoint modification. 3.2.4.5 Clock key: To read the current day, time and date, unit scheduling and Ice-cel mode scheduling (optional), touch on the clock key The display is showing the data as follows: To read the setpoint value, touch on setpoint key REAL TIME CLOCK The display is showing the data as follows: Day Time Date > > > MONDAY 15 : 30 12 / 05 / 08 SETPOINT 1 Supply Water Temp Set point = Dead Band = 44°F [6.7°C] 0.8°F [0.5°C] To alter set point data, you must be authorized. See the authorization procedure and you must be authorized at least as user level. To set the date and time, you must be authorized. See the authorization procedure and log in at least as user level. Touch on the date or time which is written in blue color and underlined to change the setpoint. Use the up or down keys of the keypad below to change the value and touch on OK key to confirm. Touch on the selected set point which written in blue color and underlined. Use the keypad to key in the desired setpoint and press OK key to confirm the change. If the value you key in is out of acceptable range, the setpoint will not change and the keypad will remain to receive another value. 44.0 Touch on right arrow key or clock key to go to next screen: The display is showing the data as follows: Touch on right arrow key or setpoint key to go to next screen: 28 Rev.03 AUTHORIZATION Please Enter Your Password **** Status = View Schedule 1 Setpoint Time On = 08 : 00 Time Off = 20 : 00 Days Monday Tuesday Wednesday Thursday Friday Saturday Sunday 1 2 3 4 5 6 7 8 9 0 C Key in the password by using the touch keys and touch on Enter key to confirm. 3.2.4.6 Alarm history key: To view the unit alarm history, touch on Main key to go to main menu, and then touch on alarm history key: Now the authorization status changes to different access level. 3.2.6 The display is showing the data as follows: ADVANCED USER KEY AND MENU 3.2.6.1 User Key User key is use to view and change the pressure, ampere safety limits and liquid injection temperature set points, unit of measurements. In order to gain access to this button, you must be authorized and log in at least as user level. ALARM HISTORY 001-C1 Starter 15:31 12/05/08 TR: 030.2 LWT: 55.5°F [13.1°C] DP1: 180PSI [12.4BAR] SP1: 80PSI [5.5BAR] C1: 068 A C2: 080 A Touch on the user key and display is showing the data as follows: Touch on left arrow key or alarm history key to go to next screen for other alarm history: To clear alarm history, press “Prg” key and “Esc” key together at the right hand side of the terminal and then press the alarm key again. Now the display should be showing “No alarm” 3.2.5 USE SETPOINT 1 High Pressure Safety Limit Hold = 240 PSI [16.5BAR] Unload = 245 PSI [16.9BAR] Cutout = 250 PSI [17.2BAR] AUTHORIZATION 3.2.5.1 Authorization key To get authorization authorization key: level, touch on The display is showing the current access level as view only Touch on right arrow key or user key to go to the next screen or setpoints. To alter setpoint data, press on the setpoint which in written in blue color and underlined. Use the keypad below to change the value and press OK key to confirm. If the value you key in is out of acceptable range, the setpoint will not change and the keypad will remain to receive another value. 29 Rev.03 245 TECHNICIAN SETPOINT 1 Comp 1 FLA CALIBRATION 157 × 00.90 + 028.50 FLA1 = 181A Capacity Comp 1 = 000.0% Min Percent Cal = 25.0% Max Percent Cal = 00A Repeat the above steps for other setpoints. 3.2.7 TECHNICIAN KEY and MENU 3.2.7.1 Technician status key Touch on the desired setpoint with blue color and underlined to calibrate the comp FLA and use the keypad shown as below to change the value and press OK key to confirm. This key is use to view and change the compressor FLA setpoint, sensors calibration, manually control digital inputs and outputs, manually control compressor and override sensor reading. In order to gain access to this button, you must be authorized and log in at least as technician level. See the authorization section about this procedure. 90 3.2.7.2 Technician status key - main menu Touch on technician key to go to technician set points main menu: 3.2.7.4 To Perform Sensor Calibration: The display is showing the data as follows: To perform sensor calibration, touch on the ‘Sensor Calibration’ sub-menu: The display is showing the data as follows: TECHNICIAN SETPOINTS MAIN MENU COMP FLA SENSOR CALIBRATION MANUAL CONTROL COMPRESSOR CONTROL SENSORS OVERRIDE Touch on on the selected sub-menu to move the next page to the sub menu. 3.2.7.3 Compressor FLA Calibration: To calibrate compressor FLA, touch on the sub-menu 'Comp FLA Calibration', The display is showing the data as follows: SENSOR OFFSET 1 Suction Pressure 1 Current = Average = 24Hrs Max = 24Hrs Min = Calibration = 078 PSI [5.4BAR] 187 PSI [12.9BAR] 200 PSI [13.8BAR] 074 PSI [5.1BAR] 00 PSI [0.0BAR] Touch on the selected sensor calibration and key in the calibration value by using the keypad. Press OK to confirm. Repeat the above steps for others sensors calibrations. 3.2.7.5 Manual Control: A digital input sensor or relay output can be controlled manually with the keypad. Digital input sensor or relay output can be turned on, off manually and placed back to auto mode. To place a digital input or relay output in 30 Rev.03 manual control, the operator must authorized at technician level or higher. be Touch on technician key to go to technician set points main menu and touch on the ‘Manual Control’ sub-menu: The display is showing the data as follows: DIGITAL INPUTS MANUAL CONTROLS Comp 1 Starter = Auto Comp 2 Starter = Auto Comp 1 Oil Level = Auto Comp 2 Oil Level = Auto Unit Enable = Auto Flow Switch = Auto Touch on desired point with blue color and underlined for manual control. Use the keypad shown as below to change to the desired digital input to AUTO/CLOSE/OPEN. Touch on OK to confirm. 3.2.7.6 Compressor Control: Screw compressors can be controlled manually with the keypad. A compressor can be turned on, off, or placed in computer control. When a compressor is controlled manually, it can be commanded to load, hold, or unload. If safety limiting condition is active, it will not accept a load command. To place a compressor in manual control, the operator must be authorized and log in as technician level and higher. Touch on technician key to go to technician setpoints main menu and touch on the ‘Compressor Control’ sub-menu: The display is showing the data as follows: COMPRESSOR CONTROL Manual Override The display is showing the data as follows: DIGITAL INPUTS MANUAL CONTROLS Comp 1 Starter = Comp 2 Starter = Comp 1 Oil Level = Close Auto Auto Compressor 1 = St = Amps = Capacity = Status = AUTO 0000 000.0 A 000.0 % OFF Use the keypad shown as below to change to the compressor control to AUTO/MANUAL/OFF. Touch on OK to confirm. For manual control of digital outputs, use the following keypad to change the desired digital output to AUTO/ON/OFF. Touch on OK to confirm. 31 Rev.03 The display is showing the data as follows: If the compressor control is placed on MANUAL control, the display is showing data as follow: Sensors Manual Override COMPRESSOR CONTROL Manual Override Compressor 1 = St = Amps = Capacity = Status = Supply Water Temp Man Reading = Manual Override = AUTO 0000 000.0 A 000.0 % OFF Touch on the value to key in the override reading. Then, touch on NO/YES key with blue color and underlined to enable, or disable the manual override control. Touch on HOLD, LOAD or UNLOAD key to manually control the compressor running status. Repeat the above steps for other sensors override. If a safety condition is exceeded while operating manually, the compressor will shutdown. CAUTION: Sensors override requires continuous monitoring and observation by the field service personnel at all time during the unit operation. Faulty sensor shall be replaced as soon as possible in order to allow the unit to be running in automatic mode. CAUTION: Anti-recycle timer is bypassed by manual control. DO NOT starts a compressor more than once every 15 minutes. NOTE: All compressors will revert back to automatic control if the computer is the computer is not given a load, unload, or hold command at least once every 15 minutes. A command can be repeated to meet the 15 minute requirement for manual control. To the change the settings of compressor load/Unload, follow the above steps and go to compressor control. Use right arrow key to move to the following page as shown: 45.0°F [7.2°C] NO 3.3 ADDRESSING THE VISION 2020i CONTROLLER AND TERMINAL 3.3.1 Vision 2020i Controller with DBG1 Display At the Vision 2020i terminal, push simultaneously the last three keys on the lower right corner of the Vision 2020i terminal keyboard. Push them for at least 5 seconds. Vision2020i 5 sec LOAD / UNLOAD CONTROL Manual Pulse Settings Pulse Rate = 001 sec Pulse Width = 001 cyc This display will appear: Display address Setting……… : I/O Board address : 17 01 3.2.7.7 Sensors Override Value of analog readings can be temporary override during sensor failure. To override the analog readings, the operator must be authorized at technician level or higher. Change the display address setting to 0 as follow. Touch on technician key to go to technician setpoints main menu and touch on ‘Sensors Override’ sub-menu: 32 Rev.03 Display address Setting……… : Again, at the Vision 2020i terminal, push simultaneously the last three keys on the lower right corner of the Vision 2020i terminal keyboard. Push them for at least 5 seconds. This display will appear: 0 Display address Setting……… : I/O Board address: 17 -- Turn off DB3 controller. At the Vision 2020i DBG1 terminal, hold simultaneously the “Alarm” key and “Up arrow” key, turn on DB3 controller and hold these keys until “Self Test” mask is appeared. Hold for 10 seconds Change I/O board address to “01”. Press Enter key to continue. The following display will appear: Vision 2020i Termianl Config Press ENTER To continue *********************************** SELF TEST PLEASE WAIT ************************************ Press Enter to continue and the following display will appear: P:01 Trm1 Trm2 Trm 3 The following mask will appear. Set pLAN address to 1 (or accordingly) using “Up” and “Down” arrow key. Press “Enter” key to save and exit. pLAN Address : 1 Up : Increase Down : Decrease Enter : Save & Exit Adr 17 32 None Priv/Shaed Pr Sh --- OK? NO Change “NO” to “YES” and press Enter key. Configuration of terminal display and controller are done now. Terminal display address shall be set to “18” if it is connected to a Vision 2020i controller with I/O address “02”. Again, at the Vision 2020i terminal, push simultaneously the last three keys on the lower right corner of the Vision 2020i terminal keyboard. Push them for at least 5 seconds. This display will appear: Display address Setting……… : I/O Board address : 17 01 Change Display address setting to “17”. The terminal display will now become blank. 3.3.2 Vision 2020i Controller with DBG2/DBG3 Display The menus can be accessed by pressing any point on the touchscreen together with the (up) and Prg buttons for at least one second. Alternatively, press the (up) / (down), (enter) buttons together for at least one second. The following operations exit the menu: 1. Pressing the Esc button; 2. Automatically 1 minute after a button was pressed or the touchscreen touched; 3. Pressing the “X” symbol when displayed at the top right. 33 Rev.03 As shown in the following figure, the buttons that can be used during the configuration phase are also visible on the right side of the display: are last pressed that the display switches from “high brightness” to “normal brightness”. The possible values range from 30 s to 15 min, default: 1 min. • Screen Saver Timeout: Used to set the time after the touchscreen or the buttons are last pressed that the display switches off, after having switched to “normal brightness”. The possible values range from 30 s to 4 hours (4 hrs), default: 15 min. • Calibrate Touch Screen: The touchscreen can be calibrated if it is evidently misaligned. To align the touchscreen, press the exact centre of the crosses displayed in sequence. The message “Done: touch the screen to ESC” indicates that the operation has been completed correctly. If, on the other hand, the message “Bad: touch to ESC and repeat” is displayed, the operation will need to be repeated. To access an item, simply press the touchscreen on the corresponding indication, or press the (up) / (down) buttons until selecting it and then confirm by pressing (enter). To modify the value of a field, after having activated it (a field is active when the cursor is flashing inside), press the (up) / (down) buttons to change the value and press (enter) to save it. Pressing Esc “Network Configuration” menu before (enter) cancel the modifications made to the field. 3.3.2.1 Description of the menu Main menu The main menu, visible in the previous image “Display Configuration”, is used to select the main three configuration categories, that is: • Screen Settings: Settings relating to the screen • Network Configuration: Settings relating to the RS485 network • General Options: Various settings The following options are possible: • Terminal Address: Used to set the address of the terminal (from 1 to 32, default: 32). If the value “--” is set (two dashes are displayed) the terminal will communicate with the Vision 2020i board using the “Point-Point” protocol : the “Baud Rate”, “Network Monitor” and “Setup I/O Board” fields will then disappear, as they have no meaning. • Baud Rate: Used to set the DBLAN communication baud rate. The possible values are 62500 (default) or 115200 (used only if all the devices in the network are configured for this speed). Note that not all the DBLAN devices support the 115200 setting. • Network Monitor: This is used to display the status of the network (see next paragraph) • Setup I/O Board Setup: These fields are used to modify the list of terminals associated with each individual Vision 2020i board. “Screen Settings” menu The following options are available: • Contrast: Used to set the contrast of the display (from 0 to 100, default: 50). • Normal Brightness After: Used to set the time after the touchscreen or the buttons 34 Rev.03 Network Monitor This screen is used to display the status of the network when master-slave sequencing control is furnished, indicating graphically which devices are connected for each address. The meaning of the symbols is the following: Vision 2020i controller active in the Any type of terminal active in the network Current terminal Device not connected If activity is detected on the network, the message “Online” is displayed. To exit the screen, press the Esc button. Assigning the list of private and shared terminals The list of terminals associated with each individual Vision 2020i board can be modified from the “Network Configuration” menu, as follows: 1. Select the address of the required board using the (up) / (down) buttons in the “Setup I/O Board” field (only the boards that are effectively on-line can be selected) and confirm by pressing (enter). If the DBLAN network is not working correctly, or no Vision 2020i board is present, the field is not modifiable, and “--“(two dashes) will be displayed. 3. Now the (enter) button is used to move the cursor from one field to the next, and (up) / (down) change the value of the current field. The “P:xx” field shows the address of the selected board (in the example, board number 12 has been selected); 4. To exit the configuration procedure and save the data, select the “OK ?” field, set (enter). “Yes” and confirm by pressing Alternatively, if the terminal remains inactive (no button is pressed) for more than 30 s, the configuration procedure is automatically ended without saving the changes. Important: the DBG2/3 terminals cannot be configured as “Sp” (shared printer) as the printer output is not featured. Selecting this mode has no effect on the management of printed messages sent via DBLAN. Assigning the I/O Board Address of the Controller In order to configure the I/O board address of the Vision 2020i controller, the terminal address must set to “--”. Please refer to “Network Configuration Menu” for procedures to configure the terminal address. The following display will appear: 2. Press the “Setup” button: the following screens will be displayed in sequence: Switch off power supply of the controller now. Disconnect connector at J23 on the controller. Resume power supply of the controller, press and hold “alarm reset” and “up” key, when the below screen is appeared. 35 Rev.03 After a few seconds, the controller commences the start-up sequence, and then the following display is shown. *********************************** SELF TEST PLEASE WAIT ************************************ When this screen appears, wait 10 seconds and then release the buttons. The controller stops the start-up sequence and the following display is shown. pLAN Address : 1 Up : Increase Down : Decrease Enter : Save & Exit Then, set the “pLAN Address” using the “Up” and “Down” buttons on the terminal. Confirm the setting by pressing “Enter” button. The controller completes the start-up sequence and uses the specified address. Now, configure the “Terminal Address” to its desired setting. Terminal display address shall be set to “17” if it is connected to a Vision 2020i controller with I/O address “01”. If the terminal is connected to a Vision 2020i controller with I/O address “02”, terminal display address shall be set to “18”. The following options are possible: 1. Beep Volume: Used to set the volume associated of the “Beep” with the buttons and the touchscreen pressing. The possible values are “off”, “low”, “high”. Default: high. This parameter has no effect on the alarm signal, which is activated or deactivated by the Vision 2020i. 2. Beep On: Used to set when the “Beep” sounds. The possible values are: “active items” (associates a sound with the active area of the display), “screen” (associates a sound with any point on the touchscreen) and “screen & keys” (associates a sound with both the touchscreen and the keypad). Default: “screen & keys”. 3. Download Bar: activates (“yes”) or deactivates (“no”) the display of the status bar that indicates the progress of the page. Default: “yes”. 4. Clear Cache Memory: deletes the cache memory used to accelerate the display of the screens. This function may be useful if there are errors in the graphics. Pressing the button displays a window that prompts for confirmation. Press “yes” to confirm the operation or “no” to abort it. 5. Display Firmware Update: starts the DBG2/3 firmware update procedure. “General Options” menu 36 Rev.03 4.0 CONTROL & OPERATIONS 4.1 CONTROL FUNCTIONS The Vision 2020i controller performs the following functions on screw compressor chillers. 4.1.1. 4.1.2. 4.1.3. 4.1.4. 4.1.5. 4.1.6. 4.1.7. 4.1.8. 4.1.9. 4.1.10. 4.1.11. 4.1.12. 4.1.13. 4.1.14. 4.1.15. 4.1.16. 4.1.17. 4.1.18. 4.1.19. 4.1.20. 4.1.21. 4.1.22. 4.1.23. 4.1.24. 4.1.25. 4.1.26. Chilled Water Pump Interlock And Flow Switch Customer Control Interlock /Unit Enable Compressor Start Delay Timer Compressor Stage Delay Timer Compressor Off-Cycle Delay Timer Compressor Anti-Recycle Timer Load Control Ramp Control Capacity Control Of Screw Compressors Staging Of Compressors Compressor Current Limiting Modmotor Setback Control Suction/Discharge Pressure Differential Control (SDD Control) Automatic Or Manual Lead/Lag Liquid Injection Solenoid Control Second Liquid Injection Solenoid Control (Optional) Condenser Fan Control (Air-Cooled Only) Pumpdown Control (DX Only) Liquid Line Solenoid Control (DX Only) Chilled Water Reset (Optional) Demand Limit Input (Optional) Hot Gas Bypass Control (Optional) Hot Gas Injection Control (R134a Units) Electronic Expansion Valve (EEV) Control (Optional) Vapor Injection Solenoid Control (Optional) Anti-Freeze Control (Circulating Pump and Heater Control) (Optional) A description of each of these functions follows: 4.1.1. Chilled Water Pump Interlock And Flow Switch These are field installed switches, both of them are used to ensure chilled water flow before the unit is allowed to start. Failure of either one during operation will cause the compressor to shut down. A No Water Flow alarm will be generated and ‘Reset Alarm’ must be pressed to clear the alarm. 4.1.2. Customer Control Interlock /Unit Enable Control contacts from an external source can be used to enable or disable operation of the unit. The wiring diagram specifies the terminals to which this contact must be wired. To enable the unit, the contacts must be closed. To disable the unit, the contacts must be opened. 4.1.3. Compressor Start Delay Timer A compressor start delay of one minute is incorporated into controller before the first compressor is started to ensure the system load requires the compressor. A start delay timer is shown at compressor status screen during this timing. 4.1.4. Compressor Stage Delay Timer A compressor stage delay of one minute is incorporated into the controller to ensure that the system load requires another compressor. A stage delay timer is shown at compressor status screen during stage delay timing. 4.1.5. Compressor Off-Cycle Delay Timer An off-cycle delay of five minutes is initiated when the compressor is stopped. The compressor will not start before the off-cycle timer is elapsed. If cooling is called for during this time, an off-cycle delay timer is displayed at compressor status. This feature applied to horizontal screw compressor units only. CAUTION: This timer is bypassed by manual control of compressors. DO NOT manually start a compressor in five minutes after a stop. 37 Rev.03 4.1.6. Compressor Anti-Recycle Timer The compressor motor requires an anti-recycle time delay which prevents restart for 15 minutes after a start. The purpose of this feature is to avoid frequent starts which tend to elevate the motor winding temperature and impose undue wear on contactors. The controller will not restart the compressor motor until the 15 minutes have elapsed. An OFF-SC timer is displayed at the compressor status during anticycle timing. CAUTION: This timer is bypassed by manual control of compressors. DO NOT manually start a compressor more than once every 15 minutes. 4.1.7. Load Control The controller controls the leaving water temperature within a narrow deadband by pulsing load and/or unloads solenoids on the compressor. The load and unload solenoids position the slide valve within the compressor to control its capacity. The controller determines a desired level of loading and varies pulse duration depending on difference between load target and actual load. The load target is varied based on rate of approach to desired temperature preventing significant temperature oscillations. The status of the compressor can be observed at terminal display. 4.1.8. Ramp Control Another feature of the controller is ramp control, which is the ability to vary ramping time of the machine from start. Often when the machine is started, the water in the chilled water circuit is warm, and the unit will go to full load quickly. With ramp control, the user can program the controller so that it loads at a predetermined rate. This is a valuable tool, since it can help reduce power consumption and demand charges. Two variables are used to define the ramp profile: Ramp rate and ramp start setpoint. Ramp Rate defines the maximum amount that can be added to the target each second. Ramp Start point defines the percent capacity target at which the ramp begins on the first compressor. The Ramp Rate setpoint can be set anywhere from 0.1 to 1.0, smaller values producing slower loading rates. The Ramp Start setpoint can be set anywhere between 0 and 50%. The compressor will load quickly to this value and then follow the ramp slope from there. See Table 4.1.8 for ramp rates at various settings with 1-minute compressor start/stage delay timer. These values are calculated with assumption that the chilled water temperature is o o not descending more than slope temperature setpoint, typically -2.0 F (-1.1 C) per minute. TABLE 4.1.8 Ramp Rates for Several Setpoints (In Minutes) Ramp 1 Comp. 2 Comp. 3 Comp. 4 Comp. Rate Start Point Setpoint Start Point Setpoint Start Point Setpoint Start Point Setpoint 30% 12 6 4 3 30% 22 11.5 8 6.5 30% 29 16 11 9 30% 33 18 13 11 Setpoint 0.1 0.2 0.3 0.4 50% 9 5 3 2.5 75% 4.5 2 1.5 1 50% 18.5 10 7 5.5 75% 14 8 5.5 4.5 50% 25.5 14 10 8 75% 21 12 9 7 50% 29 16 12 10 75% 25 14 11 9 4.1.9. Capacity Control Of Screw Compressors The capacity of a screw compressor can be controlled manually or automatically. The status of a compressor can be observed at terminal display, “Compressor Status” key. 4.1.9.1 Automatic Control The controller calculates the operating percent capacity of a compressor by measuring discharge pressure and amps. This operating percent capacity is then compared to a target percent capacity. If the operating capacity is outside of a ± 3% dead band, the load or unload solenoids are pulsed to match the operating and target percent capacities. Since all compressors have the same target, their percent of capacities are balanced. The target percent capacity is given a fixed value when a compressor starts or stops. This value is then increased or decreased based on how far the leaving water temperature (LWT) is from setpoint and also how fast the LWT is approaching setpoint. The target percent capacity will not change if the temperature is within a temperature dead band around the setpoint. Besides, compressor loading will be stop if the leaving water temperature is falling (negative derivative) more than the derivative setpoint typically at –2.0 ºF /-1.1 ºC. The desired leaving water temperature is stored in the “Supply Water Temperature” setpoint and the temperature dead band is stored in the “Supply Water Temperature Dead band”. The factory default dead o o band is 0.8 F /0.5 C. 38 Rev.03 4.1.9.2 Calibration of Screw Compressor Capacity Amps at Full Load & Minimum Load Percentage The amps calculation is calibrated at the factory and does not normally need to be altered. If a compressor is replaced or improper operation is observed, the amps values can be calibrated as follows: 1. Check calibration of all sensors (pressure sensors, current transducers, NTC temp sensors and etc.). All calibration on sensors shall be done in this step. 2. Load the compressor to full load. If the amps reading do not match with calculated FLA value within 23A, do this calculation: Amps – FLA For example, FLA = 150A, however the max amps at full load is 130A, so, do the calculation 130 – 150 = -20 3. Key in this value into “Max Percent Cal” of the compressor in “COMPRESSOR FLA CALIBRATION” mask under technician key. 4. Therefore, the value of FLA will change. Verify that amps and FLA now match closely. 5. Manually unload the compressor all the way. 6. Locate the minimum percentage of capacity for the compressor. If this value is 25% ± 3%, no change required. Else, enter this value into “Min Percent Cal” in the same mask. The default value of “Min Percent Cal” is 25%. For example, the minimum percentage of capacity for the compressor is 32.2%, therefore, enter 32.2 at “Min Percent Cal”. 7. Repeat this procedure for each compressor. 4.1.9.3 Manual Control Screw compressors can be controlled manually with the terminal display. A compressor can be turned on, off, or placed in manual control. When a compressor is controlled manually, it can be commanded to load, hold, or unload. If the limiting condition is active, it will not accept a load command. To place a compressor in manual control, the operator must be authorized and log on. Refer to section 3.1.5.6 for procedure for manual control on compressor. If a safety condition is exceeded while operating manually, the compressor will shutdown. Reset alarm to put all compressors back into automatic control from a locked off state. CAUTION: Anti-recycle timer is bypassed by manual control. DO NOT start a compressor more than once every 15 minutes. NOTE: All compressors will revert back to automatic control if the terminal display is not given a command once every 15 minutes. 4.1.10. Staging Of Compressors The staging of compressors is based on leaving water temperature and the capacity calculations mentioned in section 4.1.9. When the percent capacity target gets up to full load and temperature is above dead band, time delay of one or two minutes is initiated before starting the next compressor. When the capacity target falls below a stored setpoint and the temperature is below the dead band, a compressor is turned off. The percent capacity values that the controller is calculating can be observed at “Compressor Status” key of the terminal display. Standard unit screw patterns are as follows. 1 Comp 2 Comp 3 Comp 4 Comp Max. Target 100.0 98.0 100.0 97.0 98.0 100.0 96.0 97.0 98.0 100.0 Min. Target 15.0 15.0 40.0 15.0 40.0 55.0 15.0 40.0 55.0 65.0 Target Start 30.0 30.0 47.5 30.0 47.5 64.0 30.0 55.0 65.0 75.0 Target Stop 90.0 90.0 90.0 90.0 90.0 90.0 90.0 90.0 90.0 90.0 Max Target: Maximum setpoint of the pattern Min Target: Minimum setpoint of the pattern Target Start: Setpoint where the next stage is starts Target Stop: Setpoint after the pattern staged down 39 Rev.03 4.1.11. Compressor Current Limiting The Amp Hold setpoint is the amp value at which the compressor will be prevented from loading. The Amp Unload setpoint is the amp value at which the compressor will be given an unload command until the current drops below the Amp Unload setpoint. Typical current limit settings may be calculated with the following equations: Hold amps = RLA X 1.1 Unload amps = Hold amps X 1.1 The setpoints should not be increased above 1.4 times of RLA since the overload trip might occur. If the values are decreased, the difference between the hold and unload setpoint should not be decreased so that oscillations will not occur. 4.1.12. Modmotor Setback Control A controller contact and a resistor are wired in parallel in the modmotor control circuit. The contact is Vision 2020i controlled to open under light load conditions. This lowers liquid level slightly, preventing excessive liquid level in the evaporator. When the unit loads up, the contacts close and the resistor is bypassed. 4.1.13. Suction/Discharge Pressure Differential Control (SDD Control) This control function seeks to prevent a low differential pressure alarm. It monitors the difference between condenser and evaporator pressure. If this difference is less than 30 psid (R22) for more than 10 seconds, and evaporator pressure is above 75 psig (R22), the controller will open a set of contacts in the modmotor circuit, causing valves to travel in the closed direction. This starves the evaporator, which increases pressure differential. When this difference exceeds 30 psid, modmotor control returns to normal. If a resistor (approximately 200 ohms) is wired to the control point, the valve may not close fully when the relay contacts open. This helps prevent suction pressure undershoot. Decrease this resistance to keep the valve fully open. Increase the resistance to close the valve further if the 30 psid is not generated with the control relay open. 4.1.14. Automatic Or Manual Lead/Lag This feature allows the customer to manually select the lead compressor or let the controller automatically rotate the lead compressor. There are two setpoints in this control. The lead compressor setpoint specifies which compressor is the lead compressor in manual lead/lag mode. The rotation setpoint specifies automatic or manual lead/lag mode is in effect. Select “None” to disable automatic compressor lead/lag rotation. Select either “By Running Hours”, “By Day” or “By Stage” for automatic compressor lead/lag rotation. 4.1.15. Liquid Injection Solenoid Control The liquid injection solenoid is energized when the compressor is operating and compressor discharge o temperature rises above the liquid injection ON setpoint (typically 160 F). The liquid injection solenoid is turned off when the compressor stops or when discharge temperature falls below liquid injection OFF o setpoint (typically 150 F). If discharge superheat (DSH) control is enabled, the liquid injection solenoid may energize when discharge o superheat is above DSH ON setpoint (typically 65 F), besides discharge temperature control. Liquid injection solenoid is de-energized when both discharge superheat and discharge temperature is below the o OFF setpoints. Typical setting for DSH OFF setpoint is 55 F. 4.1.16. Second Liquid Injection Solenoid Control (Optional) A low temperature unit or high ambient air-cooled unit may furnish with two liquid injection solenoids. Three stages of liquid injection control is available with these two solenoids. The valves opening are adjusted so that valve opening of liquid injection #2 is larger than liquid injection #1. Stage 1 Stage 2 Stage 3 Liquid Inj. Sol #1 Liquid Inj. Sol #2 ON OFF OFF ON ON ON Typical Turn ON Conditions Typical Turn OFF Condition Discharge Temperature > Stage 1 ON o setpoint (160 F) Discharge Temperature > Stage 2 ON o setpoint (170 F) Discharge Temperature > Stage 3 ON o setpoint (180 F), OR Discharge o superheat > ON setpoint (65 F) Discharge Temperature < Stage 1 OFF o setpoint (150 F) Discharge Temperature < Stage 2 OFF o setpoint (160 F) Discharge Temperature < Stage 3 OFF o setpoint (170 F), AND Discharge o superheat < OFF setpoint (55 F) The above setpoints are typical for water-cooled units. 40 Rev.03 4.1.17. Condenser Fan Control (Air-Cooled Only) The Vision 2020i controller provides two types of control logic for air-cooled condensers. The type of control will be governed by the physical condenser layout of the unit. Each method of control is enhanced with adaptive, self-learning, fan control logic. The end result is condenser control that offers significantly reduced fan cycling and improved efficiency. The two types of air-cooled condenser control logic are explained as follows: A. Adaptive Individual Air-cooled Condenser Control This type of control is based upon a single compressor per circuit. The individual discharge pressure on that circuit will be the controlling pressure. B. Adaptive Air Combined Air-cooled Condenser Control This type of control is based upon a condenser that is controlled by the highest discharge pressure from any one of the compressors sharing that circuit (compressor 1&3 - share; compressor 2&4 share). The highest discharge pressure between the sharing compressors will be the controlling pressure. Air Cooled Condenser Control Setpoints The air-cooled condenser setpoints are as follows: Stage 1 ON Stage 2 OFF Stage On Diff Stage Off Diff Stage 1 Off Last Stg Max - Condenser fan stage 1 on. Condenser fan stage 2 off. Differential pressure for additional condenser fan stages. Differential pressure for subtracting condenser fan stages. Condenser fan stage 1 off Maximum setpoint for last stage on A compressor must be operating for the condenser fans to operate. The condenser points (i.e. fans) will turn on based upon the value in setpoint STAGE 1 ON. When the discharge pressure exceeds this value, the first condenser point is turned on. If additional condenser points exist, they will be turned on when the pressure exceeds the previous cut in value (Stage 1 ON for the first stage) plus the value contained in STAGE DIFF ON setpoint. Condenser points (i.e. fans) will be turned off based upon the value in the setpoint STAGE 2 OFF (Stage 2 turn OFF point). As the discharge pressure is reduced, the condenser points will be turned off based upon the STAGE 2 OFF setpoint, plus the value in STAGE OFF DIFF setpoint for each stage number above stage 2. Stage 1 of condenser staging will be turned off based upon the value in the setpoint (Stage 1 OFF). See below for an example of condenser staging. INCREASING CONDENSER PRESSURE (Example of 4 stage fan cycling, R22 unit) COND FAN1 ON when discharge pressure is > 230psig (Stage 1 ON setpoint) COND FAN2 ON when discharge pressure is > 250psig (Stage 1 ON plus 1xStage ON Diff setpoint values) COND FAN3 ON when discharge pressure is > 270psig (Stage 1 ON plus 2x Stage ON Diff setpoint values) COND FAN4 ON when discharge pressure is > 290psig (Stage 1 ON plus 3x Stage ON Diff setpoint values) And so on for the number of condenser fans supplying the circuit. DECREASING CONDENSER PRESSURE (4 fan example "continued") COND FAN4 OFF when discharge pressure is < 200psig (Stage 2 OFF plus 2xStage OFF Diff setpoint values) COND FAN3 OFF when discharge pressure is < 190psig (Stage 2 OFF plus 1xStage OFF Diff setpoint values) COND FAN2 OFF when discharge pressure is < 180psig (Stage 2 OFF setpoint value) COND FAN1 OFF when discharge pressure is < 170psig (Stage 1 OFF setpoint value) 41 Rev.03 Adaptive Control Logic The controller enhances the condenser control logic above with a unique, adaptive, self-learning fan control logic. These enhancement results in a control scheme that offers reduced fan cycling and improved efficiency. Adaptive Control Logic automatically adjusts the fan cut-in offset based upon the following criteria: 1> If the last stage fan turned on (including stage 1) is cycled off in 10 minutes or less, then a COND ON OFFSET value will be incremented by 5 psig. This increases the stage 1 turn on value (Stage 1 ON plus COND ON OFFSET) which in turn increases all of the fan turn on settings. This process will continue until fan cycling ceases or the adjusted turn on point for the last fan stage is 320 psig (R22). This will also be a setpoint (Last Stg Max). 2> The cut-in offset (COND ON OFFSET) will be decreased by 5 psig if the last fan to be turned on has not cycled off within 1 hour. The offset will continue to decrease by 5 psig every 10 minutes unless fan cycling begins again. The Adaptive Control Logic will only affect the condenser fan turn on logic, it will not affect the fan turn off logic. 4.1.18. Pumpdown Control (DX Only) This feature is to stored refrigerant in condenser when compressor is stopped. Pumpdown control will take place when temperature set point is achieved before compressor is being cycled off or unit enable input is off. The compressor will stop when suction pressure is lower than pumpdown setpoint, 65PSI/4.5BAR (for R22) or 15 seconds (setpoint) delay timer is elapsed. 4.1.19. Liquid Line Solenoid Control (DX Only) When compressors starts, the liquid line solenoid will energize when suction pressure falls below the pumpout setpoint or a time delay of 5 seconds is elapsed. For unit with two liquid lines per refrigerant circuit, the second liquid line solenoid will energize when suction pressure falls below low pressure cutout setpoint or a time delay of 25 seconds is elapsed and unit target is above 40%. The second liquid line solenoid will be de-energized when the unit target is less than 35%. 4.1.20. Chilled Water Reset (Optional) If an analog input is available, the desired chilled water temperature can be raised automatically by an external signal provided by an external controller. The external signal can be 0–5Vdc, or 4–20mA. CW Reset Enable setpoint must be enable for this option. Input Type setpoint defines the external signal, 05Vdc, or 4-20mA. The maximum temperature reset (increase) desired must be stored in Max Reset o o setpoint. For example, to raise the chilled water setpoint from 44 F to 50 F with a 4-20mA input, “4-20mA” o is selected for Input Type setpoint and 6.0 F is stored in Max Reset setpoint. 4.1.21. Demand Limit Input (Optional) If demand limiting is desired, a 4-20mA, or 0-5Vdc signal must be supplied to the Demand Limit analog input as shown on the wiring diagram. Supplying 4mA, or 0Vdc will have no limiting effect, and 20mA, or 5Vdc will have maximum limiting. The Demand Limit setpoint is used to determine the maximum amount mA/Vdc supplied to Demand limit analog input will have. If the Demand Limit setpoint is set to 0, there will be no limiting, and if set to 100, there will be maximum limiting. The Demand Limit setpoint can be set anywhere between 0 and 100 depending on the amount of Demand Limit desired. 4.1.22. Hot Gas Bypass Control (Optional) When hot gas bypass has been supplied with the unit, an output from the controller controls the solenoid. The solenoid is turned on if only one compressor is operating in the entire unit and the target percent capacity of the compressor drops below the Hot Gas Bypass ON setpoint. If the target percent capacity then climbs above the Hot Gas Bypass OFF setpoint, the solenoid id turned off. Typical setpoints are 45% for Hot Gas Bypass ON setpoint and 80% for Hot Gas Bypass OFF setpoint. 4.1.23. Hot Gas Injection Control (R134a Units) Hot gas injection control is supplied to the R134a unit as a standard feature. An output from the controller controls the solenoid. The solenoid is turned on if only one compressor is operating in the refrigerant circuit and the target percent capacity of the compressor drops below the Hot Gas Injection ON setpoint. If the target percent capacity then climbs above the Hot Gas Injection OFF setpoint, the solenoid id turned off. Typical setpoints are same as hot gas bypass control setpoints. 42 Rev.03 4.1.24. Electronic Expansion Valve (EEV) Control (Optional) When compressor starts, the electronic expansion valve will stay closed until suction pressure falls to Pumpdown setpoint. Then the controller energizes a contact to enable EEV controller. By measuring the suction pressure and temperature, the EEV controller modulates EEV to maintain suction superheat at setpoint. 4.1.25. Vapor Injection Solenoid Control (Optional) The vapor injection solenoid is energized when the compressor is operating and its percent capacity is higher than the Vapor Injection ON setpoint (typically 80%). The vapor injection solenoid is turned off when compressor is stops or when its percent capacity falls below Vapor Injection OFF setpoint (typically 75%). This option applied to horizontal screw compressor only. 4.1.26. Anti-Freeze Control (Circulating Pump and Heater Control) (Optional) Anti-Freeze control is furnished to prevent water in cooler to be frozen by low surrounding temperature. o Heater is on when ambient temperature is lower than ON setpoint (typically 35 F) and unit if off. Circulating pump will be started when heater is on and chilled water flow switch is opened. Heater will be o turned off when ambient temperature is higher than OFF setpoint (typically 38 F) or the unit is on. Circulating pump will stop three minutes after heater is off, or stop immediately when flow switch is closed. 4.2 SAFETY AND ALARMS The Vision 2020i controller performs the following safety protection on screw compressor chillers. 4.2.1. 4.2.2. 4.2.3. 4.2.4. 4.2.5. 4.2.6. 4.2.7. 4.2.8. 4.2.9. 4.2.10. 4.2.11. 4.2.12. 4.2.13. 4.2.14. Low Pressure Limiting High Pressure Limiting Amp Limiting Low Pressure Safety High Pressure Safety Low Differential Pressure Alarm Evaporator Freeze Safety Low Oil Safety Sensor Failure Alarm No-Stop Alarm External Shutdown Indication (No Run Alarm) Compressor Starter Alarm Low Chilled Water Flow Alarm Power Loss Reset A description of each of these safety and alarms follows: 4.2.1. Low Pressure Limiting This function prevents the unit from tripping at low evaporator refrigerant pressure. If evaporator pressure drops below Low Pressure Hold setpoint, the compressor will hold and load command will be bypassed. If evaporator pressure drops further below Low Pressure Unload setpoint, the compressor will unload continuously, hold and load command will be bypassed. After the evaporator pressure rises above the Low Pressure Hold setpoint, the compressor will operate based on the unit target. Typical setting for Low Pressure Hold setpoint is 62PSI and Low Pressure Unload setpoint is 60PSI, for R22 units. 4.2.2. High Pressure Limiting This function prevents the unit from tripping at high condenser refrigerant pressure. If condenser pressure rises above High Pressure Hold setpoint, the compressor will hold and load command will be bypassed. If the condenser pressure rises further above High Pressure Unload setpoint, the compressor will unload continuously, hold and load command will be bypassed. After the condenser pressure drops below the High Pressure Hold setpoint, the compressor will operates based on the unit target. Typical setting for High Pressure Hold setpoint is 240PSI and High Pressure Unload setpoint is 245PSI, for R22 water-cooled units. 4.2.3. Amps Limiting This function prevents the compressor from tripping at overload. If the compressor amperage rises above Amps Hold setpoint, the compressor will hold and load command will be bypassed. If the compressor amperage rises further above Amps Unload setpoint, the compressor will unload continuously, hold and load command will be bypassed. After the compressor amperage drops below the Amps Hold setpoint, the compressor will operates based on the unit target. Typical settings for Amps Hold setpoint 1.1XRLA, and Amps Unload setpoint is 1.21XRLA. (RLA = Rated Load Amps) 43 Rev.03 4.2.4. Low Pressure Safety This function protects the unit from operating at abnormally low evaporator refrigerant pressure. When the evaporator pressure of a refrigeration circuit drops below the Low Pressure Cutout setpoint, a time delay is initiated. If the pressure stays below the setpoint during the time period, or pressure drops below cutout setpoint minus deadband, all compressors on the circuit will be locked off immediately and the low pressure alarm will be recorded by the controller. The time delay is 45 seconds for flooded units, 60 seconds for DX units. The deadband is 5 psig for flooded units, 10 psig for DX units. Reset by pressing the ‘Reset Alarm’ button on terminal display of the controller. 4.2.5. High Pressure Safety This function protects the compressor from operating at abnormally high discharge refrigerant pressures. The controller will shut down the compressor when condenser pressure reaches the high pressure set point, and turn on the alarm indicator lamp on the control box. The high discharge pressure alarm will be recorded by the controller. Reset by pressing the ‘Reset Alarm’ button on terminal display of the controller. 4.2.6. Low Differential Pressure Alarm For proper lubrication, a screw compressor requires a 30 psid (for R22) differential pressure between condenser and evaporator pressures. If the differential pressure is less than 30 psid (for R22) for more than 3 minutes while a compressor is operating, all compressors in the same refrigerant circuit will be shut down. The controller will store the low differential pressure alarm code and turn on the alarm light. The ‘Reset Alarm’ key must be pressed to clear the alarm. 4.2.7. Evaporator Freeze Safety If the leaving chilled water temperature drops below the freeze setpoint, the controller will shut down the unit and store the freeze alarm. After solving the problem, press ‘Reset Alarm’ on terminal display of the controller to clear the alarm. 4.2.8. Low Oil Safety A standard oil level sensor is located in each compressor. If low oil indication (digital input is OFF) persists for 60 seconds during compressor operation, the controller will then shut down the compressor. The status of the oil level sensor can be seen on the terminal display. Failure is indicated on the alarm pilot light. The low oil alarm code will be recorded by the controller. 4.2.9. Sensor Failure Alarm If the controller measures an analog sensor (temperature, pressure, or Amp sensor.) the reading is beyond its measuring range, the associated compressors are shutdown. The controller then stores the alarm code corresponding to the sensor alarm. A sensor alarm indicates a problem in the analog measurement system. 4.2.10. No-Stop Alarm If the controller turns off a compressor, but the compressor digital input does not turn off, a No-Stop alarm is generated. The controller will turn off the control power relay which disables all compressor control circuits and will turn on the alarm light. This alarm indicates a wiring or hardware error. 4.2.11. External Shutdown Indication (No Run Alarm) A No-Run alarm is generated if the controller has starts a compressor but the compressor is not running and no amps reading. The controller determines that the compressor is not operating if the associated digital input from the compressor contactor is ON, but the amps of the compressor is less than 20 amps. If No-Run alarm is occurred, monitor the amps sensor input and external safety devices to see which is producing the fault. 4.2.12. Compressor Starter Alarm Compressor starter alarm is generated if the controller tries to start (run) a compressor but the associated digital input from the compressor contactor does not indicate that the contactor is pulled in (digital input stays OFF), If compressor starter alarm is occurred, monitor the digital input (from starter) to troubleshoot the problem. 4.2.13. Low Chilled Water Flow Alarm A No Flow alarm will be generated if a compressor control point is ON and the flow switch digital input is OFF all compressors will be locked off and the alarm light turned on. After resolving the problem, press “RESET ALARM”. 44 Rev.03 4.2.14. Power Loss Reset A “Power Loss” setpoint is included in Vision 2020i controller to give the customer the option of automatic or manual reset on a power failure to the unit. If the “Power Loss” setpoint is set to “Auto”, the unit will reset automatically. If the “Power Loss” setpoint is set to manual, the controller will lock the unit off on a power failure and store the Power Loss alarm code. “Reset Alarms” must be pressed to reset the alarm. 4.3 EXTERNAL CONTROL FUNCTION AND SAFETY PROTECTIONS The following control function and safety protections are standard in Dunham-Bush screw compressor chillers. 4.3.1. High Oil Temperature Thermostat 4.3.2. Overload Protector 4.3.3. Phase Control Relay (PCR) A description of each of these safety and alarms follows: 4.3.1. High Oil Temperature Thermostat A thermostat is located in each compressor which will open the compressor run circuit if oil temperature exceeds 203°F. The high oil temperature pilot light will indicate an excessive oil temperature and a No-Run alarm will be recorded by the controller. Reset is activated by pressing the ‘Reset Alarm’ button on terminal display. 4.3.2. Overload Protector A solid state overload protects each compressor by three phase current monitoring to prevent high current draw. The trip setting is factory set and is reset by pressing button on overload after correcting problem. The ‘Reset Alarm’ button on controller must also be pressed to clear the alarm. A No-Run alarm is stored in the controller. 4.3.3. Phase Control Relay (PCR) The PCR protects the unit from the following electric supply malfunctions: undervoltage, phase reversal and single phasing. If the PCR trips, a control relay (1CR) will de-energize and open the control circuit. A green LED indicates presence of power supply. The yellow LED indicates a good voltage supply. The power loss setpoint is factory set to “Auto” to allow automatic start after PCR failure. Compressor will not start for 15 minutes after failure. To select manual reset, set power loss setpoint to “Manual”. In this case, a power loss alarm will be stored by the controller and ‘Reset Alarm’ must be pressed to start. 45 Rev.03 5.0 DBLAN & MASTER-SLAVE CONTROL 5.1 DBLAN NETWORK 5.1.1 General Descriptions As mentioned earlier, the Vision 2020i controllers can be connected to DBLAN local network, allowing the communication of data and information from one location (node) to another. The Vision 2020i terminals can monitor the control variables (temperature, pressure, alarms) from one or more boards. If one or more terminals are disconnected or malfunctioning, the control program continues to function correctly on each Vision 2020i controller. Generally, the application program can monitor the status of the network and intervene as a consequence to ensure the continuity of the control functions. All the versions of the Vision 2020i controller can be connected in a local DBLAN network. However, the software program may need modifications based on applications of the project. All the devices connected to the DBLAN network are identified using their own individual address. As the terminals and the Vision 2020i I/O boards use the same type of address, terminals and Vision 2020i boards can not have the same identifier. The values which can be selected for the address range from 1 to 32 for the terminals and from 1 to 31 for the I/O boards. For addresses configurations, please refer to section 3.2. 5.1.2 DBLAN Electrical Connections Connection between boards in a DBLAN network is carried out using an AWG20/22 shielded cable, made up of a twisted pair plus shield. The boards are connected in parallel, with terminal J11 as the reference. Figure. 5.1.1 shows a diagram of a number of boards connected in a DBLAN network and powered by different transformers (with G0 not earthed). Typical application: a number of boards inside different electrical panels. Figure 5.1.1 Figure 5.1.2 shows a diagram of a number of boards connected in a DBLAN network and powered by different transformers with the same earth reference. Typical application: a number of boards inside different electrical panels. 46 Rev.03 Figure 5.1.2 Important Warnings • • The ground connection must be made to the same ground (same ground pole, for all the Vision 2020i boards); With these configurations, Class II safety transformers must be installed. 5.2 Master-Slave Control 5.2.1 General Descriptions The optional master/slave control sequence is used to sequence multiple chillers in one installation according to the building load demand. It also controls the dedicated chilled water pump or motorized valve. Vision2020i Controller offers this feature with minimized field wiring cost compare to conventional method that involves lots of hardware cost. It is carried out this control function via the advanced DBLAN communication bus to implement the network management for multiple chillers lead/lag communication, sequencing and monitoring. 5.2.2 Principle Of Operation Via DBLAN Communication Bus Example: 3 chillers network with 2 units on duty and 1 unit standby Notes a) b) c) Each chiller has a stand-alone master DB3 board and dedicated display (DBG1) Each chiller DB3 will be connected to DBLAN network through J11 connector using twisted pair shielded cable The chiller lead/lag selection can be determined by ¾ Manual lead/lag setpoint ¾ Schedule and holiday setup ¾ Alarm conditions 47 Rev.03 d) The lead/lag selection determine the chiller operation sequence as follows, The following is an example of three chillers network with two units on-duty and one unit standby. Lead chiller selection 1 2 3 e) f) g) h) 5.2.3 Normal chillers operation sequence 1 & 2 on duty 3 standby 2 & 3 on duty, 1 standby 1 & 3 on duty, 2 standby When DBLAN fails 1, 2 & 3 on duty (if unit enable are ON) 1, 2 & 3 on duty (if unit enable are ON) 1, 2 & 3 on duty (if unit enable are ON) If the lead/lag selection is changed over to a different chiller, the sequence of operation will be rotated Each chiller will use a network address setpoint to determine individual chiller network address Each chiller will require a dedicated chilled water pump or motorized valve digital output, unit enable and chilled water flow status digital inputs as well as enable next output command. Master-slave control can be extended up to maximum six chillers in the DBLAN network. Sequence of Operation 1. When the customer enable input is ‘on’ to start the lead unit, the chilled water pump starter or motorized valve control point will close and water will start to flow through the evaporator, this will activate the flow switch. The flow switch and water pump status are interlocked and feedback as digital input to the chiller and upon receipt of a valid 'on' signal, the lead chiller will begin to execute its running program. 2. The controller will start and load the compressor(s), upon both compressors achieving full load; it will send an output signal via the DBLAN to enable second unit (lag 1) 3. The second unit will now command its chilled water pump to start if the customer unit enable is activated. The second chiller will start and load the compressor(s) until it reaches full load 4. When the second chiller or lag 1 unit reaches full load, the third chiller will not starts unless all three chillers are set to be on-duty. However, the third chiller will starts if any of the on-duty chiller is tripped by alarm. 5. If the leaving water temperature falls below setpoint, all of the chillers will begin to unload evenly. 6. If the load drops below 40% total capacity, enable next signal to second chiller will be disabled, and second chiller will stop. The master chiller will load up to compensate if necessary. The pump for second chiller will be shut off. 7. As the load demand falls, the master chiller will unload continuously to cycle off the second compressor, and finally the entire unit. 8. Each unit in the network can monitor the operation of other units via DBLAN. If the master unit is having critical alarm, the lag 1 will take over as the master unit automatically. 9. In order to enable next unit, the following conditions must met a) Leaving water temperature (LWT) ≥ (LWT Setpoint + Next ON deadband), typical setting for LWT o o setpoint is 44 F and Next ON DeadBand is 5 F (both are adjustable). b) When the lead unit’s packaged capacity is higher than “Next on setpoint”, typical setting is 75%. For example, when capacities of both compressors are higher than 75% or either one compressor is locked out by alarm. c) When conditions (a) & (b) fulfilled, an enable next time delay of 3 minutes (adjustable) will be initiated. Upon completion of this timer, the next unit will be enabled. 10. In order to off next unit, the following conditions must met a. Leaving water temperature (LWT) ≤ (LWT Setpoint + Next OFF deadband), typical setting for Next o OFF DeadBand is 1 F (both are adjustable). b. Unit Capacity ≤ OFF Capacity setpoint + Net Offset. Typical settings for OFF Capacity setpoint is 40%, and Net Offset is 5%. Please refer to the Appendix for the master-slave control sequence flow chart. 48 Rev.03 6.0 WINLOAD32 & DATALOGGING 6.1 WINLOAD 32 6.1.1 Introduction WinLoad32 is the software for PCs that manages communication between the PC and the DB3 controllers (DB1, DB2 and DB3). The following operations can be performed using this connection between the PC and the controller: Update the firmware and the software of the controller; Acquire data from the board, such as the configuration parameters and the data logged; Define the logic for logging the events saved on the board. The following conventions have been adopted to indicate the direction of transfer of the files: PC 6.1.2 Æ Å UPLOAD DOWNLOAD Æ Å DB3 Controller Connection of Converters To Vision 2020i Controller Power supply for controller must be turned off before connects it to any of the converter. For different type of converter, different method of connection is used. a. RS232 – RS485 Converter Connection/communication between controller and this converter can be done in two ways: • Using 6 cores telephone cable and connect it to J10 on controller • Using AWG 20/22. A MODBUS serial card shall be inserted into SERIAL CARD slot on controller. Connect output of converter to the MODBUS serial card using AWG 20/22. Besides, a DC power supply shall be supplied to the converter. b. USB – RS485 Converter i. Using AWG 20/22 cable Connect the output of converter to MODBUS serial card using AWG 20/22. The MODBUS card shall be inserted into SERIAL CARD slot on controller. ii. Using RJ10 (6 cores phone cable) Connect the output of converter to J10 on controller using a RJ10 cable (6 cores phone cable) 6.1.3 Uploading Program/DataLog File to Controller i. ii. After connects converter to controller, turn on the controller and run WinLoad program. pCO address shall be set by refer to dip switch setting on the controller/unit number. Serial port in WinLoad is determined by type of converter used in this application. Serial port shall be set to 1 if RS232 – RS485 converter is used. Else if USB – RS485 is used, Serial port shall be set to the same port number where the converter is plugged. (Figure 6.1.1) pCO address = Dip switch setting at controller/unit number Serial port = 1, for RS232–RS485 converter Serial port = 3, for USB–RS485 converter Figure 6.1.1 49 Rev.03 iii. When WinLoad starts to communicates with controller, a password is required to access into the controller. The password is 5907 or 0032 (Figure 6.1.2). When WinLoad is On-Line, click on the “Upload” column. To upload application program onto the controller, column “Application” shall be selected. In this section, two files shall be selected; one is .iup file and another .bin file. (Figure 6.1.3) Password = 5907 or 0032 Figure 6.1.2 Click on “Application” .bin file is selected .iup file is selected Click on ‘Upload’ to start uploading Status of WinLoad Figure 6.1.3 iv. v. Click on “Upload” to start uploading. (Figure 6.1.3) Uploading application program is progress (Figure 6.1.4) and uploading is done (Figure 6.1.5). Figure 6.1.4 50 Rev.03 vi. Figure 6.1.5 To upload data log file to controller, column “Public Variables” shall be selected. A .pvt file shall be selected and upload it into controller. (Figure 6.1.6). Click on “Public Variables” .pvt file is selected Figure 6.1.6 vii. The next step is to select column “Log Project” and upload a .LCT file from this column. (Figure 6.1.7) Click on “Log Project” .LCT file is selected Figure 6.1.7 viii. After this .LCT is completely uploaded, data log file is uploaded to the controller successfully. 51 Rev.03 6.2 DATALOGGING There are two ways to read the data log from the Vision 2020i controller. A) Reading Data Log from Terminal Display Using Keypad B) Reading Data Log from WINLOAD using a local connection C) Reading Data Log from WINLOAD using a remote connection 6.2.1 Reading from terminal display using keypad This is done using the following buttons: i. To start reading the logs: ENTER + ALARM ii. To navigate around the screens: MENU, T, S, ENTER. iii. There are 4 types of screens: • Type 1 (Level 1): Select the memory where the log is saved. ”Flash 2”: memory expansion. ”Flash 3”: internal memory. Press T/ S to select the memory. Press ENTER to move to level 2. Press MENU or ESC to exit the display of the logs. • Type 2 (Level 2): Select the log. Press T/ S to select the log. Press ENTER to move to level 3. Press MENU or ESC to move to level 1. • Type 3 (Level 3): Display the data of the last event saved. The first event displayed when entering this level is the most recent one generated. Press T/ S to display the following or previous event. Press ENTER to move to level 4. Press MENU or ESC to move to level 2. • Type 4 (Level 4): Display the variables saved together with the event. Press T/ S to display the following or previous variable. Press MENU or ESC to move to level 3. iv. The number of the level is displayed in the top left. v. The structure of the screens that shows the data saved cannot be customized. vi. If there is only one memory installed to save the data, the screen corresponding to level 1 is not displayed vii. If only one log has been configured, the screen corresponding to level 2 is not displayed Previous record Previous variable + 1 DISPLAY LOG DATA Which flash? Data on flash 2 2 DISPLAY LOG DATA Which log? Alarm events 3 31-12-00 23-59-59 High temperature alarm 1 (0) Next record Level Description memory type, log and variable Current value Previous value 4 31-12-00 23-59-59 Room temperature 021.2 Next variable Variable value 52 Rev.03 6.2.2 Reading From WINLOAD Using A Local Connection The connection between the PC and the controller is the same used to download the application to the controller. Therefore, a RS 485 serial card shall be inserted to the Vision 2020i controller to allow this feature. This function allows all the data relating to a log to be downloaded and saved in a text format file that can be opened using Excel (CSV format). The data cannot be download for a specific period of time or one log only. To download the data saved: i. Open WinLOAD, key-in password and get WinLoad on-line with controller. (Figure 6.1.2) ii. Select the “Download” tab and select “LOG DATA”. Then click the “Download” button. (Figure 6.2.1) Select Log Data Memory Click on “Download” Figure 6.2.1 iii. Enter the name of the file used to save the data downloaded from the controller. Each directory can only store 1 data log file. (Figure 6.2.2 & 6.2.3) Select standard and click on “create” to start create data log file Figure 6.2.2 53 Rev.03 Key in file name Figure 6.2.3 iv. Download in progress (Figure 6.2.4) and downloading is done. (Figure 6.2.5) Figure 6.2.4 Downloading data log is done Figure 6.2.5 54 Rev.03 6.2.3 Reading From WINLOAD Using A Remote Connection As above, except for the fact that the connection between the PC and WINLOAD is made via modem. Therefore, a RS232 modem card shall be inserted to the Vision 2020i controller and a serial modem and telephone line shall supply to the unit to allow this feature. Besides. The BMS protocol must set to “Modem” option. When reading the logs, the application and the logs themselves will continue to operate. To download the data saved through a remote connection: i. Open WinLOAD program. A warning message may be pop-up, but this all right if a remote connection is used. (Figure 6.2.1) Figure 6.2.1 ii. iii. Connects the PC to a telephone line via a serial modem. Click on “Remote Connection” and “Connect” to start the remote connection. (Figure 6.2.2) Figure 6.2.2 iv. A “Connect” window will pop up. Select modem at key number to call. “Password” is refer to modem password which has been set in the controller. “IDENT” refer to “IDENT” setting in the controller. Click on “CONNECT” to start dialing to the unit. (Figure 6.2.3) 55 Rev.03 Figure 6.2.3 v. vi. After the line is connected, everything is the same as with local connection. After the downloading process is done. Click on “Remote Connection” and “Hang Up” to disconnect the line. (Figure 6.2.4) Figure 6.2.4 56 Rev.03 7.0 SMART KEY 7.1 SMART Key For Vision 2020i Controllers The SMART key is an electronic device used to program and service the Vision 2020i controllers. The SMART key simplifies the transfer of data between the controllers installed and a personal computer by exploiting the high capacity flash memory for storing software applications, Bios and variable logs. The Vision 2020i controller is connected directly via the telephone connector using cable supplied, while to transfer the data to a personal computer, the USB adapter (P/N: 4030004389) is required. The power supply comes either via the USB port on the PC or from the controller, therefore no external power supply is needed. 7.2 SMART Key Programming by Personal Computer The different operating modes described in the table below can be configured using a program on the PC. The same program can also load the software to the key or transfer the logged data from the Vision 2020i to disk. Type B C Function Update software from key to Vision 2020i Copy software from Vision 2020i to Vision 2020i D E G Read logged data Read logged data and software from Vision 2020i Copy software from Vision 2020i to Vision 2020i and read logged data Mode Button Disabled Switches the key from write mode to read mode Disabled Disabled Switches the key from write mode to read and read logged data mode When the key is connected to the personal computer, the symbols have the following meanings: Flashing Alternating Awaiting the connection to the PC During the connection to the PC, indicates that data transfer is in progress “pCO Manager” software is needed for communication between PC and smart key. A USB converter (P/N: 4030004389) is also needed for this application. Please refer to section 7.5 for “pCO Manager” software. 7.3 Use When Connected To The Vision 2020i Switch off the Vision 2020i, remove any peripherals present in the DBLan network and plug the key into the telephone connector of the controller. When switching on again, all the symbols light up momentarily and the buzzer emits a beep. Then wait a few seconds before the key is operational. This waiting phase is indicated by the flashing of the symbols. At the end, the controller enters programming mode and the start button, now on steady, can be pressed to start the data transfer. Important: If the key is type “B”, “C” or “G” (in write mode), pressing the start button immediately deletes the software already loaded on the Vision 2020i. Important: The key must not be removed while a write operation is in progress to the key, as the file being transferred will be lost and the corresponding space is not restored. To restore the original capacity, all files will need to be deleted. If the key is type “C” or “G”, simply perform a new application read operation. 7.4 Meanings of the buttons/symbols Flashing: the key is connecting to the Vision 2020i, during this phase, which may last Button is disabled. a few seconds, the Flashing: the key has detected the Vision 2020i and is checking the access right. + On steady: pressing the button starts writing the software to the Vision 2020i + On steady: pressing the button start reading the software from Vision 2020i + On steady: pressing the button starts reading the logs from the Vision 2020i On steady: for key type “C” or “G”, pressed for 1 second switches from read to write 57 Rev.03 If the key is type “C” or “G”, pressing button for 1 second switches from read to read logged data (only “G”) or write, the symbols (write to Vision 2020i), (read from Vision 2020i), (read logged data) reflect the selected status. If the key is not type “C” or “G”, the button is disabled and off. The ( button starts the read or write operation, indicated by the flashing of the corresponding symbol or ) at a frequency proportional to the progress of the operation. When the operation is completed, button again, the buzzer sounds the buzzer sounds intermittently for 2 seconds. Pressing the without repeating the operation; to repeat the operation, the key must first be unplugged. In the event of error, the corresponding symbol below shows the causes of the problem. 7.4.1 Errors before pressing + + + + Flashing Communication error: no response from the Vision 2020i or alternatively Firmware version of the key incompatible Continuous Password error Flashing Type of key incompatible Continuous + Continuous 7.4.2 comes on in combination with the other LEDs. The table + + + + + + + flashing Continuous + flashing The key is missing one or more required files (empty memory; no kit for the connected Vision 2020i type) Incompatibility between the key software and Vision 2020i hardware Incompatibility between Vision 2020i application and hardware Continuous No logged data present on the Vision 2020i Continuous Type of key not programmed Error after pressing + + + + + + + + + + buzzer Flashing and buzzer intermittent The write operation has failed + buzzer Flashing and buzzer intermittent The read operation has failed + buzzer Flashing and buzzer intermittent The read logs operation has failed Continuous flashing Incompatibility between log configuration and Vision 2020i hardware (no dedicated flash). This error does not damage the writing of the remaining files + Continuous Insufficient space to read logged data Flashing General error 58 Rev.03 7.5 pCO Manager pCO Manager software is used to configure the Smart Key, upload program files, or download data log files from Smart Key. Following are procedure to configure and upload program files to Smart Key. a. Connects the USB converter to PC and connect the smart key. Start program “pCO manager”. Click on “Smart key” to proceed with configurations for smart key. b. Select language and serial port. Check “With key” if the smart key is connected to the converter. If the smart key is not connected, check on “Without Key”. c. At “Configuration” section, select smart key type to type “B”. Set pCO password to “32”. Click on “Set Params” to program the key. 59 Rev.03 d. In “Kit Definition” section, select pCO type to pCO3, check “pLAN enable” and select the pLAN address. Click on “SELECT ALL” to check all pLAN addresses. e. Browse for the program files and “Save Kit”. f. Click on “Kit Upload”, select the kit that saved just now and upload it into the smart key. g. After the kit is uploaded, the program has been uploaded to the smart key successfully. Click on “Option” followed by “Disconnect Key” to disconnect smart key from the PC. After a “beep” sound, then removed the key from the converter. 60 Rev.03 8.0 TROUBLE SHOOTING GUIDE 8.1 General Servicing Procedures Use the operating guide and trouble-shooting guide below to do the following: a. b. c. d. e. f. g. h. i. 8.2 Check compressor status to see if it is locked off. If locked off, check alarms to see cause. Check all analog inputs for accuracy. If digital input is associated with failure, check digital inputs. Repair mechanical system problem or electrical system problem. Reset alarm by pressing “RESET ALARM”. Check that all requirements for start-up are met. Operate machine over full operating conditions and observe results. Verify that all analog values are correct. Trouble-shooting Guide This trouble-shooting guide lists problems, possible causes, and corrective action. Problems encountered Possible Causes Corrective Action 1. No text display on terminal display i. No power on Vision 2020i controller ii. Phone cable problem - Check for 24VAC on G and Go at J1 on the controller iii. Board damaged i. Improper settings of terminal display or IO address ii. Phone cable problem 2. Analog input sensor reading incorrectly iii. Faulty connector at terminal display iv. Faulty connector at controller (J10) i. Sensor out of calibration ii. Wiring problem iii. Sensor problem iv. Damaged analog input 3. Several digital inputs not correct i. Wiring problem ii. Damaged board - Check that the phone cable is connected to proper connector on the controller (J10) - Remove the phone cable and re-try. If available, test with another phone cable - Inspect board for shorted traces or foreign objects - Set address of terminal display and IO board accordingly - Remove the phone cable and re-try. If available, test with another phone cable - If possible, connect the phone cable to another terminal display - If possible, connect the terminal display to another controller - Verify that sensor reading is close to what is expected - Verify that gauge or meter is correct and the same location as the sensor - Use keypad to calibrate sensor. - Check that excitation voltage on transducer is correct - Check signal wiring - Check that shielded cable is grounded at only one end - Verify that the excitation voltage on transducer is correct - Check the analog signal (Vdc or mA) at sensor and at controller. Refer to sensor description for expected output - Make sure that sensor and meter are the same location - Verify is the analog reading shows is out of measuring range - Inject a same type of signal to the analog input and observe changes on analog reading - Check ground of digital inputs, IDC1, IDC9, IDC13, IDC15 and IDC17 are grounded properly - Inspect board for shorted traces or foreign objects 61 Rev.03 9.0 APPENDIXES 9.1 ALARM LIST 9.2 SIGNALS FOR PRESSURE TRANSDUCER (0-200PSI, 0.5-4.5Vdc) 9.3 SIGNALS FOR PRESSURE TRANSDUCER (0-500PSI, 0.5-4.5Vdc) 9.4 SIGNALS FOR PRESSURE TRANSDUCER (0-200PSI, 4-20mA) 9.5 SIGNALS FOR PRESSURE TRANSDUCER (0-500PSI, 4-20mA) 9.6 SIGNALS FOR CURRENT TRANSDUCER (0-250A, 0-20mA) 9.7 SIGNALS FOR CURRENT TRANSDUCER (0-500A, 0-20mA) 9.8 SIGNALS FOR VOLTAGE TRANSDUCER (0-500V, 0-20mA) 9.9 SIGNALS FOR NTC TEMPERATURE SENSOR (WP TYPE) 9.10 SIGNALS FOR NTC TEMPERATURE SENSOR (HP TYPE) 9.11 FLOW CHART – MASTER-SLAVE CONTROL SEQUENCE 62 Rev.03 9.1 ALARM LIST 63 Rev.03 9.1 ALARM LIST (Continue) 64 Rev.03 9.2 SIGNALS FOR PRESSURE TRANSDUCER (0-200PSI, 0.5 to 4.5Vdc) 65 Rev.03 9.3 SIGNALS FOR PRESSURE TRANSDUCER (0-500PSI, 0.5 to 4.5Vdc) 66 Rev.03 9.4 SIGNALS FOR PRESSURE TRANSDUCER (0-200PSI, 4-20mA) 67 Rev.03 9.5 SIGNALS FOR PRESSURE TRANSDUCER (0-500PSI, 4-20mA) 68 Rev.03 9.6 SIGNALS FOR CURRENT TRANSDUCER (0-250A, 0-20mA) 69 Rev.03 9.7 SIGNALS FOR CURRENT TRANSDUCER (0-500A, 0-20mA) 70 Rev.03 9.8 SIGNALS FOR VOLTAGE TRANSDUCER (0-500V, 0-20mA) 71 Rev.03 9.9 SIGNALS FOR NTC TEMPERATURE SENSOR (WP TYPE) 72 Rev.03 9.10 SIGNALS FOR NTC TEMPERATURE SENSOR (HP TYPE) 73 Rev.03 9.11 FLOW CHART – MASTER-SLAVE CONTROL SEQUENCE 74 Products that perform...By people who care (Formerly known as Dunham-Bush (Malaysia) Bhd) (129358-X) Lot 5755-6, Kidamai Industrial Park, Bukit Angkat 43000 Kajang, Selangor Darul Ehsan, Malaysia. Tel: 603-8733 9898 Fax: 603-8739 5020 E-Mail: [email protected] www.dunham-bush.com Manufacturer reserves the right to change specifications without prior notice. Corporate Head Office DUNHAM-BUSH HOLDING BHD