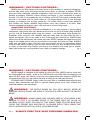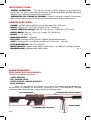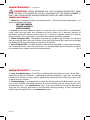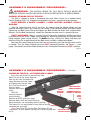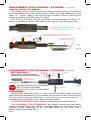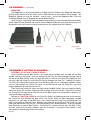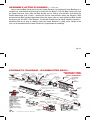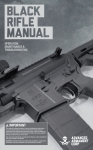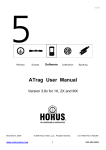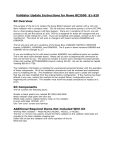
1
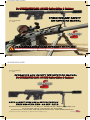
OUTSIDE FRONT COVER
For BUSHMASTER BA50 .50 BMG Caliber
Cailber Rifles & Carbines
Part # BFI BA50OPMAN
V.1 – 1/2008
OPERATING AND SAFETY
INSTRUCTION MANUAL
PLEASE PRACTICE SAFE FIREARMS HANDLING!
WARNING: BEFORE USING THlS FIREARM, READ AND FOLLOW THESE INSTRUCTIONS.
OUTSIDE BACK COVER
Part # BFI BA50OPMAN
V.1 – 1/2008
OPERATING AND SAFETY INSTRUCTION MANUAL
For BUSHMASTER BA50 .50 BMG Cailber
Caliber Rifles & Carbines
NOTE: ALWAYS WEAR EAR & EYE PROTECTION
WHEN SHOOTING THIS - OR ANY - RIFLE.
Bushmaster Firearms International, LLC • P.O. Box 1479 • 999 Roosevelt Trail • Windham, Maine 04062 U.S.A.
Tel. 207 892 3594 • Toll Free: 1 800 998 7928 • Fax: 207 892 8068
Customer Service: 1 800 883 6229 • Web: http://www.bushmaster.com • E-Mail: [email protected]
© 2008, Bushmaster Firearms International, LLC, Windham, ME USA. All Rights Reserved.
Made with Pride in the U.S.A.
Inside Front Cover
PLEASE PRACTICE SAFE FIREARMS HANDLING!
WARNING: IF THIS FIREARM IS CARELESSLY OR IMPROPERLY HANDLED,
UNINTENTIONAL DISCHARGE COULD RESULT AND COULD CAUSE INJURY, DEATH, OR
DAMAGE TO PROPERTY.
CAUTION: CAREFULLY READ THIS INSTRUCTION MANUAL PRIOR TO LOADING AND
FIRING THIS FIREARM. FOLLOW ALL INSTRUCTIONS ON THE PROPER HANDLING AND SAFE
USE OF THIS FIREARM – LIVES MAY DEPEND ON IT!
WARNING: USE ONLY CLEAN, DRY, HIGH QUALITY COMMERCIALLY MANUFACTURED
AMMUNITION APPROPRIATE TO THE .50 BMG CALIBER OF THIS FIREARM. Ammunition
must be loaded to SAAMI standards by a reputable, insured manufacturer. Bushmaster does
not recommend the use of remanufactured or hand loaded ammunition as it may damage your
rifle.
CAUTION: NEVER USE “SLAP ROUNDS” IN THIS RIFLE. THEY WILL NOT FIT IN THE
CHAMBER, AND MAY CAUSE DAMAGE. DOING SO WILL VOID YOUR WARRANTY.
This manual should always accompany this firearm. If you lend, give or sell this firearm, make
sure this manual goes with it. If there is anything you do not understand, get help from the factory or
a qualified person in the safe handling of firearms. If unfamiliar with firearms, seek further advice
through safe handling courses run by your local gun club, NRA approved instructor, or similar
qualified organizations.
Inside Back Cover
PLEASE PRACTICE SAFE FIREARMS HANDLING!
WARNING: IF THIS FIREARM IS CARELESSLY OR IMPROPERLY HANDLED,
UNINTENTIONAL DISCHARGE COULD RESULT AND COULD CAUSE INJURY, DEATH, OR
DAMAGE TO PROPERTY.
CAUTION: CAREFULLY READ THIS INSTRUCTION MANUAL PRIOR TO LOADING AND
FIRING THIS FIREARM. FOLLOW ALL INSTRUCTIONS ON THE PROPER HANDLING AND SAFE
USE OF THIS FIREARM – LIVES MAY DEPEND ON IT!
WARNING: USE ONLY CLEAN, DRY, HIGH QUALITY COMMERCIALLY MANUFACTURED
AMMUNITION APPROPRIATE TO THE .50 BMG CALIBER OF THIS FIREARM. Ammunition
must be loaded to SAAMI standards by a reputable, insured manufacturer. Bushmaster does
not recommend the use of remanufactured or hand loaded ammunition as it may damage your
rifle.
A SAFETY NOTE REGARDING LEAD... Discharging firearms in poorly ventilated areas, cleaning
firearms, or handling ammunition may result in exposure to lead, a substance known to cause birth
defects, reproductive harm, and other serious physical injury. Have adequate ventilation at all
times. Wash hands thoroughly after exposure.
This Operating and Safety Instruction Manual should always accompany your Bushmaster Firearm.
Model: ______________________________________________________________
Serial Number: ________________________________________________________
Issued To: ____________________________________________________________
Date Issued: __________________________________________________________
P.O. Box 1479 • 999 Roosevelt Trail
Windham, Maine 04062 U.S.A.
Tel. 1-800-883-6229
http://www.bushmaster.com
[email protected]
Thank you for purchasing this fine Bushmaster
Rifle. Everyone at Bushmaster Firearms hopes
you have a safe and enjoyable shooting experience with your Bushmaster BA50 Rifle.
TABLE OF CONTENTS…
SAFE HANDLING / WARNINGS / CAUTIONS…… 1
INTRODUCTION…… 5
SPECIFICATIONS…… 5
MAINTENANCE…… 6
ASSEMBLY / DISASSEMBLY PROCEDURES…… 11
AMMUNITION…… 13
FIRING THE RIFLE…… 14
DISASSEMBLY FOR CLEANING…… 16
CLEANING PROCEDURES…… 20
ASSEMBLY AFTER CLEANING…… 24
SCHEMATIC DIAGRAM…… 26
WARRANTY…… 28
FUNDAMENTAL RULES FOR SAFE GUN HANDLING
ALWAYS KEEP THE GUN POINTED IN A SAFE DlRECTlON.
NEVER LOAD THE GUN UNTIL READY TO USE.
KEEP YOUR FINGER OFF THE TRIGGER
UNTIL READY TO SHOOT.
Pg. 1
WARNING: ALWAYS USE EYE AND HEARING PROTECTION WHEN
SHOOTING THIS RIFLE. Eye and Ear protection is provided with this rifle.
WARNING: If this firearm is carelessly or improperly handled, unintentional
discharge could result and could cause injury, death, or damage to property. Read and
understand all of this Manual before removing this firearm from its package. This
Bushmaster Rifle is classified as a firearm by the Alcohol, Tobacco and Firearms division of
the Department of Justice. This Rifle may discharge accidentally when a round is fed into the
chamber, if it is dropped, or receives a blow to the muzzle or front of the Rifle. This can occur
regardless of the position of the hammer or any of the various safety devices. Please use
extra care and strict adherence to these instructions to avoid the risk of accidents.
CAUTION: GENERAL HANDLING: ALWAYS handle your firearm as if it were
loaded. NEVER point your firearm at anything you do not intend to shoot. NEVER take
anyone’s word that the rifle is unloaded, check the chamber for yourself to make sure the rifle
is unloaded to avoid accidental discharge. ALWAYS make sure your rifle is not loaded and the
chamber is empty before laying it down, or handing it to another person. ALWAYS keep and
carry your rifle unloaded with the hammer forward, except when you intend to shoot.
ALWAYS be aware of possible risk from dropping your rifle. You may not be able to see if any
part of the rifle is damaged. If damage is severe, the firearm may discharge and cause injury,
death, or damage to property.
Pg. 2
WARNINGS / CAUTIONS CONTINUED…
NEVER leave the Rifle cocked and ready to fire as this condition is extremely dangerous,
and the Rifle could easily discharge causing injury, death, or damage to property. NEVER
leave your Rifle unattended, someone, especially a child, may fire it causing injury, death, or
damage to property. ALWAYS instruct children and others in your household to respect
firearms. This rifle is not intended for use by children so DO NOT let anyone underage shoot
this rifle. A .50 caliber rifle has recoil similar to a 12 Gauge shotgun. Even if your underage
children use shotguns, the air blast created by a .50 caliber round is much more powerful
than children can handle. ALWAYS keep firearms away from children at all times. Keep
firearms unloaded and locked in a gun safe when not in use at a firing range.
SHOOTING CAUTIONS:
NEVER fire this rifle if your condition or judgment is in any way impaired. If you are taking
medications, seek advice from your doctor to ensure that you are fit to shoot safely. ALWAYS
use Eye and Ear Protection when using this firearm – we recommend using Double Ear
Protection while using this rifle. ALWAYS keep the Safety lever on Safe when the rifle is
loaded and cocked, until you are ready to aim at the target and intend to fire. ALWAYS keep
others clear of the ejection port and muzzle blast area. NEVER squeeze the trigger or put your
finger in the trigger guard until you are aiming at the target and ready to shoot. ALWAYS
make sure your rifle is clean, with the barrel and chamber free of any obstruction before
using this rifle. NEVER shoot this rifle at a hard surface such as a rock, or liquid surface such
as water, as the bullet may ricochet and travel in any direction and strike you or another
object you cannot see, causing serious injury, death, or property damage.
Pg. 3
WARNINGS / CAUTIONS CONTINUED…
NEVER engage in horseplay while holding or using this Rifle. NEVER walk or climb with
this Rifle loaded and cocked - ready to fire. NEVER dryfire this Rifle when the Receivers are
open. DO NOT abuse your Rifle by using it for any purpose other than shooting. NEVER alter
any parts of this Rifle as it may reduce the level of safety and or void your Warranty.
CLEANING AND STORAGE: Always make sure your Rifle is unloaded before cleaning and
storing. Keep Ammunition and Rifle in separate locked places away from children and
untrained people in your household.
WARNING: THE MUZZLE BRAKE ON THIS RIFLE SHOULD NEVER BE
REMOVED. SERIOUS INJURY CAN OCCUR IF THIS RIFLE IS FIRED WITHOUT THE MUZZLE
BRAKE.
WARNING: ALWAYS MAKE SURE THE BACK DROP OF YOUR RANGE IS BIG
ENOUGH TO STOP A .50 CALIBER ROUND. IF THE RANGE DOES NOT ALLOW .50
CALIBERS, DO NOT SHOOT THIS RIFLE AT THAT RANGE. THERE COULD BE BACK DROP
ISSUES THAT PREVENT SAFE SHOOTING OF .50 CALIBER RIFLES. FIND A RANGE THAT
HAS A LARGE ENOUGH DIRT HILL FOR A .50 CALIBER ROUND.
Pg. 4
ALWAYS PRACTICE SAFE FIREARMS HANDLING!
INTRODUCTION…
• GENERAL INFORMATION: This Manual includes specific operating and maintenance
instructions, and safety information pertaining to all Bushmaster BA50 .50 BMG (Browning
Machine Gun) Caliber Bolt Action Rifles and Carbines.
• PREPARATION FOR STORAGE OR SHIPMENT: Except in extreme situations, Bushmaster
BA50 models should always be stored and transported in their original factory cases.
SPECIFICATIONS…
• CALIBER: .50 BMG (Browning Machine Gun Cartridge) [12.7 X 99 mm]
• WEIGHT: Rifle: 30 Lbs. [13.61 kg] / Carbine: 27 Lbs. [12.25 kg]
• OVERALL LENGTH (Assembled): Rifle: 58” [147.32 cm] / Carbine: 50” [127.00 cm]
• BARREL LENGTH: Rifle: 30” [76.2 cm] / Carbine: 22” [55.88 cm]
• RIFLING: 1 x 15” [38.1 cm]
• MAGAZINE CAPACITY: 10 Rounds
• BUTTSTOCK: Standard AR15 Type with Trapdoor Storage Compartment
• SAFETY: Standard AR15 Type Safety with Manual Thumb Lever - Left Side
• OPTIC MOUNTING RAIL: MIL-STD 1913 Rail
• MUZZLE VELOCITY: Approximately 2850 fps [853 mps] w. std. 660 grain [42.8g] projectile
Pg. 5
• MAXIMUM RANGE: Approximately 6,800 meters
MAINTENANCE…
INSPECTION OF RIFLE’S MAJOR GROUPS:
The Rifle’s Four Major Groups are:
• LOWER RECEIVER
• BOLT CARRIER GROUP
• UPPER RECEIVER / BARREL ASSEMBLY
• BIPOD ASSEMBLY
Ensure all components are present, and inspect for obvious damage. Report any
discrepancies or problems to Bushmaster Customer Service (1-800-883-6229). Detailed
inspection should be conducted as described on the following pages.
BOLT CARRIER GROUP
UPPER RECEIVER / BARREL ASSEMBLY
BIPOD ASSEMBLY
LOWER RECEIVER / BUTTSTOCK
Pg. 6
MAINTENANCE…
(Continued)
INSPECTION OF THE LOWER RECEIVER…
1. LOWER RECEIVER should not have any pits or cracks, the Butt Stock and Pistol Grip
should not move and must be firmly attached to the Receiver. All the Trigger Group Parts
should be functioning properly. Both the Take Down Pins should be in the Receiver.
INSPECTION OF THE BOLT CARRIER GROUP…
1. THE BOLT should move freely in and out of the Bolt Carrier by rotating with the Cam Pin.
2. THE EJECTOR AND EXTRACTOR must be checked to ensure they are under spring tension
and show no signs of chipping, cracking or wear.
3. THE CARRIER PIN which holds the Firing Pin in place should not be bent or cracked, and
the Spring/Detent mechanism at its tip should be functional in order to hold the pin within the
Bolt Carrier.
4. INSPECT FIRING PIN PROTRUSION by pushing the Bolt into the Carrier and manually
pushing the Firing Pin forward. Check the Firing Pin hole on the Bolt Face. Make sure it is not
eroded or elongated. Bolt face should not be pitted.
5. THE CARRIER BEARINGS should be tightly screwed into the Carrier on the top side. This
part should never be taken out of the Bolt Carrier by unscrewing the screws.
Pg. 7
MAINTENANCE…
(Continued)
INSPECTION OF THE UPPER RECEIVER…
1. THE BARREL should be clean and free of any obstructions.
2. THE HAND GUARD should be tightly attached to the Barrel Locking Collar. Do not remove
the Hand Guard.
3. THE BIPOD ASSEMBLY MOUNT should be attached to the Hand Guard tightly. Do not
remove this Mount.
4. THE UPPER RECEIVER body should not be cracked, chipped, pitted or worn.
5. MUZZLE BRAKE should be tightly screwed to the barrel. Do not remove the muzzle brake!
6. ALL SCOPE MOUNTINGS should be tight, in good condition, and free of oil.
INSPECTION OF THE BIPOD…
1. If any parts of the BIPOD are cracked, do not use it. Replace it immediately.
2. THE BIPOD LEGS should not be bent.
3. All parts of the BIPOD should be clean and dirt free to function properly.
Pg. 8
MAINTENANCE…
(Continued)
CAUTION: BEFORE BEGINNING ANY RIFLE CLEANING PROCEDURES, MAKE
SURE THE RIFLE IS UNLOADED BY VISUALLY CHECKING THAT THE FIRING CHAMBER IS
EMPTY AND THE MAGAZINE HAS BEEN REMOVED FROM THE LOWER RECEIVER.
GENERAL MAINTENANCE…
1. Ensure that all bearing surfaces and exposed parts – particularly those listed below – are
clean and properly lubricated.
BOLT AND CARRIER
TRIGGER ASSEMBLY
BIPOD ASSEMBLY
2. Inspect all parts and tighten or replace as necessary. Each time the rifle is assembled for
firing, make sure the barrel and chamber are free of excess oil. If possible, perform an
operational check with dummy rounds (up to 10 – maximum magazine capacity) to confirm
proper function. This insures that ammunition will chamber and extract properly.
3. Before Firing the Rifle: Thoroughly clean and dry the Bore and Chamber. Use cleaning
rods by inserting them from the Chamber to the end of the barrel. Be careful not to damage
the Muzzle Crown since this effects the accuracy of the Rifle.
4. After Firing the Rifle: The Rifle should be cleaned and lubricated as soon as possible after
each shooting session. After every 50 rounds it is recommended that the Chamber and Bore
be scrubbed with a copper solvent to remove deposits.
Pg. 9
MAINTENANCE…
(Continued)
5. Long Term Maintenance: If the Rifle is not being fired for 30 days or more, oil the Rifle –
especially the Bore and Chamber – depending on climate conditions in your area. For storage
periods of six months or more, apply a good quality coating oil to the Rifle and inspect it for
re-oiling every six months.
6. Troubleshooting: If you experience any difficulty pulling back on the Bolt Handle, you may
have a dirty Chamber that needs cleaning, or the ammunition you are using has too much
chamber pressure – and should not be used. If you have difficulty closing the Bolt during
firing you may have an obstruction in the Chamber requiring cleaning, or your ammunition
might be out of specification – and should not be used.
Pg. 10
ASSEMBLY & DISASSEMBLY PROCEDURES…
WARNING: THE MUZZLE BRAKE ON THIS RIFLE SHOULD NEVER BE
REMOVED. SERIOUS INJURY CAN OCCUR IF RIFLE IS FIRED WITHOUT A MUZZLE BRAKE.
ASSEMBLY OF MAJOR PARTS OF THE RIFLE:
The Rifle is shipped in either a Cardboard Case with Foam Inserts or an optional Hard
Plastic Shipping Case. It is shipped disassembled in the case - comprised of four groups:
UPPER RECEIVER & BARREL ASSEMBLY / LOWER RECEIVER ASSEMBLY / BIPOD /
MAGAZINE
Take the Upper Receiver out of the Case by holding onto the Muzzle Brake and the
Receiver Housing. Place it on a table or flat surface. Insert the Bolt Handle with Bolt Handle
Sleeve into the Bolt Carrier Group and tighten the Bolt Handle Set Screw with supplied Allen
Wrench. Pull the Bolt Handle back. Inspect the Chamber to make sure it is empty and clear.
SAFETY MECHANISM: There is a single Thumb-Lever which prohibits the Rifle from firing
by blocking the rear of the Trigger from rotating up, effectively preventing the Hammer from
being released under spring tension. The BA50 also has a Firing Pin Safety that does not
allow the Firing Pin to protrude out of the Bolt unless the Bolt is rotated and locked.
Now take the Lower Receiver out of the Case and manually push the Hammer back until it
is cocked. Turn the Safety Selector Lever to SAFE (horizontal position, see Figure 1 - next
page). The pointed end of the Safety Selector Lever should point towards the SAFE marking.
Pg. 11
ASSEMBLY & DISASSEMBLY PROCEDURES…
(Continued)
ASSEMBLING THE RIFLE… UPPER RECEIVER TO LOWER
Push the Front Pivot Pin and the Rear Take
Down Pin out of the Lower Receiver
from the left side. Assemble the
Upper Receiver with the Lower
by aligning the Pivot Pin hole
Figure 1
first. Push the Pivot Pin
UPPER RECEIVER /
into the Upper
BARREL ASSEMBLY
Receiver from right
LOWER
to left.
HAMMER COCKED BY
RECEIVER
PUSHING TO THE REAR
ASSEMBLY
With the
Hammer cocked,
TAKE
and the Safety
DOWN
PIN
Selector on SAFE, pivot the Upper
Receiver down onto the Lower Receiver.
When Receivers are completely closed, the Rear
Take Down Pin can be pushed in from right to left to
PIVOT PIN
complete this assembly.
Note: Front Pivot Pin and the Rear Take Down Pin are
“captivated” by their detents so they can’t fall out and be lost. SAFETY SELECTOR
Pg. 12
IN SAFE POSITION
ASSEMBLY & DISASSEMBLY PROCEDURES…
(Continued)
ASSEMBLING THE RIFLE… BIPOD ASSEMBLY
Remove the Bipod Attachment Nut by unscrewing it from its stud on the Handguard (may
require a 3/4” wrench to initially loosen it). Attach the Bipod onto the Upper Receiver by sliding
it onto the Bipod Stud, then screw the Bipod Nut back on. Tighten by hand, then with 3/4”
wrench.
CAUTION: RIFLE IS NOW READY FOR USE. DO NOT INSERT A LOADED
MAGAZINE UNTIL YOU ARE AT A SHOOTING RANGE AND READY TO FIRE THE RIFLE.
ALWAYS REMEMBER TO USE EYE AND EAR PROTECTION.
AMMUNITION…
CAUTION: USE ONLY HIGH QUALITY, CLEAN, DRY AMMUNITION FROM A
REPUTABLE MANUFACTURER. FAILURE TO DO SO MAY PLACE YOU, OR THOSE AROUND
YOU AT RISK, AND MAY DAMAGE YOUR RIFLE, AND/OR VOID YOUR WARRANTY.
If you buy ammunition that is over-pressured, or is possibly old or surplus, firing such
ammunition will cause the brass to swell and stick in the Firing Chamber, and cause problems
when pulling back on the Bolt Handle for Case extraction. Only new, high quality ammunition
from reliable manufacturers should be fired in this rifle.
Pg. 13
FIRING THE RIFLE…
BREAK-IN PERIOD…
NOTE: YOUR MODEL BA50 RIFLE WILL REQUIRE SHOOTING ABOUT 75 ROUNDS TO
BREAK IN PROPERLY. The Bolt Action of the Rifle will get smoother after the break in period.
Every time you pull the Bolt Handle back to charge a new round, pull the Handle back all
the way, and push it forward and down all the way. If the Bolt is not properly closed, you
should not fire the Rifle. To visually check if the Bolt is closed properly, look at the Ejection
Port Opening. The Bolt Carrier should be flush with the Barrel Extension. If it is not, the Bolt it
is not completely closed. The Bolt Handle should be all the way down in the Handle Slot in the
Upper Receiver. Eject the round and inspect the Chamber for any obstruction. The Firing
Chamber may need cleaning if the Rifle has fired more than 50 Rounds.
When you are ready to fire the Rifle, make sure you have a safe place to shoot – with a good
back stop sufficient to stop a .50BMG round. Keep the Rifle pointed down range. Unlock the
Bolt and pull it back all the way. Place the Rifle’s Safety on SAFE position.
Insert a loaded Magazine while pushing the Magazine Release Button in about 1/8th of an
inch. Once the Magazine is inserted about 1 inch into the Magazine Well, release the Magazine
Release Button. PUSH up on the bottom of the Magazine to make sure it is properly inserted
into the Magazine Well.
Pg. 14
FIRING THE RIFLE…
(Continued)
When you are ready to fire, push the Bolt Handle forward and then down. The Bolt will push
a round from the Magazine into the Firing Chamber. Make sure the Bolt Handle is down all the
way. Look at your target through your scope or sights, acquire the target, move the Safety
Selector to the OFF position, aim, and pull the Trigger. The Trigger has a 6 lb. pull. Do not
tamper with the Trigger system - this will void your Warranty. After you have fired the round,
pull the Bolt Handle up and back, the Bolt will eject the fired round. Then move the Safety Selector to the SAFE position before you observe your target with a spotting scope. To reload
another round, simply repeat the same procedure. To remove the Magazine, push the Magazine
Release Button and pull the Magazine out of the Lower Receiver.
Pg. 15
RIFLE DISASSEMBLY PROCEDURES…
DISASSEMBLY OF THE RIFLE FOR STORAGE OR CLEANING…
CAUTION: BEFORE BEGINNING ANY RIFLE CLEANING OR DISASSEMBLY
PROCEDURES, MAKE SURE THE RIFLE IS UNLOADED BY VISUALLY CHECKING THAT THE
FIRING CHAMBER IS EMPTY, AND THE MAGAZINE HAS BEEN REMOVED FROM THE
LOWER RECEIVER.
Disassembly will be the reverse of some of the procedures already described for
Assembly. Push out the Rear Take Down Pin from the left side, pivot the Upper Receiver to an
open position, and push the Front Pivot Pin out to separate the Upper and Lower Receivers.
Place the Upper Receiver on a flat solid surface.
REMOVING THE BOLT CARRIER GROUP… Refer to Figures 2 & 3 – on the next page.
Pull the Bolt Handle up and slide it back to expose the Firing Chamber. Check again to
make sure the Chamber is empty and the Rifle is unloaded. Now close the Bolt, and rotate the
Bolt Handle down. You will see a Set Screw on the Bolt where the Handle is attached to the
Bolt.
Using a 3/32” Allen Wrench, unscrew the Set Screw until it is rotated out of the Bolt about
1/8th inch. Once the Set Screw is loose, unlock the Bolt by lifting Handle up, then slide the
Handle out of the Bolt along with the Handle Sleeve. Then slide the Bolt Carrier Group out of
the rear of the Upper Receiver.
Pg. 16
DISASSEMBLY FOR CLEANING / STORAGE…
3/32”
ALLEN WRENCH
(Continued)
REMOVE HANDLE
AND SLEEVE
SET SCREW
Figure 2
Figure 3
Pg. 17
DISASSEMBLY FOR CLEANING / STORAGE…
(Continued)
BOLT CARRIER DISASSEMBLY – REMOVING CLEVIS PIN…
After sliding the Bolt Carrier out of the Upper Receiver, remove the Carrier Pin (which
holds the Firing Pin within the Carrier) by pushing in it’s detent (on the left side of the Carrier
- see Figure 4 below). Then remove the Carrier Pin by pushing it out of the Bolt Carrier.
BOLT CARRIER
(LEFT SIDE)
Figure 4
PUSH IN DETENT. THEN PUSH CARRIER PIN THROUGH
CARRIER PIN WITH DETENT
BOLT CARRIER
(RIGHT SIDE)
Figure 5
Pg. 18
CARRIER PIN HEAD
DISASSEMBLY FOR CLEANING / STORAGE…
(Continued)
FIRING PIN / CAM PIN / BOLT REMOVAL…
The Firing Pin Sleeve, Firing Pin and Firing Pin Spring can be removed by unscrewing the
Rear Roller Bearing Cap Screw and the Firing Pin Sleeve Set Screw underneath it in the
Carrier (”A” - Figure 7 below). Then slide the Firing Pin Sleeve, Firing Pin and Firing Pin
Spring out of the rear of the Bolt Carrier (“B” below).
Once the Firing Pin Sleeve, Firing Pin and Spring have been removed, the Cam Pin (”C”
below) can be pulled up and out. Then the Bolt can be pulled out of the front of the Carrier.
UNDERSIDE OF BOLT CARRIER SHOWING FIRING
PIN SLEEVE AND FIRING PIN IN PLACE
(C) PULL CAM PIN
UP & OUT
Figure 6
(A) REMOVE REAR ROLLER BEARING CAP SCREW & BEARING
THEN REMOVE FIRING PIN SLEEVE SET SCREW
BOLT
(B) SLIDE OUT FIRING PIN SLEEVE,
THEN FIRING PIN & SPRING
Figure 7
Pg. 19
DISASSEMBLY FOR CLEANING / STORAGE…
BEARING
BOLT CARRIER GROUP…
Shown here are the disassembled CAP SCREW
& SET
components of the Bolt Carrier Group. SCREW
(Continued)
CAM PIN
BOLT
CARRIER
BOLT
FIRING PIN SLEEVE,
FIRING PIN & SPRING
BUSHMASTER DOES NOT RECOMMEND
STOP ANY FURTHER DISASSEMBLY.
DOING SO WILL VOID YOUR WARRANTY.
Figure 8
CARRIER PIN
CLEANING…
AFTER FIRING YOUR RIFLE, clean it as soon as possible to make the job easier and to
avoid allowing the development of any corrosion due to powder residue. Even when your
Rifle has not been fired, you should clean it at least once or twice a year if you live in a
temperate climate, or as often as once a week in a tropical climate.
IF YOUR RIFLE GETS WET, clean it as soon as possible to prevent corrosion or rust.
USE A HIGH QUALITY RIFLE CLEANING KIT that includes a cleaning rod; swab holder;
cotton flannel bore patches; pipe cleaners; a small toothbrush; brass wire bristle bore and
chamber brushes appropriate to the .50 BMG Caliber of this Rifle, and a
Cleaner/Lubricant/Preservative (CLP).
Pg. 20
CLEANING…
(Continued)
CLEANING THE BORE: The bore of your Bushmaster rifle has Lands and Grooves called
Rifling. Rifling makes the bullet spin as it moves down the Bore and down range. It is difficult
to push a new, stiff Bore Brush through the Bore. You will find it much easier, and more
effective, to pull your Bore Brush through the Bore. Also, because the brush will clean better
if the bristles follow the grooves (called tracking), you want the Bore Brush to be able to turn
as you pull it through.
ALWAYS CLEAN FROM FROM CHAMBER TOWARD THE MUZZLE. Commercial rifle
cleaning kits may include alternate cleaning instructions which may be just as effective.
1. insert the Cleaning Rod into the muzzle end of the barrel. Rod should be long enough
so it will protrude from the end of the Upper Receiver and allow you to easily insert Cotton
Cleaning Patches into the Patch Holder attachment of the Rod. Cleaning Patch should be
moistened with “CLP” or other suitable bore cleaner.
2. Pull the Cleaning Rod out from Receiver towards Muzzle.
3. Remove the Patch Holder from Rod, reinsert rod through barrel from Muzzle end, and
attach the .50 BMG size Bore Brush (Bore diameter of this Rifle is .510 inches).
4. Pull the Brush through the Bore and out the Muzzle. The Rod should be able to twist as
you pull it - allowing the Brush to "track” in the rifling.
NEVER reverse the direction of the Bore Brush while it is in the Bore. Always pull Brush or
Patch from Receiver towards Muzzle (following the path of the bullet to ensure that any
fouling or powder residue is removed).
Pg. 21
CLEANING…
(Continued)
5. After the first pull with the Bore Brush, remove Brush from Rod – reinsert Rod in
Muzzle – reattach Brush. Repeat this process for three or four pulls.
6. Send a patch through the Bore occasionally to help clean out the fouling that the brush
is getting loose. Just replace the Bore Brush with the Patch Holder, a wet patch, and pull it
through. Remember to always have the Bore wet with cleaner before trying to pull a brush
through. Bore cleaning is complete when bore appears bright and shiny, and a final Patch
comes through clean.
CLEANING OTHER COMPONENTS OF THE RIFLE…
BOLT CARRIER GROUP:
The parts of the Bolt Carrier Group should be wiped down with CLP type Cleaner (or other
suitable solvent), and lightly oiled with a quality gun oil before reassembly.
UPPER RECEIVER/BARREL ASSEMBLY & LOWER RECEIVER:
The interior and exterior of the Upper Receiver/Barrel Assembly and the Lower Receiver
should be thoroughly cleaned with CLP type Cleaner (or other suitable solvent). Lightly oil all
surfaces before reassembly. Pay particular attention to lubrication of the Hammer, Trigger and
Safety Selector, and test for smooth function before reassembly.
BIPOD ASSEMBLY:
Clean with CLP solvent and a small brush (toothbrush) to remove any exterior dirt or mud.
Lubricate all moving parts with quality gun oil.
Pg. 22
CLEANING…
(Continued)
MAGAZINE:
The Magazine can be disassembled by sliding the Base Plate off the Magazine Body after
prying up the front end of the plate (use an Allen Wrench or Screwdriver for leverage). The
Magazine Spring can then be worked – side to side – out of the Magazine Box. Then the
Cartridge Follower can be dropped out of the Magazine Box.
Clean all parts, and lightly lubricate before reassembling in reverse order from description
above. Note that the Follower will only fit into the Magazine Box one way, and the Spring must
be oriented so as to fit over the heavy protrusion on the underside of the Follower.
MAGAZINE BODY
FOLLOWER
Figure 9
SPRING
BASE PLATE
Pg. 23
ASSEMBLY AFTER CLEANING…
ASSEMBLY OF THE BOLT CARRIER GROUP…
Insert the Bolt into the Bolt Carrier – the large lug on the Bolt with the hole for the Bolt
Handle should be facing up. You’ll be able to see the Cam Pin hole through the large slot at
the top of the Bolt Carrier. Insert the Cam Pin with its hole for the Firing Pin aligned so that
you can slide the Firing Pin and Firing Pin Spring through the Cam Pin – holding it in place.
The Firing Pin should be inserted with its protruding side pins in a horizontal position. When
you can see through the Carrier Pin holes in the Bolt Carrier and the Firing Pin, you have
proper alignment to insert the Carrier Pin.
Then insert the Carrier Pin from the right side of the Bolt Carrier. You may need to slightly
rotate the Firing Pin to allow alignment and insertion of the Carrier Pin. Once fully inserted,
the Carrier Pin will protrude on the left side of the Bolt Carrier and will be held in place by its
spring and detent mechanism.
Perform a FUNCTION CHECK on the Firing Pin Safety by keeping pressure on the back of
the Firing Pin and rotating the Bolt within the Carrier. With the Bolt completely rotated
clockwise (as you look at the Bolt Face), you should see the Firing Pin protruding from its
hole in the center of the Bolt Face. Maintain the pressure on the back of the Firing Pin and
rotate the Bolt back all the way up - counterclockwise into “locked position” (Cam Pin aligned
with Bearings on top of Bolt Carrier). The Firing Pin should go back into the Bolt. If this
function check did not work properly then the assembly is incorrect. Disassemble it and
reassemble it following the above instructions.
Pg. 24
ASSEMBLY AFTER CLEANING…
(Continued)
Now insert the Bolt Carrier back into the Upper Receiver, by keeping all three Bearings in a
straight line, and the Bolt end forward to mate with the Barrel. Push the Bolt Carrier fully into
the Upper Receiver, then slide the Bolt Handle and its Sleeve into the Bolt, and rotate the
Handle downward until it stops – locking the Carrier into position within the Receiver. With
the bend of the Bolt Handle angled down from the Upper, you can then tighten the Bolt Handle
Set Screw with the 3/32” Allen Wrench. The Handle should now be tightly locked in position –
exhibiting little or no play or rotation. Now the Upper Receiver is ready to be stored in the
case, or assembled onto the Lower Receiver in preparation for shooting.
Pg. 25
SCHEMATIC DIAGRAM – BUSHMASTER BA50…
CARRIER PLUNGER
BMG-17956
CAP SCREW (2)
BMG-17955
BEARING (2)
BMG-17949
FIRING PIN SLEEVE SET SCREW
BMG-18008
FIRING PIN SLEEVE
BMG-18002
FIRING PIN
BMG-17936
FIRING PIN
DOWEL PIN COMPLETE
PIN
BMG-17958 FIRING PIN FIRING
SPRING
ASSEMBLY
BMG-17936A BMG-17998
CAP SCREW
BMG-17955
BEARING
BMG-17949
CAM PIN
BMG-17935
MAIN LOCKING
COLLAR BMG-17939
HANDGUARD
LOCKING COLLAR
BMG-17938
BOLT HANDLE
BMG-17946
BOLT HANDLE ROLLER SLEEVE
BMG-17966
CARRIER PIN
BMG-17959
TOP RAIL
SCREWS (4)
AN501D416-18
EJECTOR
SET SCREW
BMG-17954
EXTRACTOR EJECTOR
BMG-17926 SPRING
BMG-17964
UPPER RECEIVER
BMG-17941
EJECTOR
BMG-17925
BIPOD MOUNT
ADAPTOR
BMG-17922
PRIMARY EXTRACTION GUARD BMG-17940
PRIMARY EXTRACTION GUARD SCREWS (2) BMG-17962
BARREL EXTENSION INDEXING
PIN BMG-17950
BARREL EXTENSION COLLAR
BMG-17945
11.5” HANDGUARD FOR
22” BARREL - BMG-17918
14” HANDGUARD FOR
30” BARREL - BMG-17919
BIPOD MOUNT
SCREWS (2)
AN501D416-18
BARREL EXTENSION
BMG-17914
MUZZLE BRAKE
SCREWS (18 - 9 UP/9 DOWN)
BMG-17951
MUZZLE BRAKE
THREADED INSERT
BMG-17915
MUZZLE BRAKE
HALF (2)
BMG-17930
MUZZLE BRAKE
SPOOL INSERT
BMG-17916
MUZZLE BRAKE
LOCKING COLLAR
BMG-17929
MUZZLE BRAKE
FRONT SPOOL
INSERT
BMG-17917
DOWEL PIN (4)
BMG-17997
MUZZLE BRAKE
HALF (2)
BMG-17930
IN THE U.S.A.
© 2008, Bushmaster Firearms International, LLC, Windham, Maine
BIPOD
MOUNT NUT
BMG-18001
BIPOD MOUNT
BMG-17923
22” BARREL - BMG-17943
30” BARREL - BMG-17944
MADE WITH PRIDE
Pg. 26
TOP RAIL (OPTIONAL)
FOR 11.5” HANDGUARD
BMG-17931
FOR 14” HANDGUARD
BMG-17932
TOP RAIL
SCREWS (4)
AN501D416-18
BOLT BMG-17924
BOLT CARRIER
BMG-17933EXTRACTOR SPRING
BMG-17963
EXTRACTOR SCREW
BMG-17953-M
• CALIBER .50BMG. (12.7 X 99 MM)
• MODE OF FIRE: BOLT ACTION REPEATER
• 10 ROUND MAGAZINE
• LENGTH OVERALL:
RIFLE: 58” [147.32 cm]
CARBINE: 50” [127.00 cm]
• BARREL LENGTH:
RIFLE: 30” [76.2 cm]
CARBINE: 22” [55.88 cm]
• RIFLING: 1 x 15” [38.1 cm]
• WEIGHT:
RIFLE: 30 Lbs. [13.61 kg]
CARBINE: 27 Lbs. [12.25 kg]
UPPER RECEIVER / BARREL
MUZZLE BRAKE / FOREND
BOLT & COMPONENTS
BOLT HANDLE END KNOB
BMG-17934
BOLT HANDLE
SET SCREW
BMG-17957
MUZZLE BRAKE
SCREWS (18 - 9 UP/9 DOWN)
BMG-17951
MUZZLE BRAKE
COMPLETE
BMG-17930A
SCHEMATIC DIAGRAM – BUSHMASTER BA50…
(Continued)
LOWER RECEIVER / BUTTSTOCK
MAGAZINE & COMPONENTS
RECEIVER EXTENSION
8448581-REM
COMPLETE LOWER
RECEIVER
BMG-17921A
HAMMER BMG-17927
HAMMER SPRING BMG-17967
SAFETY SELECTOR
LEVER 9381367-S
ANTI-WALK HAMMER
AND TRIGGER
PINS WITH CIRCLIPS
WE-002
TAKEDOWN PIN
8448584
MAGPUL PRS
BUTTSTOCK
MAG300-BLK
MAGAZINE
SPRING
BMG-17970
COMPLETE 10 ROUND
MAGAZINE
BMG-17972A
MAGAZINE BOX
BMG-17972
MAGAZINE
FOLLOWER
BMG-17971
TAKEDOWN PIN
SPRING 8448586
TAKEDOWN PIN
DETENT 8448585
SAFETY DETENT
8448631
SAFETY DETENT
SPRING 8448516
MAGAZINE
CATCH
8448638
STRIPPED
LOWER
RECEIVER
BMG-17921
MAGAZINE RELEASE
SPRING 8448637
MAGAZINE RELEASE
BUTTON BMG-17928
ERGOGRIP
TACTICAL
PISTOL GRIP
SCH4045
(INCLUDES
SCREW &
WASHERS)
PIVOT PIN
BMG-17965
PIVOT PIN
DETENT
8448585
PIVOT PIN
SPRING
8448586
TRIGGER 8448592-SR
TRIGGER SPRING 8448593
FLAT WASHER
LOCK WASHER
PISTOL GRIP SCREW
MAGAZINE FLOOR PLATE
BMG-17972BP
MADE WITH PRIDE
IN THE U.S.A.
© 2008, Bushmaster Firearms International, LLC, Windham, Maine
Pg. 27
WARRANTY…
BUSHMASTER LIMITED ONE YEAR WARRANTY… Bushmaster Firearms are warranted to be free from defects in
materials and workmanship. Any such defect of which Bushmaster Firearms International, LLC is given written notice, as
provided below, within one year and ten days from the date of first purchase by a customer will be remedied by Bushmaster
Firearms International, LLC. This warranty is granted by Bushmaster Firearms International, LLC, P.O. Box 1479, 999
Roosevelt Trail, Windham, Maine 04062.
To initiate a Warranty claim, call Bushmaster Customer Service (toll free: 8:30 AM to 6:00 PM E.S.T. - Monday thru
Friday 1-800-883-6229) to get an RMA number (“Return Merchandise Authorization”). Warranty claims should state (in
writing) the model and serial number of the firearm concerned, a description of the difficulty experienced, and the date of
purchase. The firearm concerned should be shipped (transportation charges prepaid), to the Warranty Service Department,
Bushmaster Firearms International, LLC, 999 Roosevelt Trail, Windham, ME 04062. Firearm shipment should be insured
by the owner, as Bushmaster Firearms International, LLC will accept no responsibility for loss or damage in transit.
Shipping and insurance charges for the return of a firearm to its owner will be paid by Bushmaster Firearms
International, LLC if the related claim is a proper claim for warranty work.
Under no circumstances shall Bushmaster Firearms International, LLC be responsible for incidental or
consequential damages with respect to economic loss or injury to property, whether as a result of express or implied
warranty, negligence or otherwise. Some states do not allow the exclusion of limitation of incidental or consequential
damages, so the above limitation may not apply to you. Bushmaster Firearms International, LLC will not be responsible for
the results of careless handling, unauthorized adjustments, defective, low quality, reloaded, or improper ammunition,
corrosion, neglect, ordinary wear and tear, or unreasonable use. Furthermore, the liability of Bushmaster Firearms
International, LLC under this warranty shall be limited solely to the obligation to repair or replace the firearm, and to pay
transportation and insurance charges for return of the firearm to owner.
NOTE: Handguns and long guns are classified as FIREARMS or DANGEROUS WEAPONS. Guns are surrendered by
Bushmaster Firearms International, LLC with the express understanding that it assumes no responsibility for resale handling
under local laws and regulations.
Pg. 28