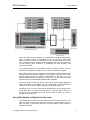
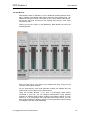
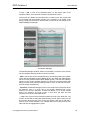
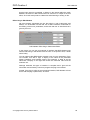
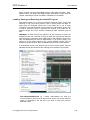
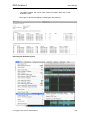
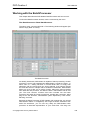
1
DSP-Quattro 4
User’s Manual
Release 4.0
April 2012
Written by Stefano Daino
© Copyright 2012 by Stefano Daino
i
DSP-Quattro 4
User's Manual
GRANT OF LICENSE. As registered user, the author grants to you the right to use one
copy of the enclosed software program (the "SOFTWARE"). You may not network the
SOFTWARE or otherwise use it or make it available for use on more than one computer
at the same time.
DSP-QUATTRO COPYRIGHT. The SOFTWARE is owned by Stefano Daino, via Del
Cancellone 21, 00047 - MARINO - ROME - ITALY, and is protected by Italian copyright
laws and international treaty provisions. Therefore, you must treat the SOFTWARE like
any other copyrighted material (e.g. a book or musical recording) except that you may
either (a) make one copy of the SOFTWARE solely for backup or archival purposes, or
(b) transfer the SOFTWARE to a single hard disk provided you keep the original solely for
backup or archival purposes. You may not copy the written materials accompanying the
software.
OTHER RESTRICTIONS. You may not rent, lease, sell or transfer the SOFTWARE to
other persons. You may not modify, adapt, translate, reverse engineer, decompile, or
disassemble the SOFTWARE.
DISCLAIMER OF WARRANTY AND LIMITED WARRANTY. THE SOFTWARE AND
ACCOMPANYING ELECTRONIC AND WRITTEN MATERIALS (INCLUDING
INSTRUCTIONS FOR USE) ARE PROVIDED "AS IS" WITHOUT WARRANTY OF ANY
KIND.
FURTHER STEFANO DAINO DOES NOT WARRANT, OR MAKE ANY
REPRESENTATIONS REGARDING THE USE, OR THE RESULTS OF THE USE, OF
THE SOFTWARE OR WRITTEN MATERIALS IN TERMS OF CORRECTNESS,
ACCURACY, RELIABILITY, CURRENTNESS, OR OTHERWISE.
THE ABOVE ARE THE ONLY WARRANTIES OF ANY KIND, EITHER EXPRESSED OR
IMPLIED, INCLUDING BUT NOT LIMITED TO THE IMPLIED WARRANTIES OF
MERCHANTABILITY AND FITNESS FOR A PARTICULAR PURPOSE THAT ARE MADE
BY STEFANO DAINO ON DSP-QUATTRO PRODUCT.
NO ORAL OR WRITTEN
INFORMATION OR ADVICE GIVEN BY THE AUTHOR, ITS DEALERS, DISTRIBUTORS,
AGENTS, OR EMPLOYEES SHALL CREATE A WARRANTY OR IN ANY WAY
INCREASE THE SCOPE OF THIS WARRANTY, AND YOU MAY NOT RELY ON SUCH
INFORMATION OR ADVICE.
THIS WARRANTY GIVES YOU SPECIFIC LEGAL
RIGHTS. YOU MAY HAVE OTHER RIGHTS, WHICH VARY FROM STATE TO STATE.
NEITHER THE AUTHOR NOR ANYONE ELSE WHO HAS BEEN INVOLVED WITH THE
CREATION, PRODUCTION, OR DELIVERY OF THE SOFTWARE SHALL BE LIABLE
FOR ANY DIRECT, INDIRECT, CONSEQUENTIAL, OR INCIDENTAL DAMAGES
(INCLUDING DAMAGES FOR LOSS OF BUSINESS PROFITS, BUSINESS
INTERRUPTION, LOSS OF BUSINESS INFORMATION, AND THE LIKE) ARISING OUT
OF THE USE OR THE INABILITY TO USE THE SOFTWARE EVEN IF THE AUTHOR
HAS BEEN ADVISED OF THE POSSIBILITY OF SUCH DAMAGES. BECAUSE SOME
STATES DO NOT ALLOW THE EXCLUSION OR LIMITATION OF LIABILITY FOR
CONSEQUENTIAL OR INCIDENTAL DAMAGES OR THE LIMITATIONS OF DURATION
OF IMPLIED WARRANTY, THE ABOVE LIMITATIONS MAY NOT APPLY TO YOU.
OTHER TRADEMARKS AND COPYRIGHTS:
- D-SoundPRO is Copyright © 1998 by Stefano Daino. All rights reserved.
- VST PlugIn Interface Technology by Steinberg Media Technologies GmbH
- Apple, Akai, Roland, E-MU, Kurzweil, Peavey, Yamaha, Opcode, OMS, Roxio and all
other copyrights and trademarks are held by their respective holders.
© Copyright 2012 by Stefano Daino
ii
DSP-Quattro 4
User's Manual
Index
INTRODUCTION.................................................................................................................................1
What is DSP-Quattro? ...............................................................................................................1
About Third Parties AudioUnit and VST Plug-Ins formats .........................................................2
What do I need to use DSP-Quattro? ........................................................................................3
What do I need to know to use DSP-Quattro? ..........................................................................3
Support: .....................................................................................................................................3
INSTALLING DSP-QUATTRO..............................................................................................................4
Running and Registering DSP-Quattro .....................................................................................5
Folders created and used by DSP-Quattro ...............................................................................5
THE BASICS OF DSP-QUATTRO........................................................................................................6
Using DSP-Quattro as Audio File Editor ....................................................................................8
Using DSP-Quattro as Digital Audio Recorder ..........................................................................9
Using DSP-Quattro for Audio-CD Mastering ...........................................................................10
Using DSP-Quattro as Real-Time Digital Multi-Effects Unit ....................................................12
Using DSP-Quattro as Software Synthesizer ..........................................................................13
Using DSP-Quattro Project .....................................................................................................14
DSP-Quattro Batch Processor.................................................................................................14
DSP-QUATTRO REFERENCE ..........................................................................................................16
Master Output Reference ........................................................................................................16
Gain Sliders and Peak and RMS Meters .............................................................................................17
Using the Gain Sliders: ...............................................................................................................17
Use of the numerical controls above each slider: .......................................................................17
Peak and RMS Meters: ...............................................................................................................17
Function buttons in the MasterOut .......................................................................................................18
The Output Device control ...................................................................................................................18
The Master BPM Tempo ......................................................................................................................18
The Aux Busses ...................................................................................................................................19
Document Manager Reference ...............................................................................................20
Function buttons in the Document Manager ........................................................................................21
Audio File Player/Editor Reference .........................................................................................24
The control section ...............................................................................................................................25
The Transport Control: ................................................................................................................26
The Marker Display .....................................................................................................................27
The Gain Control, Peak and RMS Meters and L&R assignment ................................................27
The overview ........................................................................................................................................28
The audio file editor Wave view area ...................................................................................................29
The Selection .......................................................................................................................................31
The Markers, Regions and the Marker&Regions Manager .................................................................32
The use of the Generic Markers: .................................................................................................34
Moving the Playback Marker to: ..................................................................................................35
Placing Generic Markers: ............................................................................................................35
The use of Audio Regions: ..........................................................................................................36
Working with Audio Regions: ......................................................................................................37
Cycle Mode and the Loop ....................................................................................................................38
© Copyright 2012 by Stefano Daino
iii
DSP-Quattro 4
User's Manual
Loop Helping Tools ......................................................................................................................39
The Loop Window ........................................................................................................................40
Audio Input Reference .............................................................................................................43
Audio Input Recorder Reference .............................................................................................44
Audio MasterOut Recorder Reference ....................................................................................47
Instrument Plug-in Generator Reference ................................................................................48
Effect Send Manager Reference .............................................................................................50
Effect Plug-in Edit Window ...................................................................................................................55
EDITING AN AUDIO FILE USING DSP-QUATTRO................................................................................56
Audio File Formats ..................................................................................................................56
The Support Files ....................................................................................................................57
Undo/Redo ..............................................................................................................................58
Undo/Redo History Table interface: .....................................................................................................58
The Real-Time Previewer Controller .......................................................................................60
The Programmer: .................................................................................................................................60
Efx Balance Slider: ..............................................................................................................................61
Playback Controller: .............................................................................................................................61
The Cut Editor Tool .................................................................................................................61
Doing a graphical Cut using the Cut Editor Tool: .................................................................................62
Shifting a waveform section backward or forward in time line .............................................................63
Setting Fades length and curve ...........................................................................................................63
Trimming the boundaries of a waveform section: ................................................................................63
Options for setting fade-in, fade-out, cross-fades and for trimming: ....................................................64
Cutting again a waveform section ........................................................................................................65
Inserting the Clipboard or Replacing with the Clipboard using the Cut Editor Tool: ............................65
Extended Cut, Copy&Paste Editing Functions ........................................................................66
About the Blend Option ........................................................................................................................66
About the Auto Zero Option .................................................................................................................68
Cut Functions .......................................................................................................................................68
Copy Functions ....................................................................................................................................70
Paste (Replace) and Insert Functions .................................................................................................71
Copying, Moving and Inserting by Drag&Drop .....................................................................................71
Insert Silence ...........................................................................................................................73
Mix... ........................................................................................................................................73
Silence... ..................................................................................................................................74
Repeat... ..................................................................................................................................75
Append ....................................................................................................................................76
Find Peak and RMS ................................................................................................................77
Remove DC .............................................................................................................................78
Invert........................................................................................................................................78
Reverse ...................................................................................................................................79
Swap L&R Channels ...............................................................................................................79
Normalize ................................................................................................................................79
Normalize To... ........................................................................................................................79
Change Gain... ........................................................................................................................80
The Fade In/Out ......................................................................................................................81
The Fade In/Out Graphic Editor Tool ......................................................................................82
X-Fade Looping .......................................................................................................................83
© Copyright 2012 by Stefano Daino
iv
DSP-Quattro 4
User's Manual
Loop by BPM ...........................................................................................................................85
Detect BPM... ..........................................................................................................................86
Resampling .............................................................................................................................87
Pitch Shifting ...........................................................................................................................88
Frequency Shifting ..................................................................................................................89
Time Stretching .......................................................................................................................90
Audio Restoration: the Pencil and Gainer Tool .......................................................................92
Using the Pencil Tool: ..........................................................................................................................93
Using the Gainer Tool: .........................................................................................................................93
Audio Restoration: the Analyze & Declick/Repair Tool ............................................................94
Audio Restoration: Declick/Repair Selection ...........................................................................96
Applying an Effect Plug-In as Edit function .............................................................................96
Editing Using Custom DSP-Quattro Effects ............................................................................97
DSP-Quattro Digital Effect: Chorus .....................................................................................................98
DSP-Quattro Digital Effect: Stereoizer .................................................................................................99
DSP-Quattro Digital Effect: Delay and Dual Delay ............................................................................100
DSP-Quattro Digital Effect: MultiTap Delay .......................................................................................101
DSP-Quattro Digital Effect: Reverb 1 and Reverb 2 ..........................................................................102
DSP-Quattro Digital Filter: 4 Bands Parametric EQ ...........................................................................103
DSP-Quattro Digital Filter: 7 Bands Graphic EQ ...............................................................................104
DSP-Quattro Digital Filter: Resonant LowPass, BandPass, HighPass and BandReject Analog Filter
emulations .........................................................................................................................................105
DRAG&DROP AND AUDIO FILES IMPORT/EXPORT ..........................................................................107
Exporting and Importing by Drag&Drop ................................................................................107
Exporting and Importing by Commands ................................................................................109
Exporting by New Audio File Commands ..............................................................................111
Exporting as MP3 ..................................................................................................................113
WORKING WITH THE AUDIOCD LAYOUT (PLAYLIST) .......................................................................114
Creating your first Audio-CD: .................................................................................................115
The AudioCD Layout Interface: .............................................................................................118
The Transport/Control section ...........................................................................................................119
The Transport Control: ..............................................................................................................119
The Counter Display ................................................................................................................120
The Meters ................................................................................................................................120
Overview area ....................................................................................................................................120
AudioCD Layout Wave view area ......................................................................................................121
Zoom In/Out Buttons: ................................................................................................................122
Mouse Mode Buttons: ...............................................................................................................123
The Region Waveform view: .....................................................................................................124
The Playback Cycle: .................................................................................................................124
CD-Track Markers Guide: .........................................................................................................125
The Time Ruler: .........................................................................................................................125
Region List .........................................................................................................................................125
CD-Track List .....................................................................................................................................128
Working with AudioCD Layout Regions and CD-Track Markers: Auto and Manual Modes ...131
Working with AudioCD Layout Regions: ............................................................................................132
To create a new AudioCD Layout Region: .................................................................................132
To remove a AudioCD Layout Region: ......................................................................................133
© Copyright 2012 by Stefano Daino
v
DSP-Quattro 4
User's Manual
To reorder or duplicate AudioCD Layout Regions: ....................................................................133
Editing a AudioCD Layout Region: ............................................................................................134
AUTO MODE doing cross-fades on AudioCD Layout Regions .................................................138
Setting Equal Power cross-fades slopes between AudioCD Layout regions ............................139
Using the Audio File Waveform editor to edit AudioCD Layout Regions ...................................139
Working with CD-Tracks: ...................................................................................................................140
To create a new CD-Track marker: ...........................................................................................140
To remove a CD-Track marker: .................................................................................................140
Editing a CD-Track: ...................................................................................................................141
Connections between a CD-Track Marker and underlying Region: ..........................................142
CD-Tracks AUTO MODE ...........................................................................................................144
Setting all CD-Tracks Pauses to... .............................................................................................145
Using the Plug-ins and Internal Effects on the AudioCD Layout: ..........................................146
Undo/Redo ............................................................................................................................147
Undo/Redo History Table interface: ...................................................................................................147
Loading, Saving and Exporting the AudioCD Layout: ............................................................148
Exporting the AudioCD Layout: .........................................................................................................149
Importing the AudioCD Layout: ..........................................................................................................150
The AudioCD Layout command buttons: ...............................................................................151
BURNING AN AUDIO CD-ROM .....................................................................................................154
WORKING WITH PROJECTS ...........................................................................................................157
WORKING WITH THE BATCHPROCESSOR .......................................................................................159
The BatchProcessor items:....................................................................................................160
Adding a new BatchProcessor Item on the table: ..............................................................................160
Removing one or more items from the BatchProcessor: ...................................................................162
The BatchProcessor Table:....................................................................................................162
Using the BatchProcessor: ....................................................................................................163
Setting the format of destination audio files: ..........................................................................164
Setting the processing functions: ...........................................................................................165
Saving and Loading a BatchProcessor preset: .....................................................................168
CONFIGURING AUDIO AND MIDI ....................................................................................................169
Configuring the Audio Device ................................................................................................169
How to Address External Audio Devices on Input and Output...............................................171
Configuring the MIDI Device ..................................................................................................173
INTERFACING DSP-QUATTRO WITH EXTERNAL SAMPLERS .............................................................174
About the different reading of the Loop points .......................................................................174
Midi Sample Dump Standard (SDS) ......................................................................................174
Reception of a sample by MIDI .........................................................................................................175
Transmission of a sample by MIDI .....................................................................................................176
DSP-QUATTRO PREFERENCES .....................................................................................................178
General Preferences..............................................................................................................178
Editor Preferences .................................................................................................................181
Network Preferences .............................................................................................................182
Plug-ins Preferences .............................................................................................................183
Audio Preferences .................................................................................................................185
© Copyright 2012 by Stefano Daino
vi
DSP-Quattro 4
© Copyright 2012 by Stefano Daino
User's Manual
vii
Introduction
Welcome to the DSP-Quattro User’s Guide. DSP-Quattro is the direct result
of a very long experience developing Digital Audio applications for the
MacOS, starting with D-SoundPRO, the powerful audio editor developed
since 1994 for Apple Macintosh™ computers, a highly innovative product
which uses even the latest technology of the new millennium. DSP-Quattro
inserts the new dimension of real-time into the world of audio editors, turning
your computer into a real time workstation for music production, plug-in
hosting and audio editing for writing files ready for mastering. All of the
above through the smoothest interface you have ever seen. DSP-Quattro is
designed for the most professional users, but thanks to the simple and
intuitive interface, however, DSP-Quattro turns out to be the ideal product for
whoever has no experience in the field and would like to start out in the
world of digital audio.
This User’s Guide will show you all there is to know about DSP-Quattro.
What is DSP-Quattro?
DSP-Quattro is an extremely powerful Audio Editor / AudioCD Mastering
Application with extended real-time and off-line support of AU/VST Effect
and Virtual Instrument plug-ins for the Apple MacOS.
- DSP-Quattro is a real time audio editor.
DSP-Quattro is the right software for all people who want to record, create or
edit their audio work with the computer. With DSP-Quattro you can record
audio sources, edit existing audio files, and even create new files ready for
mastering. All these using various existing formats, thanks to the import
function, such as WAVE, AIFF, SDII, mp3, CD Audio, etc. You will then be
able to edit the new file starting with the basic Cut, Copy&Paste commands,
to the most advanced algorithms, as the Time Stretching, Pitch Shifting,
Linear Phase Resampling, and Digital Effects, like reverbs, stereo
enhancers, graphic and parametric EQs, Analog Filter Simulators, and so
on. And it is all built-in! But not only that: DSP-Quattro is open to the
standard third parties plug-ins as well. DSP-Quattro Editor allows you to use
any plug-in exactly as any other internal edit function, offering also a real
time preview of the result before to apply it. And, if you will not like the result,
you have not to worry: DSP-Quattro internal engine keeps track of all edits
and you can Undo/Redo your operations without any limitation. Not only this:
the special multi-level Undo/Redo table of DSP-Quattro offers a graphical
interface to your past operations to jump back and forth on the history of
your edits.
- DSP-Quattro is the perfect tool for Audio CDROM mastering.
DSP-Quattro integrates CD burning that conforms to the Redbook standards
for playback in any CD player. DSP-Quattro comes also with a fully
programmable AudioCD Layout (called also Playlist), offering all the features
needed to build your audio CDROM by using your favorites songs or even
selections of audio files. Several non-destructive cross-fade types can be
programmed to make the transitions between your audio tracks even
smoother, without audio clicks or abrupt changes. And, as very unique
feature, DSP-Quattro allows you to setup a serial chain of effects (to choose
from the internal list or from the effect plug-ins installed on your system), to
play and master you Playlist giving a tremendous additional power to your
master. Even more, each track of the Playlist may have its own chain of real
time non-destructive effects, different from track to track to best suite all your
© Copyright 2002-2012 by Stefano Daino
1
DSP-Quattro 4
User's Manual
needs!
Moreover, audio CD image files are fully compatible with other commercial
software as Jam and Roxio Toast, making the integration between these
applications very easy and flexible. CD-Texts, EAN/UPC, ISRC, PQ subcodes are supported as well. You can even export the AudioCD layout
according the DDP 2 standard.
- DSP-Quattro is an Instrument and Effect plug-in Host:
DSP-Quattro is also a great real time synthesizer and multi-effects that can
be used by an experienced musician or by someone who simply wants to
learn how to play an instrument. Thanks to its specific connection with audio
plug-ins and MIDI, DSP-Quattro is capable to play a real time standard
Instrument plug-in through a controller MIDI and/or with a sequencer, while
listening to an audio file and recording everything on a new file! Even more,
you can add in real time the Effect plug-ins that better suites your needs.
DSP-Quattro can even be used to better the sound quality of your voice or of
your instruments as with a professional multi-effect, thanks to its real time
management of the input/output connections of both internal standard and
external analog/digital interfaces. All of the above without any additional
hardware or maximizing the use of those eventually connected to your
computer.
- DSP-Quattro is a tool for software and hardware samplers:
For all those among you that have already experienced music and both
hardware and software samplers, DSP-Quattro is the perfect editing tool. In
fact, not only does DSP-Quattro offer a way of processing in floating point
precision to satisfy even the more professional user, it offers all the graphical
tools for the punctual editing of your audio files. You will be able to set loop
points through a special editing window, and apply any internal or plug-in
effect directly to it! DSP-Quattro is even capable of connecting to most of the
modern hardware samplers through MIDI connections, or through the direct
compatibility of audio files such as AIFF, SDII, and WAVE, including the loop
points information. Even better, DSP-Quattro is also capable to transfer
more files in one click, to manage stereo files, and even to transmit a single
region of a file.
About Third Parties AudioUnit and VST Plug-Ins formats
DSP-Quattro is capable to support Instruments and Effects plug-ins.
Instruments can be used to play music in real time and to generate new
audio files. Effects can be used as real time modifiers or as offline edit
function with real time previewing. More about this will come later on this
manual.
DSP-Quattro supports Instruments and Effects Audio Unit (AU) and VST 2.4
plug-ins. VST Plug-ins must be version 2.4 compliant, built in mach-o format
for MacOS X. DSP-Quattro supports plug-ins having GUI built using MacOS
X Carbon or Cocoa graphic libraries.
DSP-Quattro 4 is a Universal Binary (UB) application, it runs natively on
Macs based on PowerPC (G4/G5) or Intel microprocessors as well.
© Copyright 2002-2012 by Stefano Daino
2
DSP-Quattro 4
User's Manual
What do I need to use DSP-Quattro?
DSP-Quattro works on any Apple Macintosh™ with a PowerPC or Intel
microprocessors.
The minimum requirements are: a CPU PowerPC G5, 128 MBytes of RAM,
and around 50 MBytes of free space on your HD.
However we recommend the use of a G5 or Intel Core 2 Duo based Apple
Macintosh, 1 Giga Bytes of RAM, and 100 MBytes of free space on the HD,
for better performance.
Please consider also that the performances of DSP-Quattro are heavily
dependent by the number of plug-ins and effects that are used at the same
time.
DSP-Quattro 4 requires MacOS X 10.5 or later to run.
If you have older systems, DSP-Quattro 2.1.2 which runs also on MacOS 9.2
or DSP-Quattro X 10.3 and 10.4, is still available. Please contact the
[email protected] to know the requirements to run it.
Macintosh standard audio interface can be used with DSP-Quattro through
Apple CoreAudio, which is built-in in the MacOS X.
DSP-Quattro X fully supports CoreMIDI, which is built-in into MacOS X.
DSP-Quattro supports also AudioUnit and VST plug-ins and all the external
hardware audio interface compatible with MacOS X.
What do I need to know to use DSP-Quattro?
This User’s Guide assumes that you know how to operate the Macintosh
and are familiar with the basic Macintosh terminology such as point, click,
drag & the Finder. If you aren’t familiar with these terms, you should refer to
the Macintosh User’s Guide to learn the basic operations of using the
Macintosh. Optionally, this User's Guide assumes that you know what
technologies like AudioUnit, VST, CoreAudio, CoreMIDI and MIDI are. If you
are not interested to receive or transmit sounds over MIDI, or if you have not
any additional audio hardware installed on your computer, you can omit to
read the chapter in question.
Support:
DSP-Quattro official home page is:
www.dsp-quattro.com
Here you can find additional information on our product, you will be able to
register your copy and, by being a registered user, you will be able to use a
list of additional services in the user area.
At any time write us by e-mail at [email protected] to have the
answer to your technical questions or for more information regarding the use
of DSP-Quattro.
© Copyright 2002-2012 by Stefano Daino
3
User's Manual
DSP-Quattro 4
Installing DSP-Quattro
To install DSP-Quattro you simply need to copy the archive DSP-Quattro.zip
somewhere into your HD. It includes a DSP-Quattro.dmg disk image file.
Decompress the zip archive, double click on the dmg file.
The Mac OS X will mount a DSP-Quattro Hard Disk. Open it.
Double click on the DSP-Quattro X Installer icon, the installer will start and
you will be guided to the installation of DSP-Quattro.
The installer will create a DSP-Quattro X folder into the Application folder of
your MacOS X system disk.
Eject the DSP-Quattro disk.
Go to the Application folder on your HD, look for the DSP-Quattro X folder,
open it.
DSP-Quattro X Application folder
© Copyright 2002-2012 by Stefano Daino
4
DSP-Quattro 4
User's Manual
Running and Registering DSP-Quattro
Double click on DSP-Quattro X icon application to run it. Then, please refer
to the DSP-Quattro Installation GUIDE which is in the DSP-Quattro disk
image to know how to register your full version of DSP-Quattro.
Folders created and used by DSP-Quattro
To run properly, DSP-Quattro creates and uses some folders on your system
HD.
MacOS X/Users/…/Library/Application Support/DSP-Quattro folder
- Support Files, Temporary Files, Overview Files are the folders that DSPQuattro uses to save all temporary support files and the graphical overviews.
- Effect Banks. which is into the same folder where there is the application, is
the place where DSP-Quattro looks for the default programs for its internal
effects. You can change these files with presets made by you, as long as
you keep the same names.
- DSP-Quattro creates also the MacOSX/Users/…/Music/DSP-Quattro folder
which, by default, will be used for new recordings.
Of course, DSP-Quattro can be then customized to allow the use of different
folders by using the preference dialog window.
That’s it. Enjoy DSP-Quattro!
© Copyright 2002-2012 by Stefano Daino
5
DSP-Quattro 4
User's Manual
The Basics of DSP-Quattro
To make the best of DSP-Quattro you need to understand how it works.
© Copyright 2002-2012 by Stefano Daino
6
DSP-Quattro 4
User's Manual
The Audio Generators: DSP-Quattro is based on Audio Generators or
Audio Documents. By Audio Generator we mean any source of sound.
Examples of Audio Generators are any kind of audio file player, audio input,
and Instrument plug-ins. Moreover, in a recording studio, a recorder, a
Synthesizer, a piano, a microphone and even a musician playing his
instrument would all be considered Audio Generators.
In DSP-Quattro you can open or create as many Audio Generators as you
want. These Audio Generators can than be played one at a time, all together
or not even be played at all! A generator can be loaded or released
dynamically, regardless of the other generators.
Effects and MasterOut Recorder: the sounds created by Audio Generators
go into a mixer that creates a Master Out audio stream with two stereo
channels. To these channels DSP-Quattro applies a series of real time
effects that can be chosen among the internal effects of DSP-Quattro or can
be loaded as external Effect plug-ins. The stereo channels can then be
recorded as a new file thanks to a MasterOut recorder, and/or can be sent to
your audio devices, such as your Mac audio output or, thanks to Coreaudio
of MacOS X, the external audio device that you may have connected to your
Mac.
The next chapters will deal with how to use different Audio Generators, how
to configure the effects chain of events, and all the other functions of DSPQuattro.
Audio File Players & Editors: a special kind of Audio Generator is the
Audio File Player/Editor. This object is not only capable of playing an audio
file, but it allows you to edit the file thanks to a series of different editing
functions.
If you are already used a digital audio editor, the Audio File Editor of DSPQuattro will look just like what you may have already used. But please do not
stop at the use of DSP-Quattro as a simple audio editor, although it has all
the possibilities to do so. In fact, DSP-Quattro introduces a new dimension of
audio editing, and the time you will spend to understand how it works will be
very well worth in the end by the improvements that will come from it.
The AudioCD Layout (Playlist): another very important component of DSPQuattro is the AudioCD Layout, called also the Playlist. The Playlist is able to
play a sequence of audio files or simply parts of audio files. Each of these is
called ‘region’. You have also the capability to set cross-fades between one
region and the next to it, to avoid abrupt changes in the output audio stream,
allowing smooth transitions between your audio regions. Then, you can also
place markers to set your Audio-CD track starts and pauses. The Playlist
output can be saved as a new file, can be used – in real time - as audio
generator itself, or can be used to create an image of an Audio-CD, also
using standard formats like DDP. Moreover, DSP-Quattro is able to burn
Audio-CDs by itself, if you have an internal or external CD writer device
connected to your Macintosh.
Following are basic examples of what can be done with DSP-Quattro. But
the list could be so much longer…
NOTE: Everything shown in these examples is dynamic and therefore can
be wholly customized by the user. Nothing stops you from adding or closing
any of the elements, and to create a melting pot of the different
configurations shown in the examples.
© Copyright 2002-2012 by Stefano Daino
7
DSP-Quattro 4
User's Manual
Using DSP-Quattro as Audio File Editor
You can choose to open/save AIFF, SDII or WAVE files (8, 16, 24, 32 or 32Floats (*) bits/sample) or you can import/export from/to RAW data files and,
using the import feature of MacOS X, a long list of formats such as .acc,
mp3, m4a, video and CD audio tracks. Again you can open different files at
the same time and pass data to one another thanks to the audio clipboard of
DSP-Quattro.
(*) SDII format does not support 32 bits floats
DSP-Quattro offers a range of editing possibilities, starting with basic Cut,
Copy and Paste operations, and passing to highly professional commands
such as High Quality time stretching and pitch shifting algorithms, an
amazing De-clicker for audio restoration, reverbs, stereo enhancers,
graphical and parametrical EQs, Analog Filter Simulators. Moreover, DSPQuattro has been developed to accept even standard effect plug-ins, which
can act as edit function as well.
DSP-Quattro includes a very special Cut Editor as well. Using it, you can
very easily remove portions, paste different audio materials on your audio
file just looking to it and dragging waveforms.
© Copyright 2002-2012 by Stefano Daino
8
DSP-Quattro 4
User's Manual
And don’t forget that the editing is not destructive, because DSP-Quattro
offers an infinite number of Undo/Redo levels, as well as an Undo/Redo
History window to trace your way back to your previous situations in one
click. Last but not least, all the editing algorithms work with the precision of
32 bits floating point arithmetic, to guarantee the best dynamic and
professional results.
To the editing settings can be added a series of real time effects, both as
insert and as global to the master out or to one of the auxiliary outputs.
Each effect can be chosen among the internal effects of DSP-Quattro and/or
between the Effect plug-ins installed in your system. There is also a very
special internal ‘plug-in’ to address output/inputs of the Mac (or of the
external audio device connected to your mac), so you can route your audio
signals to/from an external analog/digital audio hardware.
The insert chain of effects can even be used as an off-line editing algorithm.
Using a Recorder in the Master Out, any modification can be recorded in
real time, such as pitch changes, playing in Audio Scrub mode, etc.
Furthermore you can open more files at the same time and by playing them
at the same time or consecutively will result in a new file that is the mix of
the former files, processed each with its own chain of effects in insert or
globally in the master out.
Using DSP-Quattro as Digital Audio Recorder
The easiest way to make a new recording is to open an Input Recorder. This
object is able to create a new audio file, choose a couple of audio input (or
only one input, if you prefer) and then record everything exactly as with a
traditional recorder.
© Copyright 2002-2012 by Stefano Daino
9
DSP-Quattro 4
User's Manual
Each Input Recorder and Audio Input may have its own insert effect chains,
to optimize and customize the incoming sounds.
DSP-Quattro offers another possibility that can also be used together with
the previous one. You can open an Output Recorder, which works almost as
the Input Recorder, but it dumps to file everything that DSP-Quattro sends to
the audio outputs. In this case you will be able to apply all the effects in the
master out before the recording. In this way it will be possible to use a bunch
of effects such as parametric and graphic EQs, stereo enhancers or - thanks
to its external I/O routing - even external hardware devices, to have the very
best recording quality.
Is then possible to open other Input Recorders, and to record in different files
both the input and the output. This could be very useful when you have
audio interfaces with multiple audio inputs.
We bet you have already guessed that while listening one input you could
play any other audio file and record everything with the Output Recorder...
Using DSP-Quattro for Audio-CD Mastering
DSP-Quattro allows you all the operations you will need to do your new
recordings, get your audio files, edit your audio materials, improve the audio
quality of your product, build your AudioCD layout, and even burn and audioCD compliant with the Redbook standard, extended to include CD-Text,
EAN/UPC CD-ROM Disc code, CD-Track ISRC and P-Q sub-codes. You can
import/export the AudioCD layout according to the DDP 2 standard as well.
© Copyright 2002-2012 by Stefano Daino
10
DSP-Quattro 4
User's Manual
Phase 1: Record your audio files or import your audio files. Use DSPQuattro as Digital Audio Recorder, as described above, to do your new
recordings, use standard AIFF, WAVE or SDII audio file formats supported
by DSP-Quattro, or the several audio file formats supported by QuickTime
(MP3, audio CD,…) to prepare all the files you wish to master.
Phase 2: Edit your files and improve the audio quality. Use DSP-Quattro as
Audio File Editor and plug-in host to edit your audio files and to apply your
favorite plug-in to clean them or to improve their dynamics, modify their
spectrums, add reverbs and enhance the stereo image, and more.
© Copyright 2002-2012 by Stefano Daino
11
DSP-Quattro 4
User's Manual
Phase 3: Build the AudioCD layout. Use the audio files, or simply their
selections/regions to build the sequence you want to burn on your audio-CD.
By mouse dragging each region on the Playlist waveform editor, set the
cross-fades between regions to avoid clicks and for the smoothest
transitions between them. You can also use DSP-Quattro for setting realtime
non-destructive serial chains of effects differently for each track, or on the
Playlist output if you want to apply effects common to all the tracks. You can
choose the effects among the real-time effects internal to DSP-Quattro or
Effect plug-ins installed on your configuration.
Phase 4: As soon as your AudioCD layout suites all your needs, save your
work as output audio file using even the very best audio audio format (DSPQuattro allows you to save even with 32 float sample bit precision), to use it
when you will need to burn an audio-CD master (if needed, DSP-Quattro
exports also in DDP 2 format). Moreover, DSP-Quattro allows you even to
burn an audio-CD directly using your Mac, without the need of additional
software. The resulting audio-CD will be compliant with the Redbook
standard, to guarantee the perfect compatibility with all the audio CDROM
players available on the market.
Using DSP-Quattro as Real-Time Digital Multi-Effects Unit
The chain of effects in the Master Out can be easily changed to use DSPQuattro as a Real Time Digital Multi-Effects Unit. All you need to do is to
open an Audio Input, set a couple of input, load the chosen effects in the
Master Out, and choose the output.
Your Mac, without any other hardware or software, is now become a Digital
Multi-Effects Unit. And since DSP-Quattro let you choose the input and
output on your audio board, this use allows you to turn the built-in real time
effects or your Effect plug-ins into a professional stand alone processing
units for your recording studio.
© Copyright 2002-2012 by Stefano Daino
12
DSP-Quattro 4
User's Manual
This possibility can be extended, because each Audio Input may have its
own insert effect chain. It allows you to set-up a fully customizable parallel
real time multi effect unit, with any limitation except the CPU power…
Moreover, external hardware can very easily be integrated into the effect
chain of DSP-Quattro, simply using its special internal module to address I/O
devices of your mac. In this way, the audio stream will be routed to outputs
and taken again from the inputs, and external hardware will be seen exactly
as an internal plug-in.
Using DSP-Quattro as Software Synthesizer
As with what has been said before, you can open a Instrument plug-in, set it
to use it with a MIDI port and a certain MIDI channel, and play it in real time
listening to it through the output. You can even process it with the chain of
effects loaded in an Insert Effects chain (independent for each open
Instrument) or in the Master Out Effects chain, recording everything that is
played, if that’s what you want of course! The virtual Instrument plug-in can
be played in real time thanks to an external MIDI control, or with a
sequencer. Even in this case is possible to open several different virtual
© Copyright 2002-2012 by Stefano Daino
13
DSP-Quattro 4
User's Manual
Instrument plug-ins at the same time (even the same plug-in more than
once), and mix the new settings with the existing ones. This allows you to
record what is played while listening to an audio file, or while singing into a
microphone connected to the Mac, or while playing instruments together with
your friend…
All of the above are possible simply opening, creating or closing Audio
Generators, and without worries about setting new systems or make audio
connections. All is automatic. All you need to do is open a new object to use
it. And when you don’t need it anymore you can simply close it again.
Using DSP-Quattro Project
There is a very powerful additional tool in DSP-Quattro: the Project.
A Project is the union of all the objects you have loaded and configured in a
certain instant. In other words, saving a Project, DSP-Quattro saves a
snapshot of the current situation, including which Audio File is open,
Instrument plug-ins and their MIDI settings, Audio Inputs, the Playlist
settings, Insert and Master Effects matrix including loaded plug-ins and their
current presets, windows coordinates, status, and so on. And, of course,
when loading a Project, DSP-Quattro resets the configuration to the state as
it was when you saved that Project.
Using the Project, you can very easily re-configure DSP-Quattro with a
mouse click only.
DSP-Quattro Batch Processor
Last but not least, DSP-Quattro is capable of batch processing. A batch
processor is a tool, fully integrated into DSP-Quattro, to apply the same - or
same chain of – editing functions on several audio files – or simply portions
of audio files – with one mouse click only. As an example, if you want to
change the audio file format or sample rate to hundreds of audio files, DSPQuattro allows you to do it with a couple of steps only, without the need of
loading each audio file alone, one after the other, and process it. DSPQuattro will do it for you! The most common functions has been included into
the batch processor, like audio file format conversions, sample rate
conversion, internal effects or Effect plug-ins as edit functions, Normalization
(Gain adjustment), Fade In/Out, dithering, and more.
DSP-Quattro is also able to export audio files in mp3 audio file format if you
have already installed by yourself the freeware open source LAME
framework on your system (search on the web, you will find the procedure
about how to do it). DSP-Quattro will then automatically detect the presence
of the LAME framework and it will enable all the commands to export your
audio files also in mp3 format.
© Copyright 2002-2012 by Stefano Daino
14
DSP-Quattro 4
User's Manual
Because the Batch Processor of DSP-Quattro fully supports the very unique
DSP-Quattro feature of dragging and dropping selections of even a single
channel from stereo audio file waveforms, you can use very easily the DSPQuattro batch processor as ultra-fast exporter/slicer of your audio files. Just
drag over there your audio file waveform selections, and click on ‘process’.
DSP-Quattro will export each audio selection into newly created audio file,
having the file format which will best suite your needs.
© Copyright 2002-2012 by Stefano Daino
15
User's Manual
DSP-Quattro 4
DSP-Quattro Reference
This chapter deals with how the different parts of DSP-Quattro work and how
do you use them. We will talk about Audio Generators, graphic interface,
software and hardware compatibility and so on. Finally there is a list of all
menu functions.
Master Output Reference
You can show/hide the MasterOut floating window from the menu
Windows->Show Master Outputs
or using the keys ⇧⌘C
MasterOut Window
The MasterOut window shows the audio outputs of DSP-Quattro as well as
controlling them and gathering the most used buttons all in one place.
© Copyright 2002-2012 by Stefano Daino
16
DSP-Quattro 4
User's Manual
Gain Sliders and Peak and RMS Meters
Gain Sliders and V-Meters in the MasterOut are really intuitive. The behavior
of these components in the MasterOut is fairly common to many objects in
DSP-Quattro.
Using the Gain Sliders:
- One click: as per default, both sliders work in pair, when one of them is
moved the other moves as well. The coupled movement keeps constant the
ratio of the sliders (the scale is logarithmic), so that the fade in/out is as
natural as possible.
- ⇧ + click: moves the sliders independently. You can set this behavior as
default in the preference dialog window.
- CTRL + click: jump to the default value of the channel gain slider, which in
this case is equal to 0 dB.
Use of the numerical controls above each slider:
- One Click: the speed of changes depends on the position of the mouse.
The farthest you are from the center of the control, the bigger will be the
increase or decrease interval.
- Double Click: a dialog window will prompt you to set a new numerical
value.
Peak and RMS Meters:
In the middle of the MasterOut there are the Peak and RMS Meters. Their
job is to show the Peak and RMS levels of the Left and Right output signals
of DSP-Quattro. The Peak meters are innermost respect the RMS meters.
Peak meters show the current max signal level, with the sample precision.
They have a release time such that when the signal goes down, they follow
smoothly. If the signal goes up, the follow immediately.
RMS meters show the ‘power’ of the signal. It is a very important measure
about how much the audio signal is ‘strong’. An audio signal can have very
high peak levels (even up to the distortion) but very low RSM values. In this
case, it sounds very weak. A good mastering engineer is able to rise the
RMS level without causing the distortion due too high Peak levels. Usually,
multi-band compressors plug-ins can help a lot about this.
In the upper part of the V-Meters there is a number that shows the value in
dB of the audio file signal at its peak. This number shows the highest value
reached or the highest value reached in the last 3 seconds. By an option in
the preference dialog, you can set a flag to keep this value to the maximum.
In this case, to reset the last value shown, you need to click on it with the
mouse.
Also there is a peak level indicator that flashes if the signal exceeds 0dB. Be
careful not to let these indicators flash too often because even if DSPQuattro uses a special clipping algorithm, just like analog devices, any
abuse of the output levels, if not wanted, will bring too much saturation and
distortion in the output audio signal.
© Copyright 2002-2012 by Stefano Daino
17
DSP-Quattro 4
User's Manual
Function buttons in the MasterOut
In the upper part of the MasterOut there are the following function buttons
(See next chapters for the details):
-
Rec: opens the Output Recorder module window.
-
Aux: opens the Aux Outputs control window.
-
Docs: opens the Document Manager window.
-
Solo: to monitor the Master Out only, muting all the other Aux Outputs.
-
Mute: to mute the Master Out, useful if in the meanwhile you need to
monitor an Aux Output.
-
Mono: mixes left and right output channels. It is very useful to test the
mono compatibility of your product.
-
Effx: opens the global send effects window of the MasterOut.
The Output Device control
It allows you to set which audio connector of the output audio device DSPQuattro will use to play its Left and Right output audio channels.
Usually, if you have not configured any multi-outputs audio device, the two
popup-up menus show the standard L&R output ports. If an audio device
with several audio outputs is connected to your mac, you can set which pair
of connectors DSP-Quattro must address for playing the master L&R
channels.
NOTE: By default, DSP-Quattro uses the audio device which also MacOS X
is using as standard device. If you wish to assign a different output audio
device to DSP-Quattro, you must first configure this by using the Audio
Device Settings dialog from the Options menu. See later in this manual to
know how to do this.
The Master BPM Tempo
On the MasterOut you find also a control to set the current BPM tempo for
the DSP-Quattro internal master MIDI clock.
DSP-Quattro uses this master clock to send a message to all effect and
instrument modules and plug-ins for their synchronization. Of course, if
necessary, you must set the clock option of the instrument or effect plug-in to
‘external’ such to sync it to the master clock of DSP-Quattro.
© Copyright 2002-2012 by Stefano Daino
18
DSP-Quattro 4
User's Manual
The Aux Busses
DSP-Quattro allows to address up to four additional Auxiliary Busses which
play in parallel to the Master L&R Output channels. Each Auxiliary Bus can
address its own pair of audio connectors on the current output audio device,
has its own effx send, and has its own settings about being in Solo, Mute
and Mono modes.
Clicking on the Aux button on the MasterOut, DSP-Quattro will show the
Auxiliary Busses:
Each Aux Bus strip is very similar to the Master L&R strip, except for the
common master global controls.
As you would expect, each audio generator module can address the L&R
master strip or one of the four Aux busses above.
Using the Auxiliary Busses, if you have a multi-output audio device
connected to your mac, you can configure DSP-Quattro to play different
modules on different audio outputs, applying also different effects on each
output. Or, in a configuration with only L&R output audio device, you can
apply different effects to different groups of audio generators without having
to configure insert effx sends separately.
© Copyright 2002-2012 by Stefano Daino
19
User's Manual
DSP-Quattro 4
Document Manager Reference
To show/hide the Document Manager floating window you can select the
menu
Windows->Show Document Manager,
or you can use the keys ⇧⌘D, or you can click on the Docs button in the
MasterOut. Once open the same command will close this window.
Document Manager floating Window
The Document Manager shows a list of the audio generators which are open
in DSP-Quattro at that moment. The different types of generators are divided
into the following categories:
-
Audio File: these are the Audio File Player/Editor
-
Audio Input: these are the objects to listen to the audio inputs
-
Input Recorder: same as audio inputs, these objects are also recorders.
-
AudioUnit Instrument: AudioUnit Instruments each with its own MIDI
settings.
-
VSTi Instrument: VST Instruments each with its own MIDI settings.
When you double-click on an audio document in the document manager list,
the document window comes out in front, or it is opened if it was only
hidden.
NOTE: DSP-Quattro can hide the window without releasing the document.
As very unique feature, DSP-Quattro is able to keep ‘loaded’ in the Project a
document without showing its document window. You can close a document
window without actually releasing the document itself (in other words, you
can simply hide the document window). This is very useful to avoid to have
too many windows open on your desktop, when you do not need them.
© Copyright 2002-2012 by Stefano Daino
20
DSP-Quattro 4
User's Manual
To hide a document window, use the menu command
Windows->Hide Document Window
or
the keys ⌥ ⌘W. In this case, the Document Manager is still listing it on its
table.
Function buttons in the Document Manager
In the upper part of the Document Manager floating window there are the
following function buttons:
- (Table) Close All: to close (remove) all documents currently loaded into
DSP-Quattro. DSP-Quattro will ask to save changes if you did some edits,
then will release the documents, one after each other.
- (Item) Open: to open (load) a new audio file. DSP-Quattro will show a file
browser, allowing you to open an audio file to start to work with it. DSPQuattro will open a new Audio File Player/Editor. It is the same as using the
menu command File->Open->Audio File or the key combo ⌘O.
NOTE: when opening audio files, the custom file browser of DSP-Quattro
includes an additional view. It shows you some additional Info about the
current audio file before to load it. Very important is also a check box to allow
you to decide if to open or do not open a new Audio File Editor window. If
you disable this check box, DSP-Quattro will load the audio file but it will not
build the associated waveform overview. This is very useful if you wish to
use the new audio file only on the PlayList or BatchProcessor. In this case,
DSP-Quattro allows you to work with an audio file without the need to wait
for building of the waveform overview, which can be time consuming if the
audio file is very long.
- (Item) Close: closes the selected documents from the current project.
DSP-Quattro will ask to save changes if you did some edits, then will close
the document(s).
- (Item) Show: opens the selected document window(s). If this is the first
time that you open the waveform editor of the selected audio file, DSPQuattro will build the audio file graphic overview before to show the editor
window.
- (Item) Hide: hides the window(s) of the selected document(s) without
removing the objects from the current project.
NOTE: By clicking on the close button in a audio generator window, or using
the combo ⌘W, DSP-Quattro will remove the audio generator as if you
pressed the Close button. As a consequence the document will disappear
from the Document Manager. You can change this behavior in the
Preference dialog window, so that closing the window, or pressing the
keyboard shortcut, will simply hide the current window instead of removing it,
as if you pressed the Hide button on the Document Manager window or as if
you had used the keys ⌥ ⌘W.
NOTE: when you need to open the window of an Audio Generator, just
double click on the corresponding name on the Document Manager table. It
is equivalent to select the audio generator on the table and the to click on
the Show button.
© Copyright 2002-2012 by Stefano Daino
21
DSP-Quattro 4
User's Manual
Dragging Audio Files from the finder to the Document Manager Window
NOTE: when using Audio File Player/Editor Documents, DSP-Quattro allows
for the drag&drop of the audio files between the Document Manager or the
Audio File Player/Editor and the finder of the MacOS.
Once opened the Document Manager floating window,
A - Dragging one or more audio files from the desktop or from a folder on the
window of the Document Manager will load the file audio in the current
Project but will NOT open the new Audio File Player/Editor window. If you
will then want to open the Editor window, just double click on the file name
newly inserted on the Document Manager table.
B - Dragging an audio file from the Document Manager toward the desktop
or toward a folder, will export the audio file. If a file exists that has already
the same name (if, for example, you drag the file to the source folder), DSPQuattro creates a new file having the same name of the source file but with
an extension done by an unique increasing number.
Once opened an audio file in an Audio File Player/Editor window,
A - Dragging one or more audio files from the desktop or from a folder on the
window of the Audio File Player/Editor will open the audio file in a new Audio
File Player/Editor.
B - Clicking on a selection without moving the mouse, after around 2
seconds the mouse will change to a hand that allows you to drag the
selection from the Audio File Player/Editor to the desktop or to a folder. In
this case, DSP-Quattro exports the selection in a new audio file with the
same name of source file. If it already exists (if, for example, you drag the
file to the source folder), DSP-Quattro creates a new file having the same
name of the source file but with an extension done by an unique increasing
number.
© Copyright 2002-2012 by Stefano Daino
22
DSP-Quattro 4
User's Manual
C - Moreover, if you drag the selection over the Document Manager instead
of the Finder, DSP-Quattro will export the selection and will automatically
load the new file into the current Project. You can use this shortcut to create
new files trimming the portions of the audio you want to export.
NOTE: you are also able to drag even selection of a single channel of stereo
files to export only the left or right channel (or a part of it).
D – If there is not a selection, clicking on the waveform editor of the audio
file, without moving the mouse, after around 2 seconds the mouse will
change to a hand that allows you to drag all the waveform from the Audio
File Player/Editor to the desktop or to a folder. In this case, DSP-Quattro
exports all the audio file in a new audio file with the same name of source
file. If it already exists (if, for example, you drag the file to the source folder),
DSP-Quattro creates a new file having the same name of the source file but
with an extension done by an unique increasing number. This feature is very
useful as shortcut to ‘Save A Copy As’, because it saves a copy of the
current audio file as it is in that moment.
E - as in the case of the drag of a selection, if you drag all the waveform over
the Document Manager instead of the Finder, DSP-Quattro will export all the
audio file and will automatically load the new file into the current Project.
You are highly recommended to spend some minutes to make some practice
with the extended Drag&Drop support in DSP-Quattro for exporting files
with an incredible speed. It is an irreplaceable tool which will allow you to
extremely accelerate your edits.
© Copyright 2002-2012 by Stefano Daino
23
User's Manual
DSP-Quattro 4
Audio File Player/Editor Reference
To open an audio file player/editor do
File->Open AudioFile… (or ⌘O).
The following dialog window will appear:
File Navigation Dialog
The lower part of the window gives information on the selected file. The
Listen button allows you to listen to any file before opening it in DSP-Quattro
(once clicked, the Listen button will change into Stop), the Open&Proceed
button will then open the selected file without closing this window.
NOTE: You can select multiple files by ⇧+Clicking on their filenames.
NOTE: Loading the new audio file into the Project, DSP-Quattro will open
the audio file editor ONLY if ’Open in Audio File Editor’ checkbox has
been enabled. If disabled, the new audio file will be available on the
Document Manager window. You can disable this checkbox if you wish to
use the new audio file only on the PlayList or BatchProcessor. In this case,
you will avoid to wait for rebuilding of the waveform overview.
Once opened the Audio File Player/Editor window will look like this:
© Copyright 2002-2012 by Stefano Daino
24
User's Manual
DSP-Quattro 4
The Audio File Player/Editor window
This window interface features three main areas:
-
The overview: in the upper part of the window we find the waveform of
the audio file we are editing. During all editing operations the overview will
show you the whole waveform, zooming in or out automatically if the file
changes its length, such is the case with cut operations for example,
-
The audio file editor Wave view area: in the middle part this window
shows also the waveform but allows for a programmable level of zoom on
any part of the file. When used in this way the scroll bar underneath it can
be used to scroll the view along the whole file. The audio file editor Wave
view area is the heart of the interface for any editing operation. The level
of zoom can be easily modified through the commands in the menu, with
the keyboard, or with the zoom buttons located in the lower right angle of
the Wave view area. By zooming, both horizontally and vertically, you can
see the whole audio file, as in the overview above, or the single sample
for the sample-based editing of the waveform.
-
The control section: in the lower and left part of the window, there are
three different sections: the transport, the position display, and the sliders
and v-meters section. Through these commands you can control the audio
file play, you can set playback position, loop points and markers, and can
set the output signal level.
The different functions of these three sections are discussed in the following
paragraphs.
The control section
The Audio Playback Control Section is the lower part of the audio file player/
editor window. This section consists of the Playback controller; it also tells us
where markers are as well as loop and playback points.
© Copyright 2002-2012 by Stefano Daino
25
User's Manual
DSP-Quattro 4
The Audio Playback Control Section
The Transport Control:
On the left part of the Audio Playback Control Section, we find the Transport
Control, which consists of playback buttons:
Playback at normal speed, forward or reverse.
one click: Stop
double click: starts back from the beginning of the
file. Also places the Playback marker at the
beginning.
Playback at double speed, both forward and
reverse.
Go to the next or previous Generic Marker, or to
the beginning or end of a selection or of the file.
Toggle Cycle Mode. When active it will playback
the selection or the entire file if there is not one.
Toggle Audio Scrub Mode (slow motion mode).
When active Playback speed - in both directions –
will be controlled by the Ribbon Controller in the
middle of the Audio Playback Control.
NOTE: The keyboard acts to control as well:
-
Space Bar: Toggle Play/Stop mode.
-
Directional Arrows: Playback at double speed, both forward and reverse.
-
⇧ + Directional Arrows: Go to the next or previous marker.
In the middle of the Audio Playback Control there is the Ribbon Controller
which controls the Playback speed.
The Ribbon Controller
At normal speed moving the Ribbon to the right will increase playback speed
as well as increase the pitch, while moving it to the left will do the opposite.
Releasing the mouse button will then bring the controller in the central
position. To stop this from happening you can use CRTL+mouse. Now when
© Copyright 2002-2012 by Stefano Daino
26
User's Manual
DSP-Quattro 4
you release the button there will be no elastic movement and the Ribbon
Controller will stay where you have placed it. You can set this behavior as
default by using an option in the preference dialog.
NOTE: to freeze the Ribbon Controller to a certain position, press the CTRL
key while releasing the mouse.
While in Audio Scrub mode the Ribbon Controller works in almost the same
way as before, but for the central position which is equal to the stop position
(playback speed = 0). Moving the controller to the right will increase the
speed, while going to the left will do the same but in reverse play. While in
Audio Scrub is really easy to place a playback marker exactly where we
want it, since we can listen to what is played while the slow motion helps us
to find the exact spot to place the marker.
The Ribbon Controller is very useful for changing the pitch of an audio file if
you will accept also the change in time. Raising the pitch will result in a
slower time, and vice versa. If you want to change the pitch without
modifying the time, instead of this function you can use the Frequency
Shifting or, for changing time but not pitch, the Time Stretching algorithms.
These functions are discussed in later chapters.
The Marker Display
In the central part of the Audio Playback Control Section there is the Marker
Display, which shows you information regarding the Playback marker or the
current marker.
The Marker Display
The Marker Display shows in the main section the position of the Playback
marker, while in the 2 smaller sections on the left shows the positions where
DSP-Quattro will cycle the file while playing. When you click on a different
marker on the upper waveform editor, the information on the Marker Display
- name and position – will change accordingly. If you use the mouse to select
a portion of the file the display will show the length of the new selection in
the main section, while the numbers at the bottom will show the selection
start and end.
The default time unit setting of hours: minutes:sec:msec can be changed
with the commands on the menus Options->X-Axes Unit to one of the
following: Frames, Seconds, Milliseconds or AudioCD (CDDA).
Doing one mouse click on the numeric controller, and holding the button
down, will change its value. The farthest you go from the Marker Display the
faster will the change take place: moving the mouse upwards will increase
the value, while going downwards will decrease it. With a double click you
will be prompted to enter a numerical value.
The Gain Control, Peak and RMS Meters and L&R assignment
The left part of the Audio Playback Control Section hosts the Gain Control
interface. It allows you to set the gain to apply on the output signal of this
audio generator, as well as monitoring, by the V-Meters, about possible
saturations or distortions.
© Copyright 2002-2012 by Stefano Daino
27
User's Manual
DSP-Quattro 4
The Audio File Editor Gain Control
It is very similar to the MasterOut window, which you have already seen.
Below the L&R Gain Sliders and Peak / RMS Meters section, there is a
control to set L&R outputs. Use this to address the L&R MasterOut or one of
the available Auxiliary Busses.
The overview
The overview is the upper section of the Audio File Player/Editor window:
The Overview
This view is also a wave view apart from the fact that it is not possible to
zoom. However you can always use it to make new selection, move any of
the markers, or the playback position, and even set the zoom for the Wave
view area underneath.
The central part shows the waveform. Above the waveform there is the Time
Ruler, which uses the measure unit you have set in the menu Options->XAxes Unit. As for the Marker Display the unit can be changed among hours:
min:sec:msec, Frames, Seconds, Milliseconds or AudioCD (CDDA). On the
right side there is the Level Ruler, that shows the level of samples, using the
measure unit set in the menu Options->Y-Axes Unit. This unit can be
© Copyright 2002-2012 by Stefano Daino
28
User's Manual
DSP-Quattro 4
chosen among different formats, such as Floats, dB (decibel), Percentage
(normalized in the range [-1.0...1.0]).
Also there is a special Zoom Controller, in the lower part, that can be used
to set the zoom level that will be then shown in the Wave view area
underneath. This control highlights in orange the section that is shown in the
audio file editor Wave view area accordingly to the scrolling position and
zoom level.
The Zoom controller is really easy to use:
-
By going with the mouse over this section, it will turn into a magnifying
glass.
-
By clicking once you point the audio file editor Wave view area to the
exact point you have clicked on, without changing the zoom level.
-
By clicking and dragging with the mouse button you effectively choose
the zoom level and the position of the audio file editor Wave view area.
-
⌥ + Click and Drag, will scroll the view over the new section pointed by
the mouse, without altering the zoom level.
The use of the markers will be discussed later.
The audio file editor Wave view area
The Audio File Editor Wave view area
As for the overview, the Audio File Editor Wave view area shows the
waveform. This section however can be used to zoom in any part of the
waveform up to the single sample. Both axes have an independent zoom
level. The vertical axes may be zoomed without limits, even up to showing
the quantization noise in the audio file. The zoom function can be reached
from the menu Commands->Zoom:
-
Zoom In/Out will increase or decrease the view by a value of x2 or x0.5
-
Full Zoom In/Out will go directly to the maximum level possible in one
click.
© Copyright 2002-2012 by Stefano Daino
29
DSP-Quattro 4
User's Manual
Both functions are available for the axis X (horizontal), Y (vertical) or in pair
(Full X-Y Zoom Out).
There are also some functions that adapt the zoom to a portion of file:
-
Fit On Selection: the zoom is set to the current selection. This command
is not available if there is not a selection.
-
Fit On Loop: zoom is set to the loop point. This command is not available
if there is not a selection.
-
Full Zoom On Playback: zoom is set to maximum on playback point
-
Full Zoom On Edit: zoom is set to maximum on edit point.
This same functions can also be found in the lower right angle of the Audio
File Editor Wave view area.
You can: Zoom on Selection, Zoom In/Out on both axes, or open a pop-up
window with the commands shown above.
In addition, the mouse wheel Y-axe can be used for horizontal zooming.
© Copyright 2002-2012 by Stefano Daino
30
DSP-Quattro 4
User's Manual
Once used a zoom the scroll bar will let you scroll the view to another
position. You should always remember the zooming functions described
previously, that can be found in the Zoom Controller of the overview.
You can scroll the view even by clicking and dragging the Time Ruler. The
effect is the same as using the scroll bar, but often it is easier and smoother.
While playing, the Audio File Editor Wave view area will, by default, scroll to
the next section of the waveform as soon as the last sample has
disappeared from the view, to reflect the new section that will be played
shortly after. In this mode, the Playback Marker will always scroll from left to
right. You can change this behavior with the menu Options->Playback
Cursor:
-
Follow Off (or ⌃⌘F) disable auto scroll.
-
Follow Next Screen (or ⌃⇧⌘F) set the automatic scroll through pages
as above.
-
Follow Centered (or ⌥⇧⌘F) the view is centered and the waveform
moves under it. This option requires a certain amount of CPU power. We
advice to use it only when you really need it.
In the lower left side of the Audio File Editor Wave view area there are
information such as the type of audio file, its sampling rate, and its bit depth.
Lastly, the button Effx will allow you to open the chain of effects interface to
use on insert. This function will be described in later chapters.
The Selection
The Selection is the part of the file we want to work on. In fact most of DSPQuattro editing functions work on the selection, if there is one, or, otherwise,
on the whole audio file.
There are several ways of making a selection: by dragging the mouse over
the region you want to select with the left mouse button pressed, with the
menu and with the keyboard key commands.
© Copyright 2002-2012 by Stefano Daino
31
DSP-Quattro 4
User's Manual
A selection can be made on the Wave view area or on the overview. Since
both views refer to the same file any changes apply to the other view as well.
In the Wave view area going over the border, right or left, of the view will
scroll it as fast as the distance from the border increase.
Once created, ⇧+click changes the selection to the place you click with the
pointer. If there is no selection, ⇧+click makes a new one between the
Playback Marker and the point you click on.
As we said earlier as soon as you click&drag, thus changing the selection,
the Marker Display will show the length of the selection in the upper part,
while in the lower sections it will show the starting and ending point of the
selection.
Double click selects the portion of file between the two closest markers - the
precedent and the next one. If there aren't any, the whole file is selected.
With a triple click, the whole file is selected always.
There are some more commands to create or modify a selection by the
commands in the Commands menu:
- Select All, accessible by the menu command or with the combination of
keys ⌘A, creates or extends the current selection to the whole file
- Select Loop, active only if Loop is turned On, and accessible by the menu
Commands or with the combination of keys ⇧⌘A, creates or adapts the
current selection to coincide to the region of Loop.
- Select Region, active only if you are working on a region, and accessible
by the menu Commands or with the combination of keys ⌥⇧⌘A, creates
or adapts the current selection to coincide to the current region.
The Markers, Regions and the Marker&Regions Manager
The audio File Player/Editor uses a series of markers that aim to different
points of the audio file. Among these, some are always to disposition, some
only exist in some circumstances, and others can be created or destroyed to
liking if and when it serves. Besides DSP-Quattro uses a smooth interface
that keeps the user posted on the Markers and Regions situation on the
whole, through a special drawer window called Markers&Regions Manager
that we describe in detail.
NOTE: DSP-Quattro gives you an option of Auto Zero. Activating this option
any movement of a marker or of the selection, will be automatically adjusted
to the previous point of Zero Crossing. By Zero Crossing we mean the point
in which the waveform passes for the zero changing its sign. This option is
very useful when we want to place markers in a position that has a level of
common reference that is the zero.
To activate the option of Auto Zero, go to the menu Options->Auto Zero, or
to use the combination of keys ⌘U. Once activated the option, the same
commands will turn it off. When the option is active, a check mark appears in
correspondence of the command in the menu.
To open the floating window of the Marker Manager, you can select the
menu Windows->Show Markers&Regions Tool, or use the combination
© Copyright 2002-2012 by Stefano Daino
32
User's Manual
DSP-Quattro 4
of keys ⌥⌘K, or click on the Markers button on the bottom part of the
waveform editor. Once opened, the same command will close it.
The window is a drawer; this means that it is visible on the left or right side
on the Audio File Player/Editor window. Any movement of a marker, even
during a drag with the mouse, will be shown in real time on the display of the
Markers&Regions Manager.
The Marker Manager
The Marker Manager window shows a list divided in sections. Each section
can be collapsed through the arrow control on its left:
- Main: this section shows the Markers that are always present and visible.
These are the Playback Position Marker (that in the audio File Player/Editor
has a red color) and the Edit Position Marker (green). The first one is always
pointing to the current playback position, the second is a useful marker that
helps you with some particular editing functions, such as the Insert function,
that we will see subsequently.
- Selection: the Marker Manager shows in this section the information about
the selection, even if, in truth, this is not properly delimited from of the
markers. On the line 'Selection' it shows its length. If in a certain instant
there is no selection, its length is zero. In this case, the start and end
positions won't show meaningful values.
- Loop: here you'll find the information about the loop of the audio file. The
function of loop will be described subsequently, but we want to point out the
fact that the audio file will cycle on the loop points if the loop is ON and if
there is not a current selection. The markers that point out the points of loop
start and end are highlighted in yellow.
© Copyright 2002-2012 by Stefano Daino
33
DSP-Quattro 4
User's Manual
- Generic Markers: this section shows the information about Generic
Markers (they are shown in blue) if there are any.
- Audio Regions: this section shows the information about Audio Regions
(they are always constituted by a pair of markers, they are shown in orange
on the Editor window) if there are any.
The position of every marker is visualized using the unity of current
measure, as selected in the menu Options->X-Axes Unit that allows you to
choose among the format hours:min:sec:msecs, Frames, Seconds,
Milliseconds or AudioCD (CDDA).
If needed, a small lock will allow you to stop the position of a certain marker.
In such case, it is not possible to change its position, not even by drag and
drop on the audio File Player/Editor.
The lock on the line of the Loop allows you to lock its length. In such case,
moving the point of loop start will also modify the point of loop end, and vice
versa. This way the loop will always have the same length.
As with the Loop, the lock on the line of an Audio Region allows you to lock
its length. In such case, moving the point of Region start will also modify the
point of Region end, and vice versa. This way the Audio Region will always
have the same length.
A double click on the numerical value that shows the position opens a small
modal dialog where you can insert a new value in numerical form.
You can select several markers at the same time pressing ⇧ while clicking
on their rows on the Markers&Regions Tool. In this case, while always
keeping pressed the ⇧ key, dragging one marker with the mouse will cause
the synchronized movement of the others, too.
The use of the Generic Markers:
DSP-Quattro allows you to add or remove Generic Markers at any point of
the audio File. These can also be renamed. The Generic Markers go
together with their audio file and are saved with it, to be loaded again later
on.
WARNING: Should you edit the audio file with a different editor from DSPQuattro, any information about Generic Markers may be lost. This often
happens with different formats than Sound Designer II (SDII). Instead, the
information about Loop points should always be preserved and eventually
updated. DSP-Quattro is conforming to standards, including loop points, as
established by the various formats supported.
To create a Generic Marker in correspondence of the position of the
Playback Marker, it is possible to click on the ADD button on the Marker
Manager window, or you can use the command from the menu Commands>Generic Markers->New at Playback, or again use the combination of
keys ⌘M.
To destroy (or remove) a Generic Marker click the DEL button in the Marker
Manager window after having selected it, or drag it out of the Audio File
Player/Editor window.
To rename a Generic Marker double click on its name and fill in the new
name. All the printable characters can be used, even spaces.
© Copyright 2002-2012 by Stefano Daino
34
DSP-Quattro 4
User's Manual
DSP-Quattro gives you a number of commands for placing the markers and
to create new Generic Markers in particular positions.
Moving the Playback Marker to:
These commands are accessible from a series of menus under
Commands->Playback Marker:
- Go To Next Marker (or ⌘K): it moves the Playback Marker on the
following Marker
- Go To Prev Marker (or ⇧⌘K): it moves the Playback Marker on the
previous Marker
- Go To Selection Start: if there is a selection, it moves the Playback
Marker to the selection start.
- Go To Selection: if there is a selection, it moves the Playback Marker at
the selection end.
- Go To Loop Start: if the Loop is On, it moves the Playback Marker on the
point of loop start
- Go To Loop End: if the Loop is On, it moves the Playback Marker on the
point of loop end
Placing Generic Markers:
By using the Commands->Generic Markers menu you are able to choose
one of the followings commands:
© Copyright 2002-2012 by Stefano Daino
35
DSP-Quattro 4
User's Manual
- New At Playback (or ⌘M): it creates a new Generic Marker in
correspondence to the Playback Marker
- New At Selection Bounds: If there is a selection, it creates two new
Generic Markers in correspondence to its start and end.
- New At Selection Start: if there is a selection, it creates a Generic Marker
in correspondence of the selection start.
- New At Selection End: if there is a selection, it creates a Generic Marker
in correspondence of the selection end.
- New At Loop Bounds (or ⌥⇧⌘M): if the Loop is turned On, it creates
two new Generic Markers in correspondence to the loop start and end.
- New At Loop Start: if the Loop is turned On, it creates a Generic Marker
in correspondence of the loop start.
- New At Loop End: if the Loop is turned On, it creates a Generic Marker in
correspondence of the loop end.
- Remove Selected: it removes (deletes) the selected Generic Marker.
- Remove All (or ⌃⇧⌘M): it removes (deletes) all Generic Markers
NOTE: dragging a Generic Marker outside the Audio File Editor window,
DSP-Quattro will remove it, exactly as doing ‘Remove Selected’.
The use of Audio Regions:
An Audio Region is a portion of the Audio File limited by two special markers,
the Audio Region Start and Audio Region End. Audio Regions are very
similar to permanent selections. If there is an Audio Region and no selection,
DSP-Quattro will play only that Audio Region. Any edit function will act only
© Copyright 2002-2012 by Stefano Daino
36
DSP-Quattro 4
User's Manual
on that Audio Region, if there is not a selection. You cannot select several
Audio Regions at the same moment, and you can deselect – or hide – the
current Audio Region (if any) to work on the whole Audio File when you need
of.
DSP-Quattro allows you to add or remove some Audio Regions at any point
of the audio File. These can also be renamed. The Audio Regions go
together with their audio file and are saved with it, to be loaded again later
on.
Moreover, the regions are very important when you work also with the
PlayList. Please refer to the paragraph describing the PlayList to know more
about this.
WARNING: Should you edit the audio file with a different editor from DSPQuattro, any information about Audio Regions may be lost when using the
AIFF audio file format. Instead, the information about Loop points should
always be preserved and eventually adjourned. DSP-Quattro is conforming
to standards, including loop points, as established by the various formats
supported.
To create an Audio Region in correspondence of the current selection or, if
there is not a selection, on the full extension of the Audio File, it is possible
to click on the ADD button on the Markers&Regions Manager window, or
you can use the commands from the menu Commands->Regions (more
about this here below).
To destroy (or remove) an Audio Region, click on the DEL button in the
Markers&Regions Manager window after having selected it.
To rename an Audio Region double click on its name and fill in the new
name. All the printable characters can be used, even spaces.
Working with Audio Regions:
DSP-Quattro gives you a number of commands for placing Audio Regions
and to create new Audio Regions in particular positions. These commands
are accessible from the menus under Commands->Regions:
© Copyright 2002-2012 by Stefano Daino
37
DSP-Quattro 4
User's Manual
- Hide Current (or ⌥⌘U): it hides the current Audio Region. Use this
command to return to work on the whole Audio File.
- New From File (or ⌃⇧⌘U): it creates a new Audio Region from the
whole Audio File. Then, it sets this Audio Region to work with it.
- New From Selection (or ⇧⌘U): it creates a new Audio Region from the
current Selection, if any. Then, it sets this Audio Region to work with it.
- New From Loop: it creates a new Audio Region from the current Audio
Loop. Then, it selects this Audio Region to work with it.
- Generic Markers To Regions (or ⌥⇧⌘U): Given one or more Generic
Markers, this functions creates new Audio Regions splitting the Audio File at
the positions of Generic Markers. The first Audio Region starts at the first
Generic Marker and ends at the second, and so on, up to the last Audio
Region, which will start at the last Generic Marker and ends at the end of the
Audio File. On exit, DSP-Quattro selects the last created Audio Region to
work with it.
- Remove Current (or ⌃⌘M): it removes (deletes) the selected Audio
Region. Then, DSP-Quattro starts again to work with the whole Audio File.
- Remove All: it removes (deletes) all Audio Regions. Then, DSP-Quattro
starts again to work with the whole Audio File.
Cycle Mode and the Loop
The editor of DSP-Quattro uses two different concepts for cycling on a
certain portion of an audio file: the Cycle and the Loop. The Cycle is a
section of audio file on which it cycles during an editing session to listen
without interruptions a certain part of the audio file that you want to edit. The
Loop, instead, is a portion of audio file on which DSP-Quattro will cycle
endlessly, without any purpose of editing.
An example will help you to better understand the difference between the
two concepts: Let's say that while listening you find out that there are some
clicks that shouldn't be there and that you want to find out their position. In
such case, you can select the zone around the suspicious point, and while
listening to DSP-Quattro cyclically playing that part (thanks to the Cycle
Mode on) you can discover the point that originates the click. Let's instead
say that you have recorded a drum pattern, and that you want to use that
pattern later on as a base in an arrangement. You will than have to set and
activate a Loop in such a way that DSP-Quattro will play the file over and
over, effectively repeating that pattern.
The Cycle Mode is toggled ON/OFF by clicking on the relative button on the
Transport Control.
The Loop is toggled ON/OFF by the menu command Commands->Turn
Loop On, or using the combination of keys ⌘L.
To establish if and what DSP-Quattro will cycle on during play, the following
rule always applies:
© Copyright 2002-2012 by Stefano Daino
38
DSP-Quattro 4
User's Manual
- If the Cycle Mode is turned ON, DSP-Quattro will cycle on a selection if
there is one. If there isn't a selection and if the Loop is turned OFF, DSPQuattro will cycle on the current Audio Region (if any), or on the whole Audio
File. If the Loop is turned ON and there isn't a selection, DSP-Quattro will
cycle on the Loop if and, only if, it is inside the current Audio Region (if any).
- If the Cycle Mode is turned OFF, DSP-Quattro will cycle on the Loop if and,
only if, there are no selections, if the Loop is turned ON and if the Loop is
inside the current Audio Region (if any). Otherwise, DSP-Quattro will play
the selection or the Audio Region (if any) or the whole file only once,
returning automatically to the state of Stop after reaching the end of the
selection or Audio Region (if any) or of the whole file.
At any rate, the Marker Display always shows, with its two values on the left,
the portion on which DSP-Quattro will cycle.
Loop Helping Tools
DSP-Quattro gives you a series of tools to help you effectively placing loop
points.
As with any markers, you can place Loop points dragging the corresponding
marker with the mouse, or using the Marker Manager to set the position of
the Loop Markers in numerical form.
First of all, in order to set all the functions that we will go to describe, you
have to activate the Loop:
- Commands->Turn Loop On or the combination of keys ⌘L, toggles the
Loop. If the Loop in on it will turn it off, and vice versa. If the Loop is turned
on, the Loop Markers, of yellow color, will appear in the editor view.
- Commands->Lock Loop Length or the combination of keys ⌥⇧⌘L lock/
unlock the length of the Loop. By locking the length of the Loop, if you will
move any of the two Loop Markers, the other one will move in the same way.
This option is useful in the case that, once found the length of the best Loop,
you wish to place the Loop in a more proper position.
- Commands->Loop Selection or the combination of keys ⇧⌘L, moves
the Loop Markers in correspondence of the current selection (this command
is active only if there is a selection). If the Loop is turned Off, it will
automatically be turned On.
- Commands->Select Loop or the combination of keys ⇧⌘A, selects the
region of the Loop. Obviously, this command is disabled if the Loop is turned
Off.
- Processing -> Loop->Loop by BPM, it allows you to automatically set the
Loop points based on the metronomic time and on the BPM (Beats Per
Minute). This function will be better discussed in the chapter devoted to the
editing functions offered by DSP-Quattro.
- Processing -> Loop->X-Fade Loop or the combination of keys ⌘<, it will
process the samples inside the region of Loop so that it will sound as much
natural as possible when cycling during playing. We will describe this
function more in detail in the chapter devoted to the editing functions offered
by DSP-Quattro.
© Copyright 2002-2012 by Stefano Daino
39
User's Manual
DSP-Quattro 4
DSP-Quattro gives you a special tool for placing Loop points: the Loop
Window.
The Loop Window
To open the Loop floating window, you can use the menu
Windows->Show Loop Window (or ⌥⌘L).
Once opened, the same command will close it.
The Loop Window (fig. A)
This tool allows you to monitor anything that happens to the waveform in
correspondence of the Loop point.
NOTE: the window is of floating type, this means that it is also visible when
you act on the audio File Player/Editor. Any operation in the Audio File
Player/Editor, even the drag of a Loop marker, will result in a real time
change in the Loop window, and vice versa.
This window is made of two parts, divided by a yellow marker that
corresponds to the point of jump of the Loop: the left side of the view shows
the final part of the waveform as it is before the point of Loop End, the right
side of the view shows the part of waveform related to the region
immediately following the point of Loop Start.
When playing the Loop, DSP-Quattro plays the samples up to the point of
Loop End, then it restarts immediately from the samples after the point of
Loop Start. Therefore the Loop Window helps you to understand how DSPQuattro will play the audio in correspondence of the loop points, offering you
the visual continuity of the waveform that is played. If two points of Loop
Start and End don't coincide or don't give a continuity to the waveform, as for
example in the figure A above, it is clear that it an unpleasant click will be
heard during the Loop as we play the file.
© Copyright 2002-2012 by Stefano Daino
40
User's Manual
DSP-Quattro 4
The Loop Window (fig. B)
On the other hand, if the loop points are moved in such way to give a
continuity to the waveform, as shown in figure B, we may expect that the
audio will not produce audible clicks in correspondence to the jump of the
Loop.
Unfortunately the visual continuity is not always enough to guarantee that
the Loop will play without artifacts, but surely the Loop Window is an
essential tool to position the points of loop in the best possible way, in such
way that a following processing with the X-Fade Looping function makes it a
perfect Loop in the majority of the cases. But, naturally, a certain experience
is necessary to absolutely find a perfect Loop, especially on file harmonically
complexes, as in the case of a sample of a violins section or an acoustic
piano.
The Loop Window has a series of buttons:
- on the left there are the buttons for the vertical Zoom In/Out
- every Loop view has in the lower section a series of buttons for the
movement of the Loop points, that is of the Loop End for the left side of the
view and the of the Loop Start for the right.
Loop Points Move commands buttons
Respectively, from left to right, this series of buttons allows you:
- To Move the Loop point on the previous point of Zero Crossing. For Zero
Crossing we intend the point in which the waveform passes for the zero,
changing its sign. This command is very useful to reach a continuity of the
waveform exploiting all the positions of crossing of the level zero. A perfect
Loop will always appear with a waveform with identical inclinations, and the
point of zero crossing can be exploited for making some comparisons on the
inclinations of two possible points of loop.
- To quickly move the Loop point backward.
© Copyright 2002-2012 by Stefano Daino
41
DSP-Quattro 4
User's Manual
- To slowly move the Loop point backward.
- To slowly move the Loop point forward.
- To quickly move the Loop point forward.
- To move the Loop point to the next point of Zero Crossing.
NOTE: you are able to drag forward or backward the Time Ruler of every
Loop view. The respective Loop point will move accordingly.
Please refer to the chapter about how to use DSP-Quattro to edit audio files
for detailed references to Undo/Redo and editing functions interfaces.
© Copyright 2002-2012 by Stefano Daino
42
User's Manual
DSP-Quattro 4
Audio Input Reference
To open an Audio Input, you can use the command
File->Input->New Audio Input (or ⌥⌘R).
The following window will then appear:
The Audio Input generator
This type of Audio Generator allows you to listen to the audio input of your
system. Its use is very simple.
In the upper left corner the On button toggles On/Off the audio.
The couple of popup menus on the left will let you choose the two input
channels, left and right. The menu will list all the inputs that the current audio
device has available. You can set the current audio device addressed by
DSP-Quattro using the command by the menu Options->Audio Device
Settings.
Among the input devices there is also an Off option that disconnects that
input source, turning it off.
Still on the left part of the window, there is a control to set L&R outputs. Use
this to address the L&R MasterOut or one of the available Auxiliary Busses.
There is also the Effx button to Open the Insert Effect Mixer of this Audio
Generator. Please refer to the Effect Send Manager Reference chapter for
its use. DSP-Quattro allows you to setup the effects to be used in Insert on
this Audio Input. These effects will modify the audio coming from this Audio
Input only.
On the right a Gain Control is present, to set the volume and to monitor the
audio signal coming from the input device.
NOTE: you can open how many Input generators you will like, and use all
together at the same time, assign each one to a different stereo input, if you
have an input device with several audio inputs. You can even assign effects
on each audio input, differently for each input.
© Copyright 2002-2012 by Stefano Daino
43
User's Manual
DSP-Quattro 4
Audio Input Recorder Reference
To open an Audio Input Recorder, use the command
File->Input->New Audio Input Recorder (or ⌘R).
You will be presented with the following window:
The Audio Input Recorder generator
This type of Audio Generator allows you to listen, and to record to a new file,
the audio signal coming from the input device.
As per default, DSP-Quattro chooses the folder MacOSX/Users/…/Music/
DSP-Quattro/New Audio Files to create a new recording file before opening
a new Audio Input Recorder generator. You can assign a different folder by
using the Preference Dialog or by using the button 'New File', as explained
here below.
In the upper left corner the On button toggles the audio.
The Audio Monitor button, to the left, toggles the monitoring of the output of
the audio in the Audio Input Recorder. This command is useful when we
want to record the audio input without having to route it on the output. There
is the case in which some hardware audio boards allow the redirection of the
inputs to outputs with 'zero latency', without any delay. The Audio Input
Recorder, however, receives the audio packets from the input with a certain
delay, due to the dimension of the audio buffer used by the driver of the
audio board (the most common the size of the audio buffer is 512 samples, it
corresponds to a delay of around 11 msecs at 44.1 kHz). In these
circumstances, you might want to use the zero latency monitoring of the
board, therefore disabling the audio monitor of the audio Input Recorder, that
otherwise would produce an annoying echo effect and, at any rate, a
duplication and overlapping of the audio input on what it is listened.
Still on the left part of the window, there is a control to set L&R outputs. Use
this to address the L&R MasterOut or one of the available Auxiliary Busses.
In the lower part, on the left, you find the Transport Controller:
Audio Input Recorder Transport Controller
© Copyright 2002-2012 by Stefano Daino
44
User's Manual
DSP-Quattro 4
From left to right, these buttons do:
- Stop - stops the recording and it returns to the beginning
- Pause - stops the recording and waits further commands
- Record - begins a new session of recording
- Add New Marker - adds a new generic marker to the current position of
the Recording Marker.
In the upmost part you find the information about the recorded file:
Audio Input Recorder File Info
In the upper part is shown the file name and its path. In the lower part, is
shown the parameters that identify the current recording file.
On the left side, there are two buttons:
- New Files: allows you to choose a new file on which the next recording will
be written. It opens a dialog that allows you to choose the settings of the
new file:
-
Format - AIFF, WAVE or SDII (Sound Designer II)
-
Number of Bits for sample - 8, 16, 24, 32 or 32f (32 floats) bits
-
Number of channels - Stereo, Mono L+R (both channels Left and
Right are mixed as a mono channel), Mono L and Mono R (Only
one of the channels is recorded in a mono file)
then it opens the MacOS File Browser, which allows you to choose the
location and name of the new file.
- Next File: DSP-Quattro will automatically switch to a new file, with the
same path as the previous one, the same name but with an increasing
numerical extension appended at its end.
WARNING: please be aware that DSP-Quattro will use the same file to
record new data until you will not use one of the two commands ‘New File’ or
‘Next File’. It means that if you simply hit stop, and then rec again on the
transport controller, DSP-Quattro will overwrite the previous recording.
© Copyright 2002-2012 by Stefano Daino
45
User's Manual
DSP-Quattro 4
NOTE: the sampling rate of the recorded audio file is the same of the one in
the selected Audio Driver. This means that there is no software resampling
to avoid any quality degradation. If a different sample rate is needed, you
can subsequently resample off-line the file.
In the bottom part of the Audio Input Recorder Dialog there is the Time
Display that gives you all the information about the time and the point of
recording.
Audio Input Recorder Time Display
In the left side there is the total recording time. In the right side there is the
partial time elapsed since you inserted the last generic marker (more about
this in the above section), and the recording time you can use compared
with the free space on the hard disk.
Finally, on the Audio Input Recorder Dialog there is a section for the Gain
Control and the Input Device Selector:
Audio Input Recorder Gain&Input Device control
On the left side there are two pop-up menus that allows you to assign to the
left and right input channels, two audio inputs chosen among those that the
current audio device has available.
On the right side there is another Gain Control which is similar to those with
which you have already familiarized. Its use has already been described in
precedence.
Last but not least, in the upmost part of the Input Recorder window, on the
left, there is the Effx button to Open the Insert Effect Mixer of this Audio
Generator. Please refer to the Effect Send Manager Reference chapter for
its use. DSP-Quattro allows you to setup the effects to be used in Insert on
this Audio Input Recorder. These effects will modify the audio coming from
this Audio Input Recorder only.
NOTE: you can open how many Input Recorders you will like, and use all
together at the same time, assign each one to one stereo input, if you willl
need it and if you have an input device with several audio inputs. You can
even assign effects on each audio input, differently for each input. In this
way, you can record different input audio signals, or even the same audio
signal, with different effects, into different audio files.
© Copyright 2002-2012 by Stefano Daino
46
User's Manual
DSP-Quattro 4
Audio MasterOut Recorder Reference
DSP-Quattro always creates an Audio MasterOut Recorder. There is only
one Audio MasterOut Recorder in the same instant.
To open the audio Output Recorder, you can use the command
Windows->Show MasterOut Recorder (or⇧⌘R)
or you can click on the Rec button in the MasterOut. Once opened the
window, the same commands will close it.
The Audio MasterOut Recorder
The MasterOut Recorder allows you to record on a file the audio output of
DSP-Quattro.
As you can see, the interface is practically the same to that of an Audio Input
Recorder generator, except for the fact that the recording volume controller
and the control for choosing the input device are not present. In fact, the
audio MasterOut Recorder uses the gain settings of the MasterOut and it
always records both the channels, left and right, as outputs of the
MasterOut.
We advice, therefore, to refer to the paragraph that describes the audio Input
Recorder generator for a complete description of the controls of the Audio
MasterOut recorder.
© Copyright 2002-2012 by Stefano Daino
47
User's Manual
DSP-Quattro 4
Instrument Plug-in Generator Reference
DSP-Quattro allows you to open any Instrument Audio Unit plug-in as an
audio generator.
To create a new Audio Unit Instrument Generator, you can use the command
File->Instruments->Audio Unit Instrument
or
File->Instruments->VST Instrument
and then choose the plug-in that you want to create. The list will include all
the AU or VST Instrument plug-in that DSP-Quattro will find installed on your
system.
After selecting a plug-in, this is loaded in the memory and then the following
window is shown to control it:
Instrument Plug-in Generator
The window gets the name of the loaded plug-in.
To the upper left corner the On button toggles the audio output.
The window can be divided in two principal sections:
On the right there is a Gain Control which is similar to those with which you
have already familiarized. Its use has already been described in precedence.
On the left there are the controls for the management of the plug-in:
The Effx button allows you to open the Insert Effect Mixer of this Audio
Generator. Please refer to the Effect Send Manager Reference chapter for
its use. DSP-Quattro allows you to setup the effects to be used in Insert on
this Instrument plug-in. These effects will modify the audio coming from this
Instrument plug-in only.
The Edit button allows you to open the window for editing the internal
parameters of the specific plug-in. This window depends on the plug-in itself.
Many plug-ins come with their own graphic interface. Some give only the
parameters, and in those cases DSP-Quattro will use its own interface to
show the controls and the relative parameters. We will see some examples
in the chapter that describes the use of the Effect plug-ins.
Still on the left part, there is a popup menu control to set L&R outputs. Use
this to address the L&R MasterOut or one of the available Auxiliary Busses.
© Copyright 2002-2012 by Stefano Daino
48
DSP-Quattro 4
User's Manual
There is also a section to set the MIDI parameters: you can choose the MIDI
channel on which the plug-in will receive input data. The possible values are
one of the 16 channels or you can set it to OMNI. In this last case DSPQuattro will pass to the plug-in all MIDI data received.
The other pop-up menu allows you to select the MIDI Input port used by the
plug-in Instrument generator. A list is shown with the input MIDI devices
available on your current MIDI network configuration.
And, last but not least, there is a popup menu control to manage the current
preset, including the possibility to load and save the current preset.
This control allows you to chose the program number, showing you a list of a
possible programs by a popup menu. DSP-Quattro, loading the plug-in,
looks into three standard folders of MacOS X for presets, and asks to the
plug-in for the internal factory preset list, too. Then, it builds three submenus:
System, User and Factory. If the plug-in interface window does not allow a n
internal selection of possible preset, you can use this preset control of DSPQuattro to select the current preset for the virtual Instrument.
© Copyright 2002-2012 by Stefano Daino
49
DSP-Quattro 4
User's Manual
Effect Send Manager Reference
DSP-Quattro is able to manage and to apply a series of effects in real time
on the audio flow: let’s introduce the Effect Send Manager.
DSP-Quattro allows to use several serial chains of effects, and each chain
can load any number of effects, without any limitation. One effect (internal or
plug-in) is loaded on one effx slot (similar to a effect rack in a recording
studio). Each serial chain can contain any number of effx slots.
You can set the default number of effx slots for each Effect Send using the
Preference dialog of DSP-Quattro. Moreover, you can add or remove effx
slots on each Effect Send. You are totally free to configure each Effect
Sends to best suit your needs.
There are different Effect Send Managers, each with its own chain of effects
that can be grouped in two categories: the global, that acts on the audio in
the MasterOut, and the Insert, that acts on the audio in output to a specific
generator.
The MasterOut makes always a Global Effect Manager available. The audio
File Player/Editors, Audio Inputs, Input Recorders, Instrument Plug-ins use
its own chain of effects with a built-in Insert Effect Manager.
If you want to apply a series of general effects on the audio output we
recommend the use of the Global Effect Manager. While, in case all you
want is to apply only a particular effect and only to the audio coming from a
specific generator, you can use the Insert Effect Manager of that specific
generator.
Attention: effects always need a certain amount of CPU power of your
system or of your hardware board devoted to the effects. The optimization in
the distribution of system resources it is very important with the purpose to
avoid useless waste of CPU time during processing. For example, if two
generators use the same effect of reverberation with very similar
parameters, it can be very much better to use a single reverberation effect
on the MasterOut rather than two, each in the Insert of generators.
One of the advantages to using a chain in Insert is that, in case of the Audio
File Player/Editor, the Effect Manager can be seen as offline algorithm that
can be used also for processing the audio file. In fact, once set a certain
chain of effects in Insert, a procedure can be launched of offline 'rendering',
treating the chain of the effects as with any other editing algorithm on the
audio file. Because the processing is carried out offline, the amount of time
that is spent may be much less than the time it takes to play the file.
The chain of the effects on Insert or on the MasterOut can be 'rendered' on
file also playing it in real time, you need just to open an Audio MasterOut
Recorder and record on file what is played through the effects. But the
processing speed of this real time procedure is the same of playing the
audio file, usually slower than the offline procedure; differently from the offline procedure, this time you are able also to change in real time the effect
parameters while listening to the result.
The window of the Effect Global Manager on the MasterOut can be opened
by using the menu Windows->Show Master Effx, or using the combination
of keys ⇧⌘X or clicking on the pulsating Effx on the MasterOut. Once
opened the window, the same commands will bring it out in front if it wasn't,
or it will close it.
© Copyright 2002-2012 by Stefano Daino
50
User's Manual
DSP-Quattro 4
The Insert Effect Manager window, after the relative document has been
opened, can be called via the menu Windows->Show Insert Effx, or using
the combination of keys ⌥⌘X or clicking on the Effx button placed on the
window of the Audio Generator. Once opened, the same command will bring
it out in front if it wasn't, or will otherwise close it.
96
Effects Manager Window
As you might have noticed already, the Effect Manager manages a serial
chain of effects. A chain is the repetition of a basic module for the
management of an effect. The stream of the audio goes from up to down,
therefore the audio will be modified starting with the first uppermost effect,
then by the following effects, one after the other.
The only exception is the on the first module on top. It shows some controls
for the management of the Effect Manager:
BYPASS: Use this button to bypass all the effect chain. Activating the
bypass, the incoming audio will be redirected to the output without any
processing.
Cmds: this popup menu control allows you to Save, Load, Copy and Paste,
Reset the current setup of the Insert Effect Manager:
© Copyright 2002-2012 by Stefano Daino
51
User's Manual
DSP-Quattro 4
Save / Load Preset: use these commands to save and load the current
setup to/from a file.
Copy Preset: this command copies the current setup into a special Effect
Manager clipboard of DSP-Quattro.
Paste Preset: if the setup has been copied into the special Effect Manager
clipboard of DSP-Quattro, use this command to paste it into a different
Insert or into the Globlal Effx chain. This command is very useful to duplicate
Effx setups with a couple of mouse clicks only.
Reset All Effx Slots: use this command to empty all Effx slots. Any plug-in
or internal effect loaded will be automatically dismissed and the gain sliders
set to 0 dB.
Append Empty Effx Slot: it does what it says.
Moreover, on the left of the Cmds control, there are two +/- buttons to
append an additional empty Effx slot or to remove the last one. Removing, if
the last one has a plug-in or internal effect loaded, DSP-Quattro will warn
you before to dismiss it.
Effect Module
Let's see in detail the operation of the single effect module.
In the upper left corner the On button turns On/Off the effect. It works also as
bypass. In fact, when turned Off, the audio will simply bypass it to continue
to next effect without any processing.
If you turn ON the effect module but you do not load any effect, it works as a
Gain Controller. The sliders will influence the volume of the signal coming
out from this module.
To load an effect, use the upper pop-up menu among the two in the lower
section of the Effect Module, called Effx Controller.
© Copyright 2002-2012 by Stefano Daino
52
User's Manual
DSP-Quattro 4
Effx Controller
Clicking on the arrow to the left of the name of the effect, a menu with the list
of effects will appear. The first ones in the list are those native of DSPQuattro. Next, the menu adds, in another submenu, all the third parties
Effect plug-ins installed on your configuration.
Moreover, there are three very special ‘plug-ins’ listed:
- 2/4 Effx Slots Send: allows you to insert a new Effect Manager Send on
insert.
- External Audio Send&Return: there is also a very special internal ‘plugin’ to address output/inputs of the Mac (or of the external audio device
connected to your mac), so you can route your audio signals to/from an
external analog/digital audio hardware.
On the bottom of the controller to chose which plug-in to load, there is a
popup menu control to manage the current preset, including the possibility to
load and save the current preset.
This control allows you to chose the preset, showing you a list of a possible
preset by a popup menu. DSP-Quattro, loading the plug-in, looks into three
standard folders of MacOS X for presets, and asks to the plug-in for the
internal factory preset list, too. Then, it builds three submenus: System, User
and Factory. If the plug-in interface window does not allow an internal
selection of possible preset, you can use this preset control of DSP-Quattro
to select the current preset for the loaded effect.
As with the interface for the management of Instrument plug-in Generators,
once loaded a Plug-in:
© Copyright 2002-2012 by Stefano Daino
53
DSP-Quattro 4
User's Manual
Edit: allows you to open the window for editing the internal parameters of
the specific plug-in. The aspect of this window depends on the plug-in. Many
plug-ins come with their own graphic interface. Some give only the
parameters, and in those cases DSP-Quattro will use its own interface to
show the controls and the relative parameters.
Cmds: this pop-up menu allows you:
- Edit MIDI Prms: to set the MIDI parameters (MIDI Channel, MIDI port) to
let DSP-Quattro to route MIDI messages to the effect (please note that the
effect may ignore MIDI messages).
- Swap Effx Slot Backward/Forward: you can manage the order of the effx
slots by swapping the current slot with the next or the previous.
- Remove Effx Slot: to remove the current slot from the rack.
- Insert Empty Effx Slot: to Inserting a new empty slot shifting the next
forward in the chain.
The right section of the Effx slot includes:
Efx Balance - this knob allows you to balance the ratio of the mix between
the audio on input, routed on exit (dry) and the audio on effect output (effx).
In other words, if the knob is all the way to the left, the effect won't have any
influence, if the slider is all the way to the right only the audio on output from
the plug-in will play (if the module has been turned On). Some effects allow
you to customize the effect balance but some don't.
The Gain Control, which we have already met.
On the left there are two bright buttons, In and Out. Their function is to
establish what needs monitoring on the Meters. If the button In is turned on,
then the Meters will show the level of signal on input to the effect, otherwise
that on output. Since a lot of times an effect modifies in substantial way the
level of the signal, it is very important to monitor the different levels on input
and on output to the different modules to know exactly where the signal can
eventually produce distortions or where it is too low.
NOTE: DSP-Quattro always processes the signal using a floating point
arithmetic, that allows the maximum precision and above all it doesn't set
any limits on the level of the signal. But there are some plug-ins that require
© Copyright 2002-2012 by Stefano Daino
54
User's Manual
DSP-Quattro 4
that the input signal is normalized, or limited, in the interval within the 0 dB.
Besides, the level of 0 dBs should never be overcome on output of the last
effect, since this would produce a distortion while listening or writing on file.
Effect Plug-in Edit Window
We have already mentioned the fact that plug-ins, both Instruments and
Effects, can be divided in those that use a native interface customized for
the Editing of their own parameters, and those that use an interface that is
given by the host.
DSP-Quattro Effect Plug-in Parameters Editor
In the picture you can see an example of interface that DSP-Quattro uses
with an Effect Plug-in that doesn't have its own. In the specific case, it deals
with a Delay.
You can observe that DSP-Quattro creates a row for every parameter. Every
row includes, from left to right, a display of the name of the parameter
(Delay, Feedback, and Lowpass cutoff in the example), a slider to set the
value and a display on the right that shows the numerical value and the
measure unit.
Although essential, this type of interface is complete and it gives all the
information and necessary controls to program the plug-in as needed.
Instead, if the plug-in offers its own graphical interface, DSP-Quattro will use
that to edit the plug-in parameters, of course.
© Copyright 2002-2012 by Stefano Daino
55
DSP-Quattro 4
User's Manual
Editing an Audio File using DSP-Quattro
This chapter carefully describes all the functions of audio editing offered by
DSP-Quattro and their use.
To edit an audio file, you have to open it in the Audio File Player/Editor. You
can use the menu File->Open AudioFile… or the combination of keys ⌘O.
Audio File Formats
DSP-Quattro opens audio file in format AIFF, WAVE or SDII (SoundDesigner
II). It supports 8, 16, 24, 32 and 32 float bits/sample, and any sample rate (or
sampling frequency). If the sample rate of the audio file is not equal to that of
the board audio, DSP-Quattro will do a real time software resampling while
playing the audio file, to play it at the correct pitch.
Additional audio formats can be used using to the Import feature of DSPQuattro.
Import by MacOS X: select the menu File->Import Audio File ->by
QuickTime (MP3, Audio CD,…) or the combination of keys ⌘I to choose a
file that DSP-Quattro will open using the translators of MacOS X.
In this case, MacOS X is used for translating the file as a file AIFF that will
then be used by DSP-Quattro. It offers translators from a lot of formats:
mp3, MPEG-4, mp2, ac3, aifc, 3gp, mpa, mp4, caf, 3g2, m4a, AAC, audio
tracks from QuickTime movies and Audio CDROMs and many other
audio file formats.
Moreover, DSP-Quattro allows you to import an audio file as RAW data. It
means that DSP-Quattro will read the file, loading sample by sample no
matter of which header or format it has. It is useful to recover corrupted PCM
files where the header is not valid anymore. The RAW data import DOES
NOT work at all if the source file is encoded by some techniques (i.e. it is not
PCM-based audio file).
Raw Data: select this option in the menu File->Import Audio File->Raw
Data or the combination of keys ⌥⇧⌘I for choosing any file that DSPQuattro will try to read as it would be an audio file. This navigation dialog will
appear:
© Copyright 2002-2012 by Stefano Daino
56
User's Manual
DSP-Quattro 4
Import RAW dialog
The following parameters can be customized:
- Bytes Order: if every sample word of the file requires more than a byte, it
can be interpreted using a Big Endian coding, generally adopted by the
Motorola microprocessors and computers Apple Macintosh, or you can use
the Little Endian, generally adopted by Intel microprocessors and PC
MSDOS/Windows.
- Bits/Sample: selects if the file uses 8, 16, 24, 32 or 32 (floats) bits/sample
word.
- Stereo/Mono: selects the number of channels. An interleaved read is used,
that is in the case of stereo file the channels left and right are read in
succession, sample after sample.
- Sample Rate: sets the Sampling Frequency that will be adopted for playing
the file.
- First Sample Offset: sets the offset, in bytes, from the start of the file that
will be used by DSP-Quattro to read samples. This value is very important
to skip correctly the audio file header and to realign the audio sample
reading position.
The Support Files
We want to point out that DSP-Quattro, during opening and editing of an
audio file, uses temporary files. To have always successful operations, you
need to have enough free space on the hard disk that is destined to the
writing of these temporary files.
The temporary Files are files that are created when opening an audio file
editor for the graphic overview and during the editing of an audio file and
© Copyright 2002-2012 by Stefano Daino
57
DSP-Quattro 4
User's Manual
they contain some data that DSP-Quattro uses during processing and for the
operations of Undo/Redo.
At startup per default, DSP-Quattro, ), to write the temporary files, uses the
folder located in…/users/…/Library/Application Support/DSP-Quattro. You
can change folder by the Preference Dialog.
Never underestimate the space that is required to write Temporary Files. In
fact you must consider that some edit functions that modify all the samples
of an audio file ask for the new file as long as the original one. On the other
hand, until an editing session is not closed by an operation of Save, the
original file is always intact to its place; DSP-Quattro will always play to the
edited temporary files. When dealing with files of a few minutes, this issue is
of relative low importance, but when the files represents a whole audio CDROM, the size of the files cannot be neglected.
Undo/Redo
Doing editing, DSP-Quattro always allows you to return back, undoing the
edit you did. After this, you may apply again the edits by only one click using
the Redo command.
But not only this: DSP-Quattro allows you to return back to any past
situation, keeping note of the whole history of the current editing session.
After several edits, you may command an Undo, again one more Undo, a so
on. Or, thanks an specific graphic interface, to jump backward or forward
directly to a certain situation of your editing session.
The Undo/Redo mechanism of DSP-Quattro is unlimited on the number of
Undo/Redo: it always remembers all the edits since when you opened the
file – until you will not save your edits. Please be aware that any operation of
saving will also cancel the Undo/Redo history. The same happens when you
quit the application.
Because, in some cases, it may be very expensive in terms of space to have
free on the hard disk you set for temporary files, at any time you can issue a
command to empty the Undo/Redo history.
NOTE: each file under editing has its own Undo/Redo history. Let's do some
edits on one file, and let's switch on a different audio file. Doing some
additional edits on this new file, when you switch back to the previous one,
its Undo/Redo history is safe and you can Undo/Redo last edits on that file.
Again, switching back to the second file, its Undo/Redo history is still there.
Undo/Redo History Table interface:
At any time, the command Edit->Show Undo/Redo History,
combination of keys ⌥⌘Z or clicking on the Undo History button
bottom of the audio waveform views, opens a drawer window on a
the audio file editor window. Then, the same command will close
window shows a table like this:
© Copyright 2002-2012 by Stefano Daino
or the
on the
side of
it. The
58
User's Manual
DSP-Quattro 4
Undo/Redo History
Every time you do an edit, DSP-Quattro adds a row to the table, showing the
name of the edit function (for example: 'Normalize') or creating a name
identifying the undoable action (for example: 'Move Generic Marker').
The arrow on the left points to the current editing snapshot. Every time DSPQuattro adds a row, it updates also the position of the arrow.
You can set where DSP-Quattro will jump if you will command an Undo
command selecting a row with a single mouse click. A double mouse click
commands an Undo up to that editing snapshot.
DSP-Quattro allows you:
-
Single Step Undo: at any time, after at least one edit, use the command
Edit->Undo .... (where '...' is showing the name of the last edit) to Undo
the edit you did on a certain audio file. You can also use the combination
of keys ⌘Z. It corresponds to select the row one position above to the
arrow and click on the Undo button, or to double-click on that row.
-
Single Step Redo: at any time, after you did an Undo, use the
command Edit->Redo .... (where '...' is showing the name of the last
edit) to Redo the edit you did on a certain audio file. You can also use
the combination of keys ⇧⌘Z. It corresponds to select the row one
position down to the arrow and click on the Undo button, or to doubleclick on that row.
-
Multiple Steps Undo/Redo: at any time, select the row corresponding
to the editing scenario where you want to jump backward or forward and
click on the GoTo button, or double-click on that row. DSP-Quattro will
jump to that situation.
© Copyright 2002-2012 by Stefano Daino
59
User's Manual
DSP-Quattro 4
-
Clear History Table: it clears the history table, freeing any memory or
space on the HD that you set for temporary files. DSP-Quattro uses that
HD also to keep memory of all past edits done. You can also use the
command Edit->Clear History Table or to click on the Clear button
above the table. DSP-Quattro clears automatically the table also when it
does a Save, Save As or Quitting.
The Real-Time Previewer Controller
For a lot of functions of editing, DSP-Quattro introduces a common control
that allows you to listen to the effect of the editing before deciding if apply it
on the audio file or not. This controller is an essential tool to set freely and in
real time the parameters of the algorithm of editing while listening to the
output with the purpose to make the processing interface very user friendly
both for the quality of the result, and for the amount of time consumed to
reach the desired result.
The editing functions that make use of the RealTime Previewer Controller
use a dialog that shows on the left side a view that looks like this:
RealTime Previewer Controller
DSP-Quattro might omit some parts of the RealTime Previewer Controller,
depending on what the editing function allows.
The controller can be described as follows:
The Programmer:
On bottom we find the programmer, that manages the preset of the
algorithm.
Preset Programmer
This section appears only when the editing function will allow to set, save
and load one or a bank of presets for its parameter settings. This is, for
instance, the case when we use an effect plug-in or an internal effect of
DSP-Quattro.
© Copyright 2002-2012 by Stefano Daino
60
User's Manual
DSP-Quattro 4
You can use the programmer to choose a new preset going in the pop-up
menu in the lower area of this section. To load or save a preset or a bank of
presets from the disk you can use the File popup menu.
Efx Balance Slider:
Effect Balance slider
In the central part we find a slider that, as with the Effect Send Manager,
allows you to balance the level of mix between the volume of the audio
directly routed on output (dry) and the audio on output coming from the
effect (effx). If the slider is all the way to the left, the effect won't have any
influence, if the slider is all the way to the right on output of the module only
the audio of the plug-in will be heard (if the module is turned On). Some
effects include the effect balance among the parameters that can be edited
but some don't.
Playback Controller:
In the lower area we find a series of buttons that let you control the playback
of the audio file.
Playback Controller
Likewise to the Transport Control of the Audio File Player/Editor, the buttons
respectively correspond to the commands for:
- Go To Prev Marker: jumps to the previous marker
- Fast Backward: plays quick backward
- Play Backward: begins the playback on backward direction
- Stop: stops the playback
- Play Forward: begins the playback
- Fast Forward: plays quick forward
- Go To Next Marker: jumps to the following marker
The following paragraphs will describe the functions of Editing that DSPQuattro makes available.
The Cut Editor Tool
DSP-Quattro offers a very unique Cut Graphic Editor tool to make cuts on
the audio file and paste of the clipboard into an audio file without any
problem caused by abrupt changes in the level and slope of waveforms at
cut or paste boundaries.
© Copyright 2002-2012 by Stefano Daino
61
User's Manual
DSP-Quattro 4
Doing a graphical Cut using the Cut Editor Tool:
By using the menu command Edit->CutEditor->Cut... or using the
combination of keys ⇧⌘C, DSP-Quattro will show the Cut Editor Tool,
operating a cut at Playback marker position or, if any, cutting the current
waveform selection, then showing something like this:
Cut Editor Tool: doing a cut.
up, on the left, there is the waveform before the cut point. Down, on the right,
there is the waveform after the cut point.
The interface is very similar to the AudioCD Layout interface which you will
find later on this manual.
There are two buttons to set the mouse modes: Waveform Shifter (the
default mouse mode, button on right) or Scissor mode (the button on left).
© Copyright 2002-2012 by Stefano Daino
62
DSP-Quattro 4
User's Manual
Shifting a waveform section backward or forward in time line
Being in mouse Waveform Shifter mode (the default mouse mode), click on
the waveform on left, the section after the cut point, and drag it on right such
to overlap the upper waveform, the section before the cut point. DSPQuattro will automatically create a cross-fade curve on the overlapping
region:
Setting Fades length and curve
The Cut Editor Tool gives the complete freedom for setting the cross-fade
lengths and curves, even independently. Fade-in length and curve can be
different compared to the Fade-out length and curve, if necessary.
To set the length only of the Fade-out of the upper waveform, click with the
mouse on the little circle control at the beginning of the Fade-out, and shift it
backward or forward in the time line. Do the same procedure to set the
Fade-in length of the section after the cut point.
To set the slope of the curve of the Fade-out, click on the little circle control
in the middle of the Fade-out curve, and drag it where you wish in the four
directions to set the slope which satisfies your needs. Do the same to set the
slope of the curve of the Fade-in of the waveform after the cut point.
Trimming the boundaries of a waveform section:
© Copyright 2002-2012 by Stefano Daino
63
User's Manual
DSP-Quattro 4
Moving the mouse at the border of the upper waveform or of the bottom
waveform, the mouse will change to Trim mode. In this mode, clicking and
dragging the mouse, it trims the waveform end (for the section before the cut
point) or start (for the section after the cut point), making the waveform
section longer or shorter.
Trimming the end of section before the cut point
Options for setting fade-in, fade-out, cross-fades and for trimming:
There are cases in which it would be very useful to have several options to
set both fade-in and fade-out when adjusting only one of the two fade length
or curve slope. DSP-Quattro call these options ‘cross-fade’ modes:
- Cross-fade AUTO mode: it is the default. It means that the lengths of
fades are linked. Dragging a waveform section such to overlap the
previous, DSP-Quattro will adjust both fade-in and fade-out lengths such to
be long as the overlapping region. To exit from this cross-fade AUTO mode,
just click and drag the start of the fade-out or the end of the fade-in, that
fade will not follow the overlapping region anymore. To re-activate the
cross-fade AUTO mode, double-click on the start/end fade control.
- EQUAL POWER curve slope Cross-fade mode: by default, each curve
slope is independent. But, if the Cross-fade AUTO mode is engaged, if you
keep the SHIFT key pressed while clicking and dragging the control to set
the slope of the fade curve, then the other fade curve will follow such that
the sum of the two curves is always constant (equal power).
- NO-SHIFT trim mode: by default, doing a trim of the end of the first audio
section, the second waveform will shift in time. And, doing a trim of the start
of the second section, the first waveform section will remain locked. If you
keep the SHIFT key pressed while clicking and dragging to trim the
selection, then you will reverse what is above: when trimming the start of
the first selection the second will be locked, when trimming the start of the
second the first will follow.
- MIRROR trim mode: there is a special additional mode trimming: keeping
the SHIFT+cmd key pressed while trimming a section start or end, the
other will expand in the other direction for the same amount. Sections will
not shift in time in this case.
© Copyright 2002-2012 by Stefano Daino
64
DSP-Quattro 4
User's Manual
Cutting again a waveform section
Entering in the mouse Scissor mode, it is possible to cut again the audio
waveforms (except on overlapping or fade-in/out areas)
To enter in the Scissor mode, click on the scissor button. The mouse will
then change to a scissor when on a waveform section.
As you can image, you are totally free to make additional cuts, do more
overlaps, trimming the new waveform sections, adjusting fade curves, and
so on, up to obtain exactly what you need.
Inserting the Clipboard or Replacing with the Clipboard using the Cut Editor Tool:
If there is something into the audio clipboard of DSP-Quattro, and using the
menu command Edit->CutEditor->insert... or using the combination of
keys ⇧⌘I, DSP-Quattro will show the Cut Editor Tool, letting you to insert
the waveform clipboard into the current waveform at Playback marker
position or, if any, cutting the current waveform selection. It will show
something like this:
© Copyright 2002-2012 by Stefano Daino
65
DSP-Quattro 4
User's Manual
up, on the left, there is the waveform before the cut point. Down, on the
center, there is the waveform from the Clipboard, and up, on the right, the is
the waveform of the source file after the cut point.
Instead, using the menu command Edit->CutEditor->Replace... or using
the combination of keys ⇧⌘V, up, on the left, there is the waveform before
the cut point. Down, on the center, there is the waveform from the Clipboard,
and up, on the right, the is the waveform of the source file after the cut point
PLUS the clipboard length.
The difference between Inserting and Replacing is that in the first case DSPQuattro makes space for the clipboard, shifting the rest of the source audio
file forward in time, in the second case it keeps in sync the last section of the
source audio file, without shifting it in the time line.
As you can image, also in this case you can operate as when doing a cut, as
described above. You can set cross-fades, draw the curves for fades, shift
waveforms backward or forward, do new cuts.
Extended Cut, Copy&Paste Editing Functions
Besides the Cut Editor tool based on the graphic waveform interface, DSPQuattro offers the traditional Cut, Copy&Paste as we all know them.
Moreover, DSP-Quattro also offers several additional functions for Cut,
Copy&Paste that may result very useful in particular circumstances. We are
going to describe them.
About the Blend Option
Before to talk about all the functions which do a cut or paste of different
waveform one after the other, you must know what is the Blend Option.
Because, in the most general case, a cut on a waveform causes an abrupt
step on the audio file, which sounds like a click, DSP-Quattro has a special
option to automatically avoid this abrupt change, the Blend Option.
Let’s show how it works by using an example: this the source file and the
selection is the portion which we need to cut. But there is a problem: the
waveform at selection start is very different (level and slope) compared to
the waveform at selection end:
© Copyright 2002-2012 by Stefano Daino
66
DSP-Quattro 4
User's Manual
Doing a cut WITHOUT the Blend option, this is what we get:
Instead, turning the Blend option ON, this is the result:
It looks (and it sounds) amazing, but in this case DSP-Quattro built a smooth
transition at cut point such to avoid any click!
Technically speaking, DSP-Quattro does a cross-fade at cut point, and this
produces the above result. The length of the cross-fade can be changed on
the preference dialog of DSP-Quattro. The default value is 15 msec.
To turn the Blend Option ON/OFF, use the menu command Options>AutoBlend Doing Cut&Paste. Once activated the option, the same
commands will turn it off. When the option is active, a check mark appears in
correspondence of the command in the menu.
NOTE: the Blend algorithm may fail in the case in which the selection to cut
has a very strong and clear harmonic content. This is case, even if the
waveform looks very smooth after the cut, an abrupt phase change may
happen, sounding like a glitch. In this case, it is better to use the Auto Zero
option before to make the selection to cut.
© Copyright 2002-2012 by Stefano Daino
67
DSP-Quattro 4
User's Manual
About the Auto Zero Option
DSP-Quattro gives you an option of Auto Zero. Activating this option any
movement of a marker or of the selection, will be automatically adjusted to
the previous point of Zero Crossing. By Zero Crossing we mean the point in
which the waveform passes for the zero changing its sign. This option is very
useful when we want to place markers in a position that has a level of
common reference that is the zero.
Doing a cut, if the waveform at selection start and selection end will show a
similar slope and, with auto zero option ON, also the same zero crossing
level, the resulting waveform will appear very smooth also at cut point, and it
will sound very well.
As seen above talking about the Blend option, if the audio file to cut present
a sound with a very strong and clear harmonic content, the Blend Option
may fail. In these cases, turn the Blend Option OFF and use the AutoZero
option ON to place the selection to cut at zero crossing looking for points
with similar slopes. The result will be very good.
To activate the option of Auto Zero, go to the menu Options->Auto Zero, or
to use the combination of keys ⌘U. Once activated the option, the same
commands will turn it off. When the option is active, a check mark appears in
correspondence of the command in the menu.
Cut Functions
The operations of Cut gather under the following categories: Cut Selection,
Cut Before, Cut After and Trim.
Cut Selection: to cut a certain portion of the audio file, first you need to
select the portion to cut, then use the command Edit->Cut->Selection or
use the combination of keys ⌘X. The portion of the audio file that is cut will
automatically be copied in the custom audio clipboard of DSP-Quattro.
Cut Before: to quickly cut a certain portion of the audio file before a certain
position. DSP-Quattro has the following shortcuts accessible from the menu
Edit->Cut->Before:
© Copyright 2002-2012 by Stefano Daino
68
User's Manual
DSP-Quattro 4
- Cut Before Playback Marker: it cuts the whole portion of the audio file
before the Playback marker. This function is not active if the marker is at the
beginning of a file.
- Cut Before Loop Start: it cuts the whole portion of the audio file before
the marker of the Loop Start. This function is not active if the loop is turned
off or if the marker is at the beginning of a file.
- Cut Before Selection Start: it cuts the whole portion of the audio file
before the beginning of the selection. This function is not active if there isn't
a selection or if the selection starts at the beginning of a file.
Cut After: as per the command above, to quickly cut a certain portion of the
audio file after a certain position, DSP-Quattro gives the following shortcut,
accessible from the menu Edit->Cut->After:
- Cut After Playback Marker: it cuts the whole portion of the audio file after
the Playback marker. This function is not active if the marker is at the end of
a file
- Cut After Loop End: it cuts the whole portion of the audio file after the
marker of the Loop End. This function is not active if the loop is turned off or
if the marker is at the end of the file.
- Cut After Selection End: it cuts the whole portion of the audio file after the
end of the selection. This function is not active if there isn't a selection or if
the selection ends at the end of the file.
TRIM: the TRIM function cuts quickly a certain portion of the audio file
outside a certain region. The operation is similar to a double cut of the two
regions external to the one we want to keep after the TRIMming.
The command is accessible from the menu Edit->Trim, and it is available
with two options: Trim Loop and Trim Selection.
Trim menu commands
© Copyright 2002-2012 by Stefano Daino
69
User's Manual
DSP-Quattro 4
- Trim Loop: also called by the combination of keys ⌥⌘T, cuts the whole
portion of the audio file outside the region of Loop. This function is not
active if the Loop is turned Off.
- Trim Selection: also called by the combination of keys ⇧⌘T, cuts the
whole portion of the audio file outside the selection, if there is one. This
function is enabled only if there is a selection.
NOTE: you can set in the Preference Dialog, a length, measured in number
of frames, that DSP-Quattro will observe, if possible, during the operations of
Cut Before, Cut After and Trim with the purpose of leaving a certain number
of frames applying the cut. If for example, we set 128 frames that have to be
left after the Cut After, issuing the Cut After Playback Marker command will
result in DSP-Quattro cutting the file after the position of the Playback
Marker increased by 128 samples, if there is enough space before the end.
This option is very useful with the purpose to avoid making cuts too close to
the limit. We need also to consider that several samplers may need a certain
amount of samples after the Loop End to correctly play the Loop. In this
case, a cut after the Loop End too close may cause some unexpected clicks
when playing the jump at loop points.
Copy Functions
The Copy function operates in the classical way, copying the selection or all
the audio file in the special clipboard audio of DSP-Quattro. The function is
called via the menu Edit->Copy->Into Clipboard or using the combination
of keys ⌘C. If the selection concerns only one channel of an audio stereo
file, the function Copy will copy in the clipboard a mono audio signal, related
to the only selected channel. If there is no selection, DSP-Quattro will copy
all the audio file into its audio clipboard.
Copy menu commands
The command by the menu Edit->Copy->Left To Right Channel and Edit>Copy->Right To Left Channel, available only when editing stereo audio
files, copies the left channel over the right channel and respectively the
opposite.
© Copyright 2002-2012 by Stefano Daino
70
User's Manual
DSP-Quattro 4
Paste (Replace) and Insert Functions
Once DSP-Quattro fills the clipboard you can paste it to a different position
of the same file or into another file in different ways. DSP-Quattro allows a
series of paste and Insert different operations that may be grouped in the
two categories: Replace and Insert.
NOTE: DSP-Quattro will accommodate possible discrepancies among the
number of the channels of the clipboard and the audio file on which it does
a paste. If the clipboard is mono and the destination file is stereo, the single
channel of the clipboard will be doubled on the other channel. On the
contrary, if the clipboard is stereo and the destination file is mono, a mix from
both channels, left and right, will be used.
Insert: use this manu command to insert the contents of the clipboard at the
Playback marker position.
Replace menu commands
Replace: to replace a certain portion of the audio file with the contents of the
clipboard, you must select the portion on which to operate the replacement,
by using the submenu addressing the following command:
- Edit->Replace->Selection to replace the contents of the current selection
with the contents of the Audio Clipboard of DSP-Quattro.
- Edit->Replace->From Playback Marker or use the combination of keys
⌥⌘Y to the contents of Audio File starting from the position of the
Playback marker. This function is disabled if the clipboard is empty.
Copying, Moving and Inserting by Drag&Drop
DSP-Quattro fully support the drag&drop of a waveform or a selection of a
waveform (even the selection of only one channel of a stereo audio file) to
copy&paste audio files into other location of the MacOS finder or the
Document Manager floating window (see the chapter explaining the
procedure to Export audio files or selections of audio files by Drag&Drop).
© Copyright 2002-2012 by Stefano Daino
71
DSP-Quattro 4
User's Manual
Moreover, it is possible to move a waveform selection from one part of an
audio file to another on the same audio file editor, or to copy a waveform
selection from one audio file editor to another audio file editor jus by
drag&drop the selection you wish to move/copy.
As an example, do a waveform selection. Click on it, do not move the mouse
for at least 3 secs. The mouse arrow will change to hand:
Then, just drag the selection backward or forward on the same audio file:
Release the mouse on the point where you wish to move the selected
waveform. DSP-Quattro will do the rest:
© Copyright 2002-2012 by Stefano Daino
72
User's Manual
DSP-Quattro 4
NOTE: for the best result, enable the Blend option described previously on
this manual. With the Blend option ON, there will be not audible gaps or
clicks on the audio file after moving and inserting the waveform selection.
Exactly in the same way, it is possible to copy a waveform or a waveform
selection from one file to another. Just drag the source waveform on another
audio file editor, on the position in time you wish to insert the source
waveform.
Insert Silence
The function Insert Silence does an Paste of a silence (a waveform at zero
level) where the Playback Marker is.
To launch the operation to Insert Silence, use the command in the menu
Edit->Insert Silence…. The following dialog will appear:
Insert Silence Dialog
Enter the length of the silence to insert. DSP-Quattro offers two controls, one
showing the sample units and one the time.
Mix...
The Mix function allows you to mix the contents of the clipboard with the
samples of the audio file, setting the volume of the clipboard and of the
samples of the original file, and the timing of the input and output fades.
© Copyright 2002-2012 by Stefano Daino
73
User's Manual
DSP-Quattro 4
These are both customizable for timing and for type of curve of fade,
independently for the clipboard and for the original file.
The function of Mix, called by the menu Edit->Mix... (or ⌃⌘M) opens the
following dialog:
Mix dialog
For what concerns the audio file, by times of transition we mean the time
elapsed for passing from the volume of the audio not modified (+0 dB) to the
level set with the Gain slider in the control section of the audio file and, vice
versa, for the fade-out, to return to the level of gain +0 dB on output.
For what concerns the Clipboard, by times of transition we mean the time
elapsed for passing from the volume zero (-∞ dB) to the level set with the
Gain slider in the control section of the Clipboard and, vice versa, for the
fade-out, to return to volume zero (-∞ dB) on output.
The pop-up menu for the choice of the curve of Fade allows you to choose
among a transition Exponential, Linear or Inverted Exponential, that, given a
certain time, corresponds respectively to a faster transition at the beginning,
a normal one, and a faster transition at the end.
On the right side, you find a RealTime Previewer Controller to listen in
preview and in real time the effects of the algorithm using a certain setting of
the parameters.
Cancel closes the dialog without modifying the audio file; Apply closes the
dialog applying the edit on the audio file.
Silence...
The Silence function allows you to force to volume zero a certain portion of
the audio file. This is the same thing as 'to clear' with an eraser tool a certain
region. DSP-Quattro allows you to define independently the times of
transition on input and on output and the relative type of Fade In and Fade
Out curves.
If there is a selection, the function acts only on the region delimited by the
selection, otherwise on the whole file.
Calling the function of Silence by the menu Edit->Silence... (or ⌃⌘S) the
following dialog appears:
© Copyright 2002-2012 by Stefano Daino
74
User's Manual
DSP-Quattro 4
Silence dialog
For times of initial fade-out transition we intend the time elapsed for passing
from the volume of the audio not modified (+0 dB) to the volume zero (-∞ dB)
and, for Fade In transition, the time that the output takes to return to the level
of gain +0 dB.
The pop-up menu for the choice of the Fade curve allows you to choose
among a transition Exponential, Linear or Inverted Exponential, that
corresponds, given a certain time of transaction, respectively to faster
transactions at the beginning, normal ones, and faster at the end.
On the right side, you find a RealTime Previewer Controller to listen in
preview and in real time the effects of the algorithm using a certain setting of
the parameters.
Cancel closes the dialog without modifying the audio file; Apply closes the
dialog applying the edit on the audio file.
Repeat...
The Repeat function allows you to repeat a certain number of times a certain
portion of the audio file. This is the same as using the Insert command more
times, inserting, one after the other, a certain region. DSP-Quattro gives you
the choice of transition time and the type of curve for XFading.
If there is a selection, the function acts only on the region delimited by the
selection, otherwise, if the Loop has been turned On, on the region delimited
by the Loop points, otherwise on the whole file.
Calling the Repeat function by the menu Edit->Repeat... (or ⌃⌘R)
following dialog appears:
© Copyright 2002-2012 by Stefano Daino
the
75
User's Manual
DSP-Quattro 4
Repeat dialog
The commands allow you to plan the number of the repetitions, the length of
the possible region of XFade, where applicable, and the curve of XFade.
The pop-up menu for the choice of the curve of Fade allows you to choose
among a transition Exponential, Linear or Inverted Exponential, that
corresponds, given a certain time of transaction, respectively to faster
transactions at the beginning, normal ones and faster at the end.
On the right side, you find a RealTime Previewer Controller to listen in
preview and in real time the effects of the algorithm using a certain setting of
the parameters.
Cancel closes the dialog without modifying the audio file; Apply closes the
dialog applying the edit on the audio file.
Append
The function Append does an Paste of the Audio Clipboard at the end of the
current Audio File.
To run the function Append, you can use the command in the menu Edit>Append (or ⌃⌘A).
© Copyright 2002-2012 by Stefano Daino
76
User's Manual
DSP-Quattro 4
Processing menu commands
Find Peak and RMS
The function Find Peak and RMS informs you about the Peak level
(expressed as absolute value and dB), position (frame and time location)
and RMS (Root Mean Square) values, expressed as percentage % and dB.
To run the Find Peak and RMS function, use the menu
AudioFileProcessing->Find Peak and RMS.
On the bottom part of the dialog, DSP-Quattro shows also the number of
clips, defined as the points where the waveform reaches the maximum
normalized values of –1.0 or 1.0, and the ratio between the number of clips
and the number of frames of the Audio File.
On exit, DSP-Quattro allows you to add a Generic Marker at the position of
the detected peak (or at the position of the first clip, if there are more clips).
If you want to add a marker, activate the corresponding check box.
© Copyright 2002-2012 by Stefano Daino
77
User's Manual
DSP-Quattro 4
Peak and RMS Info Dialog
If there is a selection, the function analyzes only on the region delimited by
the selection, otherwise on the whole file.
Click on the button OK to close the dialog.
Remove DC
The function Remove DC allows you to eliminate the DC Level from an
audio file. The DC Level of an audio file is the average value of its samples.
The waveform that represents the audio file should oscillate around the zero,
and therefore its average value should be zero. But sometimes the
waveform doesn't oscillate around the zero, due to some reasons, for
example, to an imperfection in the analog circuit of the Analog To Digital (A/
D) converters of the system used for digitizing the audio signal.
To run the function Remove DC, use the menu
AudioFileProcessing->Remove DC.
If there is a selection, the function acts only on the region delimited by the
selection, otherwise on the whole file.
Invert
The Invert function changes the sign to all the samples in the region to edit.
To run the function Invert, use the menu
AudioFileProcessing->Invert.
© Copyright 2002-2012 by Stefano Daino
78
DSP-Quattro 4
User's Manual
If there is a selection, the function acts only on the region delimited by the
selection, otherwise on the whole file.
Reverse
The Reverse function operates a turnover of the temporal axis of the audio
file or rewrites the audio file playing it in reverse direction, from the end
toward the beginning.
To run the function Reverse, use the menu
AudioFileProcessing->Reverse.
If there is a selection, the function acts only on the region delimited by the
selection, otherwise on the whole file.
Swap L&R Channels
The Swap L&R Channels function swap the samples between Left and Right
channels of a stereo Audio File. On exit, all samples from the Left channel
will be on the Right and the opposite.
To run the function Swap L&R Channels, use the menu
AudioFileProcessing->Swap L&R Channels.
If there is a selection, the function acts only on the region delimited by the
selection, otherwise on the whole file.
Normalize
The Normalize function optimizes the dynamic of the audio signal, amplifying
the region to normalize in such way that the level of maximum peak will be
equal to the 0 dB. This is a function of very common use, since during
recording usually you must keep the maximum level of recording very much
below the level of 0 dBs, since a sudden higher level would cause a
distortion. Therefore, you can use this function to bring the level of the signal
between the minimum and maximum allowed levels. But take care, because,
unfortunately, also the background noise will be amplified accordingly.
To run the function Normalize, use the menu
AudioFileProcessing->Normalize (or ⌘G).
If there is a selection, the function acts only on the region delimited by the
selection, otherwise on the whole file.
Normalize To...
The Normalize To function serves to optimize the dynamic of the audio
signal, eventually amplifying the region to normalize in such way that the
level of maximum peak will be equal to the value, expressed in dB, set by
the user.
To run the function Normalize To, use the menu
© Copyright 2002-2012 by Stefano Daino
79
User's Manual
DSP-Quattro 4
AudioFileProcessing->Normalize To… (or ⌥⌘G).
The following dialog appears:
Normalize To Dialog
On the left part of this dialog there is the same interface of the Find Peak
and RMS function. Please refer to that paragraph for the explanation of
these parameters. The Peak and RMS parameters are very useful to
establish the optimum value for the New Peak slider.
Use the slider to set the the New Peak Value, expressed in dB. If the value is
up to 0 dB, after the processing the peak level will have the value set. For
values over 0 dB, clips will occur. Use values over 0 dB only if you wish to
cause hard saturation and distortions.
On the right side, you find a RealTime Previewer Controller to listen in
preview and in real time the effects of the algorithm using a certain setting of
the parameters.
If there is a selection, the function acts only on the region delimited by the
selection, otherwise on the whole file.
Change Gain...
The Change Gain function allows you to change the volume, or to apply a
gain, to a certain portion of the audio file. DSP-Quattro allows you to define
the transition times, independently on input and on output and the relative
types of curves of Fade In and Fade Out.
If there is a selection, the function acts only on the region delimited by the
selection, otherwise on the whole file.
Calling the function Change Gain by the menu
AudioFileProcessing->Change Gain... (or ⇧⌘G),
shows the following dialog:
© Copyright 2002-2012 by Stefano Daino
80
User's Manual
DSP-Quattro 4
Change Gain Edit Function dialog
By time of initial Fade In transition we intend the time elapsed for stepping
from the volume of the audio not modified (+0 dB) to the gain defined by the
position of the slider Gain and, viceversa, for the fade Out on output, to
return to the level of +0 dB.
The pop-up menu for the choice of the curve of Fade allows you to choose
between an Exponential, Linear or Inverted Exponential transactions that
corresponds, given a certain time of transaction, respectively to faster
transactions at the beginning, normal ones and faster at the end.
On the right side, you find a RealTime Previewer Controller to listen in
preview and in real time the effects of the algorithm using the current
parameter settings.
Cancel closes the dialog without modifying the audio file; Apply closes the
dialog applying the edit on the audio file.
The Fade In/Out
Both Fade In and Fade Out functions allow you to apply a gradual gain,
beginning from the level of zero volume, up to the original level of the source
file. This on a certain selection of the audio file for the Fade In, and vice
versa in the case of the Fade Out.
DSP-Quattro allows you to do Fade In or Fade Out in only one-shot
command or offering a very complete graphical tool for the complete control
of the fade sections, the FadeIn/Out Editor Tool (see the chapter about the
Fade In/Out Editor Tool to know how to use it).
In the first case, use the menu for the direct menu command for Fade In and
Fade Out:
AudioFileProcessing->Fade In (or ⌘F)
AudioFileProcessing->Fade Out (or ⇧⌘F)
If there is a selection, each of the above functions acts only on the region
delimited by the selection, otherwise on the whole file.
© Copyright 2002-2012 by Stefano Daino
81
DSP-Quattro 4
User's Manual
On the right side, you find a RealTime Previewer Controller to listen in
preview and in real time the effects of the algorithm using a certain setting of
the parameters.
Cancel closes the dialog without modifying the audio file; Apply closes the
dialog applying the edit on the audio file.
The Fade In/Out Graphic Editor Tool
The Fade In&Out graphic Editor Tool allows you to apply at the same time and with
only one function both a Fade In on input, as well as a Fade Out on output to a
certain region of the audio file, giving you the complete graphical control of all the
parameters to set fade lengths and fade in/out curve shapes as well.
If there is a selection, the function acts only on the region delimited by the
selection, otherwise on the whole file.
To open the Fade In&Out Graphic Editor Tool, use the menu command
AudioFileProcessing->Fade In&Out Editor...
On the left part of the window there is the waveform of the source audio file.
It is possible to set the fade-in/out curve simply dragging with the mouse the
envelope controls, setting fade lengths and curves.
To set the length of the Fade-in, click with the mouse on the little circle
control at the end of the Fade-in, and shift it backward or forward in the time
line. Do the same procedure to set the Fade-out length at the end of the
waveform section.
To set the slope of the curve of the Fade-in, click on the little circle control in
the middle of the Fade-in curve, and drag it where you wish in the four
directions to set the slope which satisfies your needs. Do the same to set the
slope of the curve of the Fade-out.
Moreover, it is possible to set the gain level of the envelope curve. Click on
the little circle control in the middle of the upper section of envelope curve
and drag it up or down to set the gain level.
© Copyright 2002-2012 by Stefano Daino
82
DSP-Quattro 4
User's Manual
Join L&R Fade In-Out Settings: if it is checked, then any adjustment on the
envelope curve on one channel will cause the same setting on the envelope
curve of the other channel. Uncheck it is you wish to set different envelope
curves on the left and right channels.
On the right part, on the upper section DSP-Quattro shows the numerical
settings of the fade-in/out envelopes and for gain levels.
On the bottom of this section there are some useful presets, for fade in/out
curves and fade in/out lengths:
From left to right, the presets are Very fast, Fast, Linear, Slow and Very
Slow.
On the bottom of the window there is a transport controller to monitor the
result, and two buttons for setting what waveform to display:
- Processed: if lit, the tool draws the waveform of the processed audio file
- Source: if lit, the tool draws the waveform of the source audio file
Both processed/source options can be active at the same time for visual
waveforms comparison.
Cancel closes the dialog without modifying the audio file; Apply closes the
dialog applying the edit on the audio file.
X-Fade Looping
The function XFade Loop, available only if the Loop is turned On, allows you
to run a special algoritm that modifies the samples inside the Loop copying
the region before the Loop Start over the region before the Loop End, using
© Copyright 2002-2012 by Stefano Daino
83
User's Manual
DSP-Quattro 4
a cross fading (XFade), with the purpose to make the loop as much natural
and continous as possible. Since at the end of the process the sample at the
Loop End will be identical to that at the Loop Start, you won't hear any audio
click when playing and cycling over the Loop.
The success of the operation depends on several factors:
- the Loop points must be positioned already in places considered to be
good points of Loop.
- The length of the cross fading is a very important factor to achieve an
acceptable result, and it is difficult to give a precise rule about its value.
Generally, when applying the X-Fade Loop algorithm to short Loops, a long
XFade is used, even up to the whole region of Loop. Instead, on long Loops,
generally smaller factors are preferred.
The maximum value of the time of X-Fade - up to the whole length of the
Loop - depends on the position of the Loop Start marker. It is in fact equal to
the smallest value between the length of the Loop and the position of the
Loop Start marker.
To open the XFade Loop algorithm interface, use the menu command
AudioFileProcessing->Loop->XFade Loop (or ⌘<)
DSP-Quattro will open the following dialog:
XFade Loop Edit Function dialog
The pop-up menu for choosing the curve of X-Fade allows you to choose
among Exponential, Linear or Inverted Exponential transactions, that
correspond, given a certain time of transaction, respectively to faster
transactions at the beginning, normal ones, and faster at the end.
On the right side, you find a RealTime Previewer Controller to listen in
preview and in real time the effects of the algorithm using a certain setting of
the parameters.
Cancel closes the dialog without modifying the audio file; Apply closes the
dialog applying the edit on the audio file.
© Copyright 2002-2012 by Stefano Daino
84
User's Manual
DSP-Quattro 4
Loop by BPM
DSP-Quattro gives you a very useful function when you want to set a Loop
on rhythmic patterns, where the length of the Loop has to be based
considering the metronomic time.
The function Loop by BPM allows you to position the points of Loop in
automatically considering the timing of the metronome expressed in Beats
Per Minute (BPM). The BPM is a measure unit, usually well known to
drummers, that measures the musical time.
Calling the function Loop by BPM by the menu
AudioFileProcessing->Loop->Loop by BPM
shows the following dialog:
Loop by BPM Edit Function dialog
This function offered by DSP-Quattro requires some parameters to set:
- BPM: it is the length in the desired BPM
- Beats/Meas: number of Beats for every Measure. This is the number of
hits of metronome before passing to the following measure. In the case of a
time in 3/4, for instance, it is equal to 3.
- Num Of Meas: it is the total number of the measures.
- Add. Beats: it is the number of additional Beats, essential in case the
measures are not all equal ones.
For example, in case you want to position the Loop points on a region equal
to 3 measures in 4/4, plus one more in 3/4, with a BPM time of 120.32, you
must set:
BPM
Beats/Meas
Num of Meas
Add. Beats
= 120.32
=4
=3
=3
© Copyright 2002-2012 by Stefano Daino
85
User's Manual
DSP-Quattro 4
Moreover, DSP-Quattro allows you to set the positioning of the Loop At
Playback, Before End, and At Beginning.
Cancel closes the dialog without modifying the audio file; Apply closes the
dialog applying the edit on the audio file.
If, before to call this edit function, the Loop was turned Off, DSP-Quattro will
turn it on automatically.
Detect BPM...
This function works exactly as the opposite of the previous Loop by BPM.
Given a certain region, DSP-Quattro will calculate the corresponding BPM
metronomic time.
Calling the function Detect BPM by the menu
AudioFileProcessing->Detect BPM
and choosing one of the possible regions to consider in the calculation of the
BPM:
- Use All: it uses the whole audio file
- Use Loop: it uses the Loop (active only if the Loop has already been
turned On)
- Use Selection: it uses the selection (active only if there is a selection)
DSP-Quattro will open the following dialog:
Detect BPM Function dialog
This function offered by DSP-Quattro requires some parameters to be set by
the user:
- Beats/Meas: number of Beats for every Measure. This is the number of
hits of metronome before passing to the following measure. In the case of a
3/4 time, for instance it is equal to 3.
- Num Of Meas: it is the total number of the measures.
- Add. Beats: it is the number of additional Beats, essential in the case the
measures are not all equals.
© Copyright 2002-2012 by Stefano Daino
86
User's Manual
DSP-Quattro 4
For example, in case we want to know the relative BPM to a region equal to
3 measures in 4/4, plus one in 3/4, we need to set:
Beats/Meas
Num of Meas
Add. Beats
=4
=3
=3
- BPM shows the result of the effected calculation. When the values in the
upper part change, the value of the BPMs is updated in real time
accordingly.
There is also an option to set the current detected BPM as Master BPM
Tempo value. It is the master clock that DSP-Quattro will send as clock
message to synchronize the effects and instruments which support
synchronization.
Click on OK to close the dialog.
Resampling
This function allows you to change the sample rate of the audio file,
operating a software resampling algorithm. Lowering the sample rate will
remove the highest frequencies components, lowering the audio spectrum
range of the audio, but the file will have smaller dimensions, saving space on
the hard disk.
NOTE: version 2.0 of DSP-Quattro introduces a new and very innovative
offline Linear Phase Sample Rate Converter (SRC) Resampling algorithm,
based on the state-of-art technology about the Digital Signal Processing and
linear phase digital filtering. DSP-Quattro 2.x SRC guarantees tha maximum
audio quality, both in terms of frequency response and audio quality (the
filter characteristic is outstanding and being Linear Phase, the algorithm
does not introduce phase artefacts at the transition band) and, running on an
Altivec processor, also in terms of processing speed.
Calling the function Resample by the menu
AudioFileProcessing->Resample
shows the following dialog:
Resample Edit Function dialog
© Copyright 2002-2012 by Stefano Daino
87
User's Manual
DSP-Quattro 4
You simply have to set the new sample rate and the audio quality parameter.
For sample rates, you can choose to use the upper popup menu, where the
most common sample rate values are included, or to use the control on the
bottom, where you can enter the value you wish.
Linear Phase SRC Algorithm Quality options
Use the Quality popup menu to set the quality used by the SRC algorithm.
We suggest to skip the UltraFast option. In most cases, the Good quality
gives excellent results, and consider also that the ‘UltraFast’ option is not so
much faster...
Cancel finally, closes the dialog without modifying the audio file, OK closes
the dialog and it applies the editing on the audio file.
Pitch Shifting
This function allows you to change the pitch of the audio file, operating a
software resampling algorithm. The sample rate remains constant. Because
by rising the pitch, it is as if the file is played more quickly, so the operation
of pitch shifting will produce a file which will be smaller and will be shorter in
time. Vice versa by lowering the pitch it will be longer in time and the audio
file will be bigger.
Calling the function Pitch Shifting by the menu
AudioFileProcessing->Pitch Shifting
opens the dialog below:
Pitch Shifting Edit Function dialog
© Copyright 2002-2012 by Stefano Daino
88
User's Manual
DSP-Quattro 4
If you don't want to modify the length of the file by changing the pitch, you
need to apply the function of frequency shifting described later.
The advantage of this Pitch Shifting is that the audio quality of the resulting
file is very good, and the range on which this functions can be applied is
particularly wide.
If there is a selection, the function acts only on the region delimited by the
selection, otherwise on the whole file.
You can set the ratio of pitch shifting by the slider on the left, or by the
numerical control above the Slider. Besides, DSP-Quattro allows you to set
the ratio expressing it in a more usual form to the musicians, in cents of
semitone. To do so use the numerical control to the right of the slider.
Clicking twice on it you can set the new value in numerical form.
On the right side, you find a RealTime Previewer Controller to listen in
preview and in real time the effects of the algorithm using a certain setting of
the parameters.
Cancel closes the dialog without modifying the audio file; Apply closes the
dialog applying the edit on the audio file.
Frequency Shifting
This function allows you to change the pitch of the audio file, without varying
its length. DSP-Quattro uses a High Quality Spectral Re-synthesizer to do it.
If there is a selection, the function acts only on the region delimited by the
selection, otherwise on the whole file.
Calling the function Frequency Shifting by the menu
AudioFileProcessing->Frequency Shifting
opens the following dialog:
Frequency Shifting Edit Function dialog
The interface is very similar to the one previously described for the Pitch
Shift.
© Copyright 2002-2012 by Stefano Daino
89
DSP-Quattro 4
User's Manual
You can set the ratio of pitch shifting through the slider on the left, or through
the numerical control above the Slider. Besides, DSP-Quattro allows you to
set the ratio expressing it in a more usual form to the musicians, in cents of
semitone. To do so use the numerical control to the right of the slider.
Clicking twice on it you can insert the new value in numerical form.
There are additional controls for setting the internal parameter of the
algorithm.
Smoothness: it controls how much the algorithm will be free to smooth the
sound. In general, when applying the algorithm to more static sounds, such
as not rhythmical, it could be convenient to apply an higher values for this
parameter. On the other hand, the value of smoothness has to be rather
small if the file on which it is used is very rhythmic or if it contains particularly
impulsive sounds.
Quality: it sets the quality of the algorithm. Higher values will require more
processing power. Some CPUs may have not enough power for that. If you
hear glitches while previewing the effect, this is the case. Please consider
that glitches will not occur when applying the algorithm to the audio file,
because the process of rendering is off-line.
Very low Quality values could cause some rather robot-like effects. Even if
these do not sound natural, for such settings DSP-Quattro allows very
particular and original changes on the audio file.
On the right side, you find a RealTime Previewer Controller to listen in
preview and in real time the effects of the algorithm using a certain setting of
the parameters.
Cancel closes the dialog without modifying the audio file; Apply closes the
dialog applying the edit on the audio file.
Time Stretching
This function allows you to change the length of the audio file, without
varying its pitch. DSP-Quattro uses a High Quality Spectral Re-synthesizer
to do it.
If there is a selection, the function acts only on the region delimited by the
selection, otherwise on the whole file.
Calling the function Time Stretching by the menu
AudioFileProcessing->Time Stretching
opens the following dialog:
© Copyright 2002-2012 by Stefano Daino
90
User's Manual
DSP-Quattro 4
Time Stretching Edit Function dialog
DSP-Quattro gives you more different possibilities to set the ratio between
the length of the destination file and that of starting file:
- Time Ratio Slider: You can directly set the ratio of Time Stretching through
the slider on the left, or through the numerical control above the slider.
- Destination Length: You can directly set the length, expressing it in
frames or in the format hours: min:sec:msec, of the destination file. To such
end, you can use the two controls of Length in the panel that describes the
Destination file. One click of the mouse increases or decreases the current
value, while a double click on the controls set the new value in numerical
form.
- Destination BPM: DSP-Quattro offers you the possibility to set the ratio
expressing it in a more usual form to musicians: BPM (Beats Per Minutes).
To this purpose you must set the BPM of the source file, clicking on the
DETECT button in the section related to the parameters of the source file.
This opens a dialog that allows you to set all the necessary parameters to
the calculation of the BPM, as previously described for the function Detect
BPM. Then you can use the numerical control to set the new BPM in the
section related to the parameters of destination file. By Clicking twice you
will be prompted to insert the new value in numerical form.
The parameters are obviously all connected to one another. Any change of
one parameter will have an effect in real time also on the value assumed by
the others.
There are additional controls for setting the internal parameter of the
algorithm.
Smoothness: it controls how much the algorithm will be free to smooth the
sound. In general, when applying the algorithm to more static sounds, such
as not rhythmical, it could be convenient to apply an higher values for this
parameter. On the other hand, the value of smoothness has to be rather
small if the file on which it is used is very rhythmic or if it contains particularly
impulsive sounds.
Quality: it sets the quality of the algorithm. Higher values will require more
processing power. Some CPUs may have not enough power for that. If you
hear glitches while previewing the effect, this is the case. Please consider
that glitches will not occur when applying the algorithm to the audio file,
because the process of rendering is off-line.
Very low Quality values could cause some rather robot-like effects. Even if
these do not sound natural, for such settings DSP-Quattro allows very
particular and original changes on the audio file.
© Copyright 2002-2012 by Stefano Daino
91
DSP-Quattro 4
User's Manual
On the right side, you find a RealTime Previewer Controller to listen in
preview and in real time the effects of the algorithm using a certain setting of
the parameters.
Cancel closes the dialog without modifying the audio file; Apply closes the
dialog applying the edit on the audio file.
Audio Restoration: the Pencil and Gainer Tool
DSP-Quattro allows to draw the waveform by yourself if needed. It offers a
complete tool to do it, called the Pencil Tool. Moreover, the same tool offers
an additional option, the Gainer. It is a very useful tool to rise/lower smoothly
only some samples of the source waveform. Very often, the Gainer does
what the Pencil tool should do, but with less artifact on the processed audio
file. By the way, you are totally free to mix the use of both tools, selecting
one tool in some circumstances, the other tool in the other cases.
NOTE: besides this, the Gainer tool is a very unique tool when you need to
lower the transients in the audio file, like consonants in voice audio track or
electronic drums. It is very useful also to rise the RMS value of the audio file
without causing the distortion of saturated Peaks. For this, just lower the
peaks of the transients and then normalize the processed audio file.
Chosen an audio file to edit using the Pencil or Gainer Tool, click on the
PencilTool button on the bottom of the waveform editor, or use the menu
command:
AudioFileProcessing-> Pencil Tool...
DSP-Quattro will open a dialog like this:
© Copyright 2002-2012 by Stefano Daino
92
DSP-Quattro 4
User's Manual
Using the Pencil Tool:
Place the playback marker on the point you wish to redraw using the Pencil,
and click on the pencil button which is on the bottom left of the waveform
display. DSP-Quattro will zoom on the playback marker and the mouse will
become a pencil.
Then, simply click and draw the new waveform. By default, DSP-Quattro will
draw the source waveform darker, and the new waveform lighter for a direct
comparison.
Repeat the procedure as many times as you like.
NOTE: if you do a zoom out, the mouse mode will exit from the pencil
mode. Click on the pencil button the engage again the pencil mode.
Using the Gainer Tool:
Place the playback marker on the point you wish to rise/lower the waveform
using the Gainer tool, and click on the Gainer button which is on the bottom
left of the waveform display, on the right of the Pencil button:
© Copyright 2002-2012 by Stefano Daino
93
DSP-Quattro 4
User's Manual
DSP-Quattro will zoom on the playback marker and the mouse will become a
Gainer.
Click on the point of the waveform you wish to lower and drag the mouse
down. DSP-Quattro will lower that waveform point, which also acts as an
‘attractor’, moving the points just before and just after, according with a curve
which is steep according to the curve shape buttons and curve width values
shown on the bottom of the waveform display.
In the above example, the Gainer tool is lowering the samples around the
Peak point in a range of 5 msec. It means that the peak point under the
mouse is following the drag, and that the samples before and after are
smoothly following the movement of that peak value. The effect of this is the
light waveform, the source audio file waveform is darker.
Cancel closes the dialog without modifying the audio file; Apply closes the
dialog applying the edit on the audio file.
Audio Restoration: the Analyze & Declick/Repair Tool
DSP-Quattro offers a very impressive de-clicker algorithm for the audio
restoration of old vinyls or corrupted recordings. This built-in algorithm is
capable to reconstruct portions of audio files and substitute them with a
portion of waveform which is very similar to the original one. It seems really
impossible, but it is so! Not only this: DSP-Quattro is also able to analyze the
audio file understanding what is good and what is not. In other words, it is
able to detect by itself the corrupted portions and to substitute them with
reconstructed waveforms, doing everything with one command only.
Recorded old music form a destroyed vinyl, use the the menu command
AudioFileProcessing-> Analyze & Declick/Repair
to run the the algorithm for the analysis and reconstruction of the corrupted
waveform. Then, a dialog like this will appear:
© Copyright 2002-2012 by Stefano Daino
94
DSP-Quattro 4
User's Manual
to hear the result, just use the transport control on the bottom of the window
to play the processed audio file.
By default, DSP-Quattro plays only the processed file and display both
waveforms: the waveform of the source audio file is darker, the waveform of
the processed audio file is lighter. Use the controls on the right of the
transport control to change what to monitor:
Audio monitor: use these three buttons to play the Processed audio file, the
Source audio or to hear the Residual, which is what the de-clicker algorithm
has removed from the source file to produce the result.
Display: use these buttons to draw or hide the Processed and/or Source
waveform on the upper display.
© Copyright 2002-2012 by Stefano Daino
95
DSP-Quattro 4
User's Manual
Cancel closes the dialog without modifying the audio file; Apply closes the
dialog applying the edit on the audio file.
Audio Restoration: Declick/Repair Selection
As introduced above, the de-clicker algorithm is capable to reconstruct
portions of audio files and substitute them with a portion of waveform which
is very similar to the original one. Usually, it is better to leave to DSP-Quattro
the analysis of the source file, to detect by itself what is good and what
should be reconstructed. But, if needed, it is possible to force DSP-Quattro
to reconstruct a certain selection of the audio file, no matter what there is in
that portion of audio file.
NOTE: because DSP-Quattro will reconstruct all the selected waveform of
the audio file, from the beginning up to the end, it is possible to do it only on
very short selections (up to around 200 msec). DSP-Quattro will show a
warning dialog if this command will be called entering longer selections.
After having isolated a click to reconstruct on the waveform of the source
audio file, select it. Then, use the menu command
AudioFileProcessing-> Declick/Repair Selection
to run the blind reconstruction of that selected waveform. You will
immediately see the result.
NOTE: in order to make the selection shorter than possible, it is
recommended to turn OFF the Auto Zero option before to make the selection
of the waveform to reconstruct.
NOTE: it is possible to call this command also after having selected only one
channel or a stereo audio file.
Applying an Effect Plug-In as Edit function
DSP-Quattro allows you to use one or more Effect plug-ins in the same way
as one of the editing functions previously described.
If there is a selection, the function acts only on the region delimited by the
selection, otherwise on the whole file.
The interface is exactly the one you have seen in the previous chapters
dealing with the Effect Send Manager Reference.
The menu command
AudioFileProcessing->AU/VSTPluginChain...
opens the following dialog:
© Copyright 2002-2012 by Stefano Daino
96
DSP-Quattro 4
User's Manual
Please refer to the chapter about Effect Send Manager to know how to use
the above interface. It is very impressive the power of being able to apply
any chain of internal, VST or AU effects exactly as another edit function, with
latency compensation, even only on a certain waveform selection, only on
those samples.
Cancel closes the dialog without modifying the audio file; Apply closes the
dialog applying the edit on the audio file.
In a very similar way, the menu commands
AudioFileProcessing->Render Insert Effx
or
AudioFileProcessing->Render Master Effx
use the current Effect Send on Insert on the AudioFile Editor or the Master
Effect Send of DSP-Quattro to render the internal or VST/AU plug-ins loaded
on them to process the samples of the Audio File or only of its selection, if
any.
Editing Using Custom DSP-Quattro Effects
As has already been described in the Effect Send Manager paragraph, DSPQuattro gives you a series of digital effects of very high quality. DSP-Quattro
effects space from the various uses of the Digital Delay, to the simulation of
analog filters and bank of filters, up to the algorithms for the room and
ambient simulations.
The series of the effects that DSP-Quattro has available is used in the same
way as the other Effect plug-ins.
If there is a selection, the function acts only on the region delimited by the
selection, otherwise on the whole file.
The graphic interface, although customized for every type of effect, uses
some common graphic objects, such as the rotating controls, sliders, and vmeters.
Now we will examine every effect, describing in detail all of their properties.
© Copyright 2002-2012 by Stefano Daino
97
User's Manual
DSP-Quattro 4
The series of effects can be separated in two principal categories:
- AudioFileProcessing->Digital Effects: they gather the effects of
modulated delay lines and chamber simulations (Delay, Chorus, Reverb)
- AudioFileProcessing->Digital Filters: they are the digital effects from the
application of the digital filters (Parametric & Graphic Equalizer, Analog Filter
Emulators).
Likewise to what happens with the other Effect plug-ins, the graphic interface
for the control of the parameters of a certain effect of DSP-Quattro is the
same one when the effect is loaded to operate as an edit function, and when
is used as a real time effect loaded and managed by the Effect Send
Manager. In the first case, the interface of the effect is inserted in a modal
dialog that, on its right, has a RealTime Previewer Controller available that
has been described in the previous paragraph when we talked about the use
of the Effect plug-ins.
DSP-Quattro Digital Effect: Chorus
To use the Chorus effect of DSP-Quattro you have to use the command from
the menu
AudioFileProcessing->Digital Effects->Chorus.
It opens the following dialog:
DSP-Quattro Chorus dialog
- Gain Control: located on the left, it allows you to set the gain to be applied
to the signal on output from the effect and to monitor it through the V-Meters.
In the case of a mono signal, only one Gain Slider and one V-Meter will be
available.
- Bypass: the button of Bypass allows to disable the processing, redirecting
the signal from input to output, to compare the sound of the original signal
with the new one.
- Efx Balance [0.0...1.0]: it allows you to set the ratio between the edited
signal and the original one. This control has the same function of the Efx
Balance on the Real-Time Previewer Controller on the left, with the
difference that its value is memorized in the preset.
© Copyright 2002-2012 by Stefano Daino
98
User's Manual
DSP-Quattro 4
- Delay [0.0...30.0 msecs]: sets the time used by the internal delay line. To
higher values correspond a more evident and deep effect.
- LFO Depth [0.0...1.0]: sets how much the delay time is modulated by the
LFO (Low Frequency Oscillator). The higher the value of the LFO Depth, the
more the effect of Chorusing will be evident.
- LFO Rate [0.0...5.0 Hz]: sets the speed of the LFO. It doesn't have any
effect if the LFO Depth is none. To smaller values correspond lighter effects,
less intrusive. To higher values correspond deeper effects,.
Cancel closes the dialog without modifying the audio file; Apply closes the
dialog applying the edit on the audio file.
DSP-Quattro Digital Effect: Stereoizer
The effect Stereoizer uses a delay line with the purpose to enhance the
stereo image of the output signal. Attention: it could bring to a mono
incompatibility due to the phase cancellation of certain frequencies.
Run the Stereoizer effect by the menu command
AudioFileProcessing->Digital Effects->Stereoizer,
it opens the following dialog:
DSP-Quattro Stereoizer dialog
- Gain Control: located on the left, it allows you to set the gain to be applied
to the signal on output from the effect and to monitor it through the V-Meters.
In the case of a mono signal, only one Gain Slider and one V-Meter will be
available.
- Bypass: the button of Bypass allows to disable the processing, redirecting
the signal from input to output, to compare the sound of the original signal
with the new one.
- Depth [0.0..30.0]: allow you to set the depth of the effect.
Cancel closes the dialog without modifying the audio file; Apply closes the
dialog applying the edit on the audio file.
© Copyright 2002-2012 by Stefano Daino
99
User's Manual
DSP-Quattro 4
DSP-Quattro Digital Effect: Delay and Dual Delay
Use the Delay effect to create very special mono and stereo echoes.
Run the Delay effect by the menu command
AudioFileProcessing->Digital Effects->Delay
The following dialog will appear:
DSP-Quattro Delay dialog
The Dual Delay effect is made by a couple of independent Delay, one for
each channel.
Run the Dual Delay effect by the menu command
AudioFileProcessing->Digital Effects->Dual Delay
The following dialog will appear:
DSP-Quattro Dual Delay dialog
- Gain Control: located on the left, it allows you to set the gain to be applied
to the signal on output from the effect and to monitor it through the V-Meters.
In the case of a mono signal, only one Gain Slider and one V-Meter will be
available.
- Bypass: the button of Bypass allows to disable the processing, redirecting
the signal from input to output, to compare the sound of the original signal
with the new one.
- Efx Balance [0.0...1.0]: it allows you to set the ratio between the edited
signal and the original one. This control has the same function of the Efx
© Copyright 2002-2012 by Stefano Daino
100
User's Manual
DSP-Quattro 4
Balance on the Real-Time Previewer Controller on the left, with the
difference that its value is memorized in the preset.
- Sync (Dual Delay only): when turned On, every change made on the left
channel control will be mirrored by a change on the right channel, and vice
versa.
- Time [0..2000 msec]: will let you set the time, expressed in msec, of the
Delay line. The value is measured both in msec and in BPM (Beats Per
Minute). Changing one of the values, DSP-Quattro will automatically change
the other in real time as well.
- Feedback Level [0.0..1.0]: set the feedback level of the output signal
toward the input. The feedback level changes the number of repetitions
(echoes) of the effect.
- Feedback Filter Cutoff [20..16000 Hz]: the feedback line includes a
lowpass filter to emulate the absorption of reflecting materials, considering
that it is function of the frequency. To lower values correspond materials
characterized by an high absorption at higher frequencies.
Cancel closes the dialog without modifying the audio file; Apply closes the
dialog applying the edit on the audio file.
DSP-Quattro Digital Effect: MultiTap Delay
The MultiTap Delay effect is made by 4 independent Delay units, each with
its own controls for setting level and panpot of output signal.
Run the MultiTap Delay effect by the menu command
AudioFileProcessing->Digital Effects->MultiTap Delay.
It will open the following dialog:
DSP-Quattro MultiTap Delay dialog
- Gain Control: located on the left, it allows you to set the gain to be applied
to the signal on output from the effect and to monitor it through the V-Meters.
In the case of a mono signal, only one Gain Slider and one V-Meter will be
available.
- Bypass: the button of Bypass allows to disable the processing, redirecting
the signal from input to output, to compare the sound of the original signal
with the new one.
© Copyright 2002-2012 by Stefano Daino
101
User's Manual
DSP-Quattro 4
- Time [0..2000 msec]: will let you set the time, expressed in msec, of the
Delay line. The value is measured both in msec and in BPM (Beats Per
Minute). Changing one of the values, DSP-Quattro will automatically change
the other in real time as well.
- Feedback Level [0.0..1.0]: set the feedback level of the output signal
toward the input. The feedback level changes the number of repetitions
(echoes) of the effect.
- Feedback HF Dump [20..16000 Hz]: the feedback line includes a lowpass
filter to emulate the absorption of reflecting materials, considering also the
function with the frequency. To lower values correspond materials
characterized by an high absorption at higher frequencies.
-Panpot [-64..0..64]: it sets the placement of the output signal from each
Delay unit with respect to the stereo image. The 0 value is equal to the
central position, -64 full to the left, and 64 full to the right.
-Level [0.0..1.0]: sets the level of the output signal from each Delay unit.
Cancel closes the dialog without modifying the audio file; Apply closes the
dialog applying the edit on the audio file.
DSP-Quattro Digital Effect: Reverb 1 and Reverb 2
The two effects of Reverb differ from one another due the algorithm that they
use. The first one is more intense, the second is lighter. Depending on the
audio file that you are working with, one of the two can be more suitable than
the other.
To get to these effects use the menu command
AudioFileProcessing->Digital Effects->Reverb 1
or menu
AudioFileProcessing->Digital Effects->Reverb 2.
In both cases, it opens a dialog just like this one:
DSP-Quattro Reverb dialog
- Gain Control: located on the left, it allows you to set the gain to be applied
to the signal on output from the effect and to monitor it through the V-
© Copyright 2002-2012 by Stefano Daino
102
User's Manual
DSP-Quattro 4
Meters. In the case of a mono signal, only one Gain Slider and one V-Meter
will be available.
- Bypass: the button of Bypass allows to disable the processing, redirecting
the signal from input to output, to compare the sound of the original signal
with the new one.
- Efx Balance [0.0...1.0]: it allows you to set the ratio between the edited
signal and the original one. This control has the same function of the Efx
Balance on the Real-Time Previewer Controller on the left, with the
difference that its value is memorized in the preset.
- Time [0.0..1.0]: sets the reverb time. This value is expressed as the ratio
between the minimum value (time = 0) and the higher possible value, very
near to infinity.
- Absorption [0.0...1.0]: sets the factor which describes the reflecting
properties of the walls in function of the frequency. To lower values
correspond materials having an higher absorption at high frequencies.
- PreDelay [0...100 msec]: sets the time of the delay line on input to the
reverb effect. It helps to simulate the time that it takes the first echo to be
heard due to the distance of the reflecting surface, for example, when
playing in a church or an open space.
Cancel closes the dialog without modifying the audio file; Apply closes the
dialog applying the edit on the audio file.
DSP-Quattro Digital Filter: 4 Bands Parametric EQ
DSP-Quattro has available a group of 4 complete parametric filters. The
frequency, gain, and bandwidth (Q) of each filter can be customized. Since
all the filters have a complete excursion, they can overlap with the purpose
of allowing some very drastic modifications on the sound.
Run the those parametric filters effect by the menu command
AudioFileProcessing->Digital Filters/EQs->4 Bands Parametric EQ.
It opens the following dialog:
DSP-Quattro 4 Bands Parametric EQ dialog
© Copyright 2002-2012 by Stefano Daino
103
User's Manual
DSP-Quattro 4
- Gain Control: located on the left, it allows you to set the gain to be applied
to the signal on output from the effect and to monitor it through the VMeters. In the case of a mono signal, only one Gain Slider and one V-Meter
will be available.
- Bypass: the button of Bypass allows to disable the processing, redirecting
the signal from input to output, to compare the sound of the original signal
with the new one.
- Gain [-18..+18 dB]: one for each parametric filter, it will let you choose the
gain at the center of the band.
- Freq [20..16000 Hz]: it sets the central frequency of the band where the
filter acts.
- Q [0.0..5.0]: it controls the width of the frequency response curve of the
filter. To higher values correspond tighter bells which mean that the filter
will be more selective.
Cancel closes the dialog without modifying the audio file; Apply closes the
dialog applying the edit on the audio file.
DSP-Quattro Digital Filter: 7 Bands Graphic EQ
DSP-Quattro built-in graphic equalizer is composed of a bank of 7 filters to
modify the signal spectrum. Each filter is positioned on ever increasing
frequencies chosen on a logarithmic scale, to offer the maximum
naturalness of audio editing. Gains can be set individually for each filter.
To use the graphic filters of DSP-Quattro use the command from the menu
AudioFileProcessing->Digital Filters/EQs->7 Bands Graphic EQ.
It will open the following dialog:
DSP-Quattro 7 Bands Graphic EQ dialog
- Gain Control: located on the left, it allows you to set the gain to be applied
to the signal on output from the effect and to monitor it through the VMeters. In the case of a mono signal, only one Gain Slider and one V-Meter
will be available.
- Bypass: the button of Bypass allows to disable the processing, redirecting
the signal from input to output, to compare the sound of the source signal
with the new one.
- Gain [-18...+18 dB]: for each filter you will be able to set the gain at the
center of the band. Under each gain slider the value of the frequency band
is shown.
© Copyright 2002-2012 by Stefano Daino
104
DSP-Quattro 4
User's Manual
- Sync: when turned On, every change made on the controller of a channel
will be mirrored on the other channel as well.
- Reset: use this button to set all sliders to the value of 0 dB.
Cancel closes the dialog without modifying the audio file; Apply closes the
dialog applying the edit on the audio file.
DSP-Quattro Digital Filter: Resonant LowPass, BandPass, HighPass and BandReject
Analog Filter emulations
DSP-Quattro has available a serie of filters that are the simulation of the
resonant analog filters, that became famous in the music world during the
’70s, thanks to musical synthesizers. This serie consists of analog resonant
filters, that are LowPass, HighPass, and BandPass, with its opposite, the
BandReject.
Each filter uses its own interface that is however very similar to the other.
You can set the cutoff frequency, the resonance at cutoff frequency – called
Resonance for LowPass and HighPass, and more appropriately called Q in
the other cases – and the slope of the curve, measured in -dB/octave.
Higher slopes bring to more selective filters, that are more resonant and that
cut frequencies with steeper curves.
Run these filters by the menu command
AudioFileProcessing->Digital Filters/EQs
and choose one of the following:
- Resonant LowPass: it cuts all frequencies above the cutoff frequency.
Slope can be set to -12 or -24 dB/Octave.
- Resonant BandPass 1: it allows to all the frequencies in the band
centered on the cutoff frequency to go through.
- Resonant BandPass 2: similar to BandPass 1, but a lot more resonant.
- Resonant HighPass: it cuts all frequencies below the frequency of cutoff.
Slope can be set to -12 o -24 dB/Octave.
- BandReject: it stops all frequencies in the band centered on the cutoff
frequency. It can be very selective with high values of Q, and is very useful
when you want to erase a specific frequency, such as the power line noise
at 50 o 60 Hz.
It will open a dialog like this:
© Copyright 2002-2012 by Stefano Daino
105
User's Manual
DSP-Quattro 4
DSP-Quattro Resonant Filter dialog
- Gain Control: located on the left, it allows you to set the gain to be applied
to the signal on output from the effect and to monitor it through the VMeters. In the case of a mono signal, only one Gain Slider and one V-Meter
will be available.
- Bypass: the button of Bypass allows to disable the processing, redirecting
the signal on input to the output, to compare the sound of the original signal
with the new one.
- CutOff Freq [20..16000 Hz]: for each filter it will let you set the value of
cutoff frequency.
- Resonance/Q: sets the resonance level or, depending on the type of filter,
the width of the band of the filter. To higher resonance levels correspond
higher gains around the frequency of cutoff that may cause the autooscillation of the filter, exactly as it happens working with analog filters.
Furthermore, in such cases it is possible to have saturation.
- Slope: a series of buttons will let you select the slope of the filter.
Cancel closes the dialog without modifying the audio file; Apply closes the
dialog applying the edit on the audio file.
© Copyright 2002-2012 by Stefano Daino
106
DSP-Quattro 4
User's Manual
Drag&Drop and Audio Files Import/Export
DSP-Quattro offers a series of possible options to simplify the procedures
and to notably reduce the loading and to saving time of the audio files,
thanks to the use of the drag&drop with the finder of the MacOS. Besides
this you can use a series of specific functions for the import/export that are
examined here.
Exporting and Importing by Drag&Drop
DSP-Quattro allows for the drag&drop of the audio files between on one
hand the Document Manager or the Audio File Player/Editor, and, on the
other hand, the finder of the Macintosh.
Once opened the Document Manager floating window,
A - Dragging one or more audio files from the desktop or from a folder on the
window of the Document Manager will open the file audio in a new Audio File
Player/Editor.
B - Dragging an audio file from the Document Manager toward the desktop
or toward a folder, will export the audio file. If a file exists that has already
the same name (if, for example, you drag the file to the source folder), DSPQuattro creates a new file having a name that begins with the name of the
source file followed by an increasing numerical extension.
© Copyright 2002-2012 by Stefano Daino
107
DSP-Quattro 4
User's Manual
Once opened an audio file in an Audio File Player/Editor,
A - Dragging one or more audio files from the desktop or from a folder on the
window of the Audio File Player/Editor will open the audio file in a new Audio
File Player/Editor.
B - Clicking on a selection without moving the mouse, after around 2
seconds the mouse will change to a hand that allows you to drag the
selection from the Audio File Player/Editor to the desktop or to a folder. In
this case, DSP-Quattro exports the selection in a new audio file with the
same name of source file. If it already exists (if, for example, you drag the
file to the source folder), DSP-Quattro creates a new file having the same
name of the source file but with an extension done by an unique increasing
number.
C - Moreover, if you drag the selection over the Document Manager instead
of the Finder, DSP-Quattro will export the selection and will automatically
load the new file into the current Project. You can use this shortcut to create
new files trimming the portions of the audio you want to export.
NOTE: you are also able to drag even selection of a single channel of stereo
files to export only the left or right channel (or a part of it).
D – If there is not a selection, clicking on the waveform editor of the audio
file, without moving the mouse, after around 2 seconds the mouse will
change to a hand that allows you to drag all the waveform from the Audio
© Copyright 2002-2012 by Stefano Daino
108
DSP-Quattro 4
User's Manual
File Player/Editor to the desktop or to a folder. In this case, DSP-Quattro
exports all the audio file in a new audio file with the same name of source
file. If it already exists (if, for example, you drag the file to the source folder),
DSP-Quattro creates a new file having the same name of the source file but
with an extension done by an unique increasing number. This feature is very
useful as shortcut to ‘Save A Copy As’, because it saves a copy of the
current audio file as it is in that moment.
E - as in the case of the drag of a selection, if you drag all the waveform over
the Document Manager instead of the Finder, DSP-Quattro will export all the
audio file and will automatically load the new file into the current Project.
You are highly recommended to spend some minutes to make some practice
with the extended Drag&Drop support in DSP-Quattro for exporting files
with an incredible speed. It is an irreplaceable tool which will allow you to
extremely accelerate your edits.es to export only the left or right channel (or
a part of it).
Exporting and Importing by Commands
DSP-Quattro has a series of menu commands that allow the import and the
export and that are accessible via the menu File:
- File->Import Audio File->RAW data.. (or ⌥⇧⌘I): please refer to the
paragraph dealing with the audio formats supported by DSP-Quattro for a
description of the use of this function.
- File->Import Audio File->by QuickTime (or ⌘I): In this case, MacOS X
is used for translating the file as a file AIFF that will then be used by DSPQuattro. MacOS X offers translators from a lot of formats: mp3, MPEG-4,
mp2, ac3, aifc, 3gp, mpa, mp4, caf, 3g2, m4a, AAC, audio tracks from
QuickTime movies and Audio CDROMs and many other audio file formats.
© Copyright 2002-2012 by Stefano Daino
109
DSP-Quattro 4
User's Manual
- File->Import Audio File->Import .mp3: in this case DSP-Quattro will
use, it is installed, the LAME open source framework to import mp3 (see
the chapter about mp3 import/export to know more about this).
- File->Import->L&R to Stereo (or ⇧⌘I): this function creates a stereo file
starting from two audio files. If the two audio files are mono, they are
respectively used as the two channels left and right. If one of the two is
stereo, DSP-Quattro will use the left channel of the first one and the right
channel of the second to build the channels left and right of the new audio
file.
- File->Export Audio File->RAW Data: the inverse function of what we
have described in the function Import RAW. This function writes in a binary
file the samples of the current audio file without using any standard header.
You will be asked to identify the destination file, and to set a series of
parameters needed for the description of the data, such as the Byte Order
(Big or Little Endian), the number of Bits For Sample (8, 16, 24, 32 and 32
float) and the number of the channels of the destination file.
- File->Export Audio File->By QuickTime (Mpeg 4, Video CD,…) (or
⇧⌘J): the inverse function of what we have described in the function
Import By QuickTime. In this case, MacOS X is used for translating the file
to a format supported by the MacOS translator. MacOS X offers translators
from a lot of formats, among which MPEG-4, ac3, aifc, mpa, mp4, caf,
m4a, AAC. If you have installed an mp3 encoder, you can use this export
function to save the work you have done with DSP-Quattro as a mp3 file.
See below to know more about this.
© Copyright 2002-2012 by Stefano Daino
110
DSP-Quattro 4
User's Manual
- File->Export Audio File->Export as .mp3...: if the freeware open source
LAME framework is installed on your system, this menu command is
enabled and it can be used to export the current audio file as .mp3. Refer
to the paragraph concerning the LAME framework to know more about this.
- File->Export Audio File->Stereo To Mono: it creates a mono file starting
from a stereo file, mixing with equal volume the two channels stereo in a
single channel of the destination file. The function is not available if the
opened audio file is mono.
- File->Export Audio File->Mono To Stereo: it creates a stereo file
starting from a mono file, duplicating the mono channel on both channels of
the destination file. The function is not available if the opened audio file is
stereo.
- File->Export Audio File->Stereo To L&R: it creates two mono files
starting from a stereo file, exporting first the left channel then the right
channel in the single channel of the two destination files. The function is
not available if the opened audio file is mono (you can also use the
Drag&Drop to the finder with the same result).
- File->Export Audio File->RegionList To Files… (or ⌥⇧⌘J): first DSPQuattro asks for a directory where to operate the export, then it exports the
list of Audio Regions of the Audio File into separate new files. This function
is not available if the audio file has not Audio Regions.
- File->Export Audio File->MarkersList To Files… (or ⌥⌘J): first DSPQuattro asks for a directory where to operate the export, then it exports all
the portions of the Audio File delimited by two following generic markers.
This function is not available if the audio file has not Generic Markers.
Exporting by New Audio File Commands
There are additional options to export when using the New Audio File->... menus:
© Copyright 2002-2012 by Stefano Daino
111
DSP-Quattro 4
User's Manual
- New Audio File->New Audio File From Clipboard (or ⌥⌘N): it exports
in a new audio file the content of the clipboard audio of DSP-Quattro. The
function is not available if the clipboard is empty.
- New Audio File->New Audio File From Selection (or ⇧⌘N): identical
to the Export Selection described above.
- New Audio File->New Audio File From Loop (or ⌥⇧⌘N): it exports in
a new audio file the portion delimited by the points of Loop of the current
audio file. The function is not active if the Loop is turned Off.
- New Audio File->New Audio File From Region: it exports in a new
audio file the current Audio Region, if any. The function is not active only if
an Audio Region has been selected on the Markers&Regions Manager
Tool.
- New Audio File->New Audio File Left Channel: it creates a mono file
starting from a stereo file, exporting the left channel in the single mono
channel of the destination file. The function is not available if the opened
audio file is mono. (you can also select the left channel and use the
Drag&Drop to the finder with the same result)
- New Audio File->New Audio File Right Channel: it creates a mono file
starting from a stereo file, exporting the right channel in the single mono
channel of the destination file. The function is not available if the opened
audio file is mono. (you can also select the right channel and use the
Drag&Drop to the finder with the same result).
© Copyright 2002-2012 by Stefano Daino
112
DSP-Quattro 4
User's Manual
Exporting as MP3
DSP-Quattro is not able to export audio file as MP3 by using directly an
internal function, but, if you have installed the freeware open source LAME
framework on your system, it automatically detects its presence and it is able
to use it to import and export as mp3.
Please search on the web to know more about the LAME framework and
about how to install it. It must be already installed before to run DSP-Quattro
to enable all import/export as .mp3 commands.
At moment of writing, the version 3.97 of LAME framework is available for
the free download at
http://www.macupdate.com
Otherwise, as different option, you can first install the LAME encoder as
component into QuickTime (and not as framework as above), and to use the
'Export by QuickTime' of DSP-Quattro to save a MP3. At moment of writing,
the UNIVERSAL BINARY INSTALLER (1.2) of the LAME encoder
component 3.97 (not only the framework) should be available for the free
download at:
http://karaoke.kjams.com/wiki/Lame
After this, using the 'Export by QuickTime' function of DSP-Quattro, you will
be able to select the option 'Sound to LAME MP3' to save a MP3.
To know more about the LAME open source project, look at
http://lame.sourceforge.net/
Please consider also that the AIFF audio file format can be used to
exchange files with Apple iTunes. At moment of writing, iTunes is distributed
for free by Apple and is able to encode MP3 files from AIFF audio files.
© Copyright 2002-2012 by Stefano Daino
113
User's Manual
DSP-Quattro 4
Working with the AudioCD Layout (PlayList)
This chapter describes the DSP-Quattro AudioCD Layout (called also
Playlist) and how to use it.
To show the AudioCD Layout window, use the command by the menu
AudioCD->Show AudioCD Layout (or ⌘P).
Once opened, the same command will close it.
The AudioCD Layout (PlayList)
As already introduced, the AudioCD Layout is a tool in DSP-Quattro to
assemble, and master a sequence of audio files. You create an Audio-CD
by adding audio files or portions of audio files to the AudioCD Layout. These
appear as regions in the AudioCD Layout window, You can then edit and
arrange them graphically or numerically. You can add effects to both
individual regions and the overall AudioCD Layout, using the included effects
or Effect plug-ins installed on your configuration. You can edit pauses
between CD-Tracks and add fade-ins, fade-outs or crossfades on Regions.
The output of the AudioCD Layout is a new audio file which can be used as
an Audio-CD image file by DSP-Quattro itself to burn a physical Audio-CD
using the internal or external CD burner device - if present.
DSP-Quattro is able to export the AudioCD Layout in DDP 2 standard format
as well.
The design of the AudioCD Layout is such that it can be used to assemble
an Audio-CD very easily in only a few steps, but it is also so powerful to
© Copyright 2002-2012 by Stefano Daino
114
DSP-Quattro 4
User's Manual
allow, if this is what your need, every kind of free combinations, assembling
one or more portions of audio files into one or more CD-Tracks.
To explain how to do it, we must introduce the concept of audio file Region
and CD-Track, and the very unique way of working of DSP-Quattro, in AUTO
or MANUAL modes.
To help you to understand these concepts, let’s begin with a very easy
tutorial.
Creating your first Audio-CD:
It is very easy and user friendly to create professional-quality audio-CDs
using DSP-Quattro. The following outlines the procedure of a very typical
situation:
Step 1: Add audio files to the PlayList
Adding audio files to the AudioCD Layout by Drag&Drop
Run DSP-Quattro and add audio files loading them in DSP-Quattro or
dragging them directly on an empty AudioCD Layout window.
Use the AudioCD Layout menu commands to create new audio file Regions
on the AudioCD Layout or drag selections of audio files from their waveform
editors or from the finder.
When you add an audio file, it is imported as a Region, which you can
arrange and edit in the Wave View area and in the Region list as well.
© Copyright 2002-2012 by Stefano Daino
115
DSP-Quattro 4
User's Manual
At the same time, DSP-Quattro will automatically create CD-Track for each
new Region. If you need, you can edit the CD-Track markers in the Wave
View area and in the CD-Tracks list.
Step 2: Set Pauses between CD-Tracks
If it is not the case of an Audio-CD from a single live recording, where the
audio never stops among CD-Tracks, usually a very common need is to set
Pauses, between a CD-Track and the next one, filled with silence. To do it
with only one command, use the menu command
AudioCD->Set All CD-Track Pauses to...
then, enter the Pause length (the standard is to make them of 2 secs), click
on OK. All the Regions and CD-Track markers will move accordingly to the
new settings.
Step 3: Edit and adjust crossfades between Regions
© Copyright 2002-2012 by Stefano Daino
116
DSP-Quattro 4
User's Manual
You can create crossfades between overlapping Regions, just clicking and
dragging a Region to shift it on left or right with the mouse in the Wave View
area. You can also adjust the crossfades curves, lower or arise the Gain
level, trim Region start and end locations by mouse movements.
Step 4: Adjust the Pause length and Start location of CD-Tracks
When you add a Region, DSP-Quattro creates also a CD-Track and adds
CD-Track markers to define the Pause between the new CD-Track and the
previous one. You can set their position in the time line just clicking and
dragging the CD-Track markers on left or right with the mouse in the Wave
View area.
Each CD-Track marker is composed by two sub-markers, one half for
defining the pause length, the other half for setting the start location.
Step 5: Add effects
You can add effects to individual Regions and to the overall AudioCD Layout
mix, to enhance and shape the sound. You can choose the effects among
the list of high quality internal effects of DSP-Quattro, or you can also use
effect plug-ins from Apple or third-party manufacturers installed on your
system. You can adjust effect parameters and save and recall settings,
including chains of effects and their settings.
Step 6: Burn an Audio-CD
Last but not least, you can use the AudioCD Layout to burn an Audio-CD by
using the supported CD writer device that is connected to (or installed in)
your Macintosh. To do it, you have only to use the menu Command
AudioCD->Burn AudioCD->Use Current AudioCD Layout (or ⌘B)
then, DSP-Quattro will do all the rest...
Done! now let’s see more in details ho the PlayList works, introducing all its
features.
© Copyright 2002-2012 by Stefano Daino
117
DSP-Quattro 4
User's Manual
The AudioCD Layout Interface:
You can use the AudioCD Layout window for all the things you will need to
assemble your Audio-CD: add and organize the Regions used by the
AudioCD Layout, edit regions graphically, set pauses and crossfades, play
the AudioCD Layout to preview your changes, and add effects plug-ins.
This window interface features the following main areas:
-
Overview: in the upper part of the window displays a timeline of the entire
AudioCD Layout, including all regions and all CD-Tracks. During all
operations of editing the overview will show you all the AudioCD Layout,
zooming in or out automatically if the AudioCD Layout changes its length.
-
Waveform view area: Displays the Regions in time order. In the Wave
View area you can graphically edit Regions, move CD-Track markers for
setting CD-Track Pause lengths and Start location, and set crossfades
between Regions. It allows for a certain level of zoom on any part of the
AudioCD Layout time line. The scroll bar underneath it can be used to
scroll the view along all the AudioCD Layout. The level of zoom can be
easily modified by the commands in the menu, with the keyboard, or with
the zoom buttons located in the lower right corner of Waveform View area.
By zooming, both horizontally and vertically, you can see all the AudioCD
Layout time line, as in the overview above, or the single sample for the
sample-based editing of the waveform.
-
Region List: Lists the Regions in chronological order. You add and
organize Regions in the Region list.
-
CD-Track List: Lists CD-Tracks in the order that they will appear on the
Audio-CD, and displays information for each CD-Track.
-
Transport/Control section: in the lower and left part of the window, there
are three different sections: the transport, the position display, and the v-
© Copyright 2002-2012 by Stefano Daino
118
User's Manual
DSP-Quattro 4
meters section. Through these commands you can play the AudioCD, you
can set playback position, and can monitor the output signal level.
NOTE: You can freely adjust the relative sizes of three main sections
(Waveform/Overview View areas, Regions List and CD-Tracks List) of the
AudioCD Layout window by click-dragging on the parallel lines found on the
borders of the various panels. Vertical borders may be dragged horizontally,
and horizontal borders may be dragged vertically.
The different features of these main area are discussed in the following
paragraphs.
The Transport/Control section
The Transport/Control Section is the lower part of the AudioCD Layout
window. This section consists of the Playback controller; it also tells you
where the PlayBack marker is as well as current Region or CD-Track start/
end and Title.
The PlayList Playback Control Section
The Transport Control:
On the left part of the Audio Playback Control Section, you find the Transport
Control, which consists of buttons to control the playback.
Toggles Playback/Pause.
- if it was playing, the AudioCD will Stop and will
return to the last location where it started to play.
- if it was on Stop, places the playback position at
the beginning of the AudioCD Layout
Playback at double speed, both forward and
reverse.
Go to the next or previous Region or CD-Track
start, depending on which between RegionTime /
CDTracksTime buttons is active
Toggle Cycle Mode.
NOTE: The keyboard acts to control as well:
-
Space Bar: Toggle Play/Stop mode, returning to the last location where
the playback started on Stop.
© Copyright 2002-2012 by Stefano Daino
119
User's Manual
DSP-Quattro 4
-
Return Key: if the AudioCD was playing, it pauses the playback. If on
Stop, places the playback position at the beginning of the AudioCD
Layout.
-
Key #1: Stops the playback and places the playback position at the
beginning of the AudioCD Layout.
-
Directional Arrows: Playback at double speed, both forward and reverse.
-
⇧ + Directional Arrows: Go to the next or previous Region or CD-Track
start, depending on which between RegionTime / CDTracksTime buttons
is active
The Counter Display
In the middle of the Transport/Control Section there is the Counter Display,
which shows you information regarding the Playback marker and the current
Region or CD-Track.
The Counter Display
The Counter Display display the values of the current Region or the current
CD-Track depending on which among the RegionsTime or CDTracksTime
button is ON in that moment.
On the left part of the Counter Display you find the value of the current
playback position relative to the current Region/CD-Track, and above it the
current Region/CD-Track title. On its left the Region/CD-Track Start location
is above the Region/CD-Track End location, relative to the AudioCD Layout
start. On the right, the buttons RegionsTime and CDTracksTime define
which information the display on the left will show.
The default time unit setting of HH:MIN:SEC:MSEC can be changed with the
commands on the menus Options->X-Axes Unit to one of the following:
Frames, Seconds, Milliseconds or AudioCD (CDDA).
Doing one mouse click on the playback position, holding the mouse button
down and dragging the mouse up or down will change its value. Moving the
mouse upwards will increase the value and will make changes faster, while
going downwards will decrease it, again making changes faster. With a
double click you will be prompted to enter a numerical value.
The Meters
The left part of the transport/control section there are two meters, to monitor
the level of the output audio signal.
Overview area
The overview is the upper area of the AudioCD Layout window:
© Copyright 2002-2012 by Stefano Daino
120
User's Manual
DSP-Quattro 4
The AudioCD Layout overview area
The overview area displays the entire duration of the AudioCD Layout,
showing all regions waveforms and all CD-Track pause and start markers.
An orange rectangle on the bottom part of the overview area, named Zoom
controller, indicates the part of the AudioCD Layout currently visible in the
Wave View area. You can navigate to a different part of the project while
simultaneously zooming in or out on the Wave View, by dragging horizontally
(move) and vertically (zoom) in the rectangle.
The Zoom controller is really easy to use:
-
Stepping over it with the mouse, the mouse pointer will turn into a
magnifying glass.
-
Click once to scroll the Wave View area view to the exact position where
you have clicked on, without changing the zoom level.
-
Click and drag with the mouse to set the zoom level of the Wave View
area.
-
⌥ + Click and Drag the mouse, to scroll the Wave View area over the
new section pointed by the mouse, without modifying the zoom level.
You can always use the Overview to make new playback cycle selection,
place and move any of the markers, or the playback position, edit Regions,
as working on the Wave View area underneath. Please refer to the Wave
View area features description for the details.
AudioCD Layout Wave view area
The AudioCD Layout Wave view area
The AudioCD Layout Wave View area is the main workspace for working
with the AudioCD Layout. In the Wave View area, you view and graphically
© Copyright 2002-2012 by Stefano Daino
121
DSP-Quattro 4
User's Manual
edit Regions and CD-Track markers. Regions are arranged, alternately,
between the top and bottom rows in the Wave View area. The two rows are
functionally identical, this design makes very easy and user friendly to edit
overlapping regions.
Each Region is displayed as a green rectangle, containing a waveform, and
also featuring a volume level line (envelope curve), which you can adjust.
CD-Track pause and start markers are displayed with a green head.
Let’s go deeper in the features of the Wave View area:
Zoom In/Out Buttons:
As for the overview, the Wave view area shows the waveforms of Regions.
This section however can be used to zoom in any part of the waveform up to
the level one sample = one pixel. Both axes have an independent zoom
level. The vertical axes may be zoomed without limits, even up to showing
the quantization noise in the audio file.
To zoom, use the buttons at the lower right corner of the Wave view area:
- Zoom In/Out will multiply the zoom level by a value of 2 or 0.5
- Full Zoom In/Out will go directly to the maximum level possible.
- Full X-Y Zoom Out will go directly to full zoom out on both axes.
- Fit On Selection: will zoom the Wave view area to fit the current selected
Region.
- Full Zoom On Playback: does full zoom-in scrolling the Wave View area
to playback position.
In addition, the mouse wheel Y-axe can be used for horizontal zooming.
Once used a zoom the scroll bar will let you scroll the view to another
position. You should always remember the zooming functions described
previously, that can be found in the Zoom Controller of the overview.
As for the Audio File Editor, while playing, the Wave view area will, by
default, scroll to the next page as soon as the playback cursor will arrive to
© Copyright 2002-2012 by Stefano Daino
122
DSP-Quattro 4
User's Manual
the right side of the Wave view area. You can change this behavior by the
menu command
Options->Playback Cursor:
- Follow Off (or ⌃⌘F) disable auto scroll.
- Follow Next Screen (or ⌃⇧⌘F) set the automatic scroll page to page as
described above.
- Follow Centered (or ⌥⇧⌘F) the view is centered and the waveform
moves under it. This option requires a certain amount of CPU power. We
advice to use it only when you really need it.
Mouse Mode Buttons:
These buttons choose one of the edit pointer modes, to perform different
Region editing tasks in the Wave View area.
There are three mouse edit modes:
- Regions Shifter: in this mode, clicking and dragging the mouse will shift
the Region underneath the mouse pointer forward or backward in time.
There are two options when shifting a Region by dragging the mouse:
1 - By default, all Regions and CD-Tracks positioned later in the time line will
shift accordingly.
2 - Press the ⌘ key to shift only the Region underneath the mouse pointer.
© Copyright 2002-2012 by Stefano Daino
123
DSP-Quattro 4
User's Manual
- Region Scissor: in this mode, clicking on a Region will split that Region in
two Regions at the time position pointed by the mouse. DSP-Quattro will
also create a new CD-Track at the new Region start. All other Regions and
CD-Tracks will remain unaffected.
- CD-Track Scissor: in this mode, clicking on a Region will split the CDTrack in two CD-Tracks at the time position pointed by the mouse, i.e.
DSP-Quattro will add a CD-Track start marker at that position. All Regions
and other CD-Tracks will remain unaffected.
NOTE: While the mouse mode is in Regions Shifter mode, you can press the
⌃ key to switch momentary to the Region Scissor Mode.
The Region Waveform view:
Each Region loaded in the PlayList appears in the Wave View area and in
the Region list. Regions are displayed chronologically from left to right in the
Wave View area, in the upper or lower half of the Wave View area
alternately, to make it easier to view any overlapping areas between two
regions.
The Region Waveform view has its own envelope curve for the gain level,
with parameters to set the attack and decay times and curve, and sustain
level. You can also do editing on Regions Waveforms, as you can resize,
trim the start and the end, shift back and forth in the time line, split, and very
much more. you can even recall the audio file editor on Region Waveforms,
being able to apply on them all the powerful edit functions of the DSPQuattro Audio Editor. More about this later in this chapter.
The Playback Cycle:
You can loop (or cycle) a section of your AudioCD Layout, so that it plays
that section repeatedly. This can be useful when editing a part of the
AudioCD Layout, as a specific crossfade between Regions, and you want to
hear the results of your edits in real time. You can loop playback by defining
a cycle area in either time ruler.
© Copyright 2002-2012 by Stefano Daino
124
DSP-Quattro 4
User's Manual
As soon as the mouse pointer passes over the Time Ruler, the cursor
becomes a speaker. Then:
- to define a Playback cycle area: In either time ruler, drag from the desired
loop start position to the point where you want looping to end. Clickdragging the cycle area handles allows you to resize an existing cycle area.
- to remove the Playback cycle area: Click anywhere outside the current
cycle area in the time ruler. Note that this will move the position line to the
clicked point.
If you define a Playback cycle area, DSP-Quattro will play only that area.
Turn the Cycle button ON to loop on the Playback Cycle area
As soon as it reaches the right border of the area, it will stop to play if the
Cycle button is OFF, otherwise it will continue to play without gaps, starting
again from the left border of the cycle area.
CD-Track Markers Guide:
On top of the AudioCD Layout Wave view area and of the Overview there is
a special guide, the CD-Track Marker Guide.
Over the CD-Track Marker guides you find the heads of CD-Track markers,
which can be split in two sub-markers, the Pause and Start location submarkers. When there is a pause, the pause length appears as a darker
section on the guide. The playback marker has a red head. More about the
use of CD-Track markers later in this chapter.
The Time Ruler:
Above the waveform there is the Time Ruler, showing the time line of the
AudioCD Layout. The default time unit setting of HH:MIN:SEC:MSEC can be
changed with the commands on the menus Options->X-Axes Unit to one
of the following: Frames, Seconds, Milliseconds or AudioCD (CDDA).
Region List
© Copyright 2002-2012 by Stefano Daino
125
DSP-Quattro 4
User's Manual
You add and organize your AudioCD Layout’s regions in the Region list.
Regions are listed chronologically, in time order, from top to bottom,
identified by an ID#.
Selecting a region in the Region list, the same region is also selected in the
Wave View area.
Click-holding the up-down arrow icon in the first column allows you to
reorder regions by dragging them up or down. You can also alt-dragging it to
duplicate that region.
The Region list displays the following information about each region:
- The Speaker icon shows which region is currently playing.
- Start time of that region
- Region Name
- Region Length (expressed in time or samples unit)
- Region Gain level (dB)
- FadeIn Length (expressed in time or samples unit)
- FadeIn Auto/Manual mode (see the details about this later in this chapter)
- FadeOut Length (expressed in time or samples unit)
- FadeOut Auto/Manual mode (see the details about this later in this chapter)
- Comment
The Region Properties window allows you to view and edit information about
the currently selected region and its source audio file. Some of these fields
are editable, some are not.
© Copyright 2002-2012 by Stefano Daino
126
User's Manual
DSP-Quattro 4
The Region Properties Window
To show the Region Properties window, you can:
- Double-click on a Region row of which you wish to know or edit info.
- Select the Region, then choose
AudioCD->Edit Region Parameters (or ⌃⌘E)
The Previous and Next buttons allow you to step between a Region and the
previous or next one in the Region list. This is very useful when you wish to
edit a particular parameter in several regions.
To close the Region Properties window, click on the OK button.
The Region Properties window displays the following information:
- Name: it is the Region name. You can edit it, double click on it and type the
new name.
- Length: the Region length expressed in time or samples. You cannot edit it.
- Start: the Region start expressed as time or samples offset from the
AudioCD Layout start. You can edit it, double click on it and type the new
length. DSP-Quattro will automatically limit the new value if it is not
possible to assign the value you entered.
- Gain: the Region Gain level, expressed in dB. You can edit it, double click
on it and type the new Gain or use the up/down arrows on the right of the
Gain value. DSP-Quattro will automatically limit the new value if it is not
possible to assign the value you entered.
© Copyright 2002-2012 by Stefano Daino
127
DSP-Quattro 4
User's Manual
- Comment: it is the Comment about that Region. You can edit it, double
click on it and type the new Comment to display.
- Fade-In Length and Curve: the Region Fade-In time and its curve shape.
You can edit it, double click on it and type the new value or use the up/
down arrows on the right of the control. DSP-Quattro will automatically limit
the new value if it is not possible to assign the value you entered.
- Fade-In Set Linear: reset the shape of the fade-In curve to linear.
- Fade-In Auto Mode: switch ON/OFF the auto mode for that Fade-In. More
about the Auto Mode for cross-fades later in this chapter.
- Fade-Out Length and Curve: the Region Fade-Out time and its curve
shape. You can edit it, double click on it and type the new value or use the
up/down arrows on the right of the control. DSP-Quattro will automatically
limit the new value if it is not possible to assign the value you entered.
- Fade-Out Set Linear: reset the shape of the Fade-Out curve to linear.
- Fade-Out Auto Mode: switch ON/OFF the auto mode for that Fade-Out.
More about the Auto Mode for cross-fades later in this chapter.
- Audio File: it is the full path of the audio file, i.e. the location of the audio file
on disk.
Please see next chapters to know how to work with the Region list and how
to add, remove, edit Regions.
CD-Track List
The CD-Track list table displays the CD-Track order as it will appear on the
Audio-CD. It shows information about each CD-Track.
Moving a CD-Track marker on the PlayList Wave view area, the same CDTrack is also selected on the CD-Track list table.
The Region list displays the following information about each region:
- The ID is the Audio-CD index for that CD-Track.
- CD-Track Pause (expressed in time or samples unit)
- CD-Track Start (expressed in time or samples unit). It is the offset from the
Audio- CD start.
© Copyright 2002-2012 by Stefano Daino
128
DSP-Quattro 4
User's Manual
- CD-Track Name
- CD-Track Length (expressed in time or samples unit)
- CD-Track Auto/Manual mode (see the details about this later in this
chapter)
- CD-Track CP - Copy Protection flag ON/OFF
- CD-Track PE - Pre-Emphasis flag ON/OFF
- CD-Track ISRC code
- CD-Track Comment
The CD-Track Properties window allows you to view and edit information
about the currently selected CD-Track, including CD-Text, and its source
audio file. Some of these fields are editable, some are not.
To show the CD-Track Properties window, you can:
- Double-click on a CD-Track row of which you wish to know or edit info.
- Select the CD-Track on the table, then choose
AudioCD->Edit CDTrack Parameters
The Previous and Next buttons allow you to step between a CD-Track and
the previous or next one in the CD-Track list. This is very useful when you
wish to edit a particular parameter in several CD-Tracks.
To close the CD-Track Properties window, click on the OK button.
© Copyright 2002-2012 by Stefano Daino
129
User's Manual
DSP-Quattro 4
The CD-Track Properties Window
The CD-Track Properties window displays the following information:
- Name: it is the CD-Track title. You can edit it, click on it and type the new
title.
- Pause: the CD-Track Pause expressed as time or samples. You can edit it,
double click on it and type the new value for the CD-Track Pause. NOTE:
the pause for the first track should be always the standard value of 2
seconds.
- Pause Auto Mode: switch ON/OFF the auto mode for that CD-Track Pause.
More about the Auto Mode for setting the Pause length later in this chapter.
- Setting the Pause, shift the region... switch ON/OFF the automatic shift of
Region which corresponds to that CD-Track start.
- Start: the CD-Track start expressed as time or samples offset from the
AudioCD Layout start. You can edit it, double click on it and type the new
length. DSP-Quattro will automatically limit the new value if it is not
possible to assign the value you entered.
- Length: the CD-Track length expressed in time or samples. You cannot edit
it.
- Comment: it is the Comment about that CD-Track. You can edit it, click on it
and type the new Comment to display.
© Copyright 2002-2012 by Stefano Daino
130
DSP-Quattro 4
User's Manual
- CP: switch ON/OFF the Copy Protection flag for that CD-Track. This info
will be written on the Audio-CD during the CD Burning process.
- PE: switch ON/OFF the Pre-Emphasis flag for that CD-Track. This info will
be written on the Audio-CD during the CD Burning process.
- ISRC: it is the ISRC code of the CD-Track. You can edit it, click on it and
type the new ISRC code. DSP-Quattro will check if the new code has an
acceptable format and if it fails it will show a warning dialog refusing the
new code. If the ISRC code is not an empty string, it will be written on the
Audio-CD during the CD Burning process.
- CD-Text: click and enter the CD-Text strings for the current CD-Track, they
will be written on Audio-CD during the CD Burning process.
NOTE: DSP-Quattro allows you to enter also the EAN/UPC sub-code and
CD-Text strings for the CDROM. Use the menu command
AudioCD->AudioCD Disc Settings...
and type your EAN/UPC sub-code and CD-Text strings for the Disc. They
will be written on the Audio-CD during the CD Burning process.
Please read next chapters to know how to work with the CD-Track list and
how to add, remove, edit CD-Track markers.
Working with AudioCD Layout Regions and CD-Track Markers: Auto and
Manual Modes
The AudioCD Layout contains audio Regions and CD tracks, that are
automatically created by DSP-Quattro when you add audio files to the
AudioCD Layout.
The main elements of the AudioCD Layout of DSP-Quattro are: audio files,
Regions, and CD-Tracks:
- Audio files: audio files are the source material for Regions in your AudioCD
Layout.
- Regions: when you add an audio file to a AudioCD Layout, DSP-Quattro
creates automatically a Region. This Region can address the entire source
audio file or any section of the audio file. When you edit a Region in the
Wave View area or in the Region list of the AudioCD Layout, the edits only
affect the Region, not the source audio file.
- CD-Tracks: when you add an audio file to a AudioCD Layout, DSP-Quattro,
in correspondence to the newly created Region, creates automatically also
a CD-Track. CD-Tracks are the same tracks which a listener chooses when
he selects the track number or forward/backward buttons on a CD player.
CD-Tracks can include multiple Regions, and multiple CD-Tracks can play
sections of the same Region. In other words, it’s possible to combine
several Regions into one CD-Track, or create several CD-Tracks into only
one Region.
© Copyright 2002-2012 by Stefano Daino
131
DSP-Quattro 4
User's Manual
Working with AudioCD Layout Regions:
You can copy, reorder, trim, split, adjust gain curve shape of each Region
and even recall its individual waveform editor. As you work, you can play all,
or any part, of the AudioCD Layout to hear the results of your edits
immediately.
To create a new AudioCD Layout Region:
- Drag&Drop a selection or all the Wave View area from the waveform editor
over the AudioCD Layout window, on the Region list or Wave view areas. In
this case, DSP-Quattro will create a new Region on the AudioCD Layout
using the source selection as reference for start end end locations, or the
whole audio file if there was not a waveform selection when the drag
started.
- You can also Drag&Drop a Region from the Markers&Regions Manager of
an audio file editor over the AudioCD Layout window, again on the Region
list or Wave view areas. As you would expect, DSP-Quattro will create a
new AudioCD Layout Region by using as reference the Audio File Region
which you dragged.
- Use the AudioCD menu commands to add Regions when there is an audio
file editor window in front of the other windows:
© Copyright 2002-2012 by Stefano Daino
132
DSP-Quattro 4
User's Manual
- AudioCD->New Region from File…: A Navigation Dialog will appear, to
let you to choose one or more audio files from the finder. Then DSPQuattro uses these audio files to create new AudioCD Layout Region(s).
- AudioCD->New Region from Current File->Use All (or ⇧⌘P): it creates
a new AudioCD Layout Region from the audio file editor window which is the
most in front of the others, using the audio file start and end as references
for the newly created AudioCD Layout Region start and end locations.
- AudioCD->New Region from Current File->Use Selection (or ⌃⌘P):
DSP-Quattro creates a new AudioCD Layout Region using as reference the
selection on the Wave View area of the audio file editor window which is the
most in front of the other windows.
- AudioCD->New Region from Current File->Use Region (or ⌥⇧⌘P):
DSP-Quattro creates a new AudioCD Layout Region from the current region
of the audio file editor window which is the most in front of.
- AudioCD->New Region from Current File->Use Loop: DSP-Quattro
creates a new AudioCD Layout Region using as reference the Loop start/
end of the audio file editor window which is the most in front of the other
windows
- AudioCD->New Region from Current File->Use Regions List from File
(or ⌥⌘P): DSP-Quattro creates as many as new AudioCD Layout Regions
using as reference the region list of the audio file editor window which is the
most in front of the other windows.
NOTE: DSP-Quattro will always use the audio file editor as reference for the
AudioCD Layout Region which you have created. All the edits you will do on
an audio file will reflect on the corresponding Region you have created on
the AudioCD Layout.
To remove a AudioCD Layout Region:
To remove a AudioCD Layout Region, first select it on the Region List or on
the Wave View area, then:
- choose the menu
AudioCD->Remove Region (or ⌃⌘X)
- use the BackSpace key of your keyboard
If you need to clear the AudioCD Layout, use the menu command
AudioCD->Remove All Regions (or ⌃⇧⌘X)
To reorder or duplicate AudioCD Layout Regions:
Selecting a region in the Region list, the same region is also selected in the
Wave View area.
To change the order of Regions, use the AudioCD Layout Region List. First
select it on the Region List or on the Wave View area, then Click-holding the
up-down arrow icon in the first column, drag the row where you wish to play
that Region. This allows you to reorder regions by dragging them up or
down.
© Copyright 2002-2012 by Stefano Daino
133
DSP-Quattro 4
User's Manual
NOTE: You can also alt-dragging it to duplicate that region.
Editing a AudioCD Layout Region:
There are two ways to edit the parameters of a AudioCD Layout Region:
- Numerically, using the Region List table
- Graphically, using the AudioCD Layout Wave view area.
As already described, when you add an audio file to a AudioCD Layout,
DSP-Quattro creates automatically a Region. The AudioCD Layout shows
this Region as a new row on the Region List table and as a new graphical
element in the AudioCD Layout Wave view area.
To edit a Region numerically, use the Region Properties Window as
described above in the chapter describing the Region List. To show the
Region Properties Window, choose the menu
AudioCD->Edit Region Parameters (or ⌃⌘E)
or double click on the row of the Region you wish to edit on the Region List
table.
Please refer to previous chapters for the details about the Region Properties
Window.
To edit a Region graphically, use the Region waveform element in the
AudioCD Layout Wave view area, which we are going to describe. A Region
waveform element appears something like the figure above.
We already described how to shift a Region back and forth in the time line
and how to split it into two Regions when we introduced Mouse Modes:
When shifting a region by clicking on it and dragging the mouse, two options
are available:
1 - By default, all Regions and CD-Tracks positioned later in the time line will
shift accordingly.
2 - Press the ⌘ key to shift only the Region underneath the mouse pointer.
© Copyright 2002-2012 by Stefano Daino
134
DSP-Quattro 4
User's Manual
Moreover, there are several other edits that you can do:
- Trimming a Region:
as soon as the mouse pointer approaches to the left or right border of the
Region waveform element, its shape changes, becoming the tool for
trimming. Then, if you click and drag it in the direction of the center of the
Region waveform element, DSP-Quattro will modify the region start (if
trimming the Region left side) or region end (if trimming the Region right
side) in accordance to movements of the mouse.
There are cases in which it would be very useful to have several different
options about if and how the other regions will shift or adjust their crossfades when trimming the region start or end. DSP-Quattro call these options
‘cross-fade’ modes:
- Default Trim MODE: Trimming a Region, all subsequent Regions will move
accordingly, to maintain constant their relative positions.
- NO-SHIFT trim mode: If you keep the SHIFT key pressed while clicking
and dragging to trim the region, the other regions will not follow.
- MIRROR trim mode: there is a special additional mode trimming: keeping
the SHIFT+cmd key pressed while trimming a region start or end, the other
overlapping region will expand in the other direction for the same amount.
Other regions will not shift in time in this case.
© Copyright 2002-2012 by Stefano Daino
135
DSP-Quattro 4
User's Manual
- Changing the Gain level of a Region:
Click and drag up or down the Gain level control point to set the new Gain
value. The Region List table will show the new Gain dB value in real time.
NOTE: When you edit stereo audio files, Gain envelope curve and control
points are doubled, one for the Left and one for the right channel, and linked,
edits on envelope curve or control point for one channel will edit also the
curve or control point for the other channel.
NOTE: you can double click on the Gain level control point to reset the Gain
to +0dB.
- Adding and Adjusting Fades of a Region:
© Copyright 2002-2012 by Stefano Daino
136
User's Manual
DSP-Quattro 4
Adding a Fade-In
To add a fade-in or fade out, click and drag left or right the Fade In/Out
length control points (the control point on the left border of the Region
waveform element sets the fade-in length, the one on the right border sets
the fade-out length). DSP-Quattro will change the Fade In/Out times
accordingly. As you would expect, also the Region List table will show the
new Fade In/Out value in real time.
© Copyright 2002-2012 by Stefano Daino
137
DSP-Quattro 4
User's Manual
To modify a fade-in or fade out curve shape, click and drag up/down/left or
right the Fade In/Out shape control points (the control point on the left border
of the Region waveform element sets the shape of the fade-in curve, the one
on the right border sets the shape of the fade-out curve). DSP-Quattro will
change the shape of the Fade In/Out curve accordingly.
AUTO MODE doing cross-fades on AudioCD Layout Regions
Describing Mouse Modes, we already introduced that, by default, clicking
and dragging the mouse will shift forward or backward in time the Region
underneath the mouse pointer. By default, all Regions and CD-Tracks
positioned later in the time line will shift accordingly. You can press the ⌘
key to shift only the Region underneath the mouse pointer.
What happens if, shifting a Region, it starts to overlap (cross-fade) with the
previous or next Region? It depends on current settings of Fade-In and
Fade-Out AUTO MODES of the two Regions involved in the cross-fade.
- If the Region overlaps the previous one and the Fade-In Auto MODE is ON,
DSP-Quattro will automatically set the Fade-In length to the length of the
overlapping section. if the the Fade-In Auto MODE is OFF, shifting the
Region to overlap the previous one will not affect the Fade-In length
previously set.
- If the Region overlaps the next one and the Fade-Out Auto MODE is ON,
DSP-Quattro will automatically set the Fade-Out length to the length of the
overlapping section. if the the Fade-Out Auto MODE is OFF, shifting the
Region to overlap the next one will not affect the Fade-Out length
previously set.
© Copyright 2002-2012 by Stefano Daino
138
DSP-Quattro 4
User's Manual
NOTE: the same happens to the other Region involved in the overlap area,
DSP-Quattro will modify Fade-Out or Fade-In lengths according with Auto
Modes.
By default, the Fade-In and Fade-Out Auto MODES of Regions are turned
ON.
To Turn OFF (deactivate) the Auto MODE for the Fade-In or Fade-Out, you
can:
- click on the Fade-In or Fade-Out AUTO column on the Region List table, in
correspondence of the row for the Region you wish to edit. Clicking will
toggle the value, i.e. will turn it ON if it is OFF or will turn it OFF it is ON.
- drag the Fade-In or Fade-Out length control point, DSP-Quattro will
automatically disabled the Fade-In or Fade-Out Auto MODE of that Region.
To Turn ON (reactivate) the Auto MODE for the Fade-In or Fade-Out, you
can:
- as above, click on the Fade-In or Fade-Out AUTO column on the Region
List table, in correspondence of the row for the Region you wish to edit.
- double-click on the Fade-In or Fade-Out length control point, DSP-Quattro
will automatically enable the Fade-In or Fade-Out Auto MODE of that
Region.
The AUTO mode is a very powerful tool when you do cross-fades. By
default, DSP-Quattro, having Auto Modes turned ON, will avoid any abrupt
changes in the audio stream when overlapping Regions, because it sets
cross-fades between Regions automatically. But, if you need, you can very
easily set fade-in or fade-out lengths on Region start or end which are
independent of overlaps with other regions, just turning OFF Auto modes.
Setting Equal Power cross-fades slopes between AudioCD Layout regions
By default, each fade-in/out curve slope is independent from the others,
even in cases of overlapping cross-fades. There is an option to make these
linked, the EQUAL POWER curve slope Cross-fade mode: if the Crossfade AUTO mode is engaged (see below), if you keep the SHIFT key
pressed while clicking and dragging the control to set the slope of the fade
curve, then the other fade curve will follow such that the sum of the two
curves is always constant (equal power).
Using the Audio File Waveform editor to edit AudioCD Layout Regions
You can very easily recall the Audio File Waveform Editor to edit the audio
region used to create a certain PlayList Region.
© Copyright 2002-2012 by Stefano Daino
139
DSP-Quattro 4
User's Manual
First select the Region you wish to edit on the AudioCD Layout, then choose
the menu
AudioCD->Edit Region Waveform (or ⌥⇧⌘E)
DSP-Quattro will open, in front of the other windows, the Audio File
Waveform Editor window setting the audio selection in correspondence to
the AudioCD Layout Region start/end locations. Then, applying any edit
function of DSP-Quattro, the AudioCD Layout Region will reflect all the
changes you will do.
Working with CD-Tracks:
By default, DSP-Quattro creates a CD-Track for each region in the AudioCD
Layout. It’s also possible to combine several Regions into one CD-Track, or
to create several CD-Tracks with one Region. CD-Tracks are defined by two
sub-markers:
- the CD-Track start marker
- a corresponding Pause marker, which is joined to the CD-Track start
marker.
You can move both these markers from their default positions, and insert
additional CD-Track markers. There is also a very powerful AUTO Mode to
work with Regions and CD-Track markers at the same time.
To create a new CD-Track marker:
- As already introduced, when you add an audio file to a AudioCD Layout,
DSP-Quattro, in correspondence to the newly created Region, creates
automatically also a CD-Track.
- You can split a CD-Track in two CD-Tracks placing the playback marker
where you wish to split, then choose the menu
AudioCD->Split CD-Track at Playback (or ⌥⇧⌘E)
DSP-Quattro will then create a new CD-Track, titled ‘Untitled’, starting at the
Playback position and ending at the next CD-Track.
- You can also switch the Mouse Mode to the CD-Track Scissor mode: in this
mode, clicking on a Region will split the CD-Track in two CD-Tracks at the
location pointed by the mouse, i.e. DSP-Quattro will add a CD-Track start
marker at that position. All Regions and other CD-Tracks will remain
unaffected.
To remove a CD-Track marker:
To remove a CD-Track from the AudioCD Layout, first select it on the CDTrack List, then:
- choose the menu
AudioCD->Remove CDTrack
If you need to clear all CD-Tracks from AudioCD Layout, use the menu
command
© Copyright 2002-2012 by Stefano Daino
140
DSP-Quattro 4
User's Manual
AudioCD->Remove All CDTracks
NOTE: if the AudioCD Layout is not empty, at least one CD-Track must exist.
DSP-Quattro will not allow you to delete the last CD-Track of a AudioCD
Layout which is not empty.
NOTE: there is an internal mechanism to join a CD-Track to the underlying
Region. If you remove a Region from the AudioCD Layout, also all the CDTracks joined with that Region will be removed. More about this mechanism
later in this chapter.
Editing a CD-Track:
There are two ways to edit the parameters of a AudioCD Layout CD-Track:
- Numerically, using the CD-Track List table
- Graphically, using the AudioCD Layout Wave view area.
Creating a CD-Track, the AudioCD Layout shows this CD-Track as a new
row on the CD-Track List table and as a new marker in the AudioCD Layout
Wave view area.
To edit a CD-Track numerically, use the CD-Track Properties Window as
described above in the chapter describing the CD-Track List. To show the
CD-Track Properties Window, choose the menu
AudioCD->Edit CD-Track Parameters
or double click on the row of the CD-Track you wish to edit on the CD-Track
List table.
Please refer to previous chapters for the details about the CD-Track
Properties Window.
To edit a Region graphically, use the CD-Track markers in the AudioCD
Layout Wave view area, which we are going to describe. As already
introduced, a CD-Track marker appears, on the CD-Track Marker Guide, like
the figure below:
The head of a CD-Track marker can be split in two sub-markers, the Pause
and Start location sub-markers. When there is a pause, the pause length
appears as a darker section on the guide.
- Moving CD-Track Start Markers:
clicking on the right side of the CD-Track marker head and shifting it on left
or right on the CD-Track marker guide, you will set the CD-Track Start
location.
© Copyright 2002-2012 by Stefano Daino
141
DSP-Quattro 4
User's Manual
NOTE: you cannot pass over the previous or next CD-Track markers, CDTracks are always ordered chronologically in the time line. If you wish to
change the CD-Tracks order, change the order of the owner Regions, DSPQuattro will change CD-Tracks accordingly.
- Setting CD-Track Pause:
clicking on the left side of the CD-Track marker head and shifting it on left or
right on the CD-Track marker guide, you will set the CD-Track Pause length.
NOTE: you cannot pass over the previous CD-Track markers, CD-Tracks
are always ordered chronologically.
NOTE: Moving the CD-Track start marker, the Pause length will remain
constant except in the special case of a CD-Track Start which is coincident
with the underlying Region start and when the CD-Track Auto MODE is ON.
More about CD-Track Auto MODE later in this chapter.
Connections between a CD-Track Marker and underlying Region:
A CD-Track is always joined with, i.e. belongs to, a certain Region. Shifting
that Region will shift also all CD-Track markers joined with it. Removing that
Region from the AudioCD Layout will also remove all CD-Track markers
joined with it.
It is very simple to know the Region which owns a CD-Track marker: given a
CD-Track marker, it is the Region which is underlying the CD-Track Start
marker or, if the marker is over a AudioCD Layout section with two
overlapping Regions, which starts before the other Region.
Let’s see all the cases:
Fig. A: both CD-Tracks are joined with the underlying Region.
© Copyright 2002-2012 by Stefano Daino
142
DSP-Quattro 4
User's Manual
Fig. B: both CD-Tracks are joined with the selected Region.
Fig. B shows a case in which there is a CD-Track starting on an overlap
section. This CD-Track is joined with the selected Region (the Region in the
lower section of the AudioCD Layout Wave view area), because this Region
starts before the other Region involved in the overlap.
Fig. C: both CD-Tracks are joined with the selected Region.
Fig. C shows a case in which there is a CD-Track starting exactly where the
underlying Region starts. Also this CD-Track is joined with the selected
Region.
Fig. D: only the second CD-Track is joined to the selected Region
Fig. D shows a case in which there is a CD-Track starting in a gap between
two Regions. This CD-Track is joined with the Region placed before the gap.
© Copyright 2002-2012 by Stefano Daino
143
User's Manual
DSP-Quattro 4
CD-Tracks AUTO MODE
We already introduced that you can shift Regions forward or backward in
time. By default, all Regions and CD-Tracks owned by these Regions (i.e.
positioned later in the time line) will shift accordingly.
Now, what happens to CD-Track markers if, when shifting a Region, the
AudioCD Layout creates a gap with the previous Region?
Usually nothing very special, EXCEPT when there is a CD-Track Start which
is coincident with the underlying Region start. In this case:
- if the CD-Track Auto MODE is ON, DSP-Quattro will lock the CD-Track
Pause to be long as much as the gap between the two Regions.
- if the CD-Track Auto MODE is OFF, the Pause length will keep the value.
CD-Track Pause is locked to the gap between tracks
if the CD-Track Auto MODE is ON
By default, CD-Track Auto MODE of newly created CD-Tracks are turned
ON if joined with a Region Start.
© Copyright 2002-2012 by Stefano Daino
144
DSP-Quattro 4
User's Manual
To Turn OFF (deactivate) the CD-Track Auto MODE you can:
- click on the AUTO column on the CD-Track List table, in correspondence of
the row for the CD-Track you wish to edit. Clicking will toggle the value, i.e.
will turn it ON if it is OFF or will turn it OFF it is ON.
- drag the CD-Track Start marker away from the underlying Region Start,
DSP-Quattro will automatically disabled the Auto MODE of that CD-Track.
To Turn ON (reactivate) the Auto MODE for the CD-Track, you can:
- as above, click on the CD-Track AUTO column on the Region List table, in
correspondence of the row for the CD-Track you wish to edit.
- double-click on the head of the CD-Track Start marker, DSP-Quattro will
automatically enable the Auto MODE of that CD-Track.
Turning ON the CD-Track Auto MODE, DSP-Quattro will move the
corresponding CD-Track Start marker to the location of the Start of
underlying Region.
NOTE: because of this, it is not always possible to turn ON the CD-Track
Auto MODE. If, to do it, the CD-Track Start marker should pass over an
already existing CD-Track marker, the operation cannot be successfully
completed. DSP-Quattro will warn you if it happens.
The AUTO mode is a very powerful tool when assembling Audio-CD starting
from Regions to be treated also as CD-Tracks. In just a few steps you can
drag your audio files over the AudioCD Layout window, then by default DSPQuattro will create also CD-Tracks for each Region. Shifting Regions in time
will move automatically CD-Tracks, too. If you wish Pauses on our AudioCD, just create gaps between Regions. DSP-Quattro will all the rest for you.
Setting all CD-Tracks Pauses to...
If you wish - it will happens most of the times - to set all CD-Track Pauses to
a common value DSP-Quattro offers a very useful menu command:
AudioCD->Set All CD-Track Pauses To...
The following dialog will appear:
© Copyright 2002-2012 by Stefano Daino
145
User's Manual
DSP-Quattro 4
Set All CD-Track Pauses To Dialog
then,
- Enter the common value you wish to use for CD-Track Pauses
- Enable/Disable the option to apply this value also on the first CD-Track (the
first CD-Track Pause should be always 2 secs according to the Redbook
standard)
- Enable/Disable the option to shift Regions underlying the CD-Track Start
marker if they start at the same location of the CD-Track Start and if there
is not an overlap with the previous Region.
The last option is very useful because it allows you to create automatically
gaps between Regions when you need also the CD-Track Pauses, and at
the same time it avoids to reset cross-fades between one Region and the
next one, when there is also a CD-Track Start over that cross-fade.
Cancel closes the dialog without modifying the PlayList; OK closes the
dialog applying the edit on the PlayList.
Using the Plug-ins and Internal Effects on the AudioCD Layout:
DSP-Quattro allows you to setup a serial chain of effects on the output of the
AudioCD Layout or, if you need, independently on each track of the AudioCD
Layout.
The interface for the effect programming is the same used in the other
sections of DSP-Quattro. You can add Internal real time effects, or effect
plug-ins.
To open the AudioCD Layout or the Effect Send windows for each track, use
the following commands:
- AudioCD->Edit AudioCD Effx (or ⌥⌘X): opens the effect chain on insert
to the AudioCD Layout realtime and off-line audio output. Use this interface
to setup the plug-ins you want to apply to all the audio tracks of the AudioCD
Layout. Use the same command to close the window.
- AudioCD->Edit Region Effx (or ⌃⇧⌘E): opens the effect chain on insert
to the selected AudioCD Layout Region. Use this interface to setup the plugins you want to apply only on that Region of the AudioCD Layout. Use the
same command to close the window.
Please refer to the chapter titled ‘Effect Send Manager Reference’ for the
description of the Insert Effects window and its use.
© Copyright 2002-2012 by Stefano Daino
146
User's Manual
DSP-Quattro 4
Undo/Redo
Exactly as when using the Audio File Editor, also the AudioCD Layout has an
internal Undo/Redo engine which offers an unlimited number of Undo/Redo
actions: it always remembers all edits since when you started to work or
opened the PlayList – until you do not save your edits.
DSP-Quattro allows you to return back to any past situation, keeping note of
the history of the current editing session. After several edits, you may
command an Undo, again one more Undo, and so on. Or, thanks an specific
graphic interface, you can jump backward or forward directly to a certain
situation of your edit session.
NOTE: Please be aware that any operation of saving will also cancel the
Undo/Redo history. The same happens when you quit the application.
Undo/Redo History Table interface:
At any time, the command
Edit->Show Undo/Redo History (or ⌥⌘Z)
or clicking on the Undo History button on the bottom of the AudioCD Layout
Wave View area, opens a drawer window on a side of the AudioCD Layout
window. Then, the same command will close it. The window shows a table
like this:
AudioCD Layout Undo/Redo History
© Copyright 2002-2012 by Stefano Daino
147
DSP-Quattro 4
User's Manual
Again, as when using the Undo/Redo engine of the Audio File editor, DSPQuattro allows you Single and Multiple Steps Undo/Redo. Please read the
chapter describing the Audio File Editor Undo/Redo for the details.
Loading, Saving and Exporting the AudioCD Layout:
DSP-Quattro allows you to save and load the AudioCD Layout, saving and
restoring on file your working session, and to export off-line the audio on
output from the AudioCD Layout into a new audio file or into a folder
compliant to the standard DDP format. Moreover, DSP-Quattro allows also
to build a AudioCD Layout by importing the regions of an audio file, an
AudioCD image file or from a folder containing a DDP compliant group of
files.
WARNING: as when burning an AudioCD, all the functions to export the
AudioCD Layout into a new file or group of audio files, will play the AudioCD
Layout using the Insert Effx and the Effx Send of the AudioCD Layout, BUT
NOT the MasterOut Effx Send of DSP-Quattro. If you need to apply your
effects on all the audio regions of the current AudioCD Layout, use the
AudioCD Layout Effx Send, NOT the MasterOut Effx Send of DSP-Quattro.
If the AudioCD Layout if the window most in front of all the others, then the
standard File Save/Load menus are referring to the AudioCD Layout itself:
- File->NewAudioCDLayout (or ⌃⇧⌘N): DSP-Quattro will clear the
current AudioCD Layout, and will start to work with a new empty AudioCD
Layout. If applicable, it will ask first if you want to save your previous
AudioCD Layout.
© Copyright 2002-2012 by Stefano Daino
148
DSP-Quattro 4
User's Manual
- File->OpenAudioCDLayout...: DSP-Quattro will first clear the current
AudioCD Layout (if it is not already empty) and then will ask for a AudioCD
Layout file to load.
- File->SaveAudioCDLayout (or ⌘S): DSP-Quattro will save the current
AudioCD Layout.
- File->SaveAudioCDLayoutAs… (or ⇧⌘S): DSP-Quattro will save the
current AudioCD Layout into a new file and will start to work with it.
- File->SaveAudioCDLayoutCopyAs… (or ⌥⌘S): DSP-Quattro will save a
copy of the current AudioCD Layout into a new file but will continue to work
with the current AudioCD Layout, differently from the ‘Save AudioCD
Layout As’.
- File->RevertAudioCDLayoutToSaved: DSP-Quattro reload the last
saved AudioCD Layout.
Exporting the AudioCD Layout:
- File->ExportAudioCDLayout->ExportAsAudioFile… (or ⌥⇧⌘B): DSPQuattro will ask you for a new audio file to export the AudioCD Layout.
Then, it will play the AudioCD Layout into the new file. You can use this
feature to save the audio output of the AudioCD Layout into a new file for
later processing. You are free to set which audio file format, sample bit
resolution to use for the new audio file.
- File->ExportAudioCDLayout->ExportAsAudioCDImage… (or ⌥⌘B):
DSP-Quattro will ask you for a new audio file to export the AudioCD Layout
as an AudioCD Image. Then, it will play the AudioCD Layout into the new
file. This function is very similar to the above ExportAsAudioFile…,
except that the format and the sample rate of the generated audio file are
fixed to AIFF or SDII (Sound Designer II) and 44.1 kHz. You can use this
function to create a new audio file to be used by DSP-Quattro to burn an
AudioCD, or to be used by another application able to burn CD-ROMs. The
SDII file format is a standard recognized by most of the other applications
for Audio-CD burning for MacOS but it is not compatible with other OS like
Windows. AIFF is a standard which can be transferred also to Windows
PCs but only DSP-Quattro will be able to read the additional information
needed to re-build the AudioCD.
- File->ExportAudioCDLayout->ExportCDTracksAsAudioFile… : D S P Quattro will ask you for a folder where to export the AudioCD Layout,
rendering it into a group of new audio files, one for each CD-Track. NOTE:
the pauses at the beginning of a certain CD-Track will be rendered at the
end of the previous CD-Track audio file.
- File->ExportAudioCDLayout->ExportAsDDPFiles…: DSP-Quattro will
ask you for a folder where to export the AudioCD Layout as a group of files
which is compliant with the DDP 2 standard format, including also the
additional md5 checksum file. The DDP standard is the best format to
export an AudioCD image standard file. This standard includes all the
AudioCD Layout informations like CD-Texts, ISRC, PQ, EAN/UPC subcodes. And, being a data file, it also guarantees the integrity of the saved
audio samples.
- File->PlayList->Export TrackList As Text...: DSP-Quattro will ask you for
a new text file where to print the AudioCD Layout Region List and CD-Track
© Copyright 2002-2012 by Stefano Daino
149
DSP-Quattro 4
User's Manual
List tables together with some other useful information about the current
AudioCD Layout.
The output on text file will appear something like the following:
Importing the AudioCD Layout:
© Copyright 2002-2012 by Stefano Daino
150
DSP-Quattro 4
User's Manual
- File->importAudioCDLayout->ImportAudioFileorAudioCDImage…
(or ⌃⌘I): DSP-Quattro will ask you for an audio file to import. Then, it will
retrieve and use the information of the audio file regions to build the
AudioCD Layout Regions, where each audio file region will be a new
Region. You can use this feature to import an AudioCD Layout exported by
other applications like Adaptec Toast and Jam in SDII format or by DSPQuattro itself.
- File->importAudioCDLayout->ImportDDPFiles…: DSP-Quattro will ask
you for a folder where to look for DDP AudioCD image files to import.
Then, it will retrieve and use all the information needed to build the
AudioCD Layout. You can use this feature to import an AudioCD Layout
exported by other applications if compliant with the DDP standard or, of
course, by DSP-Quattro itself when doing a DDP export.
- File->importAudioCDLayout->Convert3.1PPCPlaylist… : u s e t h i s
command only if you need to load a PlayList saved using the old DSPQuattro version 3.1 running on PowerPC based macs. This command
exists for compatibility only.
The AudioCD Layout command buttons:
On the AudioCD Layout window, there are several groups of buttons to be
used as shortcuts to the most used commands. Please see other chapters
on this User Manual for detailed references about how to use and the
interfaces to these commands.
On the bottom of the AudioCD Layout Wave View area you find:
From left to right:
- Undo History: it opens/closes the AudioCD Layout Undo History drawer
on a side of the PlayList window.
- CD Effx:: opens the Effx chain on Insert to the AudioCD Layout. This Effx
send is the one used by all the region of the AudioCD Layout. It is
equivalent to the menu command:
AudioCD->EditAudioCDEffx (or ⌥⌘X)
- Burn CD: DSP-Quattro will use the current AudioCD Layout to create an
audio CD-ROM image and to use this file to burn an audio CD. It is
equivalent to choose the menu:
AudioCD->BurnAudioCD->UseCurrentAudioCDLayout (or ⌘B)
- Bounce CD: creates an audio-CD image audio file for later use. It is
equivalent to choose the menu:
File->ExportAudioCDLayout->ExportAsAudioFile… (or ⌥⇧⌘B)
- CD Info: DSP-Quattro will show the Audio-CD info dialog. It is equivalent to
choose the menu:
© Copyright 2002-2012 by Stefano Daino
151
DSP-Quattro 4
User's Manual
AudioCD->AudioCD Disc Settings...
On the bottom of the AudioCD Layout Region list area you find:
From left to right:
- Import: a file Navigation Dialog will appear, to let you to choose one or
more audio files from the finder. Then DSP-Quattro uses these audio files
to create new AudioCD Layout Region(s). It is equivalent to choose the
menu:
AudioCD->New Region from File…
- Replace: a file Navigation Dialog will appear, to let you to choose one
audio file from the finder. Then DSP-Quattro uses this audio file for
replacing the audio file connected to the selected region on the region
table. The region parameter will remain the same, but the AudioCD Layout
will play that new audio file when playing that region. It is equivalent to
choose the menu:
AudioCD->ReplaceAudioRegionFile…
- Remove: it removes the selected Region from the AudioCD Layout. It is
equivalent to choose the menu:
AudioCD->Remove Region (or ⌃⌘X)
- Remove All: it clears the AudioCD Layout. It is equivalent to choose the
menu:
AudioCD->Remove All Regions (or ⌃⇧⌘X)
- Region Effx:: opens the Effect chain on Insert to the selected AudioCD
Layout Region. It is equivalent to choose the menu:
AudioCD->Edit Region Effx (or ⌃⇧⌘E)
- Info: opens the Region Properties window, It is equivalent to choose the
menu:
AudioCD->Edit Region Parameters (or ⌃⌘E)
- Waveform: call the Audio File Waveform Editor to edit the audio region
used to create a certain AudioCD Layout Region. It is equivalent to choose
the menu:
AudioCD->Edit Region Waveform (or ⌥⇧⌘E)
© Copyright 2002-2012 by Stefano Daino
152
DSP-Quattro 4
User's Manual
On the bottom of the AudioCD Layout CD-Track list area you find:
From left to right:
- Delete: it removes the selected CD-Track from the AudioCD Layout. It is
equivalent to choose the menu:
AudioCD->Remove CDTrack
- Delete All: it removes all CD-Tracks from the AudioCD Layout. It is
equivalent to choose the menu:
AudioCD->Remove All CDTracks
NOTE: if the AudioCD Layout is not empty, at least one CD-Track must exist.
DSP-Quattro will not allow you to delete the last CD-Track of a AudioCD
Layout which is not empty.
- Info: opens the CD-Track Properties window, It is equivalent to choose the
menu:
AudioCD->Edit CDTrack Parameters
© Copyright 2002-2012 by Stefano Daino
153
DSP-Quattro 4
User's Manual
Burning an Audio CD-ROM
This chapter describes the procedure to burn an audio CD-ROM by using
the internal feature of DSP-Quattro.
If you have an internal or external CD-ROM writer device connected to your
Mac and, if external, this device is supported by the disc burning component
of MacOS X, DSP-Quattro for MacOS X allows you to burn an audio CD
compliant with the Redbook standard including also CD-Text extensions.
The Redbook standard defines several specs on the format to burn an Audio
CD. If the CD follows the Redbook standard, all the audio CD reader devices
should be able always to read and play it. In most cases, anyway, the
newest models of audio CD readers are able to read audio CD which does
not follow all the redbook specs.
Among the others, the redbook standard defines that an audio cdrom cannot
have more than 99 tracks. The audio CD must start with a command of
pause of 2 secs (not silence). Each track cannot be shorter of 4 secs, and
the track start and end must have quantized values, multiple of a little
defined value expressed in bytes. Using DSP-Quattro, most of these specs
will be invisible to you, DSP-Quattro will take care to follow the specs for
you. If it will be not possible to make it automatically, it will show you a
warning message (as, for example, in the case in which a track would result
to be shorter than 4 secs) to let you to choose to continue or not.
You can command DSP-Quattro to burn an audio CD using the output of the
AudioCD Layout or using the Audio CD Image previously saved by DSP-
© Copyright 2002-2012 by Stefano Daino
154
DSP-Quattro 4
User's Manual
Quattro or by another application (in SDII audio file format, 44.1 kHz sample
rate).
Using the menu command:
AudioCD->AudioCD Disc Settings...
DSP-Quattro will show a dialog to enter the EAN/UPC Code and the Audio
CD-ROM CD-Texts:
- AudioCD->BurnAudioCD->UseCurrentAudioCDLayout (or ⌘B): DSPQuattro will use the current AudioCD Layout to create an audio CD-ROM
image and to use this file to burn an audio CD. The audio CD-ROM image
created by DSP-Quattro during this process can be used several times to
burn several copies of the same audio CD.
WARNING: when burning an AudioCD, the AudioCD Layout will be rendered
it into a new file through the Insert Effx and the Effx Send of the AudioCD
Layout, BUT NOT the MasterOut Effx Send of DSP-Quattro. If you need to
apply your effects on all the audio regions of the current AudioCD Layout,
use the AudioCD Layout Effx Send, NOT the MasterOut Effx Send of DSPQuattro.
- AudioCD->BurnAudioCDROM->Use Audio CD-ROM Image (or ⇧⌘B):
DSP-Quattro will ask for a audio CDROM image file to use to burn an audio
CD. You can use a file previously created by exporting the AudioCD Layout
as AudioCD Image by DSP-Quattro itself (AIFF or SDII) or saved by another
application (in SDII, 44.1 kHz format).
After the initialization of the disc burn component do MacOS X, if you have
several audio CD writer devices connected to your Macintosh, you can
choose which device to choose by using the Device: popup menu. Then,
DSP-Quattro will show you the following dialog:
© Copyright 2002-2012 by Stefano Daino
155
DSP-Quattro 4
User's Manual
Insert a blank disc into your CDROM writer device.
After a few seconds, if the media is compatible, the dialog will change to:
You can choose the speed used for writing your audio CD. To start the audio
CD burning, click on Start. Cancel will abort the operation.
As soon as the process ends, DSP-Quattro will eject your CD and will report
you if the process was successfully completed or will show you an error
dialog if it failed to complete for whichever reason.
© Copyright 2002-2012 by Stefano Daino
156
DSP-Quattro 4
User's Manual
Working with Projects
This chapter describes the DSP-Quattro Projects and their use.
As already introduced, a Project is the union of all the objects you have
loaded and configured in a certain instant. In other words, saving a Project,
DSP-Quattro saves a snapshot of the current situation, including which
Audio File is open, Instrument plug-ins and their MIDI settings, Audio Inputs,
the AudioCD Layout settings, Insert and Master Effects matrix including
loaded plug-ins and their current presets, windows coordinates and status,
and so on. And, of course, when loading a Project, DSP-Quattro resets the
configuration to the state as it was when you saved that Project.
Using the Project, you can very easily re-configure DSP-Quattro with a
mouse click only.
Normally, DSP-Quattro starts working with a new empty Project, but it does
not show this to you. In this way, the introduction of the Project is totally
transparent to you. As soon as you will like to get benefit from a Project, do a
‘Save Project’ to save the current working configuration. Then, you will be
able to open it later to restore your Project configuration.
To work with the Project is very simple and transparent. Use the Project
when you will need of. I you don’t need of it, you have not to take care of it.
DSP-Quattro will create a new Project for you in the background and will
work with it.
These are the commands to work with the Projects:
- File->New Project (or ⌃⌘N): DSP-Quattro will close all the current
documents and all the windows, and will start to work with a new Project. If
necessary, it will ask first if you want to save your previous edits, of course.
© Copyright 2002-2012 by Stefano Daino
157
DSP-Quattro 4
User's Manual
- File->Open Project (or ⇧⌘O): DSP-Quattro will close the current Project
(if any) and will ask for a Project file to start to work with it.
- File->SaveProject->SaveProject (or ⌥⇧⌘S): DSP-Quattro will save the
current Project. If you have not still loaded a Project, this function is
equivalent to ‘Save Project As…’.
- File->SaveProject->SaveProjectAs…: DSP-Quattro will save the current
Project into a new file and will start to work with it.
- File->SaveProject->SaveAProjectCopyAs…: DSP-Quattro will save a
copy of the current Project into a new file but will continue to work with the
current Project, differently from the ‘Save Project As’.
- File->SaveProject->RevertProjectToSaved: DSP-Quattro reload the last
saved Project.
© Copyright 2002-2012 by Stefano Daino
158
User's Manual
DSP-Quattro 4
Working with the BatchProcessor
This chapter describes the DSP-Quattro BatchProcessor and how to use it.
To show the BatchProcessor window, use the command by the menu
File->BatchProcessor->Show BatchProcessor.
The same menu command will hide it. The following window will appear (but
with an empty table of course):
The BatchProcessor
As already introduced, DSP-Quattro is capable of batch processing. A batch
processor is a tool, fully integrated into DSP-Quattro, to apply the same - or
same chain of – editing functions on several audio files, or simply their
selections, with one mouse click only. As an example, if you want to change
the audio file format or sample rate to hundreds of audio files, DSP-Quattro
allows you to do it with only a couple of steps, without the need of loading
each audio file and process it, one after the other. DSP-Quattro will do it for
you! The most common functions has been included into the batch
processor, like audio file format conversions, sample rate conversion, effect
plug-ins as edit functions, Normalization (Gain adjustment), Fade In/Out,
dithering, and more.
Because the Batch Processor of DSP-Quattro fully supports the very unique
DSP-Quattro feature to Drag&Drop also single channels selections from
audio file waveforms, you can use very easily the DSP-Quattro batch
processor as ultra-fast exporter/slicer of your audio files. Just drag over
© Copyright 2002-2012 by Stefano Daino
159
DSP-Quattro 4
User's Manual
there your audio file waveform selections, and click on ‘process’. DSPQuattro will export each audio selection into newly created audio files,
having even the file format which will best suite your needs.
The BatchProcessor items:
DSP-Quattro uses two categories of BatchProcessor items:
- Batch Processor Item by using all the Audio File: you can create a
BatchProcessor item using all the audio file. The BatchProcessor item will
start at the beginning of the Audio File and will end at its end.
- Batch Processor Item by using an Audio File Selection: you can
create a BatchProcessor item from a selection of an Audio File (even a
selection of a single channel of a stereo file).
Adding a new BatchProcessor Item on the table:
There are two ways to add your items on the BatchProcessor table:
1) By DRAG&DROP: drag on the table the selections from opened audio
editors, the files from the finder, the items from the Document Manager
window or from the Markers&Regions Tool window.
2) By MENU COMMANDS: use the menu command to add new Items
choosing your audio files from the finder, or from the current audio file.
You can Drag&Drop a selection from the waveform editor over the
BatchProcessor window, as in the figure.
Dragging a waveform selection to create a BatchProcessor item from the audio file
editor
© Copyright 2002-2012 by Stefano Daino
160
DSP-Quattro 4
User's Manual
Otherwise, you can Drag&Drop all the waveform from the waveform editor, if
there is not a selection. To do it, just click on the waveform editor without
having a selection, wait for around 2 secs, the mouse pointer will change in
a hand, and you are allowed to start the drag on the BatchProcessor. In this
case, DSP-Quattro will create a new BatchProcessor item by using all the
file.
You can even Drag&Drop a region from the Markers&Regions Manager of
an audio file on the BatchProcessor table. As you would expect, DSPQuattro will create a new BatchProcessor item by using the Audio File
Region which you dragged.
Of course, you can also use the BatchProcessor menu commands to add
tracks from the current audio file editor:
- File->BatchProcessor->NewItemfromFile…: DSP-Quattro will show the
usual navigation audio file browers, allowing you to choose which audio file
to load. Then, it will create a new BatchProcessor Item from all the audio file.
Clicking on the ‘Add’ button on the bottom part of the BatchProcessor
window will command the same internal function of DSP-Quattro.
- File->BatchProcessor->NewItemfromCurrent->UseAll: it creates a
new BatchProcessor Item from all the current audio file, i.e. from the audio
file editor which is the most in front of.
- File->BatchProcessor->NewItemfromCurrent->UseSelection :
it
creates a new BatchProcessor Item from the current audio file selection, if
© Copyright 2002-2012 by Stefano Daino
161
User's Manual
DSP-Quattro 4
any. This menu is disabled if there is not a selection on the current audio file
editor window.
- File->BatchProcessor->NewItemfromCurrent->UseRegion: it creates
a new BatchProcessor Item from the current audio file region, if any. This
menu is disabled if there is not an audio file region on the current audio file
editor window.
- File->BatchProcessor->NewItemfromCurrent->UseLoop: it creates a
new BatchProcessor Item from the current audio file Loop, if any. This menu
is disabled if the audio file Loop of the current audio file has been turned
OFF.
NOTE: the ‘File->BatchProcessor->NewItemfromCurrent‘ menus are
enabled only when the most in front window is an audio file editor window.
To recall the audio file editor and the audio selection used to create a certain
BatchProcessor Item, first select the item on the BatchProcessor, then click
on the ‘Edit‘ button on the bottom part of the BatchProcessor window, DSPQuattro will show the wavefrom editor window with the corresponding audio
selection in front of all the other windows.
Removing one or more items from the BatchProcessor:
To remove one or more BatchProcessor Items, first selected the Items you
wish to remove from the table, then:
- Use the menu command File->BatchProcessor->RemoveItem(s)
- Press the BackSpace key of your keyboard
- Click on the ‘Remove’ button on the bottom part of the BatchProcessor
window.
To clear the BatchProcessor table, removing all the Items:
- Use the menu command File->BatchProcessor->Remove All Items
- Click on the ‘Rem All’ button on the bottom part of the BatchProcessor
window.
The BatchProcessor Table:
DSP-Quattro shows you the track info over each row of the BatchProcessor
Table:
BatchProcessor Table Item info
For each BatchProcessor item, you find (from the left to right):
- Item ID: it is an unique counter identifying the table row.
- Name: the unique Track Name. DSP-Quattro checks always to avoid
duplicate item names on the table. When adding a new item, if DSP-Quattro
© Copyright 2002-2012 by Stefano Daino
162
DSP-Quattro 4
User's Manual
finds that an item with the same name already exists, it appends an unique
counter identifier (‘- 001’, ‘- 002’, …) at the end of the new item name. It is
very useful to avoid to generate two files with the same name (this would
generate an error) when running the automatic processing.
- Format: it is the audio file format (AIFF, WAVE or SDII) of the source audio
file.
- Rate (Hz): it is the sample rate of the source audio file.
- Bits: it is the number of bits per sample rate of the source audio file. It is in
the range 8, 16, 24, 32 or 32f (the last is for 32 floats).
- Channels: it identify the number of channels of the BatchProcessor Item.
Please consider that could be not the number of channels of the source
audio file. DSP-Quattro allows you to add a new item by dragging also a
selection of a single channel of a stereo file. In this case, this field will
display ‘Mono–L’ or ‘Mono–R’ if, respectively, you dragged a selection of the
Left or Right channel only.
- Length: it shows the time value of the item length.
- From: it shows the offset from the beginning of the source audio file. It is
different from 0 (zero) only if you created the BatchProcessor Item by
dragging a selection from the waveform editor.
- To: it shows the end time value respect the source audio file. As for the
‘From’ field, it is different from the Length only if you created the
BatchProcessor Item by dragging a selection from the waveform editor.
- File Path: it shows the file path of the source audio file.
Using the BatchProcessor:
It is a matter of a few steps:
1) Add your items on the table, dragging your selections from the
waveform editors, the files from the finder or using the appropriate menu
commands.
2) Set the destination Folder: it is the folder where DSP-Quattro will save
the output of BatchProcessing. Click on the ‘Browser Folder’ button in
the bottom part of the BatchProcessor window to choose or create this
destination folder.
3) Set the destination audio file format: you can decide if the output of
BatchProcessing will have the same audio file format(s) of the source
files or if you want to apply one or more common processing or
changes, like stereo to mono, sample rate, number of bits/sample, or
other conversions. More about this here below.
4) Turn ON and set the processing functions: you can enable one or
more edit functions to apply on each item. Of course, DSP-Quattro
allows you to set the parameters controlling each edit function to apply.
More about this here below.
5) Start the Batch Processor: then, click on the ‘Process All’ button on
the bottom right of the BatchProcessor window (or use the menu
command BatchProcessor->ProcessAll) to start the batch processing.
© Copyright 2002-2012 by Stefano Daino
163
DSP-Quattro 4
User's Manual
You can now have a coffee break, DSP-Quattro will do all the rest for
you!
Setting the format of destination audio files:
You can very easily use the BatchProcessor of DSP-Quattro simply to
convert the format or your audio files. Besides this, you can profit of the
advanced Linear Phase Sample Rate algorithm of DSP-Quattro to change
the sample rate of your audio files, preserving the maximum audio quality
doing the processing.
Click on the ‘Edit Options’ button of the Audio Files Options box to enter the
parameters defining the destination audio file format you will need. The
following modal dialog will appear:
In the upmost part you can choose to change the destination audio file
formats also applying a format conversion, in the bottom you can set the
parameters to control the sample rate converter (SRC) of DSP-Quattro.
NOTE: Leave all the values to the default ‘As Source’ if you do not want to
do one or more specific file format or sample rate conversions.
Possible settings for the destination audio file(s) are:
- Format: ‘As Source’, AIFF, WAVE, SDII or mp3.
© Copyright 2002-2012 by Stefano Daino
164
User's Manual
DSP-Quattro 4
NOTE: The mp3 output format and the mp3 settings button are available
only if the LAME framework is already installed on your system. Please refer
to the other chapters talking about the LAME framework to know more about
it.
- Bits/Sample: ‘As Source’, 8, 16, 24, 32 or 32 floats.
- Stereo/Mono: ‘As Source’, Mono L+R, Mono L, Mono R.
If you wish to set a common sample rate value for the destination audio
files, you must simply set the new sample rate to a value different from ‘As
Source’ and the audio quality parameter. For sample rates, you can choose
to use the upper popup menu, where the most common sample rate values
are included, or you can enter the value you wish by using the control on the
bottom.
Linear Phase SRC Algorithm Quality options
Use the Quality popup menu to set the quality used by the SRC algorithm.
We suggest to skip the UltraFast option. In most cases, the Good quality
gives excellent results, and consider also that the ‘UltraFast’ option is not so
much faster...
Last but not least, turn ON the ‘Add File Extension’ if you wish that DSPQuattro will automatically append an extension (by default they are ‘.aif’,
‘.wav’, ‘.sd2’ and ‘.mp3’)
when creating the destination files doing
processing. Use the Preferences options of DSP-Quattro to set the
extensions used by DSP-Quattro.
Setting the processing functions:
You can enable and set the editing parameters for the following editing
functions to apply during the batch processing:
© Copyright 2002-2012 by Stefano Daino
165
User's Manual
DSP-Quattro 4
-
DC Removal: it allows you to eliminate the DC Level from an audio file.
The DC Level of an audio file is equal to the average value of its
samples. The waveform that represents the audio file should oscillate
around the zero, and therefore its average value will be very near to
zero. But sometimes the waveform doesn't oscillate around the zero,
due to an imperfection in the analog circuit of the Analog To Digital (A/D)
converters of the system used for digitizing the audio signal.
-
Change Pitch: it allows you to change the Pitch of the source files.
-
Plug-ins: DSP-Quattro allows you to setup a serial chain of effects
doing batch processing. The interface for the effect programming is the
same used in the other sections of DSP-Quattro. You can add Internal
real time effects or effect plug-ins. To open the Effect Send window, use
the the Effx button on the right.
BatchProcessor Plug-in Effx interface
Please refer to the chapter titled ‘Effect Send Manager Reference’ for the
description of the Insert Effects window and its use.
-
Fade In/Out: Both Fade In and Fade Out functions allow you to apply a
gradual gain, beginning from the level of zero volume (the silence), up to
that of the un-modified signal (Fade In), and vice versa in the case of the
Fade Out. DSP-Quattro allows you to define a transition time as well as
the types of curve of Fade In and Fade Out. Click on the Edit button on
the right. The following dialog appears:
© Copyright 2002-2012 by Stefano Daino
166
DSP-Quattro 4
User's Manual
Use pop-up menus for choosing the Fade curves among Exponential, Linear
or Inverted Exponential. These curves correspond, given a certain
transaction time, respectively to faster, normal, slower attack times. Usually,
Linear Fade-Ins and Exponential Fade-Outs sound the most natural.
-
Normalize To…: The Normalize To function serves to optimize the
dynamic of the audio signal, eventually amplifying the region to
normalize in such way that the level of maximum peak is equal to the
value, expressed in dB, set by using the Edit button on the right. The
following dialog appears:
Use the slider to set the the New Peak Value, expressed in dB. If the value is
up to 0 dB, after the processing the peak level will have the value you
© Copyright 2002-2012 by Stefano Daino
167
User's Manual
DSP-Quattro 4
entered. For values over 0 dB, clips will occur. Use values over 0 dB only if
you wish to cause hard saturation and distortions.
-
Swap L&R Channels: if the source file is stereo, it swaps the Left and
Right channels.
-
Dither: we suggest to enable it if you are going to save the batch
processor output at 16 bits/sample and if you do not plan to apply
additional edits on the output audio files. The Dither algorithm add a half
bit of shaped noise to avoid the unpleasant audio distortion when
truncating to 16 bits the output values, which are processed with the
internal floating point precision. This low distortion is audible on low level
long tails, as from long orchestral sounds or reverberation effects.
Saving and Loading a BatchProcessor preset:
DSP-Quattro allows you to save and to load a BatchProcessor ‘preset’,
which is the current snapshot of the settings for the Audio File format,
including settings for the destination sample rate and Sample Rate
Converter (SRC) configuration, which edit function has been enabled, the
loaded plug-ins and their current settings.
BatchProcessor Preset I/O
Click on:
-
Reset: it resets the BatchProcessor the the factory default values. The
audio file format is ‘As Source’, all functions disabled and the Effx sends
empty.
-
Load: to load a BatchProcessor preset previously saved.
-
Save: to save a BatchProcessor preset.
© Copyright 2002-2012 by Stefano Daino
168
User's Manual
DSP-Quattro 4
Configuring Audio and MIDI
Even if DSP-Quattro doesn't need any additional audio hardware to work
properly, it supports and manages different audio boards provided that they
are compatible with CoreAudio of MacOS X. The MIDIs devices can be used
thanks to the CoreMIDI of MacOS X. In other words, if your Audio or MIDI
external device is visible by using the Apple Audio MIDI Configuration utility
which is into the Application/Utility folder, then DSP-Quattro will surely be
able to address it.
Configuring the Audio Device
DSP-Quattro X uses the CoreAudio component of MacOS X developed by
Apple to address the built-in audio I/O or third parties hardware audio
devices eventually present on your configuration. During the startup, DSPQuattro looks to the MacOS X system to know which audio I/O devices are
present.
NOTE: If a certain audio board has not been recognized correctly by DSPQuattro X, it is necessary to verify that MacOS X is correctly addressing it.
To do it, use the Apple Audio MIDI Configuration utility which is into the
Application/Utility folder.
to choose and to configure the audio device, use the command by the menu
Options->Audio Settings... (or ⌥⌘A)
It opens the following dialog:
DSP-Quattro CoreAudio dialog
© Copyright 2002-2012 by Stefano Daino
169
DSP-Quattro 4
User's Manual
The dialog can be divided into two parts:
I/O Audio Devices: in the upper part, two popup menus allow you to set
which I/O device must be used by DSP-Quattro to get audio to its inputs
(input device) and to play its outputs (output device).
NOTE: it is highly recommended to set the same physical device for both
inputs and outputs. Other settings may produce audio drop outs and clicks.
Setting the Sync menu selections check box On, when choosing the Input
Device, DSP-Quattro will automatically try to synchronize the choice of the
Output device to maintain the same physical hardware interface for both
Inputs and Outputs. It is highly recommended to keep this option On.
Audio Device Settings: on the bottom part, there are controls to setup the
selected Audio Device.
First, you need to select the Audio Device by the popup menu on the right of
the Audio Device Settings. The view will change to adopt the settings of such
Audio Device.
NOTE: you need to take care that the settings are relative to the selected
Audio Device on the Audio Device Settings popup menu, and not
necessarly about the current Audio Device used by DSP-Quattro to address
its inputs and outputs. You should select by the Audio Device Settings
popup menu the same Audio Device set on the upper I/O Audio Devices
part of the CoreAudio dialog. Only in this case your Audio Device Settings
will be relative to the I/O Audio Devices used by DSP-Quattro.
Once selected the Audio Device, the controls on the bottom part allow you to
setup your Audio Device:
- Buffer Size: it allows to set the Input and Output audio buffer dimensions,
expressed in sample frames. Lower settings correspond to lower I/O
latencies, but lower latencies cause big stress of the CPU caused by the
less efficiency in caching of sample data. I/O latency is also connected to the
sample rate. Low buffer sizes at high sample rates may cause audio drop
outs and slow graphic updates. You should always choose the best
compromise between the highest buffer size versus the lowest acceptable I/
O latency. Buffer Sizes of 256 or 512 frames is most often a good
compromise.
- Input/Output Source: if available, it allows choosing the for inputs and
outputs. Using the default built-in Audio Controller, for example, generally it
allows to choose between Line in or Microphone on inputs and Internal
Speakers or Headphone on output. Most external devices prefer to use Input
and Output channels settings (more below) to distinguish between different I/
O on the audio interface.
- Clock Source: if available, it allows choosing the source of the clock to
synchronize the CoreAudio driver.
- Direct Audio Monitor: if available, toggles the direct monitoring at zero
latency of the input on the output. If turned on, the audio on input to your
system will be redirected on output before being managed by the CoreAudio
and sent by audio buffers to DSP-Quattro. The direct audio monitor avoids
possible delays between input and output, but it is better to remember that in
this case what is listened is not synchronous with the audio on input to DSPQuattro.
© Copyright 2002-2012 by Stefano Daino
170
DSP-Quattro 4
User's Manual
- Input/Output Channel: the menu allows you to select which channel to
address among the ones available, in case of using a multi channel audio
interface.
- Input/Output Channel Format: given a certain channel above, the menu
allows you to select the properties of the audio for such audio channel
(sample rate, number of bits/sample) among the ones available.
At the very bottom of the dialog, DSP-Quattro displays a summary of the
settings for the Channel Format of the selected Input/Output Audio Channel:
Number of Bits/sample, Number of Channels and Sample Rate.
NOTE: by default, during the startup, DSP-Quattro always uses the Default
System CoreAudio device set into the system. You can change this behavior
and command the use of a specific CoreAudio device through an option in
the Preference Dialog.
You can also use the Apple Audio MIDI Configuration utility, which is into the
Application/Utility folder, to configure the CoreAudio Default Input and Output
audio device.
How to Address External Audio Devices on Input and Output
A very common question which may arise is: I have an external audio device
connected to my Mac, I wish to address certain Input and Output audio
connectors of my audio device by using DSP-Quattro. How to do it?
The answer is very simple, just three steps. Do the following:
A)
Use the menu command
Options->Audio Settings... (or ⌥⌘A)
to open the audio devices settings, set your external audio device as Input
and Output device in the uppermost section of the dialog. In the example
here below we are choosing the QUATA Fire, and external firewire audio
device having 8 inputs/10 outputs.
close the dialog by clicking OK.
B)
Use the menu command
Options->Audio Outputs...
It allows you to set which audio connector DSP-Quattro will use to play its
Left and Right output audio channels.
C)
Use the menu command
Options->Audio Inputs...
© Copyright 2002-2012 by Stefano Daino
171
DSP-Quattro 4
User's Manual
to open the Master Inputs dialog. It allows you to set which audio connector
DSP-Quattro will use by default setting the Left and Right input channels of
Input and Input Recorders module.
In the example above we are choosing the input channels 5&6 of the
QUATA Fire audio device, respectively for the default Left and Right input
channels of new Input and Input Recorders modules.
Done!
In our example DSP-Quattro will play addressing the 1&2 outputs of our
firewire audio device, and opening a new input module it will show the 5&6
inputs by default choice as L&R input channels. Of course, you can select
other inputs if you wish.
Now, how to make it a permanent setting at next startup?
To do it, open the Preference dialog, go to the Audio section:
© Copyright 2002-2012 by Stefano Daino
172
DSP-Quattro 4
User's Manual
then, be sure to set the options as above:
- ‘Use configured Input/Output devices’ must be ON, so that at next startup
DSP-Quattro will use the current audio input/output configuration and not
the system default audio input/output audio configuration.
- ‘Use current assigned Inputs’ must be ON if you wish that at next startup
DSP-Quattro will use the current input connectors (5&6 in the example
above) as default L&R inputs for a new Input and Input recorder module.
- ‘Use current assigned Outputs’ must be ON if you wish that at next startup
DSP-Quattro will use the current output connectors (1&2 in the example
above) to play its L&R output channels.
to confirm your settings, close the Preference dialog by clicking on Save.
then, at next startup, DSP-Quattro will look for your external audio device (in
our example, the QUATA Fire) and, if present, will address it on both outputs
and default inputs for playing and getting its audio.
Configuring the MIDI Device
MacOS X offers a built-in MIDI driver called CoreMIDI. DSP-Quattro X uses
CoreMIDI for interfacing with the world of MIDI.
DSP-Quattro uses the MIDI to remotely play Instruments plug-ins and to
allow the dump in the cases of sample dump via MIDI.
The configuration of the CoreMIDI can be done by using the system utility
Apple Audio MIDI Configuration utility, which is into the Application/Utility
folder.
Refer to the manual and help of the Audio MIDI Configuration utility for the
procedure of installation and its configuration.
© Copyright 2002-2012 by Stefano Daino
173
DSP-Quattro 4
User's Manual
Interfacing DSP-Quattro with External Samplers
This chapter describes how DSP-Quattro can be interfaced with an external
software and hardware sampler.
There are substantially two ways to exchange files between your sampler
and DSP-Quattro:
- Compatibility and sharing of the Files audio: the almost totality of the
samplers software and hardware of the new generation are able to read and
write files in the format AIFF and/or WAVE. In this case, all you have to do is
to share the mass storage - Hard Disk, floppy, zip, memory card, USB pen,
etc... - where to write or to read the audio files. DSP-Quattro reads and
writes all the information - including the Loop points - accordingly to the
standard defined for the supported formats.
- MIDI: DSP-Quattro supports the Midi Sample Dump Standard, and some
other hardware samplers, for the transmission and reception of samples via
the MIDI protocol. Very common, and compatible with a lot of models of
samplers, unfortunately this method is particularly slow, also considering the
huge amount of data that very often you have to transfer.
NOTE: previous versions of DSP-Quattro for PowerPC CPUs based macs,
up to version 2.1.2, were able to talk also by SCSI connection with the great
number of hardware samplers that allows a sample dump via their SCSI
interface. This connection offers the advantage to be fast, but unfortunately
not always completely reliable and easy to manage. DSP-Quattro 2.1.2 is
still available, please refer to its user manual to know more about how to do
a SCSI sample dump in that case.
About the different reading of the Loop points
Before describing the different protocols for the sample dump, we must warn
that a different interpretation of Loop points by some samplers manufacturer
is possible. The problem is that it has never been universally decided if the
sample at loop point must be played when cycling on the loop or not. It may
seem a stupid matter, but the result is that, whether a software plays that
sample or not, in some cases a perfect loop on a sampler plays with an
unpleasant click on another. In these cases, all it takes to have a perfect
sound is to move the loop point, forward or backward, of one sample, and
the problem will disappear.
On its Preferences dialog of DSP-Quattro, there is an option to add or to
remove a certain amount of samples to the loop point at the moment of the
transmission or reception to or from an external sampler, so that the different
interpretation problem will be automatically solved.
Midi Sample Dump Standard (SDS)
The midi Sample Dump Standard is a protocol for the transmission of
samples to and from a sampler, via the MIDI protocol. Many synthesizers
and hardware samplers that have memory space for samples, such as RAM,
allow transferring the waveforms related to samples via the protocol Midi
Sample Dump Standard.
NOTE: before beginning a MIDI transfer, you need to check to verify that the
external device supports the protocol of MIDI Sample Dump Standard.
© Copyright 2002-2012 by Stefano Daino
174
User's Manual
DSP-Quattro 4
Besides the external device needs to be enabled to receive and transmit
System Exclusive MIDI messages (very often shortened with SysEx), and
that both MIDI connections, in->out and out->in, are plugged, and eventually
that the memory protection of the sampler has been turned off.
Reception of a sample by MIDI
In case of transmission from a sampler to the Macintosh, a double MIDI
connection from/to is necessary between your sampler and the computer,
since it will be DSP-Quattro to ask to your sampler to transmit a certain
sample, and it will be the sampler to answer to the request with the dump of
the waveform from its internal memory.
To receive a sample from your synthesizer in DSP-Quattro, use the
command by the menu
Commands->Network Receive->MIDI Sample Dump Standard (SDS).
The following dialog appears:
DSP-Quattro MIDI Sample Dump Standard Rx dialog
- Sample Number: it allows you to set the location of the sample that will be
asked to the sampler.
- Midi Out Port: you can use the pop-up menu that appears clicking on the
arrow on the right to select the device for the MIDI OUT among those
supplied by the MIDI driver. The name of the selected device will appear on
the left of the pop-up menu (UM-1 in the example above)
- Midi In Port: you can use the pop-up menu that appears clicking on the
arrow on the right to select the device for the MIDI In among those supplied
by the MIDI driver. The name of the selected device will appear on the left of
the pop-up menu (UM-1 in the example above). Usually the device used for
the MIDI In should be the same of the one for the MIDI OUT.
- Device ID: through the relative menu you can select the Device ID. Useful
when there are more samplers connected to a certain MIDI port.
© Copyright 2002-2012 by Stefano Daino
175
User's Manual
DSP-Quattro 4
Cancel closes the dialog aborting the request; OK closes the dialog and
DSP-Quattro proceeds with the sample dump procedure, asking for the
name and location on disc of the new audio file in which to save data.
If everything is fine, a progress dialog will appear showing how much time
DSP-Quattro will need to complete the sample dump procedure and, at the
end, it will open the received file.
If an error occurs, DSP-Quattro after about 5 seconds shows an error dialog.
In this case check the software settings as well as the hardware
connections.
Transmission of a sample by MIDI
In case of a transmission from the Mac to the sampler, the double
connection MIDI to/from your sampler and the computer is optional, even if it
is highly recommended. DSP-Quattro could begin the transmission without
any answer from the peripheral, but in this case there is no check on what
happens. In case you want to use the protocol that checks acknowledges
from the MIDI device, the option of MIDI Handshaking has to be turned On.
To transmit a sampling from DSP-Quattro to your synthesizer, you can use
the command
Commands->Network Transmit->MIDI Sample Dump Standard (SDS)
The following dialog appears:
DSP-Quattro MIDI Sample Dump Standard Tx dialog
- Sample Number: it allows you to set the location where to transmit the
sample. Warning: many samplers do not support the transmission of a
sample to a specific location of their sample memory. Many samplers write
the new sample in the first free location in their RAM memory, without taking
care of this parameter during the sample dump.
© Copyright 2002-2012 by Stefano Daino
176
DSP-Quattro 4
User's Manual
- Midi Out Port: you can use the pop-up menu that appears clicking on the
arrow on the right to select the device for the MIDI OUT among those
supplied by the MIDI driver. The name of the selected device will appear on
the left of the pop-up menu (UM-1 in the example above)
- Midi In Port: you can use the pop-up menu that appears clicking on the
arrow on the right to select the device for the MIDI In among those supplied
by the MIDI driver. The name of the selected device will appear on the left of
the pop-up menu (UM-1 in the example above). Usually the device used for
the MIDI In should be the same of the one for the MIDI OUT.
- Device ID: via the menu you can select the Device ID. This is useful when
there is more than one sampler connected to a certain MIDI port.
- Bits/Sample: you can choose the number of Bits used to represent each
sample during transmission. Your choice should be based on the number of
Bits per Sample that your sampler uses to memorize the single sample
word. The total time of transmission will be less in case of sample words
smaller than 16 bits per sample.
- MIDI Handshaking: it allows you to choose between a protocol that asks
for the confirmation from the listening device or not. When the device
supports it, we recommend the use of the handshaking protocol even if it is
then obligatory to have a double MIDI connection in->out and out->in.
Then, Cancel closes the dialog without starting the MIDI transfer, while OK
starts it. In this case, if there is no answer by the device and if the option
MIDI Handshaking is turned On, DSP-Quattro after 5 seconds shows an
error dialog. In this case please check again all the settings as well as the
hardware connections. If the option MIDI handshaking is turned Off, DSPQuattro will start the transmission of the data whatsoever.
© Copyright 2002-2012 by Stefano Daino
177
User's Manual
DSP-Quattro 4
DSP-Quattro Preferences
DSP-Quattro uses a Preference dialog with a multi-panel that gathers all the
user configurable settings, split in the following categories:
-
General 1: general options – page 1
-
General 2: general options – page 2
-
Editor: DSP-Quattro audio file editor options
-
Network: options related to the transfer of data with external
MIDI devices
-
Plugins: options related with the use of Instruments and Effect
plug-ins
-
Audio: audio device options.
Use the menu command
DSP-Quattro X->Preferences... (or ⌘,)
to open the Preferences dialog. In upper part there are the different tabs to
choose the category of preference you want to set. In the lower part there
are all the user configurable settings for that category.
General Preferences
© Copyright 2002-2012 by Stefano Daino
178
DSP-Quattro 4
User's Manual
General Panel Interface of Preferences Dialog – page 1
Selecting the General 1 Preferences tab, the above interface will appear.
- Temporary Files Directory: sets the directory that DSP-Quattro will use
for temporary files. Click on the Set button to assign a different folder.
- BatchProcessor Files Directory: sets the default directory used by the
BatchProcessor. Click on the Set button to assign a different folder.
- New Audio Files Directory: sets the default directory where DSP-Quattro
will place all new files created with the Input or the Master Out Recorder.
Click on the Set button to assign a different folder.
- Closing a document window, hide it but do not remove it from the
project: if checked, DSP-Quattro will hide an audio file editor window when
closing it, but it not remove it from the project. Otherwise, when the window
is closed, the audio file will also be closed and removed from the current
project.
- L&R gain sliders are linked, use SHIFT to unlink them: if checked the
movement of the sliders for left and right channel gains are always joined,
i.e. moving the right slider will cause the proportional movement of also the
left and the opposite. The sliders can be disjoined momentarily by pressing
the SHIFT key while dragging one slider.
- Peak Level indicators keep the maximum value (click on them to
reset): if this option has been checked (turned ON) the peak value
associated to a V-Meter will keep the maximum value until you will click on
it. If this options has been tuned OFF, the peak value is automatically reset
by itself after 3 seconds.
- Peak Level turn ON if signal is greater than -1.0, 1.0 values / signal is
greater OR equal to -1.0, 1.0 values: turn ON the option you wish.
- Use new overview rebuild engine for immediate cut&paste edits:
version 2.0 of DSP-Quattro introduced a new graphic engine for the
immediate cut&paste. We suggest to keep this option turned ON.
On page 2 you find the following additional preferences:
- New Files and Records default file format: choose the file format used
by default when DSP-Quattro will open the dialog to create a new audio file
or when it will initialize the Input and Output Recording modules. Of
course, you will be able to set a different audio file format, if you will like.
These default settings define only the values used by DSP-Quattro when
opening the dialog asking for the new values. You can set the Audio File
Format (AIFF, WAVE or SDII), sample resolution (8, 16, 24, 32 or 32 float)
Stereo/mono (Stereo, Mono L+R, Mono L or Mono R for the new Input
Recorders, Stereo or Mono for the new Files settings). If you will not check
the ‘Opening a new Input Recorder, ask for audi file format settings’
control, when DSP-Quattro will create a new Input Recorder, it will use
these default settings to create a new file for recording into the default
folder for the new recordings. Otherwise, it will always ask first for the new
audio file format settings.
- Dither: These group of options let you to choose when and how to apply
the DSP-Quattro Dither algorithm:
© Copyright 2002-2012 by Stefano Daino
179
DSP-Quattro 4
User's Manual
- Apply Dither on Save, Save As, Exports and similar functions: If
checked, DSP-Quattro will apply the Dither algorithm when saving audio
files.
General Panel Interface of Preferences Dialog – page 2
- Apply Dither doing new recordings: if checked, DSP-Quattro will (if
applicable) apply the Dither algorithm when recording a new audio file.
- Do not apply Dither saving with 24 bit or better sample resolution: if
checked, DSP-Quattro will never apply the Dither algorithm when the
output file has 24 bits or better a sample resolution. It is valid on first (Apply
Dither on Save) and third (Apply Dither on new recordings) options.
- (PlayList) Use default Pause value of: enter in this field the value expressed in msec – that DSP-Quattro must use by default for the pause
at start of a new track added to the PlayList.
- (PlayList) Apply Dither creating Audio CDROM Images: if checked,
DSP-Quattro will apply the Dither algorithm when creating 16 bits audio CD
image files.
- (PlayList) New CD-Tracks have Pre Enphasis (PE) flag enabled: if
checked, DSP-Quattro, when creating a new CD-Track on the PlayList,
will set the Pre Enphasis flag ON.
- (PlayList) New CD-Tracks have copy Protection (CP) flag enabled: if
checked, DSP-Quattro, when creating a new CD-Track on the PlayList,
will set the Copy Protection flag ON.
© Copyright 2002-2012 by Stefano Daino
180
User's Manual
DSP-Quattro 4
- When the application needs to add a file extension, use: enter here the
file extensions used by DSP-Quattro when creating destination files
respectively in AIFF, WAVE and SDII audio file formats.
Editor Preferences
The following interface will be shown when selecting the Editor Preferences
tab:
Editor Panel Interface of Preferences Dialog
- X-Axe Units: it allows you to choose the default unit used by DSP-Quattro
to represent the time axes on the Time Ruler and for displaying time
values. Choose one of the possible options (HH:MM:SEC:MSEC, Seconds,
Samples, milliseconds or AudioCD)
- Y-Axe Units: the default unit used by DSP-Quattro to represent the audio
signal level. Choose one of the possible options (-1.0, 1.0 floats, Decibels
(dB), percentage (%))
- Playback cursor: it allows you to choose the default behavior of scrolling
of the audio file Editor Wave view area while playing the audio file.
- Waveform Colors: it allows you to assign the colors used by the Audio File
Editor to draw the waveform and its background. Use the Factory Default
button to restore these settings to factory values.
- Trim/Truncate commands leave...: it allows you to assign two values for
the number of samples that DSP-Quattro will leave before and after the
points of cut, when it is applicable. The type of cut operation depends on
the command issued.
© Copyright 2002-2012 by Stefano Daino
181
DSP-Quattro 4
User's Manual
- Ungroup Audio File Editors: if it is checked, DSP-Quattro will use only
one window as Audio File Editor. Loading a new Audio File will hide the
previous opened Audio File Editor.
- Auto Blend doing Cut&Paste: turn ON/OFF the Blend option doing
cut&paste between waveforms. There is also the option to set the Blend
time, expressed in msec.
- AutoZero: if the check mark appears, DSP-Quattro, during the final
positioning of a marker or of selection start and end points (end of its drag,
etc...), moves the new point to coincide with the zero crossing immediately
before that point.
- Speed Control returns to the center, use CTRL to lock it: if the check
mark appears, the movement of the Ribbon Controller of the audio file
editor has an elastic behavior with regard to its central position. This
feature can momentarily be turned off by pressing the CTRL key. The
behavior is inverted if this option has been turned OFF.
- Cut, Copy&Paste includes also Generic Markers: if the check mark
appears, the operations of Cut and Copy will copy into the DSP-Quattro
audio clipboard also the Generic Markers eventually present in the portion
of the Audio File to Cut or to Copy. The following Paste operation will
include the creation of a copy of those Generic Markers, too.
- When an Audio File is open into the Editor: Set the Cycle Mode ON: if
the check mark appears, when DSP-Quattro opens an Audio File into the
Editor, it automatically sets the Cycle Mode ON.
- When an Audio File is open into the Editor: always set this application
as its creator: if the check mark appears, when DSP-Quattro opens an
Audio File into the Editor, it automatically sets the Finder creator info of that
Audio File to itself. It means that also if the Audio File was created by
another application, the next time you will double click on its icon the Finder
will automatically open it in DSP-Quattro. If this option is On, Audio File
icons will also change to the ones used by DSP-Quattro as soon as you will
open that file in DSP-Quattro.
Network Preferences
The following interface will be shown when selecting the Network
Preferences tab:
© Copyright 2002-2012 by Stefano Daino
182
User's Manual
DSP-Quattro 4
Network Panel Interface of Preferences Dialog
- MIDI for Sample Dump: it allows you to choose the default port that will be
used as default setting in the MIDI sample dump dialogs. You can also set if
as default the MIDI Sample Dump Standard will ask for MIDI handshaking or
not.
- Always Open files after reception: If this option is ON, DSP-Quattro will
open the audio files that have been received by MIDI.
- Network I/O Loop offset: this series of options allows you to tell DSPQuattro to modify the Loop points during the transfer of a sample so to go
around the problem of possible discrepancies in the meaning of the loop
point among different samplers. With transfers using the standard protocols
MIDI, if the option Modify Loop Length by is turned On, DSP-Quattro will
apply an offset to the loop points as defined by the control on the left.
Plug-ins Preferences
The following interface will be shown when selecting the PlugIns
Preferences tab:
© Copyright 2002-2012 by Stefano Daino
183
User's Manual
DSP-Quattro 4
Plug-ins Panel Interface of Preferences Dialog
- Search for AudioUnit PlugIns: if checked, DSP-Quattro will look for
AudioUnit PlugIns into ~/Library/Audio/Plug-Ins/Components system and
users directories.
- Searching for VST PlugIns: use VST folder into MacOS X System
folder: if checked, DSP-Quattro will look for VST PlugIns into ~/Library/
Audio/Plug-Ins/VST MacOS X system directory.
- Searching for VST PlugIns: use VST folder into User folder: if checked,
DSP-Quattro will look for VST PlugIns into ~/Library/Audio/Plug-Ins/VST
MacOS X user directory.
- At Statup, use internal VST Database: if checked, DSP-Quattro will
create and will use an internal database for VST plug-ins. It is highly
recommended to keep this option ON, the startup procedure will be very
much faster. Every time DSP-Quattro will automatically detect a new VST
plug-in installed on your system, it will ask to scan it to get the information
it needs to classify it. User the Rebuild Database to force DSP-Quattro to
build its internal database at the next startup.
- MIDI For PlugIns: let you choose the default MIDI Input port for
Instruments Plug-Ins.
- Buffers for Off-line processing: set the audio buffer size that DSPQuattro will use during off-line rendering procedure of effect plug-ins.
Larger buffer size will mean faster processing, but be warned that some
plug-in might not work correctly with a size bigger than a certain value. A
value of 512 buffer size is always compatible, being 512 also the standard
value of the size of the audio buffer assigned to the audio device, exactly
as when DSP-Quattro plays in real time.
© Copyright 2002-2012 by Stefano Daino
184
DSP-Quattro 4
User's Manual
- Number of plug-in slots on Effx sends: set the default number of effx
slots when allocating a new Effx send manager.
NOTE: DSP-Quattro reads the plug-In directory only during startup. Any
changes in the pug-in directory (installing a new one, as an example), will
only take effect after next application startup.
Audio Preferences
This interface will let you choose the default audio driver used by DSPQuattro at start up.
The following interface will be shown when selecting the Audio Preferences
tab:
Audio Panel Interface of Preferences Dialog (MacOS X)
Use the Configure button to choose a specific CoreAudio driver – if different
from the default Audio Device set on the system.
Use the Inputs/Outputs ports settings if you want DSP-Quattro to use, at the
next startup, the current configured input and output ports. It is very useful if
there is a multiport audio device installed on your configuration. In case, you
can assign the input and output ports used by default for L&R channels
when opening a new Input and Input Recorder module and for the L&R
channels used by DSP-Quattro to play the outputs.
© Copyright 2002-2012 by Stefano Daino
185
DSP-Quattro 4
User's Manual
Clicking on ‘Configure’ button to set the default inputs a dialog like the
above will appear (a configuration with an audio device having 6 inputs is
used in this example).
Exactly with the same procedure, the following picture shows an example
configuring an audio device having 10 outputs:
By default, DSP-Quattro will always use the first two input ports for,
respectively, L&R inputs and the first two output ports for the L&R outputs.
Please refer to the chapter titled ‘Configuring the Audio Device’ for a crossreference about how to to configure the audio device options.
© Copyright 2002-2012 by Stefano Daino
186