1
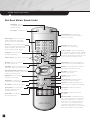
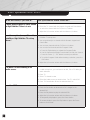
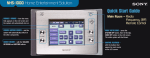
HS-301
Operating Instructions
NHS-301 Home Entertainment Solution
Welcome
Welcome
Congratulations on your purchase of the Sony
NHS-301 Home Entertainment Solution. It’s
designed to open up a world of audio and video
enjoyment throughout your home.
• You can throw a party and have the same music playing in
three rooms.
• You can have remote control access to as many as five
discs—DVDs or CDs in any combination.
• You can control the system using a single wireless remote
control (in the Main Room) and sleek, unobtrusive,
wall-mounted muting volume controls (in the remote rooms).
The Main System
The NHS-301 is a three-room system that receives entertainment from a central rack of equipment in the Main
Room. The Main Room system incorporates the following components:
• Sony A/V receiver
• Sony 5-disc DVD/CD changer with progressive scan
• Sony VHS videocassette recorder
• Sony television
• Stereo amplifier for remote rooms
• Surround-sound speakers (not supplied by Sony)
Optional, Compatible Cable, Satellite or High Definition TV Set-top Boxes*
The main system may also include a cable, satellite or High Definition TV receiver, integrated by your installer. This
may be compatible with the remote control codes of the Sony NHS-301 wireless remote control. (Not all brands
and models are compatible.) This guide includes instructions for operating a compatible cable, satellite or High
Definition TV receiver.
Audio Enjoyment in Remote Rooms
The NHS-301 supplies entertainment to three rooms.
The Main Room provides a comprehensive choice of audio and video entertainment.
Remote Rooms 1 and 2 enable you to hear the entertainment source selected in the Main Room.
Set-Up and Audio/Video Adjustments
These Operating Instructions cover such basic functions as selecting entertainment sources and enjoying them.
For information on additional component functions, including setup, advanced picture adjustments, advanced
sound adjustments, loading tapes and discs and VCR timer recording, please consult the Operating Instructions for
the individual components that make up the NHS-301
Parts and Controls
Main Room Wireless Remote Control
Transmit LED. Lights up to
confirm that the remote control is
transmitting instructions.
Set up button. For installer use only.
System Off button. Shuts off power to the
entire system, regardless of which components
happen to be on at the time.
Numeric Keypad. Use these keys to enter TV,
satellite or cable channels, AM/FM station
frequencies or presets, CD or DVD chapters.
Mute button. Press once to block the audio
portion of the program temporarily, as during a
telephone conversation. Press again to resume
hearing the audio portion of the program.
Enter button. Enters the numbers
you’ve pressed on the numeric keypad.
Volume +/- buttons. Adjusts the A/V receiver volume.
Ch/Track +/- buttons. Changes the channel up and
down on the television, VCR and an optional, compatible
cable, satellite or High Definition TV receiver. Moves up
and down through AM/FM tuner preset channels. Goes
to the next or previous DVD chapter or CD track.
Disc button. Advances a CD changer or
DVD changer to the next disc.
TV/Video button. Cycles through television input
modes, or input modes on an optional cable receiver.
Guide Button. Activates the channel guide on an
optional cable, satellite or High Definition TV receiver.
Exit button. Exits the channel guide on an optional
cable, satellite or High Definition TV receiver.
Up/Down/Left/Right/OK cursor buttons. Navigate
component menus. The central “-|-” or “OK” button
accepts the current menu selection.
Menu button. Activates the selected
component’s on-screen menu.
Display button. Activates the selected
component’s on-screen display.
Play button. Activates Play on the
selected component.
Jump button. Returns to the previous
TV, satellite or cable channel.
Rewind button. Activates rewind or
reverse scan on the selected component.
Record button. Activates Record on the VCR.
TV power button. Turns off the television.
Useful when switching from video
entertainment to audio only.
TV wide button. Cycles through TV
widescreen viewing modes.
Fast Forward button. Activates fast forward or
forward scan on the selected component.
Pause button. Temporarily halts playback on the
selected component. Press again to resume playback.
Macro A button. Activates a pre-set function,
when available.
Macro B button. Activates a pre-set function,
when available.
Source Select buttons. Automatically turns on the
correct components and selects the correct inputs for
enjoying each entertainment source. Changes the
remote control mode to operate the functions of the
selected source. If you suspect that the desired
components have been switched off or set to the
incorrect inputs, simply press the Source Select button
again to return all equipment to the proper settings.
4
Parts and Controls
Remote Room Muting Volume Control
Volume Control. Turn clockwise to raise
the volume. Turn counterclockwise to
lower the volume.
Mute button. Press once to block the audio
portion of the program temporarily, as during a
telephone conversation. Press again to resume
hearing the audio portion of the program.
5
The Main
BasicSystem
Operations: Main Room
In the Main Room, if you want to...
Pick up the wireless remote control and...
...watch television when no cable, satellite
or High Definition TV box is in use.
1. Press the TV Source Select button.
2. Select the TV channel with the Numeric Keypad and Enter button
or select the channel with the Ch/Track +/- buttons.
3. Adjust the A/V receiver volume with the Volume +/- buttons.
...watch an optional, compatible cable,
satellite or High Definition TV set-top
boxes.*
1. Press the Source Select button for the Cable, Satellite or High
Definition TV set-top box.
2. You can go directly to a channel with the Numeric Keypad and
Enter button.
3. You can tune channels with the Ch/Track +/- buttons.
4. You can also find channels with the Program Guide.
a. Press the Guide button to activate the Program Guide,
b. Use the Up/Down/Left/Right Cursor buttons to find your channel.
c. Press the center “-|-” “OK” button to make your selection.
d. To exit the Program Guide without making a selection, press the
Exit Button.
5. Adjust the A/V receiver volume with the Volume +/- buttons.
...to watch TV while listening to an
audio source.
1. If you watch over-the-air television or if you watch cable TV without
a cable set-top box, you can listen to an AM, FM or CD while you
watch television.
2. Press TV.
3. Select TV channel to view.
4. Select the Audio source you want to hear. For CD, select DVD.
5. Press TV Power button to turn the television back on.
...watch a DVD.
1. Press the Source Select button for DVD.
2. Press the Disc button to advance the DVD changer to the
desired DVD.
3. Press the Play button to play the selected DVD.
4. Adjust the A/V receiver volume with the Volume +/- buttons.
5. To temporarily halt playback, press the Pause button.
6. To resume playback, press the Play button or press the Pause
button a second time.
6
Basic Operations: Main Room/Remote Room
In the Main Room, if you want to...
Pick up the wireless remote control and...
...watch a VHS cassette.
1. Press the Source Select button for VCR.
2. Press the Play button to play the tape.
3. Adjust the A/V receiver volume with the Volume +/- buttons.
4. To temporarily halt playback, press the Pause button.
5. To resume playback, press the Play button or press the Pause
button a second time.
...listen to a Compact Disc.
1. Press the Source Select button for DVD.
2. Press the TV Off button to turn the television off.
3. Press the Disc button to advance the DVD changer to the
desired CD.
4. Press the Play button to play the selected CD.
5. Adjust the A/V receiver volume with the Volume +/- buttons.
6. To temporarily halt playback, press the Pause button.
7. To resume playback, press the Play button or press the Pause
button a second time.
...listen to AM and FM stations.
1. Press the Tuner Source Select button. TV will shut down if it was
previously on.
2. To switch between AM and FM, use the Jump button.
3. To cycle through the preset stations, use the Ch/Track +/- buttons.
4. Adjust the A/V receiver volume with the Volume +/- buttons.
...change to a different source.
1. Press the Source Select button for the new source you want to enjoy.
2. Press the TV Off button if you’re switching from audio/video
entertainment to audio only.
...turn the system off.
1. Press the System Off button to shut the entire system down.
In a Remote Room, if you want to...
Go to the muting volume control and...
...listen to the source that’s playing the
Main Room.
1. Adjust the volume with the in-wall Volume control.
2. To temporarily block the sound, as during a telephone conversation,
press the Mute button.
3. To resume listening, press the Mute button a second time.
7
Advanced Operations: Main Room
Each time you press a Source Select button on the wireless remote control, the functions of the remote unit change to
operate the specific source you’ve selected. The following section describes the action that each button performs in each
operating mode. Note: Not all buttons are active in all modes.
Watching Television
1. System Off button. Shuts off power to the entire system, regardless of which components happen to be on
at the time.
2. Numeric Keypad. Use these keys to enter TV channels.
3. Mute button. Press once to block the audio portion of the program temporarily, as during a telephone
conversation. Press again to resume hearing the audio portion of the program.
4. Enter button. Enters the numbers you’ve pressed on the numeric keypad.
5. Jump button. Returns to the previous TV channel.
6. TV/Video button. Cycles through television input modes, advancing to the next input each time you press the
button. For example: TV -> Video 1 -> Video 2 -> Video 3 -> Video 4 -> Video 5 -> TV.
7. Exit button. Exits the TV menu.
8. Volume +/- buttons. Adjusts the A/V receiver volume.
9. Ch/Track +/- buttons. Changes the television channel up and down.
10. Up/Down/Left/Right/OK cursor buttons. Navigate the TV menu. The central “-|-” or “OK” button accepts the
current menu selection.
11. Display button. Activates TV channel display.
12. Menu button. Activates the TV on-screen menu.
13. TV off button. Turns off the television. Useful when switching from video entertainment to audio only.
14. TV wide button. Cycles through TV widescreen viewing modes.
15. TV Source Select button. Automatically turns on the TV, the cable, satellite or High Definition TV receiver (if
required), and the A/V receiver. Automatically selects the correct inputs on all components. Changes the
remote control mode to operate the television.
NOTE: If you have a cable TV, satellite TV or High Definition TV set-top box*, your installer may have programmed
one of the buttons for your favorites. Please recommend a button you will always remember (e.g., Disc).
Watching an Optional, Compatible Cable, Satellite or High Definition TV Set-Top Box*
1. System Off button. Shuts off power to the entire system, regardless of which components happen to be on at
the time.
2. Numeric Keypad. Use these keys to enter cable channels.
3. Mute button. Press once to block the audio portion of the program temporarily, as during a telephone
conversation. Press again to resume hearing the audio portion of the program.
8
Advanced Operations: Main Room
Watching an Optional, Compatible Cable, Satellite or High Definition TV Set-Top Box* (CONTINUED)
4. Enter button. Enters the numbers you’ve pressed on the numeric keypad.
5. Jump button. Returns to the previous cable channel.
6. TV/Video button. For cable set-top boxes only. Cycles through input modes, advancing to the next input each
time you press the button. For example: Cable Bypass -> Input A -> Input B -> Cable Bypass.
7. Guide Button. Activates the program guide.
8. Exit button. Exits the program guide.
9. Volume +/- buttons. Adjusts the A/V receiver volume.
10. Ch/Track +/- buttons. Changes the channel up and down.
11. Up/Down/Left/Right/OK cursor buttons. Navigate set-top box menus. The central “-|-” or “OK” button accepts
the current menu selection.
12. Display button. Activates the channel display.
13. Menu button. Activates the set-top box on-screen menu.
14. TV off button. Turns off the television. Useful when switching from video entertainment to audio only.
15. TV wide button. Cycles through TV widescreen viewing modes.
16. Cable, Satellite and High Definition Source Select buttons. Automatically turn on the TV, the A/V receiver and the
cable, satellite or High Definition TV set-top box. Automatically selects the correct inputs on all three
components. Changes the remote control mode to operate the cable, satellite or High Definition TV set-top box.
Watching DVDs
1. System Off button. Shuts off power to the entire system, regardless of which components happen to be on at
the time.
2. Numeric Keypad. Use these keys to enter DVD chapter numbers.
3. Mute button. Press once to block the audio portion of the program temporarily, as during a telephone
conversation. Press again to resume hearing the audio portion of the program.
4. Enter button. Enters the numbers you’ve pressed on the numeric keypad.
5. Disc button. Advances the 5-disc DVD changer to the next disc.
6. Guide Button. Activates the DVD top menu.
7. Exit button. Exits the DVD menu.
8. Volume +/- buttons. Adjusts the A/V receiver volume.
9. Ch/Track +/- buttons. Press + to go to the next DVD chapter. Press - to go to the beginning of the current DVD
chapter or to the previous chapter if you’re already at the beginning. Press repeatedly to skip forward or back
multiple chapters.
10. Up/Down/Left/Right/OK cursor buttons. Navigate DVD menus. The central “-|-” or “OK” button accepts the
current menu selection.
9
Advanced Operations: Main Room
Watching DVDs (CONTINUED)
11. Display button. Activates the DVD on-screen time display.
12. Menu button. Activates the DVD on-screen menu.
13. Rewind button. Activates DVD reverse scan. Press again for higher-speed reverse scan.
14. Play button. Activates DVD Play.
15. Fast Forward button. Activates DVD forward scan. Press again for higher-speed forward scan.
16. Pause button. Temporarily halts DVD playback. Press again to resume playback.
17. TV off button. Turns off the television. Useful when switching from video entertainment to audio only.
18. TV wide button. Cycles through TV widescreen viewing modes.
19. DVD Source Select button. Automatically turns on the DVD changer, A/V receiver and TV. Automatically selects
the correct inputs on the A/V receiver and TV. Changes the remote control mode to operate the DVD functions.
Watching VHS Tapes
1. System Off button. Shuts off power to the entire system, regardless of which components happen to be on at
the time.
2. Numeric Keypad. Use these keys to enter channel numbers on your VCR.
3. Mute button. Press once to block the audio portion of the program temporarily, as during a telephone
conversation. Press again to resume hearing the audio portion of the program.
4. Enter button. Enters the numbers you’ve pressed on the numeric keypad.
5. Volume +/- buttons. Adjusts the A/V receiver volume.
6. Ch/Track +/- buttons. Changes the VCR channel up and down.
7. Up/Down/Left/Right/OK cursor buttons. Navigate VCR menus. The central “-|-” or “OK” button accepts the
current menu selection.
8. Display button. Activates the VCR on-screen display of recording speed (SP/LP/EP) and recording time.
9. Menu button. Activates the VCR on-screen menu.
10. Rewind button. From the Stop mode, activates rewind. From the Play mode, activates reverse scan.
11. Play button. Activates Play on the VCR.
12. Fast Forward button. From the Stop mode, activates fast forward. From the Play mode, activates forward scan.
13. Record button. Activates Record on the VCR.
14. Pause button. Temporarily halts VCR playback. Press again to resume playback.
15. TV off button. Turns off the television. Useful when switching from video entertainment to audio only.
16. TV wide button. Cycles through TV widescreen viewing modes.
17. VCR Source Select button. Automatically turns on the TV, A/V receiver and VCR and selects the correct inputs
on the TV and A/V receiver. Changes the remote control mode to operate the VCR.
10
Advanced Operations: Main Room
Listening to CDs
1. System Off button. Shuts off power to entire system, regardless of which components happen to be on at the time.
2. Numeric Keypad. Use these keys to enter CD track numbers.
3. Mute button. Press once to block the audio portion of the program temporarily, as during a telephone
conversation. Press again to resume hearing the audio portion of the program.
4. Enter button. Enters the numbers you’ve pressed on the numeric keypad.
5. TV/Video button. Acts as the +10 button when accessing CD tracks by number.
6. Disc button. Advances the 5-disc DVD changer to the next disc.
7. Volume +/- buttons. Adjusts the A/V receiver volume.
8. Ch/Track +/- buttons. Press + to go to the next CD track. Press - to go to the beginning of the current CDtrack
or to the previous track if you’re already at the beginning. Press repeatedly to skip forward or back multiple tracks.
9. Rewind button. Activates CD reverse scan.
10. Play button. Activates CD Play.
11. Fast Forward button. Activates CD forward scan.
12. Pause button. Temporarily halts CD playback. Press again to resume playback.
13. DVD Source Select button. Automatically turns on the DVD changer and A/V receiver. Automatically selects the
correct input on the A/V receiver. Changes the remote control mode to operate the DVD/CD functions.
Listening to AM/FM Stations
1. System Off button. Shuts off power to entire system, regardless of which components happen to be on at the time.
2. Numeric Keypad. Use these keys for choosing AM/FM preset stations or for Direct Tuning of stations by radio
frequency. (For Direct Tuning, first press the Enter button.)
3. Mute button. Press once to block the audio portion of the program temporarily, as during a telephone
conversation. Press again to resume hearing the audio portion of the program.
4. Enter button. Selects the direct tuning mode, which enables you to use the Numeric Keypad to tune a station
by entering its radio frequency.
a. For example, to tune 103.7 FM, press Enter, 1, 0, 3, and 7.
b. To tune 92.3 FM, press Enter, 9, 2, and 3.
c. To tune 880 AM, press Enter, 8 and 8. There is no need to press 0.
d. To tune 1010 AM, press Enter, 1, 0, and 1.
5. Jump button. Cycles between AM and FM tuning.
6. Volume +/- buttons. Adjusts the A/V receiver volume.
7. Ch/Track +/- buttons. Moves up and down through AM/FM tuner preset stations.
8. Up/Down cursor buttons. Scan up and down the radio band.
9. Tuner Source Select button. Automatically turns on the A/V receiver and selects the Tuner mode. Changes the
remote control mode to operate the tuner functions.
11
Troubleshooting
If, after reading the following instructions, you still have problems relating to the
operation of this System, please call our Customer Support Hotline:
1-877-619-7669 or email: [email protected]
Problem
Possible Remedies
No sound in Main Room
• Make sure the muting is not engaged.
• If playing a CD, make sure that a disc is loaded.
• Try pressing the Source Select button for the desired source
again, to reset the correct inputs and power up the correct
components.
No sound in additional rooms
• Make sure the muting is not engaged.
• Make sure the power button on all the amps at the bottom
of the rack are pushed in and are lit.
No picture and no sound
• Try another TV station. It may be a station issue.
• If playing a DVD, make sure that a disc is loaded.
• Try pressing the Source Select button for the desired source
again, to reset the correct inputs and power up the correct
components.
Wireless remote does not
operate
• Replace the remote control batteries.
• Confirm a direct line of sight from the remote control to the
system rack and/or infrared repeater “eye.”
Aspect ratio of the TV picture is
wrong.
• Cycle through the options on the TV Wide button of the
infrared remote control.
Sony Electronics Inc.
1 Sony Drive, Park Ridge, NJ 07656
www.sonyavdesigner.com
Version 4.0; June 7, 2004
© 2004 Sony Electronics Inc. All rights reserved. Reproduction in whole or in part without written permission is
prohibited. Features and specifications are subject to change without notice. Sony is a trademark of Sony. All other
trademarks are property of their respective owners.
* Cable, Satellite, and HD set-top boxes. These are optional products that may accompany your Sony NHS-301 system.
These may require monthly subscriber fees, not included. These products may or may not be compatible with the remote
control codes of the Sony NHS-301.
12