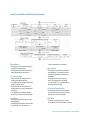
1
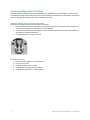
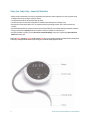
Lady-Comp: The “Intelligent” Cycle Computer. Lady-Comp is a fertility monitor that determines the fertile and infertile periods occurring throughout a woman‟s cycle by assessing the patterns of daily Basal Body Temperature readings and information regarding the dates of menstruation. Hormonal changes during a woman‟s menstrual cycle cause slight increases and decreases in the Basal Body Temperature. A slight increase in temperature is a signal that ovulation has taken place. Lady-Comp effectively identifies a woman‟s fertile period, which is often several days long. Lady-Comp considers not only the lifespan of the woman‟s egg (24-48 hours), but the fact that sperm can survive for several days within the vagina and still succeed in fertilizing an egg. Please read this user manual carefully and completely to ensure safe and effective use of your Lady-Comp fertility computer. How to Care for Your Lady-Comp • Lady-Comp contains sophisticated technology. You should take care to not drop or damage it. With exception to the power charger and temperature sensor, both of which can be removed and replaced, do not disassemble the device. Keep it in a safe dry place, out of the reach of children. • Do not expose it to heat, intense cold or sun. • Keep the device at temperatures between 50-100° Fahrenheit. • Do not immerse in water or place the device under running water. • Keep the temperature probe clean by wiping it daily water – do not use rubbing alcohol or detergent. Precautions • This device is to be used to identify days of increased fertility for conception. • If you do not become pregnant after six months of use, consult with your physician. • In no way does Lady-Comp provide protection against sexually transmitted diseases. • Lady-Comp can be used by women with menstrual cycles lasting between 19-39 days. (The menstrual cycle begins on the first day of menstruation and ends on the last day before the next menstruation.) • You should not use the Lady-Comp if you are breastfeeding, experiencing symptoms of Menopause, taking hormonal treatments and/or birth control hormones. • Lady-Comp may be less effective in identifying fertile days with irregular menstrual cycles. *Lady-Comp is not approved as a method of birth control / contraception. Consult with your physician if pregnancy is suspected. 1 Lady-Comp Fertility Monitor User Manual Lady-Comp Manual Table of Contents Set-Up Instructions ………………………………………3 Connections Battery Important Reminders …………………………………… 4 Lady-Comp Buttons and Operating Levels ……………4 Self-Testing and Switching On/Off ……………………..5 Lady-Comp Operating Levels …………………………..6 Function Keys …………………………………………….6 Lady-Comp Display ………………………………………7 Necessary Settings before You Begin …………………8 Temperature Reading ……………………………………8-10 Temperature Reading Time Limit Basal Body Temperature How to Take Your Temperature Terminating a Temperature Reading Fever Menstruation Data “M” ……………………………………11 Entering “M” Data Activating “M” Entering “M” at a Later Date Correcting “M” Data Fertility Displays ………………………………………….12 Possible Pregnancy Display Potential Fertility Display Retroactive Fertility Display Mono-phase Cycles Cycle Statistics …………………………………………..12 Further Information ………………………………………13 Back in operation after interruption Shift-Work Summer and winter time After taking Birth Control Pill Abnormal temperature readings Cleaning the thermal sensor……………………………13-14 Clinical Printout Analysis Deleting Data Technical Details Specifications 2 Lady-Comp Fertility Monitor User Manual Lady-Comp Getting Started – First Steps Lady-Comp contains an integrated lithium rechargeable battery and is equipped with an AC power adapter. Lady-Comp cannot be operated while charging. Please charge Lady-Comp for 24 hours before proceeding with set-up and operation. Lady-comp will need to be recharged approximately every 30 days for a maximum of 12 hours. Temperature Sensor and Power Charger Connections Please observe the following sequence (On the underside of the device): 1. Insert the electrical connection into the socket A (on the back of the device). Then connect to the AC wall outlet. Press the plus and minus buttons once simultaneously. The time will display. 2. Lady-Comp automatically reverts to this display if no further command is entered for 90 seconds or when the plus and minus buttons are pressed simultaneously. 3. The temperature sensor is inserted in socket B. Recharging the Battery 1. 2. 3. 4. 5. 3 Insert the AC power supply into connecting socket A. Connect to an AC outlet. Recharge the battery (approx. 12 hours). Recharged battery lasts approximately one month. Recharge battery when BA 9-1 is shown on display. Lady-Comp Fertility Monitor User Manual Using Your Lady-Comp – Important Reminders • Always take your temperature in the morning, immediately upon awakening, before engaging in any form of physical activity including moving around, getting up, talking or drinking. • The temperature should only be measured orally (by mouth). • The alarm must be set on the previous day before 12 AM and must be activated for the first day of use. • Stop all birth control hormones before use. The computer functions by identifying ovulation, birth control hormones stop ovulation. • Past menstrual data assist the computer to become more quickly familiar with your individual basal body temperature patterns. • Taking your temperature regularly assists the computer in learning to interpret your individual cycle. • During all processes or inquiries you can return to the current time display, at any time, by pressing the plus and minus buttons at the same time. Please note: Red-light and flashing red-lights indicate potentially fertile days. If you are planning a pregnancy it is advised to have sexual intercourse on these days. Yellow-light indicates that the computer cannot give you a definitive fertility diagnosis on that day. 4 Lady-Comp Fertility Monitor User Manual Self-testing and Trial readings Directions for Performing a Self-Test Lady-Comp self-tests by sequentially illuminating all displays. Proceeding from the time display: 1. Press the plus button 3 times. 2. Lady-Comp illuminates each display symbol. 3. When the test is completed the time appears and the thermometer symbol remains illuminated. 4. If you press the round button, the thermometer will flash and Lady-Comp is ready for a temperature reading. 5. If no trial temperature reading is required, press the plus and minus buttons simultaneously. 6. The current time will now display. Switching the Lady-Comp ON/OFF Turn ON 1. Press any button 2. The current time will be shown Automatic Off • If you do not press any button for 30 seconds, the display automatically returns to the time. • When you press the plus and minus buttons simultaneously, the display will return to the time. • When using the AC power adaptor, the device will return to the pre-set dimming level after 30 seconds. • When operating with the rechargeable battery, if no buttons are pressed, Lady-Comp switches off automatically after 30 seconds. ** The display will remain dark until a button is pressed or the alarm is activated. Sample values are saved in your Lady-Comp. These values are automatically deleted once you take your first temperature reading. The sample values appear again if you delete all your personal data. 5 Lady-Comp Fertility Monitor User Manual Lady-Comp Buttons and Operating Levels Round Button • Pressing the round button allows you to change the operating levels. • Pressing the round button allows you to make adjustments to the settings. To adjust settings • Press and hold the round button for 5 seconds; the display will flash. • The setting can be changed by pressing the plus or minus button. • Press and hold the round button for 5 seconds, when you have completed the adjustment. • The adjustment is confirmed; flashing stops and you hear an acoustical signal. Plus Button • Pressing the plus button advances the data displayed. • Pressing the minus button confirms data. For example, when ‟M‟ flashes you 6 confirm menstruation by pressing „+‟ Minus Button • Pressing the minus button reverses the data displayed. For example to look at past dates, temperature readings and evaluations. • Pressing the minus button corrects data. For example when „M‟ flashes you can answer „no‟, to menstruation by pressing the minus button. To Return to Start Position • Pressing the plus and minus buttons at the same time will return you to the start position; the current time display. Fast Mode • Pressing and holding the plus or minus button allows you to fast advance or reverse. Lady-Comp Fertility Monitor User Manual Lady-Comp Display (1) Fertility Indicators: Red – Fertile Red Blinking – Window of ovulation Yellow – “Learning” fertility diagnosis unavailable Green – Infertile (2) Alarm indicator: The alarm indicator icon will remain illuminated when the alarm is activated. (3) Data Display: Time, dates, temperature readings, cycle data. (4) Thermometer Symbol: Illuminates during temperature reading time-frame and flashes when ready for a temperature reading. (5) Menstruation Indicator: Flashes for input; „+‟ yes or „-‟ no menstruation. Remains illuminated with confirmation of menstruation. Please note: Red-light and flashing red-light indicate potentially fertile days. If you are planning a pregnancy it is advised to have sexual intercourse on these days. Yellow-light indicates that the computer cannot give you a definitive fertility diagnosis on that day. 7 Lady-Comp Fertility Monitor User Manual Necessary Steps for Setting-up Your Lady-Comp Please proceed proceed with Lady-Comp Set-Up in the Following Sequence: 1. Set the Date and Time 4. Enter BMI 2. Set the Alarm 5. Enter Past Menstruation Data (Optional) 3. Activate the Alarm Setting the Date and Current Time 1. 2. 3. 4. 5. 6. 7. 8. Press the plus and minus buttons simultaneously; time of day will display in military time. To enter your current time of day, press and hold the round button for 5 seconds. The hour display will flash; adjust the time with the plus and minus buttons. Press the round button; adjust the minutes with the plus and minus buttons. Press and hold the round button for 5 seconds until you hear an acoustical ring. This confirms your adjustment to the current time To enter the current date; press the plus button once; date will display. Press and hold the round button; the date display will flash; adjust the date with the plus and minus buttons. Press and hold the round button until you hear the acoustical ring which confirms your adjustment to the current date. From the date display; press the plus button once; the year will display. If adjustment is required proceed as above. ** If the device has already received one or more temperature readings, it is only possible to reverse the date setting by one day. The temperature readings for the current day and the day before are deleted when the date is reversed. You can always advance the date by one day. This is how you can correct the date when traveling in a different time zone. Do not take your temperature on the day of travel. It is impossible to change the date by accident. Once the date has been correctly entered, it automatically proceeds correctly, with adjustments for leap years. The year is automatically adjusted when you pass 31.12. Setting the Alarm Time (Proceeding from the time display) 1. 2. 3. 4. 5. Press the minus button once. The alarm setting time appears on the display. Press the round button for 5 seconds until the hour field flashes. Press plus button to advance the hour, minus button to reverse. When you reach the hour you wish to wake, press the round button once to advance to the minute field. Press the plus button to advance the minutes, minus button to reverse. Press and hold the round button for 5 seconds, acoustical ring will confirm alarm time Activate the Alarm: Turning the Alarm On/Off (The alarm must be activated before the first temperature reading) Proceeding from the time display: 1. 2. 3. 4. 5. 6. Press the minus button once. The alarm setting appears. Press the minus button, the bell symbol flashes. Press the plus button = the bell remains constantly illuminated. The alarm will sound at the time set in the previous step. Press the minus button = the bell disappears. The alarm will not sound. The Lady-Comp alarm starts off quietly and gradually becomes louder and louder. The alarm stops when you press any button to take a temperature reading and/or automatically after 1 minute. ** Changing the alarm and temperature reading time: In principle, the device is ready for a temperature reading +/-1 hour before and after the time of the previous temperature reading. If you choose an alarm time outside these 2 hours, the temperature measuring time is adjusted to +/-1 hour in relationship to the new alarm time. This involves activating the alarm. 8 Lady-Comp Fertility Monitor User Manual Enter Your BMI (Body Mass Index) Data BMI=Body Mass Index: Date of Birth, Weight and Height. Entering this data facilitates the cycle evaluation. Proceeding from the time display: 1. Press the plus and minus buttons for 5 seconds, simultaneously. The year of birth appears the birth symbol lights up. 2. Press and hold center button until display flashes; adjust with plus/minus buttons to the correct year of birth. 3. Press and hold the center button for 5 seconds to confirm. 4. Press the center button quickly. Press and hold the center button until display flashes: adjust with plus/minus buttons to enter your height. 5. Press and hold the round button for 5 seconds to confirm. 6. Press the round button quickly. Press and hold the center button until display flashes: adjust with plus/minus buttons to enter your weight. 7. Press and hold the round button for 5 seconds to confirm. Press center button quickly to view BMI calculation. Enter Past Menstruation Data: “M” Data (Optional) If you have “M” data from previous cycles, you must enter this data into the device before the first temperature reading. Only the first day of “M” is to be entered per cycle, the device saves automatically three “M” days. Begin with the input of the furthest menstruation back in time. Proceeding from the current time display: 1. Press the round button. Now you are in the Fertility Level. 2. Press the minus button until you reach the date of menstruation data, furthest back. 3. Press and hold the round button for 5 seconds. “M” flashes. 4. Press the plus button to confirm “M”. Continue to the next date of menstruation data, moving forward to the current date, confirming each cycle‟s first “M” day. 9 Lady-Comp Fertility Monitor User Manual Lady-Comp BBT (Basal Body Temperature) Reading Basics Taking your basal body temperature regularly each day is one of the key elements of the Lady-Comp system. The basal body temperature is the temperature immediately after waking up, before talking, drinking, or becoming active in anyway. While taking your temperature, avoid moving the thermal sensor. Best results are achieved by choosing the same sensor position each day. Reading Time Window and Time Limit: Lady-Comp controls the temperature reading time limit. The window of time within a temperature reading must be taken is set in one of two ways: 1. The alarm, or 2. The previous days temperature reading time, which will establish the default temperature reading time for the following day. The time-frame in which a temperature reading can be taken is comprised of a 6 hour period beginning and ending 3 hours before, and 3 hours after the actual temperature reading time, if differing from the alarm setting time. Temperature time limit example: 1st day Actual temp reading at 6:00am 2nd day Temperature reading time limit = 3:00am to 9:00am *Actual reading performed at 7:00am 3rd day Temperature reading time limit = 4:00am to 10:00am *Actual reading performed at 9:00am 4th day Temperature reading time limit 6:00am to 12:00pm Temperature Reading Essentials: Temperature can be taken once a day, within the temperature reading time limit. The alarm must be activated before the first temperature reading. The thermometer symbol remains illuminated throughout the temperature reading time. Lady-Comp will beep upon completing your temperature reading. Unless you are confirming or negating the “M” light indicating menstruation, no further steps are taken after completing a temperature reading. If there is no temperature reading for one day, the temperature reading time limit is left open and must be set again by activating the alarm before 12 PM the day before the next reading. Usually the alarm time and temperature reading default time are the same. If you wake within the temperature reading time limit, for example, to care for a child, take your temperature. If you get up late and the temperature reading time limit is over, there is no temperature reading for that day. **We recommend using the Lady-Comp alarm to wake you up each day. Taking Your Temperature 1. 2. 3. 4. Lady-Comp wakes you with an acoustical signal. Press any button to turn off the alarm tone. The thermometer symbol is illuminated. It is ready for a temperature reading. Place the thermal sensor under your tongue, near the back, to the right or left of the frenulum and close your mouth. Press any button to begin the temperature reading. The thermometer symbol flashes and the temperature reading takes less than 60 seconds. ** The display shows temperature reading values from 94.1-99.99° Fahrenheit / 34.50 – 41.00 Celsius. When the temperature reading is completed it is confirmed with an acoustical signal and your basal body temperature value appears on the display. If the temperature reading is interrupted, for example, by moving the thermal sensor in your mouth, the temperature reading is automatically extended. The temperature reading value flashes to indicate an interruption. Continue with the temperature reading until you hear the acoustical signal. If you do not take your temperature or you would like to terminate the temperature reading, press the plus and minus button simultaneously. An acoustical signal will sound; the temperature reading is left out for this day. If the temperature reading value indicates a temperature that is too high (higher than 99.99° or 37.8 C) an „F‟ for fever appears on the display, alternating with the temperature reading. It is recommended to interrupt the daily temperature reading in the case of feverish cold or when taking medications for fever reduction, to avoid entering “abnormal” values into the device. 10 Lady-Comp Fertility Monitor User Manual Entering Your Menstruation Data – Confirming or Negating Menstruation “M” After the temperature reading if menstruation the “M” symbol may flash: 1. Press the plus button if you are menstruating. “M” remains illuminated. 2. Press the minus button if you are not menstruating. “M” disappears from display. 3. Acoustical ring confirms the input; the current cycle day appears on the display alternating with the temperature reading value for the day. ** Once Lady-Comp becomes familiar with your cycle, it will only ask for “M” data when menstruation is expected. It will begin to request “M” data approximately two days before your menstruation is expected. Proceed as above to confirm or deny menstruation. Activating “M” If you have “M” on a day that the Lady-Comp does not request “M” data: Proceeding from the time display: 1. Press the round button. The temperature reading and current cycle day displays. 2. Press and hold the round button for 5 seconds. “M” flashes. 3. Press the plus button. “M” remains illuminated. Entering “M” at a later time: If you have not taken a temperature reading for some time (i.e. holiday), but you have menstruated during this time proceed as when entering „past menstruation data‟. (See page 9) Correcting “M” Data Incorrect “M” data can only be retroactively corrected for the last three days. If you want to correct “M” data, begin with the furthest date back in time. Proceed as when entering „past menstrual data‟. (See page 9). Negate “M” data with the minus button. **When entering past menstrual dates or correcting data, input is only required for the first “M” day. Lady-Comp will automatically enter the two subsequent days. Fertility Displays: Red, Red Blinking, Yellow and Green Indicators Lady-Comp supplies information concerning fertility on every day of the cycle by colored display lights. Red = Potentially Fertile Yellow = Learning Area and Transition Area, missing temperature reading value, late ovulation. Fertility diagnosis unavailable for the day. Green = Infertile Red Flashes = Optimum Fertility. Flashing Red is a prognosis, indicates the identified ovulation from previous closed cycles. Please note: Red-light and flashing red-lights indicate potentially fertile days. If you are planning a pregnancy it is advised to have sexual intercourse on these days. Yellow-light indicates that the computer cannot give you a definitive diagnosis on that day. Possible Pregnancy Lady-Comp indicates a possible pregnancy by the simultaneous flashing of the red, yellow and green lights. Within three days the lights will stop flashing and remain constantly illuminated. Lady-Comp indicates a possible pregnancy by the characteristic pattern of BBT readings, symptomatic of pregnancy. If the Lady-Comp has indicated a possible pregnancy, please consult your medical practitioner as soon as possible. 11 Lady-Comp Fertility Monitor User Manual Viewing Advance Potential Forecast Display Lady-Comp indicates the potential fertility for the next 6 days. The actual fertility level for each day can only be confirmed on the day itself. The prognosis or potential fertility of the following 6 days may change on any one of the 6 forecasted days. The current fertility diagnosis for the day is applicable. Proceeding from the time display: 1. Press the round button once. 2. Press the plus button once to gain access to the „potential fertility display‟. 3. Press the plus button several times to see the potential fertility level for the following 6 days Reviewing Past Temperature Readings / Fertility Display Proceeding from the time display: 1. Press the round button once. Today‟s temperature reading alternates with the day of the cycle. 2. Press the minus button once. Yesterday‟s date will be shown alternating with the temperature reading value of that day. 3. Reverse with the minus button / Advance with the plus button. 4. By Pressing plus and minus buttons at the same time or if no buttons are pressed for 30 seconds the process will end and the display will return to the current time of the day. ** Up to 180 days of previous temperature readings can be retrieved. Mono-Phase Cycles (cycles without detected ovulation) If no ovulation is detected, Lady-Comp will indicate this to you with a constant solid Red light throughout your window of fertility. No Red Blinking light will be displayed that month. Cycle Statistics: The Lady-Comp Can Provide You with Valuable Cycle Data Proceeding from the time display: 1. Press the round button twice. 2. The number of saved cycles in the computer displays. (i.e. C:10) 3. Press the minus button once. The average length of your cycles will display. (i.e. L:28) 4. Press the plus button twice. The average increase in temperature after ovulation will display. (i.e. .49° F increase in temperature) 5. Press the plus button again. The average fluctuation in ovulation day is displayed in plus/minus days. 6. Press the plus and minus buttons simultaneously to return to the current time display. 12 Lady-Comp Fertility Monitor User Manual Further Important Lady-Comp Operating Information Returning to Use After an Interruption The date, the year and the time continue to work automatically without connection to power supply or battery. If no temperatures are taken, the temperature reading time limit is left open and must be reset by setting the alarm for the next morning. For the period where no temperature readings were taken, you may enter previous „M‟ data, provided there are no temperature readings taken in-between. Shift-Work In case of shift-work the alarm setting and temperature reading time limit is set for the real sleep time. The basal body temperature is always taken after several hours of sleep. (Ideally 5 hours of sleep, three hours of which should be consecutive.) Rechargeable Battery It is recommended to re-charge the Lady-Comp regularly and at least every 3 months if placed in storage, to maintain battery function. Summer and Winter: Daylight Savings Time Adjustment You should advance or reverse the time to summer or winter time. Using Lady-Comp after Using Hormone-based Birth Control or Other Synthetic Hormones You must stop taking birth control hormones before you begin to use Lady-Comp. The first bleeding after stopping birth control hormones is a withdrawal bleeding. It is not a natural menstruation. Do not enter “M” for this bleeding. Abnormal Temperature Readings Abnormal temperatures caused by illness, excessive alcohol consumption, medications that cause an increase or decrease in temperature are recognized by the Lady-Comp. In general, it is recommended to interrupt the daily temperature, if it is recognized as abnormal, to avoid storing the abnormal temperature reading. If the temperature reading value indicates a temperature that is too high (higher than 99.99° or 37.8 C) an „F‟ for fever appears on the display, alternating with the temperature reading. It is recommended to interrupt the daily temperature reading in the case of feverish cold or when taking medications for fever reduction, to avoid entering “abnormal” values into the device. Cleaning the thermometer The thermal sensor should be cleaned daily by wiping with regular water. Do not use rubbing alcohol or detergents to clean the sensor. Clinical Print-out Analysis You can receive a clinical print-out of your last 180 days stored in the Lady-Comp. Contact your distributor for details. Technical Details The device should only be used with the original power adaptor. Battery To recharge the integrated battery of the Lady-Comp, it must be connected to the AC power supply for approximately 12 hours. Once fully charged the Lady-Comp will operate independent of AC power supply for approximately 1 month. Repeat the recharging of the battery when BA 9-1 appears on the display. Press the plus and minus buttons simultaneously to return to the current time display. If the display shows values less than BA 1, the device will not continue to operate. No Risk of Loss of Data In the event of loss of power or a flat battery, there is absolutely no risk of losing the data stored in the Lady-Comp. 13 Lady-Comp Fertility Monitor User Manual Deleting Stored Data To re-set device: From current time display, press the plus button 3 times to initiate self-test. Now press all 3 buttons simultaneously until “L-9” displays. Press minus button 9 times. Upon completing these steps all saved data will be deleted. Specifications: Measuring Method: 60 second measurement and zerogradient method. Measuring Range: Fahrenheit 94.1º-105.8º Temperature Display: 4 Digit, 0.01 precision. Power Lithium Battery: 3 Volt Power Supply: Multi-range AC power adaptor; 110V-230V Power Consumption: Temperature measuring and clock; 100mA max. Operating Temperature: 32 to 95º Fahrenheit. Storage Temperature: 32 to 122º Fahrenheit. Device Size: 5.5 inches in diameter x one inch. Device Weight: 6.9 ounces 14 Lady-Comp Fertility Monitor User Manual