1
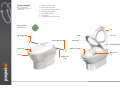
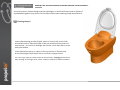
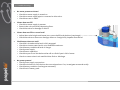
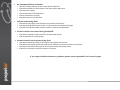
User Manual
(Version 1.0)
User manual
Please read this manual
carefully before using your new
propelair® toilet.
1
Safety Instructions
2 How does it work?
3 Using the propelair toilet
4 Cleaning the toilet
5 Troubleshooting
6 Recycling
7 Customer care & warranty
Push button
(style may vary)
Lid
LH Hinge cap
Seat
RH Hinge cap
Lid seal
Seat seal
Round buffer(s)
Latch cap
Water nozzle(s)
Air nozzle
Latch
Hinge pins
(x2)
1
1 Safety instructions
WARNING:
• The electrical supply must be isolated before accessing any equipment.
• Work shall only be carried out by a competent person.
• Depending upon the installation, this product is powered by either 24v DC or 240v AC. Always disconnect the power source before
removing any covers.
• No electrical components are serviceable. Under no circumstances attempt to dismantle or otherwise tamper with such parts. Failure to
do so will render the warranty void. Replacement parts are available from propelair® Ltd or your service engineer.
• If water leaks are evident do NOT use the product. Isolate the power and water supplies before attempting any troubleshooting.
2
2 How does it work?
instructions
After pressing the flush button, a three-stage cycle commences:
(Lid & seat omitted for clarity)
Air
Water
Water
Stage 1
Water washes the pan
Stage 2
Air ‘flushes’ the water away
Stage 3
Water refills the pan
3
3 Using the Propelair® toilet
instructions
Using the propelair® toilet is simplicity itself.
The lid is fitted with a sensor to ensure the
toilet will only flush when the latch is
engaged.
Stage 1
Lift or close seat as required.
Stage 2
Lid must always be closed before flushing.
Stage 3
Latch to be fully engaged before flushing.
Stage 4
Press flush button.
4
4 Cleaning the toilet
instructions
WARNING: DO NOT USE ABRASIVE CLEANERS OR PADS ON THIS PRODUCT.
Smooth contours, rimless design and the side-hinges on the lid and seat result in flushes of
unparalleled hygiene. Easy removal of the lid and seat make cleaning simple and effective.
Cleaning the pan:
Use a toilet cleaning product (liquid, cream or foam) with a soft cloth
and toilet brush to clean the inside of the pan and around the side and
rear nozzles – do not hit or dislodge the nozzles. Flush the toilet to rinse
away the residue.
Use a disinfectant spray or wipes on the top surface of the pan and
around the hinges. Wipe clean with a soft cloth or paper towel.
For a thorough clean, the lid and seat can be removed – see page 8. This allows
easy cleaning of the hinge areas, which is hard to achieve on traditional toilets.
5
Cleaning the toilet (continued)
instructions
WARNING: DO NOT USE ABRASIVE CLEANERS OR PADS ON THIS PRODUCT.
Cleaning the seals:
Regularly clean seals inside and out.
Use a disinfectant spray or hot soapy water and a soft cloth
to clean the seals and their housings within the lid and seat.
Wipe clean and dry with a cloth or paper towel.
If the seals become ‘tacky’ after cleaning, dust them with
talcum powder which will ensure they close correctly.
6
Cleaning the toilet (continued)
instructions
WARNING: DO NOT USE ABRASIVE CLEANERS OR PADS ON THIS PRODUCT.
Cleaning the lid and seat:
Use a disinfectant spray or hot soapy water and a soft cloth
to clean the seat and lid. Wipe clean and dry with a cloth or
paper towel.
Alternatively, the lid and seat can be removed so you can
thoroughly clean them individually. This is recommended
when the hinge areas in particular need cleaning.
7
Cleaning the toilet (continued)
instructions
WARNING: DO NOT USE ABRASIVE CLEANERS OR PADS ON THIS PRODUCT.
The propelair® toilet lid and seat are fitted with floating hinge pins for easy removal.
Removing the lid & seat:
Step 1
Unclip hinge caps from the bottom and slide upwards to remove.
Step 2
Push one hinge pin inwards to expose the second pin. Remove
this exposed pin…
Step 3
…and use it to push the remaining pin inwards to free the lid and seat.
Step 4
Carefully remove lid and seat.
REFITTING IS A REVERSAL OF THESE PROCEDURES
8
Cleaning the toilet (continued)
instructions
WARNING: DO NOT USE ABRASIVE CLEANERS OR PADS ON THIS PRODUCT.
Removing the latch:
Step 1
Pinch locking tabs together and push downwards.
Step 3
Push latch upwards into lid and remove floating hinge pin
Step 2
Lift latch cap off
Step 4
Pull latch down to remove.
REFITTING IS A REVERSAL OF THESE PROCEDURES
9
5 Trouble shooting
•
No water present at cistern:
o Check that water supply is turned on.
o Check that water supply pipe is connected to inlet valve.
o Check there are no leaks.
•
Cistern does not fill:
o Check that water supply is present.
o Ensure inlet valve works by depressing float.
o Check inlet valve for damage or defect.
•
Cistern does not fill to correct level:
o Adjust inlet valve height until water just covers the fill level platform (see image)
o Check inlet valve to ensure no damage, defect or foreign body impedes float travel.
•
Flush button does not work:
o Check lid is closed and the latch is fully engaged.
o Check that cistern water level is at its intended maximum.
o Check battery condition & level of charge.
o Check power supply.
o Check button operation.
o Check that pan is not blocked as toilet will not flush if pan is full of water.
o Check no water exists in air manifold after flush or blockage.
•
No power present:
o Check power supply connections.
o Check the isolators or RCD devices have not tripped out. If so, investigate cause and rectify.
o Check battery condition. Recharge as necessary.
o Check fuse in battery pack.
10
•
Water pump does not work but air pump operates:
o Check power supply at water pump connection. Power present means water pump is defective. No power means PCB is defective.
o Check for signs of damage or defect.
o In the event of a fault where the water trap does not refill after flushing, pour a bucket of water down the pan to restore the
water trap and call for a service engineer.
•
Water pump operates but no water is circulated:
o Check all water connections within cistern.
o Check water hose to pan is not kinked or fitted in such a way that a loop or water trap has been created.
o Check cistern is filled to the correct level.
•
Water pump does not switch off:
o Check position of float on float level sensor in cistern and that it can slide freely (see image).
o Faulty PCB timing sequence. Contact propelair® Ltd for advice.
•
Water pump runs for 5 seconds or longer:
o Check connections to float sensor. Power present means sensor is defective. No power means PCB is defective.
o Check float level sensor float is not jammed or impeded.
•
Water pump works but no water enters pan:
o Check cistern contains water.
o Check that water hose/cuffs are connected.
o Check that the water hose/cuffs are not leaking.
o Check that no water is leaking onto floor from underneath the pan. Possible wash-down hose disconnected.
o Check that no debris is blocking the filter mesh on the water pump inlet.
o Check there are no blockages within the water pipes.
o Check that the water pipe is not split, kinked or crushed.
o Check that the side & rear wash-down nozzles are not blocked.
o Remove top water hose connector and ensure check-valve cone is free to slide up & down.
o Check that outlet from water pump & downpipe are not damaged.
o Check water hose to pan is not kinked or fitted in such a way that a loop or water trap has been created.
•
Air pump does not work but water pump operates:
o Check power supply at air pump connection. Power present means motor is defective. No power means PCB is defective.
o Check for signs of damage or defect.
11
•
Air pump works but no air enters pan:
o Check that the air hose is not split, kinked or crushed.
o Check that the air hose/cuffs are connected.
o Check air pump for excessive or unusual noise.
o Check that the air pump motor revolves freely by rotating the drive shaft
manually with pliers or similar after removing motor (see image).
o Check that the motor shaft drive pin is intact.
o Check that the motor positive and negative connections are not reversed
causing pump to run backwards.
o Check that air pump rotors revolve by removing the motor and rotating
the metal drive shaft manually with pliers or similar. Slight resistance will
be felt, this is normal (see image).
•
Water pump works but spray does not clean:
o Check that water is exiting side & rear nozzles.
o Check water pressure/volume from nozzles.
o Check that no debris is blocking nozzles.
o Check that outlet from water pump & downpipe are not damaged.
o Check that nozzles spray equal amounts of water.
o Check that the motor positive and negative connections are not reversed causing pump
to run backwards.
•
Air pump works but pan not cleared:
o Check that air pump runs and delivers air.
o Check lid & seat seals are intact and in position.
o Check that the air hose is not split, kinked or crushed.
o Check that the lid & seat are secure.
o Check that lid latch is intact, swings freely and engages under pan lip.
o Check that the lid & seat are closed and secured when flushing.
o Check that pan is not blocked.
12
•
Pan trap is not replenished:
o Check water is present in cistern.
o Check that outlet from water pump & downpipe are not damaged.
o Check that breather tube in cistern is secure and not kinked or crushed.
o Check that all water connections within cistern are tight, without leak or causing air to enter downpipe or 90° elbow from water
pump.
o Pour a bucket of water down the pan to replenish the water trap.
•
Wash-down sprays over top of bowl:
o Check orientation of side nozzles, must be horizontal.
o Check that no debris or foreign object is obstructing nozzle outlets.
o Check water pressure from nozzles.
o Check that nozzles spray equal amounts of water.
•
Pan is blocked:
o Check operation of water pump & air pump.
o Physically clear blockage before re-flushing by using a small toilet brush or wire hook to loosen matter.
•
Pan overflows:
o Check that toilet does not flush at full pan blockage. If it does then check that sensor in rear of pan is intact and functioning
correctly.
o Remove blockage to drain the pan. Allow pan rear nozzle/manifold to dry out.
o Check existing soil/waste pipes for blockages.
•
Cistern overflows:
o Check that inlet valve is intact and operating correctly.
o Check that neither pan nor hoses are blocked.
•
Lid lifts up when flushed:
o Check that front latch is intact and free from damage.
o Check that rear hinge caps and pins are present and secure.
•
Cistern does not refill after flush:
o Check that inlet valve operates and float is not misaligned or impeded.
o Check that water supply is present.
13
•
No subsequent/follow-on flushes:
o Check no water remains in rear wash-down manifold.
o Check that bobbin on float sensor has risen with water level.
o Check power supply.
o Check operation of flush button.
o Check connections on PCB.
o Check that pan is not blocked.
•
Lid/seat rattle during flush:
o Check that rear hinge caps and pins are present and secure.
o Check that lid & seat are not loose or have excess movement in hinges.
o Check that lid & seat seals are intact and in contact with pan/seat.
• Excessive noise from cistern during flush/refill:
o Check that internal components are in place and secure.
o Check operation of water pump.
• Excessive noise from air pump during flush:
o Check that external pump components are in place and secure.
o Check that the upper and lower rubber anti-vibration mounts are intact and secure.
o Check that the motor drive pin is intact and rotates the pump rotors.
o Check for excessive noise from interior of pump.
If you require further assistance or guidance, please contact propelair® Ltd on 01268 548322
14
6 Disposal / recycling
Batteries: Do not dispose of used batteries in the household rubbish. Check with your local authority for advice on recycling and
recycle where facilities exist.
Device:
At the end of its life, this appliance must not be disposed of with household rubbish. Check with your local authority
for advice on recycling and recycle where facilities exist.
Packing:
All packaging and packaging materials that are no longer required can and should be recycled.
15
7 Customer care & warranty
CUSTOMER CARE
If you have a question about your new propelair® toilet, please call our Customer
Care helpline or contact us via the propelair® website.
To help us with your query, please quote the product serial number. This can be
found on the product label inside the cistern.
01268 548322
www.propelair.com
PRODUCT REGISTRATION
To help us ensure that you receive a fast service and response, please register your product. There are two ways of doing this:
•
•
By calling the Customer Care helpline.
By completing the attached form and returning it to us by post, fax or scanned file.
16
LIMITED 2 YEAR GUARANTEE
TERMS & CONDITIONS OF THE 2 YEAR WARRANTY
WHAT IS COVERED?
• The repair or replacement of your propelair® toilet (at propelair® Ltd discretion) if it is found to be defective as a result of faulty
materials, workmanship or performance within 2 years of purchase. Any part that is no longer available or manufactured will be
replaced by an equivalent in both fit and function.
WHAT IS NOT COVERED?
• The repair or replacement of a product or component as a result of normal wear & tear (e.g., seals, batteries etc).
• Accidental damage or faults arising from careless, negligent or inappropriate use, misuse or handling (which are not accordance
with the Installation Manual or User Manual.
• Blockages. Please refer to the User Manual for advice on how to clear blockages.
• Use of the propelair® toilet for anything other than its intended purpose.
• Failures in performance, operation or function as a result of using components that are not propelair® Ltd genuine parts.
• Use of parts not assembled or installed in accordance with the Installation Manual.
• Faulty installation except where installed by propelair® Ltd or our approved contractors.
• Repairs or alterations to the product carried out by persons other than propelair® Ltd or our approved contractors.
• PLEASE CONTACT OUR HELPLINE IF YOU HAVE ANY DOUBT AS TO WHAT IS COVERED BY THE 2 YEAR GUARANTEE
SUMMARY
• The guarantee commences at the date of purchase.
• Proof of purchase/delivery must be provided before any claim or work can be undertaken. Without this proof, any work performed
will be chargeable. Please retain any receipts or delivery notes.
• All work will be carried out by propelair® or our approved contractors.
• All replaced parts become the property of propelair® Ltd.
• Any repairs or replacement parts supplied during the period of guarantee will not extend the guarantee period.
• This guarantee does not affect your consumer statutory rights.
17
© 2013, propelair® Ltd
Units 1&3 West Point, 11 Durham Road, Basildon, Essex. SS15 6PH. UK
All rights reserved.
Information is subject to change without notice or warning. No material may be reproduced or transmitted by any means (electrical or mechanical) or
in any form for any purpose without the express written authority of propelair® Ltd.
Document Number: PPDLUMENG-02
18
The future is
air powered
The future is Propelair®
www.propelair.com
Call +44 (0)1268 548322 | [email protected]
Propelair® Ltd, Units 1&3 West Point, 11 Durham Road, Basildon, Essex. SS15 6PH
19
PRODUCT REGISTRATION FORM
Date of purchase
/ / Serial number
Title
Company (if applicable)
First name
Surname
Address
Postcode
Email
Telephone
Fax
20