1
Please register at address below
to get complete information services:
www.philips.com/welcome
Multimedia Function Display
Multi-function LCD
BDL3210Q
BDL4210Q
BDL4610Q
EN User Guide
English
Contents
1 Important note 2
2 Display overview 5
Control panel 5
Remote controller 5
3 How to use your display 8
Turn on/off display or switch to standby
mode 8
Adjust display volume 8
4 Equipment connection 9
Connectors at bottom of display 9
Connectors at side of display 9
Connection to computer 10
Connect with Philips EasyLink 11
5 Product information 13
Supported resolution 13
Multimedia 13
Remote controller 13
Power 13
Supported display stand 13
Product specification 13
EN
1
Please read this information before using your
display. Damages caused by not doing so are
not covered by Limited Warranty provided by
this product.
Safety
Be careful of electric shock or fire!
• Do not expose your display to rain or
water. Do not place liquid container (e.g.
vase) near your display. In case there
is liquid splashed on surface of or into
your display, please unplug it from any
power source immediately. Please consult
with Philips customer service center for
inspection before using your display.
• Do not expose your display, remote
controller, or battery to open flames
or other heat sources (including direct
sunlight).
Do not expose your display, remote
controller, or battery to lit candles or
open flames as this may cause fire.
Do not insert any object in the
ventilation slots or any other openings in
your display.
• Keep the power cord to be slack when
turning your display. A tensed power
cord may loosen the power connector
and cause sparks.
Watch out for short circuit or fire!
• Do not expose the remote controller or
battery in rain, water, or extremely hot
environment.
• Do not remove the power plug by pulling
the power cord. Loosened power plug
may cause spark or lead to fire.
Be careful of personal injury or display
damage!
• Please move this product by two people
as it weighs more than 25 kilograms.
• Please install your display on stand come
with your product. Please fasten the
•
2
EN
stand to your display securely. Place your
display on level, flat, and robust surface
that can withstand the total weight of
your display and stand.
• Use strong enough bracket when wall
mounting your display.Secure the wall
mounting bracket to walls being strong
enough to withstand the total weight of
your display and mount rack.In no event
shall Monitors & Displays Taiwan Ltd. be
liable for any accident, personal injury, or
loss caused by improper installation.
Watch out for children injury!
Please observe following precautions to avoid
children injury by falling display:
• Do not place display on top of surface
covered by cloth or other material that
can be pulled by children.
• Ensure each edge of your display is placed
within the borderlines of the installation
surface.
• In case the display is placed on top of
taller furniture (e.g. a bookcase), do
secure both the furniture itself and
your display to adjacent wall or proper
supporting structure.
• Make sure your children are well known
about risks of touching the display by
climbing on top of the furniture.
Be careful of swallowing the battery!
• This product/remote controller features
a coin size battery that may be swallowed
intentionally. Keep battery out of
children's reach.
Be careful of overheat!
• Do not install your display in closed
space. Keep at least 4 inch (10 mm) space
around your display for ventilation. Make
sure ventilation slots of your display are
not blocked by curtains or other objects.
Be careful of display damage!
• Make sure voltage of the power socket
matches with the one indicated at the
back of your display before connecting
it to the power outlet. Do not connect
your display to any power socket if the
required voltage is not provided.
Be careful of personal injury, fire, or power
cord damage!
• Do not place your display or any object
on the power cord.
• Keep the power cord be always and
completely reachable to ensure that you
can easily disconnect your display from
the wall socket.
Hold the plug instead of the cord when
disconnecting your power cord.
• In case of thunderstorm, please
disconnect your display from power
socket and antenna connection in
advance. Do not touch your display,
power cord, or any part of the antenna in
case of thunderstorm.
Be careful of hearing loss!
• Do not use headset or earpiece in long
time or high volume.
Low temperature
• For display transported in temperature
lower than 5°C, please unpack your
display and wait for it to warm to the
indoor temperature before connecting to
power socket.
•
Screen maintenance
•
•
•
•
•
Avoid still image at your best. Still image
is image that remain intact on the screen
for long time. This may include screen
menu, black strip and time display. If
still image is necessary, please reduce
contrast and brightness of screen to
avoid screen damage.
Unplug your display before attempting to
clean it.
Clean your display and frame with soft
and damp cloth. Do not clean your
display with Alcohol, chemicals or
household cleaners.
Be careful of display screen damage! Do
not touch, press, rub, or knock your
display screen with any object.
Please wipe off any droplet to avoid
deformation and discolor.
Disposal of old product and battery
English
1 Important note
This product is made of recyclable highperformance materials and components.
This symbol, a wheeled trash can with a cross
mark, indicate this product is EN Directive
2002/96/EC compliant. Please check local
recycling system for electric and electronic
equipments.
Please observe local regulations. Please do not
treat your old display as household waste.
By ensuring your old display is disposed of
correctly you will help prevent potential
negative consequences for the environment
and human health.
This product contains battery indicated by
EN Directive 2002/96/EC. Do not place it in
municipal waste for disposal.
Please observe local regulations for disposal
of batteries. By ensuring your old battery is
disposed of correctly you will help prevent
potential negative consequences for the
environment and human health.
This product qualifies for ENERGY STAR in
the factory default setting and this the setting
in which power savings will be achieved.
Changing the factory default picture setting
or enabling other features will increase power
consumption that could exceed the limits
necessary to quality for Energy Star rating.
EN
3
•
•
•
•
•
•
•
•
•
•
•
•
Read these instructions.
Keep these Instructions.
Heed all warnings.
Follow all instructions.
Do not use this apparatus near water.
Clean only with dry cloth.
Do not block any ventilation openings.
Install in accordance with the
manufacturer’s instructions.
Do not install near any heat sources such
as radiators, heat registers, stoves, or
other apparatus (including amplifiers) that
produce heat.
Do not defeat the safety purpose of
the polarized or grounding-type plug. A
polarized plug has two blades with one
wider than the other. A grounding type
plug has two blades and a third grounding
prong. The wide blade or the third
prong are provided for your safety. If the
provided plug does not fit into your outlet,
consult an electrician for replacement of
the obsolete outlet.
Protect the power cord from being
walked on or pinched particularly at plugs,
convenience receptacles, and the point
where they exit from the apparatus.
Only use attachment/accessories specifi ed
by the manufacturer.
Use only with the cart, stand, tripod,
bracket, or table specifi ed by the
manufacturer, or sold with the apparatus.
When a cart is used, use caution when
moving the cart/apparatus combination to
avoid injury from tip-over.
•
Refer all servicing to qualifi ed service
personnel. Servicing is required when
the apparatus has been damaged in any
way, such as power supply cord or plug
is damaged, liquid has been spilled or
objects have fallen into the apparatus,
the apparatus has been exposed to rain
or moisture, does not operate normally,
or has been dropped.
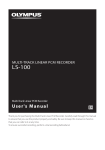
2 Display overview
Remote controller
English
Important Safety Instructions (US)
1
2
MENU
5
Control panel
TV
DVD
Blu-ray
IPTV
3
6
4
9
10
7
8
OPTION
SLEEP
11
12
13
1
14
OK
2
15
INFO
BACK
22
3
4
5
16
23
17
18
24
19
FORMAT
25
VOL
P
20
21
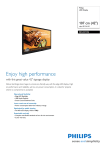
a Volume +/-: Increase and decrease
volume respectively.
b
26
c Signal source: Press it to show list of
various signal sources.
28
30
29
33
36
d Menu: Open or close main menu.
e Power: Power on or power off your
product.This product is fully powered off
only when it is unplugged.
a
27
SMART
SMART
HDMI1
HDMI2
HDMI3
VGA
USB
AV1
AV2
CVI
31
32
34
35
(Standby - power on)
• Switch to standby mode when your
display is ON.
• Turn your display off when it is in
standby model.
b MENU
Open or close main menu.
cBlu-ray
Key number on your remote controller
changes.
•
Unplug this apparatus during lightning
storms or when unused for long periods
of time.
dIPTV
Key number on your remote controller
changes.
eDVD
Key number on your remote controller
changes.
4
EN
EN
5
v
h Blue key
Sleep clock. Switch your display to
standby mode after given time.
w
j Red key
Demo menu (Digital crystal color, active
control).
k
OPTION
Browse to options relevant with current
action or selection.
l SLEEP
m
•
•
Navigation button
Open the navigation menu in menu
mode.
Press
to search forward or
backward during AV playback in USB
mode.
n OK
• Confirm input or selection and
display channel list when viewing
program in menu mode.
• Play/stop in USB mode.
o
p
INFO
Browse to options relevant with current
action or selection.
q
•
•
BACK
Return to last screen.
Return to last viewed channel.
Mute or unmute.
x
y VOL +/Increase and decrease volume
respectively.
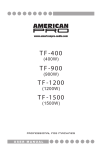
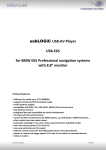
How to use your remote controller
To use your remote controller, press it when
close to your display and point it to the
remote controller sensor. Ensure there is no
furniture, wall, or other object blocking the
sight between display and remote controller.
English
g Yellow key
Sound pattern switch.
z 0-9 numeric buttons
Select a channel or setting.
{
SMART
Open on screen menu.
|
SMART
Open sound menu.
} HDMI1
Select the HDMI1 SOURCE.
~ HDMI2
Select the HDMI2 SOURCE.
~5m
~30˚
MENU
TV
DVD
Blu-ray
SLEEP
IPTV
OPTION
OK
INFO
BACK
FORMAT
P
VOL
SMART
SMART
HDMI1
HDMI2
HDMI3
VGA
USB
AV1
AV2
CVI
€ VGA
Select the VGA SOURCE.
AV1
Select the AV1 SOURCE.
‚ AV2
Select the AV2 SOURCE.
ƒ CVI
Select the CVI SOURCE.
„ USB
Currently connected USB device can
be identified automatically and you may
select to browse the USB in main menu.
No hotkey design is required for this on
remote controller.
r
s
t P +/• Switch to last or next channel in
display mode.
• Scroll to last or next page in menu
mode.
• Select last or next file during AV
playback in USB mode.
u
FORMAT
Select screen format
6
EN
EN
7
Basic display operations are described in this
section.
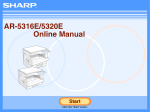
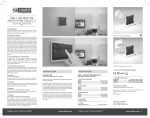
Turn on/off display or switch to
standby mode
Switch to standby mode
• Press the (Stand by - turn on) key on
your remote controller.
»» The standby indicator turns red.
Power off your display
• Press the power switch, located at side of
your display, to the power off position as
shown in figure above.
»» The standby indicator turns off.
Reminder
•• Your display consumes power, though very
little, in standby mode.Unplug your display
from power socket if your display will not be
used for long period of time.
Adjust display volume
4Equipment
connection
VGA
This section describes connection to equipments
with different connectors.
Note
•• You may connect various equipments with
different connector to your display.
$XGLR
VGA
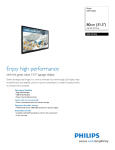
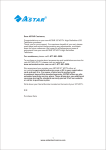
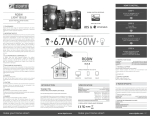
Connectors at bottom of
display
a HDMI
Digital audio and video input from high
definition digital equipments, like Blue-ray
player.
Video
㾚乥
䏳俏幑‣
c SERV. U
For maintenance technician use only.
d Composite input /AV input (Video /Y Pb
Pr Audio left/right)
Simulation audio and video inputs from
simulation or digital devices including:
DVD player or game machine.
Video
㾚乥
තᎫྙ
English
3 How to use your
display
࣋טᎫྙ
注:产品后壳图案请以实物为准
FORMAT
VOL
P
b Audio and video input from computer
(The audio connector is located at side of
display).
9LGHR
/Y
Pb
Pr
5LJKW
/HIW
&RPSRVLWHLQSXW
MENU
TV
DVD
Blu-ray
IPTV
Turn on your display
• Press the power switch, located at side of
your display, to the power on position as
shown in figure above.
• Press the (Stand by - turn on) key on
your remote controller if the standby
indicator lights red.
8
EN
Increase or decrease Volume respectively
• Press the volume +/- key on your display
or the VOL +/- key on the remote
controller.
Mute or unmute
• Press the
mute key.
• Press
again to unmute.
EN
9
Connection to computer
㾚乥
a USB
Data input from USB storage device.
㾚乥
USB
•
Before connecting computer to your display
• Set refresh rate of computer screen to
60Hz.
• Select a supported screen resolution by
computer.
Connect to computer via one of the following
connectors:
HDMI wire and HDMI-DVI adapter
English
Connectors at side of display
$XGLR
DVI
Note
•• An extra audio wire is required in case of DVI
or VGA connection.
b Coaxial output
Digital audio output to home theater or
other digital audio systems.
e Video
Composite video input from simulation
devices like VCR.
•
HDMI wire
•
DVI-HDMI wire
•
VGA wire
VGA
&RD[LDORXWSXW
cEarphone
Stereo sound output to earphone.
Note
9LGHR
fAV Audio input left/right
Audio input from video connected
simulation devices.
$XGLR
VGA
$XGLR
•• Loudspeaker of display mutes automatically
when earphone is inserted.
d Video output
Composite video output to simulation
devices like VCR.
AVinput
DVI
5LJKW
/HIW
10
EN
EN
11
Improve control function for the maximum
benefits by leveraging the Philips EasyLink
HDMI-CEC compatible devices.HDMI-CEC
compatible devices connected via the HDMI
connectors can be controlled by remote
controller of your display.
The following are required before enabling the
Philips EasyLink:
• Connect more tan two HDMI-CEC
compatible devices via the HDMI
connector
• Ensure normal operation of each HDMICEC compatible devices
• Switch to EasyLink
Note
•• The EasyLink compatible device must have
been turned on and selected as the signal
source.
•• Philips does not guarantee 100%
interoperability with every HDMI CEC device.
Enable or disable EasyLink
Once a HDMI-CEC compatible device
is enabled, your display will turn on
automatically and switch to correct signal
source.
Note
Use shortcut standby
1
Press the (Stand by - turn on)key on
your remote controller.
»» Your display and all the connected
HDMI devices switch to standby
mode.
5Product
information
Product information may be changed at any
time and without notice. For detailed product
information, please visit www.philips.com/
support.
Supported resolution
Computer format
• Resolution - refresh rate:
• 640 x 480 - 60Hz
• 800 x 600 - 60Hz
• 1024 x 768 - 60Hz
• 1360 x 768 - 60Hz
• 1920 x 1080 - 60Hz
(BDL4210Q, BDL4610Q)
Video format
• Resolution - refresh rate:
• 480i - 60Hz
• 480p - 60Hz
• 576i - 50Hz
• 576p - 50Hz
• 720p - 50Hz, 60Hz
• 1080i - 50Hz, 60Hz
• 1080p - 50Hz, 60Hz.
(BDL4210Q, BDL4610Q)
•
•
•
Power consumption at standby mode: ≤
0.5 W
Ambient temperature: 5 - 40 degree
Celsius
Power consumption:
• BDL3210Q: 100W
• BDL4210Q: 140W
• BDL4610Q: 160W
Supported display stand
Please purchase Philips or VESA compatible
display mounting stand to install your display.
Please keep at least 2.2 inch (5.5 mm) clearance
between the wall and back of your display to
avoid cable and connector damage.
US:For use only with UL listed Wall Mount
Bracket.
Dimension Required Required installation
of display
distance
screws
screen (inch)
(mm)
M4 (12 mm ≤ L ≤
32
200 x 100 416xmm)
x M6 (18mm
42
400 x 400 4recommended)
46
x M6 (18mm
400 x 400 4recommended)
•• Do not enable Philips EasyLink if you have no
intention to use it.
1
2
3
Press Menu key.
Select [Setup] > [Display setup] >
[Easylink] > [EasyLink].
Select [Off] or [On], and press OK.
Multimedia
•
•
Use shortcut play
1
Press Play on connected device after
EasyLink is enabled.
»» Your display will switch to correct
signal source automatically.
Supported storage devices: USB
(supports FAT or FAT 32 USB storage
device.)
Supported multimedia file format:
• Image: JPEG
• Audio: MP3
• Video: MPEG 2/MPEG 4, H.264,
WMV
Remote controller
•
Battery: 2 x AAA (LR03 type)
Power
•
12
EN
Main power: 100-240V, 60-50Hz
Product specification
Design and specification may be changed at any
time and without notice.
BDL3210Q
• Without stand
• Dimension (W x H x D): 745.2 x
462.7 x 39.9 (mm)
• Weight: 17.75 lb
• With stand
• Dimension (W x H x D): 745.2 x
513.2 x 180 (mm)
• Weight: 18.47 lb
BDL4210Q
• Without stand
• Dimension (W x H x D): 978.2
ENx 13
594.1 x 79.5 (mm)
• Weight: 30.09 lb
English
Connect with Philips EasyLink
Logo requirements given by Chinese
Electronic Information Products Pollution
Control
Name and contents table of toxic and hazardous substances and
elements contained in this product
Toxic and hazardous substances and elements
Lead
(Pb)
Mercury
Cadmium Hexavalent Polybrominated Polybrominated
Component name
(Hg)
(Cd)
chromium
biphenyls
diphenyl ethers
(Cr6+)
(PBBs)
(PBDEs)
Plastic frame
○
○
○
○
○
○
Back panel
○
○
○
○
○
○
LCD CCFL
×
×
○
○
○
○
panel LED
×
○
○
○
○
○
Power substrate
×
○
○
○
○
○
Main board
×
○
○
○
○
○
Keypad
×
○
○
○
○
○
Base
○
○
○
○
○
○
Power cord
×
○
○
○
○
○
Miscellaneous wires
×
○
○
○
○
○
Remote controller
×
○
○
○
○
○
*: The PCB assembly contains printed circuit board as well as its components including: resistors,
capacitors, IC, and connectors.
○: This indicates that contents of this hazardous substance in all homogeneous material of this assembly
is below the limit set by SJ/T11363-2006 (Limits of Toxic and Hazardous Substances in Electronic
Information Products).
×: This indicates that contents of this hazardous substance in at least one homogeneous material of
this assembly is above the limit set by SJ/T11363-2006 (Limits of Toxic and Hazardous Substances in
Electronic Information Products).
Note: Some above assemblies marked with symbol "X", with hazardous substance over the given limit,
cannot be replaced or made with decreased contents as restricted by existing industry technology level.
Environment protection life cycle
Product with this mark on its body indicates its Environment protection life cycle is 10 years.
The environment protection life cycle of a electronic information product is a period of time that
hazardous substance or element contained in it would not leak out or vary suddenly and that the use
of this electronic information product would not pollute the environment heavily and lead to serious
personal injury and property damage.
Please use this product according to steps described in this User Guide within its environment protection
life cycle.
Battery, the wearing parts of this product, is not covered by the environment protection life cycle.
Remarks on Management Ordinance for Disposal of Old Electrical and
Electronic Product.
To better care and protect the earth, please observe local regulations for disposal of waste electric
and electronic products by leaving this product, when it is to be used no more or at the end of its life
cycle, at certified collection points for recycling.
X41G32MV81315B
© 2012 Koninklijke Philips Electronics N.V.
All rights reserved.
Document order number: X41G32MV81315B
Philips and Philips shield logo is registered trademark of Koninklijke Philips Electronics NV.
Any use of such mark must be licensed by Koninklijke Philips Electronics NV.