1
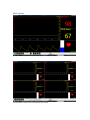
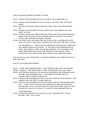
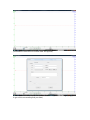
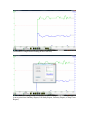
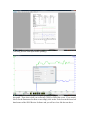
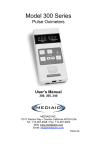
CMS-50D Plus Instructions by Cooper Medical Supplies
(These instructions are to supplement the manufacturer’s user manual not to replace it!)
Note: There are several softare versions that are compatible with the CMS-50D Plus. It
depends on which version of Windows you are using and which version of firmware your
oximeter has (the number that first shows on your oximeter screen when you first power
it on). The software is always being changed and improved. If you purchase the
oximeter from Cooper Medical Supplies, I will send you an email that may have
instructions that are newer than this manual.
CMS-50D Plus
Windows Vista, XP, or earlier use Version 1.0 of SPO2 Review
Windows 7 use Version 1.2 of SPO2 Review
Once you have installed the software onto your computer, you will have 2 icons on your
desktop. One is a red heart that says SPO2, and the other is a green heart that says SPO2
Review. For continuous readings on your computer screen select SPO2. For
downloading readings and sleep studies select SPO2 Review.
SPO2 Software
(Screenshot of SPO2 with 1 Oximeter)
(Screenshot of SPO2 with 4 oximeters on screen)
CMS-50D Plus RECORDING INSTRUCTIONS
STEP 1: PRESS THE POWER BUTTON TO TURN THE OXIMETER ON.
STEP 2: PRESS THE POWER BUTTON AGAIN TO GO INTO THE SETTINGS
MENU.
STEP 3: PRESS AND HOLD THE POWER BUTTON UNTIL RECORD SHOWS
ON.
STEP 4: PRESS THE POWER BUTTON AGAIN AND THE ARROW WILL BE
NEXT TO EXIT
STEP 5: PRESS AND HOLD THE POWER BUTTON AND THE OXIMETER WILL
SHOW THE OXYGEN LEVEL AND HEART RATE WITH A FLASHING
DOT IN THE TOP RIGHT HAND CORNER
STEP 6: AFTER A FEW SECONDS THE OXYGEN LEVEL AND HEART RATE
WILL GO AWAY AND THE FLASHING DOT WILL BE THE ONLY THING
ON THE DISPLAY. THIS IS SO THE BRIGHT LIGHTS DO NOT DISTURB
YOU WHILE TRYING TO SLEEP. IF YOU HIT THE POWER BUTTON
NOW, THE DISPLAY WILL SHOW RECORDING. IF YOU PRESS AND
HOLD THE POWER BUTTON, THE DISPLAY WILL SHOW YOUR
OXYGEN LEVEL AND HEART RATE FOR A FEW MORE SECONDS.
PLEASE NOTE: ONCE STARTING A NEW RECORDING ALL PREVIOUS DATA
WILL BE LOST
ONCE YOU FINISH RECORDING:
STEP 1: TAKE THE OXIMETER OFF. OPEN THE SPO2 REVIEW SOFTWARE.
STEP2: CONNECT THE OXIMETER TO THE COMPUTER VIA USB CABLE.
STEP3: HIT THE MAGNIFYING GLASS ICON AND PRESS NEW SESSION AND
ENTER YOUR INFORMATION. THE SCREEN SHOWS DEVICE
CONNECTED: WAITING FOR DATA.
STEP 4: PRESS THE POWER BUTTON TO GO INTO THE SETTINGS MENU. THE
ARROW WILL BE NEXT TO RECORD ON.
STEP 5: PRESS THE POWER BUTTON AND HOLD UNTIL IT SHOWS RECORD
OFF. YOUR DATA WILL BE UPLOADED INTO THE SPO2 REVIEW
SOFTWARE. YOU CAN NOW GO INTO THE SOFTWARE AND HIT THE
TOOLS BUTTON IF YOU WANT TO ADJUST THE PARAMETERS OF
YOUR READING.
STEP 7: PRESS THE PRINT ICON AND YOU CAN CHOOSE THE TYPE OF
REPORT THAT YOU WANT.
(Screenshot of SPO2 Review Screen when first opened).
(Screenshot of SPO2 Review Software New Session Entry. Press the Magnifying glass
to get to this screen and upload your data.)
(Screenshot of sample data recording in SPO2 Review)
(Screenshot after hitting printer button. You will have the option of which report you
want to print from Summary Report, Full Study Report, Oximetry Report, or Strip Chart
Report).
(You may preview each report before printing)
You may also notice small squares on your graph. These appear at 22:26 and 22:29 on
this graph. These show when you are having a SPO2 or Pulse Rate event. If you would
like to set the Parameters for these events simply click on the Tools Icon in the lower left
hand corner of the SPO2 Review Software and you will see a box like the one above.
Note: Normally a desaturation event is considered a drop of 4% for at least 10 seconds.
Also, when a person’s oxygen level drops to 88% or below, they are considered to be
hypoxic and not getting enough oxygen into the bloodstream.