1
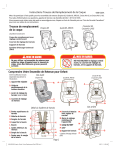
BTX 6015 BASKET 3x3 www.bodet-sport.com BODET SA BP1 49340 Trémentines I FRANCE Tél. 00 33 241 71 72 00 Fax 00 33 241 71 72 01 Usine de Trémentines Système de Management certifié Réf : 607445G Installation Instructions and user Manual Upon receipt, always check the product for damage during shipment. If any is found, you may file a damage claim with the carrier. 1 Summary I- Checking the equipment upon reception.......................................................................................3 II - Overall presentation of the products.............................................................................................4 III - Setting of the Dip switches ...........................................................................................................5 IV - Wall mounting ot the BTX6015.....................................................................................................6 V- Mounting the BTX6015 on a tripod stand.....................................................................................6 VI - Ground mounting of the BTX6015................................................................................................7 VII - Electric connections of the BTX6015............................................................................................7 VIII - Electric connections of the BTX6002............................................................................................8 IX - How to use of the main keyboard.................................................................................................9 X- Main keyboard LCD display.........................................................................................................10 XI - Sport parameter setting menu.....................................................................................................11 XII- How to use of the shot clock keyboard........................................................................................12 Electrical and mechanical safety standards - - - - - - 2 The BTX6000 scoreboard series being powered by the mains must comply with the IEC 364 standard. Indoor use (the panel is protected against hits from the basketball - DIN 18032.3 standard). The installation of this equipment must be fully completed before powering it on. It is prohibited and dangerous to immerse the scoreboard in to water or clean it with a water jet. Bodet accepts no responsibility for any use not in compliance with these instructions.. Any modification to the product will invalidate the guarantee. I - Checking the equipment upon reception The kit is made of : - The BTX6015 BASKET 3x3 scoreboard. - The BTX6002 shot clock. - The main keyboard - The shot clock keyboard BTX6015 BASKET 3x3 BTX6002 Main keyboard Shot clock keyboard The maximum distance for HF communication between the keyboard and the panel is 100 metres in line of sight. Make provision for a power source (extension cord) near the scorer’s table in order to charge the keyboard battery during a game if its charge level were to drop (operation autonomy with a full charge > 8 hours). 3 II - Overall presentation of the products Stopwatch/Timer (minutes / seconds) or Local Time display: yellow digits End of period indicator / Game clock stopped Home and Guest Score (0 to 99) display: red digits Shot clock (count down from 12 to 0 second): red digits (20cm) 4 III - Setting of the Dip switches 1/ BTX6015 panel card 1st dip bank 2nd dip bank 1.1/ On the 1st dip bank, dips 1 to 4 are used for the factory configuration of the panel. Out of the factory the dips are set as follow: Dip 1 Dip 2 Dip 3 Dip 4 on ↑ off ↓ off ↓ off ↓ Dips 5 to 7 are used to identify each panel. Dip 8 is not used. If several panels are used on the same site each panel must have its own number. Pannel number Dip 5 Dip 6 Dip 7 1 off ↓ on ↑ on ↑ 2 on ↑ off ↓ on ↑ 3 off ↓ off ↓ on ↑ 4 on ↑ on ↑ off ↓ 5 off ↓ on ↑ off ↓ 6 on ↑ off ↓ off ↓ 1.2/ On the 2nd dip bank: - Dips 1 to 3 are used to set the installation number. - Dips 4 to 8 are unused. Installation N° Dip 1 Dip 2 Dip 3 1 off ↓ on ↑ on ↑ 2 on ↑ off ↓ on ↑ 3 off ↓ off ↓ on ↑ 4 on ↑ on ↑ off ↓ 5 off ↓ on ↑ off ↓ 6 on ↑ off ↓ off ↓ 2/ BTX6002 dips 5 IV - Wall mounting the BTX6015 Install the panel to the wall with 4 screws Ø 6mm (not supplied) and 4 matching wall anchors using the 4 teardrop shaped holes. 317 800 V - Mounting the BTX6015 on a tripod stand 1/ Fasten the L shaped bracket to the base plate of the stand with the 4 supplied scews as in B. 2/ Fasten the panel to the angle bracket with the 4 supplied screws as in A. B A Nut HU M6 Zn Flat washer Ø8 Zn Screw H M8 X 20 ZI Screw H M6 X 20 ZI Flat washer Ø8 Zn Nut HU M8 Z Flat washer Ø6 Zi Flat washer Ø6 Zi A C L shaped panel bracket B Stand plate Tripod stand 6 VI - Ground mounting of the BTX6015 shot clock 1/ Install the panel on the ground with 4 screws Ø 6mm (not supplied) and 4 matching anchors using the 4 holes of the panel feet. 4 holes for ground mounting VII - Electrical connections of the BTX6015 1/Connect the 110/230V AC power plug of the display panel to the wall socket or to output socket of the inverter. BTX6015 BASKET 3x3 AC power plug 7 VIII - Electrical connections of the BTX6002 1/Connect the 20m long interface cable (A) (407179 - which carries the power and data) to the BTX6015 scoreboard. A 8 IX - How to use the main keyboard 1 2 3 4 13 8 5 6 16 9 10 11 14 12’ 15 14’ 7 12 Function 15’ Key nber Time of day clock or game clock by pressing briefly. 1 Start a new game by pressing at least 3 sec. 2 Reset the game clock (stopwatch/timer) while the game clock is stopped and without resetting the scores. 3 Next period. 4 Unused. 5 Starts the game clock. 6 Stops the game clock 7 Access to the parameter setting menu 8 Correction mode: press this key briefly, the keyboard LCD display blinks. After rectification, press this key to return to active mode. 9 Unused 10 In game mode: starts a new game when pressed at least 3 sec. In parameter setting menu: validate the parameters and exit the menu 11 Unused Keys to navigate through the menus When starting a game: press briefly on the + and - keys to change the play time (minutes). 12 et 12’ 13 Unused. 14 et 14’ Add 1 to the Home team’s score or to the Guest team’s score. 15 et 15’ Adjusment of the display panel luminosity 16 9 X - How to use the shot clock keyboard 3 2 5 6 7 1 9 8 4 Function Key nber Starts/stops the shot clock . 1 Turns ON/OFF the horn. The horn blows as long as the key is pressed. 2 Display of the shot clock timing with Start/stop LED indicator. 3 Resets the shot clock to 24 sec. 4 Erases the display of the shot clock (only when the shot clock is stopped). 5 In edit mode, pressing once this key increments the shot clock time by 1sec. 6 Shot clock time edit mode: press once and the LCD display flashes. Edit using the key + (6) and key - (8) then press C (7) to go bacl to normal mode. Correction up to 90 sec. 7 In edit mode, pressing once this key decrements the shot clock time by 1sec. 8 Reset the shot clock to 14 sec. 9 10 X - Main keyboard LCD display Cumulative total of the Home team’s fouls Game clock count up or countdown indicator. Play time. Game clock stopped indicator. Cumulative total of the Guest team’s fouls . Automatic horn indicator. Guest team 3 time-out indicators. Guest team’s score. Period number. Home team’s score. Home team 3 time-out indicators Nota : the rest times can be stopped during the countdown by pressing the «Star/Stop» key and the timeouts by pressing the appropriate «Time out» key. At the end of the countdown; the game clock does not restart automatically. To restart it press the «Start/Stop» key. 11 XI - Sport parameter setting menu Type 1 Parameters Shot timer duration : 12 sec 1 to 99 seconds Stot timer end stp game : Description Time left to attempt a field goal Yes or No Shot clock count reaching 0 stops the game clock. Yes or No If Yes, the last second is displayed on the shot clock BTX6002 in 1/10 sec No End of period indicator : yes Shot timer at 0 indicator : Shot timer 1/10 th : No No Duration before game : 0 min 0 to 90 minutes If = 0, no automatic countdown If > 0, the panel BTX6015 displays the countdown from the value that was programmed at the sport prameter setting sport. Press «Start» to launch the countdown. Horn before game play : 0 min 0 to 90 minutes To signal the beginning of the next match with a brief blow of the horn. If = 0: no horn. 1 to 9 periods Period Number /game : Period duration /game : 10 min Team foul maxi cumul. : Select the duration of each period of a game. 1 to 9 Select the maximum number of fouls allowed per team. 1 to 6 Select the number of personal fouls before exclusion. 4 1 to 99 seconds Select the duration of the time-outs. : 30 sec Yes or No Auto horn time out end : Horn duration : 0 to 99 seconds If=0, no automatic honking of the horn. If>0, limits the duration of the honking of the horn to reduce the noise level in the sport hall 10 to 60 seconds by 10 sec. steps Keeps displaying the result of the last period for a programmble length of time if the automatic rest time is not programmed. Yes or No No If=0, no automatic honking of the horn. If>0, brief honking of the horn before the end of the time-out. 0 to 5 seconds 3 sec Keep display result : 30 sec Factory data load : If Yes the horn will honk automatically at the end of a time-out. No Horn before time out end : 10 sec 12 1 to 50 minutes 7 Individual foul number : Time out duration Select a game with 1 to 9 periods. 1 If Yes, reloads the parameters as they were at the first start up of the Panel. XIII - Technician menu The technician menu is set at the factory according to the where the system will be installed. To get to the Technician menu, press the keys OK + POSS/SERVICE of the main keyboard for at least 5 sec: - Edit the value of each parameter with the + and - keys (13). - To go to the next parameter use the ► key. - To go back to the previous parameter use the ◄ key. -To validate the parameter setting press OK. This menu is for technician only Some parameters can alter the operation of the system. LCD Display Parameters Description Technician menu Luminosity: 1 1 to 5 Technician menu Temp offset: 0 - 9 to 9 by1°C steps Temperature offset adjustment. Technician menu: GPS Sync.: 0 -12 to +12 Set the time zone. No automatic summer/winter change-over. Technician menu Mode Eco: Oui Yes or No Select Yes to completeIy turn off the display panel (except for the clock stopped indicator) between minight and 6:00 am. The keyboard must not be in operation. Technician menu Board type:6015A 6002, 6006, 6008, 6015, 6020, 6120, 6025, 6025A, 6125V1, 6125V2, 6125A, 6225, 6225A, 6325V1, 6325V2, 6325A, 6425, 6425A, 6525, 6525A, 6625, 6625A, 6030A, 6130A, 6230A, 6330A, 6530A et 6730A Select the display panel to control. The main keyboard automatically adapt itself to the panel (ex. if BT6025 is selected, the keyboard does not ask to set the player number parameters). IMPORTANT: a wrong parameter setting will cause erroneous display on the panel. Technician menu Channel ? : 1 1 to 6 Adjust the luminous intensity of the panel (in cluding BTX6002). Operating channel selection. Select a different channel for different zones. Technician menu Board nb 1: Oui Yes or No Yes = the keyboard control scoreboard number 1. No = the keyboard does not control the scoreboard number 1. Technician menu: Board nb 2: Non Yes or No Yes = the keyboard control scoreboard number 2. No = the keyboard does not control the scoreboard number 2. Technician menu Board nb 3: Non Yes or No Yes = the keyboard control scoreboard number 3. No = the keyboard does not control the scoreboard number 3. Technician menu Board nb 4: Non Yes or No Yes = the keyboard control scoreboard number 4. No = the keyboard does not control the scoreboard number 4. Technician menu Board nb 5: Non Yes or No Yes = the keyboard control scoreboard number 5. No = the keyboard does not control the scoreboard number 5. Technician menu Board nb 6: Non Yes or No Yes = the keyboard control scoreboard number 6. No = the keyboard does not control the scoreboard number 6. Technician menu Modem :Auto Yes, No or Auto Select Yes if installation is wireless. Select No if installation is wired. Select AUTO if installation is both. Technician menu: Language : F F, GB, D, E, Da Selection of the language: French, English, German, Spanish or Danish. 0 to 90 minutes Elapsed time since the last action on the keyboard before it turns itself off automatically. If selection = 0, the keyboard does not turn itself off automatically. Technician menu keyb stop : 60 min min Technician menu 11/06/09 - V2_1A425 - Display of the keyboard program version number and date. A 13