1
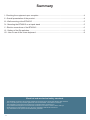
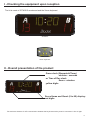
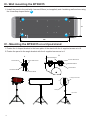
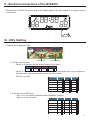
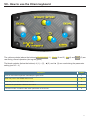
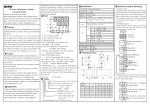
BTX 6015 Xtrem
Installation Instructions
www.bodet-sport.com
BODET SA
BP30001
49340 Trémentines I FRANCE
Tél. +33 241 71 72 00
Fax +33 241 71 72 01
Réf : 607499D
and User Manual
Upon receipt, always check the product for damage during shipment. If any is found, you may file a damage claim with the carrier.
1
Summary
I - Checking the equipment upon reception...........................................................................................4
II - Overall presentation of the product..................................................................................................4
III - Wall mounting ot the BTX6015 .......................................................................................................5
IV - Mounting the BTX6015 on a tripod stand.......................................................................................5
V - Electric connections of the BTX6015...............................................................................................6
VI - Setting of the Dip switches.............................................................................................................6
VII - How to use of the Xtrem keyboard................................................................................................8
Electrical and mechanical safety standards
-
-
-
-
-
-
2
The BTX6000 scoreboard series being powered by the mains must comply with the IEC 364 standard.
Indoor use (the panel is protected against hits from the basketball - DIN 18032.3 standard).
The installation of this equipment must be fully completed before powering it on.
It is prohibited and dangerous to immerse the scoreboard in to water or clean it with a water jet.
Bodet accepts no responsibility for any use not in compliance with these instructions..
Any modification to the product will invalidate the guarantee.
I - Checking the equipment upon reception
The kit is made of: BTX6015 scoreboard and the Xtrem keyboard.
BTX6015
Xtrem keyboard
II - Overall presentation of the product
Game clock (Stopwatch/Timer)
minutes : seconds
or Time of Day clock
hours : minutes
yellow digits
Score Home and Guest (0 to 99) display:
red digits
The maximum distance for HF communication between the keyboard and the panel is 100 metres in line of sight.
3
III - Wall mounting the BTX6015
1/ Install the panel to the wall with 4 screws Ø 6mm (not supplied) and 4 matching wall anchors using
the 4 teardrop shaped holes A .
A
A
317
A
A
800
IV - Mounting the BTX6015 on a tripod stand
1/ Fasten the L shaped bracket to the base plate of the stand with the 4 supplied scews as in B.
2/ Fasten the panel to the angle bracket with the 4 supplied screws as in A.
B
A
Nut HU M6 Zn
Flat washer Ø8 Zn
Screw H M8 X 20 ZI
Screw H M6 X 20 ZI
Flat washer Ø8 Zn
Nut HU M8 Z
Flat washer Ø6 Zi
Flat washer Ø6 Zi
A
C
L shaped panel bracket
B
Stand plate
Tripod stand
4
V - Electrical connections of the BTX6015
1/Connect the 110/230V AC power plug of the display panel to the wall socket or to output socket of
the inverter.
BTX6015
AC power plug
VI - DIPs Stetting
1/ Display panel electronic card
First DIP bank
Second DIP bank
1.1/ On the first DIP bank:
- Dips 1 to 4 are used for the factory setting of the panel.
Dip 1
Dip 2
Dip 3
on ↑ off ↓ off ↓ Dip4
on ↑ - Dips 5 to 7 are used to set the panel number (if several panels are to be controlled on
the same site, each panel needs to have its own number).
- Dip 8 is not used.
Pannel number
Dip 5
Dip 6
Dip 7
1
off ↓
on ↑
on ↑
2
on ↑
off ↓
on ↑
3
off ↓
off ↓
on ↑
4
on ↑
on ↑
off ↓
5
off ↓
on ↑
off ↓
1.2/ On the second DIP bank :
- Dips 1 to 3 are used to determined the installation number.
- Dips 4 to 8 are not used.
Installation number
Dip 1
Dip 2
Dip 3
1
off ↓
on ↑
on ↑
2
on ↑
off ↓
on ↑
3
off ↓
off ↓
on ↑
4
on ↑
on ↑
off ↓
5
off ↓
on ↑
off ↓
6
on ↑
off ↓
off ↓
5
1/ Keyboard card
1.1/ On SW1:
- Dips 1 to 3 used to set the number of the panel to control.
1.2/ On SW2 :
- Dips 1 to 3 used to set the operating channel number.
1.3/ On SW3 :
- Dips 1 to 3 used to set the operating installation number.
Nota : the Xtrem keyboard is set by default to Panel 1, Channel 1 and installation 1.
SW1
SW2
SW3
6
Panel number
Dip 1
Dip 2
Dip 3
Panel 1
off ↓
off ↓
on ↑
Panel 2
off ↓
on ↑
off ↓
Panel 3
off ↓
on ↑
on ↑
Panel 4
on ↑
off ↓
off ↓
Panel 5
on ↑
off ↓
on ↑
Panel 6
on ↑
on ↑
off ↓
Chanel number
Dip 1
Dip 2
Dip 3
Channel 1
off ↓
off ↓
on ↑
Channel 2
off ↓
on ↑
off ↓
Channel 3
off ↓
on ↑
on ↑
Channel 4
on ↑
off ↓
off ↓
Channel 5
on ↑
off ↓
on ↑
Channel 6
on ↑
on ↑
off ↓
Installation number
Dip 1
Dip 2
Dip 3
Installation 1
off ↓
off ↓
on ↑
Installation 2
off ↓
on ↑
off ↓
Installation 3
off ↓
on ↑
on ↑
Installation 4
on ↑
off ↓
off ↓
Installation 5
on ↑
off ↓
on ↑
Instllation 6
on ↑
on ↑
off ↓
VII - How to use the Xtrem keyboard
1
2
3
4
5
The yellow symbols (above the buttons) START/STOP (1), GOAL (2 and 3), OK (4) and
use during normal operation (during the game).
(5) are
The black symbols (below the buttons) + (1), - (5), ◄(2) and ► (3) are used during the parameter
setting (see VII - 4).
Function
Index
Turns on and off the keyboard / Start-Stop the game clock
1
Adds one point to the HOME team’s score
2
Adds one point to the GUEST team’s score
3
Validation of a parameter / Starts a new match
4
Correction mode: cancels the last action performed on the scores
5
7
1. How to start the system?
Press the START/STOP (1) for at least 3 sec. to pair the keyboard and the scoreboard
2. How to turn off the sytem?
If the keyboard is not used during 3 hours the BTX6015 scoreboard displays the Time of Day if the Ec
mode is Off or the Scoreboard goes blank if the Ec mode is On (see Technician menu).
3. How to start a match?
The match can be started with the Start/Stop button (1) since the parameter setting is done wehen the
system is started.
4. How to modify the parameters of a sport?
Press the keys ◄ (2) and ► (3) simultaneously for 3 seconds during a game (the game clock must be
stopped). Browse through the menu with the ◄ (2) and ► (3) keys and modify the parmeter values
with the + (1) or - (5) key.
Validate with OK (4).
Period duration (1 to 99).
Period number (1 to 99).
Stopwatch (UP) or Timer (do) mode of the game clock.
Cumulative period duration: Yes (Y) or No (n). (e.g. by chosing Yes for a 2 x 10mn periods
game, the game clock will count from 10 to 20 in the second period; however if the choice is
No, the game clock will count from 0 to 10 in the second period.
This applies also for the Extra-time periods.
Extra-time duration (1 to 99). (Et = Extra-time).
Number of Extra-times (1 to 99).
Time-out duration (0 to 60 sec)
.
Time-out activation: Yes (y) or No (n)
Maximum number of points per game (1 to 99).
DS = 0, no score management.
DS > 0, timer/stopwatch stops when the scrore of a team reaches DS, the timer / stopwatch
may be restarted.
8
5. Default parameters
The default parameter settings are as follow:
Program
Function
tP
Period duration
20
Duration of a game period.
nP
Number of periods
2
Number of periods for the game.
Co
Count Up/ Count Down
do
1/10 of sec. Countdown during the last minute
CP
Cummulative period
time
n
Et
Extra time duration
0
Et = Extra-time
nE
Number of Extra time
0
Number of Extra time if tie at the end of the match.
DS
Hour + score
CS
If «Yes» in a 2 x10 min periods match the second
period will start from 10.
If «no» the second period will start from 0.
CS: game clock + score
TS : Time + score
-S : only score
To reset the parameters to their default value press the + (1) and - (5) keys simultaneously for 3
seconds.
Select between yes (Y) o no (n) with the + (1) and - (5) keys.
Validate with OK (4).
6. How to start/stop the game clock?
During a match, press START/STOP (1) to start the game clock, press again to stop it.
7. How to add 1 point to the HOME or GUEST team ?
Press the ◄ (2) or ► (3) key.
8. How to make a correction to the score ?
Press the key (5) to go back to the previous score.
9. How to start a new match ?
Press the OK (4) key for 3 seconds.
10. How to add/remove seconds to the game clock?
Game clock stopped, press the OK (4) key, the didplay blinks.
With the + (1) and - (5) key, modify the seconds within the limit of the period.
Validate with the OK (4) key.
9
11. Technician menu
1/ To access the technician menu, press the keys + (1) and - (5) simultaneously for 3 seconds.
2/ Select the parameters with the keys ◄ (2) and ► (3).
Validate with the key OK (4)
dF : if Yes (y), reloads the factory default values. (n = No).
Ec : if Yes (y), if no activity the scoreboard display is turned off,
if No (n), the scoreboard display the Time of Day when the match is not being played.
ti : Time setting:
if Y the minutes blink, change the values with keys + (1) and - (5). To modify the hours use the
keys ◄ (2) ou ► (3), the hours blink. use the keys + (1) and - (5) to change the values.
Validalite and exit with the OK (4) key.
Lu : adjustment of the luminosity of the scoreboard with the keys + (1) and - (5).
dH : duration of the horn blowing with keys + (1) and - (5) (0 to 5 seconds).
tS : test of the scoreboard.
If Y the test program is started and progresses as follow:
1/ display of the EProm version,
2/ display of the flat cable number of each module,
3/ display of the address of each module on the cable,
4/ lighting of all LEDs of all the modules,
5/ blanking of all the LED modules,
6/ display of the keyboard channel number,
7/ back to the technician menu.
THE DOCUMENT IS CONCERNING THE FOLLOWING PRODUCT :
915797
10
BTX6015 XTREM