1
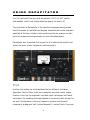
Decapitator
Analog Saturation Effects
SoundToys
P.O. Box 528
Burlington, VT 05401
Phone: 802-951-9700
Fax: 802-951-9799
Phone: 802-951-9700
Technical Support
Web: www.soundtoys.com/support
Email: [email protected]
C
O
N
T
E
N
T
S
3
I N T R O
3
3
3
THANKS!
Installation
Basics
4
USING DECAPITATOR
4
6
6
7
7
7
7
8
8
8
9
Style
Drive
Auto Gain
Punish
Output
Mix
Low Cut
Thump
Tone
High Cut
Steep
FOR MORE DETAILS
10
TRADEMARK INFO
11
2
I
N
T
R
O
THANKS!
First off we want to say a big THANK YOU for your purchase of Decapitator.
We know there are an awful lot of plug-ins for you to choose from and we
are truly grateful that you have chosen to spend your hard earned money
on our products. We take a lot of pride in our work and we sincerely hope
that you find our plug-ins inspirational and musically useful.
Installation
If you’re reading this manual, you’ve PROBABLY already installed
Decapitator successfully on your system. If you need any more help in this
area, please read our SoundToys Getting Started guide, which covers
installation for all of our plug-ins.
Basics
It’s also important to know a few things about how our knobs work (there
are a few little hidden tricks), and about using presets and automation. All
of this is covered in the SoundToys Getting Started guide.
3
U S I N G
D E C A P I T A T O R
First, let’s get out of the way what Decapitator is NOT. It’s NOT a guitar
amp modeler, and it’s not a tape saturation plug-in. So what is it?
The inspiration for Decapitator is the sound of analog gear being pushed
hard to the point of saturation and beyond. Something old-school engineers
would do all the time, whether it was overdriving the mic preamps on their
massively expensive mixing consoles, or racks of outboard gear.
Decapitator aims to emulate that sound. Use it to add warmth and dirt and
fatness to vocals, drums, keyboards, and even guitars.
Style
Use the style buttons to switch between the five different saturation
algorithms. Each of these styles was created by analyzing various analog
channels in our lab. Our engineers used both ‘geek’ techniques and ‘tweak’
techniques. Our modeling technique allowed us to closely match (at least to
our ears!) the harmonic structure, frequency response, and dynamic
response of analog gear that’s pushed beyond it’s ‘normal’ limits. Every one
4
of these channels (and much more!) resides here at the SoundToys lab. We
looked at and listened to a lot, and gave you what we thought were some of
the coolest sounds. Here is a guide to what was modeled*:
A: Modeled after Ampex® 350 tape drive preamp. The Ampex 350 tape
recorder was a studio workhorse in the 1950s, back in the early days of
Elvis and Johnny Cash; Sun, Stax, and Chess Records. Eventually these old
beasts were replaced by newer, better (really?) machines. Often, the
preamp sections were pulled out, rewired, and used as stand alone mic
pres. These things have a ridiculous amount of gain, perfect for ribbon mics
AND for an ultra-smooth tube distortion sound. We like this one A LOT!
E: Modeled after Chandler®/EMI® TG® Channel. Wade Goeke at Chandler
Designs has crafted some truly excellent gear based on vintage mixing
consoles from the famous EMI/Abbey Road studios in London. We just love
the sound and the attitude of his gear, especially the TG channel, which is
an excellent mic preamp, DI and EQ, with loads and loads of character. If
you don’t have a good mic pre, you should run out and buy one of these
now.
N: Modeled after Neve® 1057 input channel. Not your mother’s Neve input
channel! The Neve 1057 (and the rest of the 105x series) are built around
Germanium transistors (think vintage FuzzFace), and have a unique and
distinctive sound that sounds great, especially on guitars (big surprise
there!).
T: Modeled after Thermionic Culture® Culture Vulture® triode setting. The
Culture Vulture was the first dedicated Studio (meaning not just guitar)
distortion device, and is an amazingly useful tool for adding warmth and
various levels of dirt to drums, vocals, keyboards or just about anything.
This setting models the sound of an overdriven ‘Triode’ tube, which is what
is commonly used as the preamp tube for guitar amplifiers or tube mic
preamps. Triodes typically add loads of even harmonic distortion, and that’s
5
true here. The sound is warm and punchy, and is especially useful to add
some attitude to drums or other percussive instruments.
P: Modeled after Thermionic Culture® Culture Vulture® pentode setting.
This style models an overdriven Pentode tube, which is commonly used in
the output stage of guitar and other amplifiers. It is usually characterized
by odd harmonic distortion, and because of that, has a different sound from
triodes amplifiers (which have more even harmonics). We just like the
sound.
* The above products and trademarks are the property of their respective
owners, which are in no way associated or affiliated with SoundToys. These
trademarks are used only for historical reference or to identify products
whose sounds or tone were studied in the development of our plug-ins, and
in no way represent an endorsement, partnership, or any other relationship.
Drive
This is the control you will be using ALL the time. Turn it up to increase the
gain (and distortion) on the modeled channel. Watch out, as this can get
very loud!
Auto Gain
If you want to get all the distortion without all the loudness, flip auto-gain
on. This will automatically turn down the output as you increase the drive
level. Notice that as you adjust the Drive control, the Output control will
move in the opposite direction. You can still adjust
6
Punish
If you’ve maxed out your drive control and you still want more distortion go
ahead and press the Punish button. We know you want to! This kicks in an
extra 20 dB of gain, so things will be loud AND distorted.
Output
The Output knob turns DOWN the output level. When Auto is switched on,
the gain is adjusted automatically when the Drive is adjusted. If you want
total control, or just want things as loud as possible, switch off Auto and
use this control.
Mix
Use the Mix control to blend the original signal in with the saturated
version. This is a great trick to restore the transients of your original sound
that get chopped off by the saturation stage. This is similar to ‘Parallel
Compression’, a trick used by many top engineers to shape the sounds of
drums and other instruments.
Low Cut
Use the Low Cut control to remove low frequencies before they hit the
saturation ‘circuit’. This is useful to prevent the excessive ‘flabbiness’ that
can happen when distorting sounds with a lot of low frequency content.
Turning Low Cut higher will remove progressively more lows (the bass
frequencies). At extreme settings you can get some very low-fi telephone
and AM radio effects, especially when used together with the High Cut
control.
7
Thump
The Thump switch will add a few dB of low frequency boost right at the Low
Cut frequency. This is similar to the ‘head bump’ of analog tape recorders,
and is one of the reasons that recording to analog tape can sound so fat.
Keep in mind that switching on Thump will INCREASE the amount of low
frequencies that hit the saturation circuit. So, this can add some flabbiness
to the sound, or sound incredible, depending on the setting of the Low Cut
and the characteristics of the sound that you’re working with.
Tone
The Tone control is an easy way to adjust to overall color of your sound,
from “Dark”, to “Bright”. The Tone adjuster is a very gentle sloping
equalizer, similar to the old tone control on AM radios.
When the Tone knob is moved to the left, or the “Dark Side”, the low
frequencies will be boosted, and the high frequencies will be attenuated.
When the Tone knob is moved to the right, or the “Bright Side”, the lows
will be decreased, and the highs will be boosted.
Keep in mind that the Tone knob affects the sound before the saturation
section, so it will affect which frequencies get distorted, and can have a
dramatic effect on the sound.
High Cut
The high cut control will remove high frequencies from the distorted sound,
and as such it operates AFTER the saturation section. This is different from
the Low Cut and the Tone controls.
Depending on the source that you’re working with, a certain amount of High
Cut is sometimes necessary to keep the distortiong from sounding ‘fizzy’, a
8
common complaint of some distortion devices. We’ve decided to give you
total control over the amount of ‘Fizz’ you’d like to leave in, or take out.
Steep
The Steep switch alters the slope of the High Cut filter. When it is OFF, the
High Cut filter is a very gentle 6 dB per octave rolloff. When it is ON, a
super-steep 30 dB per octave filter is switched in.
Even though Decapitator is NOT a guitar amp emulator, the Steep setting IS
useful for emulating the sound of a guitar amplifier speaker cabinet. Step
Steep to ON and set the HighCut to somewhere in the 4kHz to 5 kHz range.
9
F O R
M O R E
D E T A I L S
If you made it this far, you deserve a medal! Now that you’ve taken the time
to learn all about Decapitator, go to it! Have fun, experiment, and make
great sounds!
We offer free technical support for all registered users. We love to hear
from you, but if you are having problems, please first try to look in the
manual or on the support page of our web site for an answer. If you are still
stumped, please e-mail us with the following info:
• The product version and serial number
• The version number of your audio system (e.g ProTools, Cubase, Ableton,
etc) , and type of hardware (e.g.Digi-002, M-Audio interface, etc.)
• Your computer type and operating system version number (e.g. OS X
10.4.5, Windows XP SP3, etc.)
• A detailed description of the problem
The e-mail address for support is: [email protected]
If you don’t have e-mail (What? There are people without e-mail?), you can
call us at 1-802-951-9700.
SoundToys, Inc.
PO Box 528
Burlington, VT 05402
Phone: 802-951-9700
Fax: 802-951-9799
10
T R A D E M A R K
I N F O
SoundToys, Decapitator and their respective logos are all trademarks of
SoundToys, Inc.
*All other trademarks are the property of their respective owners, which
are in no way associated or affiliated with SoundToys. These trademarks
are used only for historical reference or to identify products whose sounds
or tone were studied in the development of our plug-ins.
11