1
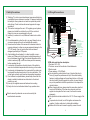
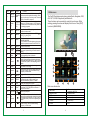
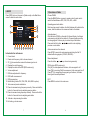
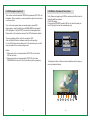
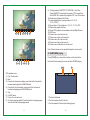
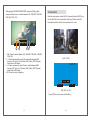
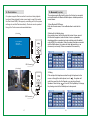
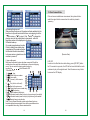
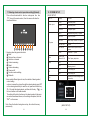
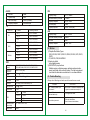
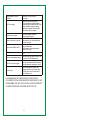
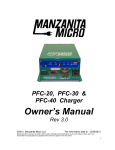
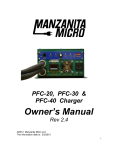
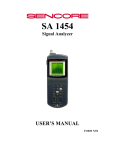
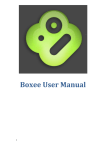
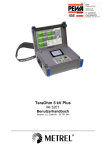
INTEGRATIVE
CAR GPS.CAR.AUDIO.CAR.VIDEO
USER'S MANUAL
USER'S MANUAL
Before operating this set, please read these instructions completely
CONTENT
FOREHEAD
1. Safety precautions
1
2. Wiring & connections
2
3. Front panel controller description
3-4
4. Remote controller description
4-5
5.Main menu
6
6. Radio
7
7. Operations of radio
8
8. GPS Navigation (optional)
9
9. DVD menu operation & description
10-12
10. CD/MP3/WMA playing
12-13
11. AUX / AV IN.
14
12. TV
15
13. SD card reader
16
14. iPod Interface
17
15. Bluetooth connection
18-19
16. Rear camera mode
20
17. Steering wheel control operation setting(optional)
21
18. System setup
22
19. Video Setup
23
20. Audio Setup
23-24
21.Specifications
24-26
22.Remarks
23.Trouble Shooting
26
26-27
Certain descriptions in the book may differ from the actual unit.
Some pictures or icons in the book may differ from actual
display.
Specifications subject to change without notice.
Thank you for choosing a Motevo DVD Multimedia System with
Navigation (Optional). Before connecting, operating or adjusting this
product, please read these instructions thoroughly to ensure proper,
safe, and trouble-free usage.
2. Wiring & Connections
1. Safety Precautions
1) Watching TV or other visual entertainment programs while driving
is prohibited in some states and countries. For personal safety and
the safety of others, please do not watch or operate the product
while driving. Check local law enforcement agencies for usage
regulations.
2) The monitor is designed for use in 12V negative ground systems,
please do not install the unit directly on a 24V bus and truck.
Attempt to do so can cause damage to the unit.
3) Install only to conform to Local, State and Federal motor vehicle
laws.
4) Do not disassemble or alter the unit in any way. Attempt to do so
can cause damage to the unit and invalidate the warranty.
5) Never clean the surface of the screen with a chemical solvent or
corrosive detergent, as they may cause permanent damage to the
TFT LCD screen. Use only a micro-fiber cloth and cleaner
designed specifically for LCD panels.
6) Avoid installing the unit where it is in direct sunlight or near a
heater vent. Please note that the normal working temperature of
the unit is between 0 to 45 . If the internal temperature of the
vehicle is extremely high, a short cool down period is necessary
before operating the unit.
7) In extremely cold conditions, allow the interior of the vehicle to
warm to a comfortable temperature before turning on the monitor.
8) In extremely cold temperatures, the movement of the picture may
be slow and the picture may be dark. It is not a malfunction. The
unit will work normally once it reaches its operating temperature.
9) Due to different car specifications, please kindly ensure that the
display is suitably located and non-obstructive to the driver's
needs in any way.
10) Use only the supplied screws and hardware for mounting.
11) Kindly refer to a local authorized dealer if any questions arise.
Defects caused by abnormal use are not covered by the
manufacturer's warrantee.
1
FAN
13PINS,GPS JACK
FUSE F15A 32V
Rear Audio L channel out (white)
Rear Audio R channel out (red)
Front Audio L channel out (white)
Front Audio R channel out (red)
Acc (red)
Video 1 out (yellow)
Handbrake(pink)
Video 2 out (yellow)
View rear video in (yellow)
TV antenna in
Amplifier control (blue-white)
Illumination (orange)
Backing control(blue)
Automatic antenna
control(orange-black)
Rear speaker R CH (purple)
Rear speaker L CH (green)
Ipod in (white)
Front speaker R CH (grey)
Radio antenna in
Front speaker L CH (white)
Brown(connecting steering wheel wire)
Black(Ground)
Steering wheel remote
control jacker
Ground (black)
Battery+12V (yellow)
16PIN cable main function description:
1. Red wire: ACC +12V.
2. Pink wire: connect to the cathode of hand brake wire
3. Back car wire:
4. Power antenna: +12V.(300mA)
Do not install this product where it may (i) obstruct the driver's
vision, (ii) impair the performance of any of the vehicle's safety
features, including airbags and hazard lamp buttons or (iii) impair
the driver's ability to safely operate the vehicle. In some cases, it
may not be possible to install this product due to the shape of the
vehicle's interior.
When changing the fuse, please select the same fuse value that
comply with the battery. If the fuse value does not match or a
copper wire to replace the fuse is used, it will result in serious
damage(s).
This product should be installed to the AC 12V Power supply of the
car.
To prevent a short circuit, turn off the ignition and remove the
negative (-) battery cable prior to starting the installation
Please refer to the user's manual to properly connect the unit.
2
3. Front Panel Control Description.
1. POWER/VOLUME: Press to turn on/off the unit. Press and hold for
2seconds to power off. Turn right/left to adjust the volume up/down.
2. MIC: The microphone will become functional during Bluetooth
mode.
3. NAVI: When GPS software & hardware are available, press to
switch to the Navigation mode. Press again to return to the
previous mode.
4. SRC: Press to switch between RADIO --> DVD --> TV--> AUX->GPS
5. MUTE/LCD OFF: Press to mute the volume. Press and hold for3
seconds, the LCD will shut off. Press again to return to normal.
6. AUX IN: Connect external video/audio signal input with this
connector.
7. USB Slot: Slot to connect a USB device or USB adaptor for card
reader to play video or audio.
8. NAV/SD card slot: insert SD card which contains the mapping date,
then press [NAVI] button to use the GPS. If the SD card contains
video or audio file as well, it can be played by using the software in
GPS module (please refer to the GPS module manual for details).
9. Press this button to go back to last chapter/track when in DVD/CD
mode. Press to decrease turning frequency in Radio mode.
10. In DVD/CD mode, press for next track/chapter. Press to increase
turning frequency in Radio mode.
11. BAND/>|:In Radio mode, press this button to switch between Fm1
/FM2/FM3/AM1/AM2. In DVD mode, press this button to switch
between PLAY/PAUSE.
12. RESET: Reset when the unit is hung up or malfunctioning.
13. Remote control signal receiver.
14. MENU/SMART DIAL: In DVD mode, press once to get back to the
DVD main menu. In Radio mode, turn this button right/left to
increase/decrease the radio frequency.
15. DISC: Press to get back to the disc playing mode from any other
modes.
16. :Press once to eject the disc.
3
17. MAP card slot.
18. BAND: In radio mode to switch between FM1/FM2/FM3/AM1/Am2,
in DVD mode to switch between play/pause.
4. Remote control Description
Note:
a). The battery life (model#:CR2025,3V)is an estimated 6 months,
please replace with a new battery when the remote control's
responsiveness begins to fail.
b). Replace the battery if the remote control is not used for a month or
longer.
c). Do not recharge, disassemble, heat or dispose of the battery in a
fire.
1
12
2
13
3
4
14
5
6
7
15
8
16
9
17
18
19
10
11
4
Signal
Ref #
Name
Function
1
Power or
Navigation
2
Number
Key
3
Setup
SETUP
Set up function in DVD playing mode. It has no
function in other modes.
4
Mode
MODE
Switch the working mode between RADIO
DVD TV AUX GPS
5
Band
BAND
6
Enter
ENTER
7
Direction
Buttons
8
Stop or
Return
9
Fast
Reverse
10
Volume up
or down
Turn the whole unit on/off. Switch between GPS
POWER/ mode and previous mode when working. Press
NAVI
again for returning to Previous mode. Press and
hold for 3 seconds to power off.
In Radio mode, press 1- 6 for changing radio
1 2 3 4 5 channels.In TV mode, press 1- 10 for changing
6 7 8 9 0 TV channels.DVD/CD/USB/SD mode, press1-10
10+
for changing programs
Confirm selected item.
An option to choose from left/right/up/down in
the screen.Up/down/left/right to select items for
setting.
In DVD mode: Stop.
/RETURN
In other working mode: No function.
In DVD/CD mode, press to fast reverse the disc
content. Keep pressing and releasing the button
to decrease the rate from x2 to x4, x6, x8, and x20.
In Radio mode, press for auto adjusting previous
station.
Volume up/down; Used to adjust background
VOL+, VOLvoice when GPS is using.
Press to select the previous chapter/track when
in DVD/CD mode. Press to decrease turning
frequency in Radio mode.
Previous
12
Mute
MUTE
Toggle on/off audio output.
13
Program
PROG
Program when in DVD mode. Store channel
automatically when in Radio mode. Store
channel automatically when in TV Mode.
14
Subtitle
SUB
Switch the Languages on screen.
15
Control
CONT
Press [Cont] button, using [] button, [ENTER]
button and [¦/RETURN] button to choose or
setup the GPS menu.
16
Play/Pause
Fast
Forward
19
Next
The Car DVD entertainment system provides Radio, Navigation, DVD,
AUX IN, TV, USB, iPod(optional),and Bluetooth.
These functions can be operated by using the touch screen. While
working, pressing the screen will display a list of menu. Press [EXIT]
to return to [MAIN MENU].
In Radio mode, press to switch between Fm1/
FM2/FM3/AM1/AM2.
In DVD mode & AV audio output mode, press to
switch the system between PAL/NTSC/AUTO.
11
17
5.Main menu
/
Start/Pause playback
MUTE
STOP
5
DOWN
3
1
4
2
7
5
8
6
9
10
11
12
Main menu introduction
7. IPod control mode (available when
connecting with iPod)
8. Bluetooth mode
9. Basic set up
10. Audio set up
1. Radio mode
2. Navigation mode
In DVD/CD mode, press to fast forward the disc
content. Keep pressing and releasing the button
to increase the rate from x2 to x4, x6, x8, and x
20.In Radio mode, press for auto adjusting next
station.
Press to select the next chapter/track when in
DVD/CD mode. Press to increase turning
frequency in Radio mode.
EXIT
3. DVD mode
4. AUX IN mode
5. TV mode
11. Video set up
6. SD card
12. Exit.
6
6.RADIO
7.Operations of Radio
Press [SRC] button on the panel or [Radio mode] on the Main Menu
screen to enter the radio mode.
Choose FM/AM
Press the [BAND] button on panel or remote control to enter and to
switch the band between FM1, FM2, FM3, AM1, or AM2.
1
1.
2.
3.
4.
5.
6.
2
7
8
FM1
87.50
90.10
98.10
106.10
107.90
108.30
9
ST
87.50MHZ
AF TA
VOL
-
3
4
5
18
+
6
10 11 12 13 14 15
Introduction for radio menu:
1. Current band.
2. Preset radio frequency, click to choose channel.
3. ST ((())) shows whether received the stereo signal or not.
4. Displays the radio frequency.
5. Displays the status of the RDS (RDS version only).
6. Volume adjustment.
7. RDS auto-adjustment for frequency.
8. RDS traffic announcement.
9. RDS program type.
10. Switch band (provide FM1, FM2, FM3, AM1, AM2 for option).
11. Auto-scan and preset radio station.
12. Press to decrease turning frequency manually. Press and hold the
button for 2 seconds for auto adjusting previous station.
13. Press to increase turning frequency manually. Press and hold the
button for 2 seconds for auto adjusting next station.
14. Activate or stop scanning the station.
15. Exit radio, go to main menu.
7
Operating preset radio station
Each band can preset 6 stations, the first 6 stations will be listed in the
screen, click the station on the screen and listen to the station.
Auto-adjustment
Click the button [SCAN] on the radio On-Screen-Display, it will begin
auto-scanning and stay at the station for 10 seconds when receiving
the strong signals. Press any key to exit and stay at that station.
Press and hold the button
or
2 seconds for auto adjusting
previous or next station.
Auto-scan and save the channels
Press [APS] 2 seconds for auto-scanning and storing the first 18
stations with strong signals. (FM18CH, AM12CH)
Manual adjustment
Press the button
or
for up /down turning manually.
RDS function (RDS version only)
Click [AF] for auto-adjustment functions, click once again for off.
Press [TA] for receiving Traffic Announcement, click once again for off.
Press [PTY] for recognizing the program type functions, it includes
three types of music/sports/news.
EXIT
Press MENU to return to the main menu.
8
8. GPS Navigation (optional)
9. DVD Menu Operation & Description
This unit can work with external GPS BOX (recommend GPS-3318) for
Navigation. After connected, you can operate through the touch screen
or remote control.
Turn on the main power when connected properly, press NAV
button again or touch the NAV mode in MAIN MENU to activate the
GPS Navigation. Click [ACCEPT] to enter into the Navigation Menu.
Please refer to the Instruction manual of the GPS software for details.
Note: Please use legal copy DVD Disc and keep the Disc clean for
better life with the machine.
DVD/VCD playing
Press the key [POWER] to switch ON the unit, insert the disc into
the DVD player, the disc will automatically play.
MOVIE PLAYING
The unique feature of this unit is the one-key-to GPS:
Just click the NAV button, whatever mode the unit is working
on, the GPS picture can be switched in. At the same time you can still
enjoy the audio of the current working mode.
Notice:
1. When main unit is not connected with GPS-3318, the function of
GPS will not work.
2. When main unit is not connected with GPS-3318, the button
POWER/NAV will not work. Then this button is just the power key.
LANGUAGE SELECT
VOCABULARY SELECT
PROGRAM
MUTE
STOP
DOWN
Touching the bottom of the touch screen initializes a list of pop-up
menu (as pictured below):
MUTE
1
9
EXIT
2
3
4
10
STOP
EXIT
DOWN
5
6
7
SUBT
RPT
RDM
SLOW
ZOOM
OSD
L/R
DOWN
8
9
10
11
12
13
14
9) (Change between CHAPTER, TITLE, REP ALL, ALL) When
clicking CHAPTER: repeat from the program. TITLE: repeat from
the title. REP ALL: repeat all the programs. OFF: turn off the repeat.
10) Random sound playback for CD disc.
11) Lower playback speed. (cycling between 1/2, 1/3, 1/4,
1/5,1/6,1/7,OFF)
12) Screen Zoom. (Cycling between 2, 3, 4, 1/2, 1/3, 1/4, OFF)
13) Display title, program and time.
14) During VCD playback, choose between Left and Right Channel.
15) OSD menu.
16) Choose menu up on the menu list.
17) Choose menu down on the menu list.
18) Choose menu left on the menu list.
19) Choose menu right on the menu list.
20) Choose menu confirmation on the menu list.
Note: These functions can be operated through the remote control.
10. CD/MP3/WMA playing
MENU
ENT
DOWN
Press [POWER] key to turn on the machine, put the disc into the
front slot with auto-reading, the screen will show CD/MP3 playing:
15
16
17
18
19
20
1 2
DVD operation menu
1) Play / Pause button.
2) Mute
3) Press shortly for previous chapter, press and hold for2 seconds to
increase reversing speed x2/4/6/8/20/Normal.
4) Press shortly for next chapter, press and hold for 2 seconds to
increase forwarding speed x2/4/6/8/20/Normal.
5) Stop
6) Exit DVD mode.
7) Press Go to next menu.
8) On Screen-language switch (Press this button to change language
when the disc has multi-language preset)
11
CD
3
TRK 5/15
00:01:45
1. The track of playback.
2. The total number of track in the disc.
3. The time elapsed of the sound track being played.
12
When playing VCD/DVD/CD/MP3/WMA, press the [VOL] position,
shown as below screen, to switch between VOL, EQ, BAS, TRE, BAL,
FAD, BRI, CON, COL..
11.AUX / AV IN
Enter into main menu, choose AUX IN or press the button [SRC] to go
into the AUX IN, it is for the Audio & Video input. Please check the
below picture to find out if the external player is in or not:
VOL
SUBT
RPT
1
+
RDM
SLOW
ZOOM
2
20
OSD
3
L/R
DOWN
4
1. VOL: Press to switch between VOL, EQ, BAS, TRE, BAL, FAD,BRI,
CON, COL.
2. - : Press to decrease the value (Press to switch between NOR
(normal), JAZ (Jazz), CLA (Classic), ROC (Rock), POP (Popular)
music effect in EQ mode)
3. +: Press to increase the value (Press to switch between NOR
(normal), JAZ (Jazz), CLA (Classic), ROC (Rock), POP (Popular)
music effect in EQ mode)
4. 20: Show the value of adjusting.
(AUX / AV IN)
AUX IN
VOL
MUTE
+
EQ
SYS
N0T (AUX / AV IN)
Press [EXIT] to quit and return to Main Menu.
13
14
20
EXIT
12. TV
13. SD CARD Reader
Enter into main MENU, press TV or press [SRC] to enter into TV.
Press the [POWER] button on the panel to switch on the unit,
then press [EJECT] button to glide down the LCD panel. The SD card
slot will appear.
Insert the SD card into the slot, the system will read the content
automatically. Press [EJECT] again to glide up the LCD. The operation
will be the same as MP3 playing when the content is Audio format or it
will be same as VCD/DVD playing when it is Video format.
CCTV-1
20:15
(SIGNAL)
In the AUX or TV mode, press the menu shown as below, to adjust
volume, bass, treble, BAL, contrast and fade the same way as DVD
mode, please refer to page 13 for details.
TV
VOL
+
SEEK
MUTE
SYS
1
2
3
20
EXIT
4
5
6
(NO SIGNAL)
TV control menu:
1. [SEEK] Auto-search and save the channel
2. [MUTE] Toggle on/off audio output
3. [SYS] System switch. Cycling from NTSC, PAL-I, PAL-D/K,PALB/G.
4. Press to select previous station.
5. Press to select next station.
6. [EXIT] Return to main menu.
15
Note:
1. In order to extend the life and avoid the error reading, please pull
out the SD card only after the unit is switched in to another mode to
confirm that the SD card is not reading.
2. The SD card function can not be activated on screen when there is
no SD card inserted.
16
15. Bluetooth(for option)
14. iPod Interface
Our system supports iPod connection for audio and video playback
functions (Video playback function cannot apply to new iPod models
like iPod classic 80GB). After properly connecting an iPod, the system
will begin to read the iPod automatically. iPod music can be operated
through the Touch screen as demonstrated below.
(iPod Mp4
iPod: LOADING
SING: 0001
TIME: 00:01:20
MENU
The system supports Blue tooth function, the Unit can be connected
and use Bluetooth with Bluetooth Mobile phone. detailed operations
are as belows:
1.Open Bluetooth OSD menu.
Enter into the main menu, Press
system.
Bluetooth
2.Match with the Mobile phone.
Open mobile phone, find the Bluetooth list and set it open, search
the Bluetooth equipment, when finished, choose yes when
displaying whether connected and enter matching code( the default
code is:0000) for confirmation. When the system has been connected
with the Mobile phone, the system will show Connect ok or
disconnect conversely, Please re-connected till successfully.
DISCONNECT
CONNECT OK
MUTE
STOP
to enter into the
EXIT
ISO Connector
(iPod Mp4
MENU
3.Dialing
Click and input the telephone number through the keyboard on the
screen or through the mobile phone, touch
, the system will
switch the sound into the Car Speaker, you can phone through
Speakers. Press the key
to turn off, Click Switch to change
the phoning voice into the Mobile phone to keep secret.
13923562546
OUTGOING......
ISO Connector
17
18
16. Rear Camera Mode
TALKING
CUT OFF
If the car has an installed rear view camera, the system will autoswitch the signal into the screen when the vehicle is placed in
everse .
4.Receiving the phone call.
When receiving the phone call, the system will auto-switched into the
hand-free in any model and mute the former voice playing, touch the
to receive or
to reject. Click switch to change the
phoning voice into the mobile phone to keep secret. while the
telephone number will be displayed on the screen.
5.Bluetooth wake up
020-83563456
Our system support wakeup function,
If there is dialing from outside when
connected well, the system will active
the Bluetooth function automatically
to choose receive or rejected even the
machine is power off,
6. play mobile music
Make sure the bluetooth system has been connected OK with the
mobile phone, then make the mobile phone on the mode of playing
music. You can control the playing music function by
touching the
on the Bluetooth OSD
7.Bluetooth OSD
4
7 6
1
1.)
: logo
2.) Redial :Redial the phone number
9
3.)
:Voice switch
10
4.)
:Connect ( click to receive
2
the call)
11
5.)
:Cut (click to cut the call)
5
6.)
:Back to the main menu,
7.) C :Clear (clear the error number key),
8.)
:Number key
11
3
8
9)
:Switch between play/pause.
10)
:In bluetooth mode, press this key to play next song in the mobile!
11)
:In bluetooth mode, press this key to play last song in the mobile!
12) MUTE :Bluetooth music mute function.
Note: Due to different Bluetooth module and software that every
branded mobile phones preinstall, there will be some differences or
not compatible when using, Please understand this.
MUTE
(Reverse View)
LCD OFF:
In order not to affect the driver while driving, press [LCD OFF] button
for 2-3 seconds in any mode, the LCD will be turned off while the audio
continues to play in the original mode. Touch the screen or any button
to resume the LCD display.
Switch
19
20
17. Steering wheel control operation setting(Optional)
1.Turn on the unit and switch to Av In mode, press 1
6
8 through the remote control, then the screen will show the
interface as below :
18. SYSTEM SET UP
BASIC SET UP
SET UP
Radio system
TV system
Range
Function
USA1
American system
USA2
American system
EUROPE
European system
PAL-I
Shenzhen/Hong Kong TV system
PAL-D/K
China TV system
PAL-B/G
Most Europe countries TV System
SECAM - BG
Middle-east/European/American
system.
Middle-east/European/American
system
SECAM-DK
2. steering wheel key-press instruction:
1 . Mute
2 . Previous item or channel
3 . Next item or channel
4 . Volume increasing
5 . Reset
6 . Volume decreasing
7 . Power on/off
8 . Function mode switching
9 . Bluetooth
NTSC
American TV system
Time
Hour: 00-23
Minute: 00-59
Time Display, adjust time
Beep
ON
Beeping voice on
OFF
Beeping voice off
ON
Clock Display on
OFF
Clock Display off
Clk
Optional (for Power Steering control
connection)
Car
3.when match different types of cars, the method of steering wheel
control setting:
such as: increase the volume through the steering wheel: press RST
on the steering wheel firstly to reset the unit, press and hold the key
V+ through the steering wheel, and then click the key V
on
the touch screen until it was selected.
The setting of the other functions on the steering wheel is the same
as we have mentioned above, as the setting is completed, click the
OK on the screen.
Note: Once the function having been set up, the units will memory
permanently
21
RADIO
TV
TIME
CLK
BEEP
EUROPE
PAL-I
04:38
OFF
OFF
(BASIC SETUP)
22
19. VIDEO SETUP
SET UP
Range
FUNCTION
BRI
0-50
Setup brightness
COL
0-50
Setup tint of color
CON
0-50
Setup contrast of color
STD
Standard mode
SOFT
Soft mode
BRIGHT
Bright mode
NORMAL
Normal mode
MIRROR
Mirror mode
MODE
CAMERA
VOL
BAL
FAD
LOUD
EQ
30
0
0
OFF
NORMAL
(AUDIO SET UP)
21. Specifications
System Parameters:
MODE
25
26
25
USER
(VIDEO SETUP)
20. AUDIO SETUP
SET UP
Range
Function
BAS
-7 - +7
Set the bass
TRE
-7 - +7
Set the treble
BAL
R7-R1,0,L1-L7
Set the Audio balance of L/R speakers.
FAD
R7-R1,0,F1-F7
Set the Audio balance of F/R speakers.
on
Volume Loudness on
off
Volume Loudness off
NORMAL
Normal
POP
Pop music effect
ROCK
Rock music effect
CLASSIC
Classic Music effect
Jazz
Jazz music effect
Loud
EQ
23
Working Voltage
12V (DC)
Powet Supply
10.8-16.0V(DC)
Max Current
15A
Working Temperature
-20
------+60
Storage Temperature
-30
------+70
Working humidity
45%-80%
Storage humidity
30%-90%
Weight
About 3.5Kg
Screen Size
7 inches (diagonal)
Resolution
480
Dot pitch
0.342(H) x 0.330(V) mm
Input
Output
H
X 3 RGB X 234
V
Video Input
2 (AV input, Back-Up Camera input )
Audio Input2
2(L/R)
Video Out
2
Audio Out
4 High Level(FL, RL, FR, RR)
& 2 Low Level (R&L)
24
FM
AUDIO:
S/N Ratio
85dBA
Dynamic Scope
Frequency Range
87.5-----108MHz
95dB
Limit noise sensitivity S/N 30dB
<10dBuV
Max Power Output
50W X 4 (200Watts)
Frequency Response
55Hz----10KHz
Frequency Response
20Hz-22KHz+3dB
S/N Ratio(-50db)
15dBu
Frequency response
30KHz 15KHz (3dB)
TV:
Color-SYS
PAL
NTSC
SECAM
CH/Band
Receiving Channels
VHF-L
49.75-136.25MHZ
VHF-H
144.25-424.25MHZ
UHF
435.25-863.25MHZ
VFH-L
55.25-139.25MHZ
VFH-H
145.25-427.25MHZ
UHF
433.25-801.25MHZ
VHF-L
49.75-163.25MHZ
VFH-H
168.25-463.25MHZ
UHF
471.25-863.25MHZ
DVD
Compatible
format
DVD-R,DVD-RW,DVD+R,DVD+RW,CD-R,CD-RW,
CD-DA,MP3,WMA,HDCD,SVCD,VCD,MPEG,JPEG
Frequency
response
20KHz 15KHz (3dB)
Video
1Vp-p
Audio
2.0V
S/N Ratio
Distortion
( 1KHz, 0dB )
0.2V
95dB
0.05
Digital audio
24bit
( 1KHz )
DVD
2-3secs
CD-DA
10secs
Mp3
100secs
200secs
WMA
Frequency Range
530----1710KHz
Limit noise sensitivity S/N 20dB
20dBuV
S/N Ratio
60dB
Frequency response
50KHz 2KHz
22. Notices
1) Playable Disc Media Types:
DVD-5, DVD-9, DVD-10, DVD-18, DVD-R, DVD+R, VCD, SVCD,
DVCD,
CD, H-DCD, JPEG, AVI-MPEG4
2) Audio play effect:
dolby digital decoder,
3) DVD/VCD/CD play functions:
Multiple angles, multiple languages, multiple caption selection,
speed, quick back, Auto memory function. The disc being played
must have this information recorded on it to use these features.
23. Trouble Shooting
Always check all wiring and make sure all connections are correct.
1W output (1KHz IN take 40HM) 0.2%
Number Audio
ESP
0.2 75Ù
AM
Mechanical antishock ability
10 ~ 100KHz, X/Y/Z: 1.0G
MAX Power
50W*4
25
TROUBLE
SOLUTION
No TV stations picked up on
auto search?
Make sure the TV Antenna is connected;If the
TV signal is too weak tune manually to it.
When in TV mode, screen is
black and white only.
The TV signal is too weak;
No Audio or just static.
1) signal too weak;
2) Check the Mute Button;
3) Check if volume is turned down;
26
Image ghosting or rolling in
TV mode.
DVD is not playing
This is caused by a weak signal or
interference from high building or
surroundings.
1) Make sure your disc is still in the unit.
2) Check to make sure the disk is loaded in
correct side up: (the side with the label is) up.
3) Check the disk for scratches or damage.
4) Make sure the Region Code on the disc is
the selected code for your region.
Radio weak or no signal
1) Check the antenna connection;
2) Check the band selected;
When in cdc status, do not work;
Check the CDC controller wire had been
connected well or not, check whether have
disc in the Controller.
Check whether SD card had been inserted
wrong, or inserted well.
Whether there are supported documents
stored in the SD card.
GPS Navigation system can not work: Check the mapping SD card is inserted well
or not.
Remote control stopped working; Check the battery and replace if needed. Use
only battery # CR-2025 Replacement.
Can not read USB/SD CARD:
NO AUX AV or back-up signal
Check all connections and check the optional
device that have been hooked up to this unit.
Fuse is blown
Check all wiring and connections. ONLY
replace a fuse with one of the same rating,
NEVER by-pass a fuse, this could lead to
serious damage or fire.
IF A PROBLEM HAS NOT BEEN SOLVED, CHECK WITH AN
AUTHORIZED INSTALLATION DEALER FOR ASSISTANCE. DO NOT
DISASSEMBLE THIS UNIT; DOING SO WILL VOID THE WARRANTY.
NO USER SERVICEABLE PARTS ARE INSIDE THE UNIT.
27