Download GBC Velobind System 4
Transcript
4.0 OPERATING INSTRUCTIONS
4.1 Document Assembly
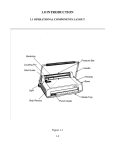
1. Check the bind edge guide alignment by inserting a receiving strip in the strip
recess area. Lay a sheet of correctly aligned punched paper on the strip,
matching up the holes and the strip so that the strip is not showing at the top or
bottom of the paper. Adjust the bind edge guide if necessary by loosening the
screw and sliding the guide to the edge of the paper.
2. Place the back cover (face down), the punched sheets (last page on the bottom),
and front cover (face up) on top of the receiving strip.
3. Place the receiving strip (bottom binding strip with holes), textured side down
in the strip recess, located in front of the backstop. Be sure the small hole in
the receiving strip is over the locating pin. The locating pin is on the left
hand side of the strip recess area in front of the backstop. The locating pin
fits into the small hole in the plastic strip. The strip is positioned correctly
over the locating pin when it is difficult to slide the strip to the right.
Failure to properly align the strip can cause machine damage.
4. Now determine the correct size of the pin strip. Use the scale on the backstop to
determine the thickness of the document and the size of the pins required. 1
inch (25 mm) on the scale requires a 1 inch (25 mm) pin. Anything over 1 inch
(25 mm) requires a 2 inch (51 mm) pin. Anything over 2 inches (51 mm)
requires a 3 inch (75 mm) pin. The pins should extend all the way through the
document but not more than 1 inch (25 mm) beyond. Insert the strip through the
document's holes and the receiving strip.
Figure 4-1
4-1
4.0 OPERATING INSTRUCTIONS
4.2
Binding
1. Turn the machine on, and the "Wait" light will be on. The machine takes about
45 seconds to warm up, and the "Wait" light to go off.
2. Use the selector button to identify whether the document is less than or greater
than 1 inch (25 mm). The machine will automatically vary the binding speed to
make the most secure bind.
3. Begin the binding process by pulling the pressure bar toward you and lowering
it on top of the document. To prevent jamming problems, lower the bar onto the
document rather than "drop" it.
4. The binding cycle will start automatically, and the pressure bar will return to its
original position when the cycle is complete.
5. Remove the bound document.
4-2
OPERATING INSTRUCTIONS
4.3
Debinding
1. Place document to be debound as follows: bound edge against the backstop,
small hole in bottom strip over locating pin, edge of document next to bind edge
guide.
2 Once the document to be debound is properly located, depress the Bind/Debind
selector to place machine in debind mode.
3 Lower the pressure bar onto document, and the machine will go through the
debinding cycle.
5. Immediately after pressure bar raises (approximately 12 seconds), remove the
document and peel the top strip off.*
*NOTE: If you do not perform this step quickly enough, it will be too difficult
to remove the strip. Put the document through the debind process again and
remove the strip faster this time.
Figure 4-2
4-3


