1
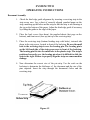
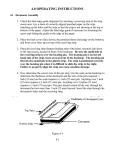
SYSTEM TWO
OPERATING INSTRUCTIONS
Punching
1.
Adjust the punch edge guide to the correct paper length. Check the punch
alignment by punching a sheet of paper and folding it in half along the
punched edge (See Figure 4-1). Match the holes up; if the corners of the
paper match with no overlap, the alignment is correct. If not, readjust the
guide and repeat the process until the edges are square.
2.
Place the paper fully in the punch throat, slide the paper to the left against
the punch edge guide, and press the punch button.
3.
To prevent jamming, only 22 sheets of 20 pound bond paper should be
punched at one time (fewer sheets if the paper is heavier). Punch one 22
sheet segment of your document at a time, and stack the punched sections
on the binding surface. Do not punch more than 4 composition covers or 3
plastic covers at one time.
4.
If you try to punch too much paper the Jam-Stopper feature will sense the
high paper load, retract the punch pins, and you will hear a beeping sound.
Simply separate the paper stack, and punch fewer pages at a time.
Figure 4-1
SYSTEM TWO
OPERATING INSTRUCTIONS
Document Assembly
1. Check the bind edge guide alignment by inserting a receiving strip in the
strip recess area. Lay a sheet of correctly aligned punched paper on the
strip, matching up the holes and the strip so that the strip is not showing at
the top or the bottom of the paper. Adjust the bind edge guide if necessary
by sliding the guide to the edge of the paper.
2. Place the back cover (face down), the punched sheets (last page on the
bottom), and front cover (face up) on top of the receiving strip.
3. Place the receiving strip (bottom binding strip with holes), textured side
down in the strip recess, located in front of the backstop. Be sure the small
hole in the receiving strip is over the locating pin. The locating pin is
on the left hand side of the strip recess area in front of the backstop.
The locating pin fits into the small hole in the plastic strip. The strip is
positioned correctly over the locating pin when it is difficult to slide the
strip to the right. Failure to properly align the strip can cause machine
damage.
4. Now determine the correct size of the pin strip. Use the scale on the
backstop to determine the thickness of the document and the size of the
pins required. Insert the strip through the document's holes and the
receiving strip.
Figure 4-2
SYSTEM TWO
OPERATING INSTRUCTIONS
Binding
1. Begin the binding process by pulling the pressure bar toward you and lowering it
on top of the document. To prevent jamming problems, lower the bar onto the
document rather than "drop" it.
2. Press the bind button, and the ready indicator will flash. When the binding cycle
is complete, you will hear beeps and the ready indicator will be off.
3. Lift the pressure bar to its original position, and the ready indicator will
illuminate continuously. Remove the bound document.
4. IF THE BINDING CYCLE IS NOT COMPLETED, THE TRAY-FULL
AND READY INDICATORS WILL FLASH ALTERNATELY. Simply turn
the machine off and on, or, press either the Bind or Punch Button. Rebind the
document. If the binding cycle is incomplete again, call for service.
5. The Tray Full Indicator will flash after 50 binds. Remove the tray with the power
on, empty it, and reinsert it.