1
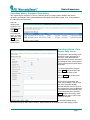
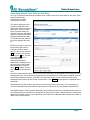
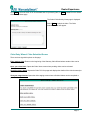
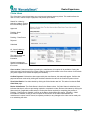
ARI WarrantySmart
User Documentation
For Version 3.0
The Dealer Experience
WS3.0-092506-001
October 23, 2006
Dealer Experience
ARI Network Services, Inc.
Copyright 2006 ARI Network Services
All rights reserved.
ARI Network Services retains all ownership rights to the software offered by ARI and related documentation.
Use of the software and related documentation is governed by the license agreement of the software and
applicable copyright law.
ARI Network Services
www.arinet.com
Dealer Experience
Table of Contents
System Overview .............................................................................................................................................. 2
New Claims ........................................................................................................................................................ 5
Claim Entry Wizard - Registration Information ............................................................................................... 6
Claim Entry Wizard - Equipment Claim History .............................................................................................. 7
Claim Entry Wizard- Claim Service Entry Screen........................................................................................... 7
Claim Entry Wizard: Claim Parts & Labor Entry ............................................................................................. 8
Claim Entry Wizard: Claim Submitted Screen ................................................................................................ 9
Claim Inbox ...................................................................................................................................................... 10
Claim Staging .................................................................................................................................................. 12
Product Registration....................................................................................................................................... 13
Product Registration Wizard - Select Equipment to Register....................................................................... 14
Product Registration Wizard – View Registration Information...................................................................... 15
Product Registration Wizard – Determine the Selling Dealer....................................................................... 15
Product Registration Wizard – Registration: Notes ...................................................................................... 19
Product Registration Wizard – Submit to Manufacturer ............................................................................... 19
Product Registration Wizard – Edit Registration Screen.............................................................................. 20
Product Registration – Edit the Registration................................................................................................. 21
Product Registration – Submit to Manufacturer............................................................................................ 24
Product Registration - Registration Complete .............................................................................................. 25
Registration Inbox......................................................................................................................................... 26
Equipment Lookup – Equipment Selection.................................................................................................. 27
Equipment Lookup – Equipment Details ...................................................................................................... 28
Setup ................................................................................................................................................................ 29
General Settings: Company Information ...................................................................................................... 29
General Settings: Alarms & Notifications...................................................................................................... 30
Account Management: User Administration ................................................................................................. 31
Account Management: Merge Accounts....................................................................................................... 32
Policies............................................................................................................................................................. 34
Reports and Tools........................................................................................................................................... 35
Claim Lookup ................................................................................................................................................ 35
Return Authorizations ................................................................................................................................... 38
UPS Labels ................................................................................................................................................... 40
Reports ......................................................................................................................................................... 40
Support............................................................................................................................................................. 41
Page 1
Dealer Experience
System Overview
Welcome to the WarrantySmart system, the most effective, efficient way to process product registrations and
warranty claims. This system has been designed specifically for equipment Manufacturers and Dealers.
WarrantySmart facilitates processing of warranty claims, streamlines operations, expedites claim processing,
and greatly improves communications between manufacturers and dealers and customers. All resulting in
increased customer/dealer satisfaction and reduced operational costs that save time and money.
The easy-to-use, intuitive web interface is designed to simplify user access and accelerate management of
important warranty records.
The system has been divided into nine modules, represented by individual ICONs, that allow the user to go
straight to the information they are seeking without having to click through unnecessary menu trees to find
and update the information and manage records.
Main Menu ICON Arrangement
ICONS for the Main Menu options have been positioned for user convenience in order to facilitate and
streamline access to frequently used menu options.
Top row of modules
are dedicated to
frequently-used, dayto-day system
management options.
The second row includes
important administrative
functions that are used
during system setup and
are maintained on an as
needed basis. Report
generation is included.
Should support be required, this
module will take you to the
contact information for ARI
Network Services
Page 2
Dealer Experience
Quick Overview of Main Menu ICONs & Associated Applications
The intuitive Wizards facilitate claim entry by taking the user step by step
through the claim entry process.
ACCESS NEW CLAIM to: Enter new claims through the Claim Entry
Wizard.
The Claim Inbox streamlines processes by providing the user with the
ability to search for, and directly access claim status and details.
ACCESS CLAIM INBOX to: Search, view, and manage all claims in the
system that require attention.
The Claim Staging module provides the User with direct access to
information about staged & preauthorized claims.
ACCESS CLAIM STAGING to: Manage staged and preauthorized claims.
The time-saving feature of Product Registration allows Dealers to submit
registrations directly to the manufacturer via the web.
ACCESS PRODUCT REGISTRATION to: View important information
about registered equipment owners and associated Dealers, change and
update records as equipment changes hands. View outstanding
registrations through the Registration Inbox.
The Equipment Lookup ICON leads the user to the equipment search
attributes and quickly displays the equipment by serial number or owner.
ACCESS EQUIPMENT LOOKUP to: Change equipment registration,
change or update dealer or owner details, view claim history for a piece of
equipment.
Page 3
Dealer Experience
Setup allows dealers to manage administrative options related to the
system.
ACCESS SETUP to: Setup system users, edit company and contact
information, manage notifications and alarms, or merge multiple
manufacturer accounts under one login.
ACCESS POLICIES to: Quickly view warranty policies for each
manufacturer.
The Reports & Tools feature enables users to quickly search for claims
and return authorizations, and review and print system Reports.
ACCESS REPORTS & TOOLS to: Lookup claims or return authorizations,
manage shipments, and run system reports.
The support module provides important information regarding ARI support
availability and contact information, and direct access to user manuals.
Page 4
Dealer Experience
New Claims
To begin an equipment warranty claim, select the New Claim ICON from the main screen. Select the
equipment manufacturer from the Manufacturer drop-down and enter a complete or partial serial number.
Click Search.
A list of equipment
matching the search
criteria will be
displayed. Select an
applicable serial
number from the list by
clicking the Serial
Number. The selection
is highlighted.
Click Next to continue.
Page 5
Dealer Experience
Claim Entry Wizard - Registration Information
If this equipment has already been registered to an owner, the current registration information will appear.
Review and click Next to continue, or Previous to go back to the previous screen. Cancel restarts the Claim
Wizard with no serial number.
Click the Edit the Registration
text link to change registration
information.
Note: The manufacturers may
require that the equipment be
registered prior to processing
a claim. If this is the case, the
screens will indicate as such.
If a piece of equipment is
selected from the results area
(previous screen) that does
not show any registration
information, the registration
status will show as
“unregistered.” Register the
equipment by clicking the Edit
the Registration link to
continue. This opens the
Product Registration Wizard.
CAUTION- Selecting one of
the above links navigates the
system out of the Warranty
Claim Wizard into Product
Registration. Once the
equipment is registered, users
will be presented with a link
that allows them to continue
processing the claim.
See the Product Registration
section of this manual for
more information on
registering a product.
Page 6
Dealer Experience
Claim Entry Wizard - Equipment Claim History
After registering the equipment, if there is a warranty history or existing claims related to the piece of
equipment, the Warranty Claim Wizard displays the Equipment Claim History page. If not, it will proceed to
the Claim Service Entry screen.
Select an
existing claim
number to view
or process, then
click Next to
continue
processing the
claim. To enter a
new claim, click
Next. The Claim
Service Entry
screen opens.
Claim Entry Wizard- Claim
Service Entry Screen
The next step in the Warranty Claim
Wizard is to enter the specifics of
the claim. Some data fields are
optional while others are required for
processing the claim. Select options
from the drop-down list boxes where
applicable.
To continue processing the claim,
select Next. This opens the Claim
Parts and Labor Entry screen
Select Previous to go back to the
previous page.
At this point in the process, the
claim can be Staged. This will save
the claim information already
entered and allow users to go back
and complete the claim as additional
information becomes available (See
Claim Staging section). Selecting
Stage brings up the Activity Notes
page allowing users to enter notes
related to the claim.
All submitted claims can be
accessed through the Claim Inbox, however, staged claims can be located in the Claim Staging section.
Page 7
Dealer Experience
Claim Entry Wizard: Claim Parts & Labor Entry
The Type of claim selected determines whether parts or labor or both are to be included on the claim. Claim
types are specified by
manufacturers and their
requirements may differ.
The options displayed on this
screen are dependant upon
whether the claim type requires
parts, labor, or both. In other
words, if parts and labor are
required, the screen will display
options for entering information
regarding both parts and labor.
If only labor has been selected,
the screen displays labor only,
etc.
Enter the job code or select one
from the drop-down list box.
If the part number is known,
enter it in the text box and click
Add. Or browse for the part by
selecting the … box. This will
invoke Empartweb if it is
integrated with the
WarrantySmart system.
Additionally, multiple parts can
be entered in the part number
field separated by a comma.
When Add is clicked, all of the
part numbers will be entered at
once.
If parts are required for the claim, then one of the parts may need to be designated as the causal part with an
assigned fault code. This requirement is determined by the manufacturer. If this feature is enabled, once the
part has been identified in the list, select Edit. The screen will change so that a Causal selection box is
enabled with a drop-down list box for fault code selection. Click Update and the part will be displayed as the
causal part.
Manufacturers may also configure the system to require a fault code on every part, only causal part(s), or
none at all. Be aware that the operational requirements for this section may vary between manufacturers.
Add additional parts or labor requests. Additional parts and labor requests are for handling items that are not
pre-configured and not available in the drop-downs for parts or labor codes. If additional parts or charges are
added, the total dollar amount must be specified in the Total field. If additional Labor is added, the number of
repair hours must be entered.
Page 8
Dealer Experience
Click Stage to save the claim in an un-submitted state for processing later, or Next to advance to the Submit
Claim/Activity Notes page.
The Submit Claim/Activity Notes page is displayed.
Select Finish to submit the claim. The Claim
Submitted screen will appear.
Claim Entry Wizard: Claim Submitted Screen
There are three hyperlink options on this page:
Enter another claim: Returns to the beginning of the Warranty Claim Wizard where another claim can be
entered.
Open your claim inbox: Opens the Claim Inbox screen where pending claims can be reviewed.
View this claim’s details: Opens the Claim Full View page and displays the details of the claim that was just
submitted.
View your staged claims: Opens the claim staging screen where unfinished claims can be completed or
processed.
.
Page 9
Dealer Experience
Claim Inbox
The Claim Inbox is a quick and easy way to access and manage warranty claims. This module allows the
user to review, confirm receipt of payment, and process open claims.
Search for a claim by
selecting a status. Choose
from the following options:
Approved
Pending –Need
Information
Pending – Parts Return
Rejected
Submitted
Or, view all claims by
selecting Search.
The search results will
look similar to the
illustration.
Several management
options are available from
this screen.
Close a claim: If claims have been rejected by the manufacturer, this option will be available. Closing the
claim removes it from the work flow. Close a claim by clicking the checkbox in the Close column for that claim
(only those eligible to be closed will display the checkbox).
Confirm Payment: If claims have been approved by the manufacturer, this status will appear. Confirm that
payment has been received by clicking the checkbox related to the claim in the Confirm Payment column.
View Claim Details: View claim details by clicking the Claim Number text link. This action invokes the Full
Claim View page.
Review Claim Status: The Claim Status is listed in the Status column. If a Claim Status is underlined, that
indicates that there is still more processing required to complete the claim. Review claim status by clicking the
Status text link (if applicable) and that action invokes the section required for completing the process. If
Pending – Parts Return is enabled, it will link to the Return Authorization Slip screen. If Pending – Need
Information is enabled, clicking on the link opens the final screen of the Claim Wizard where the
manufacturer’s request can be viewed, a response provided, or any changes to the claim can be made prior
to re-submitting the claim.
Page 10
Dealer Experience
Claim Lookup: Opens the Claim Lookup screen allowing users to quickly search for, and locate a specific
claim.
Select the Manufacturer,
Claim Status, or enter
the Claim Number and
click Search.
The list of claims
meeting the search
criteria is displayed
below.
Selecting the Claim
number link opens the
Claim Full View screen
for that claim.
Page 11
Dealer Experience
Claim Staging
The Claim Staging area is used to manage staged (those that have been started and not completed) and
preauthorized claims. First, search for a claim by entering the claim search criteria. Search by Claim, Work
Order, or Preauthorization number, or click Search and all records are displayed
Search results are displayed allowing users to view claim details by clicking the Claim Number text link or
continue entering claim information by clicking the Status text link. To close out a claim, click the checkbox
next to the claim number and click the Close button. This will remove it from the staging area.
The status link indicates the point in the process where a staged claim was left off, or in the case of
preauthorized claims, indicates the status from the manufacturer. Preauthorized claims will appear in the list
when the manufacturer preauthorizes a claim with the expectation that the dealer will fill in the details.
Update the claim with new/additional information by clicking on the Status text link and filling in the necessary
information.
Other possible claim statuses related to staged claims are Registration Information Needed, Service
Information Needed, Parts Information Needed, Ready To Submit, and Preauthorized.
Click on the Claim Number link to view the Full Claim View for the claim.
Page 12
Dealer Experience
Product Registration
There are two options available through Product registration: Product Registration Wizard and Registration
Inbox.
Select the Product Registration Wizard to register a piece of equipment, or the Registration Inbox to view
outstanding registrations. Outstanding Registrations are those that have been returned by the manufacturer
and require more information.
Page 13
Dealer Experience
Product Registration Wizard - Select Equipment to Register
Select the equipment manufacturer from the drop-down. Enter a full or partial equipment serial number and
click Search. A list of equipment matching the search criteria is displayed.
If a piece of equipment needs to be registered, the Customer, Address, City, and State fields are displayed as
blank. To register the piece of equipment, click a Serial Number from the list and click Next. This action
invokes the Registration Information screen.
If the equipment is unregistered, the screen flow will take a different turn than if the equipment is registered. If
unregistered, the Registration Information screen opens. If registered, the Edit Registration screen opens.
Page 14
Dealer Experience
Product Registration Wizard – View Registration Information
If the equipment is unregistered, the
Registration Information screen is
invoked displaying the equipment
manufacturer, registration status, serial
number, manufacturer, and model
number.
Hours Used: If the equipment has an
hour meter, enter the number of hours
on the piece of equipment as of the
date of purchase or registration.
Otherwise, leave the field blank.
Purchase Date: Enter the new
purchase date for the equipment. The
system will accept dates entered in a
variety of formats such as: Jan 1 2006,
1-1-2006, or 1/1/2006. The default date
will be the current date.
Click Next to continue or Previous to go
back to the previous screen.
Product Registration Wizard – Determine the Selling Dealer
The Dealer page prompts the user to select an option that identifies the selling dealer for the equipment being
registered. There are three options
from which to choose:
A) I Am the Selling Dealer: If the
user’s dealership sold the equipment,
select this option. Clicking Next
opens the Owner selection screen.
B) Search for a Different Dealer: If
the user’s dealership is not the selling
dealer, select this option. Clicking
Next opens the Dealer Search screen
enabling users to search for a dealer
in the system.
C) Unknown Selling Dealer: If the selling dealer is unknown, select this option. Click Next advance to the
Owner selection screen.
Page 15
Dealer Experience
Product Registration Wizard - Dealer Search Screen
From the Dealer screen, when the Search for a Different Dealer option is selected, the Dealer Search
page opens.
Enter full or partial search criteria into any of the fields. To search on state, select a country from the
drop-down list that has states, such as United States. The States associated with the Country are
enabled in the State field. Select Search.
Select the Dealer from the list and click Next to advance to the Owner selection screen.
Page 16
Dealer Experience
Product Registration Wizard - Owner Selection Screen
If either the: I am the Selling Dealer, or Unknown Selling Dealer options are selected, the Owner
selection screen is invoked.
Select one of the following options:
Search for an existing
owner: Opens the Owner
Search page.
Add a new owner:
Opens the Owner
Information page.
Click Next to continue
with the registration.
Owner Selection - Search for an Existing Owner
Enter a full or partial Company or Last name and click Search. A list of owners meeting the search
criteria is displayed. Select an owner from the list and click Next. At this point, the program follows
the finalization process continuing on to the Notes and Submit pages.
If the owner can not be found, click Previous to return to the Owner Screen where a new owner can
be added.
Page 17
Dealer Experience
Owner Selection - Add a New Owner
Selecting this option opens the Owner Information screen. Select the Type of owner and enter the
data in the fields. Click Next to proceed to the Notes screen.
Page 18
Dealer Experience
Product Registration Wizard – Registration: Notes
The option of entering notes regarding the
registration is presented. Click Next to continue.
Product Registration Wizard – Submit to Manufacturer
Page 19
Dealer Experience
From this screen, confirm that the registration information is correct. Read the two statements at the bottom
area of the screen, click each of the checkboxes to concur with the statements, and click Finish.
Product Registration Wizard – Edit Registration Screen
If the piece of equipment selected has already been registered, the current registration information is
displayed on the screen.
The Product Registration Wizard is complete.
If the registration information needs to be changed, select the Edit registration link.
That opens the Product Registration screen. From there, a new owner or dealer can be assigned.
Page 20
Dealer Experience
Product Registration – Edit the Registration
When the Edit registration link is clicked, the Product Registration page opens. Users can take actions or
make updates or changes from this screen such as: changing the owner, changing the selling dealer,
registering the equipment, or viewing equipment history.
Page 21
Dealer Experience
Select a Different Owner
The Owner Search page is displayed. Enter a full or partial Company name, or Last name, and select Search.
The search results are displayed below.
Click on the Owner Number from the list. The owner selected will appear on the Product Registration screen
in the Owner Details section.
From the Product Registration screen, Select a Different Dealer or Register to complete the process.
Page 22
Dealer Experience
Select a Different Dealer
The Dealer Search page is displayed. Enter full or partial search criteria in any field. To search on state,
select a country from the drop-down list that has states, such as United States. The states associated with the
Country are enabled in the State field. Select Search.
Click on the Dealer number from the list. The dealer selected will appear on the Product Registration screen
in the Selling Dealer Details section.
Select Register to complete the process.
Page 23
Dealer Experience
Product Registration – Submit to Manufacturer
Selecting Register opens the Submit to Manufacturer page. Confirm the registration terms and conditions by
selecting the checkbox next to each term. Change notes are required in order to process the registration.
Page 24
Dealer Experience
Product Registration - Registration Complete
The Registration Complete page displays the options of:
View equipment details: Opens the Equipment Details page for the piece of equipment that was just
registered.
Register another product: Returns to the Product Registration Wizard – Equipment Selection page.
Review your registration inbox: Opens the Registration Inbox page.
Open a claim against this equipment: Opens the Warranty Claim Wizard with this equipment pre-selected.
Page 25
Dealer Experience
Registration Inbox
Manufacturers will respond to the registrations that have been submitted through the Product Registration
Wizard with a status such as: Additional Information Required, Approved, Rejected, etc. These outstanding
registrations will be listed here in the Registration Inbox. Users can quickly view and respond to the
registrations requiring additional information.
Click on the Status link for the equipment. The Product Registration screen opens allowing users to make
modifications or corrections and submit the changes. The revised correspondence is returned to the
manufacturer.
Page 26
Dealer Experience
Equipment Lookup – Equipment Selection
Equipment Selection allows users to search for a piece of equipment by using a combination of manufacturer
and partial or full serial number.
Select the equipment manufacturer from the drop-down and enter a full or partial serial number. Click Search.
A list of results matching the search criteria will be displayed.
Select the Serial Number from search results. This opens the Equipment Details screen. The Equipment
Details page displays Equipment, Owner, Dealer and Claim History information.
Page 27
Dealer Experience
Equipment Lookup – Equipment Details
The Equipment Details screen displays a summary of registration details along with the Claim History for the
piece of equipment. Once the piece of equipment has been located, the following functions can be performed:
Edit the Registration: Opens the Product Registration page where owner and dealer details can be
changed.
File a Claim: Opens the Warranty Claim Wizard. The equipment found during the lookup is displayed on the
Claim Wizard screen, ready for claim processing.
Review a claim: Selecting the claim number link opens the Claim Full View window.
Page 28
Dealer Experience
Setup
This module is where company and internal user information is edited or added. “Warnings & Alarms” can be
setup so that an email alert is sent to the user when changes are made to different statuses of the claims.
General Settings: Company Information
Click Company Information to edit and/or update company contact information. Make changes and click
Update.
Page 29
Dealer Experience
General Settings: Alarms & Notifications
Alarms and Notifications are very useful when expediting claims. Immediately receiving the status of a
submitted claim via email can indicate that further action is required in order to process the claim.
WarrantySmart can be configured to alert users via email if there are any status changes to the claim(s).
Start by clicking the Alarms & Notifications text link from the main Setup screen. This invokes the Alarms and
Notifications page, as shown below. The alarm options are as follows: Claim Approved, Claim Incomplete,
Claim Rejected, or Policy Change
Enter the email address(es) to which notifications and alarms should be sent. Note that multiple email
addresses can be entered providing that they are separated by a semi-colon.
Page 30
Dealer Experience
Account Management: User Administration
Each Dealer can enter users from their company that have access to the WarrantySmart system. Click the
User Administration text link to add or edit authorized users. Each user can be setup to have access to some
or all of the system functions.
Name and Email Address: When
entering a new user, include name and
email address.
Login Names: Assign the user a login.
Logins can be any name or assigned set
of characters. The system will not accept
duplicate logins and will generate an error
message prompting the user to enter a
different login. Logins are not case
sensitive.
Passwords: When entering and
confirming the password for the user,
please note that in either case, the
characters entered will appear as round
dots only. The system does not retain the
password for security purposes so once a
password has been entered, it can not be
retrieved when the record is to be
modified or recalled later. The spaces in
the dialog box will be blank when the
record is recalled. If a user forgets their
password simply assign a new password
and update the record.
Account Settings: The account settings
represent the modules that the user will
be able to access after login. Select the
module by clicking the check box next to
the module name.
To create a new user, select (New) from the User drop-down and fill in the fields that pertain to the new user.
Under the Account Settings column, choose the areas of the system to which the user will have access.
When finished, click Add. This user will now have access to the system.
If an existing user account requires editing, select the user from the drop-down list. The user’s record will
appear on the screen for editing or updating. Change the necessary information and click Update to update
and save the user, or click Delete to delete the user from the system.
Page 31
Dealer Experience
Account Management: Merge Accounts
The Merge Accounts page allows a single dealer to merge manufacturer’s accounts under one login. In other
words, if a Dealer sells, repairs, or deals with several different manufacturers, rather than have multiple user
logins, they can be combined under one login.
The idea is to have one central account so that both manufacturers exhibit the same record for the company.
A single login name and password can be used to access records from both manufacturers.
The User will have received two
or more different login names
and passwords, one from each
manufacturer. When at this
screen, the User is viewing
under one of those login
names.
The screen displays a list of
manufacturers for which the
user is an authorized dealer.
Enter the login name and
password for the New (or
second) manufacturer and click
the Next button to proceed.
Page 32
Dealer Experience
The screen changes to display the manufacturer’s accounts that are about to be combined: the Source Dealer
information (the first account), and the Target Dealer (second account) information.
If all of the information is correct, click the Finish button to complete the merge.
When complete, a screen will appear indicating that the merge was completed successfully.
Page 33
Dealer Experience
Policies
The policies screen displays warranty claim policies established by the manufacturer. Choose a manufacturer
from the drop-down to see its warranty claim policies.
WarrantySmart can be configured to send notification of manufacturer policy changes from the
Alarms and Notifications screen.
Page 34
Dealer Experience
Reports and Tools
Claim Lookup
Claim Lookup enables users to search for any claim even though it has been removed from work flow. From
the Claim Selection screen, enter the claim search criteria. To view all claims, leave the defaults at (All) and
click Search.
Page 35
Dealer Experience
Click the Claim Number text link and the Claim Full View screen opens displaying details of that claim.
Claim Full View Top Portion of Screen
Page 36
Dealer Experience
Claim Full View Bottom Screen
Page 37
Dealer Experience
Return Authorizations
The Return Authorization (RA)
Lookup screen allows users to
lookup manufacturer RAs and
print out RA slips. Return
Authorizations are generated
automatically on the
manufacturer’s side of the
system when parts are
designated as ‘return to
manufacturer’.
Search for an RA by entering
the search criteria or to see all
RAs, click Search with the
default values (All) intact and
click Search.
The search results will appear
below the search criteria.
Click the RA Number text link to open
and view the RA slip for that claim.
The RA number begins with the
claim number. For example, if the
RA number is 454-58984, the claim
number is 454.
There are two sections to a Return
Authorization: The RA Slip and Claim
Copy. Manufacturers have the option
of configuring the system to require
that dealers submit either the Claim
Copy, the RA Slip, or both.
Note: To Print the RA Slip, use the
Print function on the browser. If using
MS Internet Explorer, go to File
(upper left hand corner of the browser
screen), Print Preview, and Print.
RA Slip Screen Top Portion
Page 38
Dealer Experience
RA Slip Screen Middle View
Page 39
Dealer Experience
RA Slip Screen Bottom View
Note: To Print the RA Slip, use the Print function on the browser. If using MS Internet Explorer, go to File
(upper left hand corner of the browser screen), Print Preview, and Print.
UPS Labels
Provides a link to the UPS web site.
Reports
Not yet configured.
Page 40
Dealer Experience
Support
The Support area provides a copy of this WarrantySmart Users manual, problem submission area, and
support and sales phone numbers and email addresses.
Page 41