1
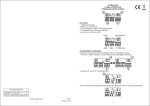
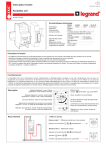
CARE OF YOUR STOPWATCH
ULTRAK 440 STOPWATCH
OPERATING INSTRUSTIONS
WATER RESISTANCE
- The stopwatch is designed to withstand accidental contact with water such as splashes or rain,
but it is not designed for use in water. Do not operate the buttons when the stopwatch is wet.
TEMPERATURE
- Do not leave your stopwatch under direct sunlight or in very high temperatures for a long time, the
display may become black. Do not leave your stopwatch in very low temperature as this may
cause a slight time loss or gain and the change of digits becomes slow. In both cases the above
conditions will be corrected when the stopwatch returns to normal temperature.
SHOCKS
- Be careful not to drop your stopwatch or hit it against hard surfaces as it may cause a mechanical
damage.
STATIC ELECTRICITY
- The integrated circuit in your stopwatch can be affected by static electricity. If the static electricty
is very strong, a permanent damage can occur. Be careful of the screen of the TV set and the
wearing of clothing made of synthetic material in dry weather; in such cases a very strong electricity
can be generated.
FEATURES:
- 7 digit CHRONOGRAPH with user selectable CUMULATIVE SPLIT or LAP, 1/100 sec resolution
to range 9: 59’ 59” 99
- 6 digit TIMER with user selectable COUNT DOWN then COUNT UP or COUNT DOWN then
REPEAT operations, maximum presetable period 23: 59’ 59”
- PACER with user selectable beeping rates of 60/70/80/100/120/160/240 beeps per minute
- CALENDAR CLOCK with AUTO LEAP YEAR, user selectable 12/24 hour display
- HOURLY CHIME and 4 ALARMS
- HIGH CAPACITY 3 VOLT LITHIUM BATTERY for long battery life
- WATER - RESISTANT
MAGNETISM
- Not affected
CLOCK MODE:
CHEMICALS
- Do not expose your stopwatch to solvents such as gasoline and alcohol, spray of cosmetics,
cleaners, paints etc as they may cause damage to the stopwatch.
1. Depress C to go to CLOCK mode. Display is as shown in Fig. 2.
2. Depress B to toggle between 12 hour and 24 hour display formats, as shown in Fig. 3 . In the
12 hour mode A (for a.m. ) or P (for p.m.) is displayed.
3. Depress A to display MONTH - DATE WEEKDAY, as shown in Fig. 4.
BATTERY CHANGE
When the display becomes dim or faded out, battery replacement is necessary.
1. Turn the battery cover off from close to open position by using the rope holder.
2. Push the Battery Lock in the direction shown to release the old battery.
Fig. 2
push to
release
CR2032
Fig. 3
(Battery Lock)
3. Install a new lithum battery CR2032 into the battery holder, please make sure the Battery Lock is
in the position shown.
4. Re - install the battery cover, turn the dot from open to close position.
ALARM MODE:
www.cei-ultrak.com
4
BK 148.1
Printed in China
Fig. 4
1. Depress C to go to the ALARM mode. Display is as shown in Fig. 5.
2. Press and hold B for 2 seconds to go into the SET ALARM mode with the ALARM MINUTE
digits linking. Press A to set ALARM MINUTES. When ALARM MIN. is set, press B once to go to
the SET ALARM HOUR with the ALARM HOUR digits blinking. Press A set ALARM HOURS.
1
3. When ALARM HOUR is set, press B to display the ALARM TIME with no digits blinking. In this
mode depressing B will enable the hourly chime, the hourly chime indicator will be turned on and
the stopwatch will give 2 short beeps on every turn of the hour. Depressing A will enable the
alarm with the ALARM indicator turned on, as shown in Fig. 6.
4. Depress D to go to the 2nd, 3rd and 4th ALARMS sequentially, Repeat steps 2 and 3 to set the
alarm times.
5. When the set time of any one of these alarms is approached, the alarm will sound, 3 beeps per
sounds for 30 seconds. Depressing any button during sounding will stop the sound.
TIMER MODE:
1. From the CHRONOGRAPH mode, depress C once to go to the TIMER mode. The display is as
shown in Fig. 8. The timer is either in the COUNT DOWN then COUNT UP mode (as in Fig. 8a)
or in the COUNT DOWN then REPEAT mode (as in Fig. 8b), depending on previous settings.
Press D to switch between these two modes.
Fig. 8(a)
Fig. 5
COUNT DOWN THEN COUNT UP
ALRAM
HOUR
ALARM
MIN.
ALARM
NO.
OR
Fig. 8(b)
HOURLY
CHIME ALARM
IND.
IND.
COUNT DOWN THEN REPEAT
Fig. 6
CHRONOGRAPH MODE:
1. From the ALARM mode, depress C once to go to the CHRONOGRAPH mode. The display
format is as shown in Fig. 7. The chronograph is either in the CUMULATIVE SPLIT or the LAP
mode (depending on previous setting) with their corresponding indicators blinking. Depress A to
START or STOP the CHRONOGRAPH and B for the SPLIT or LAP times. In the CUM SPLIT
mode the display always shows the time from the START to the time at the depression of B
whereas in the LAP mode the display always show the time between the last 2 depressions of B.
When the B button is depressed to show the CUM SPLIT or LAP times, the RUN indicator is
blinking to show that the CHRONOGRAPH is running. Depressing B when the CHRONOGRAPH
is stopped resets it.
2. Depress D to toggle between CUMULATIVE SPLIT and LAP modes.
LAP
IND.
Fig. 7(a)
2. Depress and hold B for 2 seconds to enter the SET TIMER mode with the SECONDS digits
blinking. Depress A to set SECONDS. When SECONDS are set depress B to enter the SET
TIMER MINUTES and SET TIMER HOURS modes respectively and the contents can be set by
using A. After the TIMER HOURS are set depress B to return to the TIMER mode with no digit
blinking.
3. Depress A to START or STOP the timer. When the time approahes zero the alarm will sound, 2
beeps per second, for 30 seconds. Depressing any button when the alarm sounds stops the
sound.
4. When the TIMER is in the COUNT DOWN then COUNT UP mode the timer will count down to
zero then counts up. If it is in the COUNT DOWN then REPEAT mode it will count down to zero,
then counts down again from the originally set time. In both cases the timer will sound for 30
seconds or until a button is depressed.
PACER MODE:
1. From the TIMER mode, depress C once to go to the PACER mode. The display is as shown in
Fig. 9. The last few digits can be 60, 70, 80, 100, 120, 160 or 240 (no. of beeps per mintue)
depending on previous setting. Press B to select frequency. Depress A to start or stop the
PACER. When the PACER is in operation the frequency digits are blinking.
2. Depressing C in the PACER mode will return to NORMAL TIME mode.
OR
CUM
SPLIT
IND.
Fig. 7(b)
2
Fig. 9
REMARKS: Switching between modes using the C button will not affect the contents inside each
mode.
3