1
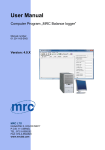
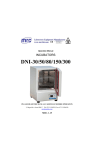
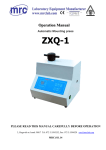
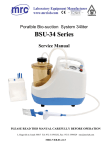
Operation Manual for
Auto Hematology Analyzer
HA-17600
Short Version
PLEASE READ THIS MANUAL CAREFULLY BEFORE OPERATION
3, Hagavish st. Israel 58817 Tel: 972 3 5595252, Fax: 972 3 5594529 [email protected]
MRC.VER.01-4.12
HEMATOLOGY BRIEF OPERATION AND DAILY MAINTENANCE INSTRUCTION
HEMATOLOGY ANALYZER BRIEF OPERATION INSTRUCTION
(Note: This direction is only basic operation, for further details please refer to the USER MANUAL)
1. Preparation
Before operation, the operator should check the following:
a) Be sure that the Diluent, Lyse and Cleanser are enough for testing; be sure that the pipeline is not
folded and all the connections are OK; please empty the waste bottle if any.
b) Be sure that the power supply adapter is safely and tightly connected to power socket.
c) Be sure that there is enough paper for printing in internal or external printer and the paper is well
installed.
To connect the Diluent, Lyse and Cleanser bottles correctly, please refer to the USER MANUAL.
2. SWITCH ON THE INSTRUMENT
Turn on the instrument with the rear power button.
3. BLANK TEST
Press Aspiration key to start blank test. Acceptable range for blank test is as following:
Parameter
Acceptable blank range
WBC
≤ 0.2 × 10⁹ / L
RBC
≤ 0.02 × 10¹²/ L
HGB
≤1g/L
HCT
≤ 0.5 %
PLT
≤ 10 × 109 / L
4. CHECKING
If the results of blank test are not in this acceptable range, please repeat the steps above until the results
are good. If the results are still out of range after 5 times’ tests, please check if the reagent and
connections of pipeline are good. And please try to use functions like “Remove Blockage”, “Back Flush”,
“Cleaning” and “Concentrated Cleanser Soaking” in the software Service Menu to solve possible
BRIEF OPERATION AND DAILY MAINTENANCE INSTRUCTION
apertureHEMATOLOGY
blockage problem.
5. SAMPLE TEST
A. Sample mixing.
The blood sample must be mixed well in sample tubes before testing. Suggested method:
Shake the tube up and down; rotate the tube for 3-5 minutes. Please do not shake the tube acutely.
Note: The samples waiting for testing shall be stored at room temperature and is only valid for testing within
4 hours. If the storage time is too long or the sample has not been mixed well, the accuracy of test result will
be affected.
B. Select “Mode” button.
Cautions! Before counting, please be sure that you’ve selected the right sample mode and have the
correct blood sample ready. Otherwise, it may block the counting aperture.
C. Sample test
Test procedures are as following:
a) Put the sample tube under aspiration pipette, press aspiration key, then the instrument will aspirate
sample.
b) Instrument starts analyzing the sample, the status bar on the top of screen displays “Testing…”
c) When test Pre-diluted peripheral blood, prepare one tube and put it under the needle click “diluent”,
press “aspirate key”, then the 700ul diluent will be dispensed into test tube, accurately add 20ul
peripheral blood and mix completely. Aspirate the liquid for testing.
D. WBC Histogram Adjustment
a) Please make sure the environment temperature is between 15℃ and 30℃, or the result will be
abnormal.
b) Some times the instrument needs some adjustment during the first installation. If the Mid% result is a little
high, please try to adjust differential 2 and 3.
c) After testing a patient sample, you will get WBC histogram.
Abnormal differential 2 & 3
Normal differential 2 & 3
d) If differential 2 and 3 are abnormal, please click Adjust button, select WBC option and then click OK.
e) Click differential 2 or 3 and then adjust them around the valley.
f) Click Confirm button to save the setting.
6. EDIT PATIENT INFORMATION
On the test window, click “Profile” at Sample Test Window, edit information of patient before or after the
test.
7. PRINT REPORT
At Sample Test Window, click “Print” button to print the test report. You can also print the report later in
Results Menu.
8. SHUT DOWN THE INSTRUMENT
Click “Shut down” to perform the correct shut down procedure before you switch off instrument.
When display turns to black screen, switch off instrument.
HEMATOLOGY BRIEF OPERATION AND DAILY MAINTENANCE INSTRUCTION
HEMATOLOGY ANALYZER DAILY MAINTAINANCE INSTRUCTION
(Note: We strongly recommend that user should maintain the instrument as following )
DAILY MAINTENANCE
A.Every day
a)
Clean the sampling needle: before shut down the instrument, you should use a soft cloth or clean
paper dipped with a little concentrated cleanser to clean the needle.
b)
Clean the aperture: Enter the Service Menu; perform the operation of “Back Flush”, “Remove
Blockage” and “Cleaning” one time.
c)
Clean the surface:
Wipe liquid away, if there is any on the bottom plastic plate or inside the instrument.
d)
Blank test is too high solution: If you find the test results abnormal, please perform blank tests and
check if the results are high. If these results remain high, please refer to the trouble shooting.
B.Every week
a)
Every week you should perform the operation of “Concentrated cleanser soaking” at least two times.
Adding 2ml concentrated cleanser into the each counting chamber. And then click “Concentrated
cleanser soaking”. You can also increase times of soaking according to your test amount.
b) Please turn off the instrument at least once a week, and keep the instrument in close condition for 1
hour.
C. Every month
Clean the shield of counting chamber: If the black shield cover of counting chamber is dirty, please
clean it with wet clean cloth. This is to prevent unexpected objects like dust entering the counting chamber
and blocking the counting aperture.
HEMATOLOGY BRIEF OPERATION AND DAILY MAINTENANCE INSTRUCTION
BASIC TROUBLE SHOOTING
Possible problems
Solutions
Check the power supply of instrument.
1)Instrument can not power
Check if the power cord has been well connected.
on
Check the voltage from power supply.
Restart the instrument.
2) No Diluent
3) No Cleanser
4) No Lyse
5) Waste bottle full
Change Diluent; perform the operation of Prime->Diluent in maintenance
menu.
Change Cleanser; perform the operation of Prime->Cleanser in the
maintenance menu.
Change Lyse; perform the operation of Prime->Lyse in the maintenance
menu.
Empty the waste bottle.
Click “System Info”->“System status” at main menu of software, check the
6) Temperature abnormal
environment temperature, if it is not in the range of 15°C ~35°C, please get
the environment temperature back to this range.
Check if the reagent is finished. Change the reagent with new.
Check if the reagent is not valid or polluted.
7)Blank test result remains
high
Perform the operation of “Back Flush” at the service menu, if the problem
remains, please perform the operation of “Concentrated cleanser soaking”.
Clean the aspiration needle and cleansing set assembly.
Check if the temperature or pressure is in normal range.
Check whether there is high voltage electricity or magnetic field interference.
Perform the operation of “Remove Blockage” at the maintenance menu.
Also perform the operation of “Concentrated cleanser soaking”.
8) Blockage in aperture
If you can not solve the problem by above method, perform the operation of
“Burn”.
Please check pressure inside the instrument in the service/debug/target
value. Or test the pressure with barometer.
Perform the operation of “Cleaning” in the maintenance menu.
9) Air bubbles
Check if the valve is working well.
Check if the reagent pipeline system is well connected.
Perform the operation of “Prime” again.
Check if there is enough paper in the printer.
10) Printer can not print
Check if the printer and instrument are well connected
Check the printer settings in the software.
Open the two side doors of the instrument, check if there is unexpected object
11) Abnormal noise in the
instrument
blocking the movement parts, if any, clean it away.
Check if the piston of the vacuum pump is out of the pump body. If so, please
make the piston towards the pump body and push it back.
If the problem remains, please contact our service people.