1
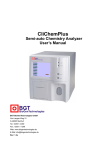
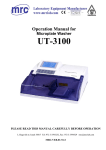
Semi-auto Chemistry Analyzer User’s Manual SACA-19900 PLEASE READ THIS MANUAL CAREFULLY BEFORE OPERATION 3, Hagavish st. Israel 58817 Tel: 972 3 5595252, Fax: 972 3 5594529 MRC.010.14 [email protected] Semi-auto Chemistry Analyzer User’s Manual How to use this manual? It’s greatly appreciated you become the user of Semi-auto Chemistry Analyzer. In order to get the best effect, you must be familiar with our instruments and their functions before performing the clinical diagnostic tests. This manual is the operating guidance of Semi-auto Chemistry Analyzer , which including the contents of instrument installation, daily test, quality control, and daily maintenance, etc. As to the users who uses external printer, please refer to the user’s manual of external printer at the same time. Please reserve all the packing materials for the use of deposit, transportation and maintenance in the future. You may contact with your distributor if there is any problem. As to the instruments of different version or configuration, their functions are slightly different. Note: Indications, advices and suggestions. Italics are used to differ from each other. Warning! Warning indications must be obeyed, so as to ensure the normal operation of instruments and correct and real test results. Bold-face is used to make the difference. 1 Semi-auto Chemistry Analyzer User’s Manual Signals used on the packing box Upward Dampproof Fragile Stack 2 Semi-auto Chemistry Analyzer User’s Manual Warning and Safety Indications This instrument is only used for in vitro diagnosis, please carefully read the following warnings before the usage, and strictly obeys them. Warning: Please carefully read the following announcements before using this instrument. Cut off the power source at once if there is abnormal smells or smokes, and pull out the power plug from the outlet. At the moment, you must immediately propose test applications to the distributors and the agents of our company. If it is continuously used under this condition, it may cause fire, electric shock or personnel casualty. Neither blood and reagent nor metal pieces of staple and pin should be dropped into the instrument; otherwise it would lead to short circuit or smoke and fire. If there is something abnormal, cut off the power source at once, and pull out the power plug from the outlet. At the moment, you must immediately propose test applications to the distributors and the agents of our company. Operators don’t touch the electric circuit inside the instrument, especially wet hands, which may be easier to get electric shock. Rubber gloves must be put on while maintaining and checking the instrument, and prescriptive tools and spare parts should be used. After finishing the operation, please use disinfecting liquid soap to wash hands. Otherwise, the parts of skin that contact with blood may be infected, electrically injured or burned. Extremely be careful while dealing with samples. Rubber gloves must be put on, or it may cause infection. If the sample enters into eyes or wounds, use a great amount of water to wash at once, and accept the checkup of doctors. Reagent Application If the reagent enters into eyes, use a great amount of water to wash at once, and accept the checkup of doctors. If drink the reagent at error, turn to the doctors immediately, and take a lot of water to vomit the reagent at the same time. If hand or skin is stained with the reagent, clear with water at once. The used tubes and other instruments should be properly disposed as the medical wastes or infective wastes. If the person is stained with blood, there is possibility of being infected by pathogens. 3 Semi-auto Chemistry Analyzer User’s Manual Power voltage, connection and earthing Be sure not to insert the plug into the electrical outlet of alternating current over 220V. Otherwise, it may cause fire or electrical shock. When the instrument is installed, three-core power cable accompanied with the machine must be used, and ensure it is well earthing. Otherwise, it may cause fire or electrical shock. Be sure not to damage the isolation protection peel of power line. Don not pull the power line with exertion or hang heavy things on it. Otherwise, it may cause broken circuit or short circuit, thus lead to electrical shock or fire. Power source must be cut off when connect the peripheral equipments. Otherwise, it may cause electrical shock or troubles. Specifications of Pharmaceutical affairs law: It is forbidden to refit the medical instruments. 4 Semi-auto Chemistry Analyzer User’s Manual Content SIGNALS USED ON THE PACKING BOX........................................................ 2 CHAPTER 1: BRIEF INTRODUCTION OF INSTRUMENT............................... 7 1.1 Product introduction ................................................................................. 7 1.1.1Product name ......................................................................................... 7 1.1.2 Model ..................................................................................................... 7 1.1.3 Product features .................................................................................... 7 1.2 Product structure and composition ......................................................... 7 1.3 Product applicability.................................................................................. 7 1.4 Instrument specifications.......................................................................... 8 1.5 Instrument installation............................................................................... 8 1.5.1 Instrument Opening and Sealing ........................................................... 8 1.5.2 Select proper position for the instrument ............................................... 8 1.5.3 Power supply requirement..................................................................... 9 1.5.4 Connect instrument to power supply ..................................................... 9 1.5.5 Installation of Flow Cell ........................................................................ 10 1.6 Main Structure......................................................................................... 11 1.6.1 Front View............................................................................................ 11 1.6.2 Keypad................................................................................................. 11 1.6.3 Back View ............................................................................................ 12 1.6.4 Built-in Printer ...................................................................................... 12 1.6.5 Flow Cell and Cuvette.......................................................................... 12 1.6.6 Lamp and Peristaltic Pump .................................................................. 13 1.6.7 Schematic Diagram of Structure (for Reference Only) ......................... 14 CHAPTER 2: OPERATION ............................................................................. 15 2.1 Power on................................................................................................... 15 2.2 Function introduction of main menu...................................................... 15 2.3 How to operate the software?................................................................. 15 2.4 Sys. Setting .............................................................................................. 15 2.4.1 Printer .................................................................................................. 16 2.4.2 Date ..................................................................................................... 16 2.4.3 Data send ............................................................................................ 16 2.4.4 Optic setting......................................................................................... 17 2.4.5 Del. data .............................................................................................. 17 2.5 Test............................................................................................................ 17 2.5.1 Item Parameter settings....................................................................... 17 2.5.2 Item Test .............................................................................................. 22 CHAPTER 3: REPORT ................................................................................... 28 3.1 Print by sample ........................................................................................ 28 3.2 Print by item ............................................................................................. 29 3.3 Quality control.......................................................................................... 30 CHAPTER 4: POWER OFF............................................................................. 32 CHAPTER 5: MAINTENANCE ........................................................................ 33 5 Semi-auto Chemistry Analyzer User’s Manual 5.1 Overview ................................................................................................... 33 5.2 Clean instrument...................................................................................... 33 5.2.1 Clean the surface of instrument ........................................................... 33 5.2.2 Clean Flow-cell .................................................................................... 33 5.3 Instrument maintenance ......................................................................... 34 5.3.1 Change fuse ........................................................................................ 34 5.3.2 Adjustment of Peristaltic Pump tube .................................................... 34 5.3.3 Change of aspiration tube.................................................................... 34 5.3.4 Change of Light Source Lamp ............................................................. 35 6 Semi-auto Chemistry Analyzer User’s Manual Chapter 1: Brief introduction of instrument 1.1 Product introduction 1.1.1Product name Semi-auto Chemistry Analyzer 1.1.2 Model 1.1.3 Product features Monochrome LCD, English menus. It has two test modes of single wavelength and double wavelength. Following test methods can be provided: Endpoint method (Endpoint) Fixed time method (Fixed time) Kinetics method (Kinetics) Double wavelength (Dichromatic) Absorbance (Absorbance) Multi-calibration curve (Multi- Calibration) It can perform sample analysis of serum, plasma, whole blood and urine, etc. Open for reagent, and there is no specific restriction. Internal printer can print English reports and programming parameters, etc. 1.2 Product structure and composition It is composed of optical system, pipeline system, computer control system and software, etc. 1.3 Product applicability It is for the clinical tests of body blood and the tests of all kinds of general biochemical criterion of other body fluids. 7 Semi-auto Chemistry Analyzer User’s Manual 1.4 Instrument specifications Resolution Light source: Wavelength: Temperature control: Flow-cell : Interface: Display: Print: Work environment: Storage environment: Weight: Overall dimensions: Power supply: Power input: Fuse type: Fuse specification: 0.001Abs (Display) , 0.0001 Abs (Internal calculation) Halogen tungsten lamp 330-800nm continuously adjusted Ambient temperature,25,30,37OC Flow-cell RS-232 bidirectional communication Liquid crystal display Internal printer 10 OC -30 OC;relative humidity≤70% -20 OC -55 OC; relative humidity≤93% 8 kg 360mm(L)×318mm(W)×185mm(H) AC110/220V±10%, 50/60Hz±1Hz 80VA Ф5×20 3.15AL250V 1.5 Instrument installation 1.5.1 Instrument Opening and Sealing Open the instrument package, and take the materials used in transportation away. Preserve the packing box and materials well, and it’s convenient for you to repack the instrument someday in the future. Take off the packing materials, and take the instrument out of the plastic package. Check the articles inside the package box, and confirm the following should be included: Semi-auto Chemistry Analyzer User’s manual Packing list Power line Note: The product accessories should be in accordance with the packing list. Please contact with the distributor when the accessories are found not right. 1.5.2 Select proper position for the instrument Find a place without direct sunshine in your working place. The surface of the selected working table should be flat, and there is enough space for placing Semi-auto Chemistry Analyzer. The anterior edge of instrument should be near to the edge of working table. Avoid comparatively large shake of working table (For example, put hydroextractor on the working table). 8 Semi-auto Chemistry Analyzer User’s Manual Note: The work environment of instrument is that temperature is between 10 OC -30 OC and relative humidity is below 70%. In order to guarantee the normal working of instrument, the following places are forbidden to be put on: Places with extreme changes of temperature. Particularly hot or cold places. Places full of dust. Places nearer to the electromagnetic devices that produce magnetic field. Places with direct sunshine. 1.5.3 Power supply requirement 1.5.4 AC110/220V±10% 50/60±1 Hz Connect instrument to power supply 1)Insert one end of the power line into the outlet of instrument. 2)Insert the other end of the power line into the outlet of power supply. Warning: Alternating current power must be well earthed (near-ground voltage<5V). Alternating current power must be stable. It is prohibited to use power supply with high-power equipments together, and it’s better to equip with voltage-regulated power supply. In the area with unstable voltage, please use UPS power supply to ensure the normal work of instrument. When power line is pulled out, you must hold plug itself, not the power line. If there is smoke, abnormal smell or strange sound of instrument, cut off the power at once, and contact with the distributor. 9 Semi-auto Chemistry Analyzer User’s Manual 1.5.5 Installation of Flow Cell Open the cell cover manually as shown in Fig. 1-1. Fig. 1-1 Opening of light source cover 1) 2) 3) 4) 5) Remove the tape of the cell. Remove the package. Place the cell to the thermostatic bath. Slightly insert the cell to the cell socket. Put the pipette through the fixing hole with it forward straightly. Cover the cell. Warning: Do NOT touch the transparent window of the cell to avoid grease on the hand attached to the window. Ensure that the pipette is not located in the groove; otherwise, the pipette will be folded and pressed to suck bubble and lead to higher water blank. 10 Semi-auto Chemistry Analyzer User’s Manual 1.6 Main Structure 1.6.1 Front View Fig. 1-2 Front view Printer cover Keypad Light source cover Power indicator Pipette LCD SUCK key 1.6.2 Keypad Fig. 1-3 Keypad 11 Semi-auto Chemistry Analyzer User’s Manual Direction keys: used to move the cursor on the screen forwards/downwards/leftwards/rightwards. Feed Paper: RINSE: ESC: ENTER: used for manual paper feeding (hotkey for parameter printing). used to clean the pipe. used to exit from an interface and cancel operation. used to confirm entry and storage. 1.6.3 Back View Fig. 1-4 Rear view Printer interface Fuse RS-232 interface Power socket Fan Fan Waste liquid hole Nameplate Power switch Peristaltic pump 1.6.4 Built-in Printer Semi-auto chemistry analyzer has a built-in thermal printer. 1.6.5 Flow Cell and Cuvette 1) Open the flow cell cover as shown in Fig. 1-5. Press the projections on both sides of the cover, press the both sides of the cover until the cover is internally deformed, and then turn the cover backwards as shown in the following figure. 12 Semi-auto Chemistry Analyzer User’s Manual Fig. 1-5 Opening of the cell cover 2) Inside of the colorimetric system The colorimetric system consists of thermostatic bath and the cell. Flow cell Thermostatic bath SUCK key Fig. 1-6 Inside of cell system 3) Use of cuvette system Remove the cell from the thermostatic bath. Place the cell with sample to the thermostatic bath. Press the SUCK key to test (by the method the same as the one of colorimetric system). 1.6.6 Lamp and Peristaltic Pump Light source module Open the cell cover. The light source module consists of light source lamp, light source support, light source holder and lens. 13 Semi-auto Chemistry Analyzer User’s Manual Lamp holder Screws 1 and 2 Bulb Screws 3 and 4 Lamp holder adjustment screw Fig. 1-7 Light source module Peristaltic pump system Peristaltic pump system consists of peristaltic pump motor, peristaltic pump installation plate, peristaltic pump and pump pipe. The peristaltic pump is installed on the outer surface of the rear panel of the analyzer, so that the pump pipe can be replaced easily. Peristaltic pump unit Pressing plate Peristaltic pump pipe Adjustment screw Peristaltic pump motor Water inlet Peristaltic pump installation plate Water outlet Fig. 1-8 Peristaltic pump system 1.6.7 Schematic Diagram of Structure (for Reference Only) Keypad Optical and colorimetric system Signal amplification A/D conversion PC LCD Printer Fig. 1-9 Schematic diagram of structure 14 Semi-auto Chemistry Analyzer User’s Manual Chapter 2: Operation 2.1 Power on Switch on the power switch on the rear of the analyzer. After several seconds, system main interface is displayed on the screen as shown in Fig. 2-1. 1 Test 3 Sys. Setting 2 Report 4 Power Off Ver1.0 2007-06-27 13:01:21 Fig. 2-1 System main interface 2.2 Function introduction of main menu Test: Used to set normal parameters, standard parameters and quality control (QC) parameters of the test project which will be saved after confirmation, and access the test procedure for project test. Report: Used to manage the data of the test system. The functions include printing according to project and patient No., deletion of test result and search of QC information of current month. Sys. Setting: Used to set the basic system operation. Settings include printer selection, switching, time setting and transfer of all test data of current day to external management system. Power Off: Used to clean the piping after test. The power switch can be switched off if piping does not require cleaning. (It is recommended that the piping should be cleaned before switching off.) 2.3 How to operate the software? The number before the name refers to the number on the panel as a serial number, and is the number of key for access to corresponding operation (by which the corresponding operation can be accessed). The on the right of the name means setting and changing the parameters by left and right key of the keypad. The in the software interface means choosing the specific menu item by up and down key of the keypad. 2.4 Sys. Setting The System Settings is used to set some basic parameters of the analyzer, such as date and time. Press the number key 3 in the system main interface to access system setting interface as shown in Fig. 2-2. 1 Printer 4 Optic setting 2 Date 5 Del. data 3 Data send ID: 6009010001 Fig. 2-2 System Setting menu 15 Semi-auto Chemistry Analyzer User’s Manual 2.4.1 Printer Press the number key 1 in the system setting interface to access the following interface as shown in Fig. 2-3. Printer: On Printer: Built-in Fig. 2-3 Printing settings The analyzer is equipped with a built-in thermal printer or external printer which can be selected by pressing the key on the panel. In addition, online printing support can be reselected during test. (For detailed setting, please refer to the printing settings during test.) 2.4.2 Date Press the number key 2 in the system to access the following interface as shown in Fig. 2-4. 2006-11-09 12:15:30 Fig. 2-4 Time setting Use the key on the panel to move the cursor to the desired item, and use number keys to change the current date or time. Press the ENTER key to save the setting. Press the ESC key to return to system setting interface. 2.4.3 Data send Press the number key 3 in the system setting interface (after ensuring that the communication cable between the analyzer and external PC is securely connected and related data management software is started with communication parameters correctly configured) to access the following interface as shown in Fig. 2-5(a). Fig. 2-5(b) shows that data has been uploaded. Data sending... (a) Uploading Transfer finish! (b) Uploaded Fig. 2-5 Uploading data 16 Semi-auto Chemistry Analyzer User’s Manual 2.4.4 Optic setting Press the number key 4 in system setting interface to access interface for replacement of bulb, and press “Help for replacement of bulb”. 2.4.5 Del. data Press the number key 5 in system setting interface to access interface for deleting data, and press ENTER key to delete all test results saved. 2.5 Test Sample test includes project settings including test method, project name, unit, temperature, wavelength, blank, delay time, reading time, suction amount, scope of normal reference value, factor, standard, QC parameters, etc., and project test including blank test, standard test, QC test, sample test, etc. 2.5.1 Item Parameter settings 2.5.1.1 Selection of Test Project Choose “1” in the system main interface as shown in Fig. 2-1 to access project selection interface (as shown in Fig. 2-6). The first row is the status bar, and the three rows below display project name and corresponding serial number. Various flexible methods can be used to select the desired project, such as direction key, number positioning and name search. Detailed operation method is as follows: Fig. 2-6 Project selection interface Selection by using direction keys: Select the project by pressing Up, Down, Left and Right keys ( and ). If the project is selected, the project is highlighted and its number is displayed on the left upper corner of the screen. Selection by entry: The input method (i.e. “123” and “ABC”) is displayed on the right upper corner of the screen, which can be switched by pressing key. “123” refers to number input method where numbers can be input and the project with corresponding number can be selected and highlighted. “ABC” refers to character input method where characters can be input according to the indication given by the keypad and 17 Semi-auto Chemistry Analyzer User’s Manual displayed on the upper middle part of the screen. After input, press the ENTER key directly to select the corresponding project. (If no corresponding project, no operation will be made.) 2.5.1. 2 Change of Project Parameters Choose the desired project and press the ENTER key to perform parameter setting of the corresponding project as shown in Figs. 2-7 and 2-8. Fig. 2-7 Parameter change interface 1 Upper: 1000.0 Decimal:: 3 Lower: 200.0 Asp.Vol.:500 Delay: 30 Standard: Read: 60 Control: Fig. 2-8 Parameter change interface 2 Basic Operation Method 1) 2) 3) To select the content to be changed, press the key on the keypad to move the cursor to the content with the content highlighted. Method for changing content. If “ ” is displayed on the right of the selected content, the content can be changed by using key; if “ ” is displayed, the content of lower level can be changed by using key. If the selected content has decimal point, decimal point can be input; if not, only an integer can be input. Method for quick paging. If it is confirmed that no change is to be made for the current page, press the ENTER key directly to access the next page or access project test procedure. 4) Press the ENTER key at the final page of the project setting to save parameter setting automatically and access project test procedure. 1) Setting of Parameters Name: Project name. Fixed project and self-definition project can be set in the system (with project Nos. 48 to 204). The self-definition project can be realized by adding, changing and saving the name. 2) Mode: Select the test method, including End Point, Two Points and Speed, by using the key. End Point End Point means when the sample is mixed with the reagent, the reaction ends after a period of time, (that is the color of the liquid does not change any more or the absorbance of the liquid does not change,) while the absorbance of the liquid can be tested and the concentration can be obtained by the Lambert-Bouguer law. Reagent kits for some test projects requires test using Dichromatic method to remove the effect of some interference factors. Therefore, the analyzer has Dichromatic method. 18 Semi-auto Chemistry Analyzer User’s Manual Kinetics Kinetics means when the sample is mixed with the reagent, the absorbance of the liquid is measured continuously by photometer. When the absorbance starts to change linearly, the change speed is measured, and the concentration of the liquid can be obtained according to the Lambert-Bouguer law. Two Points Two Points is a special application of test method Speed, which is when the absorbance starts to change linearly, absorbance within two points on the measured linear segment in order to obtain the concentration. 3) Unit: Used to select the unit of the test result, including mg/L, g/L, umol/L, mmol/L, mol/L, U/L, IU/L, mg/dL and Blank, which can be selected by using key. Temp.: Used to select the temperature for the test, including room temperature, 25, 30 and 37, which can be selected by using key. 4) 5) Fir. W: Used to select the primary wavelength according to the requirement of the reagent kit. 6) Sec. W: Used to select the secondary wavelength according to the requirement of the reagent kit. The system can perform Dichromatic method by setting the secondary wavelength. To use Monochromatic method, set the secondary wavelength as zero, that is the secondary wavelength is not used. 7) Blank: Used to select the blank type. Types include Not Used, Reagent Blank and Sample Blank, which can be selected by using key. When End Point is used, Reagent Blank and Sample Blank can be selected as required. When Two Points is used, Reagent Blank can be used. When Speed is used, no blank is used. 8) Factor: Used to input factor for calculation. The system supports direct entry of factor and determines the calculation factor by system standard making (i.e. standard test). 9) Upper: It is the upper limit based on the result input. 10) Lower: It is the lower limit based on the result input. 11) Delay: Used to input the delay time for the test. The delay time is from the time when the tested liquid accesses to the flow cell to the time when the actual test starts. 12) Read: Used to input the reaction time for the test (which is not available for End Point). 13) Decimal: Used to set the number of places after the decimal point, which is up to 4. 14) Asp.Vol.: Used to set the suction amount of the suction pump, and the setting range is 0-3000uL. This parameter means the amount of liquid to be sucked and tested. To ensure the test accuracy, the suction amount shall be more than 400uL generally. (For 19 Semi-auto Chemistry Analyzer User’s Manual normal project, 500uL shall be set, and for reagent with high pollution degree, 700uL shall be set.) Note: To maintain the temperature balanced and remove the small bubbles in the sample to be tested, it is necessary to set certain time delay. For most tests by using End Point, the time delay shall be 5 sec. O For tests by using Kinetics at 25 C, the time delay shall be not less than 10 sec. O For tests by using Kinetics at 30 C, the time delay shall be not less than 12 sec. O For tests by using Kinetics at 37 C, the time delay shall be not less than 15 sec. Generally, suction amount of 500uL can ensure that the cross pollution rate is lower than 1%, and the suction amount can be increased and reduced through adjustment by pressing number keys. 15) Standard: Used to set the standard making parameters. Move the cursor to the “Standard”, press the key according to the indication to access the interface for Standard Setting as shown in Fig. 2-9. Mode: The calculation methods for standard test include linear regression and polyline regression, which can be selected by using key. Std.Count: The number of standards used in the test, which is up to 8. Repeat: The number of repeats of each standard test. Con.: The concentration of the standard used in the standard test. Mode: Linear regression Std. Num: 1 Repeat: 1 Con.: 133.00 Fig. 2-9 Interface of standard parameter setting Note: When polyline regression is used, the number of standards shall be more than 3; otherwise, linear regression shall be used. When the number of standards more than 2 is used, the number of repeat will be set as 1 automatically. When the number of standards more than 3 is used, it is necessary to input according to the method for increasing progressively or decreasing progressively; otherwise, the standard making will fail. During standard parameter processing, the system will indicate the range of concentration of standard which starts thirdly as shown in Fig. 2-10. The system automatically judges the trend of progressive increase or decrease in proper order with the range of concentration of standard which starts thirdly displayed on the right side. 20 Semi-auto Chemistry Analyzer User’s Manual Fig. 2-10 Indication interface of standard concentration With parameters set, press the ESC and ENTER keys to save the set parameters and return to the main interface for parameter setting automatically. Therefore, correct standard parameters shall be input. 16) Control: Used to set the QC parameters. Move the cursor to “Control”, and press the key according to the indication to access interface for setting QC parameters as shown in Fig. 2-11. Control: Up to two QC items can be set. Press the key to select. (Press the key to choose QC item circularly in the interface for setting QC parameters.) Avg.: The standard concentration of the QC item. SD: Standard deviation of the QC item. Batch: Corresponding lot No. of QC item. Fig. 2-11 Interface for setting QC parameters With parameters set, press the ESC and ENTER keys to save the set parameters and return to the main interface for parameter setting automatically. Therefore, correct QC parameters shall be input. After confirmation of parameter setting, press the ENTER key to save parameters set and access to project test procedure automatically, or press the ESC key to cancel storage of parameters set and return to the project interface. Therefore, correct parameters shall be input. 2.5.1.3 Self-definition of Project 1. 2. Move the cursor to the “Name” of parameter setting, while the project name is highlighted or cursor symbol is displayed (if no project name exists). Enter the project name according to the characters indicated on the keypad, of which size is up to 5 characters. During entry, a character is confirmed after 3 seconds 21 Semi-auto Chemistry Analyzer User’s Manual automatically, and the next character can be input according to the indication. 3. 4. During entry, press DEL key to delete a character entered. To set the project parameters, press the ENTER key to save the name and parameters of the self-definition project and access the test procedure automatically. 2.5.2 Item Test With project parameters set, press the ENTER key to save parameters set and access project test procedure automatically. Other information will be configured by the system according to the wavelength set, and the indication information as shown in Fig. 2-12 will be displayed. The time for switching is short (generally, several seconds), and temperature control will be performed automatically. Fig. 2-12 Indication of project switching After the system switches the project and configures the information, temperature control will be performed as shown in Fig. 2-13. The time of temperature control is determined according to the difference between the temperature measured before switching and the one measured after switching, and is several seconds to three minutes. Press ESC key to cancel temperature to access blank test. Fig. 2-13 Temperature control status 2.5.2.1 Blank Test After the system switches the project and performs temperature control, blank test procedure will be accessed automatically. The system confirms whether to perform reagent blank according to the parameter setting information. If Not Used or Sample Blank is selected in the interface for blank setting, only water blank is performed in blank test. If Reagent Blank is selected, water blank and reagent blank is performed in blank test. 22 Semi-auto Chemistry Analyzer User’s Manual Fig. 2-14 Blank test As shown in Fig. 2-14, the water blank is carried out first and “Please press SUCK key!” is displayed. Prepare distilled water and press the SUCK key, and the system will automatically measure the result of water blank. If the water blank is too high, “Too high difference” will be displayed, and the measured AD value will be displayed below as shown in Fig. 2-15. In this case, water blank shall be retested. If “Too high difference” is still displayed after retests, it is recommended to check whether the light path is loose. Fig. 2-15 Abnormal water blank Reagent blank is accessed automatically after water blank test. Perform reagent suction according to indication, and the system will generate the result of test. No key should be pressed after reagent blank test, and the test selection interface will be accessed automatically after several seconds as shown in Fig. 2-16. The cursor moves to the “Sample test” by default, and selection can be made by pressing the key. Press the ENTER key to access corresponding test procedure, or press the ESC key to return to the test selection interface at the corresponding test interface. Fig. 2-16 Test selection interface 2.5.2.2 Standard Test The system can obtain standard factor by two means. "K=xxx" can be displayed in the test selection interface when factor is manually input in parameter setting as shown in Fig. 2-16; or the factor can be displayed by standard test which will be described in this section in details. 23 Semi-auto Chemistry Analyzer User’s Manual 1) Test selection Move the cursor to “Standard test” in the test selection interface while the item is highlighted. The system will check whether the standard parameter setting is correct. If not, “No setting!” will be displayed as shown in Fig. 2-17(a); if correct, “OK?” will be displayed as shown in Fig. 2-17(b). In this case, press the ENTER key to access test procedure, move the cursor to select other test, or press ESC key to return to the main interface. Standard : No setting! QC : Sample : (a) Standard parameter error (b) Correct standard parameter Fig. 2-17 Standard test selection 2) Test operation After access to standard test procedure, standard test interface is displayed as shown in Fig. 2-18. Where, “Standard test” shows the project name of the current test, “Sample No.” shows the number of the current standard liquid with corresponding concentration value on the right (if “Concentration: C=133.0” is displayed, please confirm whether to fill solution with the same concentration prior to suction of standard liquid), and “Test status” shows the test progress and result. “Please press SUCK key!”, “Testing…” or “Save?” is displayed at the bottom of the screen. For detailed test procedure and project test procedure, please refer to detailed operation of project test. Fig. 2-18 Standard test interface 3) Test storage After suction of corresponding standard liquid according to procedures, the system will make calculation of standard factor in real time, display values K and b for standard making after the “Test result”, and indicate “Save?” in the system status bar. In this case, press the ENTER key to save the result of standard making calculation until standard factor is reset or standard making is performed again and saved as shown in Fig. 2-19. Press the ESC key to cancel saving to access project test procedure directly. In this case, the following project test is calculated according to the factor before standard making is performed. Therefore, standard making should be performed again. Please reselect “Standard test” for standard making in the test selection interface as shown in Fig. 2-16. 24 Semi-auto Chemistry Analyzer User’s Manual Fig. 2-19 Standard test saving 2.5.2.3 QC Test 1) Test selection In the test selection interface, move the cursor to “QC test” with the item highlighted and available QC item displayed on the right. In this case, indication that the key can be used to select is given at the rightmost side. The system supports single and double QC which can be chosen by pressing the key with the selected QC item highlighted as shown in Fig. 2-20(a). If double QC is selected, continuously press the key until double QC items are highlighted as shown in Fig. 2-20(b). After confirmation of the selected QC item, press the ENTER key to access QC test interface as shown in Fig. 2-21. (a) Selection of single QC (b) Selection of double QC Fig. 2-20 Selection of QC test 2) Test operation After access to QC test procedure, QC test interface as shown in Fig. 2-21 shown is displayed. Where, “QC test” shows the project name of the current test, “Sample No.” shows the number of the current QC solution with corresponding QC lot No. displayed on the right (if “QC item: 070691” is displayed, please confirm whether to fill solution with the same lot No. prior to suction of QC solution), and “Test status” shows the test progress and result. “Please press SUCK key!”, “Testing…” or “Save?” is displayed at the bottom of the screen. For detailed test procedure and project test procedure, please refer to detailed operation of project test. Fig. 2-21 QC test interface 25 Semi-auto Chemistry Analyzer User’s Manual 3) Test storage After suction of corresponding standard liquid according to procedures, the system will make calculation in real time, display the result of QC test and judge the QC status after the “Test result” (“C>2SD” indicates that the result of the QC test is greater than two value SDs. If not, this indication is not displayed), and indicate “Save?”. After the confirmation that the QC is effective, press the ENTER key to save the result of QC test. If double QC is selected, the two QC items are tested in proper order. Make suction of corresponding QC solution according to the indication and save the effective result of QC test as shown in Fig. 2-22. (Note: Only one result of QC test can be saved for the same project with the same lot No. on each day.) Press the ESC key to performed QC test again. After the QC test, the system will turn to the test selection interface with project test indicated as shown in Fig. 2-16. Fig. 2-22 Saving of QC test 2.5.2.4 Sample Test The cursor moves to the “Sample test” with the item highlighted in the test selection 1) interface. In this case, press the ENTER key to access sample test procedure. Test operation If sample blank is selected in the parameter setting, sample blank is performed prior to sample test as shown in Fig. 2-23(a). If “Not Used” or “Reagent” is selected, it is done in the preceding blank test, and the test interface as shown in Fig. 2-23(b) is directly accessed. The name of the current project will be displayed after the “Sample blank” and “Sample test”. “>Print On” or “>Print Off” displayed on the right upper corner of the screen indicates that the online printing function can be switched on or off by pressing the key and the result can be printed right after test. This function can only be changed before suction status. The “Sample No.” shows the number of the next tested sample, which can be changed before test, with indication of “Change?” highlighted on the right of the corresponding bar. It is recommended that the number shall be checked before test. Otherwise, if the same number is used for the same project, the test result will be overwritten automatically. The “Test status” shows the test progress, and the “Test result” shows the absorbance and concentration of the test. “Please press SUCK key!”, “Testing…” or “Save?” is displayed at the bottom of the screen. 26 Semi-auto Chemistry Analyzer User’s Manual (a) Sample blank (b) Sample test Fig. 2-23 Sample test interface 2) Test procedure The following will take the case of no sample blank (when “Not Used” or “Reagent” is selected) as example to describe the sample test procedure and relevant operation in details. If sample blank is selected, sample blank is performed prior to each project test and sample test is automatically accessed, waiting for suction of test sample, with operation the same as the one for sample test. a) Confirm the number of sample (to be tested), and press the key to switch on or off the online printing function as shown Fig. 2-23. In case of status of “Press the SUCK key!”, prepare the test sample and press the SUCK key to suck the sample. The system sucks according to the amount set and accesses test procedure automatically. The status bar will display “Testing…”, and the “Test status” bar will display the progress in second as shown in Fig. 2-24. b) Item: ALT Sam. No.: 10 Status: 10 Testing... Fig. 2-24 Sample test status c) d) e) f) After test, the test result will be saved automatically. (If test result of the sample of the project exists at the day, it will be overwritten.) In this case, the number of sample will automatically have an increase of 1 in order to be used as the number of the next test sample for confirmation and change. Result printing: If the online printing function which can be switched on or off by key while waiting for suction status is switched on, the system will pressing the automatically print the test result. After the test and printing of the current sample, the number of sample has an increase of 1 and the status for waiting for suction of the next sample is accessed. Operate as indicated to continuously perform sample test. If QC, standard making or exit is required during test, press the ESC key to return to the test selection interface and select the relevant operation. 27 Semi-auto Chemistry Analyzer User’s Manual Chapter 3: Report The data management is mainly designed for management of test result and the QC result of the current month, which is provided with data search, printing, deletion and other basic functions. Press the 2 key to access management interface as shown in Fig. 3-1 in the system main interface. “Sample report”, “Project report” and “QC report” can be accessed respectively by pressing the number keys 1, 2 and 3. Sample report: The test result can be found according to the date and sample No. Project report: The test result can be found according to the date and project No. QC report: The QC result can be found according to the month, project No and the QC lot No. Fig. 3-1 Options of management functions Note: The system is provided with data update function. Therefore, the system will automatically delete some previous data if the size of test data exceeds the remained memory space of the system. In addition, relevant indication will be given during updating, so some time will be spent before test can be performed again. 3.1 Print by sample To search the test result, enter the range of time and sample No. Enter the “Date started” and “Date ended” respectively. The date ended shall be later than or the same as the date started. Enter the sample No. desired after the “Sample No.” “A-B” can be used to set the range of sample Nos. from No. A to B, where B shall be greater than or equal to A. If A is equal to B, single sample will be searched. As shown in Fig. 3-2, result of test of sample Nos. 1, 2 and 3 obtained on November 9th, 2006 will be searched. Fig. 3-2 Sample report search After entry of range of time and sample No., press the ENTER key to search the result meeting the conditions. If none is found, “None” will be displayed on the right lower 28 Semi-auto Chemistry Analyzer User’s Manual corner of the screen as shown in Fig. 3-3(a). If a relevant record is found, record meeting the conditions will be displayed as shown in Fig. 3-3(b). (a) No record (b) Record meeting the conditions Fig. 3-3 Status of sample search In the result search screen as shown in Fig. 3-3(b), the following hotkeys are defined. Paging: Only 3 records can be displayed on one page, and the previous and next page can be turned to by pressing the key. Printing: Press the ENTER key to print all results found. Return: Press the ESC key to return to the search screen. Note: The “Remark” bar of the display and printing of report: “H” means that the test result is higher than the reference upper limit, “L” means that the test result is lower than the reference upper limit, and no character is displayed in normal case. 3.2 Print by item To search the test result, enter the range of time and project No. Enter the “Date started” and “Date ended” respectively. The date ended shall be later than or the same as the date started. To search a “Project No.”, enter the desired project No. to display the project name corresponding to the project No. on the right in real time, or press the . key to switch the input method to "ABC” to enter the name expressed in characters. As shown in Fig. 3-4, all results of ALT project obtained on November 9th, 2006 will be searched. Fig. 3-4 Project report search After entry of range of time and project No., press the ENTER key to search the result meeting the conditions. If none is found, “None” will be displayed on the right lower corner of the screen as shown in Fig. 3-5(a). If a relevant record is found, record meeting the conditions will be displayed as shown in Fig. 3-5(b). 29 Semi-auto Chemistry Analyzer User’s Manual (a) No record (b) Record meeting the conditions Fig. 3-5 Status of project search In the result search screen as shown in Fig. 3-5(b), the following hotkeys are defined. Paging: Only 3 records can be displayed on one page, and the previous and next page can be turned to by pressing the key. Printing: Press the ENTER key to print all results found. Return: Press the ESC key to return to the search screen. 3.3 Quality control To search the QC result, enter the month, project NO. and QC lot No. To search a “Project No.”, enter the desired project No. to display the project name corresponding to the project No. on the right in real time, or press the . switch the input method to "ABC” to enter the name expressed in characters. key to Enter the “Test date” and “QC lot No.” and press the ENTER key to search the QC data of the month. As shown in Fig. 3-6, the QC result with lot No. 070691 of ALT project performed at November 2006 will be searched. Fig. 3-6 Search of QC report After entry of month, project No. and QC lot No., press the ENTER key to search the result meeting the conditions. If none is found, “None” will be displayed on the right lower corner of the screen as shown in Fig. 3-7(a). If a relevant record is found, record meeting the conditions will be displayed as shown in Fig. 3-7(b). (a) No record (b) Record meeting the conditions Fig. 3-7 Status of QC search In the result search screen as shown in Fig. 3-7(b), the following hotkeys are defined. 30 Semi-auto Chemistry Analyzer User’s Manual Paging: Only 3 records can be displayed on one page, and the previous and next page can be turned to by pressing the key. Press the key to switch between QC data list and QC diagram. Printing: Press the ENTER key to print all results found and QC diagrams. Return: Press the ESC key to return to the search screen. Note: The “Remark” bar of the display and printing of report: “0” means that the test result exceeds two SDs. 31 Semi-auto Chemistry Analyzer User’s Manual Chapter 4: Power off After all tests, return to the main menu, and press the number key 4 to shut down the program. When screen displays as Fig. 4-1 shows, press the ENTER key, (or press the ESC key to skip the shut-down and return to main menu again). Fig. 4-1 Confirmation of shut-down The system shows the screen as shown in Fig. 4-2, and indicates suction of distilled water to purge the flow cell. Fig. 4-2 Purge of flow cell In this case, prepare sufficient distilled water, and press the SUCK key or RINSE key to purge the cell as shown in Fig. 4-3. Rinsing... Fig. 4-3 Indication of purge As shown in Fig. 4-4, the system shows “Shut down” after the cell is rinsed. Fig. 4-4 Shut-down Switch off the power switch. 32 Semi-auto Chemistry Analyzer User’s Manual Chapter 5: Maintenance 5.1 Overview semi-auto chemistry analyzer is a clinical precision analyzer. To maintain it a good state, daily maintenance work shall be securely performed. Maintenance of semi-auto chemistry analyzer is very simple, but requires careful attention. 5.2 Clean instrument 5.2.1 Clean the surface of instrument Maintain the operating condition of the analyzer clean. To clean the exterior of the analyzer, wipe with wet cloth with neutral cleaner. Clean the LCD with soft cloth. Warning: Do NOT apply any solution, oil, or corrosive substance to the analyzer. 5.2.2 Clean Flow-cell Maintain the cell clean to make the test result accurate and reliable. 1. Cleaning of cell exterior a. Install the cell as required (see 1.5.5). b. If the exterior of the cell is polluted, clean it with soft cloth with anhydrous alcohol. 2. Cleaning of cell interior a. Place the container filled with distilled water under the pipette, and press the b. RINSE key to start continuous rinsing function. Press the RINSE key again to end rinsing. Generally, spend half of minute to rinse. Clean the flowcell with glass container cleaner, dilute hydrochloric acid (0.1N) or Tween 20 (2-3 drops/L). Press the RINSE key to suck cleaner, and press the RINSE key again to stop the rotation of peristaltic pump. Maintain the cleaner in the cell for 5 minutes and rinse it with distilled water for 1 minute. If it is not clean, lean it with cleaner once again. The cell shall be cleaned: when the deviation of water blank is too large on start-up; when the test project is switched; prior to shut-down of the analyzer. Warning: Do NOT maintain the reagent or other pollutant in the cell for long time. 33 Semi-auto Chemistry Analyzer User’s Manual 5.3 Instrument maintenance 5.3.1 Change fuse The fuse is installed in the fuse box beside the power switch on the rear of the analyzer. Open the box cover to replace the fuse easily. Specifications of the fuse: 3.15A 250V. It is recommended that a regulated power supply should be used. Warning: Do use the fuse with the specifications as mentioned above. To replace the fuse, remove the power cord first. Do NOT replace the fuse with the analyzer energized! 5.3.2 Adjustment of Peristaltic Pump tube After several-year use of the analyzer, adjust the peristaltic pump pipe by following steps below: Turn the latch of the peristaltic pump pipe clockwise to open the protective plate of the pump pipe; Remove the peristaltic pump pipe; Remove the retaining wire on the pump pipe joint, turn the pipe for 180°, and fix it again with wire; Install and lock the pump pipe (by counterclockwise turning the latch of the peristaltic pump pipe). Note: If the pump pipe is not installed correctly, the analyzer does not suck liquid. 5.3.3 Change of aspiration tube If the pipette (or flow cell) is blocked by foreign substances, use an injector to clean. If the pipette is damaged or blocked seriously, replace the pipette by following steps below: Remove the flow cell; Remove the pipette at the inlet, and replace it with a new one; Push into the positioning pipe (with larger diameter) from one end of the new pipette, and then push into the retaining pipe (with the largest diameter); Remain a portion of pipette with a length of 1 cm outside of the positioning pipe (as shown in Fig. 5-1); Fix the retaining pipe to the inlet of the flow cell. Positioning pipe Pipette Retaining pipe Fig. 5-1 Pipette joint applied to the inlet of the flow cell 34 Semi-auto Chemistry Analyzer User’s Manual 5.3.4 Change of Light Source Lamp Switch off the power supply of the analyzer prior to replacement of bulb. Open the cell cover as shown in Fig. 1-7, fix the new bulb to the lamp holder with screws 1 and 2. Start up the analyzer to access the interface for bulb replacement and turn to the wavelength of 340nm. Start the peristaltic pump to suck distilled water, and click the real-time AD display. Loosen screws 3 and 4 a bit. Slightly turn the lamp holder adjustment screw and monitor value AD. Value AD shall be adjusted to the range of 0.100~0.400, and the ideal value is 0.180. When value AD is approx. 0.180, lock screws 3 and 4. In this case, check that value AD does not change to large to exceed the range of 0.100~0.400. If exceeded, repeat Step 3. After performing 3 steps above, check value AD of wavelengths that are used generally, i.e. 340, 380, 405, 492, 546, 578, 620, 670 and 750nm. Value AD shall be adjusted to the range of 0.08~0.450, 380(0.08—0.60) If not, repeat Step 3. 35