1
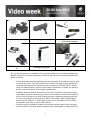
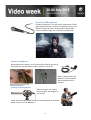
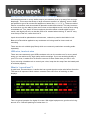
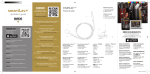
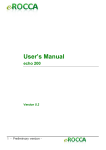
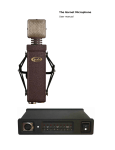
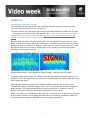
AUDIO 101
Getting audio right while filming
The philosophy of recording audio in film and video can be summed up in one sentence:
“you can’t make a silk purse out of a sow’s ear.”
To further explain: get good sound when you are recording because it is difficult to “fix” later.
– To quote from the Final Cut Pro user manual: “Any audio recorded poorly at this phase
will be difficult to fix later in the process. There is no match for properly recorded
sound, no matter how good your audio clean-up tools are.”
But what does this mean? What is “good audio”? For the purposes of your projects, “good
audio” is audio that sits well above the “noise floor”, or that has a good “signal-to-noise ratio”.
All that this means is that there is always a certain level of “noise” in every recording – even
the electronic devices one uses to record make “noise”, but the noise floor also contains
anything you don’t want to record.
As this graphic shows, if your signal isn’t strong enough, it will get lost in the noise.
To achieve good audio results, you need to make decisions based on what exactly you are
going to record. This requirement will guide your equipment selection and the best way to go
about getting the audio.
Most cameras today have great built in features; DSLR cameras that can shoot video,
domestic level handy cams with shotgun mics, even normal handheld cameras should have
audio settings. The most important thing is to find out what type of sound you need to
capture, this will then help you decide what equipment you may need.
There is however, one consideration that trumps all. How close can you get your microphone
to your subject? While it is not always possible within your shooting constraints, getting the
mic as close to the subject as possible is crucial to getting good audio.
1
Wireless Lapel mics
Shotgun mic
RØDE SmartLav+ and iXY
Ampridge MightyMic
Hand held mics
(wired and wireless)
iRig
Are you shooting indoors or outdoors? Do you need to capture a conversation between two
people, a group, or one person speaking to camera? Let’s look at how these examples can
guide our shoot.
•
•
•
Indoor shooting means less background noise (hopefully, or at least you may be able
to control the noise). This means that you are much more likely to get a good result
using the mics built into the camera or phone. However to limit the “echo-y” sound,
keep your camera within 3 metres of the subject. Remember: for audio, the closer to
the mic you are the better. Direct audio is good audio.
Outdoors, direct to camera (one person): Here the noise floor is going to be higher;
wind, traffic, people or just nature (you have no idea how loud crickets and frogs are
until you try to record over the top of them) will form a distracting background noise.
To limit this, fall back on the axiom from above: direct audio. Use a lapel plugged
directly into the camera, or a radio lapel to get close to the subject (on the collar or
concealed in their hair), or use a hand held mic.
Filming a group (or dialogue) outdoors (or indoors) usually means using a shotgun
mic with a boom. This also means having an extra crew member to swing the boom.
2
Hand held Microphone
Good for interview or “on the scene” type shoots. Gives
great audio because it is close to the audio source, and
filters out external noise. No good when distant from
source. (Dynamic type mic, if anyone is interested)
Lapel microphone
Not as close to the source, so the result will not be as good as a
hand held, but can be hidden under a collar or in the hair.
Note: in these cases, the
lapel mic must be paired
with a belt pack and a
receiver.
Shotgun microphone
When you can’t use a hand
held or a lapel, the shotgun is
your friend.
These are known as condenser type mics and require an external
power source, such as batteries.
3
Microphone placement and correct mic technique
All microphones work in a very similar way to your eardrum; that is, by way of air moving a
diaphragm. This means that sharp or large movement results in a “popping” sound. When
we speak this type of air movement happens on letters like p, t, k; b, d, g. These are called
Plosive consonants, and mics should be placed to avoid these sounds. This only becomes
an issue when you are able to place a mic close to the subjects mouth, such as when using
a handheld mic. The “head” of the microphone should be about a hands width from the
mouth, and slightly off axis, so that the puffs of air created when uttering “P” and “B” carry
over the top of the mic, rather than into it.
Lapel mics should be placed about mid-sternum, unless they need to be hidden in hair.
Bass roll off should be applied to any condenser mic being used for close vocal mic
recording.
There are also mic shields (pop filters) which are commonly used when recording audio
separately.
USB mics, head set mics
There are some extremely good USB condenser mics on the market now; for a very small
outlay you can achieve very high quality audio recordings. If you are recording directly to
your PC or mac, it makes a lot of sense to use one of these rather than you built in mic.
If you are using a head-set mic to record your voice, keep the mic away from the breath path
to minimise popping.
What is “a good level”?
A good level, as noted above, is audio that has a good signal-to-noise ratio before distortion.
That last bit is important. Most modern cameras have some form of metering on their
displays.
This is a typical example of a digital VU meter. With digital equipment a good level is living
around -6 to -3 dB and peaking no further than +2.
4
Remember, make sure your microphone is on and the camera is set to use it! If your
microphone isn’t turned on, you won’t capture any sound. The same thing will happen if you
don’t tell your camera to use the external microphone (normally located in the cameras
settings, however newer cameras detect the microphone automatically and don’t need to be
told about it). Check everything twice and make test recordings. Before recording, try taking
a 5 second video clip and playing it back with headphones. This will give you a good idea of
how the camera is picking up sound, that way you can decide if you need to change
locations, mics, etc.
When everything is said and done, the most important thing to remember when filming in
general, and with audio in particular, is never take anything for granted. Always consider
audio up there with location, shot framing and lighting.
There are some great Vimeo resources available which are definitely worth watching:
https://vimeo.com/blog/post/capturing-good-sound
https://vimeo.com/blog/category/video-school
Research your gear, don’t buy what you don’t need, and always listen to the recordings
before you wrap!
Happy shooting
5