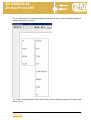
1
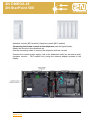
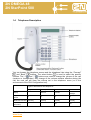
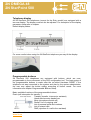
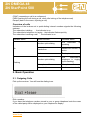
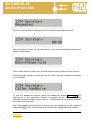
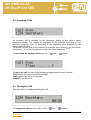
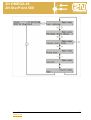
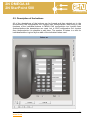
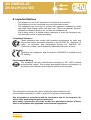
2N OMEGA 48
2N StarPoint 500
USER‘S MANUAL
2N StarPoint 500
version 2.0
2N OMEGA 48
2N StarPoint 500
Dear customer,
Congratulations on the purchase of the product 2N StarPoint 500. This new product
was developed and manufactured with an emphasis on maximum user value, quality
and reliability. It is our desire that the 2N StarPoint 500 should give you complete
and long satisfaction.
User‘s Manual
www.2n.cz
2
2N OMEGA 48
2N StarPoint 500
CONTENTS
1.
Introduction ................................................................................................................... 4
1.1
1.2
1.3
1.4
2.
Basic Operation ............................................................................................................. 9
2.1.
2.2.
2.3.
2.4.
3.
Set the Programmable Buttons ........................................................................................... 15
Respond to Missed Calls .................................................................................................... 16
Dial a Previously Called Number ......................................................................................... 16
Dial a Previously Calling Number ........................................................................................ 16
Reject an Incoming Call ...................................................................................................... 16
Turn Down the Ringing Volume........................................................................................... 17
Turn Off the Microphone Temporarily – To Prevent the Other Party from Hearing Me.......... 17
Transfer a Call .................................................................................................................... 17
Add a Call to a Conference ................................................................................................. 17
Telephone Functions .................................................................................................... 18
4.1.
4.2.
4.3.
4.4.
4.5.
4.6.
4.7.
4.8.
5.
Outgoing Calls ...................................................................................................................... 9
Incoming Calls .................................................................................................................... 12
During the Call .................................................................................................................... 12
Main Menu.......................................................................................................................... 13
I would like to... ........................................................................................................... 15
3.1.
3.2.
3.3.
3.4.
3.5.
3.6.
3.7.
3.8.
3.9.
4.
Content of the Package......................................................................................................... 4
Getting Started ..................................................................................................................... 4
Accessories .......................................................................................................................... 5
Telephone Description .......................................................................................................... 7
Lists of Calls ....................................................................................................................... 18
List of Missed Calls ............................................................................................................. 20
List of Incoming Calls .......................................................................................................... 20
List of Outgoing Calls .......................................................................................................... 20
Internal Telephone Book ..................................................................................................... 20
PBX Services...................................................................................................................... 21
Intercom - TRF ................................................................................................................... 22
Displaying the System Version............................................................................................ 22
Telephone Setup .......................................................................................................... 24
5.1. Programmable Buttons Setup ............................................................................................. 24
5.2. Description of the buttons ................................................................................................... 28
6.
Important Notices ........................................................................................................ 32
User‘s Manual
www.2n.cz
3
2N OMEGA 48
2N StarPoint 500
1. Introduction
2N StarPoint 500 telephone sets are digital system telephones. The sets (except for
2N StarPoint 500 Entry) feature a two-row display, programmable buttons,
loudspeaker function (hands-free), and the option of additional accessories. The
telephone sets are available in grey (arctic) or black (anthracite) color versions.
2N StarPoint 500 series types:
2N StarPoint 500 Entry
2N StarPoint 500 Economy, Standard 2N StarPoint 500
Advance
A telephone for common operations − 2N StarPoint 500 Entry: a simple digital
telephone without display, with 8 programmable buttons, one-way speakerphone (no
microphone for hands-free telephony).
A mid-range office telephone − 2N StarPoint 500 Economy, Standard: a basic type
of digital system telephone with a two-row display and 12 programmable buttons.
The Economy model features a one-way speakerphone (no microphone for handsfree telephony); the Standard model features two-way speakerphone function (it is
equipped with a microphone for hands-free telephony). The Economy model is not
equipped with interfaces for additional accessories (e.g., additional button modules).
A managerial telephone − 2N StarPoint 500 Advance: The most advanced telephone
set of the 2N StarPoint 500 series. It is equipped with a two-row back-lit display, 19
programmable buttons and an interface for additional modules. It is also possible to
connect a headset to the telephone set. The set offers a two-way speakerphone
function (it is equipped with a loudspeaker and microphone for hands-free
operation).
1.1
Content of the Package
The telephone set package includes:
a telephone set
a telephone cord
User Manual on a CD
a quick help card
1.2
Getting Started
Unpack the telephone set
User‘s Manual
www.2n.cz
4
2N OMEGA 48
2N StarPoint 500
Connect the receiver to the telephone set using the twisted cable (from the bottom –
see the figure below)
Connect the telephone set to your telephone socket using the telephone cord
supplied. Note: The 2N StarPoint 500 telephone can only be connected to the
dedicated socket.
Button name tags
For automatic name tag creation use the PbX Configuration Tool: on the button
settings screen click the “Prepare for printing” button. After clicking this button, the
pre-filled out print template will be created automatically.
You can also use the empty template included in the telephone set package to
create name tags for the predefined programmable buttons.
For more information on button setup refer to chapter Telephone Setup.
1.3
Accessories
The 2N StarPoint 500 telephones can be enhanced with optional user comfort
accessories such as additional button modules, headsets, etc. The additional
accessories are to be connected from the bottom of the telephone set.
To add more buttons, you can add an assistant console (button KEY module) or an
operator console (button BLF module) to your 2N StarPoint 500 Standard and
Advance. By connecting these consoles serially you will obtain a large number of
additional buttons. All buttons on the consoles can be set up in the same manner as
the telephone programmable buttons.
User‘s Manual
www.2n.cz
5
2N OMEGA 48
2N StarPoint 500
Assistant console (KEY module): Operator console (BLF module)
Connecting the button console to the telephone (see the figure below):
Attach the console to the telephone set.
Use the connecting cable to connect the telephone with the console
Connect the console power supply cord to the dedicated outlet (on the bottom side)
(operator console − BLF module only) using the network adapter included in the
supply.
User‘s Manual
www.2n.cz
6
2N OMEGA 48
2N StarPoint 500
1.4
Telephone Description
You can browse the telephone menus and the telephone lists using the “Forward”
and “Back”
buttons. The select button
is used to select the specific
function. The “+”
and “-“
buttons are used to change the volume of the call
(receiver or loudspeaker). Any change of the volume remains effective during the
call; the next call will have the volume set in the telephone menu (or in the
environment of the PbX Configuration tool).
Types of 2N StarPoint 500 telephones
Entry
Economy
Standard
Advance
Display
−
Two-row
Two-row
Two-row
backlight
Programmable
buttons
8
12
12
19
Hands-free function One-way
One-way
Two-way
Two-way
Additional modules −
(KEY, BLF)
−
Yes
Yes
User‘s Manual
www.2n.cz
with
7
2N OMEGA 48
2N StarPoint 500
Telephone display
All 2N StarPoint 500 telephones (except for the Entry model) are equipped with a
two-row display. The display contract can be adjusted. For description of the display
parameter setup refer to chapter.
Default display status:
For more comfort when using the 2N StarPoint telephone you may tilt the display.
Programmable buttons
2N StarPoint 500 telephones are equipped with buttons, which are userprogrammable in the environment of the PbX configuration tool. The basic setup of
the programmable buttons is made after the so-called Hardware RESET if the
telephone set was connected to the system and also by the system administrator;
the user may adjust the button setting according to his/her needs. For more
information see chapter Programmable Buttons Setup.
Basic available functions of the programmable buttons:
Flash (call interruption for transfer,..)
Transfer (transfer, intercom to assistant)
Hands-free/one-way hands-free
Mute (microphone switch-off)
Redial / List of outgoing calls
List of personal quick-dial numbers
List of missed calls
DND (rejection of a call to the assistant)
User‘s Manual
www.2n.cz
8
2N OMEGA 48
2N StarPoint 500
CONF (connecting a call to a conference)
PARK (parking the call during a call, when idle locking of the telephone set)
Escape (back in the menu, rejecting a call)
Overview of calls
Indicators of the buttons set to quick-dialing internal numbers signals the following
statuses:
The subscriber is dialing − the indicator is on
The subscriber’s telephone is ringing – the indicator flashes quickly
The subscriber is making a call − the indicator is on
Indicator status
On
Button function
Indicated status
Number quick-dialing
The subscriber
speaking
Hands-free
Hands-free function is
active
Back
The key is active
Number quick-dialing
The
subscriber’s
telephone is ringing
(quick flashing)
Microphone off
Microphone off
Missed calls
You have missed calls
Flashing
is
2. Basic Operation
2.1. Outgoing Calls
Pick up the receiver. You will hear the dialing tone.
Dial a number.
If you have the telephone number stored in your or group telephone book the name
of the called party will be displayed on your telephone’s display.
User‘s Manual
www.2n.cz
9
2N OMEGA 48
2N StarPoint 500
The time of the call will be displayed when the called party answers the call:
If the called party is busy you will hear the busy tone and the following message will
appear on the display:
You can also dial the number first, and then start the call by picking up the receiver.
If the called party hangs up during the call, the “caller hung-up” message will appear
on your display.
To use the hands-free function press the hands-free button Hands-free
(the
switching-on of the hands-free function is signaled by the hands-free button
indicator) instead of picking up the receiver. To terminate the call press the handsfree button one more time.
Note: If the hands-free button has not been set on your telephone you can press the
select button
to turn on the hands-free function after having dialed the number.
User‘s Manual
www.2n.cz
10
2N OMEGA 48
2N StarPoint 500
You can set the programmable buttons for so-called one-touch dialing of frequently
called numbers. You can then dial the telephone number by pressing a single button.
For one-touch dialing setup see chapter Programmable Buttons Setup.
The telephone keeps records of missed, incoming and outgoing calls, so-called list
of calls. Using these lists you can call the parties whom you had already called or
who had called you. The lists of calls are accessible through the telephone main
menu, by selecting the List of calls item. In the lists of calls select the item you wish
to call and press the select button (or pick up the receiver) to dial the number. For
more information on call history see chapter List of Calls.
For simplified calling you may use the telephone book, which is accessible by the
programmable button Tel.
. The telephone book allows you to search items
seznam
by name (or a part of the name); pick up the receiver or press the select button
to
dial the selected telephone number.
User‘s Manual
www.2n.cz
11
2N OMEGA 48
2N StarPoint 500
2.2. Incoming Calls
An incoming call is indicated on the telephone display by the caller’s name,
telephone number. The names are displayed for the numbers according to your
personal telephone book, or according to the telephone book assigned by the
system administrator.
To answer the call, pick up the receiver or press the select button
(or the handsfree button) – if you want to make the call in the hands-free mode.
To turn down the ringing volume use the “+”
and “-“
buttons.
To reject the call use one of the following programmable function buttons:
-TRF transfer the call to a defined assistant
-DND transfer the call to an operator
-CANCEL reject the call
2.3. During the Call
The call duration is displayed during the call.
To change the volume of the call use the “+”
User‘s Manual
www.2n.cz
and “-“
buttons.
12
2N OMEGA 48
2N StarPoint 500
Press the hands-free button Handsfree
to switch to the hands-free mode (the
hands-free button indicator lights up); turn the hands-free mode by pressing the
button one more time.
To turn off the microphone temporarily during a call (if you do not want the caller to
hear you) press the MUTE function button Mute
. The button indicator will light
up to indicate that the microphone is switched off.
2.4. Main Menu
You can enter the main menu of the telephone by pressing the “forward” button
or the “back” button
. Use the arrow keys to browse the menu items; enter the
individual sub-menus by pressing the select button
. To return quickly to the
higher level of the menu set the “Back” programmable button Zpět
.
User‘s Manual
www.2n.cz
13
2N OMEGA 48
2N StarPoint 500
User‘s Manual
www.2n.cz
14
2N OMEGA 48
2N StarPoint 500
3. I would like to...
This chapter provides instructions how to solve standard situations.
3.1. Set the Programmable Buttons
The programmable buttons on your telephone can be set up by the PbX
configuration tool. Your system administrator will perform the setup.
After you log in select the system telephone/buttons item in the menu and from the
list displayed select the station whose buttons you wish to set. Click the respective
button on the telephone picture to display the screen for button setup.
You can assign one of the following functions to the button:
• Flash – a short-time disconnection; used for example for transferring calls.
• Transfer – at idle = intercom to the assistant, at ringing = transfer of ringing to the
assistant, during the call after FLASH and dialing to finish the transfer.
• Handsfree/Speakerphone – hands-free mode.
• Mute – temporary microphone switch-off during the call.
• DND – at idle = immediate redirecting/cancellation of redirecting to operator
(signaled by lit button indicator), at ringing = transfer of ringing to operator.
• PARK – putting a call on hold (allows you to make another call and then return to
the call on hold by pressing the button again) (signaled by lit button indicator).
• CONF – function for adding a call to a conference.
• Redial – list of last-dialed numbers.
• List of incoming calls – access to the history of incoming calls.
• List of missed calls − access to the history of missed calls.
• Telephone book – access to the telephone book (PBX line).
• Dialing a set number – one-touch dialing; the set number is dialed by pressing
the button. Occupation of the specific internal line is signaled by lighting of the
button.
• Access to external port – press the button to occupy and directly go to a specific
outgoing line; occupation of the line is signaled by lighting of the button.
• Log in department 1-8 – long in/out the internal PBX line departments.
• New messages – direct access to VoiceMail.
• ME on/off – an option to permit/ban calling the MobilityExtension function
• Back (Escape) – rejecting a call, return to a higher level of the menu, deleting
telephone book characters.
+ it is possible to add under a programmable button services that can be normally
dialed on the telephone keypad (for the list of services see the User Manuals “Basic
Services” and “Services for Operator”)
For detailed description of the programmable button functions see chapter
Programmable Buttons Setup.
User‘s Manual
www.2n.cz
15
2N OMEGA 48
2N StarPoint 500
3.2. Respond to Missed Calls
Situation: the telephone signals missed calls, you want to respond to these
calls
What to do: If you have defined the button for accessing missed calls, Missed
press this button to access the list.
Otherwise use the “forward” button
to access the main menu, use the select
button
to select the List of call item; in the list of calls use the “forward” button
and the select button
to select the List of missed calls.
Now the list of missed calls is displayed. Use the “Forward”
and “Back”
buttons to browse the list items.
To select the item you wish to call pick up the receiver or press the hands-free
Handsfree
button.
For more information on list of calls see chapter Lists of Calls.
3.3. Dial a Previously Called Number
To dial a previously called number use the list of outgoing calls. The telephone set
keeps records of the last twenty calls.
What to do: From the default status of the telephone use the “forward” button
access the list of calls; use the “forward” button
and the select button
select the numbers called item.
Use the “Forward”
and “Back”
to
to
buttons to browse the list items.
To dial the number pick up the receiver or press the hands-free button.
Handsfree
3.4. Dial a Previously Calling Number
What to do: Enter the main menu, select the List of calls item, then select Received
calls. Select the record you wish to call from the list of received calls. Pick up the
receiver or press the hands-free button. Handsfree
For quick access to the list
of received calls you can set up a programmable button, see chapter Programmable
Buttons Setup.
3.5. Reject an Incoming Call
Situation: Your telephone is ringing, you want to reject the call
What to do: 1) Press the Escape button Back
– The caller will hear a busy
tone; the call will be recorded in the list of received calls.
2) Press the TRF button – The caller will be immediately redirected to your
“assistant”.
User‘s Manual
www.2n.cz
16
2N OMEGA 48
2N StarPoint 500
3) Press the DND button - The caller will be immediately redirected to the
“operator”.
3.6. Turn Down the Ringing Volume
Situation: Your telephone is ringing, you don’t want to be disturbed by the
ringing and you don’t want to answer the call
What to do: Press and use the “+”
and “-“
buttons.
The sound of the ringing is muted, the caller still hears the ringing tone. You can still
answer the call by picking up the receiver.
3.7. Turn Off the Microphone Temporarily – To Prevent the Other
Party from Hearing Me
Situation: During a call you want to prevent the caller from hearing you
temporarily
What to do: Press the programmable button with the set Mute function Mute
to turn the microphone off temporarily.
3.8. Transfer a Call
Situation: During a call you want to transfer the caller to another telephone
number
What to do: Press the FLASH programmable button Flash
, you will hear a
dialing tone in the receiver (the other hears the on-hold music in the receiver). Dial
the telephone number, to which you wish to transfer the call. After getting the ringing
tone press the TRF function button and hang up. Alternatively, you can wait until the
call is answered by the called party (if you want to speak with the party, to which the
call is being transferred, before the transfer), press the TRF function button, and
after you hang up the parties will be connected.
3.9. Add a Call to a Conference
Situation: During a call you want to add a third party to a conference.
What to do: Press the FLASH programmable button
User‘s Manual
www.2n.cz
Flash
, you will hear a
17
2N OMEGA 48
2N StarPoint 500
dialing tone in the receiver (the other hears the on-hold music in the receiver). Dial
the telephone number of the party you wish to add to the conference. After the called
party answers the call press the CONF function button. All three parties are now
connected. The conference call is indicated on the display by a message
“Conference” with the number of lines participating in the conference.
4. Telephone Functions
4.1. Lists of Calls
The menu of the 2N StarPoint 500 digital system telephones offers lists of missed,
received and outgoing calls. The telephone set keeps records of the last twenty calls
in each list. You can access the list of calls from the main menu and also by pressing
a single button using the programmable buttons.
Signaling of missed calls
Setting a button to access the call history is convenient especially for the list of
missed calls Missed
− after setting up the button, missed calls will be
signaled by the button indicator.
Structure of the system telephone menu:
User‘s Manual
www.2n.cz
18
2N OMEGA 48
2N StarPoint 500
The list of the individual items will be displayed when you enter the respective list of
calls.
On the system telephone display:
Use the “Forward”
the select button
item.
User‘s Manual
www.2n.cz
and “Back”
buttons to browse the individual items. Press
to display another sub-menu allowing you to call the respective
19
2N OMEGA 48
2N StarPoint 500
4.2. List of Missed Calls
The list of missed calls offers an overview of the last twenty incoming calls that were
not answered.
If you have a programmable button set for access to the list of missed calls the
indicator of this button signals the missed calls, if any, by flashing.
Missed calls signaling is active until you enter the history of missed calls.
4.3. List of Incoming Calls
Displays the list of the last twenty received calls.
4.4. List of Outgoing Calls
Displays the list of the last twenty outgoing calls.
4.5. Internal Telephone Book
It is a list of all internal PbX lines. With the 2N StarPoint digital system telephone you
can search this telephone book and simply call the items selected. To access the
telephone book from the system telephone it is necessary to have a programmable
button set up; see chapter Programmable Buttons Setup.
After pressing the button for access to the telephone book the telephone display will
show the search line, the second line shows the individual items of the telephone
book. Use the “Forward”
and “Back”
buttons to browse the individual items.
User‘s Manual
www.2n.cz
20
2N OMEGA 48
2N StarPoint 500
4.6. PBX Services
PBX services can be inserted and dialed using a programmable button, but also
directly from the MENU of the digital system telephone, 2N StarPoint 500.
Press the button
for entering the MENU the item
enter the MENU PBX functions.
browsing buttons to
The services are divided, according to the type, into 5 categories. Select the required
category, e.g., Hotel services.
Here you can select for example Alarm clock setup for (another line).
User‘s Manual
www.2n.cz
21
2N OMEGA 48
2N StarPoint 500
Note:
The use of the different services is described in the manual called Basic services
and Services for the operator.
4.7. Intercom - TRF
Intercom TRF is a special type of call where a preset telephone number, “assistant”,
is dialed by pressing the TRF intercom button, and the number called will
automatically receive the call in the hands-free mode. This function is suitable for
flexible communication – you can speak almost immediately after pressing the
button. The intercom - TRF function can be automatically used only between system
telephone sets; if the intercom - TRF function is set with a telephone number with
another type of telephone set the call will not be automatically accepted.
Application: For example, you want to give quickly some information to a colleague
equipped with the system telephone: Press the button set for the intercom – TRF
function; you can speak after the beep.
The called party answers the call and switches to the hands-free mode; the called
party is notified by a sound signal prior to the call. The connection terminates by
hanging up.
4.8. Displaying the System Version
Digital system telephone supports displaying of the current FW version used in the
digital modules attached to your telephone set and also in your PbX (useful for
maintenance).
User‘s Manual
www.2n.cz
22
2N OMEGA 48
2N StarPoint 500
User‘s Manual
www.2n.cz
23
2N OMEGA 48
2N StarPoint 500
5. Telephone Setup
All telephone settings are conveniently accessible in the environment of Pbx
configuration tool.
5.1. Programmable Buttons Setup
Programmable buttons are set up in the environment of Pbx configuration
tool/system lines/buttons.
User‘s Manual
www.2n.cz
24
2N OMEGA 48
2N StarPoint 500
User‘s Manual
www.2n.cz
25
2N OMEGA 48
2N StarPoint 500
If you want to assign a function (Hands-free, Transfer, Mute,..), direct dialing of an
internal line, or direct access to an external line to one of the programmable buttons,
first left-click the programmable button you wish to set up as follows:
Select the Type:
- Line (direct access to internal and external lines)
- Function (basic functions for controlling the system telephone – HF, MUTE, TRF,
CANCEL,..)
- Service (services – e.g., DAY/NIGHT switching, log in a department, permitting
Mobility Extension,..)
User‘s Manual
www.2n.cz
26
2N OMEGA 48
2N StarPoint 500
This way you can set up all the programmable buttons you want.
The following will be displayed when right-clicking the mouse button:
- Default set, default settings of the programmable buttons (balanced settings with
respect to the individual telephone set types).
-Manager set, specific settings of the programmable buttons if at least one extender
is connected.
-Operator set, specific settings of the programmable buttons if at least one extender
is connected.
-Reception set, specific settings of the programmable buttons if at least one
extender is connected.
-Reset, cancels the settings of the programmable buttons.
-To clipboard, copies the settings of the programmable buttons.
-From clipboard, inserts the copied the settings of the programmable buttons.
-Export, exports the settings of the programmable buttons to a “.csv” file.
-Import, imports the settings of the programmable buttons from a “.csv” file.
User‘s Manual
www.2n.cz
27
2N OMEGA 48
2N StarPoint 500
5.2. Description of the buttons
All of the descriptions of the buttons can be formed and then printed out in the
environment PbX configuration tool /system lines /buttons/prints. After filling in the
functions of the individual buttons in MENU PbX configuration tool /system lines
/buttons/buttons the descriptions are reset, but in PbX configuration tool /system
lines /buttons/prints it is possible to edit them. The number of letters in a text for
individual buttons is given by the width of the individual letters used.
User‘s Manual
www.2n.cz
28
2N OMEGA 48
2N StarPoint 500
For a “print preview” of the descriptions allow the printing of the individual groups of
buttons and press “preview”.
To “Print” the descriptions allow the printing of the individual groups of buttons and
press “Print”.
User‘s Manual
www.2n.cz
29
2N OMEGA 48
2N StarPoint 500
Volume and Ringtones Setup
2N StarPoint telephones offer the option to select from several ringtones.
Assign the ringtones to the individual types of calls in the environment of PbX
Configuration tool/system lines/buttons/user settings.
Set:
-Key sound volume, permitting acoustic signaling of pressing the system telephone
buttons.
-Receiver volume, volume in the receiver.
-Hands-free volume, volume when using hands-free.
-Ringing volume, volume of the ringing.
-Display contrast, display contrast intensity.
-Internal calls, type of ringing when an internal line calls.
User‘s Manual
www.2n.cz
30
2N OMEGA 48
2N StarPoint 500
-External calls, type of ringing when an external line calls.
-Alarm clock, type of ringing if “alarm clock”.
-Door control/communication system, type of ringing of the door communicator,
“door control/communication system”.
-Call return, type of ringing if a transferred call comes back.
-VIP calls, type of ringing if a call comes from the number found in personal quickdial list of the respective system telephone.
-Back calling, type of ringing if a call comes from the line that was previously
blocking the call using the “waiting for release” service.
-Special calls,
User‘s Manual
www.2n.cz
31
2N OMEGA 48
2N StarPoint 500
6. Important Notices
-
-
The telephone is not to be operated in an explosive environment.
The telephone is to be connected only to the dedicated outlets.
The telephone may not come in contact with aggressive substances, fluids
that might cause tinting (coffee, tea, wine, etc.). Never use gasoline, thinners,
detergents containing alcohol, etc. to clean the telephone set.
Use a damp cloth or a diluted kitchen detergent to clean the telephone set.
Use microfiber cloths to clean the display.
Compliance Statement
These telephone sets comply with technical requirements for radio and
telecommunication equipment pursuant to Act 22/1997 Sb. (Collection of
Laws), as amended, and Government Decree No. 426/2000 Sb.
(Collection of Laws), and Compliance Statement was issue for them.
CE Marking
Telephone set compliance with EU directive 1999/5/EG is certified by the
CE marking.
Environmental Marking
This telephone set was manufactured according to ISO 14001 certified
environmental system. This process guarantees minimum consumption of
the primary raw materials and energy as well as minimum waste.
The manufacture reserves the right to modify the product relative to the
documentation presented, in order to improve the product characteristics.
Use the product in accordance with the instructions and for the purposes, for
which it has been designed and manufactured.
Upon expiry of the service life of the product or a part thereof dispose of these
items in compliance with applicable environmental regulations.
User‘s Manual
www.2n.cz
32