1
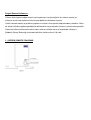
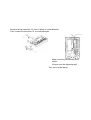
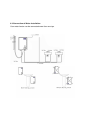
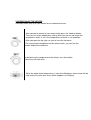
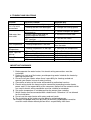
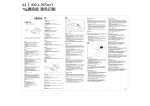
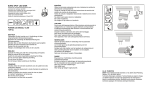
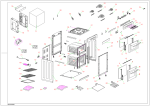
Değerli Daxom Kullanıcısı,
Cihazın fonksiyonunu doğru olarak yerine getirmesi ve güvenliğiniz için cihazın montaj ve
kullanımı esnasında kullanma kılavuzunda belirtilen talimatlara uyunuz.
Yetkisiz olarak montaj veya bakım yapılması halinde, cihaz garanti kapsamından çıkacaktır. Buna
ek olarak üründe meydana gelebilecek bir bozukluk veya kazadan firmamız sorumlu olmayacaktır.
Lütfen bu kullanma kılavuzunu daha sonra referans almak üzere iyi koşullarda saklayınız.
Şofbenin Sanayi Bakanlığı tarafından belirtilen kullanım ömrü 10 yıldır.
1- ŞOFBEN ŞEMATİK DİAGRAMI
12 0
2-ELEKTRİKSEL ŞEMATİK DİAGRAM
3-TEKNİK VERİLER
Typ
UKDAX-8KT
Max.Güç (KW)
8,5
Voltaj (Volt) 50 Hz
220
Akım (A)
39
Kablo çapı mm2
3x4 mm2 (Mesafeye göre uygun kesitte)
Min.Debi(lt/dk)
1.8
Max.Debi (lt/dk)
5
Max.Su Sıcaklık ( C )
55
Min.Su Sıcaklığı ( C )
30
Elektrik koruma
IPX4
Max.Su Basıncı (Bar)
6
Min.Su Basıncı (Bar)
0,5
Su bağlantı çapı
½
Ölçüler (mm)
Sigorta (A)
412 x 241 x 85
40
4- MONTAJ
4.1 Montaj İçin Gerekli Önlemler
• Cihaz için gücün uygun olup olmadığını kontrol ediniz. (220V AC) ve sigorta sistemi ile
donanımlı olmalıdır.
• Cihaz üzerine su gelmeyecek şekilde monte edilmelidir.
• Cihaz mutlaka dik monte edilmelidir.
• Cihazın topraklama hattı hatasız ve güvenilir olmalıdır.
• Cihazın elektrik tesisatı mutlaka yasal yönetmeliklere uygun olarak YETKİLİ
ELEKTRİKÇİYE yaptırılmalıdır.
• Cihazı ilk kullanımdan önce suyu açın sonra elektriği açın.
• Cihazı donma ihtimali olan yerlere montajını yapmayınız.
• Bağlantılar zarar görmemesi açısından aşırı şekilde sıkılmamalı.
• Su basıncınız 4 bar’ın üstündeyse cihaz girişine mutlaka su basınç düşürücü takılmalıdır.
• Cihazınızla birlikte verilen ½’’ su flekslerini kullanın.
4.2 Montajın Yapılması
Cihazın yerden yüksekliğini kullanmanıza
uygun mesafede ayarlayınız.
Şematik verilen ölçülere göre cihaz için
ideal konumunuzu belirleyin.
Ardından duvarda 3 adet delik açın.
Aşağıdaki şekilde gösterildiği gibi 2 adet
vidayı yerinden sökün ve cihazın üst
kapağını ok yönünde çıkarın
Üst Kapak Kutusu “A” yı ok yönünde yerinden çıkarın.
Ardından “B” alt kapağını ok yönünde çıkarın.
Cihazın ilgili kablo bağlantılarına bağlayın.
( Vidalar iyi sıkılmalıdır, gevşek olmamalıdır.)
Asma Plakasını cihaza takın.
Cihazı önce duvara takın. Ardından sıcak ve soğuk su borularını takın. Su Bağlantıları için “alt
kapak kutusu B” deki ve “üst kapak kutusu A” daki plastik parçaları tornavida ile çıkarın ardından
alt kapak “B” yi ve üst kapak “A” yı ana gövdeye monte edin.
4.3 Su Tesisatı Bağlantısı
Cihazınız birden fazla musluğa bağlanabilir.
5-CİHAZIN ÇALIŞTIRILMASI
Cihazın ilk çalıştırılmasını mutlaka yetkili servisimize yaptırınız
Cihazın elektriğini bağladıktan sonra yandaki düğmeye basınız.
Ardından sıcaklık ayarlamasını yapabilirsiniz. Cihazı açtıktan
sonraki hazır ayarlanmış olan sıcaklık daha önceki sıcaklık ayarıdır.
Suyu açtıktan sonra, sıcak su almaya başalayabilirsiniz.
Cihazın sıcaklığını yükseltmek için çevirme düğmesini saat
yönünde çevirin.
Cihazın derecesini düşürmek için çevirme düğmesini saat
yönünün tersine çevirin.
Çıkış suyu sıcaklığı 60 dereceden fazla olduğunda cihaz duracak
ve aynı zamanda ekranda sinyal olacaktır.
.
6. ARIZA VE ÇÖZÜMLERİ
Problem
Su Giriş ve Çıkış
Bağlantılarında
sızıntı var
Çıkıştan Soğuk
Su Akıyor
Düşük Sıcaklık
Yüksek Sıcaklık
Cihazda güç
lambası yanmıyor
Problem Nedeni
1. Bağlantılar iyi yapılmamış.
2. Sızdırmazlık Contası hasar
görmüş.
1. Cihaz çalışmaya başlamadan güç
kapanıyor.
2. Su Akışı çok zayıf ve cihaz
düzgün başlatılmadı.
3. Cihazın elektrik düğmesi kapalı
konumda
4. Isı Elementi Problemi
1. Ayarlanan sıcaklık çok düşük.
2. Ayarlanan Sıcaklık Çok Yüksek
1. Güç Kapalı.
2. Termostad Koruması
3. Cihaz arızası
Uyarı Sesi
Elektriksel arıza
Ekran ışığı yok
Elektriksel arıza
Su Akışı Yetersiz
1.Su Girişi Filtre Tıkalı
2. Borular Tıkalı.
Çözüm Yolu
1.Bağlantıları yeteri kadar sıkın
2. Sızdırmazlık Contasını
Değiştirin
1. Gücü Kontrol Edip Açınız.
2. Su akışını Artırın
3. Elektrik düğmesini Açınız
4. Yetkili servise haber veriniz
1. Sıcaklığı Yükseltin veya suyu azaltın
2. Sıcaklığı Düşürün
1. Gücü Açınız
2. Yetkili Servise Müracaat
Ediniz.
3. Yetkili Servise Müracaat
Ediniz
Yetkili servise Müracaat Ediniz
1-Gücü Açınız
2-Yetkili Servise Müracaat
Ediniz
1.Filtreyi Temizleyin
2. Borularınızı Kontrol Ettirin.
ÖNEMLİ UYARILAR
1. Cihaz çalıştırılmadan önce elektrik tesisat bağlantıları kontrol edilmelidir.
2. Cihazı ilk çalıştırmada once sıcak su musluğunu açarak cihazın içinden suyun geçmesini
sağlayınız
3. Cihazı suyun donma ihtimali olan yerlere monte etmeyiniz ve suyun donması halinde
cihazınızı çalıştırmayınız.
4. Kabloların cihaza bağlantısı yetkili servislerimiz tarafından yapılacaktır.
5. Bina içi elektrik tesisatı cihaz gücüne uygun olarak hazırlanmalıdır ve tüketicinin
sorumluluğundadır. Elektrik tesisatında kullanılan malzemelerin standartlara uygun
olduğuna dikkat ediniz.
6. Yanmayı engellemek için sıcaklığı uygun konumda ayarlayınız.
7. Cihaz güvenli topraklama hattı ile bağlanmalıdır. Aksi takdirde montajına izin verilmez.
8. Cihazı ıslak ve nemli eller ile kullanmayınız.
9. Şofbenin montajı yetkili kişiler tarafından yapılmalıdır.
10. Yanlarında kendilerinden sorumlu kişi olmadan çocuklar, zihinsel ve bedensel özürlü kişiler
bu cihazı kullanamaz.
Dear DAXOM User;
In order to perform device’s function properly and for your safety follow the instructions mentioned
in the user manual of the device during the mounting and the usage of the device.
In case of an unauthorized mounting and maintenance, the device will be void from warranty
cover. In addition to that, our company will not be responsible from failure or an accident that may
occur in the device.
Please keep this user manual in good conditions for future reference.
The physical life of the heater, which is determined by Ministry Of Industry is 10 years.
1- SCHEMATIC DIAGRAM OF THE HEATER
12 0
2-ELECTRICAL SCHEMATIC DIAGRAM
3-TECHNICAL DATAS
Type
UKDAX-8KT
Max.Power(KW)
8,5
Voltage (Volt) 50 Hz
220
Current(A)
39
Cable Diameter mm2
3x4 mm2 (Suitable Crossing According
to distance)
Min.Water Flow(lt/min)
1.8
Max.Water Flow(lt/min)
5
Max.Water Temp ( C )
55
Min.Water Temp ( C )
30
Electric Protection
IPX4
Max.Water Pressure
(Bar)
6
Min.Water Pressure
(Bar)
0,5
Water Connection
Diamter
½
Dimensions(mm)
412 x 241 x 85
Breaker(A)
40
4- INSTALLATION
4.1 Necessary Precautions For Installation
• Please control the power if it is suitable for the heater or not. (220V AC) and the
heater must be equipped with suitable breaker.
• Heater must be install as not come water on it.
• The earth of heater must be faultless and reliable.
• Definitely, electric Installation of your heater must be done by AUTHORISED
ELECTRICIAN as suitable as legal obligations.
• Before using the first time of the heater, first open the water then turn on the
electricity of the heater.
• Do not make installation of heater to the places where has freezing possibility.
• Connections must not be tighten very much because of not have damage.
• If your water peressure is over 4 bar, definitely pressure reduce valve must be
installed to the heater inlet.
• Use ½” water flexes which is given with your heater.
• Your heater must be only install as vertical
4.2 Making the Installation
Arrange ground clearance of your heater as your suitable using length.
Determine the ideal position for water heater
according to schematic dimensions which are given.
Then open 3 holes on the water.
Remove the 2 pieces screw from
their place as it is shown at the
following figure. Remove the up
cover of the heater same as arrow
direction.
Remove the up cover box “A” from its place as arrow direction.
Then remove the low cover “B” as arrow direction.
Make necessary connection of the
heater.
(Screws must be tightening well.
They must not be loose.)
Fix the hanging plate to the heater.
First hang the water heater to the wall. Then fix hot and cold water pipes. For the water
connections , remove the plastic parts from low cover “B” and up cover “A” with
screwdriver then fix the low cover “B” and up cover “A” to the main frame of the heater.
4.3 Connection of Water Installation
Your water heater can be connected more than one tap.
5-OPERATION OF THE HEATER
Definetely make start up of your heater to our authorized service.
After connect to electric of your water heater press the sidewise button.
Then you can make temperature setting. After you turn on the heater the
temperature which is set is the temperature set which is set up before.
After you open the tap, you can start to have the hot water.
For increasing the temperature of the water heater, you can turn the
rotation knob to the clockwise.
For decreasing the temperature of the heater, turn the rotation
knob to the anti clock wise.
When the outlet water temperature is more than 60 degree, water heater will be
stop and at the same time alarm will be happen in the display.
6. TROUBLE AND SOLUTIONS
Problem
Leakage at water
inlet and outlet
connections
Cold water flow
from outlet
Cause Of Problem
1. Connections do not tighten good
Solution Way
1.Tighten the connections
2. Sealing Gasket have damaged
2. Change the sealing gasket
1. Power off before water heater not
get to work on
2. Water Flow is weak and not
started to operate correctly.
3. Switch of the water heater is
“OFF” position.
4. Heating Element Problem
1. Control and open the power.
2. Increase the water flow
3. Turn on the switch
4. Call Authorised service
1. Increase the temperature or
less the water
Low Temperature
1. Setting temperature is too low.
Higher
Temperature
2. Setting Temperature is too high.
2. Decrease the temperature.
1. Power Off
2. Thermostad Protection
3. Trouble of Water Heater
1.Water Heater Filter is blocked
2. Pipes are blocked
1. Turn On the power
2. Call the authorized service
3. Call the authorized service
1.Clean the filter
2. Make control of your pipes.
Power Light not
light up
Water Flow is not
enough
IMPORTANT WARNINGS
1. Before operate the water heater, first electric wiring connections must be
controlled.
2. Before first start up of the heater, provide passing water inside de the heater by
opening hot water tap.
3. Do not install your heater where there is possibility for freezing and do not
operate your heater in case of water freezing.
4. Connection of wires to the heater will be done by authorized services.
5. Electric wiring inside the house must be convenient according to water heater
power and it is the responsibility of the consumer. Notice that the materials which
are used in electric wiring connection must be suitable for standards.
6. Set up the temperature in suitable position for prevent from scalding.
7. Water Heater must be connected with suitable earth. Otherwise it is not allowed
for the installation.
8. Do not use the water heater with watery and wet hands.
9. The installation of the heater must be done by authorized person.
10. Children and people who have physically or mentally handicapped cannot be
used this water heater without person who is responsibility from them.