1
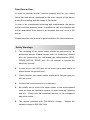
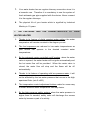
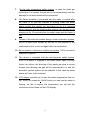
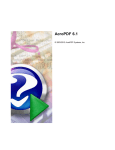
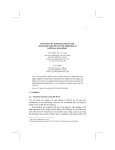
1 Dear Daxom User, In order to perform device’s function properly and for your safety follow the instructions mentioned in the user manual of the device during the mounting and the usage of the device. In case of an unauthorized mounting and maintenance, the device will be void from warranty cover. In addition to that, our company will not be responsible from failure or an accident that may occur in the device. Please keep this user manual in good conditions for future reference. Safety Warnings 1. The mounting of the water heater should be performed by an authorized person. Please contact with our authorized dealers who are powered by the authorized gas administration (EGO, İGDAŞ, BOTAŞ, İZGAZ, etc). Do not attempt to operate the device by yourself. 2. In case of you use LPG gas, do not mount your water heater in places below the ground level. 3. Check whether your water heater conforms to the gas type you will use or not. 4. Perform the hose connection in a safe way. 5. Be careful not to mount the water heater to the environments such as clean air/ ventilation spaces of waste chimney, lightning and etc. Check with the authorized service or the companies about this matter. 6. The device operates with 220-240Volt voltage. network voltage is 220-240 Volts. 2 Ensure the 7. Your water heater has no regular chimney connection since it is a hermetic one. Therefore it is mandatory to use the system of fresh air/waste gas pipe supplied with the device. Never connect it to the regular chimneys. 8. The physical life of your heater which is signified by Industrıal Ministry is 10 years. 1. THE FEATURES AND THE CHARACTERISTICS OF YOUR WATER HEATER 1. Thanks to its feature of digital constant water setting, the water temperature will remain constant in the degree you set. 2. The fuel expenses are reduced in low water temperatures as your device can operate in the desired constant water temperatures. 3. By the automatic water controlled on/off system, when the water valve is opened, the water heater will be ignite automatically and the hot water flow will be provided. When the water valve is closed, the water flow will stop and the flame will be off automatically. 4. Thanks to its feature of operating with low pressure water, it will not be affected by the low water pressure that occurs in the high apartment flats. (min 2 mSS) 5. The temperature control adjustment buttons make for users easy to obtain different water temperature that they desire. 6. By the high pressure safety system, when the water pressure is higher than it’s needed, safety valve will discharge the excess water by become a part of a activity. 3 7. By the high temperature safety system, in case the water get hotter than it is needed, the gas will be cut automatically and the damage to the water heater will be prevented. 8. The flame instability is prevented and the water is cooled after the flame is off with the features of blowing inside the water heater before the ignition (air fan blows air for 2~4 seconds before ignition) and the blowing after service (air fan will go on blowing air for 10 seconds after the water stops and the flame is off). 9. Thanks to the safe and reliable design of the combustion system, the air is taken from outside by the fan for the purpose of the combustion and it is sent out again after the combustion. 10. By the system of electronic continuous ignition, 100% success is achieved in ignition. 11. The device is equipped with the multi-purpose safety system. Even if the power is supplied to the water heater again in power failure, fan failure, the blocking of the waste gas pipe or strong reverse wind blowing the gas will be automatically cut and the automatic ignition system will be disabled. In this case the water heater will have to be restarted. 12. LCD display provides you to see the water temperature that you set. When you press the On/Off button you can see the water is flowing, the fan is turning, the temperature you set and the occurrence of the flame on the LCD display. 4 2. THE CONFIGURATION OF YOUR WATER HEATER . The fuel expenses are reduced Flue Outlet in low water temperatures as your device can operate in the desired constant water temperatures. ByFront theCover automatic water controlled on/off system, when the water valve is opened, the water heater will be ignite automatically and the hot water flow will be provided. When the water valve is closed, the water flow will stop and the flame will be off automatically. Thanks to its feature of operating with low pressure water, it will not be affected by the low water pressure Control Panel that occurs in the high apartment flats. 1 mSS Water Adjustment Button The temperature control setting buttons make for users WATERHEATER Super thin Intelligent Temp. constant 12L SET PRIORITY C Temp.+ Temp.- ON/OFF Mİ N. MA X. easy to obtain different water temperature that they 1/2" Hot Water Outlet desire. 1/2" Cold Water Inlet 1/2 "Gas Inlet Grounded By the high pressure safety system, when Discharge Valvethe water Plug pressure is higher than it’s needed, safety valve will discharge the excess water by become a part of a activity. UKDAX – 12 CT MODEL By the high temperature safety system, in case the water get hotter than it is needed, the gas will be cut automatically and the damage to the water heater will be prevented. The flame instability is prevented and the water is cooled after the flame is off with the features of blowing inside the water heater before the ignition (air fan blows air for 2~4 seconds before ignition) and the blowing after service (air fan will go on blowing air for 10 seconds 5 after the water stops and the flame is off). Thanks to the safe and reliable design of the combustion 3. TECHNICAL INFORMATIONS Device type Gas category Gas type Gas input pressure Fan Power Water flow(Δt=25K) Nominal power P Nominal load Q Gas consumption Water pressure Electrical connection Minimum water flow Normal heat load Net weight Dimensions Cold water Hot water Natural gas Waste gas Air channel Model:DAXOM Plus Type: UKDAX-12CT C13 I3B/P I2H LPG(G30) Natural Gas(G20) 29 mBar 20 mBar 48 W 12 l/min 20 KW 23 KW 3 1,79 kg/h 2,43 m /h Min. 0.1 Bar Max. 10 Bar 220-240 Volt AC 50Hz 48 W IP 44 2,7 lt/min 25 KW 13,5 kg 568 x355 x 103 Connections 1/2'' 1/2'' 1/2'' Ø60 Ø100 4. THE MOUNTING OF YOUR WATER HEATER Warning: The mounting of the water heater should be performed by an authorized person. Please contact our authorized dealers who are powered by the authorized gas administration (EGO, İGDAŞ, BOTAŞ, İZGAZ, etc). Do not attempt to operate your device by yourself. 6 4.1 Mounting Conditions and Safety Warnings 1. The waste gas pipe should not be mounted to the general chimney or the ventilation space of the building. The waste gas pipe should have an outlet to the building outlet and there should be at least 500 mm space from the open part of the exhaust outside the building. The open edge of the air inlet pipe should be at least 100 away from the wall where it is mounted. 2. In order to prevent the backflow of the condensed water or the rain water, the part of the waste gas pipe remaining outside the environment should be placed as to make a horizontal angle of 3 degrees. 3. Avoid the strong wind blowing as much as possible regarding the waste gas pipe. Backflow may lead the device to get out of function. 4. The environment where the water heater is mounted should be free from blocking, preventing parts and projections during the repair and maintenance; there should be sufficient space around the device for repair and maintenance. 5. Flammable and explosive substances must definitely be kept away from the water heater. 6. The waste gas pipe can be extended when necessary however the total pipe length should not exceed 2,5 m. The extension pipe should be supplied by DAXOM. More than 2 brackets should not be used for extension (including original bracket), the pipes should be appropriately fixed. 7 7. The hole opened for the waste gas pipe in the wall after the mounting should be filled with a substance resistant to burning and it should be isolated. 8. The electrical connection of the water heater should be grounded and there should be 2 Amp fuse. 9. The wall, which your water heater is mounted, should be strong as to carry the weight of the water heater. 10. Do not mount your water heater on the power supplies. 11. Your water heater is a household device. Do not operate for extended periods in industrial managements. 4.2. The Wall Mounting Of The Heater 1. Drill bolts and screw holes by using the mounting template supplied with the water heater in a place appropriate to the conditions mentioned above. 2. Insert the Ø8 diameter bolt to the upper part and insert the screws to the lower part. 3. Drill the 100 mm diameter waste gas pipe hole according to pipe measurement, which is given as follows. (The waste gas pipes are supplied with the water heater 600 40 60 100 8 4.2.1. Mountaning Of The Waste Gas Pipe Place the fresh air/waste gas pipe into the holes previously opened for the exhaust as their clearance will stay outside. Mount the relevant edge of the bracket part to the water heater flue and mount the other edge as to pass over the waste gas pipe. Sealing Components Sealing Components 110 (Diameter of flue hole) 568 603 101 min. 500 Super thin Intelligent Temp. constant 12L WATERHEATER 4 x M8 50 mm SET PRIORITY C Temp.- ON/OFF MİN. MAX. Temp.+ 180 Exterior Environment Interior Environment 4.2.1.a. The Up and Side Mounting Of Waste Gas Pipe 1. Insert the bolt to the mounting rings on the water heater. Fix the water heater by tightening the nut on the bolt. Mount the pipe to the hole opened previously on the wall as the fresh air/waste gas outlet will be outside. Connect the relevant edges of the bracket part as to face the water heater chimney and the pipe. 2. Fill hole opened for the waste gas pipe in the wall with a substance resistant to burning and isolate it. Make sure that the 9 isolation is performed well and the pipe will not fall down in future times. 3. Be careful to avoid any accident while mounting the water heater. Make sure the waste gas pipe is fixed as not fall down. 4.2.2. Performing of Connection of Water and Gas Connect the cold water inlet of your device to the cold water main pie with the ½ ‘’ flex pipe supplied with the device. The isolation seal should be applied to the connections to prevent water leakage. There should be a valve in the cold water main pipe line in order to cut the water when needed. 1. Connect the hot water flow of the water heater to the hot water pipe of your installation with ½’’ flex pipe supplied with the device. 2. Use TSE certified valve and flex pipe in the gas connection, never use Teflon in the connection. 5. USING OF THE WATER HEATER 5.1. THE Operation Of The Heater 1. Make sure the used gas type is the same with the one stated in the brand plate. 2. Turn on the gas and power supply of the water heater . The blue light will highlight on the On/Off, Temp+ and Temp- buttons 10 existing on the control panel with a warning sound. If you turn on the tap without turning on the power supply, your device will not operate and give an audio warning. 3. By pressing the On/Off button on the control panel, see that the lcd display is operating. By pressing the Tepm+ and Temp- buttons set the water temperature you want between 35 C and 65 C degrees. The water temperature you set will show stability after some time according to the distance of the water heater to the tap and the change of the water pressure. 4. Turn on the water valve. A sign will appear which shows the fan is turning on the Lcd display with the douche ejector sign. After that the fan which is inside will operate. After a few seconds the device will start to operate and hot water will be ready for instantly use. In the meantime the flame sign will occur on the lcd display. In case the device does not operate, try these procedures again several times. Contact the authorized service if the device does not operate. 5. The fault code may occur on the Lcd display when the device does not operate and the device may give an audio warning. The meanings of these codes are: Fault codes E0 E1 E4 E6 FAILURE DESCRIPTION Water Inlet Sensor Failure No ignition Fan Failure NTC Failure 11 5.1.1.Water And Temperature Kontrol Flame Formation Indicator Adjusting Water Temperature Value Fan Operation Indicator Water Flow Indicator WATERHEATER SET PRIORITY C Temp.+ Temp.- ON/OFF On/Off Button Temperature Adjustment Buttons Temp-/Temp+ When the Temp+ button is pressed the temperature you want to set will increase and when the Temp- button is pressed the temperature you want to set will decrease. Your water heater has the capacity to heat 12 lt of water per minute. If you would like to obtain high temperature from the water heater in o winter months (like 65 C) please set the adjustment valve in the cold water inlet to minimum position. Please check the temperature of the water with your hand before aiming it to your body against any burning event. 5.2.Shutting The Water Heater Off In case of your water heater stays long time out of use , shut the gas and water off and then in order to shut the water heater off disconnect the power supply (with the help of fuse or plug) also discharge the water which stays inside the heater. 12 5.3. The Precautions to be Taken 1. Make sure the used gas type is the same with the one stated in the brand plate. The use of inappropriate type of gas may lead to accident. 2. The repair of the water heater as unauthorized is dangerous and it may cause accidents. 3. Check the connection places regularly with a detergent against the gas leakage. Make sure there is sufficient space around the water heater. Always take precautions against possible gas leakage and when the gas smell is encountered, ventilate the environment by opening the door and the windows and shut the gas valves off urgently. Never make a phone call inside the room, do not turn the lights on and off, do not plug anything to the electric plugs or unplug anything before the gas leaves out completely. Do not forget that any flame or a spark that may occur in such a case, will lead to fire or explosion. Check the pipes, mount the places where happens leakage again or replace with the new one. In case of a leakage not resulting from the pipes, consult the service department or the relevant gas administration unit. 4. Change urgently old or cracked pipes by controlling gas pipes regularly. 5. When an unstable flame state is seen at water heaters working with LPG it is very likely that the gas control system is not operating. Stop using the water heater and have the device checked by an authorized technician and get it 13 repaired. Stop the water heater against an accident for the water heaters working with city gas or natural gas. 6. In case of not using your water heater long term in winter conditions, for preventing against to freezing, it is advised that to shut off gas and electric of the heater and discharge the water inside the heater. 5.4. Fire Precautions 1. Never leave the water heater and the gas open when you leave home for the long term period. 2. Never keep the flammable and explosive substances near the water heater. 5.5. For The Safe Use 1. Check the newly mounted water heaters carefully and make sure it works properly before using. 2. Wait for about 10~20 seconds to ignite again when the flame is out. 3. Do not drink the water inside the water heater. 4. If neccessary preventations do not taken, situations which ambient temperature deduct under the 0 degree, water inside heater can give damage to your heater by freezing. It is possible to hinder this situation by following below informations. Thanks to freezing preventation of your heater, although ambient temperature deduct under 0 degree, water that stays inside of heater can be prevented to freezing but for become of activity of this system although you do not use the heater, you must not 14 disconnect electrical connection and ON/OFF buttons on the heater pannel must be “ON” position. At that position your heater will be heat inside water by automatically short time working and will be prevent freezing. 5. Never touch the waste gas pipe during using and after a short time of using (against skin burns) 6. In case the water heater fails, do not panic and stop using the heater. Disconnect the gas and the electricity. Consult the service department or an authorized technician. 6. REPAIR AND SERVICE We have been providing service free of charge during the warranty period of the device. When you encounter a problem during using please contact our after sales service department. The unauthorized repair and the maintenance of the device will void its warranty cover. Our company will not be liable for the failures and the accidents that might occur later on 15 7. CHART OF TROUBLESHOOT AND CORRECT Flame does not go out although the water valve is off Water is too hot in low degree Water is too cold in high degree Abnormal ıgnition sound Smell Water comes from safety valve of the heater No energy Ignition with explosion CAUSE No ignition in the device after the water valve is opened No light on the control panel PROBLEM x Gas valve is not on x Gas valve semi-on x Air in the gas pipe x Abnormal pressure x Water valve is not turned on properly x Insufficient fresh air The wind pressure outside is too much Frozen water Insufficient water pressure Power failure or the device is not on Blocking of the igniter Check the electricity fuse Turn the gas valve on or perform gas load x Turn the gas valve completely Turn the device on and off until the ignition occurs x x x Contact the authorized service Turn the water valve on completely x x Ventilate until sufficient air comes x x Do not use for a certain time x Use again after the melting occurs x Control the water pressure x Turn the power supply on x Contact the authorized service Exchanger blocked Failure in water control Ignition pin is not in proper position Leakage in gas pipe or the flue Contact the authorized service x Leakage in gas pipe or the flue Safety ventilation is open Contact the authorized service Contact the authorized service x Turn the main valve off. Contact the authorized service Set the water adjustment valve to minimum position Choose the appropriate mounting area Turn the main valve off. Contact the authorized service Check the network water pressure x x x x x Water amount is too much Too much brackets installed WAYS OF SOLUTION Xx x 16 17 18 19 20