1
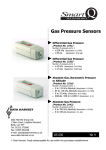
Pressure Sensor 400 (Order Code PS400-BTA) The Pressure Sensor 400 measures absolute gas pressure. It can be used to monitor pressure changes in gas-law experiments in chemistry and physics. Vapor pressure of various liquids can be monitored using this sensor. Its metal fittings provide for versatile, airtight connections. The following is a partial list of activities and experiments that can be performed using this sensor: Investigate the relationship between pressure and volume, Boyle’s law. Measure vapor pressure of liquids. Study the effect of temperature on gas pressure, Gay-Lussac’s law. Study the effect of temperature and concentration on the rate of decomposition of H2O2. Pressure Sensor 400 Accessories Included with the Pressure Sensor 400 are accessories to allow you to connect it to a reaction container or instrument. Check to be sure that each of these items is included: Nickel-plated brass push-to-connect connector: To secure this adapter to the pressure sensor, wrap plumber's tape around the pressure sensor threading, then use the 1/2" tightening wrench to secure the adapter in place. For additional security, you may want to use the 22 mm tightening wrench to hold down the pressure sensor while you tighten the adapter in place. Two-foot section of nylon tubing: This stiff tubing is designed to fit with the nickel-plated push-to-connect connector. Its standard 1/4" OD and 0.18" ID size allows you to connect to a variety of third-party instrumentation or adapters. Double barb brass connector: To secure this adapter to the pressure sensor, wrap plumber's tape around the pressure sensor threading, then use the 9/16" tightening wrench to secure the adapter in place. For additional security, you may want to use the 22 mm tightening wrench to hold down the pressure sensor while you tighten the adapter in place. Two-foot section of plastic tubing: This soft tubing is designed to fit over the brass barb connector. Its standard size allows you to connect to a variety of thirdparty instrumentation or adapters. Two tightening wrenches: The smaller wrench has a 1/2" end and a 9/16" end. The larger wrench is 22 mm. Plumber's tape: This 1/2" sealing tape should be wrapped around the threading on the pressure sensor. Wrap only once and to the right, as the threading runs. This will help ensure an airtight seal. Compatible Interfaces and Software See www.vernier.com/ps400-bta for a list of interfaces and software compatible with the Pressure Sensor 400. Here is the general procedure to follow when using the Pressure Sensor 400: 1. Connect the Pressure Sensor 400 to the interface. 2. Start the data-collection software or app. 3. The software will identify the Pressure Sensor 400 and load a default datacollection setup. You are now ready to collect data. NOTE: Vernier products are designed for educational use. Our products are not designed nor recommended for any industrial, medical, or commercial process such as life support, patient diagnosis, control of a manufacturing process, or industrial testing of any kind. Specifications Pressure range 0 to 410 kPa (0 to 58.0 psi, 0 to 3.95 atm, 0 to 3000 mmHg) Maximum pressure that the sensor can tolerate without permanent damage Sensing element Accuracy using factory calibration Accuracy using one-point custom calibration at atmosphere Response time Temperature range 800 kPa Honeywell PX2 Series ±2 kPa ±1 kPa 10 milliseconds –40°C to 125°C How the Pressure Sensor 400 Works The active sensor in this unit is a Honeywell PX2 Series pressure transducer. It has a membrane that flexes as pressure changes. This sensor is arranged to measure absolute pressure. One side of the membrane is a vacuum, while the other side is open to the atmosphere. The sensor produces an output voltage that varies in a linear way with absolute pressure. It includes special circuitry to minimize errors caused by changes in temperature. Optional Calibration Procedure You do not have to perform a new calibration when using the Pressure Sensor 400. The sensor is calibrated prior to shipping. If you would like to perform your own calibration, follow the steps described here. A one-point calibration at atmosphere is adequate for most applications. To perform a one-point calibration, 1. Connect the Pressure Sensor 400 to an interface and launch the software. 2. Initiate the calibration procedure and make sure the one-point calibration option is checked. This should be the default option. 3. Enter the actual pressure as the known value for Reading 1. 4. When the voltage reading stabilizes, click Keep. 5. If you want to use the calibration for the current session only, click Done to complete the calibration process. To save the calibration onto the sensor, click the storage tab and save to the sensor. 2 As discussed above, the Pressure Sensor 400 has been calibrated to read station pressure. Station pressure is the true atmospheric pressure at your location, or station. If you prefer it to read sea level pressure for conducting weather studies, you can perform a one-point calibration to correct for elevation, using the sea-level corrected pressure value for your location obtained from a reputable source (NOAA, Weather Underground, etc.). Sea level pressure is the pressure after the station pressure has been adjusted to its equivalent pressure at sea level. This is commonly done to normalize pressures at various altitudes for weather forecasts. To further improve accuracy, you may want to perform a two-point calibration. 1. Connect the Pressure Sensor 400 to an interface and launch the software. Change the units first, if desired. 2. Initiate the calibration procedure and uncheck the one-point calibration option. 3. For the first calibration point, allow the sensor to equilibrate to atmospheric pressure. When the voltage reading stabilizes, enter the atmospheric pressure in for Reading 1. When the voltage reading stabilizes, click Keep. 4. For the second calibration point, apply pressure with an external pump, measuring it at the same time with a pressure gauge. Enter the gauge reading into the calibration dialog box in your data-collection program. When the voltage reading stabilizes, click Keep. 5. If you want to use the calibration for the current session only, click Done to complete the calibration process. To save the calibration onto the sensor, click the storage tab and save to the sensor. Pressure in Liquids: Depth Measurements If you measure the pressure at the end of a long plastic tube forced underwater, you can indirectly measure depth. Connect the tubing to the stem of the Pressure Sensor 400 and then put the end of the tube under water. The pressure reading will increase 8.105 kPa (0.0800 atm or 60.79 mmHg) for every meter below the surface of the water. Note: If you measure depth in this way, the depth you are measuring is to the top of the water in the tubing. Warranty Vernier warrants this product to be free from defects in materials and workmanship for a period of five years from the date of shipment to the customer. This warranty does not cover damage to the product caused by abuse or improper use. This warranty covers educational institutions only. Consumable items, such as the tubing, adapters, and wrenches are excluded from the warranty. Vernier Software & Technology 13979 S. W. Millikan Way Beaverton, OR 97005-2886 Toll Free (888) 837-6437 (503) 277-2299 FAX (503) 277-2440 [email protected] www.vernier.com Rev. 9/16/2015 Marks not owned by us that appear herein are the property of their respective owners, who may or may not be affiliated with, connected to, or sponsored by us. Printed on recycled paper. 3 4