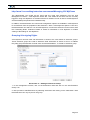
1
Manual 3CX Phone System for Windows Version 11 Copyright 2006-2012, 3CX Ltd. http://www.3cx.com E-mail: [email protected] Information in this document is subject to change without notice. Companies’ names and data used in examples herein are fictitious unless otherwise noted. No part of this document may be reproduced or transmitted in any form or by any means, electronic or mechanical, for any purpose, without the express written permission of 3CX Ltd. 3CX Phone System for Windows is copyright of 3CX Ltd. 3CX is a registered trademark, and 3CX Phone System for Windows and the 3CX logo are trademarks of 3CX Ltd. in Europe, the United States and other countries. Version 11.0 – Last updated 08 July 2012 Table of Contents INTRODUCTION................................................................................................................................................................ 9 What is 3CX Phone System for Windows? ......................................................................................................... 9 Benefits of 3CX Phone System ........................................................................................................................... 9 How an IP Phone system works........................................................................................................................ 10 SIP phones ........................................................................................................................................................ 11 3CX Phone System editions.............................................................................................................................. 12 What’s new in 3CX Phone System V11? .......................................................................................................... 13 Additional Resources ........................................................................................................................................ 14 ESSENTIAL 3CX PHONE SYSTEM CONFIGURATION ......................................................................................................... 17 1. INSTALLING 3CX PHONE SYSTEM FOR WINDOWS................................................................................................... 18 System requirements ........................................................................................................................................ 18 Download and install 3CX Phone System ......................................................................................................... 18 3CX Phone System configuration wizard .......................................................................................................... 19 Upgrading from a previous version of 3CX Phone System ............................................................................... 20 Activating 3CX Phone System .......................................................................................................................... 21 Firewall configuration ........................................................................................................................................ 21 3CX MyPhone ................................................................................................................................................... 22 System prompts language................................................................................................................................. 22 2. CONFIGURING PHONES AND EXTENSIONS ............................................................................................................. 23 Introduction ........................................................................................................................................................ 23 Provisioning your phones .................................................................................................................................. 23 Configuring Grandstream, Tiptel, snom and Yealink phones ........................................................................... 23 Configuring 3CXPhone for Android, iPhone and Windows ............................................................................... 24 Configuring Cisco, Polycom and older models of Grandstream phones .......................................................... 26 Extension Configuration .................................................................................................................................... 27 Importing extensions ......................................................................................................................................... 28 3. ADDING PSTN LINE(S) VIA A VOIP GATEWAY .......................................................................................................... 29 Introduction ........................................................................................................................................................ 29 Recommended VoIP Gateways ........................................................................................................................ 29 Configuring VOIP Gateways ............................................................................................................................. 30 4. ADDING A VOIP PROVIDER / SIP TRUNK ................................................................................................................. 33 Introduction ........................................................................................................................................................ 33 Requirements for using a VoIP provider / SIP Trunk ........................................................................................ 33 Configuring a VoIP Provider / SIP Trunk ........................................................................................................... 33 Specifying a STUN server ................................................................................................................................. 35 DID’s and Inbound Call Identification ................................................................................................................ 35 5. CREATING OUTBOUND CALL RULES ........................................................................................................................ 39 Introduction ........................................................................................................................................................ 39 Creating an outbound call rule .......................................................................................................................... 39 6. 3CX MYPHONE ....................................................................................................................................................... 41 Introduction ........................................................................................................................................................ 41 Deploying 3CX MyPhone .................................................................................................................................. 42 Updating 3CX MyPhone .................................................................................................................................... 42 Using 3CX MyPhone ......................................................................................................................................... 42 http://www.3cx.com/blog/extension-user-manual/Managing 3CX MyPhone .................................................... 43 Grouping & Assigning Rights ............................................................................................................................ 43 The Management Extension group ................................................................................................................... 45 7. THE DIGITAL RECEPTIONIST / AUTO ATTENDANT ................................................................................................... 47 Introduction ........................................................................................................................................................ 47 Recording a menu prompt ................................................................................................................................. 47 Creating a digital receptionist ............................................................................................................................ 47 Allowing callers to dial a known extension directly ........................................................................................... 48 Call By Name..................................................................................................................................................... 49 ADDITIONAL FEATURES OF 3CX PHONE SYSTEM ............................................................................................................ 51 8. ADDING DID NUMBERS / INBOUND RULES............................................................................................................. 52 Introduction ........................................................................................................................................................ 52 DID numbers and 3CX Phone System – How it works ..................................................................................... 52 Adding DID’s...................................................................................................................................................... 53 Using DID’s with a VoIP provider account ........................................................................................................ 54 Troubleshooting DID lines ................................................................................................................................. 54 9. RING GROUPS/ PAGING / INTERCOM ..................................................................................................................... 55 Ring Groups ...................................................................................................................................................... 55 Paging / Intercom (Paid editions only) .............................................................................................................. 56 10. CALL QUEUES ...................................................................................................................................................... 57 Introduction ........................................................................................................................................................ 57 Creating a Call Queue ....................................................................................................................................... 57 Call Center Module ............................................................................................................................................ 58 11. CALL CONFERENCING .......................................................................................................................................... 60 Introduction ........................................................................................................................................................ 60 Configuring conferencing .................................................................................................................................. 60 Creating a conference call................................................................................................................................. 60 12. DIAL CODES ........................................................................................................................................................ 61 13. GENERATING CALL REPORTS ............................................................................................................................... 63 Introduction ........................................................................................................................................................ 63 Reports available ............................................................................................................................................... 63 14. CONNECTING 3CX PHONE SYSTEMS (BRIDGES) ................................................................................................... 65 Introduction ........................................................................................................................................................ 65 Creating a bridge ............................................................................................................................................... 65 Calling a party on the other end of the bridge ................................................................................................... 68 15. ADDITIONAL PHONE/EXTENSION CONFIGURATION ........................................................................................... 69 Forwarding rules ................................................................................................................................................ 69 Pin Protect ......................................................................................................................................................... 69 BLF fields........................................................................................................................................................... 69 Re-provisioning the phones............................................................................................................................... 69 Managing your IP phones ................................................................................................................................. 70 Time Zone ......................................................................................................................................................... 71 Updating the firmware on your phones ............................................................................................................. 71 16. CONFIGURING REMOTE EXTENSIONS ................................................................................................................. 73 Introduction ........................................................................................................................................................ 73 Configuring IP Phones as Remote Extensions ................................................................................................. 73 How the 3CX Tunnel Works .............................................................................................................................. 74 Configuring the tunnel ....................................................................................................................................... 74 Configuring 3CXPhone as Remote Extensions ................................................................................................ 75 3CXPhone for Android ...................................................................................................................................... 77 3CX Phone for iPhone ....................................................................................................................................... 78 17. BACKUP AND RESTORE ....................................................................................................................................... 79 Introduction ........................................................................................................................................................ 79 18. FAX SERVER ........................................................................................................................................................ 81 Introduction ........................................................................................................................................................ 81 Fax receiving configuration ............................................................................................................................... 81 Configuring Fax machines / Fax servers ........................................................................................................... 82 19. THE PHONEBOOK ............................................................................................................................................... 83 Introduction ........................................................................................................................................................ 83 Company phonebook ........................................................................................................................................ 83 20. MONITORING YOUR PHONE SYSTEM .................................................................................................................. 84 Introduction ........................................................................................................................................................ 84 Things to monitor ............................................................................................................................................... 84 21. TROUBLESHOOTING ........................................................................................................................................... 87 Introduction ........................................................................................................................................................ 87 Check that IP Phones are registered ................................................................................................................ 87 Review the Server status log............................................................................................................................. 88 Troubleshooting the PSTN Interface ................................................................................................................. 88 22. GETTING ADDITIONAL INFORMATION / SUPPORT .............................................................................................. 89 Support .............................................................................................................................................................. 89 Knowledge base / Help ..................................................................................................................................... 89 Support page / Configuration guides ................................................................................................................. 89 3CX Phone System Blog ................................................................................................................................... 89 3CX Facebook page .......................................................................................................................................... 89 Feature Requests .............................................................................................................................................. 89 Online training ................................................................................................................................................... 90 Community Support forums............................................................................................................................... 90 Request support via our support system ........................................................................................................... 90 3CX Phone System for Windows System for Windows www.3cx.com Introduction What is 3CX Phone System for Windows? 3CX Phone System is a software-based IP PBX that replaces a traditional PBX and delivers employees the ability to make, receive and transfer calls. The IP PBX supports all traditional PBX features. An IP PBX is also referred to as a VoIP Phone System, IP PABX or SIP server. Calls are sent as data packets over the computer data network instead of via the traditional phone network. Phones share the network with computers and separate phone wiring is not required. With the use of a VoIP/PSTN gateway, you can connect existing phone lines to the IP PBX to make and receive phone calls via a regular PSTN line. An alternative would be to use a VoIP Provider, which removes the requirement a gateway. 3CX phone system operates with standard SIP software or hardware phones, and provides internal call switching, as well as inbound and outbound calling via the standard phone network or via a VoIP service. Benefits of 3CX Phone System Much easier to install & configure then a proprietary phone system A software program running on a computer can take advantage of the advanced processing power of the computer, making it easier to upgrade the hardware when necessary. In addition, since 3CX Phone System is a Windows based application, you can expect a standard Windows user interface. Anyone with an understanding of computer networks and Windows can install and configure the PBX. A proprietary phone system often requires an installer trained on that particular proprietary phone system. Easier to manage 3CX Phone System has an easy to use web based configuration interface, allowing you to easily maintain and fine tune your phone system. Proprietary phone systems often have difficult to use interfaces which are designed to allow only trained phone system installers to use it effectively. Call cost reduction You can save substantially by using a VoIP service provider for long distance or international calls. Easily connect remote workers and remote offices to the phone system or multiple phone systems together and make free phone calls. No need for separate phone wiring – use computer network A VoIP phone system allows you to connect hardware phones directly to a standard computer network port (which it can share with the adjacent computer). Software phones can be installed directly onto the PC. This means that you do not need to install & maintain a separate wiring network for the phone system, giving you much greater flexibility to add users/extensions. If you are moving into an office and have not yet installed phone wiring, you can save significantly by just installing a computer network. No vendor lock-in VoIP phone systems are open standard – all modern IP PBX systems use SIP as a protocol. This means that you can use almost any SIP VoIP phone or VoIP gateway hardware. In contrast, a proprietary phone system often requires proprietary phones, designed specifically for that phone system and proprietary expansion modules to add features and lines. Page 9 3CX Phone System for Windows System for Windows www.3cx.com Scalable Proprietary systems are easy to outgrow: Adding more phone lines or extensions often requires expensive hardware upgrades. In some cases you need an entirely new phone system. Not so with a VoIP phone system: a standard computer can easily handle a large number of phone lines and extensions – just add more phones to your network to expand! Better customer service & productivity Because calls are computer based, it is much easier for developers to integrate with business applications. For example: an incoming call can automatically bring up the customer record of the caller, dramatically improving customer service and cutting cost. Outbound calls can be placed directly from Outlook, removing the need for the user to type in the phone number. Web based user portal makes phones easier to use It is often difficult to use advanced phone system features such as conferencing, call recording and call transfer on proprietary phones. Not so with 3CX – via the web based user portal 3CX MyPhone - all actions are easily performed from a user friendly GUI. More features included as standard Because 3CX Phone System is software based, it is easier and more cost effective for 3CX to improve feature sets and performance. 3CX Phone Systems come with a rich feature set, including auto attendant, voice mail, call queuing, call conferencing and more. These options are often very expensive add-ons in proprietary systems. Better control via better reporting The web-based reporting system provides the ability to generate advanced reports on inbound and outbound calls, statistical reports on queues as well as produce reports on call costs and call traffic. Reports can be exported to the most common file formats including PDF and RTF and CSV. 3CX MyPhone shows extension and line status Proprietary systems often require expensive ‘system’ phones to get an idea what is going on in your phone system. Even then, status information is cryptic at best. With 3CX Phone System, the 3CX MyPhone user portal clearly shows which users are available to take calls (presence). In addition, management can also see that customers are being serviced in a timely fashion in realtime. Teleworking / Remote use via Smartphones With the use of 3CXPhone for Windows, Android and iPhone, extension users can take and make calls via the company phone system from anywhere using their smartphone or laptop. How an IP Phone system works A VoIP Phone System, also referred to as an IP PBX, generally consists of the IP PBX server, one or more SIP based phones, and optionally a VoIP/PSTN Gateway or a VoIP service provider. The IP PBX server is similar to a proxy server: SIP clients, being either soft phones or hardware based phones, register with the IP PBX server, and when they wish to make a call they ask the IP PBX to establish the connection. The IP PBX has a directory of all phones/users and their corresponding sip address and thus is able to connect an internal call or route an external call via either a VoIP/PSTN gateway or a VoIP service provider. Page 10 3CX Phone System for Windows System for Windows www.3cx.com Figure 1 - VoIP Phone System Overview The image illustrates how an IP PBX integrates on the network and how it uses the PSTN and/or the Internet to connect calls. SIP phones A VoIP phone system requires the use of SIP phones. These phones are based on the Session Initiation Protocol (SIP), an industry standard to which all modern IP PBXs adhere. The SIP protocol defines how calls should be established and is specified in RFC 3261. SIP allows the possibility to mix and match IP PBX software, phones and gateways. This protects your investment in the phone hardware. SIP phones are available in several versions/types: Software based SIP phones A software based SIP phone is a program which makes use of your computers microphone and speakers, or an attached headset to allow you to make or receive calls. Examples of software SIP phones are 3CXPhone or X-Lite from Counterpath. Page 11 3CX Phone System for Windows System for Windows www.3cx.com Hardware based SIP Phones Figure 2 - A hardware sip phone A hardware based SIP phone looks like and behaves like a normal phone. It’s actually a mini computer that connects directly to the computer network. They have an integrated mini hub, allowing them to share a network connection point with a computer, eliminating the need for an additional network point for the phone. Examples of hardware SIP phones are GrandStream GXP2000 or SNOM 320. Smartphones (iPhone and Android) Figure 3 - Using an iPhone with 3CX iPhone and Android phones can be used as clients to 3CX Phone System using the freely available 3CXPhone for Android and 3CXPhone for iPhone. Using 3CXPhone, your smartphone becomes a wireless desk phone in the office, and can be used to answer and receive company calls while out of the office via WIFI or 3G (Your mobile provider must support VoIP over 3G). 3CX Phone System editions 3CX Phone System is available in 5 different versions – a Free Edition, a MINI edition, a Small Business Edition, a Pro Edition and an Enterprise edition. A detailed feature comparison between versions is available at this location: http://www.3cx.com/phone-system/edition-comparison.html The Call Center module is available as an upgrade to any of the commercial editions. This module adds call center specific features to your 3CX Phone System Pricing information and ordering information can be found here: http://www.3cx.com/ordering/index.php Page 12 3CX Phone System for Windows System for Windows www.3cx.com What’s new in 3CX Phone System V11? 3CX Phone System version 11 includes the following updates and new features: Full Video Support 3CX Phone System now includes full Video Support. Using compatible SIP phones, users can make, transfer and park video calls. Video calls are supported on 3CXPhone, Grandstream, Yealink and Polycom phones. Improved Remote PBX Integration 3CX Phone System has been updated to provide better support to Bridged installations. Extensions on a remote bridged PBX can be configured as agents in queues or as members of ring groups on the local PBX. In addition, 3CX MyPhone has also been updated to show the presence information and the status of extensions on the remote PBX. MyPhone Updates MyPhone includes a number of updates, the most evident of which is the new user interface, which makes MyPhone functions easier to access, making MyPhone much more intuitive for the end user. Apart from that, MyPhone allows the user to easily create ad hoc conference calls by selecting the extensions that need to participate in the conference call. MyPhone also provides real-time information on the failed calls to conference participants, as well as status information on the conference call itself. Using MyPhone, the presenter of a conference can also invite conference participants by email. MyPhone users have the ability to enter additional information for the status, for example, “Away – Business trip”. MyPhone can also automatically detect out of office and arranges the status of the user. MyPhone now allows users to view recorded calls. MyPhone includes various improvements to the chat feature too. Improved Call Parking 3CX Phone System version 11 can now be configured to automatically transfer a call that has been parked for a pre-defined amount of time. The administrator can also configure different onhold music for parked calls, and up to 50 shared parking orbits can be enabled. In addition, parking of calls can be enabled per extension group. Digital Receptionist Improvements 3CX Phone System version 11 allows the administrator to configure different operators per menu. Calls answered by a Digital Receptionist can be diverted to an operator when an incorrect number is pressed by the caller. The Digital Receptionist now provides the ability to configure a prompt for holidays. Web based Reporting 3CX Phone System version 11 includes a new web based reporter, allowing the administrator to easily generate reports remotely. In addition, additional users can be allowed to generate reports. Page 13 3CX Phone System for Windows System for Windows www.3cx.com Apart from a number of bug fixes, the new reporter includes a set of new reports which separate international, mobile calls, national, and local calls. Google Chrome support and various UI updates 3CX Phone System version 11 now fully supports Google Chrome. In addition, the web UI has undergone various minor updates, improving the general ease of use and configurability of the product. Better performance on x64 3CX Phone System now natively supports x64, giving it higher performance on servers running an x64 operating system. Call Center Updates The Call Center has been updated to allow VIPs in queues – people calling a specific number / DID take preference over normal calls. A maximum number of callers can be configured for each queue. Alerts can also be generated in MyPhone if nobody is answering a call in the Queue. Other Updates 3CX Phone system version 11 includes the following updates: • Emergency numbers are always dialled irrelevant of the time of the day, outbound rules, holidays or other time restrictions. • Voice messages which are shorter than 2 seconds will only generate missed call notification. • Calls can now also be transferred directly to someone’s voice mail. • The administrator can be notified of missed calls and calls to blocked countries • Security has also been improved. 3CX MyPhone can be configured to allow calls to certain countries only, thus avoiding Toll fraud. • The Administrator can now configure a directory containing music on hold files which can be played either in sequence or randomly for music on hold. Additional Resources Call Center Edition The Call Center Edition is an upgrade to any commercial edition that adds a number of call center features: • Advanced real time statistics from 3CX MyPhone – With the Call Center Module, supervisors can get access to the advanced real time information in the Queues page of 3CX MyPhone. Besides monitoring queue status and which agents are logged on, you can see the number of callers in queue the, number of answered/unanswered calls, average and longest wait time, time an agent logged in /out of queue and more. • Additional Queue strategies including Call Back, Longest Wait, Least Used Page 14 3CX Phone System for Windows System for Windows www.3cx.com • Whisper – Whisper functionality on queue calls. Listen to monitor Agent responses, and if Agent responds wrongly you can provide feedback to the Agent only, allowing him / her to correct their answers. • Listen in – Allows supervisors to listen in on calls to monitor Agent responses. • Wrap up time – Wrap up time gives agents a configurable amount of time to enter notes in the customer record or follow up tasks before they have to take another call. Wrap up time can be configured per queue • Wall Board feature – web page which can be displayed on large screen with total number of calls waiting, number of answered and unanswered calls and average wait time • Alerts to file and email when a call is in the queue beyond a certain time. You can now enforce SLA requirements and get notifications whenever a call is in a queue beyond a certain time. An email notification can be sent, the agent’s MyPhone can be configured to play a sound and the alert is also logged. • Ability to log out an agent from the queue • More extensive reports • More information can be found at http://www.3cx.com/call-center/index.html. Pricing information can be found at http://www.3cx.com/ordering/pricing.html 3CX Training 3CX maintains an online training course which trains users on all important functions of the PBX via a series of video tutorials. The online training course is free of charge and can be completed in approximately one day. The training course can be found here: http://training.3cx.com It is also possible for administrators to obtain 3CX certification. Certification is free of charge and can be taken here http://www.3cxacademy.com 3CX Help/Support pages Additional documentation, tutorials and documents about 3CX Phone System can be found on our support page, located at: http://www.3cx.com/support/ 3CX Blog We recommend that you subscribe to the 3CX blog at http://www.3cx.com/blog/ There we publish important product news, updates & security alerts. You can get notified by email of new blog posts by subscribing here: http://feedburner.google.com/fb/a/mailverify?uri=3CXVoIPBlog Page 15 3CX Phone System for Windows System for Windows www.3cx.com Essential 3CX Phone System Configuration The following sections describe the functionality that you need to configure to get up and running with 3CX Phone System which include: • Installing 3CX Phone System, and running through the post installation system configuration wizard which will ensure that the essential settings required by 3CX Phone System are configured. • The installation and configuration of phones and extensions, which can be easily done as one step using provisioning. This section also covers importing extensions – something that should be considered by larger installations. • The configuration of hardware VoIP Gateways, so that they can work and provisioned by 3CX Phone System allowing you to connect to the PSTN • The configuration of a VoIP provider / SIP trunk service – another popular way of connecting to the PSTN. • The creation of outbound rules which are required to route calls from your extensions to either a VoIP Gateway or a VoIP provider / SIP trunk • 3CX MyPhone – the easy to use utility which allows users to manage their extension, initiate calls, view the presence of other users, and effortlessly create ad hoc conference calls • Configuring the digital receptionist / auto attendant, allowing you to create a professional menu prompt for your organisation. Page 17 3CX Phone System for Windows System for Windows www.3cx.com 1. Installing 3CX Phone System for Windows System requirements 3CX Phone System for Windows requires the following: • Windows 7(Pro or Ultimate), Windows 8, Windows Server 2003 SP2, Windows Server 2008, Windows Server 2008 R2 and Windows Server 2012 • Port 5060 (SIP), 5080 – 5089 (Bridge connections), 5090 (Tunnel - Optional) and ports 9000 – 9049 (audio) – Calls are performed on these ports. You might need to configure your firewall to allow and route connections to these ports accordingly. • Ports 4515, 4516, 5000, 5100, 5480 - 5489, 7000 – 7499, 32000 – 32999, 40000 – 40999 are used by the 3CX Phone System processes. There should be no other application listening on these ports • .NET Framework version 4 or higher • Minimum: Core2Duo processor and 1 Gigabyte Memory • Internet Explorer 8 and higher, Firefox 3.6 and higher or Google Chrome • If using a VoIP provider or remote extensions, you will need a fixed IP. DynDNS and similar configurations are not supported! • More information on system requirements including benchmark tests can be found at http://www.3cx.com/blog/docs/3cx-system-requirements/ and http://www.3cx.com/blog/news/3cx-phone-system-for-large-enterprises/ • If you are planning to use 3CX Phone System in a multi-tenant system, you need to upgrade the machine specifications accordingly, depending on the number of tenants that will be hosted on each machine. You should avoid having more than 20 3CX Phone Systems running in a multi-tenant environment. Recommended • 3CX supported SIP Phones and VoIP Gateways ( full list at http://www.3cx.com/support/) • 3CX recommended VoIP Providers • If you are using a VoIP provider, you must have a firewall that is configured to do static port mapping. A static IP is highly recommended also! For more information see: http://www.3cx.com/blog/voip-howto/static-port-mappings/ • You will need to have a good basic understanding of Windows Networking. Download and install 3CX Phone System 1. Download the latest version of 3CX Phone System from http://www.3cx.com/ippbx/downloadlinks.html. Run set-up by double-clicking on the set-up file. Click ‘Next’ to start installation. 2. You will be asked to review and accept the license agreement, as well as to choose an installation location. 3CX Phone System will need a minimum of approximately 10GB free hard disk space. You will need to reserve additional space to store voice mail files & prompts. Page 18 3CX Phone System for Windows System for Windows www.3cx.com 3. Select the installation location and click Next 4. You will be asked whether you wish to use IIS version 6 or the in-built web server, Abyss. With Abyss your phone system will be independent of windows updates and other web sites running on IIS. Abyss performs equally well. On Windows 2003, you need to use Abyss, since IIS 6 cannot be used on Windows 2003. On Windows 7 and Windows 8, IIS will enforce a 10 connection limit. Choose Abyss if this is an issue, or install on a server operating system. 5. Click ‘Install” to start the installation of 3CX Phone System. Setup will now copy all files and install the necessary Windows services. After set-up has completed copying files and installing the services, set-up will run the 3CX Phone System Configuration Wizard. To complete the install, click ‘Finish’. 3CX Phone System configuration wizard 1. The 3CX Phone System configuration wizard walks you through a number of essential tasks that you need to do in order to get your system up and running. After it starts up, it will ask which language you want to use for 3CX Phone System. 2. The wizard will then ask you for the Local IP Address which 3CX will use by default. 3. Set-up will ask you for the public IP of the 3CX Phone System machine so that remote extensions can be provisioned. You can skip this step if you wish and enter it later. 4. If you are upgrading or moving your 3CX Phone System installation, the wizard will give you the option to restore settings that have been backed up previously. 5. The wizard will ask you how many digits you wish your extension numbers to be. This is a very important decision since it cannot be altered without re-installing and re-configuring the PBX. 6. It will ask you for your mail server name and reply to address. These settings are used to send email notifications, voice mail and faxes. It will then ask you for a preferred username and password to be used to logon to the 3CX Phone System management console and manage the phone system. Screenshot 1 - The 3CX Configuration Wizard Page 19 3CX Phone System for Windows System for Windows www.3cx.com 7. The wizard will ask you to create your extensions, however you might want to do this at a later stage using phone provisioning, or importing users. You do however need to create at least one extension – the one which will be used as the operator extension. 8. The wizard will then ask you to select your country, which is used to determine the International Dialling Prefix for your country. 9. In the next step it will ask you to specify the operator extension. The operator extension is the default extension used to route all inbound calls to. Select one of the extensions created in the previous step. 10. Now review the voice mail extension – this is the number that users will call to retrieve their voice mail. You need to ensure that this number is not used for any other purposes (e.g. an emergency number in your country) 11. The wizard will ask you to specify the countries and regions to which calls can be made. Calls to countries which are not selected will be rejected. This is done as a security measure against VoIP toll fraud. 12. If you want to use a VoIP provider, you can select the VoIP provider to use, specify server name, proxy (if applicable), account details and rule prefix. Click the Skip button if you are not using a VoIP, or want to specify this later. 13. 3CX Phone System Wizard will prompt you whether you would like to receive a quote for a complete phone system. If yes, fill in your details and 3CX or a 3CX partner will send you a detailed quote. You can skip this step if you do not need a quote at this stage. After the Wizard has completed, you can connect to the 3CX Phone System Management Console by clicking on the management console short cut in the 3CX Phone System program group. To connect to the management console from a remote machine, start a web browser and enter the name of the machine on which 3CX Phone System is installed, followed by ‘:5000/Management’. (For example: http://phone-system:5000/Management/). 5000 is the port used by web server in 3CX Phone System. Upgrading from a previous version of 3CX Phone System It is possible to upgrade a 3CX Phone System version 9 and 10 installation to version 11 as follows: 1. Before uninstalling, backup your current configuration using the backup and restore tool located in the 3CX program group. 2. Now uninstall the old installation using Add/Remove programs. 3. Install 3CX Phone System v11 – You will be prompted for the backup file in the post install wizard. This will restore your configuration. Note • Upgrades of versions 3.1, 5, 6.0, 6.1, 7.0, 7.1 and 8 are not supported. You will need to upgrade to an interim version before upgrading to version 11. Page 20 3CX Phone System for Windows System for Windows www.3cx.com Activating 3CX Phone System If you have purchased a MINI, Small Business, Pro or Enterprise version then you must activate your license by going to the General > Activate License page in the 3CX Management Console. Screenshot 2 - Activating your license Enter your license key, Company, Contact Name, E-mail, Telephone and Country and Reseller name and click on “Activate” to activate your license. This information will be sent to our license key server and your license key and installation will be activated. You will need to do this each time you re-install 3CX Phone System on a new machine or when a change in the local network topology occurs (example: the local IP address changes) Firewall configuration There are 2 scenarios in which you will need to update your router / firewall configuration: 1. If you intend to use a VoIP provider 2. If you intend to use remote extensions Undoubtedly, the best place for 3CX Phone System is on a machine behind the firewall. This configuration is easier and more secure. If you only use PSTN lines and do not plan to have any remote extensions, you don’t even need to make any changes to your firewall configuration. If you intend to use a VoIP Provider or remote extensions without using the 3CX Tunnel, then you will need to open the following ports to allow 3CX Phone System to communicate with the VoIP Provider: • Port 5060 (UDP) for SIP communications (send & receive) MUST BE STATICALLY MAPPED. See sample firewall configuration at http://www.3cx.com/blog/voip- howto/linksys-router-configuration/ Page 21 3CX Phone System for Windows System for Windows www.3cx.com • Port 5061 (TCP) for TLS communications – If using secure SiP. • Port 9000-9049 (or higher) (UDP) (send & receive) for RTP communications, which contain the actual call. Each call requires 2 RTP ports, one to control to call and one for the call data. Therefore, you must open twice as many ports as you wish to support simultaneous calls via the VoIP provider. For example, if you want to allow 4 people to make calls via the VoIP provider simultaneously, you must open port 9000 to 9007. If you plan to use remote extensions using the 3CX Tunnel, you will also need to configure your firewall to allow and route the following: • Port 5090 (UDP and TCP) for the 3CX Tunnel Note that the above port ranges are the default ports in 3CX Phone System. You can adjust these ports from the Management Console, in the Settings > Network node. From this node, you can configure the ports to be used for internal calls, and the ports to be used for external calls being made via a VoIP provider or calls to and from a remote extension. More information on how to configure your firewall can be found at http://www.3cx.com/blog/voiphowto/firewall-configuration-overview/ 3CX MyPhone The 3CX MyPhone is a web based utility that allows users to easily manage their extension with a few mouse clicks – rather than via a cryptic and limited phone interface. 3CX MyPhone works in tandem with a desk phone or soft phone. For more information about the 3CX MyPhone and how to install it, please refer to the chapter ‘3CX MyPhone’. System prompts language 3CX Phone System ships with a US English prompt set by default. Prompts are voice files that are played by the system to callers and users of the system. For example, when a user picks up their voice mail, the system prompts will instruct the user what buttons to press in order to hear or delete voice messages. To change the system prompts to a different language: 1. Go to 3CX Phone System Updates > System prompt sets node and then select the prompt set you wish to use and click on 'Download Selected'. The prompt set will be downloaded. 2. Now go to the Settings > System prompts sets node and click on the ‘Manage Prompt sets’ button at the top of the screen. 3. Select the prompt set you have downloaded and click on ‘Set As Current Promptset’. The system will now use this new prompt set. Page 22 3CX Phone System for Windows System for Windows www.3cx.com 2. Configuring phones and extensions Introduction After you have installed 3CX Phone System, one of the first things that you need to do is configure your IP hardphones, smartphones or softphones, and assign extensions to each phone. This can be done in 2 ways – provision the phones, or manually configuring the phones. Provisioning of phones can be compared to plug n play, whereby 3CX Phone System makes it extremely easy to configure the phone. On the other hand, manually configuring the phone is rather cumbersome, and should be avoided where possible. Start-up the Windows Management console from the 3CX program group (Windows based), or point your web browser to the Management Console by entering the name of the machine (including port 5000), for example: http://phone-system:5000/Management/ A login page will appear. Enter the Username and Password that you provided during setup, select the language you would like to use and then click on the ‘Login’ button. Provisioning your phones We recommend that you have 3CX automatically configure your IP phones for use with 3CX Phone System. This process is called phone provisioning. This method is preferable to manual configuration because it allows you to easily manage the phones from the 3CX Management Console. It makes it easy to change extension passwords, BLF lights and so on because you can do it centrally for all phones from the 3CX Management Console and then push the changes to the phone without having to manually configure the phone (which is generally cumbersome). It is also possible to manually configure your IP Phones. This is sometimes required. For information how to do this, please visit our support page at http://www.3cx.com/support/ Configuring Grandstream, Tiptel, snom and Yealink phones Yealink, Tiptel, snom and Grandstream phones can be easily configured to be part of the 3CX Phone System using provisioning. Note: Grandstream PNP provisioning only works with the newer executive models, which include the Grandstream GXP-1450, GXP 2100, GXP 2110 and GXP 2120. Older Grandstream phones must be provisioned HTTP provisioning, as explained further on. Page 23 3CX Phone System for Windows System for Windows www.3cx.com Screenshot 3- Plug and Play phone provisioning Proceed as follows to provision phones: 1. Connect the IP Phone to the LAN. Ensure that the phone is on the same LAN as 3CX Phone System. 2. The phone will show up in the Phones node as a new phone 3. Right-click on the entry and assign to an existing extension or create a new one for the phone. More information on how to configure an extension can be found in the Extension Configuration section. 4. The phone will be sent a link to a configuration file which will be used to configure the specific phone with the settings configured in 3CX Phone System. The phone will restart with the correct extension credentials. Some phones will ask for a confirmation by the user before restarting. 5. You can specify any BLF options that must be configured in the Provisioning tab of the extension. Any changes will be automatically sent to the phone when the phone checks for changes to its configuration file. Alternatively, you can force the phone to reprovision itself from the Phones node. Configuring 3CXPhone for Android, iPhone and Windows 3CXPhone for Android, iPhone and Windows can be provisioned in a similar way. 1. In the case of iPhone or Android, install 3CXPhone from the App Store or Google Play respectively. If using Windows, download and install 3CXPhone for Windows from http://www.3cx.com/VOIP/voip-phone.html Page 24 3CX Phone System for Windows System for Windows www.3cx.com Screenshot 4 - Provisioning 3CXPhone 2. Ensure you are on the local LAN when you install 3CXPhone. 3CXPhone will ask you whether you wish to provision the phone. Confirm. 3. 3CXPhone will show up in the phones node as a new phone, using the IP and the MAC of the Smartphone or Computer on which it is installed. 4. Right-click on the entry and assign an existing extension or create a new one. More information on how to configure an extension can be found in the Extension Configuration section. 5. The phone will be sent a link to a configuration file which will be used to configure the soft phone with the settings configured in 3CX Phone System. The phone will then register with 3CX Phone System using the correct extension credentials. 6. In the case of 3CXPhone for Windows, you can configure BLF fields in the Provisioning tab of the extension. Page 25 3CX Phone System for Windows System for Windows www.3cx.com Configuring Cisco, Polycom and older models of Grandstream phones This section explains how to provision phones using HTTP Provisioning. All IP phones, including snom, Tiptel, Yealink and newer Grandstream phones can be provisioned using this method, although the auto-provisioning method is preferred for these phones, since it is easier. The older Grandstream models (GXP 2000, 2020) must be provisioned using the MAC address. Provisioning a phone using HTTP provisioning can be done in 2 Steps: 1. Configure the extensions to be provisioned 2. Configure the phone to retrieve the configuration file Step 1 – Configuring the extensions for provisioning Screenshot 5 – Provisioning a Phone 1. After creating the extension in the 3CX Management Console (as explained in the Extension Configuration section), go to the ‘Phone Provisioning’ tab of the extension 2. Enter the MAC address of the phone (which can be found at the bottom of the phone) in the MAC address field. 3. Select the appropriate phone model 4. Confirm the IP address which the phone should connect to (in case your phone system server has multiple network interfaces) 5. The codecs and codec priority will be automatically configured depending on the phone model selected. 6. Configure the BLF buttons of the phone as needed. 7. Click OK to save. The provisioning files will now be created in the provisioning directory. Each time you make a change to the extension, these files will be re-created. Page 26 3CX Phone System for Windows System for Windows www.3cx.com Step 2 – Configure the phone to retrieve the configuration file Now you need to instruct the phone to download its configuration from the provisioning directory on the 3CX Phone System server. This can be done in two ways: One time configuration via the phone’s web interface By configuring the provisioning URL in the phone via its web configuration – this is a one-time operation and makes sense in smaller networks. The exact procedure and the format of the URL to use are dependent on the model of phone. You can find configuration guides for each phone at http://www.3cx.com/support/ Using option 66 in your DHCP server By using option ‘66’ in your DHCP server, the phone will obtain the URL when it receives its IP from the DHCP server. This is recommended for larger networks. Essentially the phone will be told where to get its configuration file at the same time it receives its IP and networking info. This makes it easy to change the provisioning URL later, for example in case you wish to move your phone system to another server. To use this option, you must configure your DHCP server to provide this information. On this link you will find a guide how to configure DHCP option ‘66’ for Microsoft DHCP servers: http://www.3cx.com/sip-phones/DHCP-option-66.html. Keep in mind that the provisioning URL is different for different types of phones. If you do not use Microsoft DHCP server, you will need to refer to the documentation of your DHCP server for more information on how to configure this. Extension Configuration There are multiple ways to create an extension, which include: • When provisioning a new phone, you can choose to create a new extension • Extensions can be manually created from the Extensions node • Extensions can be imported from Active Directory (or any other LDAP server) • Extensions can be imported from a CSV file. This section explains how to configure one extension. Importing of extensions is explained in the Importing extensions section. To add an extension, click on the Extensions node in the 3CX Management Console and click Add Extension. Page 27 3CX Phone System for Windows System for Windows www.3cx.com Screenshot 6 – Extension configuration In the user information section you can enter the first and last name and optionally the email address of the user. A welcome email with information on the extension created, as well as voice mail notifications (configurable) will be sent to the email address configured. In the Authentication section, the authentication ID and password are auto generated, however they can be altered as needed. If the phone is provisioned, the authentication details will be sent to the phone automatically. If the phone is manually configured, the authentication details need to be entered manually in the phone’s configuration. The Voice Mail Configuration section allows you to configure the extension’s voice mail preferences, including the voicemail PIN number for authentication, and if you want 3CX Phone System to read out the Caller ID and the Date / time of when the message was received. You can also choose to send an email to the email address configured for the extension when voice mail is received. Importing extensions If you need to create a large number of extensions it is handier to bulk import the extensions. To do this, you can create a spreadsheet with columns for each field that you wish to import and save this as CSV. You can find a detailed description of fields as well as a link to a sample import file at: http://www.3cx.com/blog/docs/bulk-extension-import/ Alternatively you can import directly from Active Directory or other LDAP servers via LDAP. Every time a change is made to the user configuration in Active Directory, users can be re-synchronised, in which case only the updates will be imported. A description of how to do this can be found at http://www.3cx.com/blog/docs/import-active-directory/ Page 28 3CX Phone System for Windows System for Windows www.3cx.com 3. Adding PSTN line(s) via a VoIP Gateway Introduction External calls can be made on PSTN/phone lines or via VoIP providers. A traditional PBX requires you to connect the PSTN lines to the PBX hardware box; however in the case of 3CX Phone System you have more options: • Connect PSTN lines (physical phone lines) to a VoIP Gateway situated on your internal network. • Connect PSTN lines to a VoIP add in card, installed in the 3CX Phone System machine or on another machine. • Use a ‘hosted’ phone line from a VoIP Service Provider. In this case the VoIP service provider gives you the ability to make calls via your internet connection. This is explained in the next section. To make & receive external phone calls via your regular phone lines, you will have to buy and configure a VoIP gateway or VoIP add in card. This chapter explains what they are and how to configure them. What is a VoIP Gateway or VoIP add in card? A VoIP gateway is a device which converts telephony traffic into data, so that it can be transmitted over a computer network. In this manner PSTN/telephone lines are “converted” to SIP extensions, allowing you to receive & place calls via the regular telephony network. VoIP Gateways exist for analog lines as well as BRI, PRI/E1 lines and T1 lines. VoIP cards do the same thing, but are add in cards that are installed into an existing computer. What is a port? A port is a physical line outlet on a gateway or VoIP card. In the case of an analog line, one port is used for each voice channel. In the case of BRI ISDN, one port allows for 2 voice channels, and in the case of E1 or T1 ports, each port represents 30 and 23 channels respectively. Just as it is necessary to configure a phone to register with the phone system, it is also necessary to configure the VoIP gateway or card to register its ports with 3CX Phone System. Each port gets a SIP user ID, Password and virtual extension number. To the IP PBX, the PSTN line appears just like any other SIP extension which can be used for external calls. Recommended VoIP Gateways It is important to use a VoIP gateway recommended by 3CX. Supported gateways have been tested by 3CX and are automatically configured with the right settings. If using the default configuration, 3CX will also provide first line support on its use with 3CX phone System. For the latest list of supported gateway hardware, please visit http://www.3cx.com/support/ Page 29 3CX Phone System for Windows System for Windows www.3cx.com Configuring VOIP Gateways In order to make use of a VOIP Gateway, you need to: 1. In 3CX Phone System, configure the settings that will be used by the Gateway to connect to the PBX. 2. Configure the VoIP Gateway using the settings made available by the PBX Let’s see how this is done in more detail Step 1: Configure the VOIP gateway in 3CX Phone System The first step is to create the VoIP gateway in the 3CX management console. Screenshot 7 – Choosing gateway template 1. In the 3CX Phone Management console menu click on Add > PSTN Gateway. 2. In the name field, enter a friendly name for the VoIP gateway. Now choose the gateway brand and model that you are using from the list. Now click “Next”. 3. Depending on the gateway you selected, you might be asked additional options, such as what country the device will be connected in. Some questions are line specific and thus you may need to check with your line provider. Screenshot 8 - Specifying VoIP Gateway details 4. Now enter the host name or IP of the VoIP Gateway in the ‘Gateway Hostname or IP’ field, and specify the SIP Port on which the gateway is operating. By default this is 5060. 5. If you selected a Generic device, you need to specify the number and type of ports the gateway supports, i.e. analog, BRI, PRI or T1. This will set up one account for each port and enable the corresponding number of calls/lines for that account. An analog line supports 1 call; a BRI port supports 2 calls, an E1 (PRI) 30, and a T1 (PRI) 23. For example, if you specify 1 x T1 port, it will create one SIP account which can handle up to 23 calls. If you wish to have Page 30 3CX Phone System for Windows System for Windows www.3cx.com each line individually addressed, simply select 23 * Analog lines. Click Next to go to the next screen. Screenshot 9 - Adding PSTN Lines 6. The individual ports will be ‘created’ and displayed in a columnar format. Virtual extension number – In effect the VoIP Gateway “converts” each line/port to an extension, so that the phone system can receive and forward calls to it. The virtual extension number is a number assigned to it by 3CX Phone System so that it can address it as an extension. There is no need to change this field. Authentication ID & Password: These values are used to authenticate the ports with 3CX phone system. Channels: The Channels field show how many simultaneous calls the port supports. An analog line supports 1 call; a BRI port supports 2 calls, an E1 (PRI) 30, and a T1 (PRI) 23. If you prefer to address each line individually, you can create additional SIP accounts and change the number of channels supported by each account to 1. Note that your VoIP Gateway must support this – especially higher density VoIP Gateways are easier to configure if you use one account for all lines connected to a port. Port Identification – This field shows the identification number given to the port. Inbound Route: If the port will receive inbound calls, you can specify to which extension, ring group or digital receptionist a call must be routed. 7. On the next page, you can create an outbound rule for the VoIP Gateway that is being configured. For example, you can have calls where the called number starts with a prefix routed to this Gateway. 8. Click Finish to create the VoIP Gateway. Step 2: Configure the VoIP gateway device After you have configured the PSTN ports, a summary page is shown. The configuration of the VoIP gateway will vary depending on the brand of the device. Beronet gateways If you have a Beronet gateway, you would need to download the configuration file from the summary page and uploaded it to the Beronet Gateway in order to automatically provision the gateway. More information can be found at http://www.3cx.com/voip-gateways/beroNet-berofix-400.html Page 31 3CX Phone System for Windows System for Windows www.3cx.com Patton gateways If you are using a Patton gateway, you will need to: 1. Use the Patton SmartNode Discovery Tool to find gateway on the network. 2. Configure the Gateway in 3CX as described in the previous step. 3. Download the Patton configuration file from the summary page (or from the VoIP/PSTN Gateway node > Generate Config File button). 4. Upload the configuration file to the Patton gateway automatically provision it. More information can be found at http://www.3cx.com/blog/voip-howto/patton-smartnode-configuration/ Grandstream gateways If you are using a Grandstream gateway, you will need to configure the device using the information provided in the summary page. More information can be found at http://www.3cx.com/voip-gateways/Grandstream-GXW-41044108.html Page 32 3CX Phone System for Windows System for Windows www.3cx.com 4. Adding a VoIP provider / SIP trunk Introduction VoIP providers “host” phone lines – they can assign local numbers in one or more cities or countries and route these to your phone system. In addition, VoIP providers are often able to give better call rates because they have an international network or have negotiated better rates. Therefore, using VoIP providers can reduce call costs. However be aware that each VoIP call requires bandwidth. VoIP is real time, so it does place a demand on your internet connection. As a rule of thumb, each call will consume approximately 30k-120k per second, depending on which codec you use. For more information about bandwidth consumption of particular codecs, see this article: http://www.3cx.com/blog/docs/bandwidth-dsl-atm-isp/ 3CX Phone System supports 2 types of VoIP Providers: • Registration based – These VoIP providers require the PBX to register with the provider using an authentication ID and password. Most of the VoIP providers pre-defined in 3CX Phone System are registration based. • IP based / SIP Trunk – IP Based VoIP Providers (also known as SIP Trunks) do not generally require the PBX to register with the provider. The IP address of the PBX needs to be configured with the provider, so that it knows where calls to your number should be routed. This chapter describes the supported VoIP providers and how to configure 3CX Phone System to work with VoIP Providers. Requirements for using a VoIP provider / SIP Trunk If you plan to use a VoIP provider, you need to have a firewall/router/NAT device that supports STATIC PORT MAPPINGS. Often routers will perform port address translation, which will cause problems such as one way audio, failing inbound calls and so on. It is also highly recommended that you have a static external IP. If your external IP changes intermittently, inbound calls will fail. For more information on how to configure your firewall, review this article: http://www.3cx.com/blog/voip-howto/linksys-router-configuration/ Configuring a VoIP Provider / SIP Trunk A VoIP provider / SIP Trunk can be configured in 2 steps: 1. Create an account with the VoIP Provider 2. Add the VoIP Provider account in 3CX Phone System Let’s see how to do this in more detail Step 1: Create an account with the VoIP Provider To use a VoIP Provider, you need to have an account with a quality VoIP service provider. 3CX Phone System supports most popular SIP based VoIP service providers and we recommend using Page 33 3CX Phone System for Windows System for Windows www.3cx.com one that has been tested by 3CX. 3CX includes pre-configured templates for these VoIP providers. Simply click on the ‘Add VoIP Provider Wizard’ button to see a list of supported providers. If there is no VoIP provider in your country you can use Skype for SIP which has a global presence. Step 2: Add the VoIP provider account in 3CX Phone System After you have created the VoIP provider account, you will need to configure the account in 3CX Phone System. To do this: 1. In the 3CX Phone Management console menu, click on the Add VoIP provider Wizard button. 2. Enter a friendly name for this VoIP provider account 3. Select the Country that the VoIP provider operates in. 4. Select your VoIP Provider from the Provider drop down list 5. If the provider is not listed, select ‘Generic VoIP provider’, or ‘Generic SIP Trunk’. If using a generic provider we will not able to guarantee that it will work with this VoIP provider. Click Next. Screenshot 10 - Add VoIP Provider account 6. The SIP server hostname or IP may be pre-filled. Compare these with the details that you have received from your VoIP provider and check that these are indeed correct. Depending on the VoIP provider that you are using, some fields will be disabled. This means you do not need to change them. Click Next to continue. 7. Now enter the VoIP provider account details. In the External number field, enter the VoIP line number that has been assigned to you. Then enter the Authentication ID/user name and password of your VoIP provider account. Specify the number of simultaneous calls your provider allows. Click Next to continue. If you are using a SIP trunk, the password will be greyed out, since authentication is done via IP. 8. Now specify how calls from this VoIP provider should be routed. You can specify a different route outside office hours. The routing configured here will take affect when no inbound routing rules are matched. 9. On the next page, you can optionally configure an outbound call rule, which will be used to route outbound calls through the new provider. This is normally done by routing calls starting with a specific prefix. Enter the dialling prefix in the “Calls to numbers starting with (prefix)” text box. To make calls via this provider, precede the number to be dialled with this prefix. Page 34 3CX Phone System for Windows System for Windows www.3cx.com Note: Frequently the internet facing firewall sitting between 3CX Phone System and the VoIP provider is not correctly configured or is not able to correctly route VoIP traffic. To check the firewall configuration, it is important to perform a firewall check using the inbuilt firewall checker. You can start it by going to the Settings > Firewall Checker node. It will use the STUN server configured in Settings > Network > STUN Server to ensure that your firewall allows and correctly routes connections on Port 5060 (for SIP) and Ports 9000 – 9049 (for RTP Audio) to the PBX. If the firewall check fails, you will not be able to reliably make and receive VoIP provider calls and you will have to edit your firewall configuration. Note: We do not provide firewall configuration support. Specifying a STUN server Although 3CX includes a default STUN server setting, it is recommended that you specify the STUN server suggested by your VoIP provider as your Primary STUN server. The STUN server suggested by your VoIP provider is probably closer to you and therefore quicker to reach (requires fewer hops). The faster the STUN server responds to requests, the quicker the call is setup. To specify a STUN Server: 1. In the Management Console, go to Settings > Network node. Now click on the ‘STUN server’ tab. Screenshot 11 - Specifying STUN server 2. In the edit box ‘Primary STUN server’ specify the STUN server suggested by your provider, for example stun.sipgate.net. Define the Port if needed. 3. You can specify an alternate backup server, or leave the stun2.3cx.com as the backup STUN server. This address will be used if the primary STUN server cannot be reached. Click OK to exit and save the settings. Note: Ideally, you should make use of a Static Public IP address, in which case you do not need to make use of STUN requests, resulting in even faster call setup. DID’s and Inbound Call Identification If your VoIP provider has provided you with DID numbers, you will need to configure 3CX Phone System to identify the source of the call from the DID numbers. This section explains how to configure your DID numbers in 3CX Phone System, and at the same time configure inbound source identification by DID. Page 35 3CX Phone System for Windows System for Windows www.3cx.com 1. From the 3CX Management Console, expand your VoIP Providers, and click on the VoIP provider you want to configure. 2. Change to the DID tab. Screenshot 12 - Adding DIDs which will route to an extension 3. Add the DID numbers, associated with your account, which need to be routed to specific extensions. An Inbound Rule, which can be configured at a later stage, will be created for each extension specified in this list. Remember that any calls coming for a DID number which is not found in this list will be routed according to the routing settings configured for the VoIP port. 4. After adding the DID numbers, switch to the Source ID tab. Screenshot 13 - Adding DIDs for Source Identification 5. Enable Source identification by DID 6. The default value for SIP Field containing DID numbers should be valid for most VoIP providers. 7. In the Source Identification by DID list, you need to insert all the DID numbers assigned to you by the VoIP provider which you want to receive calls on. You can start off by clicking on the Add DID button and adding the DID numbers configured previously. If there are additional numbers that you would like to add, click on the Add Mask button to add these. You can use the * wildcard when entering a DID Mask. For example, if you have a range of 1000 DID numbers, e.g. 2456000 to 2456999, you can enter 2456*. 8. Click Apply and Ok once finished. Note: An inbound call can also be identified as originating from a VoIP Provider / SIP Trunk using other information which is found in other SIP fields. Identification of a call using information other Page 36 3CX Phone System for Windows System for Windows www.3cx.com than DID, although not normally required, can be configured from the properties of the VoIP Provider > Source ID > Call Source Identification section. Page 37 3CX Phone System for Windows System for Windows www.3cx.com 5. Creating Outbound Call Rules Introduction An outbound rule defines on which VoIP gateway/provider an outbound call should be placed, based on who is making the call, the number that is being dialled or the length of the number. When configuring a VoIP Gateway or a VoIP Provider, you will be asked to create an outbound rule that will be used to route calls to the Gateway or Provider. You can also edit these rules or create new ones from the outbound rules node. Creating an outbound call rule Screenshot 14 - Creating a new outbound rule To create an outbound rule: 1. On the 3CX Management Console menu, click Add > Outbound Rule, and enter a name for the new rule. 2. Now specify the criteria that should be matched for this outbound rule to be triggered. In the ‘Apply this rule to these calls’ section, specify any of these options: • Calls to Numbers starting with (Prefix) – apply this rule to all calls starting with the number you specify. For example, specify 9 to specify that all calls starting with a 9 are outbound calls and should trigger this rule. Callers would dial ‘9123456’ to reach the number ‘123456’ • Calls from extension(s) – Select this option to define particular extensions or extension ranges for which this rule applies. Specify one or more extensions separated by commas, or specify a range using a -, for example 100-120 Page 39 3CX Phone System for Windows System for Windows www.3cx.com • Calls with a Number length of – Select this option to apply the rule to numbers with a particular digit length, for example 8 digits. This way you can capture calls to local area numbers or national numbers without requiring a prefix. • Calls from Extension Group – rather than specifying individual extensions, you can select a an extension group 3. Now specify how outbound calls matching the criteria should be handled. In the ‘Make outbound calls on’ section, select up to 3 routes for the call. Each defined gateway or provider will be listed as a possible route. If the first route is not available or busy, 3CX Phone System will automatically try the second route. 4. You can transform the number that matches the outbound rule before the call is routed to the selected gateway or provider using the ‘Strip digits’ and ‘Prepend’ fields: • Strip digits – allows you to remove 1 or more digits from the called number. Use this to remove the prefix before it is dialled on the gateway or provider if it is not required. In the example above, you would specify to remove 1 digit, in order to remove the prefix ‘9’ before it is dialled. • Prepend – allows you to add one or more digits at the end of the number if this is required by the provider or gateway. You can configure these options per outbound rule, since a rule that applies to a VoIP gateway connected to the local PSTN would normally require different criteria than a rule that applies to a VoIP provider. A complete example showing how to create an outbound rule in 3CX Phone System can be found at http://www.3cx.com/blog/voip-howto/outbound-rules-a-complete-example/. . Page 40 3CX Phone System for Windows System for Windows www.3cx.com 6. 3CX MyPhone Introduction 3CX MyPhone is a web based utility which allows users to easily manage their extension with a few mouse clicks – rather than via a cryptic and limited phone interface. Screenshot 15 - 3CX MyPhone 3CX MyPhone is not a phone – it works in tandem with an existing IP hardware phone, soft phone or even a smartphone. Calls are made and answered on your existing phone. 3CX MyPhone provides the following functions: 1. Call Pop-up - Upon receiving a call, 3CX MyPhone will allow you to reject the call or transfer the call to another person or to voice mail - with a single mouse click or using drag and drop. 2. Easy Call Transfer / Park - When on a call, you can transfer or park a call with a mouse click or via drag and drop, no need to learn dial codes or call transfer procedures on a phone. 3. Presence - The status of the other extensions is shown, allowing you to avoid unnecessary calls or call transfers to colleagues. 4. Click to Call - Launch calls with a mouse click – double click on an extension to call the person, or enter a name or number in the make call dialog. The call will automatically be launched without requiring you to dial the number. Calls can also be launched directly from your contact management software with the CRM integration module. Page 41 3CX Phone System for Windows System for Windows www.3cx.com 5. Hotkey dialing – Select a number in a web page or document to launch a call 6. Queue monitoring - View the status of queues that you are a member of. You will see callers waiting in the queue and be able to take a call from the queue. 7. Text chat – Message other users using the in-built chat option 8. Record calls - you can trigger the recording of a call by hitting the record button 9. Phonebook – 3CX MyPhone provides easy access to the company and to the personal phonebook, and allows users to trigger calls simply by typing a name – this will then automatically resolve the number and launch the call. 3CX MyPhone will show different information based on whether you are a standard user, a departmental manager or a company manager. In department manager mode you will see calls from anyone in your department. In management mode you will see information of the entire company. These rights are set by the Phone System administrator in the 3CX Management console. More information about 3CX MyPhone can be found here http://www.3cx.com/MyPhone/ Deploying 3CX MyPhone Since 3CX MyPhone is a web based Silverlight application, there is no need to run an installer. Users will receive the link to 3CX MyPhone in their Welcome email which is sent to them when their extension is created. Users can ‘install’ 3CX MyPhone on their computers by right clicking on the 3CX MyPhone web page and selecting ‘Install 3CX MyPhone on this computer’. This will download a copy of the Silverlight application and install a desktop shortcut. 3CX MyPhone application will still connect to 3CX Phone System, however the application provides a faster user experience. Updating 3CX MyPhone Updates to 3CX MyPhone are deployed automatically. If a user has an outdated 3CX MyPhone on his desktop, upon starting 3CX MyPhone, he is shown message informing him that a new version of 3CX MyPhone is being installed. He will be required to restart 3CX MyPhone for the upgrade to complete. Screenshot 16 - 3CX MyPhone has been updated Using 3CX MyPhone A web based user manual exists for 3CX MyPhone. This manual can be found here: Page 42 3CX Phone System for Windows System for Windows www.3cx.com http://www.3cx.com/blog/extension-user-manual/Managing 3CX MyPhone The administrator can review all the users that are using 3CX MyPhone from the 3CX Management Console > 3CX MyPhone Clients tab. This shows all the users who are currently logged in using 3CX MyPhone. It will also show the IP address of user as well as if 3CX MyPhone and the Desktop Components are installed locally. In addition, the administrator can control what configuration options are available in 3CX MyPhone for an extension from the properties of the extension > Other > 3CX MyPhone Options. From here, the administrator can select to Turn off 3CX MyPhone, not show the extension to other users, Hide the Forwarding Rules, Extension Details or Caller ID information in 3CX MyPhone or enable viewing of Recordings in 3CX MyPhone. Grouping & Assigning Rights 3CX MyPhone can limit what call information is shown to the user based on extension groups. These extension groups are used to determine what information is shown to whom. In addition they help group the extension for both users and the administrator. To create an extension group: Screenshot 17 - Adding an Extension Group 1. In the management console, click on the Extensions node and click on the ‘Add Extension Group’ icon. 2. Now proceed to add Extensions by selecting extensions and clicking on the ‘Add button. Note that Extensions can only be part of one group. Page 43 3CX Phone System for Windows System for Windows www.3cx.com Screenshot 18 - Setting Extension Group Rights 3. Now click on the ‘Rights’ tab. These settings pertain to what group members and users within this group can see and do in the 3CX MyPhone. 4. You can configure one or more ‘Administrators’ for this group. Typically this would be a department supervisor. Group administrators will be able to see the call details of everyone within that group. Page 44 3CX Phone System for Windows System for Windows www.3cx.com 5. Optionally you can enable the Administrator extensions to perform operations on calls of the group members. Check the option “Perform operations on calls to users of this group” to enable this. 6. Similarly, you can also configure what rights regular group members have. 7. Click OK to save group and rights information. Users will need to logout and login to 3CX MyPhone to see their new rights reflected. The Management Extension group The Management Group is a group that is always present in 3CX Phone System. Extensions assigned to this group can: 1. See the call details of ALL extensions and queues 2. Perform operations on ANY call in the system (Pickup, transfer, Divert, Reject, Barge-in, Park). To add an extension to the management group: 1. Click on the MANAGEMENT sub-node under the extensions node. 2. Select an extension and click Add. Press Apply/OK to save the changes. 3. Now logout and login with 3CX MyPhone to see the additional information. Page 45 3CX Phone System for Windows System for Windows www.3cx.com 7. The Digital Receptionist / Auto attendant Introduction The digital receptionist feature allows you to answer phone calls automatically using 3CX Phone System and present the caller with a list of options. The caller can then choose the appropriate option using the numbers on his phone key pad. Using this feature you can implement a menu, for example: “For sales press 1, for support press 2, or wait on the line to be transferred to the operator”. A digital receptionist is also known as an auto attendant. You can configure different menu options and text for the menus based on which line the calls comes in, as well as based on whether the call is received within or outside office hours. This way you could have a different answer outside office hours and de-activate menu options accordingly. Recording a menu prompt Before you create your digital receptionist, you must first write down the menu options you wish to offer the caller and then record the announcement. A simple example would be “Welcome to Company XYZ, for sales press 1, for support press 2 or stay on the line for an operator” Note: It is generally recommended to put the number the user should press after the option, i.e. “for sales, press 1”, rather than “press 1 for sales”. This is because the user will wait for the desired option and only then “register” what number to press Once you have devised the text you can create the prompt. To record the prompt: 1. You can use the Record button to record the prompt via the phone. You will be prompted for your extension number and the system will call you and prompt you to record the prompt rd 2. Alternatively, you can use Windows Sound Recorder or a 3 party voice talent service to record the prompt. You must save the file in WAV format in PCM, 8 kHz, 16 bit, Mono format. (In Windows Sound Recorder you must use the ‘Save As’ option to save this format) Do not use MP3 format. Creating a digital receptionist You can create multiple digital receptionists and link them to a particular line. To create a digital receptionist: 1. In the 3CX Phone System Management Console menu, select on Add > Digital Receptionist. Page 47 3CX Phone System for Windows System for Windows www.3cx.com Screenshot 19 - Configuring a digital receptionist 2. Specify a name and virtual extension number for the digital receptionist. 3. Now click on the record button and enter your extension number. You will be called so that you can record the prompt. Alternatively click on the browse button and specify a file that you previously recorded. The file will be copied into the <%allusersprofile%\3CX\Data\Ivr\Prompts> or <C:\ProgramData\3CX\Data\Ivr\Prompts> directory depending on your OS. 4. Specify the menu options. Select the appropriate key, and then select from the available actions. Then specify the extension number or virtual extension number (virtual extension number in the case of Ring Group, Call Queue or to another Digital receptionist) 5. The last option, Timeout, allows you to specify how long the system should wait for an input. If it receives no input, it will automatically perform this action. This is handy for callers who did not understand the menu or who do not have a DTMF capable phone. When ready, click OK to save the digital receptionist. Allowing callers to dial a known extension directly Whilst a digital receptionist prompt is playing, a caller can enter the extension number directly to be connected to an extension immediately. This allows callers who know their party’s extension to avoid bothering the receptionist. This option is enabled by default. If you wish to make use of this feature simply instruct your callers by explaining this in the voice prompt. For example: Page 48 3CX Phone System for Windows System for Windows www.3cx.com “Welcome to Company XYZ, for sales press 1, for support press 2. If you know your parties extension number, you may enter it now” Call By Name Using a Digital Receptionist, you can also direct callers to the call by name function. This allows them to find the person they wish to speak to by entering the first letters of the person’s last name on the phone dial pad. The call by name function requires: 1. A self-identification message for the user. Users without a self-identification message are not accessible via the call-by-name feature. 2. User can not have a last name with Unicode characters 3. The Call-by-name menu feature must be made available from a Digital Receptionist as one of the menu options. Self-identification Message To record your self-identification message: 1. Go to your voice-mail menu (Default 999). 2. Enter your Voice Mail PIN number 3. Go to the options menu (‘9’ key). 4. Press ‘5’ key to record the self ID message. 5. Record your name only, i.e. ‘Sarah Jones’ How it works The Call-by-name feature uses the last name of the user and compares it with the input (that has been entered on the phone keypad). The following rules are used: • The last name is converted to upper case. • All symbols except [2-9] and [A-Z] are ignored. • The following translations for symbols are used: o 'ABC2' => '2' o 'DEF3’ => '3' o 'GHI4' => '4' o 'JKL5' => '5' o 'MNO6' => '6' o 'PQRS7' => '7' o 'TUV8' => '8' o 'WXYZ9' => '9' The caller has to type a minimum of three digits (‘0’ – ‘9’) to call to a user. Digits ‘0’ and ‘1’ are ignored, but can be used to call to users with short last names (for example, to access someone with the last name ‘Li’, you can type ‘540’). Page 49 3CX Phone System for Windows System for Windows www.3cx.com After the user has entered three digits, IVR queries the phone system database for matching users. If there are no matching users, it plays “extension not found”. If there is only one matching user, the IVR plays “Please hold while I transfer your call” and redirects the call to the user. If there is more than one matching user, the IVR will wait for additional digits from the user for 2 seconds. If IVR waits for additional digits (more than one matching user) and user presses any digit, the IVR will add this digit to the current input and check currently matching users. If there are no matching users, it will play “extension not found”. If the user does not input any more digits (2 seconds elapsed or ‘#’ has been pressed) and more than one user is matched, then the IVR will play: “To call to Van Damme press 0. To call to Van Halen press 1. To exit press pound”. In this example ‘Van Damme’ and ‘Van Hallen’ are the selfidentification prompts of the matching users. Page 50 3CX Phone System for Windows System for Windows www.3cx.com Additional features of 3CX Phone System Now that we have gone over the features which you need to configure to get the basic functionality working, let us take a look at the additional features in 3CX Phone System. Keep in mind that you will only need to configure the features that you intend using. This part of the manual covers the following: • Adding DID numbers / Inbound call rules so that inbound calls can be routed to internal users. • Configuring Ring Groups, paging and intercom features • Configuring Call Queues and the Call Center Module • Configuring and creating conference calls • Review the reports that are available to the administrator • Connecting using 3CX Phone Systems in remote locations using bridges • Using the Tunnel for Remote Extensions • Backing up and restoring the 3CX Phone System configuration. • Using the 3CX Fax Server • Using the phonebook in 3CX Phone System • Review the various monitoring options provided by 3CX Phone System • Troubleshooting the PBX and support options. Page 51 3CX Phone System for Windows System for Windows www.3cx.com 8. Adding DID numbers / Inbound Rules Introduction Many companies provide users and/or departments with “Direct or DID numbers”, which allow their contacts to call them directly, bypassing the receptionist. DID numbers are referred to as DDI numbers in the United Kingdom and as MSN numbers in Germany. Even if you make use of a digital receptionist, a direct line / number is often preferable because it’s more convenient for the caller. Direct numbers can be easily implemented using DID numbers. DID numbers are provided by your VoIP provider or Phone Company and are virtual numbers assigned to your physical lines. Usually you are assigned a range of numbers, which is linked to an existing BRI/T1/E1. There will be an extra charge per number or per range, but this will be a fraction of the cost of adding physical lines. Enquire with your Phone Company or VoIP provider for more information on DID numbers. Screenshot 20 - Configuring DID numbers DID numbers and 3CX Phone System – How it works DID numbers “play well” with 3CX Phone System, or indeed with any SIP based IP PBX. Acting according to the SIP standard, 3CX Phone System expects the DID number, i.e. the intended destination, to be in the To: field of the SIP invite request. Most VoIP providers and VoIP Gateways will do this by default. Then all you need to do in the 3CX Management Console is to configure calls made to that particular DID number to go to a particular extension, digital receptionist or other destination. Page 52 3CX Phone System for Windows System for Windows www.3cx.com Adding DID’s Screenshot 21 - Selecting where to route calls to this DID To add a DID; 1. Click on the ‘Create DID’ button in the 3CX Management Console in the toolbar. 2. Enter a name for the DID (for example sales). Note: The DID name can be pre-pended or appended to the Caller ID so as to identify on which number a caller has called. You can enable this from the Settings > General > Global options page under ‘Append/Prepend name to caller ID’ 3. Now enter the DID number as it will appear in the SIP “to” header. 3CX Phone System will match the number inserted in this field with the “to” header, starting from the last part of the received string, thus avoiding any differences in the format of the number. For example, if you are based in the UK and your DID number is 0845-2304024, then you can enter the number 2304024. This will match any DID number inserted in the “To” field ending with these numbers, including +448452304024, 08452304024, 00448452304024, and, of course, 2304024. Of course it is best to check with your VoIP provider or Phone Company in what format the DID number will be inserted just for reference. 4. Now select for which ports you wish to add this DID. If the DID number is associated with multiple ISDN ports, then you must select each. An inbound rule will be created for each port that you select. 5. Now specify where you wish to direct calls made to this DID: Page 53 3CX Phone System for Windows System for Windows • End Call • Connection to extension • Connect to Queue/Ring Group • Connect to Digital receptionist • Voicemail box for extension • Forward to outside number • Send fax to email of extension www.3cx.com 6. You can specify that an incoming call is routed differently if it is received outside office hours. De-select the ‘Same as during office hours’ option to specify a different route. 7. Click OK to create the DID / Inbound rule. Using DID’s with a VoIP provider account If your VoIP provider has supplied you with DID’s, AND inbound call identification is based on destination/dialled number (rather than authentication ID), you will need to configure the Source Identification rules for the VoIP Provider. Please refer to the chapter on ‘Adding lines hosted by a VoIP provider’ for more information. Troubleshooting DID lines If you have created DID lines, but calls are not being forwarded as expected, do the following: 1. Go to the Server Activity log node in the 3CX management Console. The Server Status screen lists current server activity and logs calls that are being received and for which number they were received. 2. Call the DID number that you configured, and monitor the Server Status log. You will see a line similar to: Incoming call from 1000 to <sip:789456123@3CXPhone System> where “1000” is the internal number of the line configured to receive calls from the VoIP Gateway or VoIP Provider and <sip:789456123@3CXPhone System> is the content of the “To” header of the INVITE, i.e. the intended recipient. 3. Now analyse the “To” header carefully and ensure that the DID number you have dialled is present in the “To” header: <sip:789456123@3CXPhone System>. 4. If the DID number is not present in the “To” header, you will have to check the documentation of your VoIP Gateway to find how you can configure it to insert the DID number into the “To” field. In the case of a VoIP Provider, contact your VoIP provider for more information. 5. If the DID number is present in the “To” header, check whether the string listed in the “To” field matches the string you configured in the rule. Adjust accordingly and try again. Page 54 3CX Phone System for Windows System for Windows www.3cx.com 9. Ring groups/ Paging / Intercom Ring Groups A ring group allows you to direct calls to a group of extensions. For example, you could define a group of 3 sales people, and have the general sales number ring on all 3 extensions at the same time or after each other. When you create a ring group, you assign it a virtual extension number. This will be the number used by the phone system to “address” the ring group. Screenshot 22 - Adding a Ring Group To add a ring group: 1. In the 3CX Phone Management console menu, select Add > Ring group. 2. Now enter the ring group options: • Virtual extension number – This number identifies the ring group from other extensions. Keep the extension number automatically generated, or specify a new one as needed. Do not specify an existing extension number. • Name – Enter a friendly name for the ring group • Ring strategy – Select the appropriate ring strategy for this ring group: Page 55 3CX Phone System for Windows System for Windows www.3cx.com o Prioritised Hunt – this will start ringing on the first extension, then the second etc. o Ring all – all phones will ring at the same time o Paging – this will page all extensions part of the group (see next section) • Ring time – Specify how long the phones should ring for. 3. In the section ‘Ring group members’ specify the extensions that should be part of this ring group. Simply click on the extensions and click on the Add > button to add them to the ring group. Move the extensions up or down to configure the priority of an extension. 4. In the section ‘Destination if no answer’, you can define what should happen if the call does not get answered by the ring group. Paging / Intercom (Paid editions only) Paging allows someone to ring a group of extensions and make an announcement via the phone speaker. The called party will not need to pick up the handset. The connection will be one way audio. The intercom feature allows a phone system user to make an announcement to a single extension. In this scenario the audio is two way, and the called party can respond immediately without picking up the handset. Both paging and intercom features require a phone that supports intercom and that is configured to allow it. See the phone configuration guides for more information. To add a paging group: 1. Click on the Add > Ring Group menu option to bring up the ‘Add Ring Group’ page. 2. Now enter the ring group options: Virtual extension number – Specify an extension number which will be used for this paging group. Name – Enter a friendly name for the ring group Ring strategy – Select the Paging ring strategy 3. If you have phones that support multi cast, and you have a very large installation with specialized requirements, you can enable the Multi cast option. For most installations this option is not required. 4. In the section ‘Ring group members’ specify the extensions that should be part of this paging ring group. Simply click on the extensions and click on Add > to make them a member. Note: The ‘Ring time’ and ‘Destination if no answer’ options will be ignored, since they are not relevant for paging. The intercom features allows you to make an announcement to another extension without requiring the called extension to pick up the handset. To call a user via the intercom function: Prefix the extension you wish to call with *9, followed by the extension. For example to make an intercom call to extension 100 you should dial: '*9100' Page 56 3CX Phone System for Windows System for Windows www.3cx.com 10. Call Queues Introduction Note: This feature is not present in the free edition of 3CX Phone System Call Queues allow calls to be queued whilst agents (members of a call queue) answer calls. Calls do not go unanswered but are queued until an agent is available to take the call. For example, you can define a group of 3 sales people, and have the general sales number route to a sales call queue. If all 3 sales people are busy, callers will be kept in the queue until the next sales person is free. When you create a call queue, you also assign it a virtual extension number. This will be the number used by the phone system to “address” the Call Queue. Creating a Call Queue Screenshot 23 - Adding a Call Queue To add a Call Queue: 1. Click on the Add > Call Queue menu option to bring up the ‘Add Call Queue’ page. 2. Now enter the call queue options: • Virtual extension number – Optionally change the suggested virtual extension number. Note that this extension number will be automatically created. Do not specify an existing extension number. Page 57 3CX Phone System for Windows System for Windows www.3cx.com • Name – Enter a friendly name for the ring group • Polling strategy – This option allows you to choose how calls should be distributed to the agents: o Hunt random start – 3CX will randomly choose an agent to distribute the call to. This will evenly distribute the calls to each of the agents o Ring All – the phones of ALL the agents will ring o Prioritised Hunt – 3CX will distribute the call according to the order specified in the Queue members section. All calls will go to the first agent first, and only if this one is busy, it will go to the next agent. This strategy can be used to setup skills based routing, by ordering the agents according to their skills. 3. Ring timeout – Indicate the timeout in seconds, i.e. for how long the phone should keep ringing before it considers the call unanswered by that agent. 4. In the section ‘Call Queue agents’ specify the extensions that should be part of this Call queue. Simply click on the extensions and click on the -> to make them a member. Move the extensions up or down to configure the priority of an extension. In addition to being a member, an extension/user must also login to start answering calls routed to this call queue. Users can login to a call queue using the login button in the 3CX MyPhone. 5. In the section ‘Destination if no answer’, you can define what should happen if the call does not get answered by an agent. If no agent is logged into the queue, this option gets triggered immediately. In addition, this option gets triggered if the caller presses the ‘*’ button on his phone. This gives callers an option to exit out of the queue and leave a message. 6. In the section ‘Other options’, you can specify a custom introduction prompt and a custom music on hold file. You can also decide whether you wish to announce a caller’s position in the queue and what the maximum wait time should be. Call Center Module The Call Center Module is an optional component that adds Call Center features to 3CX Phone System. No further installation is required – you just purchase the module, reactivate your existing key and the call center features will become available. Additional Queue Strategies With the Call Center module, you have these additional Queue strategies: • Longest Waiting – will forward a call to the agent who has been waiting the longest for a call. • Least Talk Time – will forward the call to the agent with the least total talk time. • Fewest Answered – will forward the call to the agent that has answered the least number of calls. • Hunt by threes prioritized – will forward the call to the top 3 agents (as configured in the call queue agent section simultaneously). • Hunt by threes random start – will send call to 3 random agents simultaneously. • Round Robin – will target agents in round robin manner, i.e. first call will be sent to agent 1, the second call to agent 2 and so on. Page 58 3CX Phone System for Windows System for Windows www.3cx.com Additional Queue Options Screenshot 24 - Call Center Edition options When the Call Center Edition is activated, you have additional options that you can configure: • You can enable a Callback option – this allows callers to hang up and get called back when it’s their turn. This option requires that you specify an outbound rule on which the call back is to be triggered. The Call Back option can be requested by the caller (Option 2) or it can be offered if the timeout of the queue is reached. • You can specify the wrap up time in minutes – this gives the agent time to enter notes into the call record after taking a call. • You can specify the maximum number of callers in the queue – when this is reached, the caller will be routed according to the setting in the Destination if no answer section. • Reset Call Statistics for this Queue – Detailed statistics for the queue, such as average call time, average wait time and so on are visible through the Queues tab in 3CX MyPhone. You can reset the Agent Call Statistics for the Queue by clicking on the Reset button. • Call statistics can also be reset automatically using a pre-configured schedule. • Priority Queue – The administrator can configure this queue as a priority queue. This is useful when the same people are part of 2 queues, and calls on one of the queue should receive priority over calls in the other queue. E.g. a support team might have one line (and one queue) for normal support calls, and another line (and another queue) for VIP customers. Both queues are serviced by the same people. The queue for VIP customers will have the Priority Queue feature enabled. • Queue Notifications – Various notifications can be enabled so that the Queue Manager.is notified when certain conditions are encountered, such as the SLA time has been breached, or a call in the Queue has been lost. More information on the Call Center Module can be found at http://www.3cx.com/callcenter/index.html. Page 59 3CX Phone System for Windows System for Windows www.3cx.com 11. Call conferencing Introduction Note: This feature is not present in the free edition of 3CX Phone System Call conferencing allows you to easily configure up to eight conference calls that can allow a total of 64 callers (license permitting). In other words the 64 caller limit is for all conferences, not per conference. Note that a conference with 64 participants will require a powerful machine. Although many conference call services exist, it’s often easier and cheaper to host your own audio conferences. Conferences can be set-up ad hoc, without the need to reserve a conference room. This has been done to simplify the set-up of conference calls. Configuring conferencing 1. In the 3CX Management Console, open the Settings > Advanced node and click on the Conferencing tab. 2. Now specify the conferencing extension number. This is the number that users must call to setup a conference. 3. Specify the maximum number of conferences you wish to support. By default 4 conferences can be held at a time. 4. Now specify whether you wish to require a PIN to create a conference. If you enable this, users that create a conference must enter this conference PIN after the conference ID when creating a conference. The PIN will be used automatically if a user creates the conference via 3CX MyPhone. Creating a conference call Conference calls can be created using one of the following methods: • From 3CX MyPhone, the user can create an ad hoc conference call from the Conference section. He can add users that need to be in the conference call, and click the Create button to create the conference call. 3CX Phone System will then call all the users and create the conference once all the users join in. • From the Conference section in 3CX MyPhone, the user can also schedule conference calls to occur in the future. Users will receive an email with the conference call details. External users need to be notified by the user. • Users can create conference call using their Phone. They will need to dial the Conference Extension number (700) by default, and follow the prompt. For information how to create a conference call, see this page of the online extension user manual: http://www.3cx.com/blog/myphone/conference-calls/ Page 60 3CX Phone System for Windows System for Windows www.3cx.com 12. Dial Codes Dial Codes are codes that the user can dial in order to access certain functions such as turning on DND for their extension, or picking up a call from another extension. Dial Codes are defined in the 3CX Phone System Management Console > Settings > Advanced > Dial Codes tab. The following table describes all the dial codes available in 3CX Phone System. Dial Code Description *0 Used to park a call. While on a call, click on the Transfer button and dial *0 followed by the parking slot. E.g. to park the call in parking slot 1, dial *01. *1 Used to pick up a parked call. E.g. to pick up a call parked in slot 1, dial *11 *20* Used to pick up a call which is dialling at another extension. For example to pick up a call dialling on extension 106, dial *20*106 Used to change the status of your profile. *3 should be followed by one of the following to change the profile accordingly: 0 - Available *3 1 - Away 2 – Out of Office 3 – Available 2 4 – Out of Office 2 *4 Used to connect to voicemail of an extension. E.g. to leave a message for extension 106, dial *4106 *60 Used to disable DND for the extension *61 Used to enable DND for the extension *62 Used to log the extension in to the Queues *63 Used to log the extension out of the Queues *9 Allows the user to page a desired extension. Dial *9 followed by the extension number. If the receiver’s phone supports paging, the phone will pick up automatically, and the caller can start calling to the receiver. ** This indicates that a billing code is to be used for the call. First dial the number followed by ** followed by the billing code. E.g. if the number to be dialled is 956322 and the billing code is 562, then the full number to be dialled is 956322**562 *5 Dial *5 before the number to be dialled to hide your caller ID from the call. Emergency code The Emergency code is used to toggle the status of the Phone System between In Office to Out of Office. This code is not defined by default. If you want to use this code, you will need to define your own code from the Dial Codes page. Page 61 3CX Phone System for Windows System for Windows www.3cx.com 13. Generating Call Reports Introduction Screenshot 25- Call Reports 3CX provides a number of reports via its 3CX Web Reports. This utility can be started from the 3CX Phone System program group. Reports available After you have started 3CX Web Reports, you can access the following report categories, each of which provides a set of reports: • Call Statistics Reports – these reports provide information on the calls made and received through 3CX Phone System, statistical Information on the phone extensions and Ring Groups. • Basic Queue Statistics Reports – Reports related to Queue Statistics, Abandoned calls, and agent reports. • Call Center Statistics Reports – The reports provide more detailed information on the Queue statistics, call distribution, team statistics, abandoned calls, SLA statistics, callback statistics, and other reports related to the Call Center. Page 63 3CX Phone System for Windows System for Windows www.3cx.com 14. Connecting 3CX Phone Systems (Bridges) Introduction Note: This feature is not present in the free edition of 3CX Phone System You can connect 2 separate 3CX Phone Systems or a 3CX Phone System with another phone system that supports SIP using a bridge, allowing you to make calls between branch offices using your internet connection – and thus at no charge. The “bridge” will be assigned a prefix, which users must dial to access the other 3CX Phone System or SIP phone system. This prefix must be followed by the extension number of the user they wish to reach on the other 3CX Phone System. For example, if you assign the prefix “2” to a bridge with another office, and within that office you want to dial someone who has extension number 105 on that phone system, you would dial 2105 to reach that person directly. Alternatively, you can assign the extensions in one office to start with one number (e.g. 1), and the extension in the second office to start with a different number (e.g. 2 and 3). That way, the users do not need to dial a prefix, since the PBX will route the call based on the first digit of the called number. In this case, the outbound rule (with prefix 1 and 2) should not remove any digit Creating a bridge To create a bridge: 1. Click on the Add > Bridge menu option to bring up the ‘Add Bridge’ page. 2. Enter a name for the bridge and assign a virtual extension number. A bridge must be assigned a virtual extension number so it can be addressed by the phone system. Accept the default or choose another extension that is free. The virtual extension number will also be used as the Authentication ID, so virtual extension chosen should be available on both phone systems. 3. Now select the Type of bridge: • Master (Direct - UDP) - If you select ‘Master’, the other PBX must register with this system. In Direct - UDP mode, all traffic will be sent via UDP and will use multiple ports. • Master (Tunnel - TCP) - If you select ‘Master’, then the other PBX must register with this system. The tunnel option allows all SIP and RTP traffic to be sent via a single TCP port. The 3CX Tunnel vastly simplifies firewall configuration, although it cannot provide the same quality as a direct connection. Also, the tunnel option can only be used with another 3CX Phone System. • Slave (Direct - UDP) – This system will register with the remote system using direct UDP. • Slave (Tunnel - TCP) – This system will register with the remote system using the 3CX tunnel. Page 65 3CX Phone System for Windows System for Windows www.3cx.com Screenshot 26 - Creating a master bridge 4. If you selected ‘Master (Direct-UDP)’ then all you need to do is enter the authentication password which together with the Virtual extension number must be used by the slave to register with this 3CX Phone System. The Virtual extension number must be UNIQUE on this phone system and these same credentials must be used by the slave bridge. 5. If you selected ‘Master (Tunnel-TCP)’ then you must enter • Authentication Password – the password that will be used for authentication. • Remote end of the tunnel – Enter the public IP of the REMOTE 3CX Phone System machine. • Enter the remote port of the 3CX Tunnel (by default 5090) • Enter the port of the Local end of Tunnel. For the first bridge connection it is 5081 (5080 is used for external extensions). The port will be incremented by 1 for each bridge you create that uses the tunnel. Screenshot 27 - Configuring a slave bridge 6. If you selected to create a slave bridge using direct UDP, then you must enter: • Virtual extension number – this should be the same as the virtual extension number of the Master Bridge. • Public IP of the remote 3CX Phone System • SIP Port of the remote 3CX Phone System (by default 5060) • Authentication Password – The password with which ‘Slave must authenticate with the ‘Master’. These must of course match the credentials entered on the master. Page 66 3CX Phone System for Windows System for Windows www.3cx.com Screenshot 28 - Slave bridge using 3CX Tunnel 7. If you are configuring a Slave (Tunnel-TCP) bridge using a 3CX Tunnel, then you must enter • Virtual extension number – this should be the same as the one configured for the ‘Master’ • Local IP or hostname of remote 3CX Phone System and port • Remote end of the tunnel – in most cases the tunnel will be running on the 3CX Phone System machine, in which case you need to enter the public IP of the remote 3CX Phone System machine. Enter the remote tunnel port of the 3CX Tunnel (by default 5090) • Select the local IP address on which the Tunnel will run, and configure the port to the be used for the local end of the tunnel (5081 by default). The port will be incremented with each bridge that you create that uses the tunnel. • Authentication Password – This will be used to authenticate with the ‘Master’. This must match the credentials entered on the master. Note: You will have to open port 5090 on the firewall behind which the ‘Master’ 3CX Phone System resides. 8. Select if you want to publish and receive PBX remote information. Using MyPhone, users will be able to see the presence of users on the remote PBX. In this case, you will need to configure the Public IP address used by MyPhone on the remote PBX. 9. Select provider capabilities – You can enable all options if the remote system is a 3CX Phone System. 10. Select which codecs you wish to use. You can select GSM, Speex, Ilbc or G729 to save bandwidth. Note you much turn on ‘PBX delivers audio’ to ‘enforce this codec’. Click Next 11. Now you need to configure an outbound rule which will be used to route calls from the local PBX to the Bridge. You can for example assign a prefix that users must dial to access the bridge. Click Finish to create the bridge. 12. After the bridge has been created, you can edit bridge options by going to the bridges node. You can edit: • In the Other Bridge Options section you can define the maximum number of simultaneous calls you will allow for this bridge and whether outgoing or incoming lines will be allowed. Page 67 3CX Phone System for Windows System for Windows www.3cx.com 13. Now you must go to the Management Console of the other 3CX Phone System and set-up the opposite end of the bridge, i.e. either a ‘Master’ or a ‘Slave’. You must use the same authentication credentials! Calling a party on the other end of the bridge To dial a number on the other end of the bridge, you would generally need to dial the assigned prefix, plus the number of the person you wish to call. This will however depend on the configuration of the outbound rule configured for the bridge. Page 68 3CX Phone System for Windows System for Windows www.3cx.com 15. Additional phone/extension configuration This section will explain how to configure forwarding rules for an extension, which will be used when the extension is busy, how to configure the BLF fields for a phone, how to re-provision a phone following a change to the phone’s / extension configuration, how to manage existing phones / extensions, how to configure the time zone on your phones and how to centrally manage your phone’s firmware from 3CX Phone System. Forwarding rules Each extension can have a set of call forwarding rules that define what 3CX Phone System should do when the extension user is unable to take an incoming call. This can be configured based on the user’s status, the time, the caller ID, and whether the call is an internal or external call. Each status requires a call forwarding rule. For example, if the user is unable to take a call whilst his/her status is ‘Available’, you can forward the call to voice mail, whilst if the status is set to ‘Out of Office’ you could forward it to his/her mobile. Call forwarding can be configured by the administrator from the management console or by the user from the MyPhone portal. Please see this web page for instructions how to configure call forwarding for an extension: http://www.3cx.com/blog/myphone/forwarding-rules/ Pin Protect You can configure an extension to allow outbound calls only after the user dials the PIN number for the extension. This feature called PIN Protect can be enabled from the Extension’s settings > Other tab > Extension options. When the feature is enabled for an extension, the user will need to dial 777 and insert the PIN number of his extension followed by a #. The PBX will inform the user that access has been granted. The user can then proceed to dial the desired external number. BLF fields If your phone has BLF lights, you can automatically configure what information the BLF lights should display. Match a BLF button with an extension, so that this button will show the status of that extension. The number of available BLF buttons varies per phone. You can also link a shared parking place to a BLF button. This allows users to easily park or unpark calls by hitting that BLF button. Speed dials and custom speed dials are also supported. Re-provisioning the phones If you need to re-provision the phones, for example after you have made configuration changes, you can easily do this from the IP Phones node: Page 69 3CX Phone System for Windows System for Windows www.3cx.com 1. Go to the 3CX Phone System > Phones node 2. Select the phones that you wish to re-provision 3. Click ‘Re-provision phones’ 4. Select the phones again and select ‘Reboot’ to make the new provisioning information active on the phone. Managing your IP phones Screenshot 29 - The phones node 3CX Phone System provides an easy way to monitor and manage your phones network wide. The ‘Phones’ node in the 3CX Management console allows you to: • View all phones in the network • Quickly view IP and Mac address of each phone • Check firmware version that the phone is running • Remotely reboot one or all of the phones • Re-provision the phones (after you have made a change you can reboot the phones to have the changes take effect) • Launch the admin interface of the phone • Monitor security of extension password and PIN. Weak extension passwords and PIN's are the most common cause of security breaches Page 70 3CX Phone System for Windows System for Windows www.3cx.com Time Zone Most phones display the date and time, which is affected by the time zone setting of the PBX. The time zone can be configured from 3CX Management Console > Settings > Phone Provisioning. You will need to select the phone model of your phones and configure the time zone accordingly. From this page, you can enable daylight savings time, and configure when the time changes in your region. Updating the firmware on your phones It is possible to update the firmware on your IP phones network wide using the 3CX Management Console. The procedure varies somewhat depending on the IP Phone that needs to be updated. The steps are as follows: 1. Download the appropriate firmware from the IP Phone vendor’s website. Check that the firmware has been tested by 3CX first before proceeding with the upgrade! 2. Now you need to upload the new firmware to 3CX Phone System. To do this, open the 3CX Management console and go to click on Settings->Phone Provisioning ->Firmware 3. Now click on the Phones node, and select one or more phones, which you want to upgrade to this firmware. The firmware will be uploaded and the phone rebooted. 4. These links provide detailed descriptions for popular IP Phone models • Cisco: http://www.3cx.com/blog/ip-phone-configuration/upgrading-firmware-cisco/ • Grandstream:http://www.3cx.com/blog/ip-phone-configuration/upgrading-firmwaregrandstream/ • Yealink: http://www.3cx.com/blog/ip-phone-configuration/upgrading-firmware-yealink/ • Polycom:http://www.3cx.com/blog/ip-phone-configuration/upgrading-firmware-polycom/ Page 71 3CX Phone System for Windows System for Windows www.3cx.com 16. Configuring Remote Extensions Introduction A powerful benefit of a software based IP PBX is the ability to support remote extensions, i.e. employees using their extension from home or a satellite office. This gives tremendous flexibility to employees and truly delivers mobility, because employees working from home or at remote offices can be seamlessly integrated with head office. They can be a member of call queues and can use the 3CX MyPhone to see presence of other users. Configuring IP Phones as Remote Extensions There are 2 ways to configure a remote extension. These are: 1. A direct remote extension 2. A remote extension using SIP Proxy Manager (http://www.3cx.com/blog/releases/sip-proxymanager/) A direct remote extension is generally used when only a few (less than 5) phones are used in the remote location. If you have more than 5 remote extensions, you might want to consider using the SIP Proxy Manager, a service which needs to be running at the remote location and is used to tunnel all VoIP traffic between the remote location and the PBX. If you have more than 10 extensions in the remote location, you should consider installing another PBX in the remote location and creating a bridge between the two locations. Screenshot 30 – Provisioning a Remote Extension When configuring remote extensions, you should try to provision the extensions from the network where 3CX Phone System is installed. This will allow you to provision the phones as you would do for other extensions. In this case, you would specify that the extension is to be used as a remote extension from the Phone Provisioning tab. After the phones have been provisioned as remote extensions, they will only be able to connect to the PBX when used from a remote location. If you are not able to provision the phones from the network where 3CX is installed, you can provision the phones remotely using HTTP provisioning. In this case, you need to manually configure the MAC address of the phone in the Extension's Phone Provisioning tab. You will then need to instruct the phone to provision itself using HTTP provisioning Page 73 3CX Phone System for Windows System for Windows More information on provisioning of remote extensions http://www.3cx.com/blog/docs/provisioning-a-remote-extension/. www.3cx.com can be found at Note that you will need to configure one to one port forwarding at your firewall so that connections from the phones will be forwarded to the PBX. This will depend on the type of remote extensions that you configure. 1. For direct remote extensions, you will need to configure port forwarding for UDP port 5060 and UDP ports 9000 – 9049. 2. For remote extensions using the 3CX Tunnel or SIP Proxy Manager, you will need to configure port forwarding for TCP / UDP port 5090 How the 3CX Tunnel Works Figure 4 – 3CX Tunnel The picture above demonstrates how the 3CX Tunnel works. In this example, the 3CX Phone System is on IP Address 10.0.0.181, and listens on TCP port 5090 (by default) for incoming Tunnel traffic. We must set up a single Port Forwarding rule on the Modem or NAT/Firewall Device, telling it that all incoming TCP traffic received on port 5090 should be delivered to LAN IP Address 10.0.0.181. The remote setup is shown on the left hand side of the cloud. In this example, the machine with IP address 192.168.0.2 has the 3CXPhone installed. We will need to tell the VoIP Phone the public IP address of the PBX Server (which in this case is 213.165.190.51), and also the private IP address of the PBX Server (which in this case is 10.0.0.181). Since the 3CXPhone will by default use the standard port numbers used by 3CX Phone System, typically no further configuration will be necessary! Configuring the tunnel We will now use the above example in ‘How the 3CX Tunnel Works’ to configure a tunnel connection. Step 1 – Configure the PBX 1. In 3CX Management Console, go to the Settings > Network > 3CX Tunnel tab. • Configure the Tunnel Password (e.g. “r6W4Qi”) • Set the Local IP to the Local IP Address of the NIC which will be receiving tunnel connections. If the PBX has only one NIC, then there will be no need to set this field. In our example this is 10.0.0.181 • Set the Tunnel Listening Port to the port which will be receiving tunnel connections. The default value is 5090. • Click the “OK” button. The Tunnel service will be restarted automatically. Page 74 3CX Phone System for Windows System for Windows www.3cx.com Step 2 – Configure the Firewall The Tunnel protocol is designed to eliminate NAT traversal problems and reduce Firewall configuration work to a minimum. There is only one Firewall setting that needs to be made – we must forward the TCP Tunnel port (set by default to 5090) to the PBX. Screenshot 31 - Configure a port forward rule The above picture shows configuration for a Sitecom WL-183 WAN-to-LAN router - most routers will provider similar functionality. In your firewall: 1. Enable Port Forwarding 2. Specify the PBX’s Local IP Address (which we had set previously to 10.0.0.181) 3. Set the Type to “TCP” 4. Set the Port Range to be from 5090 to 5090 (only one port) 5. Set the Comment field to “3CX Tunnel” 6. Click on the “Add” button followed by the “Apply” button Your firewall configuration is now done! Configuring 3CXPhone as Remote Extensions 3CXPhone is a software phone which can replace or used together with a normal IP phone. 3CXPhone can be installed on Windows, Android and iPhone and is often used as an external extension, especially when installed on a smartphone. Ideally, you have the phone connected to the WIFI network within the same network where the PBX is installed. The first time you start 3CX Phone, you will be asked to provision the phone, in which case the administrator would need to assign 3CXPhone to a new or an existing extension. 3CX Phone can be used both within the office and outside of the office. Let us take a look at how to switch between In Office and Out of Office in each 3CX Phone. Page 75 3CX Phone System for Windows System for Windows www.3cx.com 3CXPhone for Windows Screenshot 32 – 3CXPhone for Windows: Switching between In Office and Out of Office In 3CXPhone for Windows, you can switch between In Office and Out of Office by clicking on the Office Button. The Office button will switch to the Home button, indicating that the phone is being used outside of the office. Screenshot 33 - 3CXPhone for Windows - Enable and Configure 3CX Tunnel If you need to make use of the 3CX Tunnel, you will need to enable it manually for the profile. Page 76 3CX Phone System for Windows System for Windows www.3cx.com 3CXPhone for Android Screenshot 34 - 3CXPhone for Android: Switching between In Office and Out of Office In 3CXPhone for Android, you can switch between In Office and Out of Office by clicking on the Office Button at the bottom. The Office button will switch to the Home button, indicating that the phone is being used outside of the office. If the extension was configured to use the 3CX Tunnel, and 3CXPhone for Android was provisioned, the 3CXPhone will automatically make use of the 3CX Tunnel when it is switched to Out of Office. Page 77 3CX Phone System for Windows System for Windows www.3cx.com 3CX Phone for iPhone Screenshot 35 - 3CXPhone for iPhone: Switching between In Office and Out of Office In 3CXPhone for iPhone, you can switch between In Office and Out of Office by clicking on the Office Button at the bottom. The Office button will ask you which profile you want to use. To switch to Out of Office, select SIP Account. If you need to use the 3CX Tunnel, you will first need to download the 3CX Tunnel App from the AppStore. You need to configure the app to use the Tunnel, and start the Tunnel service. When the Tunnel service is detected, you will be able to choose Out of Office Tunnel when you click on the Office button. An interactive demo of the 3CXPhone for iPhone can be found at http://www.3cx.de/blog/how-touse-3cxphone-ios/ More information To learn more about tunnel connections and to learn how to troubleshoot remote extensions, you can view the video tutorial on this subject in the 3CX Online training area: http://www.3cx.com/blog/voip-nuggets/external-extension-2/ SIP Proxy Manager It is also possible to use the tunnel with an IP phone using the SIP Proxy Manager. More information and the download of this utility can be found in this blog post: http://www.3cx.com/blog/releases/sip-proxy-manager/ Page 78 3CX Phone System for Windows System for Windows www.3cx.com 17. Backup and Restore Introduction 3CX Phone System includes a convenient backup and restore utility, that allows you to create a complete backup of your phone system configuration and data to a file. To backup data, run the Backup and Restore utility located in the 3CX Phone System Program group. To restore phone system data, locate the backup of the phone system data and click ‘Restore’. Note that the current configuration will be OVERWRITTEN with the backup data, and any changes that you have made since performing the backup will be lost. You must also close the management console BEFORE making a restore. You should use the Backup and Restore utility when upgrading versions. You will need to backup your configuration before you un-install your current installation. During the installation of the new version, you will can restore the settings from your previous version. Screenshot 36 - Backup & Restore utility Scheduling a backup Using the Windows scheduler you can easily schedule a daily phone system backup. To do this: 1. Go to Start > Accessories > System tools > Schedule Tasks 2. Double-click on ‘Add Scheduled task’ 3. Browse to the 3cxbackup program. The default path is: <C:\Program Files\3CX PhoneSystem\Bin\3cxbackup.exe> 4. Specify schedule and account to use. 5. After it is created, you have to modify the schedule to include the command line parameters that you need: • Hidden - runs the process hidden so it will close automatically after completion • Backup - will backup the database Page 79 3CX Phone System for Windows System for Windows • Restore - will restore the database • Filepath is the location of the database to restore from or backup to • Options o /callhist - will include the call history database o /voiceprompts - will include system prompts o /voicemails – will include voice mails o /callrecordings - will include call recordings. o /exit – to exit the utility after backup is done. o /firmware – backup the stored firmwares www.3cx.com Example: Complete hidden backup with exit 3CXBackup.exe hidden backup c:\backup.zip /callrecordings /voicemails /voiceprompts /callhist /exit Page 80 3CX Phone System for Windows System for Windows www.3cx.com 18. Fax server Introduction Note: This feature is not present in the free edition of 3CX Phone System 3CX Phone System includes a fax server that allows sending and receiving of faxes. The 3CX fax server is based on the T38 standard and requires a compatible supported T38 VoIP gateway or provider. Note that it must be configured according to our configuration guides, so that fax reception is enabled. It is also possible to use a VoIP provider that supports T38, however the quality of the fax implementation between VoIP providers varies and can therefore not be guaranteed. For the latest information on fax and 3cx, visit the fax section on our support page at http://www.3cx.com/blog/tag/fax/. Here you will find configuration guides for recommended ATAs and fax software. Fax receiving configuration To receive faxes, you must configure a line or a DID to be dedicated to fax, so that all calls on this number are forwarded to the 3CX Fax Server. The 3CX Fax server will then receive the fax, convert it to PDF and email the fax to the configured email address. Screenshot 37 - Configuring a port or DID to receive a fax To do this: 1. In the Management console, select the Inbound rule for port or DID which will be dedicated to receiving faxes. 2. From the ‘Office hours’ routing options, select ‘Send fax to email of extension’ 3. Select the extension that should receive incoming faxes. If you select “Default FAX Destination”, incoming faxes will be sent to the email address configured for the virtual fax extension number. You can configure the email address of the default virtual fax extension from the Fax Machine node > 888 – 3CX Fax Server. Alternatively you can forward incoming faxes to the email address configured for a user’s extension. This allows you to create multiple DID rules so as to give people a personal fax number. Page 81 3CX Phone System for Windows System for Windows www.3cx.com Configuring Fax machines / Fax servers The fax machines node in the management console lists all known ‘Fax extensions’ including the extension used by the 3CX Fax Server. These ‘Fax extensions’ are similar to a normal extension and require an authentication ID and password to login to the SIP server. 3CX Phone System included a pre-configured fax extension (ext: 888). This extension is used by the 3CX Fax Server for incoming fax calls, which are routed to an email address. In addition, 3CX Phone System can be configured to proxy fax calls (T38 traffic) to a fax machine connected to an ATA or another software based T38 fax server by creating additional fax. Fax extension settings Screenshot 38 - Fax extension To create a new fax extension: 1. In the 3CX management console, go to the Fax machines node. Click Add Fax Extension, 2. In the ‘Fax Server Extension Number’ field, specify the fax extension number. Any call forwarded to this extension will be assumed to be a fax and receive a fax tone. 3. Specify the Fax Server Authentication ID and Password – These credentials will be used by rd the ATA / 3 party fax server to login to the 3CX Phone System. 4. If this extension is used by the 3CX Fax Server, you can specify the default email address to which all faxes should be sent, and select the network interface to which the 3CX fax server should bind to. rd 5. If this extension is used for an ATA or 3 party T38 fax software, the extension will be used only to register to the SIP server and receive T38 fax traffic. Note: You must restart the fax service for changes to take effect. Page 82 3CX Phone System for Windows System for Windows www.3cx.com 19. The Phonebook Introduction The phonebook feature allows you to easily publish a companywide phonebook. Used in tandem with a personal phonebook, it allows users to quickly launch calls without wasting time finding a person’s number and subsequently entering it in the phone. 3CX Phone System supports a company and a personal phonebook. The Company phone book is company wide and is managed from the management console. The personal phonebook is only available to a particular extension and is managed from 3CX MyPhone. The company phonebook is also published to a directory in a format that Cisco, Yealink, SNOM, Grandstream, Aastra and Polycom phones can download. These phones can then show the same phonebook on their display. Company phonebook Screenshot 39 - The company phonebook To manage the company phonebook, go to the Settings > Company Phonebook node. Click ‘Add’ to add an entry. Importing Phonebook entries You can import phonebook entries from a CSV file. Each entry should be on a new line, and the fields separated by a comma as follows: First name, Last name, Phone number Using the Phonebook To use the phonebook, users enter a name or part of the name in the ‘Dial’ edit box in 3CX MyPhone. 3CX MyPhone will automatically resolve the name or part of the name to a phonebook entry. To launch a call, the user just selects the name and clicks the ‘Call’ button. Page 83 3CX Phone System for Windows System for Windows www.3cx.com 20. Monitoring your Phone System Introduction 3CX Phone System is easy to monitor for any Windows administrator, since it behaves just like any other Windows Server application. You can monitor 3CX Phone System using your favourite network monitoring solution, such as for example ActiveXperts or Microsoft Operations manager. Things to monitor Systems extensions status Screenshot 40 - Monitoring System extensions 3CX Phone System uses system extensions for services such as IVR, Queue, Fax, Parking and so on. Using the System extensions node in the 3CX Management Console you can quickly monitor if all these system extensions are working and registered correctly. 3CX services A good first check is to monitor all 3CX services are running. You can view all 3CX services from the services node in the 3CX Management Console. Any network monitoring package can monitor windows services remotely. Page 84 3CX Phone System for Windows System for Windows www.3cx.com Server Event Log Screenshot 41 - Server Event Log The Server Event Log node lists events related to 3CX Phone System. You can configure email alerts to be sent to you for critical events from the Settings > General > Email notifications tab. These events are also posted to the Windows events log as application events so that you may monitor the events using your network monitoring package. The following server events are posted to the log: a. A person dialling the Emergency number (ID 4099) b. The status of a trunk changes (ID 4100) c. A trunk failover occurs, i.e. the backup rule is triggered (ID 12289) d. A Trunk or VoIP provider account responds with an error code (ID 12294) - This could happen if your account is inactive or reached the credit limit. e. The registration of an extension changes (ID 4101) f. The licence limit has been reached (ID 8193) g. An IP is blacklisted (ID 12290) – This can happen if an IP has reached the maximum number of failed authentication attempts h. An IP is blacklisted because of too many requests (ID 12292) – This happens if the web server anti hacking module blocks it because of too many requests. i. A Call Back is triggered by the queue module (ID 102) j. Upon failure of a DNS resolution - (ID 12293) - This event occurs when the remote VoIP provider could not be contacted. This could occur when your internet connection is down or the specified IP or FQDN for the VoIP provider is incorrect or down. k. Upon failure of resolving an IP via STUN (ID 12295) – This happens when the STUN server is down. It can also happen when the internet is down since then the STUN server will not be reachable. Page 85 3CX Phone System for Windows System for Windows www.3cx.com Screenshot 42 - Configuring email alerts Monitor IP’s of gateways and phone system Additionally, you should create checks that regularly check the IP of any VoIP gateway as well as the phone system to ensure that they are up and running Page 86 3CX Phone System for Windows System for Windows www.3cx.com 21. Troubleshooting Introduction This chapter explains basic steps that you can take to troubleshoot a problem and which online sources are available to you. It is important to ensure that you isolate the problem, for example you can make internal calls but not external calls? Training Video A training video is available on troubleshooting http://www.3cx.com/blog/training-videos/basic-troubleshooting/ 3CX Phone System at: Check that IP Phones are registered Screenshot 43 - The Status monitor If you cannot make internal calls, check that the extensions are registered. To do this: 1. Load up the 3CX Phone System Management console, and click on the ‘Extension Status’ node. 2. Check that all extensions are listed and are ‘Registered’. If the phone is listed as ‘Not registered’ then the extension has been created, but the phone has not registered itself with the system. This could be because the device is off, or because the SIP credentials are incorrect. Check whether you have entered the Extension Number, Authentication ID and Authentication Password in the right fields. Another cause could be that you have a firewall enabled on the machine running 3CX Phone System and that it is blocking communications between the server and the phone. 3. If the extension is showing as Registered in the Extension Status, you should check that the extension is registered on the correct phone. This can be done from the Phones node, which shows the Phone Model and Firmware version of each phone that is registered with 3CX Phone System, and which extension . Page 87 3CX Phone System for Windows System for Windows www.3cx.com Review the Server status log Screenshot 44 - 3CX Phone System Activity Log If dialling another extension does not work, check the Server Activity Log. This screen shows the activity log of the server, and the log messages can indicate the reason of an error condition. The Server Activity Log shows the logging for all the activity the PBX is handling. The Server Activity log allows you to easily filter the logging for the activity of an Extension, or the logging for a specific call. In addition, you can filter the logging by date and time. Enabling Verbose Logging will show additional advanced logging including the SIP messages for the filtered logging. Troubleshooting the PSTN Interface If you are using analog phone lines, and you experience issues such as calls not being disconnected or not being established, it’s very possible that the PSTN interface on your VoIP gateway needs to be configured correctly for your country. If in doubt, check with the VoIP Gateway supplier. For example if you have bought a device that is configured for the US but you are using it in the UK, you might have issues such as the device not detecting a hang up by a caller. In these cases you will have to configure the Call Progress Tones for the VoIP Gateway. For more information about this consult the VoIP Gateway supplier and manual Page 88 3CX Phone System for Windows System for Windows www.3cx.com 22. Getting additional information / support This manual is covers the basic information that you require to get up and running with 3CX Phone Systems. It covers the most standard scenarios. Your setup may require information which is specific to your network. This section provides a list of other resources which can be used to find the information that you require. Support 3CX Technical Support is available via our Support Portal for 3CX Partners (free) or with a 3CX Support package (Extra charge). Review our support procedures and pricing. We also have a community forum from where you can obtain user to user support for our products. Knowledge base / Help 3CX maintains a knowledge base / help page on its blog at http://www.3cx.com/blog Support page / Configuration guides Be sure to follow the configuration guides for your make and model of your VoIP gateway or sip phone. The configuration guides can be found at http://www.3cx.com/support 3CX Phone System Blog We highly recommend that you follow our product blog to keep up to date with the latest updates on 3CX Phone System. The blog can be accessed from http://www.3cx.com/blog/ You can subscribe to receive email alerts for new blog entries here: http://feedburner.google.com/fb/a/mailverify?uri=3CXVoIPBlog 3CX Facebook page We also maintain a page on Facebook. Let us know what you think of 3CX Phone System at http://www.facebook.com/3CXPhoneSystem We also post product news to the Facebook fan page Feature Requests If you would like to request a new feature, you can do this on our feature requests page, which can be found at https://apps.facebook.com/threecxideas/ Take some time to review the ideas from other users and vote for the ones which you good. Page 89 3CX Phone System for Windows System for Windows www.3cx.com Online training 3CX also has free online training available at http://training.3cx.com Our Online training program consists of a series of youtube videos. After you have followed the videos, you can also get 3CX certified at the 3CX Academy. www.3cxacademy.com The training material provides the information required to undertake the test. Upon passing the test, you will become a 3CX certified professional. Community Support forums If you are evaluating 3CX or using the free edition, you can visit the forums to discuss questions with other users of 3CX. The forums are located here: http://www.3cx.com/forums/ Please note that 3CX does not provide technical support via the forums. Official 3CX Technical support requires you to have a support package or be a 3CX partner. Request support via our support system If you are a 3CX Partner or have purchased a support package from 3CX, you can contact the 3CX support department via the support system. Login details would have been provided to you by email. When requesting support, include the ‘Support info’ data. 3CX Phone System can automatically generate a file which includes all relevant support information. NO PASSWORDS TO PHONES OR VoIP PROVIDERS WILL BE INCLUDED. The data will NOT be sent automatically. You will be prompted for a location to save the data, so you can check what data will be sent to us before you send it to us. To generate the support info file: 1. In the 3CX Phone System Program Group, start the ‘Backup and Restore’ tool. 2. Click on the button ‘Browse’ next to ‘Generate Support’. 3. You will be prompted for a location to save the data. Enter the file name for the support zip file to be generated. Click Save 4. Click ‘Generate Support’ to generate the support file. You can review the file before sending it over to us. 5. Login to the 3CX support system, and attach the information to your support request. 6. Include a detailed problem description. It should clearly indicate what the problem is, and when it occurs. Mention what hardware or VoIP provider you are using with 3CX Phone System. Indicate also what tests have been performed to isolate the problem. Page 90