1
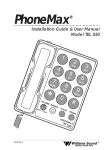
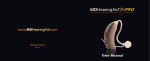
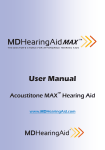
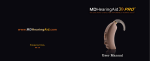
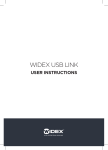
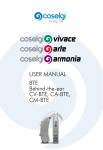
User Guide What’s Included: 2 Eargo Devices 2 Ear Cleaners 2 Charger & Charging Base 3 Sample Packs For Friends Micro USB Cord USB Plug Contents Indications for Use 04 Getting to Know Eargo 08 Charging Your Eargo 10 Charging Your Charger 16 Preparing Your Ears 18 Inserting and Removing 21 Sound 27 Care 30 Storage 32 Share The Love! 34 Troubleshooting 36 Support 38 Appendix 40 3 Indications for Use The hearing instrument is intended to amplify and transmit sound to the ear and thereby compensate for mild to moderate impaired hearing. Warning to Hearing Aid Dispensers A hearing aid dispenser should advise a prospective hearing aid user to consult promptly with a licensed physician (preferably an ear specialist) before dispensing a hearing aid if the hearing aid dispenser determines through inquiry, actual observation, or review of any other available information concerning the prospective user, that the prospective user has any of the following conditions: (i) Visible congenital or traumatic deformity of the ear. (ii) History of active drainage from the ear within the previous 90 days. (iii) History of sudden or rapidly progressive hearing loss within the previous 90 days. (iv) Acute or chronic dizziness. (v) Unilateral hearing loss of sudden or recent onset within the previous 90 days. (vi) Audiometric airbone gap equal to or greater than 15 decibels at 500 hertz (Hz), 1,000 Hz, and 2,000 Hz. (vii) Visible evidence of significant cerumen accumulation or a foreign body in the ear canal. (viii) Pain or discomfort in the ear. 4 Important Notice for Prospective Hearing Aid Users Good health practice requires that a person with hearing loss have a medical evaluation by a licensed physician (preferably a physician who specializes in diseases of the ear) before purchasing a hearing aid. Licensed physicians who specialize in diseases of the ear are often referred to as otolaryngologists, otologists or otorhinolaryngologists. The purpose of medical evaluation is to assure that all medically treatable conditions that may affect hearing are identified and treated before the hearing aid is purchased. Following the medical evaluation, the physician will give you a written statement that states that your hearing loss has been medically evaluated and that you may be considered a candidate for a hearing aid. The physician will refer you to an audiologist or a hearing aid dispenser, as appropriate, for a hearing aid evaluation. The audiologist or hearing aid dispenser will conduct a hearing aid evaluation to assess your ability to hear with and without a hearing aid. The hearing aid evaluation will enable the audiologist or dispenser to select and fit a hearing aid to your individual needs. If you have reservations about your ability to adapt to amplification, you should inquire about the availability of a trialrental or purchase option program. Many hearing aid dispensers now offer programs that permit you to wear a hearing aid for a period of time for a 5 nominal fee after which you may decide if you want to purchase the hearing aid. Federal law restricts the sale of hearing aids to those individuals who have obtained a medical evaluation from a licensed physician. Federal law permits a fully informed adult to sign a waiver statement declining the medical evaluation for religious or personal beliefs that preclude consultation with a physician. The exercise of such a waiver is not in your best health interest and its use is strongly discouraged. Children with Hearing Loss In addition to seeing a physician for a medical evaluation, a child with a hearing loss should be directed to an audiologist for evaluation and rehabilitation since hearing loss may cause problems in language development and the educational and social growth of a child. An audiologist is qualified by training and experience to assist in the evaluation and rehabilitation of a child with a hearing loss. Additional Notices A hearing aid will not restore normal hearing and will not prevent or improve a hearing impairment resulting from organic conditions. In most cases infrequent use of a hearing aid does not permit a user to attain full benefit from it. The use of a hearing aid is only part of hearing habilitation and may need to be supplemented by auditory training and 6 instruction in lip reading. Please see the accompanying Guide to Your First Month with Eargo for additional information about adjusting to and maximizing your experience using your Eargo hearing devices. Possible Side Effects Minor irritation and inflammation may occur as your ear becomes accustomed to having an object in it. If this or anything related may arise, please contact Eargo. If an actual allergic reaction occurs, contact your hearing care professional. Severe swelling, discharge from the ear, excessive wax or other unusual conditions warrant immediate consultation with a physician. If, for any reason, your hearing devices do not operate properly, do NOT attempt to fix them yourself. Not only are you likely to violate any applicable warranties, you could cause further damage. 7 Get to Know Your Eargo Flexi Fibers TM Dome Speaker Microphone Wax Guard Removal Thread Left is BLUE 8 Right is RED Get Going in 4 Easy Steps 1 - CHARGE Charge your Eargo devices (Pg. 10) 3 - INSERT Pop them in (Pg. 21) 2 - CLEAN Clean your ears (Pg. 18) 4 - ADJUST Find the right setting for you (Pg. 27) 9 Let’s Get All Charged Up The Charger and Charging Base Ok, this is the part where we tell you some things you might find kind of obvious. We’d just ask that you read everything through – you never know when you’re going to run across something you don’t know but need to. Heck, we’ve gone to the trouble to write all these words, it’d be a shame if no one read them. They’d get so lonely. The Eargo charger is portable, which means it can charge your Eargo devices on the go. The charger also needs to get charged from time to time. That’s what the white charging base is for. Let’s make sure your charger and Eargo devices are fully charged before using them. Top those babies up! Sometimes the batteries drain while in shipment from our factory. It’s a long trip and they get bored and lonesome. You know how it is. As you know by now, we like to make things as easy as we can for you. So when your Eargo devices arrive, they’re already placed inside the charger. Please leave them there for now. • Connect the smaller end of the micro USB cord to the white charging base, and the larger end of the cord to the USB plug • Plug the USB plug into a powered wall outlet • Place the charger, with lights and logo facing up, on top of the white charging base 10 Make sure the charger is centered on the charging base. When the charger is properly seated on the charging base, a light on the charging base will briefly turn on, and you will hear a tone. On the charger itself, all indicator lights will briefly glow. When this happens, the charger (and the Eargo devices inside) will begin to charge via inductive charging. Bada bing, bada boom. If the light on the charging base does not turn on and you don’t hear a tone, please reposition the charger in the center of the charging base. It takes approximately 6 hours to fully charge your charger and Eargo devices. When charging is complete, you can start using your Eargo devices. Please discard the tape and foam that is used to secure the Eargo devices during shipping before removing your Eargo devices from the charger for the first time. The Eargo charger can also be charged by connecting the micro USB cord directly to the bottom of the charger. Charger Indicator Light Charging Base Micro USB Cord 11 Let’s Continue To Get All Charged Up Inserting Eargo Devices Into The Charger When it comes time to charge your Eargo devices, simply insert them into the charger, one Eargo at a time. Gently wiggle them into the cradles with the domes facing inward and the removal threads out and up. Do not force them into place - a little wiggle, and they slide right into place. When inserting your Eargo into the cradle, gently push straight down on the black body of the Eargo above the gold contacts, not on the white Flexi Fibers. When the charging light under the Eargo changes from solid blue to solid white, charging will begin. This charging light may flash blue for a few seconds before turning solid white when you first insert the Eargo. This is normal. But, if this charging light continues to flash blue for an extended period of time, or remains solid blue, the Eargo is not inserted correctly. Remove and re-insert the Eargo. You will know you’re all set when the charging lights under the Eargo devices remain solid white, and the indicator lights on the outside of the charger start scrolling. 12 Removal thread out and up Push down into cradle Cradle Charging light inside charger 13 14 Let’s Continue To Get All Charged Up Charging Indicators After your Eargo devices are inserted, the charge indicator lights will turn on and start scrolling. This will last for about 90 seconds while the charger is assessing how much charge the Eargo devices have left. This way the charger will know if it should charge the devices full blast, or just gently trickle-charge them. Clever little charger, eh? After this assessment period, the lights will show how much juice you have in each Eargo (1 to 4 lights) and will dim after approximately 10 seconds. It takes approximately 6 hours to fully charge your Eargo devices and a full charge will give you up to 16 hours of use. FULL CHARGE LOW CHARGE 15 Charging Your Charger The Eargo charger is portable, and you can use it to charge your Eargo devices on the go. What we mean is the charger runs on its own internal rechargeable battery. The charger will hold a charge for about a week while charging your Eargo devices every day. To recharge your charger, simply put it on the charging base or plug in the micro USB cord. It’ll take about 6 hours to charge up fully. Then you’re good to go. In a literal and figurative sense. While charging the charger, the Eargo devices will also charge. If you’re the curious sort – and we can’t blame you if you are – gently tap the charge indicator wake-up button at any time. This is an invisible button (pretty cool, isn’t it?) that’s located between the Eargo logo and the battery symbol. Tapping it will wake up the indicator lights and check the charge levels of the charger and Eargo devices. You know the old saying, a watched Eargo charges at approximately the same rate as an unwatched Eargo. That is an old saying, right? Well, it should be. 16 Full Charge When charger is fully charged, all battery lights glow white. Low Charge When charger is at low charge, one battery light glows red. 17 Clean-up in Ear 2 Preparing Your Ears We know it’s exciting getting your Eargo devices. Heck, we’re so excited for you we can barely sit still. But before you go running off half-cocked, slamming your devices into place, we recommend using the included ear cleaner* to remove any excess wax that may have accumulated in the ear canal. A clean ear is a happy – and better functioning – ear. Our in-house doctors and audiologists urge you to not skip this step, even if you feel your ears are pretty clean already. Gently insert and remove the ear cleaner 2-3 times for best results. Clean it off with an alcohol pad or cotton swab moistened with alcohol between each insertion, and only use one ear cleaner per ear. The ear guard will help to keep the ear cleaner from going too deep into the ear canal. Now that your ears are nice and clean, let’s get started. CLEAN Carefully remove wax from ear canal before inserting your devices. * Do not force. Do not push farther than the ear guard allows. Ear cleaner is for one time use only. 18 Ear Guard Ear Cleaner 19 20 Inserting & Removing Eargo Devices Inserting Using your index finger and thumb, grab the removal thread at the base of the device and insert the Eargo device into the ear.* The device should sit entirely in the ear canal, with the microphone up and the removal thread down. As we said before, bada bing, bada boom. The Eargo devices turn on 10 seconds after removing them from the charger. When first inserting your devices, they undergo an active calibration process for 30-60 seconds. During this time they may ring a bit. Don’t be alarmed - this is normal. It’s just the devices adjusting their tuning to your specific ear canal. Kind of like how an orchestra takes a minute or so to make sure they’re in tune with one another. You don’t have an orchestra in your ear – we’re making an assumption here – but you know what we mean. If the ringing doesn’t stop, try rotating the device slightly to make sure the microphone is not touching the ear canal and causing feedback. You can also remove and re-insert the device. * Do not use a cotton swab or other object to push in the Eargo. 21 The Eargo device should be inserted almost completely in the ear canal, so the very back of the Eargo is flush with the opening of the ear canal. The Eargo will be almost completely invisible. The main part of the Eargo that may be visible is the very back. In fact, this is why we make the Eargo device black If you apply hairspray or cosmetics, please do so BEFORE inserting the Eargo devices. Otherwise they could clog the microphone. Likewise, if you apply hand lotion, please do so AFTER the devices have been inserted, so the lotion does not clog the microphone. 22 CORRECT All the way in (and not various skin colors). You see, the ear canal appears quite dark since it receives little light, so a black Eargo is better camouflaged as it more closely resembles a dark ear canal than a skin-colored one would. Clever, right? INCORRECT Halfway Out 23 24 Inserting & Removing Eargo Devices Removing Grasp the removal thread and gently pull. We know Eargo devices are quite comfortable, we’re the ones who made them that way. Many people tell us they forget they even have them in. But please don’t forget to take them out. Got to let those babies breathe and recharge every now and then. Eargo devices are designed for all day use. Please remove and recharge them while you’re sleeping. 25 Tap Twice 26 Sound Amplification Levels Your Eargo devices have four sound profiles (SPs), ranging from low amplification (SP1) to maximum (SP4). To move from one SP setting to the next, open your hand (as if you were going to clap) and gently and rapidly double-tap your ear. Your Eargo will beep when you’ve changed SPs. The number of beeps reflects the SP (e.g. 4 beeps for SP4). It will progress through all 4 levels and then repeat from the beginning (SP 1-2-3-4, then back to SP 1-2-3-4 etc.). Sound settings are highly personal and often vary between ears and in different settings. Each ear is different, so do this for each ear independently. SP1 is a special setting that has lower amplification and a special equalization curve designed for phone calls. When talking on a phone, try this setting to reduce any potential feedback. Your Eargo devices will always start on SP 1 every time you take them out of the charger. 27 Sound Sound Profiles SP4 SP3 SP2 SP1 28 LOW/PHONE MED HIGH MAX ONE BEEP TWO BEEPS THREE BEEPS FOUR BEEPS Sound What to Expect When first using your Eargo devices, many everyday sounds—running water, ringing telephones, background noise, that grackle that won’t leave the tree in the front yard— can be louder than you’re used to. Give yourself a week or two to adjust to processing all this information. It’s pretty awesome to be hearing so sharply, but it can take a little time to get accustomed to. That’s normal. If you haven’t adjusted to these new sounds after a few weeks, please give us a call. Our audiologists and hearing specialists would be happy to help. We have included an additional user guide (Guide to Your First Month with Eargo) which goes into this in much more detail. Please refer to this guide for additional information on what to expect as you begin wearing your Eargo devices. 29 Care Daily Care Keeping your Eargo devices in good shape is very important, and very easy. It just takes a few simple steps each day. Never thought you’d spend so much time reading about ear wax, did you? Well, surprise! Eargo devices are designed to help keep your ears clean. The Flexi Fibers may sweep out excess wax with each removal. There’s often a sizable amount of wax that comes out during the cleaning period before using your devices. That amount should lessen over time. It’s very important to keep your devices clean. Wax buildup or other debris may lessen their sound quality and performance. If you notice wax or other debris on your Eargo devices, simply clean with an alcohol wipe or cotton swab moistened with alcohol. Do not immerse or submerge your devices in alcohol as this will damage their electronics. If wax is inside the dome, you can get it out by first letting your Eargo devices dry overnight, and then by gently wiping the dome with an alcohol pad or a cotton swab moistened with alcohol. Now, let’s all agree to stop talking about ear wax. 30 Before placing your Eargo devices in the charger, make sure that your devices are completely dry. Long-term exposure to moisture can harm them. Let your devices air dry or dry them with a soft, lint free cloth. Gotta be lint free. Don’t want to be trading ear wax for lint. Don’t use hot air or a hair dryer to dry your Eargo devices. It might give them a stylish, carefree, wind-blown look, but it could also damage their internal electronics. Eargo devices are not waterproof. Please do not wear them while swimming or in the shower. Flexi Fibers are secured nice and tight. Please do not try to remove them or this will damage the Eargo. 31 32 Storage and Battery Life Keep Your Eargo Devices Safe and Working Well Proper storage of your Eargo devices will increase their lifespan and keep them in top working condition. They’re kind of like people in that way. When not in use, store them in the charger. That’ll keep them fully charged. Maximizing Battery Life To maximize the battery life of your Eargo devices, it is best to wear them all day until their batteries run low or run out, and then recharge them fully overnight in the charger. To maximize the battery life of the charger, please place it on the charging base each night. Turning Off Your Eargo Devices Placing your Eargo devices in the charger automatically turns them off. 33 Share the Love! Sample Packs for Friends Don’t keep the ease and comfort of Eargo devices all to yourself. Included in your box are three non-working sample packs to pass along to friends and family. If any of them purchase Eargo devices, and they use the code included in the box, they’ll receive a $100 credit towards their Eargo purchase, and will probably give you a big hug. Your friends can also order sample packs at eargo.com or by calling 1-800-61-EARGO. 34 Size 12 Size 15 35 Troubleshooting Guide ISSUE Poor sound quality Eargo devices don’t charge POSSIBLE CAUSE • Low battery • Wax or debris buildup • Change in hearing level • Eargo devices not placed correctly in charger No LEDs showing on charger • Did not tap wake-up button • Charger discharged No sound • Dead battery • Wax or debris is blocking the speaker Different volume in left and right ear • Not set to correct program Repeated beeps • Battery low Charging light flashing blue • Eargo device not inserted How do I turn them off? • Not in charger 36 correctly in charger SOLUTIONS • Charge Eargo • Clean with alcohol pad • Adjust sound profile • Remove and reposition Eargo devices correctly in charger • If on charging base, reposition charger on charging base • Tap charge indicator wake-up button • Charge charger using micro USB cord and USB plug • Charge Eargo • Clean dome with alcohol pad or cotton swab moistened with alcohol • Cycle through SP on one ear until volume matches in both • Charge Eargo • Remove and reposition Eargo device correctly in charger • Place devices in charger to automatically turn them off 37 Support Have Questions? If your Eargo devices begin to have any issues, please consult the troubleshooting guide on the previous pages. Have questions? Call 1-800-61-EARGO (1-800-613-2746). We have answers and are ready to help. Guarantee Happiness Guaranteed If you’re not happy with your Eargo devices, return them within 60 days for a full refund. Call us at 1-800-61-EARGO (1-800-613-2746) and we’ll tell you how. 38 39 Appendix Storage: Store in dry place, away from direct sunlight, or heat to avoid extreme temps. Keep out of reach of pets and children. Temperature Limits: Eargo devices are designed for use from 5°C to 45°C (41°F to 113°F). Eargo devices can be stored from -20°C to 50°C (-4°F to 122°F). Do not use or store your devices outside of these ranges respectively. Battery Warnings: Batteries are dangerous if swallowed. To help prevent accidental ingestion of batteries: - Keep out of reach of children and pets - Check your medications before taking them – batteries have been mistaken for pills - Never put batteries in your mouth, as they can easily be swallowed NATIONAL BUTTON BATTERY INGESTION HOTLINE: 202-625-3333. As with many batteries, Eargo device batteries have a risk of leakage. Periodically check Eargo devices for any signs of leakage (visible white residue). If you see such residue or suspect battery 40 leakage for any other reason, immediately discontinue use and contact Eargo immediately. If you suspect you have touched any battery fluid or residue, wash your hands thoroughly. Waste Disposal: Waste from electronic equipment must be handled according to local regulations. Power Supply Specification: - Input: 110 Vac, 50/60 Hz, 200mA max current - Output: 5 Vdc, 1.2A 41 Technical Data: (i) Saturation output curve (SSPL 90 curve) 0.4CC COUPLER 2CC COUPLER (ii) Frequency response curve 0.4CC COUPLER 2CC COUPLER (iii) Average saturation output (HF-Average SSPL 90): 116dB SPL (iv) Average full-on gain (HF-Average full-on gain): 48db SPL (v) Reference test gain: 23dB SPL (vi) Frequency range: <200Hz ~ 8000Hz (vii) Total harmonic distortion: - 500Hz - 2% - 800Hz - <1% - 1600Hz - 1% (viii) Equivalent input noise: 30dB SPL 42 (ix) Battery current drain Sound Profile Quiescent 1kHz @ 65dB SPL Avg @ 90 dB SPL SP 1 1.04 mA 1.03 mA 1.24 mA SP 2 1.04 mA 1.04 mA 1.23 mA SP 3 1.04 mA 1.04 mA 1.25 mA SP 4 1.04 mA 1.04 mA 1.97 mA (x) Input-output curve (ACG aids only) (xi) Attack and release times (ACG aids only) BASIC attack BASIC release FAST attack 400 msec 15,000 msec 3 msec FAST release REACH release 100 msec 600 msec Calibrated swept pure tones per ANSI s3.22-2003 were used as the input signals. In addition to the standard 2cc coupler measurements, responses using a 0.4cc CIC coupler are provided as a more realistic representation of the device inside the ear canal. 43 Compliance Information This device complies with FCC Part 15 and 18 of the FCC Rules This equipment has been tested and found to comply with the limits for a Class B digital device, pursuant to part 15 of the FCC Rules. These limits are designed to provide reasonable protection against harmful interference in a residential installation. This equipment generates, uses and can radiate radio frequency energy and, if not installed and used in accordance with the instructions, may cause harmful interference to radio communications. However, there is no guarantee that interference will not occur in a particular installation. If this equipment does cause harmful interference to radio or television reception, which can be determined by turning the equipment off and on, the user is encouraged to try to correct the interference by one or more of the following measures: - Reorient or relocate the receiving antenna. - Increase the separation between the equipment and receiver. - Connect the equipment into an outlet on a circuit different from that to which the receiver is connected. - Consult the dealer or an experienced radio/TV technician for help. 44 Information and Explanation of Symbols Warning: Important information for injury prevention, handling and product safety. 45°C 104°F TEMP: Use between 5°C to 45°C (41°F to 113°F). 5°C 32°F 50°C 122°F -20°C -4°F TEMP: Store between -20°C to 50°C (-4°F to 122°F). 90 Relative humidity: Store between 0% to 90% relative humidity. 0 600 hPa 1000 hPa Atmospheric pressure should be 600 hPa to 1000 hPa. Product adheres to requirements of Type B applied part. Read and follow instructions for use. Contains electronics, dispose according to local regulations or return to Eargo. Do not use if package is damaged. Single use only. 45 General Warnings - Only use medical grade (IEC 60601-1) or ITE approved (UL 60950) power supply. - Hearing aid and accessories contain small parts which can be swallowed. Keep small parts out of reach of children due to choking hazard. - Electrical equipment are an ignition source. Do not use hearing aids, charger or base in an oxygen enriched environment. - Hearing aid may impair remaining hearing. Only use as prescribed by your hearing care professional. - Hearing aid must only be used by intended person. Use by another person may damage their hearing. - Do not use an instrument, such as a cotton swab, to push the hearing aid in the ear canal. The hearing aid may be placed too deep and cause damage to the ear. - Do not place charger in clothing pocket while charging with the micro USB cord. The charger may overheat and malfunction. - Users with active implants such as a pacemaker should keep hearing aid, charger and base away from the active implant. Base contains a magnet. Do not place charger in chest pocket. - Do not use hearing aid during X-rays, MRIs, CT scans or other similar medical treatment to prevent damage to the hearing instrument. 46 - Check for electronic or wireless restrictions prior to using hearing aid, charger or base to prevent electrical interference to nearby equipment. - Do not expose hearing aid to contaminants such as hair spray, mousse, gel, lotions, etc to prevent damage to the hearing aid. - Avoid exposure to water or long term exposure to moisture to prevent damage to hearing aid, charger and base. - Do not dry hearing aid with a hairdryer. Heat may damage hearing aid. - Only clean hearing aid with a pad moistened with alcohol. Carefully wipe hearing aid to prevent damage. - To prevent damage and/or malfunction, do not modify hearing aid, charger, base or accessories. - Do not replace battery. 47 Warranty Free trial period Eargo grants you a sixty (60) day free trial period valid from the date of purchase. Within this 60-day period, you can return your Eargo devices for a full refund. Devices need to be postmarked no more than 60 days after the date of delivery within the limited warranty period listed below. This warranty is guaranteed by Eargo Inc. REPAIR What your warranty covers… This limited warranty covers defects in material and workmanship for the Eargo hearing system, which includes the hearing devices, internal components, charger, charging base, cord and plug, within the limited warranty period listed below. Warranty period Eargo offers you a one (1) year limited warranty valid starting from the date of delivery. What you get with your repair? For valid repairs, Eargo pledges to secure functionality at least equivalent to the original hearing device. At the discretion of Eargo, hearing devices may be replaced by new products or products manufactured from new or serviceable used parts or repaired using new or refurbished replacement parts. 48 Exclusions from warranty repair coverage - Devices purchased from unauthorized distributors are not covered by this or any other Eargo warranty. - Damage from improper handling or care, exposure to chemicals, immersion in water or undue stress. - Damage caused by third parties or non-authorized service centers renders this warranty null and void. Number of repairs Unlimited during warranty period for repairs covered by warranty terms. LOSS AND DAMAGE Loss & Damage Eargo offers a one time (1x) replacement for each device that is lost or damaged during the one (1) year warranty period, for a fee. Devices damaged from improper use or care will not be replaced. HOW TO SUBMIT REQUEST FOR REPAIR Call 1-800-61-EARGO and we will be happy to assist. Repairs or returns: Eargo, Inc. 1975 W El Camino Real, Suite 204 Mountain View, CA 94040 Manufacturer: Eargo Inc. SKU #: 99-0001-001 SKU #: 99-0001-002 SKU #: 99-0002-001 SKU #: 99-0002-002 49 NOTES: 50 51 Support: 1-800-61-EARGO (1-800-613-2746) www.EARGO.com This is a new product, not used or refurbished. “Eargo” is a registered trademark of Eargo, Inc. The Eargo wordmark and symbol are trademarks of Eargo, Inc. ©2015 Eargo, Inc. User Guide LBL0018 Rev B 04/23