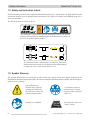
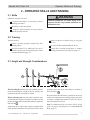
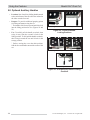
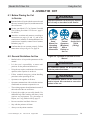
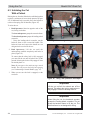
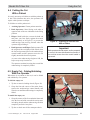
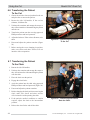
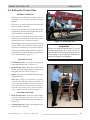
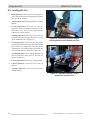
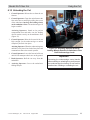
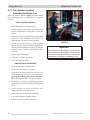
1
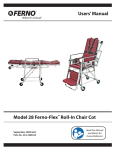
Users’ Manual
Model 28-Z
Chair Cot
August 2006 GLO
Pub. No. 234-3356-00
Model 28-Z Chair Cot
Disclaimer
This manual contains general instructions for the use, operation and
care of this product. The instructions are not all-inclusive. Safe and
proper use of this product is solely at the discretion of the user. Safety
information is included as a service to the user. All other safety
measures taken by the user should be within and under consideration
of applicable regulations. It is recommended that training on the proper
use of this product be provided before using this product in an actual
situation.
Retain this manual for future reference. Include it with the product in
the event of transfer to new users. Additional free copies are available
upon request from Customer Relations.
Proprietary Notice
The information disclosed in this manual is the property of FernoWashington, Inc., Wilmington, Ohio, USA. Ferno-Washington, Inc.
reserves all patent rights, proprietary design rights, manufacturing
rights, reproduction use rights, and sales use rights thereto, and to any
article disclosed therein except to the extent those rights are expressly
granted to others or where not applicable to vendor proprietary parts.
European Representative
Ferno (UK) Limited, Stubs Beck Lane, Cleckheaton
West Yorkshire BD19 4TZ, United Kingdom
Telephone
+44 (0) 1274 851999
Fax
+44 (0) 1274 851111
Internet
www.ferno.co.uk
234-3468-00
© Copyright Ferno-Washington, Inc. All Rights Reserved.
Ferno-Washington, Inc.
70 Weil Way
Wilmington, OH 45177-9371 U.S.A.
Telephone (Toll Free) ......................... 1.877.733.0911
Telephone ........................................ +1.937.382.1451
Fax (Toll Free) ................................... 1.888.388.1349
Fax .................................................. +1.937.382.6569
Internet ............................................... www.ferno.com
2
© Ferno-Washington, Inc. 234-3356-00 August 2006
Model 28-Z Chair Cot
TABLE OF CONTENTS
Section
Page
Section
Page
1 - Safety Information ................................................. 5, 6
6 - Using the Cot ....................................................... 19-27
1.1 Warning ................................................................ 5
6.1 Before Placing the Cot in Service ..................... 19
1.2 Important .............................................................. 5
6.2 General Guidelines for Use ............................... 19
1.3 Bloodborne Disease Notice ................................. 5
6.3 Unfolding the Cot with a Patient ....................... 20
1.4 Cot and Fastener Compatibility ........................... 5
6.4 Folding the Cot with a Patient ........................... 21
1.5 Safety and Instruction Labels .............................. 6
6.5 Empty Cot - Folding/Unfolding with
1.6 Symbol Glossary .................................................. 6
One Operator ..................................................... 21
2 - Operator Skills and Training .................................... 7
6.6 Transferring the Patient to the Cot .................... 22
2.1 Skills .................................................................... 7
6.7 Transferring the Patient to the Chair ................. 22
2.2 Training ................................................................ 7
6.8 Rolling the Cot and Chair .................................. 23
2.3 Height and Strength Considerations .................... 7
6.9 Loading the Cot ................................................. 24
3 - About the Cot ........................................................ 8-10
6.10 Unloading the Cot ........................................... 25
3.1 Cot Description .................................................... 8
6.11 One Operator Loading/Unloading an
3.2 General Specifications ......................................... 8
Empty Cot ........................................................ 26
3.3 Components ......................................................... 9
6.12 Using Additional Help .................................... 27
3.4 Cot and Chair Positions ..................................... 10
7 - Maintenance ....................................................... 28, 29
4 - Setup ..................................................................... 11-13
7.1 Maintenance Schedule ....................................... 28
4.1 Preparing the Ambulance and Cot for Use ......... 11
7.2 Disinfecting and Cleaning Restraints ................ 28
4.2 Updating Your Model 173 Cot Fastener ............ 11
7.3 Disinfecting and Cleaning the Mattresses ......... 28
4.3 Patient Restraints ............................................... 12
7.4 Disinfecting and Cleaning the Cot ..................... 28
4.4 Locking Mattress ............................................... 13
7.5 Inspecting the Cot .............................................. 29
5 - Using the Features ............................................... 14-18
7.6 Lubricating the Cot ............................................ 29
5.1 Undercarriage Control Handle .......................... 14
8 - Parts and Service ............................................... 30, 31
5.2 Telescoping Side Lift Handles .......................... 14
8.1 Parts and Service - U.S.A. and Canada ............ 30
5.3 Cot/Chair Conversion Handle ........................... 15
8.2 Parts and Service - Worldwide .......................... 30
5.4 Backrest ............................................................. 16
8.3 Parts List ............................................................ 30
5.5 Wheel Locks ...................................................... 16
8.4 Parts Diagrams ................................................... 31
5.6 Optional Folding Sidearms ................................ 17
9 - Accessories and Related Products .......................... 32
5.7 Optional Lead Handle ........................................ 17
10 - Limited Warranty Summary ................................ 33
5.8 Optional Auxiliary Handles ............................... 18
11 - Ferno Customer Relations .................................... 33
Training Record ............................................................. 34
Maintenance Record ..................................................... 35
© Ferno-Washington, Inc. 234-3356-00 August 2006
3
Model 28-Z Chair Cot
Illustrations
Safety and Instruction Labels ............................................ 6
Figure 21 - Using the Lead Handle to Pull the Cot ......... 17
Symbol Glossary ............................................................... 6
Figure 22 - Foot-End Handle Locking Positions ............ 18
Height and Strength Considerations .................................. 7
Figure 23 - Side Handle Locking Positions .................... 18
Components ....................................................................... 9
Figure 24 - Symbols on Cot and in Users' Manual ......... 19
Cot and Chair Positions ................................................... 10
Figure 25 - Using Two Operators .................................... 20
Figure 1A - New-Style Hook ............................................ 11
Figure 26 - Using Two Operators and Two Helpers ....... 20
Figure 1B - Old-Style Hook ............................................. 11
Figure 27 - Preparing to Fold the Cot with
Figure 1C - Serial Number Location ................................ 11
a Patient .................................................................... 21
Figure 1D - Serial Number Location ............................... 11
Figure 28 - Preparing to Fold the Empty Cot ................. 21
Figure 2 - Patient Restraints ............................................ 12
Figure 29 - Transferring the Patient to the Cot ............... 22
Figure 3 - Attachment Points for Patient Restraints ........ 12
Figure 30 - Transferring the Patient onto the Chair ........ 22
Figures 4-6 - Attaching Guide and Shoulder Straps ....... 12
Figure 31 - Rolling the Cot ............................................. 23
Figure 7 - Locking Mattress Components ....................... 13
Figure 32 - Rolling the Chair .......................................... 23
Figure 8A - Mattress Hooks Anchored
Figure 33 - Assisting Operator Guides Loading Wheels .....
Through Backrest-Panel Holes ............................... 13
Figure 8B - Backrest with Shoulder Straps Attached
onto Ambulance Floor .............................................. 24
Figure 34 - Operator Pushes Cot into Ambulance and ........
and Mattress Anchored in Place ............................... 13
Fastener .................................................................... 24
Figure 9 - Using the Undercarriage Control Handle ....... 14
Figure 35 - Assisting Operator Ensures Loading Wheels ...
Figures 10 and 11 - Side Lift Handle Positions .............. 14
Remain on Ambulance Floor ................................... 25
Figure 12 - Using the Cylinder Grip ............................... 14
Figure 36 - Loading the Cot with One Operator ............. 26
Figure 13 - Conversion Handle Location ........................ 15
Using Additional Help Diagrams .................................... 27
Figure 14 - Cot and Chair Locking Positions ................. 15
Maintenance Table .......................................................... 28
Figure 15 - Recommended: Use Two Hands .................. 15
Figure 37 - Lubrication Points ........................................ 29
Figure 16 - Alternative: Use One Hand ........................... 15
Parts Diagrams ................................................................ 31
Figure 17 - Using the Backrest Control Handle .............. 16
Serial Number Location .................................................. 33
Figure 18 - Engaging/Disengaging the Wheel Lock ....... 16
Figure 19 - Raising a Sidearm ......................................... 17
Figure 20 - Folding a Sidearm ........................................ 17
4
© Ferno-Washington, Inc. 234-3356-00 August 2006
Model 28-Z Chair Cot
Safety Information
1 - SAFETY INFORMATION
1.1 Warning
1.2 Important
Warning notices indicate a potentially hazardous
situation which, if not avoided, could result in injury
or death.
Important notices emphasize important usage or
maintenance information.
! WARNING
Untrained operators can cause injury or be
injured. Permit only trained personnel to
operate the cot.
Improper use of the cot can cause injury. Use
the cot only for the purpose described in this
manual.
An unrestrained patient can fall off the cot
and be injured. Use restraints to secure the
patient on the cot.
Improper operation can cause injury. Operate
the cot only as described in this manual.
An unattended patient can be injured. Stay
with the patient at all times.
Helpers can cause injury. Maintain control
of the cot, operate the controls, and direct
all helpers.
Improper maintenance can cause injury.
Maintain the cot only as described in this
manual.
Improper parts and service can cause injury.
Use only Ferno parts and Ferno-approved
service on the cot.
Important
Squeezing the undercarriage control handle
when unfolding or unloading the cot will prevent
the undercarriage from locking. Do not use this
handle when unfolding or unloading the cot.
1.3 Bloodborne Disease Notice
To reduce the risk of exposure to bloodborne diseases
such as HIV-1 and hepatitis when using the cot, follow
the disinfecting and cleaning instructions in this manual.
1.4 Cot and Fastener Compatibility
Combining different manufacturers’ products into a
“mixed-component” cot/cot fastener system can
increase the user’s risk of injury and damage.
Ferno-Washington, Inc. strongly recommends that only
Ferno-manufactured cots be used in Fernomanufactured cot fasteners, and that only Fernomanufactured cot fasteners be used for securing Fernomanufactured cots in ambulances.
ANY COMBINATION OF A FERNO COT OR COT
FASTENER WITH A NON-FERNO COT OR COT
FASTENER IS MISUSE OF THE FERNO PRODUCT.
Responsibility for the outcome of known, intentional
misuse rests squarely on the misuser.
Modifying the cot can cause injury and
damage. Use the cot only as designed by
Ferno.
Attaching improper items to the cot can
cause injury. Use only Ferno-approved items
on the cot.
© Ferno-Washington, Inc. 234-3356-00 August 2006
5
Model 28-Z Chair Cot
Safety Information
1.5 Safety and Instruction Labels
Safety and instruction labels place important information from the users’ manual on the cot. Read and follow label
instructions. Replace worn or damaged labels immediately. New labels are available from EMSAR (page 30) or
from your distributor.
238-1505-01-A
The following labels are affixed to the cot:
238-1505-01-B
This safety label is affixed to the foot-end main frame of the cot. The General
Warning of Potential Injury triangle applies to all three specific symbols in
the box (see Symbol Glossary below).
This instruction label is affixed to the red Cot/Chair Conversion
Handle at the head end of the cot. It illustrates squeezing the handle
to change the cot to a chair and the chair to a cot.
1.6 Symbol Glossary
The symbols defined below are used on the cot and/or in this users' manual. Ferno uses symbols recognized by the
International Standards Organization (ISO), the American National Standards Institute (ANSI), and the emergency
medical services industry.
General Warning of
Potential Injury. Specific
warnings are indicated by
the symbols or words used
with the triangle symbol.
Read the Users' Manual.
6
2
700 lb
318 kg
Cot operation requires a
minimum of two trained
operators when a patient is
on the cot.
The load limit of the cot is
700 lb (318 kg).
© Ferno-Washington, Inc. 234-3356-00 August 2006
Model 28-Z Chair Cot
Operator Skills and Training
2 - OPERATOR SKILLS AND TRAINING
2.1 Skills
Operators using the cot need:
a working knowledge of emergency patienthandling procedures.
! WARNING
Untrained operators can cause injury or be
injured. Permit only trained personnel to
operate the cot.
the ability to assist the patient.
a complete understanding of the procedures
described in this manual.
2.2 Training
Trainees need to:
follow a training program designed by their
training officer.
read this manual. For additional free users’
manuals, contact your Ferno distributor or Ferno
Customer Relations (page 33).
practice with the cot before using it in regular
service.
be tested on their understanding of the cot.
record their training information. A sample
training record sheet is provided on page 34.
2.3 Height and Strength Considerations
E.M.S.
2
1
When loading the cot, the foot-end (control) operator
must lift and hold the weight of the cot, patient, and
equipment until the cot legs have folded.
When unloading the cot, the control operator must
lift and hold the weight, keeping the cot wheels off the
ground, until the undercarriage has unfolded completely
and locked. 1
Supporting this weight requires greater strength from
short operators than from tall operators because short
© Ferno-Washington, Inc. 234-3356-00 August 2006
operators must raise their arms higher in relation to
their shoulders. 2
Be aware that if the ambulance is parked on an uneven
surface, the control operator (and any helpers) may need
to lift the cot higher than normal to allow the legs to
unfold completely and lock.
Note: Use additional help as needed to lift the weight
of the cot, patient, and equipment (see Using Additional
Help, page 27).
7
About the Cot
Model 28-Z Chair Cot
3 - ABOUT THE COT
3.1 Cot Description
The Model 28-Z Chair Cot (called the “cot” in this manual)
is an emergency patient-handling device designed to
transport a patient in a ground-based ambulance.
The cot is for professional use by a minimum of two
trained operators. Additional help is needed when
working with heavy loads.
The cot is designed for use with an updated Ferno®
Model 173 Cot Fastening System and is shipped with a
kit to update one Model 173 Fastener (see Updating
Your Model 173 Cot Fastener, page 11.
Cot features include:
COT CONFIGURATION
Height
Folded (Minimum) .......................... 9 in. (22 cm)
Raised (Maximum) ........................ 33 in. (84 cm)
Loading Height .............................. 27 in. (68 cm)
Length
Folded ........................................... 80 in.(204 cm)
Raised .......................................... 75 in. (190 cm)
Width
Overall Width ............................... 25 in. (63 cm)
CHAIR CONFIGURATION
• Easy conversion between cot and chair positions
• One intermediate chair position
• Pneumatic backrest, infinitely adjustable between
0° and 85°
• Two integrated telescoping side lift handles
• Foot-end swivel wheels with locks
• Sealed casters and bearings
• Locking mattress
• Complete set of patient restraints
• (Optional) Folding sidearms
• (Optional) Carry handles for foot end and sides
• (Optional) Foot-end lead handle
Maximum Height ............................. 55 in. (140 cm)
Overall Width ..................................... 25 in. (63 cm)
Overall Depth (front to back) .......... 48 in. (122 cm)
! WARNING
Ferno reserves the right to change specifications without
notice.
Improper use of the cot can cause injury. Use
the cot only for the purpose described in this
manual.
AMBULANCE INFORMATION
The ambulance bumper extension should not exceed
16 inches. The patient compartment should have a level
floor large enough for the folded cot, and a Ferno® cot
fastener (not included) installed.
The cot is for use with ambulances that meet the
requirements of the Federal Ambulance Specification
KKK-A-1822. For information, contact Federal Supply
Services. Specifications Section. Suite 8100. 470 E.
L'Enfant Plaza, SW. Washington, DC 20407.
8
3.2 General Specifications
COT AND CHAIR
Weight** (w/o optional features) ....... 69 lb (31.2 kg)
Load Limit.......................................... 69 lb (31.2 kg)
Strength to Weight Ratio (SWR)*** ............... 10:1
General specifications are rounded to the nearest whole
number. Metric conversions are calculated before rounding
the Imperial numbers. For more information about the chair
cot, contact Ferno Customer Relations (page 33) or your
Ferno distributor.
* Height is the distance from the ground to the patient surface
at the seat panel. Loading height is the distance from the
ground to the bottom of the loading wheels.
**Weight is determined without mattress, restraints,
accessories, or optional features.
***Strength to Weight Ratio is the cot load limit divided by
the cot weight.
LOAD LIMIT
700 lb
318 kg
Inspect the cot if the load limit
has been exceeded
(see Inspecting the
Cot, page 29).
© Ferno-Washington, Inc. 234-3356-00 August 2006
Model 28-Z Chair Cot
About the Cot
3.3 Components
HEAD END
Backrest
Loading
Wheel
Crosstube
Telescoping
Side Lift Handle
(2)
Loading
Wheel
(2)
Undercarriage
Control Handle
Undercarriage
6" Locking
Swivel Wheel
(2)
Backrest
Control Handle
6" Fixed Transport
Wheel (2)
Model 417-1
Torso
Restraint
with Guide
Strap (1)
Chair-Adjustment
Handle
Model 430 Restraints (2)
Head-End
Mattress
Foot-End
Mattress
To request additional free users’ manuals
contact Ferno Customer Relations (page
33) or visit us at www.ferno.com
© Ferno-Washington, Inc. 234-3356-00 August 2006
9
Model 28-Z Chair Cot
About the Cot
27" (68 cm)
Loading Height
3.4 Cot and Chair Positions
Cot Position
Use for Rolling and Loading.
Intermediate Chair Position
Use for patient comfort.
Chair may be rolled in this position.
Chair Position
Use for Patient Transfer and Rolling.
Folded Position
Use for Patient Transfer and Ambulance Transport.
10
© Ferno-Washington, Inc. 234-3356-00 August 2006
Model 28-Z Chair Cot
Setup
4 - SETUP
4.1 Preparing the Ambulance and
Cot for Use
Update your Model 173 Fastener if necessary (see
Updating Your Model 173 Cot Fastener, this page)
Attach an approved set of restraints as shown on
page 12.
Attach the mattress as shown on page 13.
Attach any accessories shipped with the cot. Follow
the instructions included with accessories. Keep
accessory instruction manuals with this manual.
Inspect the cot. See Inspecting the Cot, page 29.
4.2 Updating Your Model 173
Cot Fastener
Model 173 Fasteners with old-style hooks must be
updated to function properly with the 28-Z chair cot.
Fasteners with updated hooks are compatible with all
previous Model 28 chair cots as well as with the 28-Z
chair cot.
Your fastener hook is new style and does not require
updating if it has a lip as illustrated in Figure 1A
Lip
Does Not Require Updating
Figure 1A- New-Style Hook
Your fastener hook is old-style and requires updating
if there is no lip, as illustrated in Figure 1B. Use Model
173 Fastener Update Kit 082-2134 from Ferno
Customer Relations (page 33).
SERIAL NUMBER LOCATIONS
To establish the style of your fastener and take the
correct action, Ferno's Customer Relations
representative will ask for the serial number or numbers
on your fastener hook. Please have the serial number,
or numbers, at hand.
No Lip
Requires Updating with Kit 082-2134
Figure 1B- Old-Style Hook
Serial numbers are located as follows:
1. the plate portion of the hook (Figure 1C)
2. the vertical portion of the hook (Figure 1D)
3. both the plate portion and the vertical portion of
the hook as in Figures 1C and 1D. (These will be
two different serial numbers.) In this case, the
fastener hook has already been updated.
Figure 1C - Serial
Number Location
© Ferno-Washington, Inc. 234-3356-00 August 2006
Figure 1D - Serial
Number Location
11
Model 28-Z Chair Cot
Setup
4.3 Patient Restraints
•
Use a complete set of patient restraints (Figure
2) to secure the patient on the cot or chair.
•
Attach the restraints to the attachment points
specified in Figure 3.
•
Use the guide strap supplied with the torso
restraint system. The guide straps holds the
shoulder straps in place on the backrest frame.
Follow the instructions below for attaching the
guide strap and shoulder straps.
! WARNING
An unrestrained patient can fall off the cot
and be injured. Use restraints to secure the
patient on the cot.
Torso
Restraint
System
(1)
Guide Strap
Note: For complete details on attaching, using,
and maintaining all the restraints supplied with
the cot, see the restraint users' manuals provided
with the restraints. Additional, free manuals are
available from Ferno Customer Relations (page 33).
ATTACHING THE GUIDE STRAP
AND SHOULDER STRAPS
Hip and Thigh Restraints (2)
1. Position the guide strap between the backrest and
the backrest control handle, and slide it up against
the backrest frame (Figure 4).
2. Thread the looped end of one shoulder strap up
through one side of the guide strap, then thread
the shoulder strap over the backrest control handle
and under the backrest frame to the front of the
backrest (Figure 5).
Figure 2 - Patient Restraints
Brackets
for Leg
Straps
Thigh
Strap
Slots
Chest
Strap
Slots
Shoulder
Straps
Here
3. Slide the hardware end of the shoulder strap
through the looped end (Figure 6) and pull to
tighten the strap around the backrest frame.
4. Repeat with the remaining shoulder strap.
5. Snug the guide strap up against the backrest frame
(see Figure 8B, page 13).
Figure 4 - Positioning the Guide Strap
12
Figure 3 - Attachment Points for Patient
Restraints
Figure 5 - Threading the
Shoulder Strap
Figure 6 - Attaching the
Shoulder Strap
© Ferno-Washington, Inc. 234-3356-00 August 2006
Model 28-Z Chair Cot
4.4 Locking Mattress
•
The two-piece mattress is designed with
articulated segments (Figure 7) that conform to
the cot and chair configurations.
•
Hooks on the underside of each mattress anchor
it to the cot (Figures 8A and 8B) for easier patient
transfer.
•
To attach a mattress: align the mattress segments
with their matching bed panels, then feed the
hooks through the bed-panel holes.
•
To remove a mattress: slide one hand under the
mattress and apply gentle upward pressure as you
use your other hand to slide the hooks from the
bed-panel holes.
Setup
Foot-End
Mattress
Foot and Leg
Segments
Head-End
Mattress
Seat Gussett
Segment
Back
Segment
Figure 7 - Locking Mattress Components
Tip
Attach the gusset segment
first (Figure 7). This
positions the upper mattress
properly for attaching the
seat and back segments.
Figure 8A - Mattress Hooks Anchored
Through Backrest Panel Holes
Guide Strap and
Shoulder Straps
Mattress Hooks
Figure 8B - Backrest with Shoulder Straps
Attached and Mattress Anchored in Place
© Ferno-Washington, Inc. 234-3356-00 August 2006
13
Model 28-Z Chair Cot
Using the Features
5 - USING THE FEATURES
5.1 Undercarriage Control Handle
•
Location: Patient's left side at foot end of cot.
•
Purpose: Releases the safety lock to allow the
undercarriage to fold when folding or loading the
cot.
•
Use: Squeeze the undercarriage control handle
(Figure 9) only when folding the cot and when
loading the cot into an ambulance.
° Do not squeeze the control handle when
unfolding or unloading the cot. Doing so will
prevent the undercarriage from locking.
Figure 9 - Using the Undercarriage Control
Handle
Important
Squeezing the undercarriage control handle
when unfolding or unloading the cot will prevent
the undercarriage from locking. Do not use this
handle when unfolding or unloading the cot.
5.2 Telescoping Side Lift Handles
•
Location: Both sides of the cot at the head-end
legs.
•
Purpose: Provide additional grasping points for
lifting and rolling the cot and rolling the chair.
•
Use: Pull to extend a handle (Figure 10). Push to
retract a handle (Figure 11).
Figure 10 - Side Lift
Handle Retracted
Figure 11 - Side Lift
Handle Extended
° To maintain cot balance, always use both
handles.
° Use both hands in a cylinder grip as in Figure
12 when doing a four-person lift.
Note: Additional lifting handles are available for
the foot end and sides of the cot (see Optional
Lifting Handles, page 18).
Figure 12 - Using the Cylinder Grip for a
Four-Person Lift
14
© Ferno-Washington, Inc. 234-3356-00 August 2006
Model 28-Z Chair Cot
5.3 Cot/Chair Conversion Handle
•
Location: Next to the loading-wheel crosstube
at the head end of the cot (Figure 13). A label
illustrating the handle's use is affixed to the center
portion of the handle.
•
Purpose: Squeezing the handle releases the
locking mechanism and allows the cot to be
moved to any of its three locking positions: cot;
intermediate; and chair (Figure 14).
•
Before Use:
° Loosen the leg restraints.
° Lower the backrest before moving from the cot
to the intermediate or chair position. This
prevents the patient's upper body from leaning
forward in an uncomfortable position.
•
Use:
° To convert the cot to a chair: Lower the
backrest. Exert a little downward pressure on the
loading-wheel crosstube to relieve the load on the
lock mechanism, then squeeze the conversion
handle while raising the crosstube until the chair
position is reached.
° To convert the chair to a cot: Exert a little
upward pressure on the loading-wheel crosstube
to relieve the load on the lock mechanism, then
squeeze the handle while pushing down on the
loading-wheel crosstube until the cot position is
reached.
° To achieve the intermediate position: Follow
either of the conversion instructions above except
you must release the handle when you begin to
raise or lower the loading-wheel crosstube. The
lock will engage when the intermediate position
is reached.
Recommendation
Ferno recommends operating the
conversion handle with two hands
(Figure 15). Alternatively, one hand
may be used as in Figure 16 if local
protocols, operator strength, and
patient weight permit.
Using the Features
Loading-Wheel
Crosstube
Cot/Chair
Conversion Handle
Figure 13 - Conversion Handle Location
Cot Position
Intermediate Position
Chair Position
Figure 14 - Cot and Chair Locking Positions
Important
Before moving from the cot to the chair or
intermediate position, lower the backrest to
prevent leaning the patient's upper body too
far forward and causing discomfort.
Figure 15
Recommended:
Use Two Hands
© Ferno-Washington, Inc. 234-3356-00 August 2006
Figure 16
Alternative:
Use One Hand
15
Using the Features
Model 28-Z Chair Cot
5.4 Backrest Control Handle
•
Location: Beneath the backrest.
•
Purpose: Adjusts between 0° and 85° for patient
comfort or medical necessity.
•
Before Use:
° Be prepared to support the backrest and patient
weight while adjusting the backrest.
•
Use: To adjust, press the red control hand toward
the backrest (Figure 17), raise or lower the
backrest to the desired position, and release the
handle to lock in place.
° The gas spring is under pressure to ease raising
and lowering. Control the upward movement of
the backrest so it does not move too forcefully.
Figure 17 - Using the Backrest Control
Handle
Note: When the operator cannot stand behind the
backrest it can be adjusted from the side but the
operator must be able to support the weight
throughout the adjustment.
5.5 Wheel Locks
•
Location: Both foot-end wheels.
•
Purpose: Locks stop wheels from rotating and
swiveling to help keep the cot stationary during
patient transfer and certain medical procedures.
° Wheel locks are not designed for use as brakes.
Remain with the cot and keep control of it at all
times. Do not leave the cot or patient unattended.
•
Use: To engage, press down on the free end of
the lock lever with your toe (Figure 18). To
disengage, press down on the opposite end of the
lock lever with your toe (Figure 18).
Disengage
Engage
Figure 18 - Engaging and Disengaging the
Wheel Lock
16
© Ferno-Washington, Inc. 234-3356-00 August 2006
Model 28-Z Chair Cot
Using the Features
5.6 Optional Folding Sidearms
•
Location: Both sides of the cot.
•
Purpose: Sidearms add patient comfort.
•
Use: To raise, move the sidearm upward and
toward the head end of the cot until it locks in
place (Figure 19). To lower, squeeze the sidearm
release (Figure 20) and move the sidearm toward
the foot-end of the cot until it is flat against the
main frame.
° Do not use the sidearms to lift the cot. Grasp
the cot frame when lifting the cot.
Figure 19 - Raising a Sidearm
Important
Sidearms are not designed for lifting the cot.
Lift the cot by grasping the loading-wheel
crosstube at the head end, the main frame at
the foot end, and when needed, the telescoping
side lift handles and/or the optional auxiliary
foot-end or side lifting handles.
Figure 20 - Folding a Sidearm
5.7 Optional Lead Handle
•
Location: Foot end of cot.
•
Purpose: Aids in rolling the cot on smooth, level
surfaces.
•
Use: The control operator grasps the lead handle
to pull and steer the cot (Figure 21) while the
head-end operator grasps the loading-wheel
crosstube and pushes.
Figure 21 - Using the Lead Handle
To Pull the Cot
© Ferno-Washington, Inc. 234-3356-00 August 2006
17
Using the Features
Model 28-Z Chair Cot
5.8 Optional Auxiliary Handles
•
Location: Sets of auxiliary folding handles attach
to the main frame of the cot at the foot end and at
the sides near the foot end.
•
Purpose: To provide additional grasping points
for lifting and maneuvering the cot.
° The handles fold for storage and unfold to lock
into the lifting position for use. (Figures 22 and
23).
•
Use: To unfold, pull the handle to unlock, then
swing it away from the cot until it locks in the
lifting position. To fold, pull the handle to unlock,
then swing it toward the cot until it locks in the
storage position.
Storage Position
Lifting Position
Figure 22 - Foot-End Handle
Locking Positions
° Before moving the cot to the chair position,
fold the foot-end handles toward the center of the
cot.
Storage Position
Storage Position
Lifting Position
Figure 23 - Side Auxiliary Handle Locking
Positions
18
© Ferno-Washington, Inc. 234-3356-00 August 2006
Model 28-Z Chair Cot
Using the Cot
6 - USING THE COT
6.1 Before Placing the Cot
in Service
Personnel who will work with the cot need to read
this users' manual (Figure 24) and the manual for
the cot fastener.
! WARNING
Improper operation can cause injury. Operate
the cot only as described in this manual.
Update your Model 173 Cot Fastener if needed
(see Updating Your Model 173 Fastener, page 11
for details).
Attach the restraints and mattress according to
instructions on pages 12 and 13, and in the
restraint users' manuals. To obtain additional, free
restraint users' manuals, contact Ferno Customer
Relations, page 33.
Confirm that the cot operates properly. Follow
instructions in Inspecting the Cot, page 29.
6.2 General Guidelines for Use
•
Medical advice is beyond the parameters of this
manual.
•
It is the users’ responsibility to ensure safe
practices for the patient and themselves.
•
Using the cot requires a minimum of two trained
operators when a patient is on the cot.
•
Follow standard emergency patient-handling
procedures when operating the cot.
•
Operators work together at all times.
•
Operators communicate with each other and use
coordinated movements to operate the cot.
•
The assisting operator should maintain control of
the head end of the cot at all times.
•
Lift only the weight you can safely handle. Use
additional help when working with heavy loads
(patient and equipment). For placement of
helpers, see Using Additional Help, page 27.
•
Do not exceed the load limit of the cot.
•
Stay with the patient at all times.
•
Always use the patient restraints.
© Ferno-Washington, Inc. 234-3356-00 August 2006
2
700 lb
318 kg
Read the
Users'
Manual for
Operating
and Safety
Information
Use Two
Trained
Operators
(Minimum)
With a
Patient on
the Cot
Load Limit
for the Cot Is
700 lb
(381 kg)
Figure 24 - Symbols on Cot and in Users'
Manual
! WARNING
An unattended patient can be injured. Stay
with the patient at all times.
! WARNING
An unrestrained patient can fall off the cot
and be injured. Use restraints to secure the
patient on the cot.
19
Using the Cot
Model 28-Z Chair Cot
6.3 Unfolding the Cot
With a Patient
Raising the cot from the folded to the unfolded position
requires a minimum of two trained operators (Figure
25). If additional help is needed, direct the helpers to
use the telescoping side lift handles (Figure 26).
To raise the cot:
1. Both Operators: Stand at opposite ends of the
cot, facing each other.
The foot-end operator grasps the cot main frame.
The head-end operator grasps the loading-wheel
crosstube.
° Grasp the loading-wheel crosstube, not the
backrest frame or the conversion handle. The
backrest frame and conversion handle are not
designed to be used to lift the cot.
Figure 25 - Using Two Operators
2. Both Operators: Lift the cot until the
undercarriage unfolds completely and locks in
place (Figure 25).
To ensure that the safety lock is fully engaged,
you must lift the cot until all wheels are off the
ground, allowing the lock to fully engage if it has
not already done so.
Note: Do not squeeze the undercarriage control
handle. This will prevent the lock from engaging
(see Undercarriage Control Handle, page 14).
3. When you are sure the lock is engaged, set the
cot down.
Figure 26 - Using Two Operators and Helpers
Important
Lift the cot until all four wheels are off the
ground. This allows the locking mechanism to
fully engage if it has not already done so.
Important
When lifting the cot, the head-end operator
grasps the loading-wheel crosstube. Do not
grasp the backrest frame to lift the cot. The
backrest frame is not designed for lifting.
20
© Ferno-Washington, Inc. 234-3356-00 August 2006
Model 28-Z Chair Cot
Using the Cot
6.4 Folding the Cot
With a Patient
It is rarely necessary to fold the cot with the patient on
it, but if this situation does arise, the operators will
require a third person as a helper.
To fold the cot with a patient on it:
1. Assisting Operator: Fasten patient restraints.
2. Both Operators: Stand facing each other at
opposite ends of the cot with hands in the lifting
position.
3. Helper: Stand beside the cot near the head end
and place your foot firmly against the nearest
transport wheel, as in Figure 27, to prevent the
undercarriage from moving forward when the
operators begin folding it.
4. Both Operators and Helper: Both operators lift
the weight of the cot slightly off the wheels, then
the foot-end operator squeezes the undercarriage
control handle and the operators move the cot
slightly toward the head-end operator.
Figure 27 - Preparing to Fold the Cot
With a Patient
Important
Both operators should expect, and be prepared
to control, the normal downward movement of
the cot that occurs when the control handle is
squeezed.
As soon as the undercarriage begins to fold, the
helper steps away from the cot.
The operators continue lowering the cot until the
undercarriage is completely folded.
6.5 Empty Cot - Folding/Unfolding
With One Operator
When there is no patient on the cot, it can be folded
and unfolded by one operator.
To fold the empty cot:
1. Tip the cot onto its loading wheels (Figure 28).
2. Grasp the foot-end corners of the main frame,
squeeze the undercarriage control handle, and
lower the cot until the undercarriage is completely
folded.
To unfold the empty cot:
1. Grasp the corners of the foot-end main frame and
raise the foot end of the cot until the cot tips onto
its loading wheels and the undercarriage unfolds
completely and locks into place.
2. Tip the cot back onto all four transport wheels.
© Ferno-Washington, Inc. 234-3356-00 August 2006
Figure 28 - Preparing to Fold the Empty Cot
21
Using the Cot
Model 28-Z Chair Cot
6.6 Transferring the Patient
To the Cot
1. Choose the raised or lowered position for the cot
and place the cot next to the patient.
2. Retract the side lift handles. If the cot has
sidearms, fold them flat.
3. Unfasten the restraints and arrange the straps so
they will not interfere with transferring the patient
onto the cot.
4. Transfer the patient onto the cot using approved
EMS procedures and local protocols.
5. Adjust the backrest. If the cot has sidearms, raise
them.
6. Fasten and adjust the patient restraints (Figure
29).
Figure 29 - Transferring the Patient
To the Cot
7. Before moving the cot or changing its position,
make sure sheets and other articles will not
interfere with cot operation.
6.7 Transferring the Patient
To the Chair
1. Retract the side lift handles.
2. Unfasten the restraints and arrange the straps so
they will not interfere with transferring the patient
onto the chair.
3. Place the chair near the patient.
4. Engage the wheel locks.
5. Assist the patient into the chair using approved
EMS procedures and local protocols (Figure 30).
6. Fasten and adjust the patient restraints.
7. Before changing the chair position or moving the
chair, make sure sheets and other articles
will not interfere with operating the chair.
8. If the patient's medical condition or comfort
requires, adjust the chair to the intermediate
position.
Figure 30 - Transferring the Patient
Onto the Chair
9. Release the wheel locks and roll the chair.
22
© Ferno-Washington, Inc. 234-3356-00 August 2006
Model 28-Z Chair Cot
Using the Cot
6.8 Rolling the Cot and Chair
GENERAL GUIDELINES
•
Rolling the cot or chair with a patient requires a
minimum of two trained operators working
together.
•
Roll the cot or chair on smooth, unobstructed
surfaces whenever possible.
•
To cross a low obstacle such as a door sill, lift the
weight off the wheels enough to allow the wheels
to roll smoothly over the obstacle.
•
If you must cross a high obstacle such as a curb,
lift the cot by the main frame and loading-wheel
crosstube and carry it across the obstacle.
•
When rolling the chair, do not cross obstacles such
as curbs. Either seek an alternate route or convert
the chair to a cot and carry it across the obstacle.
•
Use help as needed to safely control the combined
weight of the cot, patient, and any equipment (see
Using Additional Help, page 27).
Figure 31 - Rolling the Cot
Important
Roll the cot downhill foot-end first. If it is not
medically appropriate to do this, roll the cot
head-end first, but the head-end operator must
lift up slightly on the load-wheel crosstube to
ensure cot balance is maintained.
ROLLING AS A COT
1. Foot-End Operator: Grasp the main frame or
lead handle and pull the cot (Figure 31).
2. Head-End Operator: Stand at the head end of
the cot, grasp the loading-wheel crosstube, and
help guide and move the cot (Figure 31).
3. Helpers: Grasp the extended side lift handles and
help push the cot.
Note: When rolling the cot downhill, roll it footend first to help maintain end-to-end balance. If
it is not medically appropriate to do this, you may
roll it head end first, but to maintain cot balance
the head-end operator must grasp the loadingwheel crosstube and exert some upward force.
ROLLING AS A CHAIR
1. Head-End Operator: Grasp the loading-wheel
crosstube and push and steer the cot. The
telescoping side lift handle may also be used (see
Figure 32).
2. Assisting Operator: Grasp a telescoping side lift
handle and assist pushing.
© Ferno-Washington, Inc. 234-3356-00 August 2006
Figure 32 - Rolling the Chair
23
Using the Cot
Model 28-Z Chair Cot
6.9 Loading the Cot
1. Both Operators: Roll the cot to the open doors
of the ambulance patient compartment, aligning
the cot with the fastener.
2. Assisting Operator: Raise the ambulance folding
bumper.
3. Control Operator: Push the cot into the
ambulance until both loading wheels are on the
ambulance floor and the cot undercarriage
contacts the vehicle bumper.
Assisting Operator: Stand at the side of the cot
and make sure both loading wheels are securely
on the ambulance floor (Figure 33).
4. Control Operator: Lift the cot until the wheels
are off the ground, then squeeze the control handle
and push the cot completely into the patient
compartment. The undercarriage will fold as the
cot is pushed into the ambulance (Figure 34).
Figure 33 - Assisting Operator Guides
Loading Wheels onto Ambulance Floor
Assisting Operator: Assist with pushing the cot
into the ambulance and guide it into the cot
fastener (Figure 34).
5. Control Operator: Release the control handle.
6. Control Operator: Secure the cot in the cot
fastener.
7. Assisting Operator: Lower the ambulance
folding bumper.
Figure 34 - Operator Pushes Cot into
Ambulance and Fastener
24
© Ferno-Washington, Inc. 234-3356-00 August 2006
Model 28-Z Chair Cot
Using the Cot
6.10 Unloading the Cot
1. Control Operator: Release the cot from the cot
fastener.
2. Control Operator: Grasp the main frame at the
foot end of the cot and begin pulling the cot out
of the ambulance but keep the loading wheels
on the ambulance floor. The undercarriage will
begin to unfold.
Assisting Operator: Stand at the patient
compartment door and make sure the loading
wheels remain securely on the ambulance floor
(Figure 35).
3. Control Operator: Raise the foot end of the cot
high enough for the undercarriage to unfold
completely and lock into place.
Assisting Operator: When the undercarriage has
unfolded, verify that it has locked into place and
communicate that to the control operator.
4. Control Operator: Lower the foot end of the cot
until all four transport wheels are on the ground.
5. Both Operators: Roll the cot away from the
ambulance.
6. Assisting Operator: Lower the ambulance
folding bumper.
© Ferno-Washington, Inc. 234-3356-00 August 2006
Figure 35 - Assisting Operator Ensures
Loading Wheels Remain on Ambulance Floor
Until Undercarriage Locks
Important
Squeezing the undercarriage control handle
when unfolding or unloading the cot will prevent
the undercarriage from locking. Do not use this
handle when unfolding or unloading the cot.
25
Using the Cot
Model 28-Z Chair Cot
6.11 One Operator Loading/
Unloading An Empty Cot
If local protocols permit, the empty cot can be loaded
into, or unloaded from, an ambulance by one trained
operator.
ONE-OPERATOR LOADING
1
Raise the ambulance folding bumper.
2. Roll the cot to the open doors of the ambulance
patient compartment, aligning the cot with the
fastener.
3. Push the cot into the ambulance until both loading
wheels are on the ambulance floor and the cot
undercarriage contacts the vehicle bumper.
4. Lift the cot until the wheels are off the ground,
then squeeze the control handle and push the cot
into the patient compartment (Figure 36) until the
fastener antler captures the loading-wheel
crosstube.
5. Release the control handle.
6. Secure the cot in the cot fastener.
Figure 36 - Loading the Cot with One
Operator
Important
Squeezing the undercarriage control handle
when unfolding or unloading the cot will prevent
the undercarriage from locking. Do not use this
handle when unfolding or unloading the cot.
7. Lower the folding bumper.
ONE-OPERATOR UNLOADING
1. Raise the ambulance folding bumper.
2. Release the cot from the cot fastener.
3. Grasp the main frame at the foot end of the cot
and begin pulling the cot out of the ambulance
but keep the loading wheels on the ambulance
floor. The undercarriage will begin to unfold.
4. Raise the foot end of the cot high enough for the
undercarriage to unfold completely and lock into
place.
5. Lower the foot end of the cot until all four
transport wheels are on the ground.
6. Finish rolling the cot out of the ambulance.
7. Lower the ambulance folding bumper.
8. Roll the cot away from the ambulance.
26
© Ferno-Washington, Inc. 234-3356-00 August 2006
Using the Cot
Model 28-Z Chair Cot
6.12 Using Additional Help
Operating the cot requires a minimum of two trained operators. They may need additional help when working with
heavy loads (patient plus equipment). The trained operators should maintain control of the cot, operate the controls,
and direct all helpers. The chart below shows suggested placement for operators and helpers.
Helpers
H
o
H
H
H
P
P
H
o
o
o
P
o
H
H
H
H
H
o
H
H
P
H
Key: O = Operator
H = Helper
o
H
o
o
o
H
P
P
H
Two
Operators
+
Four
Helpers
Loading/Unloading
H
o
Two
Operators
+
Two
Helpers
Rolling
Changing Levels
H
o
P = Patient
! WARNING
Helpers can cause injury. Maintain control of
the cot, operate the controls, and direct all
helpers.
LOAD LIMIT
700 lb
318 kg
© Ferno-Washington, Inc. 234-3356-00 August 2006
Inspect the cot if the load limit
has been exceeded
(see Inspecting the
Cot, page 29.
27
Model 28-Z Chair Cot
Maintenance
7 - MAINTENANCE
7.1 Maintenance Schedule
The cot requires regular maintenance. Set up and follow
a maintenance schedule. A sample maintenance record
sheet is provided on page 35. The table below represents
minimum intervals for maintenance.
Disinfecting (this page)
Each Month
As Needed
Minimum Intervals
For Basic Maintenance
Each Use
When using maintenance products, follow the
manufacturers’ directions and read the manufacturers’
material safety data sheets. You can purchase a
recommended disinfectant from your Ferno distributor
or Ferno Customer Relations (page 33).
•
Cleaning (this page)
Inspecting (page 29)
Lubricating (page 29)
•
•
•
7.2 Disinfecting and Cleaning
Restraints
Remove restraints from the cot. Disinfect and clean the
restraints only as directed in the restraint users' manuals
provided with the restraints.
Additional, free manuals can be ordered from Ferno
Customer Relations (page 33).
7.3 Disinfecting and Cleaning
the Mattresses
To disinfect: Remove the upper and lower mattresses
from the cot. Apply disinfectant to the mattresses
following the disinfectant manufacturer's instructions
for application method and contact time.
To clean: Use a soft cloth to wash the mattress with a
mild detergent in warm water.
•
! WARNING
Improper maintenance can cause injury.
Maintain the cot only as described in this
manual.
Important
Disinfectants and cleaners containing bleach,
phenolics, or iodines can damage the cot. Use
caution when disinfecting and cleaning with
products containing these chemicals.
Rinse the mattresses with clear water and hang them to
dry, or dry them with a towel.
7.4 Disinfecting and Cleaning the
Cot
To disinfect: Remove restraints and mattresses. Apply
disinfectant to all surfaces following the disinfectant
manufacturer's instructions for application method and
contact time.
Ferno recommends inspecting the cot for obvious
damage as you disinfect it.
To clean: Hand wash all parts of the cot with warm
water and a mild detergent.
Rinse with warm, clear water. Dry the cot with a towel
or allow it to air dry.
Important
Using abrasive cleaning compounds or
applicators on the cot can cause damage. Use
only non-abrasive cleaning compounds and
applicators on the cot.
28
Important
Water under high pressure, or steam,
penetrates joints, flushes away lubricant, and
causes corrosion. Use caution when cleaning
moving parts such as joints and hinges.
© Ferno-Washington, Inc. 234-3356-00 August 2006
Model 28-Z Chair Cot
Maintenance
7.5 Inspecting the Cot
7.6 Lubricating the Cot
Have your service’s equipment maintenance personnel
inspect the cot, following the checklist below and working
the cot through all its functions as described in this manual.
Disinfect and clean the chair before applying lubricant.
If the inspection shows damage or excessive wear,
remove the cot from service until repair is made. See
Parts and Service, pages 30 and 31.
INSPECTION CHECKLIST
Are all components present?
Is the cot free of excessive wear?
Are all screws, nuts, bolts, rivets, and roll pins
securely in place?
Do all moving parts operate smoothly and
properly?
Does the undercarriage safety lock function
properly?
Does the chair/cot conversion bar lock
function properly?
There are two identical lubrication points, located on
opposite sides of the chair at the main hinge (see Figure
37).
Apply one or two drops of a light lubricant such as
EZ-1 or SAE 30-weight oil inside the opening, then
work the chair through alternating chair and cot
positions a few times to distribute the lubricant.
Wipe away excess lubricant.
Do not lubricate any other parts of the cot. Doing so
can cause dirt and foreign particles to collect on those
parts and cause poor performance.
Important
Lubricating parts that should not be lubricated
allows dirt and foreign particles to collect on
those parts, resulting in damage. Lubricate only
the points shown.
Does the cot load and unload properly?
Does the cot roll smoothly?
Do the wheels have some tread?
Are the restraints properly installed?
Is restraint webbing in good condition with
no cuts or frayed edges?
Are restraint buckles free of visible damage
and do they operate properly?
Do installed accessories operate properly
without interfering with cot operation?
Is the ambulance properly prepared for the cot
(approved fastener installed)?
Lube
Point
(1 each side
of chair)
Figure 37 - Lubrication Point (Identical Point
Is Located on Opposite Side of Chair)
© Ferno-Washington, Inc. 234-3356-00 August 2006
29
Model 28-Z Chair Cot
Parts and Service
8 - PARTS AND SERVICE
8.1 Parts and Service U.S.A. and Canada
To order parts or for professional cot repair, contact
EMSAR ® - the only agent authorized by Ferno to
manage, service, and repair Ferno products. EMSAR
factory-trained technicians use Ferno-approved parts
and repair procedures. EMSAR has a franchise location
serving you. For details, phone, fax, or visit EMSAR’s
web site.
! WARNING
Improper parts and service can cause injury.
Use only Ferno parts and Ferno-approved
service on the cot.
1.800.73.EMSAR (Phone)
1.937.383.1051 (Fax)
www.EMSAR.com (Internet)
! WARNING
8.2 Parts and Service Worldwide
To order Ferno parts and for professional cot repair,
contact your Ferno distributor. Your distributor is the
only agent authorized by Ferno to manage, service, and
repair Ferno products.
Modifying the cot can cause injury and
damage. Use the cot only as designed by
Ferno.
8.3 Parts List
Ref. #
1
2
3
4
5
6
7
8
9
Description
Part #
Swivel Caster with Brake Assembly (with screw)
...............................................................190-1626
6" Wheel with Bearing .......................... 190-1144
Finger Guard with Hardware.................190-1629
Finger Guard Label Sheet .....................190-1632
Red Side Extension Knob w/Hardware 190-1634
4" Loading Wheel with Bushing ...........090-0539
Gas Assist Cylinder w/Hardware ..........190-1627
Loading Wheel Axle with Cover, Tube, and Nuts
...............................................................190-1628
Backrest Release Handle w/Hardware ..190-1630
Not Shown
10 Reflective Label Sheet (complete set) ..190-1631
11 Safety Label Sheet (complete set) .........190-1633
12 Lead Handle with Hardware .................190-1209
30
© Ferno-Washington, Inc. 234-3356-00 August 2006
Model 28-Z Chair Cot
Parts and Service
8.4 Parts Diagrams
6
5
2
1
3
2
4
9
8
Not Shown 10
11
12
7
© Ferno-Washington, Inc. 234-3356-00 August 2006
31
Model 28-Z Chair Cot
Accessories and Related Products
9 - ACCESSORIES AND RELATED PRODUCTS
Ferno offers a full line of accessories and related
products approved for use with the cot.
Follow the instructions packed with accessories. Keep
the instructions with this manual. Be aware of any
special considerations (loading heights, door heights,
etc.) when using accessories.
Contact Ferno Customer Relations (page 33) or your
Ferno distributor for product information.
Description
Part Number
417-1 Torso Restraint, black ........................031-3915
Guide Strap for Torso Restraint ...................031-3945
430 Restraint, 2-piece, 5 ft./152cm, black ...031-3892
28-Z Mattress set ..........................................031-4031
28-Z Mattress, Head End .............................031-4037
28-Z Mattress, Foot End...............................031-4038
Model 173 Fastener Update Kit ...................082-2134
TOUCH-UP PAINT
Rescue red ....................................................081-9972
Day-glo green ...............................................081-9973
Safety orange ................................................081-9974
Electric blue ..................................................081-9975
Black .............................................................081-9977
Platinum ..................................................... Please Call
ACCESSORIES
Auxiliary Folding Handles, Foot End ..........082-2137
Auxiliary Folding Handles, Side ..................082-2136
Folding Sidearms (Pair) ...............................082-2135
Lead Handle .................................................082-2139
513-11 IV Pole with Storage Pouch .............008-7157
RELATED PRODUCTS
445 Head Immobilizer ..................................031-3855
132 Manta Rescue Aid (burgundy) ..............038-2969
Cot Rain Cover .............................................031-3924
Transfer Board ..............................................010-7992
SaniZene® Hard Surface Cleaner/Disinfectant
4 ea., 1 gallon ........................................078-9214
! WARNING
Attaching improper items to the cot can
cause injury. Use only Ferno-approved items
on the cot.
32
© Ferno-Washington, Inc. 234-3356-00 August 2006
Model 28-Z Chair Cot
Warranty, Ferno Customer Relations
10 - LIMITED WARRANTY SUMMARY
Ferno products are warranted to be free from defects in material and workmanship for a period of one year, except:
• External finishes (gelcoat, paint, powdercoat, decals, etc.) are warranted for 90 days.
• Soft goods (webbing, vinyl, fabric, foam, etc.) are warranted for 90 days.
• Fiberglass AquaCiser tanks are warranted against leakage for 5 years.
• Stainless hydrotherapy tanks are warranted against tank shell leakage and corrosion for 5 years.
• Mortuary products (except hydraulic parts and soft goods) are warranted for 2 years.
• Ambulance cots and ambulance transporters (except external finish and soft goods) are warranted for 2 years.
• EZ Glide™ Chairs are warranted for 2 years.
• EMS bags (replaceable bottom excluded) and backboards are warranted for lifetime replacement. (Damage caused by accident,
abuse, misuse or improper care will be repaired at a reasonable charge for which you will be informed prior to the repair work
being done.)
• Integrated Charging System (ICS) is warranted for 2 years
Ferno repairs are warranted for 90 days from the date of repair.
This limited warranty applies only when the product is used as described in the instructions provided. The warranty period
begins when the product is shipped from Ferno or when you receive it if you have proof of delivery. Shipping charges are not
covered by this limited warranty. Ferno is not liable for shipping damages or damages sustained through using the product.
Non-Ferno products sold by Ferno retain the product manufacturer’s original warranties. Ferno offers no warranties of any
kind additional to those of the product manufacturer, nor does Ferno assume any liability for products manufactured by others.
Limited Warranty Obligation
If a product is proven defective, Ferno will repair or replace it, or, at our option, refund the item’s purchase price. In no event
is Ferno liable for more than the selling price of the product. The purchaser accepts these terms in lieu of all damages.
This is a summary of the limited warranty. The actual terms and conditions of the limited warranty, and the limitations
of liability and disclaimers, are available upon request by calling 800-733-3766 or 937-382-1451.
11 - FERNO CUSTOMER RELATIONS
Customer service and product support are important
aspects of each Ferno product.
Please have the serial number of your Ferno cot
available when calling Ferno Customer Relations, and
include it in all written communications.
For assistance, please contact Ferno Customer
Relations:
Telephone (Toll-free).......................... 1.877.733.0911
Telephone ........................................... 1.937.382.1451
Fax (Toll-free) .................................... 1.888.388.1349
Fax ...................................................... 1.937.382.1191
Fax (International) ........................... +1.937.382.6569
Internet ............................................... www.ferno.com
Serial Number ________________________
© Ferno-Washington, Inc. 234-3356-00 August 2006
33
Model 28-Z Chair Cot
TRAINING RECORD
Date
34
Name
Training Method
© Ferno-Washington, Inc. 234-3356-00 August 2006
Model 28-Z Chair Cot
MAINTENANCE RECORD
Date
Maintenance Performed
© Ferno-Washington, Inc. 234-3356-00 August 2006
By
35