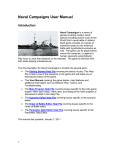
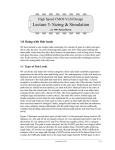
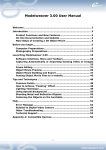
1
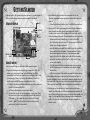
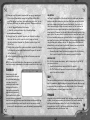
Table of Contents
Quick Start ............................................................................4
SYSTEM REQUIREMENTS.......................................................4
INSTALLATION........................................................................ 4
MAIN MENU............................................................................5
MULTIPLAYER GAME..............................................................7
GAME CONTROLS.................................................................10
Operation Blintz .............................................................11
Getting Started ...............................................................12
HEADS UP DISPLAY ..............................................................12
BASIC STRATEGY..................................................................12
RESOURCES..........................................................................14
MAP......................................................................................15
UPGRADES............................................................................15
SQUADS................................................................................16
RALLY POINTS (FLAGS)....................................................... 16
SARGE’S OUTFIT...................................................................16
RELATIVE DAMAGE/STRENGTH............................................19
© 2002 The 3DO Company. All Rights Reserved. 3DO, Army Men, Real Combat. Plastic Men., and their
respective logos,are trademarks or registered trademarks of The 3DO Company in the U.S.and other countries.
GameSpy and the GameSpy logo are trademarks of GameSpy Industries,Inc. All other trademarks belong to
their respective owners.
The software and related manual for this 3DO product are copyrighted. No portion of this product may be
photocopied, scanned, translated, reproduced, copied or reduced to any tangible or electronic medium or
machine-readable form, or publicly performed or displayed, without the prior written consent of The 3DO Company.
The owner of this product is entitled to use the software and related manual for his or her own use,but is not
entitled to reproduce and distribute any copies of the software or manual to any other individual or entity; nor
to rent or lease this product or any copy thereof to any third party.
Windows® 95,Windows® 98,DirectPlay and DirectX ® are trademarks of the Microsoft Corporation.
Components ........................................................................20
Power-Ups ...........................................................................27
Secret Codes.......................................................................27
Pause Menu: Saving and Loading ..........................28
Customer Support ..........................................................29
Limited 90-Day Warranty .........................................30
Quick Start
System Requirements
Main Menu
Make sure that your computer meets all of these requirements before
installation.
BOOT CAMP (TUTORIAL)
• Operating System: Windows® 95/98/Me/2k/XP home
• CPU: Pentium® 233 (PII400 recommended)
• Free Hard Disk Space: 250MB
• Memory: 64MB RAM minimum (96MB recommended)
• CD-ROM Drive: 4X Speed
• Video Card: DirectX® 8.0 compatible at least 16MB VRAM (32MB recommended)
• Sound Card: All major DirectX 8.0 compatible sound cards
• Peripherals: Keyboard and mouse
• Multiplayer: 56k modem or faster connection to the Internet. TCP/IP
protocol for the Internet or LAN play
Note: May not run from CD-RW and DVD drives.
You must have Winsock v2.0 (comes installed in Windows 98, 2000, Me
and XP home) and DirectX 8 installed on your computer. Both of these
files are available directly from http://www.microsoft.com.
Installation
1. Place the CD-ROM labeled Army Men®: RTS into your CD-ROM drive
and follow the onscreen instructions. If your CD-ROM does not
autorun, double-click on the CD-ROM drive icon under “My Computer”
from your desktop.
2. When you see a listing of the files on the CD-ROM, look for
AUTORUN.EXE and double-click to install Army Men: RTS.
3. Press the “Install” button to begin installing and follow the onscreen
instructions.
Boot Camp offers three lessons in
real-time strategy basics:
1.Camera and Movement: Learn
to set the camera position and
how to command each Soldier.
2.Building a Base: This lesson is
essential for knowing how to
build and set up camp, upgrade each building, and create your army.
3.Squads and Combat: The final lesson of the tutorial teaches you how to
create individual squads and engage the enemy.
CAMPAIGN
Campaign mode takes you on 15 action-packed missions through the backyard
and into the house in your search for the renegade soldier, Blintz.
GREAT BATTLES
If you’re in the mood for simple short skirmishes, Great Battles allows you
to choose from a list of unique single-objective missions. Try missions like
eliminating all Tan structures, blowing up the Tan base, or clearing the
bathroom towel rack of all Tan troops! Great Battles are unlocked as you earn
Gold Medals in the campaign.
LOAD GAME
From here you can load a previously saved game.
MULTIPLAYER
Go here to start or join a Multiplayer Game. (see Multiplayer Game section on
page 7 for more specifics)
4. View the Readme file that contains last minute information and
changes that could not be printed in this manual. If you have any
problems with Army Men: RTS, please review the Readme file for any
known problems and workarounds.
4
5
OPTIONS
The Options Menu is separated into the following sections:
Multiplayer Game
Screen Resolution and Color Depth
Here you choose among seven different options. High performance
computer systems can run at higher resolutions than low performance
systems. If you find the game running slowly, you can modify this setting
to a lower resolution.
Now you can challenge friends to tactical battles online, either on a Local
Area Network or over the Internet. As many as eight people can play. Join up
as teammates or play head-to-head. The goal is simple: defeat your
opponent’s troops and destroy his or her Headquarters. If you are able to
destroy the Headquarters and your opponent is unable to rebuild it within 3
minutes, you win! Likewise, if your Headquarters is destroyed and can’t be
rebuilt in time, you’re out of the game.
World Detail & Texture Detail
Again, higher performance computers should use a higher setting.
• Select MULTIPLAYER from the Main Menu.
VIDEO OPTIONS
AUDIO OPTIONS
You can set the Master Volume and the Music Volume separately with these
controls.
DIFFICULTY
We recommend playing the game on “Normal” difficulty. However, some
missions may require playing on “Hard” difficulty to be awarded a gold medal.
CREDITS
Select this option to view the game credits.
QUIT
Select this to quit the game and return to the desktop.
FOR A MULTIPLAYER GAME OVER A LOCAL AREA NETWORK:
• From here you can create a game, select an existing game, create or change
your player name and access your address book for additions or modifications.
• Select Change Name to create your player name. Enter the name you wish
to give yourself and select OK.
• If someone is already hosting a game, the game name will appear in the
dialog box; select it if you want to join in.
• To Host a new game, select Create Game, enter a name for your new game
and select OK.
• Now you can choose from several multiplayer missions by clicking on the
Select Mission button, highlighting a mission and selecting OK. The current
mission map is displayed beneath the Select Mission button.
• You can choose to let the computer control a team by selecting the Add AI
Player button.
• Wait for other players to join in (their names will appear in the Players Box).
• Select the Lock Game button if you don’t want anyone other than the
players listed to join in.
• Select a color for your troops by clicking on a color sphere. The selected
color will appear next to your player name in the Players Box.
• Once you have made all the modifications you want, and all the
players’ names appear in the Players Box, select Play to start the
mission.
6
7
HOW TO PLAY ARMY MEN: RTS IN GAMESPY ARCADE:
FOR A MULTIPLAYER GAME OVER THE INTERNET:
You can play Army Men: RTS online through GameSpy Arcade, which comes
conveniently bundled with the game. If you haven't done so already, insert
your Army Men: RTS CD and install Arcade now. Then, to play Army Men:
RTS online, just follow these simple instructions:
• Select MULTIPLAYER from the main menu.
Launch GameSpy Arcade and Go to the Army Men: RTS Room: Click on the
GameSpy Arcade link in your Start Menu. When the software starts, you'll
see a list of games and more along the left-hand side. There's plenty to do,
but there's time for that later. Click on the Army Men: RTS button on the
left to enter the Army Men: RTS room.
Find or Start an Army Men: RTS Server: Once you're in the Army Men: RTS
room you can meet or greet other players, find servers or create your own
server. The top half of the application will list all of the available servers,
including the number of people playing and your connection speed –
measured by something called "ping." The lower your ping, the better.
Don't like any servers? Click on the "Create Room" button to start your own
server and wait for people to sign up. (A clever server name, such as
"Taste the end of my rusty hob-nailed boot!" usually attracts people.)
Otherwise, double-click on a server of your choice to join in.
Joining and Starting a Game: Once you double-click on a server or start
your own, you'll be in a staging room, in which you can trash talk with
your fellow players and prepare for combat. When you're ready to play,
click the "Ready" button at the top of the screen. When everyone in the
room has signaled their readiness, the host can then launch the game.
Arcade will fire up Army Men: RTS and the carnage will begin!
Problems? If you have problems using Arcade, whether installing the program,
registering it, or using it in conjunction with Army Men: RTS, consult our
help pages, located at http://www.gamespyarcade.com/help/ or e-mail us
by using the form located at:
http://www.gamespyarcade.com/support/contact.shtml.
8
• From here you can create a game, select an existing game, create or change
your player name and access your address book for additions or
modifications.
• Select Change Name to create your player name. Enter the name you wish
to give yourself and select OK.
• If you want to join an existing game, select Address Book and select the IP
address of the host of the game you wish to join. If the address has not
yet been entered, select Address Book, and select Add. Enter the name and
IP address of the person hosting the game, and select OK to add it. You can
edit any address at any time by selecting Edit on the Multiplayer screen.
• To Host a new game, select Create Game, enter a name for your new game
and select OK.
• Now you can choose from several multiplayer missions by clicking
on the Select Mission button, highlighting a mission and selecting OK. The
current mission map is displayed beneath the Select Mission button.
• You can choose to let the computer control a team by selecting the Add AI
Player button.
• Wait for other players to join in (their names will appear in the Players Box).
• Select the Lock Game button if you don’t want anyone other than the
players listed to join in.
• Select a color for your troops by clicking on a color sphere. The selected
color will appear next to your player name in the Players Box.
• Once you have made all the modifications you want, and all the players’
names appear in the Players Box, select Play to start the mission.
9
Operation Blintz
Game Controls
FUNCTION
MOUSE
Select Unit . . . . . . . . . . . . . . . . . . . . . . . . Left Mouse Button
Select Multiple Units . . . . . . . . . . . . . . . . Left Mouse Drag
Move Selected Unit(s) to. . . . . . . . . . . . . . Left Mouse Button
Location Selected/Attack
Deselect Unit . . . . . . . . . . . . . . . . . . . . . . Right Mouse Button
Change direction of building . . . . . . . . . . Middle Mouse Button,
before construction
"<" and ">" Keys
Scroll Camera Around. . . . . . . . . . . . . . . . Right Mouse Drag
Camera Height . . . . . . . . . . . . . . . . . . . . . Mouse Wheel
FUNCTION
KEYBOARD
Create squad with currently. . . . . . . . . . . Ctrl + [number key]
selected units
Select Squad. . . . . . . . . . . . . . . . . . . . . . . [number key]
Bring up Game Menu. . . . . . . . . . . . . . . . . ESC
Move camera to the
last point of combat. . . . . . . . . . . . . . . . . Spacebar
Stop Units. . . . . . . . . . . . . . . . . . . . . . . . . s
Center Camera Over Headquarters. . . . . . h
Camera Height . . . . . . . . . . . . . . . . . . . . . F1 – F4
Quick Save . . . . . . . . . . . . . . . . . . . . . . . . F9
Save/Load Game. . . . . . . . . . . . . . . . . . . . F10
Scroll Screen. . . . . . . . . . . . . . . . . . . . . . . Arrow Keys
I’ve seen plenty of action in my time. I’ve led troops into countless
skirmishes, situations where we knew we’d either make it back to fight
another day or be reduced to puddles of plastic on the battlefield. But
we’ve never had to deal with anything like this before. This mission is
bad. Worst I've ever seen.
Not long ago, we had this region secure under the supervision of one of
our own, Colonel Blintz. That changed when Blintz was injured in the line
of duty. Medics did what they could, but he sustained a "massive,
disfiguring head wound". Long story short, there’s a chunk of plastic
missing from the top of his head. "Disfiguring head wound"? He’s lost
his mind…literally!
That was the last we had heard of him. That’s when our reconnaissance
got on the case and found…well, it ain’t pretty. With the help of a
bucket of paint, Blintz has gone Tan.
Our mission is to find Blintz and…terminate him. This will be the toughest
mission I’ve ever had to lead. Blintz was famous for inspiring loyalty. His
men would march across a grill if he ordered it. And there are a lot of them.
This won’t be easy.
- Sarge
10
11
Getting Started
Listen up, Soldier…this is a war we’ve got on our hands! If you want to make it
to the end of the day, you’ve got to know this platoon inside and out.
Heads Up Display
PLASTIC
ELECTRICITY
MELT
BUTTON
MAP
CONSTRUCTION
MENUS
SQUAD MENU
Basic Strategy
There are several steps you will need to follow in most missions.
1) Begin base-building missions by building a Headquarters (HQ). This
allows you to build several Dump Trucks. In addition, the HQ is a
prerequisite for all buildings except the Resource Depot, so you’ll want
to have one at all times. You can also build Bulldozers from the HQ
should you lose one to the enemy or want more than one.
• To build a structure, select the Bulldozer and your choices appear on
the left in the Construction Menu.
• Left-click on the structure you would like to build.
• A ghosted icon of your new structure appears on your cursor. Move
the cursor over the place on the playfield you would like to build it.
(If the image is red, it cannot be placed in the current location.)
• Use the "<" and ">" keys to rotate the structure to the desired
position, and then left-click to build it.
12
2) Use a Bulldozer to build a Resource Depot reasonably close to any
resources you see, and then send your Dump Truck(s) to the resource to
collect it.
• Follow the instructions listed in Step 1 to build the Resource Depot.
3) When your HQ is built, you’re ready for recruits! Use the Bulldozer to
build a Barracks and create a basic squad comprised of Grunts,
Grenadiers and a couple of Mine Sweepers. With your squad ready for
action, send them out to explore the area immediately around your base.
• Follow the instructions listed in Step 1 to build the Barracks.
• To create Soldiers, select the Barracks. The Construction Menu with
Soldier icons will appear on the left.
• Select the Soldiers you would like to create. Every click on a Soldier
icon is another Soldier to be made. The total number of Soldiers
being created appears over the icon. If you change your mind,
simply right-click on the Soldier icon to subtract from the queue.
• Set a Rally Point for the Soldiers. (See the "Rally Points" (Flags)
section in this chapter.)
• Select the group of Soldiers you want to explore the area with by
left-clicking, dragging a box around them, and releasing the left
mouse button.
• Left-click on the point of the playfield you would like them to explore.
Note: When a Soldier type is highlighted in the Construction Menu, his
relative strength vs. Infantry, Armor and Air enemies is displayed on the
right side of the screen. This info is useful when you are deciding which
soldiers you will need to fight against the enemies you currently face.
4) Once you’ve sent your squads out to explore the area, you’ll have a
general idea of where the Tans attack from and the basic layout of the
land. With these things in mind, build a Barbed Wire Fence around your
camp. It’s also a good idea to put a few Guard Towers between pieces
of fence. The Tower functions as a lookout and has the firepower of
several Grunts.
13
5) When you’ve got the resource reserves built up enough, upgrade your
HQ to a Super HQ and build a Garage. Use the Garage to build Medic
jeeps that can heal your troops, your buildings and each other. You can
also create Half-Tracks (aka: machine gun trucks), Minelayers and Tanks.
• See the "Upgrades" section of this chapter.
• Follow the instructions listed in Step 1 to build the Garage.
…in more advanced missions.
6) When you have the resources, upgrade your Barracks to a Super
Barracks. You can use this new structure to pump out a more
specialized platoon: Bazooka Men, Machine Gunners, Snipers and
Mortar Men.
7) Finally, when you have the resources available, upgrade the Garage
to the Super Garage and make DumDums and Choppers for assaults
on the Tan base!
8) Further upgrades will allow you to take on the enemy even more
effectively.
NOTE: If any icon in the Construction Menu appears red, you either don’t
have the necessary requirements or the resources available to build it yet.
Resources
Resources are the vital
components that allow you
to create items and build up
your army. In order to
survive, you need to keep
building, and in order to
keep building, you need to
keep collecting resources:
Plastic and Electricity. While
you may not have an immediate
need for resources, it’s always a good idea to keep collecting and storing
so you have them when you need them. Be sure to keep an eye on each
resource as it’s being collected, as each will eventually become depleted.
14
COLLECTING
Use Dump Trucks to collect all Plastic and Electricity. Water guns, dog bowls,
batteries, and walkie-talkies are just a few of the items you may find. When
you locate a resource, build your Resource Depot nearby. Your trucks will
collect resources faster if they only have to move a few feet to deliver the
goods. Be sure to check your resources from time to time to see if they’re
being depleted. The amount of collected Plastic and Electricity appears in the
upper-right of the game screen. If a resource runs dry, move the Dump Trucks
to the next available resource and continue the hunt. It is also helpful while
one Dump Truck works on collecting resources, to have another one looking to
collect melted plastic Soldiers, vehicles, etc. Dump Trucks collect resources
automatically, and do not need to be directed. However, you can override the
automatic function by manually assigning them to a resource:
• To manually send a Dump Truck to mine a resource, left-click the Dump
Truck to select it and left-click the resource you want it to collect.
MELTING STUFF
If a structure becomes unnecessary, melt it down and you’ll get half of
your resources back.
• To melt a structure down, simply left-click it to select it.
• The "Melt" button will appear in the upper-right corner of the screen.
Select it to melt the structure.
Map
The map is your most useful tool for keeping apprised of everything at once;
use it to immediately jump to enemy units or your own squads. When you get
a red warning that your units are under attack, double-click on the map or
press the Spacebar to instantly jump to the action!
Upgrades
Whenever you have collected enough Plastic and have reasonable defenses
in place, you can begin upgrading your buildings. You’ll want to have the
most specialized equipment before the Tan do! The buildings that can
be upgraded are: the HQ’s , the Barracks and the Garage. You can
upgrade each one on its Construction Menu.
15
Squads
You can form up to four
unique squads. This makes
independent control of each
group on multiple
battlefronts much easier!
• Highlight a group of
Soldiers and press Ctrl
+ 1, 2, 3, or 4 to assign
a number to each group
or click on a Squad icon at the bottom of the screen.
• To instantly highlight a squad and give them a command, press
the corresponding key: 1, 2, 3 or 4, or select the Squad icon at
the bottom of the screen.
Rally Points (Flags)
As you build troops and vehicles, you can set up Rally Points to
immediately ship your units to any specified location the moment they pop
out of the mold. This automates your troops, allowing you to concentrate
on the mission at hand.
• Highlight the structure (either the Barracks or the Garage) by
pressing the left-mouse button.
• Left-click anywhere on the playfield to set the Rally Point, a Flag icon
will appear. (Right-click will cancel Flag placement.)
Sarge’s Outfit
As you advance through the missions, you may recognize these faces:
Sarge, Hoover, Scorch, and many other members of Bravo Company. Some
or all of these fighters are the first to appear in each mission. Assign them
to the defense of your base until you get the Barracks up and running,
then lead them into battle! They are leaner, meaner and tougher than any
Soldiers you can create and have more hit points, so send them out with
your squads and into battle. Use them wisely!
16
• To select a Soldier and move him, left-click on the Soldier and then on the
place on the playfield you want him to move to. If an enemy is sighted,
the Soldier automatically launches an attack and radios a message to you.
• To select a group of Soldiers, left-click, drag a box around them,
and release the left mouse button. Left-click on the point of the playfield
you would like them to move to.
SERGEANT HAWK
Sergeant Hawk, a.k.a. “Sarge”, is the Bravo Company
Commandos’ unquestioned leader. Whether the battle is in a
town, on a bridge or in a backyard, Sarge is itching for the
chance to send the Tan Army back to the plastic goo from
which they were molded! Sarge has plenty of motivation to
fight the Tan menace - he must save his friends in Bravo
Company to keep the Green Nation safe and to protect the
woman of his dreams, Vikki.
VIKKI
Vikki is Colonel Grimm’s feisty and lovely daughter. She has
a spirit for adventure and has chosen the occasionally
dangerous occupation of reporter. She’s able to take care of
herself and is practically one of the Bravo Company
Commandos - only her beauty singles her out from the rest
of the war dogs! Sarge is the guy for her.
RIFF
Riff is itching to play some tunes on the Tan Army in the key
of “B”, for Bazooka! Riff is the heavy hitter of Bravo
Company and the Commando the Green Army needs when
serious thumping on the Tan Army is required.
17
HOOVER
Private Hoover has got the most stressful job in Bravo
Company and it shows, judging by his easily startled
nature. Still, he is a heroic soldier who is called upon
whenever a mine field needs sweeping.
Relative Damage/Strength
SHRAP
Shrap is a Mortar Man extraordinaire. Although he would
rather be catching a wave than riding the sound wave of
a large mortar explosion, Shrap is happy as long as he’s
dropping some heinous mortar shells on the Tan Army.
THICK
Thick is about as sharp as a marble. What the big lug
lacks in brains, he makes up for with brawn and enough
cover fire with his M-60 machine gun to knit a lead
blanket. Sarge has a soft spot for Thick and the
enthusiasm he brings to the Bravo Company Commandos.
RELATIVE DAMAGE
The chart above shows how much damage each component can take.
SCORCH
Scorch likes fire just a little too much, considering that
he’s made of plastic. There’s nothing Scorch loves to
hear more than the sound of Tan Soldiers bubbling after
he has laid on some serious heat with his flamethrower.
BULLSEYE
Bullseye, the newest Commando in the company, has a
keen eye. His sharp shooting can drop a Tan Soldier in
his tracks even before the others know danger is coming.
He keeps his cool in any situation - the “ice man” of the
Bravo Company Commandos.
18
RELATIVE STRENGTH
The chart above shows how much damage each component
in the game causes the other components.
19
GUARD TOWER
Components
Everything revolves around Plastic and Electricity – the more
resources, the bigger the army you can create. The mission itself
determines the amount of Plastic you begin with.
Buildings
Plastic required: 200
Guard Towers are very effective for
providing defense around the perimeter of
the base and at the main entrance, as well
as against Tan air attacks. Guard Towers
can link to Barbed Wire Posts.
HEADQUARTERS (HQ)
Plastic required: 400
This is the most basic component in
your base. The HQ allows you to build
Bulldozers and Dump Trucks that are
necessary for building every other unit
in the army. This should be the focal
point of your base.
GARAGE
Plastic required: 400
The Garage gives you the ability to build
heavy assault vehicles and one of your most
important assets, the Medic jeep.
RESOURCE DEPOT
Plastic required: 500
The Resource Depot is the structure in
which you process all of the Plastic
and Electricity the Dump Trucks collect.
Guard the Resource Depot well!
PILLBOX
Plastic required: 300
This is a small building which allows the
Soldiers inside to be protected, yet have the
ability to shoot 360º from a single position.
They are vulnerable from the air.
BARRACKS
Plastic required: 300
The Barracks creates the bread and
butter of your army: your infantry.
Your Barracks is your first line of
attack... and defense. Units built from
the Barracks do not require electricity,
which can be scarce at times.
ANTI-AIRCRAFT GUN
Plastic required: 150
This stationary gun mount for defense
against enemy Choppers is a must for
every army base.
BARBED WIRE POST
20
Plastic required: 50
Use Barbed Wire Posts to build fences to
hold back the enemy and keep them out of
your base. It is cheap and fast to build.
21
BAZOOKA MAN
Soldiers
GRUNT
Plastic required: 50
You can never have enough Grunts in your
platoon. They operate by targeting one thing
and firing at it continuously with rifles. They
are not only the cheapest unit you can create,
but are also effective against the entire Tan Army.
Plastic required: 125
These plastic Soldiers use their bazookas for
long-range attacks, and are very effective against
Half-Tracks, Tanks, Choppers, and buildings.
SNIPER
Plastic required: 250
Plastic required: 75
While a Sniper’s rate of fire is fairly slow, his gun
has the longest range of any Soldier’s. However,
they are only effective against personnel.
Grenadiers are the other staple to every squad.
These highly effective fighters throw grenades
for an area-effect attack and are cheap to produce,
so don’t be afraid to populate the platoon with
them. However, they cannot attack air vehicles.
Plastic required: 150
GRENADIER
MINE SWEEPER
MORTAR MAN
Mortar Men attack structures only, so send them
out directly to each Tan base for some serious
long-range wreckage. Remember, if they can see it,
they can destroy it.
Plastic required: 50
While Mine Sweepers are not fighters, they are
very useful for detecting Tan mines.
RADIO OPERATOR
Plastic required: 400
MACHINE GUNNER
Plastic required: 100
Like Bazooka Men, Machine Gunners have the
ability to fire long-range guns. Also, their guns
shoot much more rapidly than Grunts fire.
22
Bring in a Radio Operator for some incredible
attacks! Use Radio Operators to call in:
• Paratroopers
• A giant Magnifying Glass for massive Tan melting
• Bombing Runs
23
Vehicles
Structure Upgrades
SUPER HQ
BULLDOZER
Plastic required: 400
Plastic required: 200
Upgrade the HQ to a Super HQ to
increase your build options.
Bulldozers are essential to building all
camp structures: Barracks, Guard Towers,
HQ, Resource Depots, Barbed Wire Posts,
Anti-aircraft Guns, Garages and Pillboxes.
Keep them safe from the enemy as they are
key to getting your base up and running,
and keeping it active.
SUPER BARRACKS
Plastic required: 400
Upgrade your Barracks to get the
Super Barracks. This new structure
gives you the ability to produce the
“best of the best” fighters: Bazooka
Men, Machine Gunners, Snipers and
Mortar Men. These Soldiers have
increased range and more powerful
guns than the basic Grunts.
SUPER GARAGE
Plastic required: 400
Plastic required: 150
Dump Trucks are the key to collecting
resources. They gather the Plastic and
Electricity needed to build your army.
MINELAYER
Plastic required: 100
Electricity required: 100
When the Plastic is available,
upgrade your Garage to a Super
Garage. This will give you access
to the next level of equipment,
including Choppers!
The Minelayer is useful in situations
where your army is on the move and
you need to protect your flank and
lay mines.
SUPER-DUPER HQ
MEDIC
Plastic required: 600
This will let you build a Radio
Operator. Radio Men will let you
build Paratroopers, a Magnifying
Glass and Bombing Runs.
24
DUMP TRUCK
Plastic required: 100
Electricity required: 150
A Medic jeep allows you to heal all of
your wounded Soldiers, any damaged
structures and even other damaged
Medics.
25
POWER-UPS
Vehicles cont...
WEAPON BOOST
HALF-TRACK
This power-up increases the firepower of all your units.
Plastic required: 100
Electricity required: 150
The Half-Track is a good all-around
assault vehicle, and its ability to hit
air targets, as well as ground troops,
makes it a useful addition to any squad.
SPEED BOOST
This power-up increases the rate of movement of your troops.
HEALTH BOOST
This power-up gives full health to all of your units on the map.
TANK
Plastic required: 200
Electricity required: 250
Tanks are well-known as powerhouses in
any assault. Just watch out for
Choppers. These guys can’t do
anything but run away from them.
CHOPPER
Plastic required: 150
Electricity required: 250
Choppers are great for quick aerial
assaults on enemy positions.
SECRET CODES
For destroying specific objects in some missions, the player will be awarded
a “secret code” on the Victory screen. (When the object is destroyed, a sound
effect will be heard).
Entering the secret code: While in any mission, hold down the “ALT” key and
press the “Backspace” key. This will bring up a dialog box. Type in the secret
code and press the “Enter” key. You may enter most codes only once per
mission.
DUMDUM
Plastic required: 50
Electricity required: 150
Send these small robots out to the
enemy lines where they can deliver
the explosives strapped to their backs
up-close and personal.
26
27
Pause Menu:
Saving and Loading
At any point in the game, simply press the ESC key to pause the game and
bring up the Pause Menu. The Pause Menu offers the following options:
RESUME GAME
Select this when you are ready to return to gameplay.
MEDAL GOALS
This displays the Medal Goals for the current mission.
SAVE AND LOAD
Save the game or load a previously saved game.
OPTIONS
Adjust your Gameplay or Audio Options.
RESTART MISSION
If the mission is going badly, select this option to begin again.
ABORT MISSION
Quit the current mission.
QUIT
Quit the game.
NOTE: The game cannot be paused in Multiplayer mode.
Customer Support
However you choose to contact us, there are some pieces of information about
your computer that we will need in order to help you properly. You can get this
information by following these steps: First, right-click on the My Computer icon
and choose “Properties”. On this System Properties screen, you will find the
following information that we will need: Computer OS type (Windows version),
amount of RAM and CPU type.
After you get this information, exit the System Properties screen, then double
left-click on the My Computer icon. On this screen, right-click on the icon of the
hard drive that the game is installed on and choose “Properties”. On this screen,
you will need to find out the drive’s total capacity, and the amount of free space
left on the drive.
WEBSITE
Visit www.3DO.com/support for late-breaking news and information,
answers to Frequently Asked Questions (FAQ’s), links to hardware
manufacturers’ websites, and the latest product updates.
If you want to ask a specific technical question, you can use the online email
form available at our website or send e-mail directly to: [email protected].
AUTOMATED PHONE AND FAX
Call (650) 385-3193 or fax us at (650) 385-3181.
U.S.MAIL
Customer Support
The 3DO Company
100 Cardinal Way
Redwood City, CA 94063
BUY DIRECT
If you wish to purchase additional copies or other titles from The 3DO Company,
please visit the 3DO Direct Online Store at http://store.3DO.com, or call:
3DO Direct Sales
(800) 336-3506 in the United States
(650) 385-3187 in Canada and Mexico
WORLD WIDE WEB
http://www.3DO.com
28
29
THE 3DO COMPANY LIMITED 90-DAY WARRANTY
The 3DO Company ("3DO") warrants to the original consumer purchaser of this 3DO software
product that the media on which the underlying computer program is recorded is free from defects
in materials and workmanship under normal, recommended use for ninety (90) days from the date
of purchase. The 3DO software program recorded on such a media is sold on an "as is" basis,
without any warranty or condition of any kind, and 3DO shall not be liable for any losses or damage
of any kind or nature resulting from the use or inability to use such program.
3DO's entire liability and the original consumer purchaser's exclusive remedy for breach of any
warranty (express or implied) shall be, at 3DO's option, either: (a) to replace, free of charge, this 3DO
software product, or (b) to return to the original consumer purchaser the price paid for this 3DO
software product. The preceding warranty shall not be applicable and 3DO shall not be obligated to
replace this 3DO software product or to return any such sum to the original purchaser unless this
3DO software product is returned within the 90-day warranty period,postage pre-paid with proof of
purchase to The 3DO Company, 100 Cardinal Way, Redwood City, CA 94063, Attn.: Customer Support
Dept. The preceding warranty shall be void if any defect in this 3DO software product arises through
accident,negligence, use in any application for which this 3DO software product was not designed or
intended,modification without the prior consent of 3DO, any cause external to the product (e.g.,
heat), or by any other cause unrelated to defective materials or workmanship.
EXCEPT FOR THE LIMITED WARRANTY SET FORTH ABOVE,ALL OTHER REPRESENTATIONS,
WARRANTIES,CONDITIONS,TERMS AND OBLIGATIONS,WHETHER EXPRESSED OR IMPLIED,
INCLUDING,BUT NOT LIMITED TO,ANY IMPLIED WARRANTIES OF MERCHANTABILITY, FITNESS
FOR ANY PARTICULAR PURPOSE AND/OR NON-INFRINGEMENT REGARDING THIS 3DO SOFTWARE
PRODUCT (WHETHER RELATING TO THE MEDIA,THE SOFTWARE OR OTHERWISE) ARE
EXCLUDED TO THE MAXIMUM EXTENT ALLOWED BY APPLICABLE LAW.
3DO neither assumes nor authorizes any other person or entity to assume for 3DO (or any related
or affiliated entity) any other liability in connection with this 3DO software product.
IN NO EVENT SHALL 3DO BE LIABLE FOR ANY INCIDENTAL, CONSEQUENTIAL (INCLUDING LOSS OF
PROFITS), SPECIAL AND/OR OTHER DAMAGES OF ANY KIND OR NATURE RESULTING FROM THE
PURCHASE,POSSESSION,USE, OR INABILITY TO USE THIS 3DO SOFTWARE PRODUCT, EVEN IF 3DO
HAS BEEN ADVISED OF THE POSSIBILITY OF SUCH DAMAGES OR LOSS. IN NO EVENT SHALL 3DO'S
LIABILITY TO THE ORIGINAL CONSUMER PURCHASER EXCEED THE AMOUNT ACTUALLY PAID FOR
THIS 3DO SOFTWARE PRODUCT. SOME STATES/COUNTRIES DO NOT ALLOW LIMITATIONS ON HOW
LONG AN IMPLIED WARRANTY LASTS AND/OR THE EXCLUSION OR LIMITATION OF INCIDENTAL OR
CONSEQUENTIAL DAMAGES, SO THE ABOVE LIMITATIONS AND/OR EXCLUSIONS OR LIMITATIONS
OF LIABILITY MAY NOT APPLY TO YOU. THIS WARRANTY GIVES YOU SPECIFIC LEGAL RIGHTS AND
YOU MAY ALSO HAVE OTHER RIGHTS WHICH VARY FROM JURISDICTION TO JURISDICTION.
3DO has endeavored to ensure that the end user manual and promotional materials regarding this
3DO software product accurately reference the product. However, because of ongoing
improvements and updating of 3DO software products, 3DO cannot guarantee the accuracy of
printed materials after the date of publication, and 3DO disclaims any loss, liability and/or damages,
whether in contract, tort or otherwise, arising out of or resulting from the manual and promotional
materials,including, without limitation,any loss or liability resulting from changes, errors or
omissions with respect to any of such items.
30