1
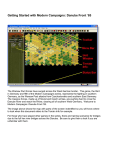
Getting Started tutorial for Falklands
Welcome to the latest edition to the Squad Battles series of games, Falklands. This title covers the war between
Argentina and Great Britain over the Falkland Islands. You will command the British forces in this scenario.
This file contains instructions on how to get started in Falklands.
If it is not already running, you should run the Main Program (fl.exe) entry in the John Tiller Software \
Falklands program group (The John Tiller Software \ Falklands program group can be found under the
Programs list found by clicking the Start button). If you prefer, you can print these instructions. Note: the
Falklands software is designed to run on displays with screen areas of at least 800 by 600 pixels and with color
settings of 16-bit or higher.
The first scenario in the list in the window on the right side of the file selection screen is “000.Getting
Started.scn.” This is going to be your tutorial scenario. If you are new to the series, you will want to read these
instructions as you fight this battle for a basic understanding of how this game works.
In the bottom center of this same screen is a window that gives you information on the scenarios in the game.
The text gives you some historical or hypothetical background information on the battle and may even give you
some hints, suggestions or house rules. Take the time to read this information about this battle. You will be
better prepared to enter this battle and win it.
After reading the information you now know that you are taking the role of the British forces trying to capture
Sapper Hill, the last high ground before Stanley. You also know that Sapper Hill is defended by a company of
Argentine Marines. Since you are significantly outnumbered, it might be wise to be conservative. As casualties
are also included in determining victory, you will want to inflict as many loses on the Argentine defenders as
possible while limiting those you incur yourself.
Once you hit the enter key or click on “OK,” you’ll see
another menu of choices. This is the A/I Selection Dialog.
In this menu you will pick which side you will be
controlling. So choose “Manual” for the British A/I which
means you will be controlling the British side. Next, click
either on “Automatic” or “Automatic with FOW” for the
Argentine side. Now the computer will control the
opposition. “FOW” stands for fog of war. If you choose it,
you won’t be able to see any enemy units until they come
within the line of sight (LOS) of one or more of your units.
Playing with FOW turned on makes the battle much more
realistic and exciting as surprise and LOS are key elements
of small unit actions. If you are, however, a first time
player, it will be easier to play without FOW. In this circumstance, it is not entirely unrealistic, however, as
British troops held the high ground to the west and all of the Argentine positions were under observation.
Notice the word “Rules…” at the bottom of the dialog box.
Clicking on it will allow you turn on and or off the optional rules
in the game. We’ll leave that alone for this time, but when
starting future battles you can go in and select the optional rules
that you desire. For more details on each rule, check the “Help”
button on that screen. After you have picked the method of play
in the A/I Selection Dialog Menu, click on “OK.”
Since you are playing the British, the Enemy side will go second.
That may not always be the case, as sometimes the A/I will go
first. A box will appear telling the player which Army’s turn it is to move as well as turn number and the total
number of turns in the scenario. This box will appear at the beginning of each turn throughout the game. You
can either left-click on it to make it go away and then repeat that each turn, or you can right-click on it and it
will display briefly then automatically go away each turn for the remainder of your session.
Notice a small dialog box that appeared once your turn started stating that
you have support in this scenario. Support refers to airstrikes and off-map
artillery. Remember this and we will come back to it in a couple of
minutes. For now, just click the OK button.
Now you see the battlefield and your troops. If you wish to easily scroll
around the map, click on the menu list at the top called “Settings.” Then
left-click on “Auto Scroll” unless there is already a check mark next to it.
Now you can simply run your mouse pointer to any edge of the map and
the screen will scroll in that direction until the edge of the map is reached.
As you scroll around the map, you will see that there are three stacks of British units. Two of these stacks make
up the 9th Troop of the 40th Royal Marine Commando, which has been assigned to the Welsh Guards for this
operation. These troops have been deposited on the main track between Goose Green and Stanley by the Sea
King helicopters that overflew the planned landing zone. In addition to the stack of British units, there are
brown boxes in these hexes with the number “4” inside of them. These are objective hexes. The color indicates
the current owner and the number is the value of the objective in victory points. There are additional objectives
located on Sapper Hill to the northwest of 9th Troop. These objectives are green, indicating that they are held
by Argentine forces.
The third stack of British units consists of a fire control officer and his support team from the 4th Regiment,
Royal Artillery. If you push and hold the shift key, you will see the map labels (if you press the Alt and the
Shift keys at the same time, the labels will remain until you again press the Shift key). These tell you that this
fire control team is actually located on Mount Tumbledown, approximately two miles to the west. The scenario
designer has placed them inside a pillbox to protect them from any fire that the A/I might direct at them. If you
click on this stack of units, their portraits will be visible in the information bar at the bottom of the screen.
You will see that the word “Fixed” covers a portion of their portrait. This means that these units may not move
until fired upon, or released (if the scenario designer set them to be). You can also see the weapons and
equipment that these men are carrying (weapons are to the right of the unit carrying them). The word “Setup”
across the radio means that the penalty for calling for indirect artillery fire outside of the spotter’s line of sight
does not apply. You can also see that these men are laying down or knelling, which protects them from fire, but
slows movement. This is indicated by the “On Ground” label on the portrait as well as a white bar on the bottom
of the map counter. To the right of the units in the information bar is the hex information box. Here you will
find that this is a clear hex at an elevation of 100 meters and that the maximum visibility is 50 hexes (2000
meters). If there were red arrows adjacent to this box which have a number in them, this means that there are
additional units and/or weapons in that direction. You can click on the arrow to scroll the unit tray in that
direction.
If you right-click on the information bar, you will see additional information about the units and weapons. The
order of battle information is listed for the units which is important for command and control. Leaders need to
be close to the units they command to be effective and their ability to influence units not in their command
hierarchy is significantly reduced. The additional information for weapons and equipment includes their
reliability, how fast they degrade as they are fired; maximum, effective range; lethality, a measure of their
ability to cause loses to the enemy; and penetration, their ability to negate protective cover and armor. The hex
information box also changes showing the total number of men in the hex in the center along with any special
terrain features on the hexsides, such as roads, streams and walls.
Below the information bar is another area where information is presented. During play, this will show the date
and time, which side’s turn it is, the turn number and number of turns and the ground conditions. If, however,
you try to do give a command that is not allowed or not possible, then an error message explaining why the
command cannot be completed will be displayed here also.
In order to have a plan for the upcoming battle, you must know what is required to win. Only the player who
moves first, which is you in this scenario, scores victory points. Points are awarded for objectives and for
casualties incurred on the enemy. The Argentine A/I can take points away from you by taking any objectives
you hold and causing British casualties. There are different types of objectives. The most common type requires
you to seize the objective and hold it at the end of the game. The objectives in this scenario are of this type.
Others may require you only to seize the hex, but not necessarily hold it (Capture Objective), while others may
give you points for exiting units from the map (Exit Objective). Objectives can also be hidden from your view
until you move into the hex (Hidden Objective).
Once you have examined the objectives on the map, take a look
at the victory conditions. These are found under the “Info”
menu item by clicking on “Victory.” Here you will see that you
need ten victory points to obtain a minor victory and twenty
victory points to obtain a major victory. Since you currently
hold eight points worth of objectives and have not taken or
caused any loses yet, you will need to take an objective without
losing too many troops in order to obtain a minor victory.
You may now want to take a look at your tactical situation.
Your troops are standing on a road. There is not any cover
nearby, a not uncommon situation in the Falklands. On the hill
above you, you can see numerous units of Argentine Marines,
including heavy weapons such as bazookas and machine guns.
The Argentines are located in foxholes. Your situation does not
look advantageous. You are aware that if your troops stay in
the open, they will take large numbers of casualties very
quickly.
If you look at the row of buttons between the menu items and the map, you
will see one that looks like a crosshair (if you hold your cursor over the
button, it will tell you what it does). This is the Visible Hex button. Once
you click on this button, the computer will shade every hex that is not visible
from the highlighted hex. Use this tool to examine the line of sight from the
Argentine positions. You will see that the computer treats the hill as if it
were similar to a wedding cake, with each contour line representing a cake
layer. There is dead ground at the base of the hill that is out of sight of the
enemy. This might be a good place to order your troops to head for. While
your troops are concealed from the enemy, you can use your artillery support
to soften up the position.
Let’s take a look at your troops. If you click on the hex
containing the left hand stack of units, you will see that
this hex contains two squads (or sections in British
terminology) of infantry. Each squad contains two
fireteams as well as a squad leader (a corporal). You will
want to keep your corporal either stacked with or
adjacent to one or both of his fireteams for command
purposes. You will also see that in addition to rifles and
machine guns, each squad is equipped with both LAW anti-tank weapons and white phosphorus grenades.
Since these troops will have to move through open ground to reach concealment, you might want to consider
using one of these white phosphorus grenades to screen your troops. These grenades have multiple uses. They
have good penetration and lethality values (24 and 60 respectively), which means they can be effective in
attacking units in fortifications. They can illuminate the hex they attack during night scenarios and in this case,
they can provide a smoke screen for your men to move through or behind.
The button on the far left, above the map, is the Move/Fire Mode button. It looks like
a crosshair also. If it is depressed by left-clicking on it, any selected weapon will fire
when the target is right-clicked on. If the button is out, the default position, a selected
unit(s) will move to an adjacent hex when it is right-clicked on. Another way to change the Move/Fire Mode
button is to press and hold the Control key. This will change the mode as long as the button is depressed. Many
players find it easier to leave the Move/Fire Mode button out and use the Control key to fire their units.
So let’s go back to your Marines. In order to fire a WP Grenade you must select it by left-clicking on the
grenade in the information box. Be sure that it is the only weapon or unit that is selected. If you left-click on a
unit, it will select the unit and all of the weapons it is carrying. If you double click on a hex, the computer will
select all of the units/weapons in that hex. With a single WP Grenade selected, hold down the Control key and
right-click on the hex directly to the north of your units. A smoke and illumination marker should appear at that
location. You will notice that the “X2” below the weapon label is replaced by X1. That is because this is a
single use weapon and once it is fired, it is removed from the map. Fire that is directed into or from a hex
containing a smoke marker has its lethality value cut in half.
On the other hand, fire directed at infantry who are standing has its lethality multiplied by two. However the
infantry can move faster and hence farther in a single turn if they are standing. You will have to decide whether
to have your men go prone and crawl to the dead ground, or cover it at a run. Extra equipment like radios,
rockets and grenades can slow your men slightly. You will also have to determine whether to move your men in
one large stack, in smaller stacks or by themselves. Each movement command may draw fire from the enemy so
there so there is a lesser chance of drawing fire if all the men move at the same time. But, there is another
modifier based on the number of men in the hex, which will make any fire more effective. I have elected to
move this stack of units one squad (squad and section are used synonymously in this tutorial) at a time. I leftclicked on the Corporal, First Team and Second Team that compromise the 1st Squad. I then right-clicked on
the hex containing the smoke screen. The Argentines fired at my troops and one my men was hit, however, my
morale remained good and I was able to complete my move. Your results may be different. I then moved the
stack into the dead ground at the base of the hill and out of sight of the Argentines above. Since I intend to
move the remaining squad and the platoon sergeant together, I double-left-clicked on the hex, selecting all of
the units and weapons located there. I then moved them into the smoke screen also. I was lucky this time and
no fire was directed my way. Let’s now move the right-hand stack of units. Since these troops are only one hex
away from the dead ground, there is no need to screen their movement. Again, I split the stack into two with the
3rd Squad moving to the right, while the platoon leader and support units went left. All of my troops are still
standing. Since the enemy may have artillery or may launch an attack, I want my troops to go prone now that
they are done moving. To do so, double-click on each stack to select all of the units and then click on the
Toggle Ground button. This button has a red arrow pointed down at a white line. Your troops should have an
“On Ground” label in the information box and a white line at the bottom of their counters.
You have one remaining stack of units, the Fire Control Team from the 4th Artillery Regiment.
Since you have been informed that you have support, click on the leader in the hex; his box is
smaller and does not have the number of men listed. Once you have a selected a leader with a radio in the same
hex, you can call for fire. To do so, click on the Artillery/Air Support button. It looks like a radio.
This brings up the Support Dialog. You have fire missions from both a light artillery battery and naval gun
turret. If you click on each listing, the call button at the bottom of the dialog becomes active. Call for both
artillery units. You can call up to three support units each time you click on the Artillery/ Air Support button.
You can only direct one fire mission per selection, however. Examining this dialog further, you will notice that
there is a delay of from one to three turns before your artillery is available. Both support units have three fire
missions available.
Now that you have called for your support, you are done with your turn. To end your turn, click on the Next
Turn button, which has a clock on a red background. You will be asked to provide a name for the saved game
file at this point if you have not saved the game before now. The default is “battle,” but you can name it
whatever you feel is appropriate. It is now the Argentine’s turn. Since most of your units are out of sight of the
enemy, they may fire at your artillery spotters, but this should not cause them much discomfort. They may
move some of their units also. Depending on whether you have fog of war turned off or on, you may be able to
see this. When the Argentine A/I is done, there will be another screen telling you it is your turn. Click on this to
continue.
My command report informed me that I had support available this turn. You may or may not get the same
command report. If you do, you will probably want to soften up the Argentine positions before you make any
other moves. Click on the OK button to start your turn.
You will then want to select your Fire Control officer. If you don’t
select a leader and click on the Artillery/Air Support button, the
computer will randomly choose one of your leaders that is in the same
hex as a radio to direct y your fire support. This is fine if you have only
one such leader, but here you have two. Your Lieutenant is most likely
in the same hex as his RTO carrying a radio. He cannot see the
Argentine positions from where he is currently located, however, and
his radio is not setup (setup status is lost whenever the weapon is
moved). Once you have the appropriate leader selected, click on the
Artillery/Air Support button. You will now see that one or both of your
artillery units are available this turn. If you click on the available artillery unit, the Call button at the bottom
will turn into a Target button. If you do not use your artillery this turn, you will have to start the process over
again by calling for it on your next turn. Click on the Target button to call for your artillery support. This brings
up the Targeting Dialog. There is a picture of the weapon or vehicle providing the support as well as two pulldown menus. The one on the left is used if there is a choice of weapons to be used, such as might be possible
with an airplane. That is not the case here and the only selection is the 105 mm L118 or Light Gun. The righthand menu is for different types of ammunition. If there is a large X in front of the listing, this means that this
type of ammunition is not available in this scenario. Here our only choice is HE or high explosive. Once these
pull-down menus have been completed to your satisfaction it is time to target your artillery. Choose the hex on
the map that you would like to be the center of your barrage and right click on it. The computer will determine
the actual center hex based on the morale rating of the spotting officer. The artillery rounds will then be
randomly scattered around this hex. Since the artillery can land several hexes away from the intended target, it
is prudent to not call for artillery too close to your own troops. In our situation on Sapper Hill, it would be nice
to hammer the Argentine squad dug in midway up the hill. However, these troops are only three hexes away
from our own, there is a significant risk of friendly fire. Consequently, I am going to call for the artillery on the
top of the hill where the majority of visible troops and support weapons are located. I right-clicked on hex 14, 7
and the computer made hex 13, 8 the center of the barrage. Twelve artillery rounds landed around this hex in a
random pattern. I was not informed of the results, but I can see that an Argentine medium machine gun unit has
become pinned, which will reduce the amount of fire that will be directed my way. You may also notice that the
hexes that were impacted by artillery rounds now contain craters. These craters provide some cover to troops of
both sides, but slow down movement to some extent. Since only one of my artillery batteries was available, this
ends my ability to call for support this turn. I could move my troops out of the dead ground they now occupy,
but I would like to soften up the Argentine position a bit more first. Consequently, I am going to end my turn
and see what surprises the Argentine A/I has for me.
During my game, I did not observe any significant Argentine movements or changes. I
began my third turn by continuing to bombard the hilltop with my off map artillery
support. Both of my artillery batteries were available this turn. Additional loses and
unit disruptions resulted. Since time is short in this scenario, I am going to move my
infantry platoon forward. However, before ordering the men out of the concealment of
the dead ground, I am going to throw some smoke grenades to cover my advance. The
engineer half-section stacked with the platoon leader has two such smoke grenades. I
“fired” them into adjacent hexes and then moved an infantry squad into each one. I
received some enemy fire, but this did not cause any loses. I am going to leave my HQ
group in reserve and move the remaining squad on the left flank forward also. You
can elect to use a WP grenade to screen this movement if you so desire. You may
notice that I had my men crawl forward rather than stand up and take the hill at the
run. In my experience, it is rarely faster to run over a contour than it is to crawl.
Since crawling leads to fewer casualties, I elected to crawl. My left flank squad made it without any loses also,
but the worst is yet to come. This concludes my third turn and it is now time to see what the Argentine
defenders are up to.
Much to my surprise, an Argentine platoon came running
down the road. My troops fired at them, but partially because
they were in a smoke screen, the fire did not stop them,
although it did cause some loses (you can see the enemy rifle
lying on the ground where the casualty dropped it). The
Argentines swept around my right flank and seized one of the
LZ objectives. I now have another decision to make. Do I
continue to the attack to take objectives on Sapper Hill, do I
attack to the rear and try and recapture the lost objective, or
do I do some combination of the two? One advantage that I
have is that the enemy troops that occupy my objective are
still standing. This will double the lethality of my first attack
directed at them. Since the engineer half-section also has a
satchel charge, a very potent weapon, this will be my first
attack. This would also be a good time to check the loads of
those weapons that have more than one available. If you
right-click on the units in the Information Bar, you will see
that there is a +1 below the label for the Gustav rocket launcher and a +2 below the 51 mm mortar. This
indicates that both of these weapons have additional loads. Right above this marker will be the current load.
You want to make sure that these are both HE for attacking infantry in the open (you might want to use the
HEAT load for the Gustav if your target occupied fortifications). If you need to change them, select the weapon
and then click on the Command menu item. Scroll down the list until you come to Select Weapon Load. If you
click on this, it will show the current load and any other possible loads. If there is an X in front of the load that
means that load is not available in this scenario. My first attack is fairly successful, causing four casualties and
pinning the enemy squad. I let my excitement get the better of me and before I forget, I am going to go back and
let my artillery work over the top of the hill. This could be critical as any actions by my troops exposed to view
could draw enemy fire. My artillery again pounds the hilltop and I can see additional pinned and disrupted units.
Since I have pinned the enemy squad on the objective with my first attack, the HQ stack
fires at the second unit on the road. My first attack causes a single loss, while the second
pins the defenders. I then decide to assault this hex with the 3rd Squad located directly
above them. Assaulting is a dangerous proposition and can cause significant loses for both
sides. I have the advantage, however, of attacking a pinned enemy and also of attacking
downhill. I prepare for my assault by firing LAW rockets and a WP grenade at the enemy
squad. To make an assault, simply move the assaulting units into the enemy occupied hex. Unlike many other
games designed by John Tiller, you can only assault from one hex at a time in Squad Battles. My assault is
successful; however, I have lost three men, including the squad leader of 3rd Squad. The demoralized enemy
troops have retreated to the southeast. Third Squad could continue to assault the enemy occupying the objective,
but I think this is a bit risky and I just have them fire at the enemy. I end my turn by moving 1st and 2nd Squads
forward, across the fence line and adjacent to the enemy positions. I again elect to have them crawl, rather than
risk excessive casualties. I am fairly lucky and do not receive any loses. Since all of my units have moved, I end
my turn.
The Argentine fire during their turn is effective and my forward squads take loses. However, they are in
position to assault this turn and may be able to secure an objective. I should also be able to recapture the LZ
objective this turn also, barring any additional surprises. I check the victory conditions by going to the Info
menu selection and scrolling down to Victory. While the Argentine player has managed to take one of my initial
objectives, the loses he has incurred more than offset his gain in victory points. My artillery has also caused
loses and currently, the British have a minor victory.
Since this tutorial has exposed you to the basics of movement, fire and assault, I am going to let you finish the
game on your own. Remember that assaults can be very costly, but the only sure way of gaining ground. Be
sure and read the User’s Manual (Press F9 in game) for additional information on playing the game. Good luck!
For updates, downloads and the latest information visit JTS at http://www.johntillersoftware.com or email
[email protected] .