1
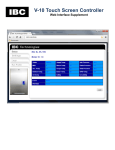
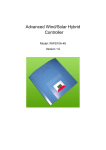
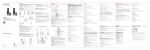
AIM-‐DAC System DAC844 User Manual Anviz Global Inc 1 AIM-‐DAC System Notice and Disclaimer This manual’s sole purpose is to assist installers and/or users in the safe and efficient installation and usage of the system and/or product, and/or software described herein. BEFORE ATTEMPTING TO INSTALL AND/OR USE THE SYSTEM, THE INSTALLER AND THE USER MUST READ THIS MANUAL AND BECOME FAMILIAR WITH ALL SAFETY REQUIREMENTS AND OPERATING PROCEDURES. 1 The system must not be used for purposes other than those for which it was designed. 2 The use of the software associated with the system and/or product, if applicable, is subject to the terms of the license provided as part of the purchase documents. 3 Anviz global.Inc and/or its related companies and/or subsidiaries’ (hereafter: "Anviz") exclusive warranty and liability is limited to the warranty and liability statement provided in an appendix at the end of this document. 4 This manual describes the maximum configuration of the system with the maximum number of functions, including future options. Therefore, not all functions described in this manual may be available in the specific system and/or product configuration you purchased. 5 Incorrect operation or installation, or failure of the user to effectively maintain the system, relieves the manufacturer (and seller) from all or any responsibility for consequent non-compliance, damage, or injury. 6 The text, images and graphics contained in the manual are for the purpose of illustration and reference only. In no event shall manufacturer be liable for any special, direct, indirect, incidental, consequential, exemplary, or punitive damages (including, without limitation, any and all damages from business interruption, loss of profits or revenue, cost of capital or loss of use of any property or capital or injury). 7 All graphics in this manual are for reference only, some deviation between the image(s) 8 All wiring diagrams are intended for reference only, the photograph or graphic of the PCB(s) and the actual product may occur. are intended for clearer illustration and understanding of the product and may differ from the actual PCB(s). Anviz Global Inc 2 AIM-‐DAC System Catalogue 1.1 Product feature ....................................................................................................................... 5 1.2 Product parameters ........................................................................................................... 6 2 Product Operation ..................................................................................................................... 7 2.1 Product Communication .................................................................................................... 7 2.1.1 Net Work Communication wiring ........................................................................... 7 2.1.2 RS485 Communication ............................................................................................ 8 2.2 Product Interface ............................................................................................................... 9 2.3 Product Wiring ................................................................................................................. 10 2.3.1 DAC844 Earth Wiring ............................................................................................ 10 2.3.2 Reader, Switch and Door Contact Wiring .............................................................. 10 2.3.3 Lock connection .................................................................................................... 11 2.3.4 RS485 Wiring ......................................................................................................... 11 2.3.4 LED ........................................................................................................................ 12 3 DAC system Overview .............................................................................................................. 13 3.1 Starting the Software ....................................................................................................... 13 3.2 Starting the Software ....................................................................................................... 14 3.3 Device Management ........................................................................................................ 15 3.3.1 Controller Operation ............................................................................................. 15 3.3.2 Door Operation ..................................................................................................... 22 3.3.3 Time Zone ............................................................................................................. 25 3.3.4 Privilege ................................................................................................................. 28 3.3.5 First Card ............................................................................................................... 33 3.3.6 Multi Card ............................................................................................................. 37 3.3.7 Crontab ................................................................................................................. 40 3.3.8 Access Records ...................................................................................................... 41 3.4 User management ........................................................................................................ 42 3.5 Real Time Monitoring ................................................................................................... 46 4 Initialization the Access Controller ........................................................................................ 49 5 Upgrade Firmware for DAC844 .............................................................................................. 50 Anviz Global Inc 3 AIM-‐DAC System 1 Product Introduce DAC84 is a simple and flexible access controller. It is based on TCP/IP communication. The device adopts the latest PCB process design to make sure the working stable and reliable, meet the different needs of the market. The 20000 users and 200000 records huge storage capacity, meet the medium scale enterprise access control requires. Support 4 standard Weigand26 readers input. Both with TCP/IP and RS485 communication mode easily upgrade the access control without rewiring. The DAC844 combine with Anviz intelligent management Distributed Access Controller system (AIM-DAC system). The DAC system is user-friendly, intuitive, and rich in functionality. Not only support Anviz RFID product also with Anviz fingerprint products. DAC844 Access control panel Anviz Global Inc 4 AIM-‐DAC System 1.1 Product feature DAC844 is a powerful and suitable for a wide range of access control solutions. l 4 standard Wiegand 26 input for 4 doors l 4 relays output directly control 4 locks (Maximum Current <5A) l TCP/IP network communication , RS485 communication (Baud Rate:115200bps) l Support Min USB port firmware upgrade l 20000 Users and 200000 records capacity l 4 Switching Signal input and 4 door contact input l Fire Alarm input for open the door l Duress open door and send alarm to system. l Pluggability connection pins flexible install and replace. System Automatic Restoration (Watchdog) If temporary the system in trouble by unusual interference (Noise, Shock and Inverse Current), Watchdog function senses it automatically then the function lets system work correctly. Anti-Pass back Anti-Pass back rules can be applied to each access area to prevent one user's card or entry code from being used for two subsequent entries, and to prevent a second entry without a previous exit. Door Interlock Door Interlock sometimes referred to as Mantrap, prevents two or more related doors from opening at the same time. It may be useful for the entry holes of Clean Rooms, or in other facilities with two exit doors. It should only be possible to open one door at a time with a valid user code. The Door Interlock must have door contact equipment. First Card function The First Card function is that the first card has especial privilege. After verified the first card, the door will change status. The first card function needs setting the time and door status before activate the first card function. Multi Card Function Multi Card Function is that before entering in an important area need verify different cards at same time. The Multi Card function needs setting multi registered cards then upload the privilege to the door. Duress Open Door This function is used to notice any case that the door has to be opened by force. In case of duress, enter the Duress Password and <ENT> key before the normal access process then the door will be opened as normal but the duress alarm is also generated at the same time and the duress alarm output will send to the system. Anviz Global Inc 5 AIM-‐DAC System Crontab Setting time, and at this time the door will change status automatically. Real Time Monitoring Monitoring user access records, Fire Alarm Record, Duress Open Door Record and Door Status (Need door contact equipment) 1.2 Product parameters Parameter Describe Working Power 12V -4A Max/Min Working Current Standby:86mA Input 4 Switching Signals,4 door contacts Relay 4 relays LED prompt 22 LEDs Communication TCP/IP, RS485(115200bps) Working Temperature -10℃—50℃ Working Humidity 0-80% Size 128*128*15mm (H*W*D) Weight Max:560mA 12V 5A (NO NC COM) Anviz Global Inc 6 AIM-‐DAC System 2 Product Operation 2.1 Product Communication 2.1.1 Net Work Communication wiring TCP/IP Communication Mode Anviz Global Inc 7 AIM-‐DAC System 2.1.2 RS485 Communication RS485 Communication mode Anviz Global Inc 8 AIM-‐DAC System 2.2 Product Interface NO. Describe NO. Describe 1 Power Input 7 4 Switching Signal Input 2 Min USB port (Upgrade firmware) 8 4 Door Contact Input 3 TCP/IP port 9 4 Relay Output (NO,NC,COM) 4 RS485 port (A+,B-,GND) 10 4 Readers Input 5 I2C Expand Port() 11 Restart Button 6 Fire Alarm input Earth Anviz Global Inc 9 AIM-‐DAC System 2.3 Product Wiring Please follow below steps wiring with DAC844: 1 Please make sure the DAC844 connect with Earth. 2 Connect with Reader, Switch and Door Contact equipment 3 Connect with Lock 4 RS485 communication 5 LED prompts 2.3.1 DAC844 Earth Wiring Earth 2.3.2 Reader, Switch and Door Contact Wiring Anviz Global Inc 10 AIM-‐DAC System Remark: Exit Button means Switch Door Sensor means Door Contact Reader, Switch and Door Contact 2.3.3 Lock connection Lock and Relay 2.3.4 RS485 Wiring RS485 Wiring Anviz Global Inc 11 AIM-‐DAC System 2.3.4 LED LEDS No. Describe (Y=Yellow G= Green) ① Switch Signal prompt LEDs (Y) ② Door Contact prompt LEDs (Y) ③ Relays prompt LEDs (G) ④ Reader Wiegand 26 input prompt LEDs (G) ⑤ RS485 Communication prompt LEDs (Left: Y Right: G) ⑥ Fire Alarm Input (G) ⑦ Power (G) ⑧ WatchDog (G) Anviz Global Inc 12 AIM-‐DAC System 3 DAC system Overview AIM-DAC System is controlled through an easy to use interface, with a three modules of all aspects of the device setup, and windowed design for standard operations. 3.1 Starting the Software This section explains how to start the software and log in to the main window. Staring DAC System Click the DAC icon on the desktop, or select the program from the DAC folder in the Start menu. The DAC Software login dialog appears. DAC Software Dialog box 1. Enter a Use Name and type a Password. Note: By default, the User Name is "admin" and Password is “1”. 2. Click “Confirm” The main DAC window opens. Note: The SW versions in the screenshots are exemplary. only. Anviz Global Inc 13 AIM-‐DAC System 3.2 Starting the Software The entire central functionality of AIM-DAC System is available from its main window. Figure 3.2 AIM DAC System Main windows The AIM DAC System Main window has three Parts: Section Description Controls the software general operation and device setup. Controls register User information in the System. Monitoring all the access, alarms and error events. Click “ ” back to AIM DAC System Main windows. Anviz Global Inc 14 AIM-‐DAC System 3.3 Device Management Device Management controls the software general operation and device setup. Controller list: All of added controllers will display in the Controller list. 3.3.1 Controller Operation Controller option has two parts. Part One: Edit: Add and edit the DAC844 device information into the software. Controller S/N: After added the controller in the software, the administrator could select controller via the controller ID. Search: Click “Search” option into Quick Add Device interface. Anviz Global Inc 15 AIM-‐DAC System Quick Add Device Interface Click “Search” option, the software will list out all the DAC844 devices which connect in the LAN. Select the device, the device network parameter displays as below and you can modify the network parameter as you need. Click “Modify” to setting and save the DAC844 device’s newwork. Click “Add” you will success add a DAC844 device in the software. Note: The Quick Add Mode only suit for DAC844 TCP/IP connection mode. only. Add: To manual to add a DAC844 device. The DAC844 support two connection mode. TCP/IP and RS485 connection mode. TCP/IP mode: Please enter the “Controller No.”. The “Controller NO.” is the unique ID of the DAC844. You can find it in the DAC844 Package or on the DAC844 product lable. It is a 6 digit number. Such as ”44893”. Select “LAN” in “Connection Mode” and input IP address which you need. “Detail Info”: Input DAC844 devices describe information. “Save”: To save the device setting. “Cancel”: To cancel the device setting. Anviz Global Inc 16 AIM-‐DAC System RS485 mode Please enter the “Controller No.”. The “Controller NO.” is the unique of the DAC844. You can find it in the DAC844 Package or on the DAC844 product lable. It is a 6 digit number. Such as ”44893”. Select “COM” in “Connection Mode” and Select Com Port number in the drop down list。 “Detail Info”: Input DAC844 devices describe information. “Save”: To save the device setting. “Cancel”: To cancel the device setting. “Delete”: Please select DAC844 device in the “Contorller list” and click “Delete” to delete device. “Modify”: Click “Modify” to input DAC844 devices describe information and change the device Anviz Global Inc 17 AIM-‐DAC System connection mode. Part Two: Setting: It is general operation and device setup. Include “Status”, “Advanced”, “Password”, “Communication” and “Clear” functions. At the left side of the “Setting” interface display the selected DAC844 device’s information; include “Controller No.”, “Connection Mode” and Device status. “Status”: controls each relay and relay status on the DAC844. (The DAC844 have 4 relays output.) “Door Open Delay”: controls the relay working delay time. (3000 means 3000ms. The minimum delay time is 100ms. ms= millisecond) “Door Status”: There are three door statuses. Online, NO and NC “Online” means the relay in standby. When someone accessed the device the relay will open. “NO” means the relay always open. “NC” means the relay always close. “Timing”: Setting the time to the device. The device will synchronize the time with PC system. “Synchronization”: Select this option will help administrator quick setting all the relay in the device. The administrator just needs setting the first relay status, the others relays will have the some status as the first one. After setting all the status of the delay, please click “Setup” upload all the settings in the DAC844 device. “Advanced”: Controls the advanced functions in the DAC844 device. Include “First Card, Multi Card”, “Anti-Passback”, “Interlock” and “Forced Password” functions. “First Card, Multi Card”: Enable the First Card and Multi Card function. The Multi Card need Anviz Global Inc 18 AIM-‐DAC System verify more than one card to pass access. The “ “is the valid time gap between two cards verify on the DAC844. (Default is 10 second) Anti-Passback: enable Anti-Passback rules can be applied to each access area to prevent one user's card or entry code from being used for two subsequent entries, and to prevent a second entry without a previous exit. In the drop down box there are three options. A-B: Reader A and Reader B two readers make up an Anti-Passback application. C-D: Reader C and Reader D two readers make up an Anti-Passback application. A-B C-D: Four Readers make up two areas Anti-Passback application. Please click “Setup” upload all the settings in the DAC844 device. Interlock: Enable door Interlock to prevent two doors from opening at the same time. It should only be possible to open one door at a time with a valid user code. In the drop down box there are three options. A-B: Reader A and Reader B two readers make up an Interlock application. C-D: Reader C and Reader D two readers make up an Interlock application. A-B C-D: Four Readers make up two Interlock applications. Please click “Setup” upload all the settings in the DAC844 device. Note: The Door Interlock must have door contact equipment. only. Anviz Global Inc 19 AIM-‐DAC System Duress Password: Enable the Duress Password function. When input the Duress Password the door will be opened as normal but the duress alarm is also generated at the same time and the duress alarm output will send to the system. The Maximum duress password supports 10 digit numbers in DAC system. Please click “Setup” upload all the settings in the DAC844 device. Note: Duress Password function must enable PIN Pad function in the DAC system. Password: Controls all of PIN Pad operation. Include enable PIN Pad, Super Password, Card+Password functions. Enable PIN Pad: Enable PIN Pad function the DAC844 device will support the KEY pad reader and number input from the KEY pad. And the Duress Password function can be used. Enable password: After enable this function the DAC844 could be accessed by Super Password. Card+Password: Enable this function. The user could input Card number and Password to access the DAC844 without carry the card. Or the user must swipe registered card and input password to access the DAC844. Password timeout: It is the time gap for input the password. (20 means 20second) Please click “Setup” upload all the settings in the DAC844 device. Anviz Global Inc 20 AIM-‐DAC System Super Password: Input super password from with Key pad Reader, the super password could access the DAC844 device directly without swipe any card. Each reader with only one super password and the maximum super password is 10 digit numbers. Please click “Setup” upload all the settings in the DAC844 device. Communication: Check and modify the DAC844 device network parameter. Search: Click “Search” the software will find out the selected DAC844’s network parameter. You can modify all the network parameter except “MAC Addr:”. Note: MAC Address is unique for each DAC844 device. Please click “Setup” save and upload all the settings in the DAC844 device. Clear: To clear the settings in the DAC844 device. Please select the settings which you want to clear. Please click “Clear” to clear the settings in the DAC844 device. Anviz Global Inc 21 AIM-‐DAC System 3.3.2 Door Operation The Door option includes Door Edit and Door Group functions. Door Edit: Edit the door information, add door description information, to help administrator to remark the door. There are two parts in Door Edit interface, include “All the Door” and “Controller Door”. All the Door: Listed out all of doors in each controller. Controller Door: list out selected DAC844 controller’s door. The administrator could edit door information via select controller. Controller ID: Input controller ID and click “Select”, all of doors will list in controller door column. Anviz Global Inc 22 AIM-‐DAC System Add: add a door for controller and door information. Note: Because different DAC device support different doors. Such as DAC844 maximum support 4 doors. By default the software list out all of doors for a controller. So you do not need add doors when you first time to use software. Delete: delete spare doors for the controller. Please select spare doors which you want to delete click “Delete” to dele. Note: After delete doors, you can use “Add” function to retrieve the door. Modify: modify the door information. Please select the door which you want to modify. Door Group: Create a group; the group includes many doors from different controllers. The Door Group help administrator to quick setting user privilege. There are three columns in the Door Group interface, “Door Groups List”, “Added Group List” and “Unorganized Group List” Door Group List: List out created door groups. Added Group List: List out the door which have added in the group. Unorganized Group List: List out the door which do not have added in the group. Please click “Add” to create a group. Input group name and information. Anviz Global Inc 23 AIM-‐DAC System After add group, please click the group in “Door Group List” and you could select doors from “Unorganized Group List”, Click “ click “ ” put the selected door to “Added Group List”, or ” put the door out from “Added Group List”. By now doors in the “Unorganized Group List” reduced. Delete: Delete the door group. Select the door group in the “Door Group List”, click “Delete” to delete. Modify: Modify the door group information. Select the door group in the “Door Group List”, click “Modify” to edit door group information. Anviz Global Inc 24 AIM-‐DAC System 3.3.3 Time Zone The Time Zone is the main function for AIM-DAC system. A time zone defines a weekly time period or set of time periods, for example, "Office Hours" or "Out of Office Hours". Door access rights, input and output behavior can all be set to behave differently within each Time Zone. The AIM-DAC System support 255 Time Zone. By default the time zone “0” and “1” are fixed time zones. Time Zone 0: Normal Close, means all users with time zone 0 that can not pass access the door. Time Zone 1: Pass any time means all users with time zone 1 that can pass access the door at any time. Time Zone No: the software can set 255 time zones. The time zone 0 and 1 is fixed. Time Zone Name: Input a name to describe the time zone. Start / Ending Date: Date range of the time zone. The date range can be week, month and year. The format is: YYYY-MM-DD. Link Time: is a time zone for subsequent event after current time zone. Such as setup “link Anviz Global Inc 25 AIM-‐DAC System time” is “0”. That’s means all of the door cannot pass after current time zone (Working Time). Monday---Sunday: Quick setting for week period. 1st—3rd Time Zone Start / 1st—3rd Time Zone End: One Time Zone could have three time range. The administrator could setting three time rang to make up a time zone. Note: One Time Zone must make up by one time range. After setup a time zone, please click “Add”. The time zone will add into AIM-DAC system. Then need select a controller (the controller which need with this time zone), in Controller List, and click “Upload” to upload the time zone to selected controller. The system will pop up a window to prompt succeed or failed. For Example: Access control for normal working time. Start working time is 9:00—18:00 1 Select a Time Zone No 2 Input a Time Zone Name Anviz Global Inc 26 AIM-‐DAC System 3 Input Start Date and Ending Date 4 Select Link Time Normal off duty the office closes the door. So select link time as 0 5 Input time range for working time and select week period. Because the working time range is: 9:00—18:00 from Monday ---Friday. So we just need use 1st Time Zone Start—1st Time Zone End that’s enough. And the time range of the 1st Time Zone we had best more loose time range (Some body will early in office and later out office) 6 Upload the Time Zone to controller Anviz Global Inc 27 AIM-‐DAC System Please click “Add” and select the controller in the controller. Click “Upload” to upload time zone to DAC844 device. 3.3.4 Privilege Privilege option: It is according to the rules of time zone, authorized the user privilege to pass the door or not allowed to pass the door. Note: Please refer to the section User Management first. Before setting Privilege. Anviz Global Inc 28 AIM-‐DAC System Door / Door Group area: Left side of the “Door / Door Group area” list out all of doors and door groups. Click “ “ put all of doors or door groups to right side. Click “ “ put select single door or door group to right side. The selected doors and door groups will list in right side of the “Door / Door Group area”. Anviz Global Inc 29 AIM-‐DAC System Click “ Click “ “ to put all of selected doors or door groups back to left side. “ to put single select door or door group back to left side. User area: Left side of the “User area” list out all users registered in the AIM-DAC system. Click “ “ put all users to right side. Click “ “ put single user to right side. The selected users will list in right side of the “User area”. Click “ “ to put all users back to left side. Click “ “ to put single user back to left side. Add Time Zone area: Time Zone No: Please select time zone in the drop down box. Name: Display Time Zone name. Start Date / End Date: This date range is the privilege expiry date. It is different with time zone. Anviz Global Inc 30 AIM-‐DAC System After select the door or door group, select the user and set the time zone, the next is authorizing. Click“ ” button the user authorized pass the door. Click” ” button the user cannot pass the door. Note: After authorized the user pass the door. The “Ban Pass the door” function uses to cancel user pass door privilege. Anviz Global Inc 31 AIM-‐DAC System After “operation Successful!”, The user access control privilege has made up and store in the system database. Now we need upload these access control privilege to the corresponding DAC844 devices. In the “Upload” interface, please select corresponding DAC844 controller in the Controller list. Click “ ” to upload Access control privileges to the Controller. Anviz Global Inc 32 AIM-‐DAC System 3.3.5 First Card The First Card function is widely used in public place. Such as Bank hall, Embassy hall and so on. After verified the first card, the door will change status. The First Card function not confined to only one registered card. All of the administrator cards could with First Card function. Note: Must enable First Card function in the system. Please refer to 3.3.1 Controller Operation -‐-‐ First Card, Multi Card The First Card controls the status of a single door. So before setting First Card function needs select a controller in the Controller List and select a door in Edit column. First Card Time: It is time point. The first card must be verified at this time point the door will change the status. Anviz Global Inc 33 AIM-‐DAC System Note: The time before this time point to verify the first card. The door cannot change the status. And the door must verify the first card to change status when the time over this time point. First Card Status: It is door’s target state after verify the first card. End Time: It is also a time point. At End Time point verify the first card the door will change the status again. Note: The time before End Time point to verify the first card. The door cannot change the status. And the door must verify the first card to change status when the time over End time point. End Status: It is door’s target state after verify the first card at End Time point. Select first cards in the User area Left side of the “User area” list out all users registered in the AIM-DAC system. Click “ “ put all users to right side. Click “ “ put single user to right side. The selected users will list in right side of the “User area”. Click “ Click “ “ to put all users back to left side. “ to put single user back to left side. Anviz Global Inc 34 AIM-‐DAC System After select user and setting time point and door status, need click ”Add” to store all of these information in the system. Delete: Delete the doors first card information in the AIM-DAC system Modify: After modify the first card informations and click “Modify” to save in the system. The next step is to upload the first card information to controller. In the Upload interface, click first card information. You could check the firs card members in the right list. Note: You can back to Edit interface to Modify or Delete first card information. Click “Upload” to upload first card information to controller. Anviz Global Inc 35 AIM-‐DAC System Anviz Global Inc 36 AIM-‐DAC System 3.3.6 Multi Card Multi Card is a high security access control function. Enter into an important area need verify different cards at same time. Note: Must enable Multi Card function in the system. Please refer to 3.3.1 Controller Operation -‐-‐ First Card, Multi Card The Multi Card function also controls a single door. So administrator needs select a controller in the Controller List and select a door in Edit column. After selected the door, click “Add” and “Continue Operation” will pop up below window: Anviz Global Inc 37 AIM-‐DAC System Multi Card Number: This is total number of cards need verified. The maximum number is 200. Multi Card Group: There are 8 groups. The Group can make multi card function more agile. Click “ ” or “ “to assign user to different groups. For example: There are 4 groups with different users. Anviz Global Inc 38 AIM-‐DAC System And the “Multi Card Number” is “4”, that’s means need verify 4 users to pass the access control. In the “Multi Card Group” the “Group1” to “Group 4” as number “1”. That means the multi card verify users must come from “Group1” to “Group4”. And you can see the “Group2” to “Group4” have more than 1 users in the group. So you just need verify any one user in these groups. Note: The Multi Card function must work with “Multi Card Group” setting and “Multi Card Number” must more than 1 users. Click “Add” will make up all multi card informations store in the system database, and click “Upload” to upload all multi card informations to controller. Click “Delete” to delete “Multi Card” setting in the AIM-DAC system database. After modified the “Multi Card” setting in the AIM-DAC system, please click “Modify” to save the settings. Note: To clear the “Multi Card” functions in the controller. Please refer to 3.3.1 Controller Operation – Clear. Anviz Global Inc 39 AIM-‐DAC System 3.3.7 Crontab The Crontab function is setting data and time point, when at this point the door will change status automatical. This function will help customer easy manage access control. The crontab function support Date format and Week format. The Date format is MM-DD and Week format the administrator can select days by self. Name: Input a name for crontab function. Execution Time: Setting a time point. Status Control:Door change status when at execution time. Door: Select a door will have crontab function. The DAC844 normal with 4 doors. Select a conntroller in the conntroller list and Click “Add” will make up crontab informations store in the system database and click “Upload” to upload crontab informations to controller. Before upload crontab informations to controller. The administrator could click “Delete” to delete “Crontab” setting in the AIM-DAC system database. After modified the “Multi Card” setting in the AIM-DAC system, please click “Modify” to save the settings. Note: To clear the “Crontab” functions in the controller. Please refer to 3.3.1 Controller Operation – Clear. Anviz Global Inc 40 AIM-‐DAC System 3.3.8 Access Records This interface include two parts: “Extract recrods” and “Browse”. The “Extract records” interface could download the access records from controller. Select All: Download all records from all of controllers. The “Browse” interface could select records according the condition setting in the software. Anviz Global Inc 41 AIM-‐DAC System 3.4 User management User management controls register all user information in the controller. The DAC software support RFID card register and fingerprint register. Register RFID Card In the “Edit” interface, the administrator could manual add user in the “Base Info” area. Card No:input the RFID card number in the “Card No” column. No: It corresponds to the “Serial No” in the “User list”. So this serial number cannot be repeated. That’s unique number for user. Name: Input the User name. Statue: the user account’s statue. There are two statuses: “Normal” and “Cancel”. The “Normal” means the register user been active in the system. “Cancel” means the register user do not been active in the system. Password: The user’s password for verify the access controller. Then click “Add” button. The user will add in the “User list”. Also could select the user in the “User list”, modify the user information in the “Base Info.”, to click “Modify” button to save or click “Delete” to delete selected user. Anviz Global Inc 42 AIM-‐DAC System Qucik Add: If need enroll more user, administrator need enter “Quick Add” Controll ID: Please select the Controll ID in the drop down list and click “Select” to active “Qucik Add” function. Then administrator could swipe the card on any readers which connect with the DAC844 device. Then in the below list will display all the card numbers. When you finsih swipe cards. Please click “Stop first and click “Add” button, all of cards will add in the AIN-DAC software. Anviz Global Inc 43 AIM-‐DAC System And you had best restrat the software. You can see all cards registered in the “User list”. The adminisrtator must modify all cards’s Name and Serial No in the “Base Info.” area. Register Fingerprint The AIM-DAC system support Anviz T5 fingerprint reader. So the system provided the user’s fingerprint in the DAC844 access controller. Step 1 Input “No”, ”Name” and “Password” in the “Base Info” area. Except the “Card No” do not input any number. Step 2 Connect the T5 reader with AIM-DAC system via the USB cable. Step 3 Click “Collect” will active the T5 reader to register fingerprint. Please hold press the fingerprint on the T5 reader. When you see the clear finger image in the system, Please click “Fingerprint 1 Registration” to register one fingerprint. Then you need click “Collect” and “Fingerprint 2 Registration” to continue registers another finger in the system. Note: One user could register two fingers in the system and these two fingerprints shared one card number in the system. After enrolled two fingerprints please click “Add” the user will list in the “User list”; Anviz Global Inc 44 AIM-‐DAC System Step4 After enrolled the fingerprint. The fingerprint templates store in the AIM-DAC system. Need upload fingerprint templates to T5 reader device. Enter into “Upload” interface. Please input T5 device’s IP address and click “Upload”. The fingerprint template will upload to the T5 reader via the TCP/IP communication. Note: After register fingerprint, you could verify the finger in the t5 reader now. Step5 Enter “Quick Add” interface, select the controller ID and active “Quick Add” function, and press the fingerprint on the T5 reader. Then the T5 will send out a number to AIM-DAC System. And we could use this number to the user (who we register in the Step 1). Then the user with fingerprint registered in AIM-DAC System. Note: The number from the T5 is the Wiegand 26 code for user fingerprint. Anviz Global Inc 45 AIM-‐DAC System After register the User please refer to the section 3.3.4 Privilege to authorized user. 3.5 Real Time Monitoring Enable the Real Time Monitoring function; the AIM-DAC System could display any operation in the system monitoring windows. Click “Monitoring” button will enable the Real Time Monitoring function. Anviz Global Inc 46 AIM-‐DAC System The system administrator will see there are 4 doors display in the main windows. Means the door status is open. Means the door status is closed. (The controller need with door contact equipment). The administrator could select the icon of the door and right click the mouse. The doo could opened by remote. Stop: Click “Stop” to stop monitoring the controller. Map: AIM-DAC system support import image. The administrator could import the building floor maps into the system. So could put the door icon on the maps to monitoring. The image support BMP and JPGE. Anviz Global Inc 47 AIM-‐DAC System In the Real Time Monitoring windows, we can also support multiple records. Such as: Exit button open the door. Swipe the card to open the door. And the abnormity warning also display in the software. The abnormity warning will display in the right side of the Real Time Monitoring windows. Anviz Global Inc 48 AIM-‐DAC System 4 Initialization the Access Controller There is an initialization button in the access controller. The user could hold press the initialization button for 4-5 sec. and the reader prompt LEDs will flash 8-9 times. After initialization the controller all the user information will not be clearly. Only the IP address back to default IP address: 192.168.0.150 Anviz Global Inc 49 AIM-‐DAC System 5 Upgrade Firmware for DAC844 The DAC844 could upgrade the firmware via the Mini USB port. When you need upgrade the firmware please hold press initialization button and power on the DAC844. The DAC844 device wills only bright Power LED. Running the below icon Will display the windows as below: Click icon to find the firmware files. And click “Update” to upload the firmware to DAC844 device Anviz Global Inc 50