1
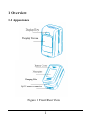
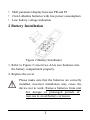
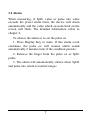
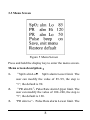
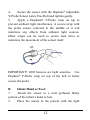
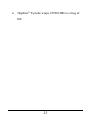
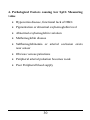
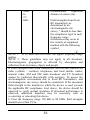
User Manual for the Hopkins® Newborn & Mom Pulse Ox Instructions to User Dear Hopkins Customer, Thank you very much for purchasing our product. Please read the manual very carefully before using this device. Failure to follow these instructions can cause abnormal readings or damage to the oximeter. No part of this manual may be photocopied, reproduced or translated into another language without the prior written consent. We reserve the right to improve and amend it at any time without prior notice. This device complies with Part 15 of the FCC Rules. Operation is subject to the following two conditions: (1) this device may not cause harmful interference, and (2) this device must accept any interference received, including interference that may cause undesired operation. Version of the Manual: Ver 1.2 Revised date: September, 2014 Hopkins Medical Products All rights reserved. I User Manual for the Hopkins® Newborn & Mom Pulse Ox Warnings! • • • • • • Check the device, sensors and probes to make sure that there is no visible damage that may affect user’s safety or measurement performance with regard to sensors and clips. It is recommended that the device should be inspected once a week. When there is obvious damage, stop using the device. The device should be carefully monitored if in use when ambient temperature exceeds 98.6°F, 37ºC. Injury may occur due to overheating of the sensor Discomfort may occur if the oximeter is used on the same finger for an extended period of time, especially for poor microcirculation patients. It is recommended that the oximeter should not be applied to the same location for longer than 2 hours. If any abnormal condition is found, please change the position of oximeter. Avoid placing the device on the same limb which is wrapped with a cuff for blood pressure measurement or during venous infusion. DO NOT clip this device on edema or tender tissue. II User Manual for the Hopkins® Newborn & Mom Pulse Ox • • The light (the infrared light is invisible) emitted by the device is harmful to the eyes, so service technicians and patients should not stare at the light. Please follow local regulations when disposing of the oximeter, its accessories and batteries. Warnings for Adult Fingertip Operation • The finger should be inserted into the sensor in the correct position. • The patient’s finger should remain still during measurement. • Do not put wet finger directly into sensor. • Do not let anything block the emitting light from device. • Vigorous exercise and electrosurgical device interference may affect the measuring accuracy. • Using enamel or other makeup on the nail may affect the accuracy of measurement; long fingernails may cause failure of measurement or inaccurate measurement results. • Keep the oximeter away from dust, vibration, corrosive substances, explosive materials, high temperature and moisture. III User Manual for the Hopkins® Newborn & Mom Pulse Ox Important! • Existence of high intensive light sources, such as fluorescence light, ruby lamp, infrared heater or strong sunshine, etc. may cause inaccurate measurement. Please put an opaque cover on the sensor or change the patient’s location. • If the first reading shows unstable waveform, the measurement may be false. In order to obtain a more accurate measurement, simply wait for the waveform to stabilize or remove the sensor and take a second reading. IV User Manual for the Hopkins® Newborn & Mom Pulse Ox Content 1 Overview ....................................................................... 1 1.1 Appearance ............................................................. 1 1.2 Name and Model .................................................... 2 1.3 Intended Use........................................................... 2 1.4 Structure and Conformation ................................ 2 1.5 Features ............................................................... 2-3 2 Battery Installation ...................................................... 3 3 Operation ...................................................................... 4 3.1 Direct measurement............................................ 4-6 3.2 Alarm and alarm silence ....................................... 7 3.3 Menu Screen ........................................................ 8-9 3.4 Hopkins® Y-Probe Sensor .............................. 10-11 3.5 Proper application of Hopkins® Y-probe .......... 10 3.6 Safe Operation in a Neonatal Incubator ........... 17 4. Technical Specifications ....................................... 17-19 5. Accessories ................................................................. 20 6. Maintenance & Replacement Parts ................... 20-22 V User Manual for the Hopkins® Newborn & Mom Pulse Ox 6.1 Oximeter Maintenance ................................... 20-21 6.2 Cleaning and Disinfecting Instruction............... 22 6.3 Replacement Parts .......................................... 22-23 7. Troubleshooting ......................................................... 24 Appendix ........................................................................ 25 A Key of Symbols ....................................................... 25 B SpO2 Common Knowledge............................... 25-30 C Electromagnetic Interference Data ................. 31-38 VI User Manual for the Hopkins® Newborn & Mom Pulse Ox 1 Overview 1.1 Appearance Figure 1 Front/Rear View 1 User Manual for the Hopkins® Newborn & Mom Pulse Ox 1.2 Name and Model Name: Hopkins® Newborn and Mom Pulse OX Kit Model: #716266 1.3 Intended Use This Fingertip Oximeter is intended for measuring the pulse rate and functional oxygen saturation (SpO2) through a patient’s finger. It is applicable for spot-checking SpO2 and pulse rate of adult and pediatric patients in homes and clinics. 1.4 Structure and Conformation It consists of main unit and photoelectric sensor, and an additional sensor port. 1.5 Features • External Hopkins® Newborn Y-probe sensor #592018 • Large true color OLED display of SpO2, PR Pulse Bar, PI & Plethysmogram • Innovative 4 directions display • Automatic power on/off • Audible & visible alarm function 2 User Manual for the Hopkins® Newborn & Mom Pulse Ox • Shift parameter display between PR and PI • 2AAA alkaline batteries with low power consumption • Low battery voltage indication 2 Battery Installation Figure 2 Battery Installation 1. Refer to Figure 2; insert two AAA size batteries into the battery compartment properly. 2. Replace the cover. Please make sure that the batteries are correctly installed, incorrect installation may cause the device not to work. Remove batteries from unit for storage or prolonged periods of non-use to avoid battery corrosion. 3 User Manual for the Hopkins® Newborn & Mom Pulse Ox Operation 3.1 Direct Measurement 1. Open the clip as shown in Figure 3. Figure 3 Put finger into the Oximeter 2. Put finger into the rubber cushions of the clip (make sure the finger is in the correct position with OLED display facing up), and then clip the finger. 3. The device will power on automatically in 2 seconds, and start to display software version number. 4. The user can read the values and view the waveform on the display screen as seen in figures 4A-4F below. Shift parameter display between PR and PI during measurement: Press the Display Key, the screen will tilt 90º. At this time, PR will shift to PI automatically (as shown in 4B). When shown as 4B, the display will shift to 4C automatically after 20 seconds without operation. Press the key again and the screen will change to another position (as shown 4 User Manual for the Hopkins® Newborn & Mom Pulse Ox in 4D). Shifting parameter display between PR and PI is under the condition of the screen tilting to a side, as shown in 4B and 4E. After 20 seconds without operation, the PI will automatically shift to PR, as shown in 4C and 4F. Figure4A Figure4B Figure4C Figure4D Figure4E Figure4F 5 User Manual for the Hopkins® Newborn & Mom Pulse Ox Screen Description: “%SpO2”: SpO2 symbol; “99”: SpO2 value; “PR”: Pulse rate icon; “65”: Pulse rate value; “ ”: Pulse beat symbol; “ ”: Pulse intensity histogram. “PI%”: Perfusion index icon; “1.4”: Perfusion index value; 6 User Manual for the Hopkins® Newborn & Mom Pulse Ox 3.2 Alarm When measuring, if SpO2 value or pulse rate value exceeds the preset alarm limit, the device will alarm automatically and the value which exceeds limit on the screen will flash. The detailed information refers to chapter 4. To silence the alarm or re-set the pulse ox 1. Press Display Key to mute. If this alarm event continues, the pulse ox will resume alarm sound automatically 2 minutes later if the condition persists. 2. Remove the finger from the pulse ox or SpO2 probe. 3. The alarm will automatically silence when SpO2 and pulse rate return to normal ranges 7 User Manual for the Hopkins® Newborn & Mom Pulse Ox 3.3 Menu Screen Figure 5 Menu Screen Press and hold the display key to enter the menu screen. Menu screen description: 1. “SpO2 alm Lo”: SpO2 alarm Lower limit. The user can modify the value of 85~99, the step is “1”, the default is 90. 2. “PR alm Hi”:Pulse Rate alarm Upper limit. The user can modify the value of 100~240, the step is “5”, the default is 120. 3. “PR alm Lo”:Pulse Rate alarm Lower limit. The 8 User Manual for the Hopkins® Newborn & Mom Pulse Ox user can modify the value of 30~60, the step is “1”, the default is 50. 4. “Pulse beep”:Pulse beep button. When SpO2 value (90~99) changes, the pitch tone changes accordingly. 5. “Save, exit menu”: Press and hold this item to store and exit from the setup menu then enter the display screen. 6. “Restore default”: Restore default setting. Refer to Figure 5 for each default value. On setup menu screen: 1. Press the Display Key to choose the setting item 2. Press and hold the Display Key to activate the setting item, then press it to modify the setting parameter 3. Next, press and hold the Display Key to confirm the modification and exit from this setting item. 4. Move the setting item to “Save, exit menu”, and press and hold the Display Key to store the modification and exit from the setup menu. 9 User Manual for the Hopkins® Newborn & Mom Pulse Ox 3.4 Hopkins® Y-Probe Sensor 1. Connect the Hopkins® Y-Probe Sensor to SpO2 sensor connector as shown below. Make sure the side with “Arrow” faces upward. Figure 6 Probe Connection Important! Note: When the Hopkins® Y-Probe Sensor is connected properly, the built-in finger clip sensor will be disabled. The measurement is detected from the external SpO2 probe. 2. The finger should be inserted into the SpO2 probe in the correct position with the light emitting diode “LED” on top of the measuring location. 3. The oximeter will power on automatically 2 seconds 10 User Manual for the Hopkins® Newborn & Mom Pulse Ox later, displaying the software version number. 4. Other operation is similar to chapter 3.1 direct measurement. 3.5 Proper Application of Hopkins Y-Probe Your Newborn and Mom Pulse OX Kit, Model: #716266 comes with a package of 10 hook-and-loop non-stick sensor wraps which are provided to secure the Hopkins® Adjustable Y-Probe Sensor for accurate monitoring of pulse and blood oxygen levels in the patient. The recommended application site for infant and pediatric patients is on the finger, foot, or hand. The recommended application for adult patients is on the finger. Using the Hopkins® Y-Probe wrap (#592012) A. Finger Application Adult or Pediatric Use: 1. Choose a well perfused (large blood supply) site that fits in the sensor. The index finger is recommended for adult patients. 2. Remove nail polish or artificial fingernails. 3. Place the sensor to the patient with the light source (LED) to the fingernail. The photo-detector (PD) sensor should be placed on the opposite side so both sensors are lined up and facing each other. 11 User Manual for the Hopkins® Newborn & Mom Pulse Ox 4. Secure the sensor with the Hopkins® Adjustable Y-Probe Sensor Latex Free Belt and tighten gently. 5. Apply a Hopkins® Y-Probe wrap on top to prevent ambient light interference. A secure wrap with the probe sensor centered in the middle of it will minimize any effects from ambient light sources. Other wraps can be used to secure lead wires to minimize the movement of the sensor itself. IMPORTANT! LED Sensors are light sensitive. Use Hopkins® Y-Probe wrap on top of the belt to better secure the probe. B. Infant Hand or Foot: 1. Attach the sensor to a well perfused fleshy portion of the infant’s hand or foot. 2. Place the sensor to the patient with the light 12 User Manual for the Hopkins® Newborn & Mom Pulse Ox source (LED) on the top of the hand or foot. The photo-detector (PD) sensor should be placed on the opposite side so both sensors are lined up and facing each other. 4. Secure the sensor with the Hopkins® Adjustable Y-Probe Sensor Latex Free Belt and tighten gently. 5. Apply a Hopkins® Y-Probe wrap on top to prevent ambient light interference. A secure wrap with the probe sensor centered in the middle of it will minimize any effects from ambient light sources. Other wraps can be used to secure lead wires to minimize the movement of the sensor itself. IMPORTANT! LED Sensors are light sensitive. Use Hopkins® Y-Probe wrap on top of the Adjustable Y-Probe Sensor with belt to better secure the probe. Product Care 13 User Manual for the Hopkins® Newborn & Mom Pulse Ox Cleaning and Disinfecting the Hopkins® Adjustable Y-Probe Sensor after each use: 1. Unplug the sensor from the monitor before cleaning or disinfecting. 2. Clean the sensors and contact surfaces with a soft cloth moistened in water or a mild soap solution. 3. To disinfect, wipe the sensor and patient contact surfaces with disinfecting solution. Isopropyl alcohol is recommended. If using Sanizide®, follow the manufacturer’s recommendations. 4. The 592012 Hopkins® Y-Probe wraps are intended for one-time use and should be disposed of and not used among multiple patients. Replacement Hopkins® Y-Probe wraps are available by calling 800-835-1995 or at www.hmponline.com. Warnings and Precautions: 14 User Manual for the Hopkins® Newborn & Mom Pulse Ox 1. The Hopkins® Adjustable Y-Probe Sensor is only intended to be used with the Hopkins Neonatal Pulse Oximeter #716266. Use of the Hopkins® Adjustable Y-Probe Sensor with incompatible devices may result in inaccurate performance or damage to the sensor or monitor. 2. Operation may be affected in the presence of strong electromagnetic sources such as electro surgery equipment. 3. Important! Batteries are not to be stored in the oximeter for an extended period of time, and battery failure due to prolonged storage in the oximeter is not covered under the 3-year product warranty. 4. This product is not recommended for use in the presence of imaging equipment such as Magnetic Resonance Imaging (MRI) and Computed Tomography (CT) devices. 5. Do not autoclave or immerse in liquid of any kind. Do not sterilize with Ethylene Oxide (ETO). 6. If the sensor is damaged in any way, discontinue use immediately. 7. Operation may be affected in the presence of high ambient light. Shield the sensors with a surgical 15 User Manual for the Hopkins® Newborn & Mom Pulse Ox towel if necessary. 8. Important! During prolonged use, check and reposition the sensor to an alternate location every 4 hours. 9. Intravascular dyes may interfere with performance of the sensor and monitor and may cause inaccurate measurements. 10. The performance of the sensor and monitor may be compromised by excessive motion. 11. Fingernail polish or artificial fingernails can cause inaccurate readings. 3.6 Safe Operation in a Neonatal Incubator Continuous use of fingertip SpO2 sensor may result in discomfort or pain, so we suggest inspecting the monitoring site for skin integrity every 2 hours for an adult patient, every 1 hour for pediatric / infant patients. For a neonate / infant in neonatal incubator, we suggest inspection every 20 minutes. Because the temperature range of neonatal incubator is from 25℃ to 37℃, 77ºF to 98.6ºF and the SpO2 sensor’s red light produces some heat, making the monitoring site’s temperature higher, this may bring discomfort or pain. If the SpO2 sensor is wrapped with adhesive gauze outside for fixation, this can decrease ventilation on the monitoring point and increase heat exposure. 16 User Manual for the Hopkins® Newborn & Mom Pulse Ox Neonate SpO2 sensor: 4. Technical Specifications A. Technique: dual-wavelength LED sensor, LED sensor wavelength: Red light: 663 nanometers, Infrared light: 890 nanometers. Maximal optical output power: less than 1.5mW maximum average. B. SpO2 measurement Measuring range: 70%~100% Measuring accuracy: 70~99% ±2digits Note: Accuracy defined as root-mean-square value of deviation according to ISO 9919. SpO2 alarm low limit range: 85%~99% (default 90%) 17 User Manual for the Hopkins® Newborn & Mom Pulse Ox C. Pulse Rate measurement Measuring range: 30bpm~240bpm Measuring accuracy: ±2bpm or ±2% (whichever is greater) Pulse Rate alarm range: high limit: 100~240bpm (default 120bpm) low limit: 30~60bpm (default 50bpm) D. Perfusion Index(PI) Display Range: 0.2%~20% E. Audible &visual alarm function When measuring, if SpO2 value or pulse rate value exceeds the preset alarm limit, the device will alarm automatically and the value which exceeds limit on the screen will flash. The oximeter will shut down automatically in 8 seconds with no signal. F. Display mode:Color OLED Display G. Power supply requirement: 2 x LR03 (AAA) alkaline batteries Supply voltage: 3.0VDC Operating current: ≤40mA H. Environment requirement 18 User Manual for the Hopkins® Newborn & Mom Pulse Ox I. Operating Temperature: 41ºF~104°F, 5ºC~40ºC Operating Humidity: 30~80% Atmospheric pressure: 70~106kPa The performance under low perfusion condition The accuracy of SpO2 and PR measurement still meet the precision described above when the modulation amplitude is as low as 0.6%. J. Resistance to interference of surrounding light: The difference between the SpO2 value measured in the condition of indoor natural light and that of darkroom is less than ±1%. When using the Hopkins Wrap, ensure the probe is centered in the wrap to prevent interference from ambient light. K. Dimensions: 60 mm (L) × 33 mm (W) × 30 mm (H) L. Net Weight: 35g (including battery) M. Classification: The type of protection against electric shock: Internally powered equipment. The degree of protection against electric shock: Type BF applied parts. Not waterproof: Ordinary equipment without protection against water or other fluids Electro-Magnetic Compatibility: Group I, Class B 19 User Manual for the Hopkins® Newborn & Mom Pulse Ox 5. Accessories A. Lanyard B. Two batteries C. Pouch D. External SpO2 Probe (optional) E. User Manual F. Quality Certificate Note: The accessories are subject to change. For detailed items and quantity see the Packing List. 6. Maintenance & Replacement Parts 6.1 Oximeter Maintenance The service life (not a warranty) of this device is 5 years. In order to ensure its long service life, please adhere to the use of maintenance. • Please change the batteries when the low-voltage indicator appears. • Please clean the surface of the oximeter before use. Use soft cloth with alcohol to wipe the oximeter first, and then let it air dry or wipe it dry. • Please remove the batteries if the oximeter will 20 User Manual for the Hopkins® Newborn & Mom Pulse Ox not be used for an extended period of time. • The recommended storage environment of the device: Ambient temperature: -4ºF~140ºF,-20ºC~60ºC Relative humidity 10%~95%, Atmospheric pressure: 50kPa~107.4kPa. • The oximeter is calibrated in the factory prior to sale; there is no need to calibrate the device during use. However, if it is necessary to verify its accuracy routinely, the user can obtain verification by means of SpO2 simulator, or send it to a local third party testing facility. • Necessary servicing must be performed by qualified service engineers ONLY. Users are not permitted to maintain service themselves. High-pressure sterilization cannot be used on the device. Do not immerse the device in liquid. 21 User Manual for the Hopkins® Newborn & Mom Pulse Ox 6.2 Cleaning and Disinfecting Instruction • Surface-clean the sensor with a soft cloth dampened with a 75% isopropyl alcohol solution. If low-level disinfection is required, use a 1:10 bleach solution. • Then surface-clean by soft cloth wet with clean water and let air dry or wipe it dry. • You may use Sanizide® to clean the unit. Caution: Do not sterilize by irradiation steam, or ethylene oxide. Do not use the sensor if it is damaged. 6.3 Replacement Parts • Hopkins® Fingertip Pulse Ox w/ Adjustable Y-Probe Sensor #594020 • Kit Case Re-order #530344 • Alcohol Wipes (200/box) #723001 • Disposable Tape Measure (100/pk) #570074 • Hopkins® Adjustable Y-Probe Sensor #592018 • Hopkins® Y-probe wraps #592012 pack of 10 22 User Manual for the Hopkins® Newborn & Mom Pulse Ox • Hopkins® Y-probe wraps #592012BG is a bag of 100. 23 User Manual for the Hopkins® Newborn & Mom Pulse Ox 7. Troubleshooting Trouble The SpO2 and Pulse Rate display unstable Cannot turn the device on No display Possible Reason Solution 1. The finger is not placed far enough inside. 2. The finger is shaking or the patient is moving. 1. Place the finger correctly inside and try again. 1. The batteries are drained or almost drained. 2. The batteries are not inserted properly. 3. The device is malfunctioning. 1. The device will power off automatically when it gets no signal for 8 seconds. 2. The batteries are almost drained. 1. Change batteries. 24 2. Keep the patient calm. 2. Reinstall batteries. 3. Please contact service provider. 1.This is a normal function. 2. Change batteries. User Manual for the Hopkins® Newborn & Mom Pulse Ox Appendix A Key of Symbols Symbol Description With Type BF applied part Warning ─ See User Manual %SpO2 The pulse oxygen saturation PR Pulse rate (beats per minute) Pulse rate icon Low battery voltage B SpO2 Common Knowledge 1. Meaning of SpO2 SpO2 is the saturation percentage of oxygen in the blood, so called O2 concentration in the blood; it is defined by the percentage of oxyhemoglobin (HbO2) in the total 25 User Manual for the Hopkins® Newborn & Mom Pulse Ox hemoglobin of the arterial blood. SpO2 is an important physiological parameter to reflect the respiration function; it is calculated by the following method: SpO2 = HbO2/ (HbO2 +Hb) ×100% HbO2 are the oxyhemoglobins (oxygenized hemoglobin), Hb are those hemoglobins which release oxygen. 2. Principle of Measurement According to the Lamber-Beer law, the light absorbance of a given substance is directly proportional with its density or concentration. When the light with certain wavelength emits on human tissue, the measured intensity of light after absorption, reflecting and attenuation in tissue can reflect the structure character of the tissue by which the light passes. Oxygenated hemoglobin (HbO2) and deoxygenated hemoglobin (Hb) have different absorption characteristics in the spectrum range from red to infrared light (600nm~1000nm wavelength). By using these characteristics, SpO2 can be determined. SpO2 measured by this oximeter is the functional oxygen saturation -- a percentage of the hemoglobin that can transport oxygen. In contrast, hemoximeters report 26 User Manual for the Hopkins® Newborn & Mom Pulse Ox fractional oxygen saturation – a percentage of all measured hemoglobin, including dysfunctional hemoglobin, such as carboxyhemoglobin or metahemoglobin. 3. Clinical application of pulse oximeters SpO2 is an important physiological parameter to analyze a patient’s respiration and blood oxygenation levels. Some examples where SpO2 monitoring is important are monitoring patients with serious respiratory disease, patients under anesthesia during surgeries and premature and neonatal infants. The status of SpO2 can be determined in a timely manner by measurement and will allow finding the hypoxemia patient earlier, thereby effectively preventing or reducing accidental death caused by hypoxia. 27 User Manual for the Hopkins® Newborn & Mom Pulse Ox 3. Outside Interference Factors affecting SpO2 measuring accuracy • Intravascular dyes such as indocyanine green or methylene blue • Exposure to excessive illumination, such as surgical lamps, bilirubin lamps, fluorescent lights, infrared heating lamps, or direct sunlight. • Insufficient coverage of the y probe can interfere with readings. Make sure to have the Y-Probe centered in the middle of the Hopkins Wrap. • Vascular dyes or externally used products such as nail enamel or tinted skin care • Excessive patient movement • Placement of a sensor on an extremity with a blood pressure cuff, arterial catheter, or intravascular line • Exposure to the chamber with high pressure oxygen • There is an arterial occlusion proximal to the sensor 28 User Manual for the Hopkins® Newborn & Mom Pulse Ox • Blood vessel contraction caused by peripheral vessel hyperkinesia or body temperature decreasing 29 User Manual for the Hopkins® Newborn & Mom Pulse Ox 4. Pathological Factors causing low SpO2 Measuring value • Hypoxemia disease, functional lack of HbO2 • Pigmentation or abnormal oxyhemoglobin level • Abnormal oxyhemoglobin variation • Methemoglobin disease • Sulfhemoglobinemia or arterial occlusion exists near sensor • Obvious venous pulsations • Peripheral arterial pulsation becomes weak • Poor Peripheral blood supply 30 User Manual for the Hopkins® Newborn & Mom Pulse Ox C Guidance and Electromagnetic Interference Data The following tables (Table 1 to 4) provide the specific information regarding this device's compliance to IEC 60601-1-2. 31 User Manual for the Hopkins® Newborn & Mom Pulse Ox Table 1 Guidance and manufacturer’s declaration electromagnetic emissions The device is intended for use in the electromagnetic environment specified below. The user of this device should assure that it is used in such an environment. Emissions test Comp liance Electromagnetic environment - guidance RF emissions CISPR 11 This device uses RF energy only for its internal function. Therefore, its RF emissions are very low and are not likely to cause any interference in nearby electronic equipment. This device is suitable for use in all establishments, including domestic and those directly connected to the public low-voltage power supply network that supplies buildings used for domestic purposes. Group 1 RF emissions CISPR 11 Harmonic emissions IEC 61000-3-2 Voltage fluctuations/flick er emissions IEC 61000-3-3 Class B N/A N/A 32 User Manual for the Hopkins® Newborn & Mom Pulse Ox Table 2 Guidance and manufacturer’s declaration electromagnetic immunity The device is intended for use in the electromagnetic environment specified below. The user of this device should assure that it is used in such an electromagnetic environment. Compli Electromagnetic Immunity IEC 60601 ance environment test test level level guidance Electrostati ±6 kV ±6 kV Floors should be c discharge contact contact wood, concrete or (ESD) ±8 kV air ±8 kV ceramic tile. If IEC air floors are covered 61000-4-2 with synthetic material, the relative humidity should be at least 30%. Electrical ±2 kV for fast power transient/burs supply lines t ±1 kV for IEC61000-4- input/output 4 lines N/A 33 N/A User Manual for the Hopkins® Newborn & Mom Pulse Ox Surge IEC 61000-4-5 ±1 kV line (s) to line(s) ±2 kV line(s) to earth N/A N/A Voltage dips, short interruptions and voltage variations on power supply input lines IEC 61000-4-11 <5 % UT (>95 % dip in UT) for 0.5 cycle 40 % UT (60 % dip in UT) for 5 cycles 70 % UT (30 % dip in UT) for 25 cycles <5 % UT (>95 % dip in UT) for 5 s N/A N/A 3 A/m Power frequency magnetic fields should be at levels characteristic of a typical location in a typical commercial or hospital environment. Power frequency (50/60Hz) magnetic field IEC61000-48 3 A/m NOTE: UT is the a.c. mains voltage prior to application of the test level. 34 User Manual for the Hopkins® Newborn & Mom Pulse Ox Table 3 Guidance and manufacturer’s declaration – electromagnetic immunity The device is intended for use in the electromagnetic environment specified below. The user of this device should assure that it is used in such an electromagnetic environment. IEC 6060 Immuni Complian Electromagnetic 1 ty test ce level environment - guidance test level Conduct ed RF IEC 61000-46 Radiated RF IEC 61000-43 3 Vrms 150 kHz to 80 MHz Portable and mobile RF communications equipment should be used no closer to any part of this device, including cables, than the recommended separation distance calculated from the equation applicable to the frequency of the transmitter. Recommended separation distance N/A 3 V/m Where P is the maximum output power rating of the transmitter in watts (W) according to the transmitter manufacturer and d is the 3 V/m 80 35 User Manual for the Hopkins® Newborn & Mom Pulse Ox MHz to 2.5 GHz recommended separation distance in meters (m). Field strengths from fixed RF transmitters, as determined by an electromagnetic site survey ,a should be less than the compliance level in each frequency range .b Interference may occur in the vicinity of equipment marked with the following symbol. NOTE 1: At 80 MHz and 800 MHz, the higher frequency range applies. NOTE 2: These guidelines may not apply in all situations. Electromagnetic propagation is affected by absorption and reflection from structures, objects and people. a: Field strengths from fixed transmitters, such as base stations for radio (cellular / cordless) telephones and land mobile radios, amateur radio, AM and FM radio broadcast and TV broadcast cannot be predicted theoretically with accuracy. To assess the electromagnetic environment due to fixed RF transmitters, and electromagnetic site survey should be considered. If the measured field strength in the location in which the device is used exceeds the applicable RF compliance level above, the device should be observed to verify normal operation. If abnormal performance is observed, additional measures may be necessary, such as re-orienting or relocating this device. b: Over the frequency range 150 kHz to 80 MHz, field strengths should be less than 3V/m. 36 User Manual for the Hopkins® Newborn & Mom Pulse Ox Table 4 Recommended separation distances between portable and mobile RF communications equipment and the device The device is intended for use in an electromagnetic environment in which radiated RF disturbances are controlled. The user of this device can help prevent electromagnetic interference by maintaining a minimum distance between portable and mobile RF communications equipment (transmitters) and this device as recommended below, according to the maximum output power of the communications equipment. Rated maximum output power of transmitte r W Separation distance according to frequency of transmitter M 150 kHz 80 MHz to 80 to 800 MHz MHz 800 MHz to 2.5 GHz 0,01 N/A 0.12 0.23 0,1 N/A 0.38 0.73 1 N/A 1.2 2.3 10 N/A 3.8 7.3 37 User Manual for the Hopkins® Newborn & Mom Pulse Ox 100 N/A 12 23 For transmitters rated at a maximum output power not listed above, the recommended separation distance d in metres (m) can be estimated using the equation applicable to the frequency of the transmitter, where P is the maximum output power rating of the transmitter in watts (W) according to the transmitter manufacturer. NOTE 1: At 80 MHz and 800 MHz, the separation distance for the higher frequency range applies. NOTE 2: These guidelines may not apply in all situations. Electromagnetic propagation is affected by absorption and reflection from structures, objects and people. 38