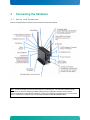
1
Document Revision 1.15 Part Numbers: Kontron: 930-0053-00 Wind River: DOC-177668-ND Kontron M2M Smart Services Developer Kit Wind River Intelligent Device Platform LiveUSB Getting Started Guide » Table of Contents « 1 Introduction ........................................ 4 1.1 About this Manual & How to Get the Latest Versions of all Documentation ....................... 4 1.2 Overview ...................................................................... 4 1.3 Required Hardware .............................................................. 5 Intel® Atom™ based Reference Platform for M2M Specification ........................... 5 Host Computer Specification ..................................................... 5 1.4 LiveUSB Technology ............................................................. 5 2 Connecting the Hardware .............................. 7 2.1 Ports and Antennas .............................................................. 7 2.2 Activating your evaluation license .................................................... 8 2.3 Connecting the Kontron M2M system to your development host .............................. 8 2.4 Powering the Kontron M2M System................................................... 9 3 Starting the Evaluation Software ........................ 10 3.1 Booting the Host Computer ........................................................ 10 3.2 Accepting the Agreements ........................................................ 10 3.3 Obtaining an Evaluation License .................................................... 10 3.4 Starting Your Software Evaluation ................................................... 13 3.5 Notes ....................................................................... 14 Appendix A: Manual License Activation ...................... 16 A.1 Manual License Activation on a non-Internet connected host .................................. 16 A.2 Automatic License Activation on a Windows host .......................................... 18 A.3 Manual License Activation on a Windows host ............................................ 18 Appendix B: Troubleshooting Your Evaluation Setup ............ 19 B.1 Network Topology Overview ......................................................... 19 For retrieving the evaluation license: .............................................. 19 For running the evaluation: ..................................................... 19 Appendix C: Troubleshooting Graphics Problems on Your LiveUSB Host Computer .................................... 21 Appendix D: Recovering Your Linux Image on the Kontron M2M System .......................................... 22 www.kontron.com www.kontron.com D.1 Making the Evaluation Image Recovery Tool USB Drive ..................................... 23 D.2 Recovering your Kontron M2M System Software Evaluation System ............................ 24 Document Revision History ............................... 28 www.kontron.com www.kontron.com 1 Introduction Welcome to the Wind River Intelligent Device Platform LiveUSB Getting Started Guide. Using the specially configured evaluation environment provided in this kit you will quickly be able to use Wind River’s market leading development tools and run Wind River Intelligent Device Platform (the industry-leading Linux platform for embedded device development) on the Kontron M2M System. 1.1 About this Manual & How to Get the Latest Versions of all Documentation Thank you for purchasing and using the Kontron M2M Smart Service Developer Kit. Your kit was developed by Kontron in collaboration with Intel and Wind River. This manual is for smart services developers who are responsible for using the developer kit. This document is a companion document to the User Manual and the Out-of-box Guide. The latest versions of all documents are available for download from Kontron’s website using these links: User manual: www.kontron.com/UserManualM2M Out of box guide: www.kontron.com/OutofboxguideM2M - Getting started guide: www.kontron.com/gettingstartedguideM2M Kontron would like to point out that the information contained in this manual may be subject to technical alteration, particularly as a result of the constant upgrading of Kontron products. The attached documentation does not entail any guarantee on the part of Kontron with respect to technical processes described in the manual or any product characteristics set out in the manual. Kontron does not accept any liability for any printing errors or other inaccuracies in the manual unless it can be proven that Kontron is aware of such errors or inaccuracies or that Kontron is unaware of these as a result of gross negligence and Kontron has failed to eliminate these errors or inaccuracies for this reason. Kontron expressly informs the user that this manual only contains a general description of technical processes and instructions which may not be applicable in every individual case. In cases of doubt, please contact Kontron. This manual is protected by copyright. All rights are reserved by Kontron. Copies of all or part of this manual or translations into a different language may only be made with the prior written consent of Kontron. Kontron points out that the information contained in this manual is constantly being updated in line with the technical alterations and improvements made by Kontron to the products and thus this manual only reflects the technical status of the products by Kontron the time of printing. © 2012 by Kontron America, Inc. Printing and duplication, even of sections, is only permissible with the express approval of: Kontron America, Inc. 1.2 Overview This evaluation leads you through the steps to use Wind River Workbench, configure a Linux kernel and file system, work with patches, and outline how Wind River tools can aid in the debugging and analysis of embedded systems based on the Kontron M2M System. During this evaluation you will work with two separate systems: A host computer (workstation) on which you will perform tasks such as configuring the Linux OS that runs on the target, analyzing test results and debugging code. You will also use the host computer to view Wind River documentation and guide material. The preferred specification for the host computer is outlined below. The Kontron M2M system included in the Kontron M2M Smart Services developer Kit running Wind River Intelligent Device Platform, referred to as a target system. Software Included in the Kontron M2M Smart Services Developer Kit 4 This kit includes the following components: The Kontron M2M System, pre-flashed with a Wind River Intelligent Device Platform kernel and root file system preinstalled on the microSD with recovery image available on the LiveUSB. The pre-installed demonstration (including the Wind River 4.3 Linux runtime) that runs from the target board Flash memory remains operative after the demonstration license key expires. One bootable LiveUSB flash drive (viewable as a non-boot device under Windows) to boot a host development workstation. The Live USB contains software packages and components which help package Wind River Intelligent Device Platform for the Embedded Platform. The User/Developer can quickly start working with the Wind River Workbench development suite and can build a bootable image of Wind River Intelligent Device Platform for the target. You will have 90 days to use the licensed Wind River Workbench products once the demo license key is activated. 1.3 Required Hardware Intel® Atom™ based Reference Platform for M2M Specification The Kontron M2M System is built on a COM Express module, which integrates with a carrier board to provide a System controller. The Kontron M2M System is a high-performance, low-power module based on the Intel® Atom™ ® processor. It uses an integrated two-chip solution comprised of the Intel® Atom™ E6xx series processor and Intel System Controller Hub EG20T. This evaluation is available for the Kontron M2M system with the following specifications: An internal microSD boot device. An Ethernet interface with default static IP alias address of 172.31.255.1 For this evaluation kit, the Kontron M2M System has been pre-flashed with a fully functional Wind River Intelligent Device Platform image that boots the board into Linux and connects to the Wind River Workbench development tools running on your host computer. Host Computer Specification During this evaluation you will run the Wind River Workbench development suite which requires a suitable host computer. This host computer can be a laptop or desktop PC with the following specifications: Host architecture: Intel Core2, 2 GHz or greater (recommended) Host memory: 2 GB RAM (recommended) USB requirements: USB 2.0 connection (required) Static IP addresses: host computer (172.31.255.254) target (172.31.255.1) You do not need to install any software on your host computer prior to the evaluation. 1.4 LiveUSB Technology All the software required for this evaluation on your host computer is delivered on a fully configured, bootable USB flash drive (referred to as a LiveUSB) that you can boot on most standard modern PCs. The LiveUSB contains: 5 A fully configured and bootable version of the Fedora (Linux) operating system The Wind River Intelligent Device Platform, which includes the Wind River Workbench development suite, a board support package for the Kontron M2M System and the Wind River Intelligent Device Platform 1.0 layer Wind River documentation including this Getting Started Guide A guide which will lead you through the Wind River Intelligent Device Platform evaluation Documentation for Wind River Intelligent Device Platform which includes Wind River Workbench and Wind River Linux The pre-configured LiveUSB environment lets you use Wind River development tools without the need to install, configure, or build anything prior to the evaluation. You can begin the evaluation immediately after you have booted the LiveUSB. Note that, once booted, the LiveUSB software uses the RAM memory of the host PC and the flash memory available in the LiveUSB flash drive itself—it does not use the hard drive on the host computer. When used as designed, this evaluation will not write to hard drive of the host computer. 6 2 Connecting the Hardware 2.1 Ports and Antennas Refer to the figure below for locations of ports and where to attach the antennas: Note: The MicroUSB port closest to the lower antenna is a USB host port. The other Micro-USB port can be either a host or client port, depending on BIOS settings (and the configuration of the S3 switch inside the Kontron/Intel® Atom™ based Reference Platform). These ports have static configurations and can provide 5Vdc power. DO NOT PLUG USB OTG (On-The-Go) DEVICES INTO THESE MICROUSB PORTS. 7 2.2 Peripheral Hookup Connect an HDMI Monitor, a USB Hub, Mouse and Keyboard to the Development Target as shown below. Monitor Development Target Mouse USB Hub Keyboard Figure 1 Development Target Device Setup 2.3 Connecting the Kontron M2M system to your development host Following Figure 2 Connecting the Host to the Target, below: 1. Connect an Ethernet cable between your Development Host and the Router. 2. Connect an Ethernet cable between your Kontron M2M System and the Router. 3. Connect the Router to your WAN Note: The evaluation host will be assigned a dynamic IP address in the normal manner if your network has a DHCP server. Initially you need an Internet connection to obtain an evaluation license. Before you begin the evaluation you will be directed to change to a static IP address so the tools can communicate with the target 8 WAN WAN Router LiveUSB Development Target Evaluation Host 1 Figure 2 Connecting the Host to the Target 2.4 Powering the Kontron M2M System You should ensure that your Kontron M2M System is correctly connected and is capable of booting. To do this plug the power adapter into the AC wall socket – there is no on/off switch. The board should begin booting within a few seconds. The Kontron M2M System is preprogrammed with Wind River Intelligent Device Platform, which is specifically configured for development purposes. The preprogrammed image also includes a Wind River Qt Graphics demonstration. If your target board boots successfully, and an optional display is connected, the display will show the main Wind River Qt Graphics Suite Demo screen. (Note: The main splash screen defaults to a 800x600 resolution.) NOTE: You may shut down or reboot the target board using a secure shell (SSH) connection—powering off by disconnecting power can cause problems. SSH is a network protocol that allows data exchanges between two devices—it opens a shell on the host computer that lets a user execute commands on a remote machine (in this case, the Kontron M2M System). Alternately, the CTRL+ALT+F1 keys can be pressed simultaneously to switch the user to a command line console where the user can login as root with a password of root and then issue a “poweroff” command. 2.5 Activating your evaluation license In order to evaluate the system, you must activate your license by following these steps. 1. Connect your evaluation host as per section 2.3, Connecting the Kontron M2M system to your development host, on page 8, above, making sure it has an Ethernet connection to the WAN Router. 2. Follow the steps in section 3 to obtain a license file 9 10 3 Starting the Evaluation Software 3.1 Booting the Host Computer Before booting your host computer, ensure that the LiveUSB flash drive is correctly plugged into a USB port on the host computer. Switch on your host computer. You may have to interrupt the boot process in order to instruct the BIOS to boot from the LiveUSB flash drive instead of the internal hard drive. The host computer boots into a preconfigured Fedora environment. NOTE: Your host computer may have a graphics driver that is not compatible with the default boot settings. In this case you will see distorted graphics or no graphics at all. If you have this issue, please consult Appendix C: Troubleshooting Graphics Issues on your LiveUSB Host. 3.2 Accepting the Agreements You will then be presented with several License Agreements to read and several Product Evaluation License Agreements to accept. Click ACCEPT to accept each agreement and proceed. 3.3 Obtaining an Evaluation License Before you begin to evaluate the features of the Wind River tools included on the LiveUSB, you will be required to obtain an evaluation license. This requires an Internet connection, either on the host on which you will be running the evaluation or, in the case of Manual License Activation, an Internet connection on some other available machine. Whichever method you use, the license is valid for any machine on which the LiveUSB runs. 11 3.4 License Activation on an Internet connected host If the host on which you will be running your evaluation is connected to the Internet then this method provides the easiest and quickest way of obtaining an evaluation license. For additional license activation methods, see Appendix A: Manual License Activation. 1. Once your host has correctly booted you will be presented with the following Wind River EDK Agent dialog box. Click the Automatic License Activation option. 2. If you are not using a network proxy then press the Next button and continue at step 5 below. 3. If you do use a network proxy then press the Configure Network Proxy button, where you can enter your proxy info. 12 4. Once completed press the Save Changes button and then press the Next button (from the previous screen shot). 5. Fill in your registration details (including a valid email address) and click the Submit button at the bottom of the form. 3 6. You will be notified when host successfully obtains an Evaluation license. You can then begin using the Wind River host tools. NOTE: When obtaining a license the host will attempt to connect to the Internet over the wired Ethernet interface (eth0). It is strongly suggested that you use a wired Ethernet connection. If your host has multiple interfaces, or if you want to use wireless interfaces, you must make the necessary configuration changes. 13 3.5 3rd Party Software Evaluation License If you are not planning to evaluate the Prosyst OSGi software, then you may safely skip this section. Once you have successfully obtained the Wind River Intelligent Device Platform Evaluation license, the LiveUSB will automatically retrieve a license file via the internet for the additional 3rd party software which comes as part of the evaluation kit. The license file, named wr-idp-isv-1-0.noarch.rpm will be placed into the /mnt/live directory. If you have rd successfully licensed the Wind River Systems Intelligent Device Platform, but do not have the 3 party software license file, you can request it by running the command: [wruser@wrhost ~]$ sudo /usr/bin/wrfetch-isv-license Once the license file has been retrieved, you will need to perform the following steps in order to apply this license to the target device. 1. Transfer the license file from the LiveUSB system to the target device. This may be done via secure copy (scp) as follows: [wruser@wrhost ~]$ scp /mnt/live/wr-idp-isv-1-0.noarch.rpm [email protected]: The target’s default password is root If you’re not able to connect to the target, you may need to switch your host IP to static. From the main Fedora menu, select: Applications > Wind River > IP Address > Switch to Static IP 2. Once the file is transferred, login to the target device using the console, or via ssh from the the host system, and install it using the rpm command as follows: Connect to target device. [wruser@wrhost ~]$ ssh [email protected] Password: Remove existing ISV license (if any) root@localhost:/root> rpm -e wr-idp-isv-1-0.noarch (If you see an error at this point saying the package is not installed, it may be safely ignored.) Install the license root@localhost:/root> rpm -i wr-idp-isv-1-0.noarch.rpm rd The 3 party software should now be licensed for a period of 90 days from the time the Evaluation license was obtained. 14 3.6 Starting Your Software Evaluation After the host computer boots into the Fedora LiveUSB environment, you will see a desktop that includes a number of icons, including a link to this document and quick launches to the tools. Check online for the latest versions of documentation. For your convenience, there are several pull down menus under Applications->Wind River. 1. To open the evaluation tutorial, select: Applications > Wind River > Documentation > Evaluation Tutorial. 2. To view this guide at any time, select: Getting Started Guide. 3. To view videos of the exercises, select: Applications > Wind River > Videos > Evaluation Tutorial Videos. 3.7 Notes You can exercise the evaluation in any way you choose—by following the tutorials, trying your own software, running benchmarks, and so on. The evaluation is safe to use with your existing machine. When correctly used no data will be written outside of the LiveUSB flash drive. The evaluation is interruptible—if you stop at any point in the evaluation, you can resume where you stopped. The version of Fedora on the LiveUSB flash drive is minimal. It uses a RAM file system. When the size of the file system approaches the memory limits of the computer, operations may degrade. If a slowdown or stop occurs, shut down the computer, reboot, and resume the evaluation. To download updated materials, visit www.windriver.com/evaluations 15 16 Appendix A: Manual License Activation A.1 Manual License Activation on a non-Internet connected host If the host on which you will be running your evaluation is not connected to the Internet (for example, it is in a secure network environment) then Manual License Activation makes it possible to obtain an Evaluation license by using email communication through some other host. 1. Once your host has correctly booted you will be presented with the following Wind River EDK Agent dialog box. Click the Manual License Activation option. 2. Read the instructions and then click the Next button. 2 3. Fill in your registration details in the form (including a valid email address). 4. Click the URL to read the Wind River Privacy Statement. 17 4 5. Once you have read and understood the Wind River Privacy Statement, select the tick box to acknowledge your agreement. 6. Click the Submit button at the bottom of the form. 6 5 The host will now generate a user registration file and write it to the LiveUSB device. The file can be found at /mnt/live/user_registration.txt when running in the host (Fedora) environment or in the root directory of the LiveUSB stick when it is plugged into a Windows machine. 18 7. The user_registration.txt file should be emailed, as an attachment, to [email protected]. A Wind River service representative from the Wind River licensing department will then help you with further instructions. A.2 Automatic License Activation on a Windows host You may also activate the Evaluation by plugging the LiveUSB stick into any Windows machine and obtain an Evaluation license automatically. 1. Plug the LiveUSB stick into any Windows machine and browse to the root of the stick. 2. Double click on the start.exe file. This will start the Wind River EDK Agent on your Windows machine. Click the Automatic License Activation option. 3. From this point you can follow the instructions shown in section 3.3 to obtain an Evaluation license. 4. Once a license has been obtained you can remove the LiveUSB stick from your Windows machine and begin your Evaluation as detailed in section 3.4 above. A.3 Manual License Activation on a Windows host You may also activate the Evaluation by plugging the LiveUSB stick into any Windows machine and obtain an Evaluation license by using email communication. 1. Plug the LiveUSB stick into any Windows machine and browse to the root of the stick. 2. Double click on the start.exe file. This will start the Wind River EDK Agent on your Windows machine. Click the Manual License Activation option. 3. From this point you can follow the instructions shown in Appendix A.1: Manual License Activation above to obtain an Evaluation license. 19 Appendix B: Troubleshooting Your Evaluation Setup B.3 Network Topology Overview B.3.1 Retrieving the evaluation license: To retrieve the evaluation license automatically, the LiveUSB host computer must have access to the Internet. The host computer will attempt to retrieve an IP address on its first wired interface dynamically via DHCP. Although wireless connections may be available on the LiveUSB host computer, they are disabled in the default configuration. If you wish to connect to the Internet over a wireless connection, you must determine the configuration yourself. B.3.2 Running the evaluation The steps in the tutorial have been tested using wired interfaces only. Both the target and the LiveUSB host computer must be set to their respective static IP address. Before running the evaluation tutorial, you must switch the LiveUSB host computer to its static IP address. The script that sets the static IP address uses the lowest numbered eth interface that it finds. For example, if the host computer has eth1 and eth2 interfaces, then eth1 will be set to the static IP address. If you have trouble retrieving the license automatically, perform the following procedure to repair the problem. Troubleshooting Your License Activation 1. Configure your system as shown in section 2.2. 2. From the main Fedora menu, select Applications > Wind River > IP Address > Switch to DHCP. 3. From the main Fedora menu start the EDK agent, select Applications > Wind River > Embedded Development Kit Agent. 20 4. Perform the steps in section 3.3 to complete your license activation. 21 Appendix C: Troubleshooting Graphics Problems on Your LiveUSB Host Computer The LiveUSB was validated with many different host computers, but some computers may have a graphics controller that is incompatible with the default boot settings of the LiveUSB. If you see distorted graphics (or no graphics at all), your host computer has an incompatible graphics controller. If this problem occurs, perform the following steps to change your boot option. Reboot your host computer. The screen shown in the figure below displays. 1. Press any key to interrupt the default boot process. The Wind River Embedded Development Kit Video Options screen displays. 2. On your keyboard, press the down arrow key to navigate to Alternate Boot, then press ENTER. In many cases this alternate boot option resolves problems with incompatible graphics drivers. If you continue to experience problems, try a different host computer with a different graphics driver for the evaluation. 22 Appendix D: Recovering Your Linux Image on the Kontron M2M System Your Kontron M2M System comes factory-installed with Wind River Intelligent Device Platform and a Qt Graphics Suite demonstration. When you reset the target system, you should see the demonstration screen if the optional display is connected. Without a connected display you will have to ssh into the target. If your target does not boot into the demonstration or allow you to ssh into it, you can restore the microSD memory to its factory settings by performing the following procedure detailed in D.1 and D.2. 23 D.1 Making the Evaluation Image Recovery Tool USB Drive Before you make a bootable recovery USB image, you must have booted the host computer from the evaluation LiveUSB drive (or from a development workstation that has had the LiveUSB contents installed on its hard drive). Then: 1. Insert a second USB flash drive that is 2 GB or larger into your host computer (Note: This is not supplied as part of the kit). 2. Open a terminal window. 3. Change to the root user, and then execute the following commands to transfer the recovery image to the target device cd /home/wruser/WindRiver/intelligent_device-1.0/images ls *.img dd if=USB-R177671.1-1-##.img of=/dev/sdX bs=4M Where ## is the current patch number. NOTE: Replace the placeholder /dev/sdX with the specific device file assigned to your USB flash drive when it was inserted. The X in sdX can be found using dmesg or the df command. If the USB drive mounted automatically when you inserted it (that is, if an icon appeared on the desktop or a file manager window opened), you must un-mount the device before you proceed to copy the image to the device. 4. When the command prompt returns, and the activity light (if any) on your flash drive stops blinking, remove the flash drive. 24 D.2 Recovering your Kontron M2M System Software Evaluation System 1. Disconnect the power adapter from AC power to turn off your system. 2. You must connect a USB keyboard, a display, and the evaluation image recover y tool USB drive to the target board HDMI Monitor Bootable Recovery USB Stick Keyboard NOT the LiveUSB Stick used on host User supplied – not part of kit NOTE: Do not remove the recovery tool USB drive until you return to the command prompt. 3. Make sure the MicroSD card on the processor card is seated well. This step will require the unit to be disassembled and will most likely not be necessary. A poorly seated MicoSD card can result in Timeout crashes of the reset_media utility listed below 4. Reconnect the power adapter to AC power to turn on your system NOTE: If your system does not boot from the image recovery tool USB drive, reapply power and immediately press and hold the F7 key until the Boot Manager screen displays, then select the proper entry from the Boot Option Menu and press ENTER. 5. To prevent Date/Time stamp errors it may be necessary to go to the BIOS and set the current date 6. After the system boots, log in with the user name root and the password root 7. Execute the command reset_media The following prompt displays – Restore the internal media to its factory defaults? [y/n] 8. Type Y then press ENTER to begin re-installing the evaluation image. Note: Be patient - the re-install operation needs several minutes to complete. (Depending on the quality of the recovery tool USB drive, this operation can take up to an hour.) Do not power down the target or remove the evaluation image recovery tool USB drive until the command prompt displays again on the monitor 9. Disconnect the power adapter from AC power again to turn off your system 10. Disconnect the evaluation image recovery tool USB drive 25 11. Reconnect the power adapter to AC power to turn on your system 12. The Kontron M2M System target now boots into the Qt Graphics Suite demonstration. 26 Appendix F: Installing the LiveUSB to VMWare Virtual Machine The following instructions will step you through installing the LiveUSB into a VMWare Virtual Machine. Once the installation is complete, you will no longer have to boot off of the LiveUSB, you may boot the VMWare Virtual Machine instead. What you’ll need VMWare Workstation (VMPlayer may work, but has not been tested) – I used VMWare Workstation 8.0.4. PLOP Boot Manager (http://www.plop.at/en/home.html) – I used version 5.0.14 Wind River Intelligent Device Platform LiveUSB Initial Installation & Licensing 1. Unzip the Plop Boot Manager package to disk 2. Create a new VMWare Virtual Machine with the following specs: Use Iso Image: Set the VM to boot off of the plpbt.iso file which you unzipped in step 1 above. Guest Operating System: Linux / Fedora Disk Size: 60G+ Disk (may be configured as a dynamically allocated disk). Allocating less then 60Gig of hard disk space will not work. 3. Insert the LiveUSB key into the host 4. From VMWare, boot the newly created Virtual Machine. 5. The VMWare boot screen will appear briefly, you should then see the Plop Boot Manager Menu. a) From the VMWare Menu, select VM > Removable Devices b) On my system, the LiveUSB device shows up as “JetFlash Mass Storage Device”, yours may appear differently. c) Select VM > Removable Devices > JetFlash Mass Storage Device > Connect (Disconnect from host) d) From the PLOP Menu, select the USB menu option and then hit enter to boot. e) You should see the Wind River boot screen appear. 6. Accept the EULAs as they appear multiple times 27 Note: the Virtual Machine will be running in a small window. This is expected during the installation processes. Once installation has completed, installing VMWare tools will configure the display correctly. 7. When the Getting Started Menu appears, select Automatic License Activation. Follow the instructions in section 3.3 Obtaining an Evaluation License, on page 10, above. Installation to the Virtual Hard Disk 1. Once the LiveUSB has been properly licensed, you may install it to the Virtual Machines Hard Disk. 2. From the Main Menu, select Applications > Wind River > Install to Hard Disk 3. Select Proceed on the Install Embedded Development Kit to Hard Drive window. 4. Select either “Install Original” or “Install Current” if you’d like to start from scratch, or wish to keep any changes you have made to the LiveUSB. In most cases, you’ll want to select “Install Original” 5. Read the Warning below before proceeding! You should receive a warning screen that your hard disk needs to be initialized. This is expected. Select “Re-Initialize” Warning: DO NOT select “Ignore”, “Ignore All” or “Re-Initialize All”. These options will format your LiveUSB stick. 6. On “Which type of installation would you like?” . Select “Use All Space” and hit “Next” 7. On the Data Storage Screen, select the “VMWare, VMWare Virtual S” device and move it to “Install Target Devices”. 8. Click on “VMWare, VMWare Virtual S” to enable boot and then hit Next 9. The system will then initialize and format the new VMWare Virtual Disk. 10. Once the disk formatting is complete, the LiveUSB image will be installed to the disk. Attention: If you get an error during installation saying that it’s due to bad media, it’s most probably not. It’s most likely due to the license file either not being valid, or not being applied correctly. 11. Once installation is complete, reboot the system and then apply the VMWare tools (VM > Install VMWare Tools…). This will configure your graphics card and enable other niceties such copy/paste between virtual machines. 28 Document Revision History Revision 1.0-1.04 1.05 Date 2011 8 May 2012 Author Staff CAV 1.06 15 May 2012 CAV 1.07 16 May 2012 CAV 1.08 1.14 11 Sept 2012 22 Oct 2012 RR RR Description Initial release and various updates throughout Updates throughout Changed screenshots in Section 3.4 and Appendix B.1. Adjusted step numbering in Appendix B, C, and D. Corrected recovery information in section D.1. Changed screenshots in steps 2 and 3 in Appendis B.1 Updated for IDP 1.0, added appendix on VMWare Installation. Final edits. 29 30 Corporate Offices Europe, Middle East & Africa North America Asia Pacific Oskar-von-Miller-Str. 1 14118 Stowe Drive 17 Building, Block #1, ABP. 85386 Eching/Munich Poway, CA 92064-7147 188 Southern West 4th Ring Germany USA Road Tel.: +49 (0)8165/ 77 777 Tel.: +1 888 294 4558 Beijing 100070, P.R.China Fax: +49 (0)8165/ 77 219 Fax: +1 858 677 0898 Tel.: + 86 10 63751188 [email protected] [email protected] Fax: + 86 10 83682438 [email protected] 31