1
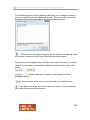
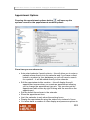
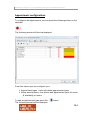
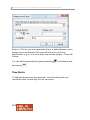
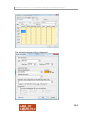
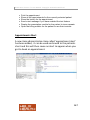
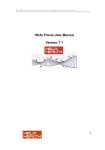
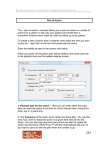
Health One Version 7.1 User Manual. Copyright 2011Helix Health Ltd Appointments Module The Health One appointments screen can be seen in the screen shot below. In this section we will explain the function of each button on the appointments screen and how you can book appointments and configure the screen to meet your needs. On the appointments screen the time slots are displayed on the left. You can set the duration of these in the appointments option section. There is a calendar on the right which allows you to choose a date to book appointments. You can also choose a different month by pressing the little black arrows to the left and right of the month display. - this facility at the top of the screen can also be used to change the day by clicking on the arrows 153 Health One Version 7.1 User Manual. Copyright 2011Helix Health Ltd Today’s date is highlighted in red. You can press the today button to bring you back to today at any stage. . View Selector Use this selector to choose: A one day view A 5 day week view A full week view A month view A list Or see who is in the waiting room. Resource Selector The resource selector can be used to add or remove users from the appointments screen – simply press the check box beside the users name to add or remove them from the screen User Priority on appointments screen To reorder the users priority on the appointment screen press the following button 154 Health One Version 7.1 User Manual. Copyright 2011Helix Health Ltd The following screen will be displayed allowing you to drag the users to the top using the mouse or Shift and arrows. The user at the top will be displayed on the left hand side of the appointments screen. - This button on the resource panel can be used to change the order of the date / resource on the top of the appointments screen. The buttons in the image below will allow you save the views you have require for example you could have different views for each day of the week. - this will allow you to select a view using the black dropdown arrow. - these buttons allow you to move through your saved views. - this button will allow you save & edit your views. You can also set your default view using this feature. 155 Health One Version 7.1 User Manual. Copyright 2011Helix Health Ltd Appointment Search By pressing this button at the top of the appointment screen you can search for a patients appointments or search for an available appointment Search appointments Enter the patients name on the text to search box – you can then search by date range, time, appointment type, User by pressing the search button. Search for a free period. Enter the search criteria from date, times, appointment types users, duration and press search. You can then select one of 156 Health One Version 7.1 User Manual. Copyright 2011Helix Health Ltd the times returned to book an appointment. - this button will display the invoices for the selected patient allowing you to make changes to patient billing. - This button lists all the appointments for the selected patient or pressing F12 refreshes the screen 157 Health One Version 7.1 User Manual. Copyright 2011Helix Health Ltd Change appointment status When you have booked an appointment you can use the above buttons to change the status of a selected appointment to Booked Present In Appointment – this will add the patient to the waiting room. Completed Did not attend Canceled Too late Whiteboard You can enter notes on the whiteboard which can be seen by any user on a shared configuration. 158 Health One Version 7.1 User Manual. Copyright 2011Helix Health Ltd Appointment Options Pressing the appointment options button will open up the options screen on the appointments module options From here you can choose to: Auto select patients if match criteria – this will allow you to enter a patients name directly into the calendar and if you have a direct match to a patient in your database you will not have to search for a patient – it will be added directly to the calendar. Edit the appointment after creation – this will display the edit appointment screen when you create an appointment allowing you to change the appointment type etc. You can also get the appointment edit screen by right clicking with the mouse on the appointment Set the default time shown in the calendar Show the appointment time Limit the calendar to only show the working hours Display the appointments using the status color instead of icons You allow have a number of other display and presence options to 159 Health One Version 7.1 User Manual. Copyright 2011Helix Health Ltd chose from which you can select to meet your needs. From this options screen you can also update the patient details displayed on the patient details panel of the calendar To update the details drag the fields from the panel on the right to the panel on the left using the mouse and press OK to save. This will update the details seen for the selected patient in details panel in the calendar. 160 Health One Version 7.1 User Manual. Copyright 2011Helix Health Ltd Appointment configurations To configure the appointments you can press the following button on the calendar The following screen will then be displayed From this screen you can configure your : Appointment types – add, edit delete appointment types Setup working hours, time blocks and appointment types for users & availability of rooms To add an appointment type press the The following screen will be displayed button. 161 Health One Version 7.1 User Manual. Copyright 2011Helix Health Ltd Enter in a Title for your new appointment type, a default duration and a display colour and indicate if the user will be free or not for this appointment (e.g. if it is a clinic when they will see people) – Press OK to save. You can edit the appointment types by pressing by pressing and delete a type . Time Blocks To add time blocks press the users tab – select the time slots your require the block for and right click on the mouse. 162 Health One Version 7.1 User Manual. Copyright 2011Helix Health Ltd The following screen will be displayed. 163 Health One Version 7.1 User Manual. Copyright 2011Helix Health Ltd Select the day of the week , then the start time and end time. Enter the appointment type of the time block – e.g. Lunch. You can then set when the time block will occur, by choosing the days or selecting first week of month, last week of month, Odd weeks, Even weeks. Then press OK to save. To Book an appointment 1. Select the times slot you require. 2. You can then either type the patients name directly into the slot if a patient matches an appointment will be booked for them. If not the patient search screen will be displayed allowing you to search for your patient. Press enter / ok to book the appointment 3. If you have the edit after creation options selected in the appointment options the following screen will be displayed otherwise the appointment will be added to the calendar. (you can then select the appointment and right click to see the edit screen. 164 Health One Version 7.1 User Manual. Copyright 2011Helix Health Ltd Using the edit appointment screen you can set the type of appointment, the resource the appointment is scheduled with, enter a to do status avatar to allow a user to easily see what a patient is coming in for and enter any comments on the appointment. Pressing F3 when you have an appointment selected will also allow you to add appointment comments. 165 Health One Version 7.1 User Manual. Copyright 2011Helix Health Ltd Open a patients Chart from appointments To open a patients chart from the calendar you can press the enter button on a selected patient in the calendar, or double click on a patient in the calendar using the mouse. Right Click appointment options If you select an appointment in the calendar and right click you can access the following options 166 Open Patient Edit the patient Edit / set a reoccurrence Insert a new appointment into the same slot. Add a comment (or press F3) Enter a to do status icon Cut, copy, paste & delete an appointment Health One Version 7.1 User Manual. Copyright 2011Helix Health Ltd Print the appointment Show all the appointments for the currently selected patient Show the history for the appointment Send a text message if you have enabled the text feature Display the prescription module for the patient to issue repeats. Open the billing module for the patient to see their invoices. Appointments Alert A new item administrative item called ‘appointment alert’ has been added, it can be used and saved to the patients chart and this will then cause an alert to appear when you got to book an appointment. 167