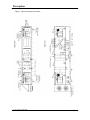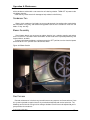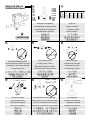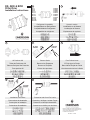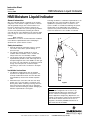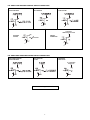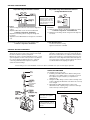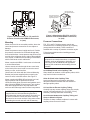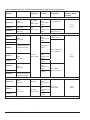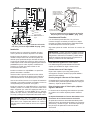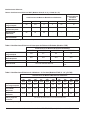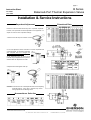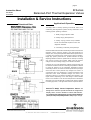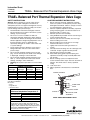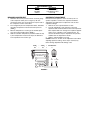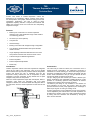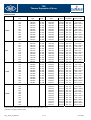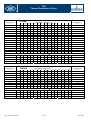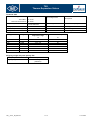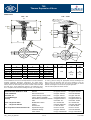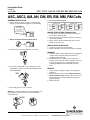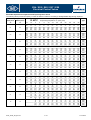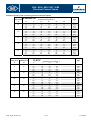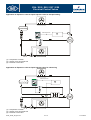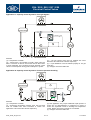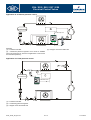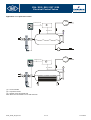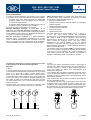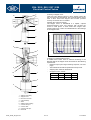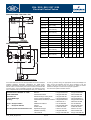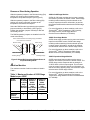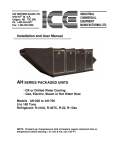
1
ICE WESTERN SALES LTD. 9732-52nd St. S.E. Calgary, AB T2C 2R5 Ph: 1-403-252-5577 Fax: 1-403-252-5556 Installation and User Manual AH SERIES PACKAGED UNITS - DX or Chilled Water Cooling - Gas, Electric, Steam or Hot Water Heat Models AH-020 to AH-700 5 to 180 Tons Refrigerant: R-410A, R-407C, R-22, R-134a NOTE: Prestart-up: Compressors with oil heaters require minimum time or temperature before starting. ( ie: min 8 hrs, min 120 ºF ) Contents Contents 1. Description……………………………………………………………………………….….. 3 Hazard Identification Information Safety Considerations Unit Description Refrigeration Piping 2. Model Number Description………………………………………………………………….. 8 Unit Model Number 3. User’s Information……………………………………………………………………………. 9 DX Package Units Hydronic Cooling & Heating Gas or Electric Heating Multiple Unit Operation Condensate Piping Normal Thermostat Operation Night and Vacancy Operation Gas Heating System Hot Gas Bypass System Filter Sizes Cabinet Construction 4. Delivery……………………………………………………………………………………….. 14 Receipt & Inspection Storage 5. Installation…………………………………………………………………………………….. 15 General Handling Heating and Cooling Systems Service Clearances Setting the Unit Electrical Standard Control Board Optional Control Board Thermostat Economizer Option Lockout Modes Condensate Piping 6. Start-Up……………………………………………………………………………………….. 26 General Procedures Air Balancing Controls Unit Start-up Checklist 7. Operation & Maintenance………………………………………………………………….. 36 General Planned Maintenance Cooling Condenser Fan Blower Assembly ICE WESTERN 1 Contents Gas Furnace Chilled Water Filters Cleaning Service 8. Pressure-Temperature Chart ……………………………………………………….……. 40 APPENDICES Solenoid Valves 200RB/500RB Model Solenoid Valves 240RA/540RA Model EK, ADK & BOK Filter Drier Installation Instructions HMI Moisture Liquid Indicator PS1 Single High and Low Pressure & PS2 Dual Pressure Refrigeration Controls P70, P72, P170 Series Controls for High Pressure Applications B Series Balanced-Port Thermal Expansion Valves Installation & Service Instructions TRAE+ Balanced Port Thermal Expansion Valve Cage TX6 Thermo Expansion Valves Technical Data ASC, ASC2, AM, AH, DM, EB, EM, MM, RM Coils Instruction Sheet EX4 / EX5 / EX6 / EX7 / EX8 Electrical Control Valves Technical Data EC3-D7x Digital Superheat Controller with EC3-D72 TCP/IP Communication Instructions System 350 A350P Electronic Proportional Plus Integral Temperature Control ICE WESTERN 2 Description 1. Description Hazard Identification Information WARNING Warnings indicate potentially hazardous situations, which can result in property damage, severe personal injury, or death if not avoided. CAUTION Cautions indicate potentially hazardous situations, which result in personal injury or equipment damage if not avoided. WARNING Safety Considerations Installation and servicing of air-conditioning equipment can be hazardous due to system pressure and electrical components. Only trained and qualified service personnel should install, repair, or service air-conditioning equipment. Untrained personnel can perform basic maintenance functions of cleaning coils and filters and replacing filters. All other operations should be performed by trained service personnel. When working on air-conditioning equipment, observe precautions in the literature, tags and labels attached to the unit, and other safety precautions that may apply. Follow all safety codes, including UL 1995 (Issued: 2005/02/18 Ed:3 UL Standard for Safety Heating and Cooling Equipment - ) and CSA C22.2#236 (Issued: 2005/02/01 Ed:3 UL Standard for Safety Heating and Cooling Equipment - ). Wear safety glasses and work gloves. Use quenching cloth for unbrazing operations. Have fire extinguisher available for all brazing operations. WARNING Before performing service or maintenance operations on unit, turn off main power switch to unit. Electrical shock could cause personal injury. ICE WESTERN 3 Description WARNING What to do if you smell gas: 1. DO NOT try to light any appliance. 2. DO NOT touch any electrical switch, or use any phone in your building. 3. IMMEDIATELY call your gas supplier from a neighbor’s phone. Follow the gas supplier’s instructions. 4. If you cannot reach your gas supplier, call the fire department. 5. DO NOT try to light any appliance. WARNING DO NOT store or use gasoline or other flammable vapors and liquids in the vicinity of this or any other appliance. WARNING Improper installation, adjustment, alteration, service, or maintenance can cause injury or property damage. Refer to installation instructions provided with the unit, and this manual. For assistance or additional information, consult a qualified installer, service agency, or the gas supplier. Unit Description Figure 1 & 2 shows typical packaged DX cooling unit with the locations of the major components. These figures are for general information only. See the project’s certified submittals for actual specific dimensions and locations. ICE WESTERN 4 Description Figure 1: Typical Component Locations ICE WESTERN 5 Description Figure 2: Typical Component Locations ICE WESTERN 6 Description Refrigeration Piping This Section presents the unit refrigeration piping diagrams (single circuit, dual stage w/ Hot Gas Bypass System ). Figure 3: Circuit Schematic ICE WESTERN 7 Model Number Description 2. Model Number Description Unit Model Number Model Nom. Casing AH - Voltage a1 a2 a3 Discharge Location b Cooling Heating c d1 d2 d3 d4 Heat Humidification Recovery e1 e2 f1 f2 g1 g2 a1a2a3: Norminal Casing ( 20=2000CFM, 60=6000CFM, 80=8000CFM, 120=12000CFM, 150=15000CFM, 180=18000CFM, 210=21000CFM, 240=24000CFM, 320=32000CFM, 400=40000CFM, 480=48000CFM, 600=60000CFM, 700=70000CFM ) b: Voltage A = 575~600V/3Ø/60HZ, B = 460~480V/3Ø/60HZ, C = 208~230V/3Ø/60HZ, D = 208~230V/1Ø/60HZ, E=120V/1Ø/60HZ c: Discharge T = Top, S = Side, E =End, B =Bottom, AC=Vertical d1: Refrigerant Type A = R410A, B = R407C, C = R-22, D = R-134a d2: Configuration E = Air Cooled Cond. w/ std. DX Coil F = Cooling Water Coil DX = DX Coil d3: Staging Circuit & Stage 11 = Single Circuit Single Stage 12 = Single Circuit Dual Stage 13 = Single Circuit 3 Stage 14 = Single Circuit 4 Stage 22 = Dual Circuit 2 Stage 24 = Dual Circuit 4 Stage 26 = Dual Circuit 6 Stage 28 = Dual Circuit 8 Stage 36 = Three Circuit 6 Stage 44 = Four Circuit 4 Stage 48 = Four Circuit 8 Stage d4: Nominal Tonnage Range of 3 Ton – 180 Ton e1: Type GIDM = Indirect Gas Heat ( 4 - Pass Drum & Tube Heat Exchanger ) GIDMH = Indirect Gas Heat ( 4 - Pass Drum & Tube Heat Exchanger ), w/High CFM. BMA = Direct Gas Heat BMAE = Electric Heating Unit DIDM = Indirect Gas Heat ( 4 - Pass Drum & Tube Heat Exchanger ) DIDMH = Indirect Gas Heat ( 4 - Pass Drum & Tube Heat Exchanger ), w/High CFM. MTI = Indirect Gas Heat ( Multiple Tube Heat Exchanger) HTDM = Indirect Gas Heat ( 2 - Pass Drum & Tube Heat Exchanger ) SC = Steam Coil HW = Hot Water Coil EC = Electric Heating Coil AC = Air Turnover e2: Heating Capacity ( from 20 MBH to 7500 MBH) or Electric Capacity ( from 1 KW to 550 KW ) f1: HP = Heat Pipe, HC = Heat Core, EW = Enthalpy Wheel, RA = Run Around Glycol f2: Size or Capacity g1: EH = Electric Humidifier, GH = Gas to Steam Humidifier, CD = Evaporative Humidifier g2: Capacity ICE WESTERN 8 User’s Information 3. User’s Information WARNING Failure to observe the following instructions may result in premature failure of your system, and possible voiding of the warranty. DX Package Units Never cut off the main power supply to the unit, except for complete shutdown. Always control the system from the thermostat, or control panel, and never at the main power supply (except in an emergency, or complete shutdown of the system). During the cooling season, if the airflow is reduced due to dirty air filters, or other reasons, the cooling coils will get too cold and result in excessive liquid return to the compressor. As the liquid concentration accumulates, oil is washed out of the compressor leaving it starved for lubrication. The compressors must be on a minimum of four minutes, and off for a minimum of five minutes. The cycle rate must not exceed eight starts per hour. THE COMPRESSOR LIFE WILL BE SERIOUSLY SHORTENED BY RESULTING REDUCED LUBRICATION, AND THE PUMPING OF EXCESS AMOUNTS OF LIQUID OIL AND REFRIGERANT. Hydronic Cooling and Heating Non-compressorized units may contain chilled water and/or hot water coils. Units are provided with internal header connections for field piping. Vent and drain connections can be accessed within the unit. Piping is to be run via the piping chase inside the coil compartment, accessible through the coil compartment access door on the front of the unit. Piping to coil header connections must be supported independently of the coil to prevent undue stress from weakening connections over time. Allow adequate flexibility for thermal expansion of the piping. Use proper glycol solutions or brines to help prevent coil freezing. Consult the designer or project engineer if you have concerns about lower than normal entering air temperature (typically air temperatures below 40ºF) that could cause coils to freeze. Gas or Electric Heating The system is designed to heat a given amount of air each minute of operation. If the amount of air heated is greatly reduced (approximately 1/3 capacity), the heat exchanger (or heat coil if electric) temperature will increase above acceptable levels, and will result in shut down by a high temperature safety switch incorporated into either the heat exchanger, or the heater area. WARNING GAS HEAT UNITS – If heat shuts off due to safety switch, or gas supply shut off failure, then always close manual gas valve to unit prior to any electrical service. Prolonged overheating of the heat exchanger will shorten its life. Multiple Unit Operation ICE WESTERN 9 User’s Information When several units are used in conditioning the space, and any are combination heatingcooling units, all system thermostat switches must be set at either heating, cooling, or set at ‘OFF’. Do not run part of a system switched to an opposite mode. Cooling only units should be switched to ‘OFF’ at the thermostat during the heating season. Wiring Diagrams A complete set of unit specific wiring diagrams in both ladder and point-to point form are laminated in plastic and affixed to the inside of the service access door. Condensate Piping A drain trap must be connected to the drain connection located on the side or back of the unit. If codes require a condensate drain line, it should be the same pipe size as the drain nipple and should pitch downward for its entire length toward the drain. A “P” Trap could be required and supplied by others. An air break should be used with long runs of condensate lines. Normal Thermostat Operation For Heating - Set system switch to ‘HEAT’ - Set fan switch to ‘AUTO’ or ‘ON’ - Set the desired temperature For Cooling - Set system switch to ‘COOL’ - Set fan switch to ‘AUTO’ or ‘ON’ Air Circulation - Set the system switch to ‘OFF’ - Set the fan switch to ‘ON’ System Off - Set the system switch to ‘OFF’ - Set the fan switch to ‘AUTO’ - Do not change temperature setting - With these settings the system id shut down, except for the 24-volt control system power, and the compressor crankcase heater (approx. 60W). Night and Vacancy Operation To reduce the operation time during low load periods, it is recommended that the temperature setting be increased by 5 ºF during non-occupied periods of the cooling season in commercial buildings, such as nights and weekends. Decrease the temperature by 10ºF at these times during the heating season. ICE WESTERN 10 User’s Information Gas Heating System The heating section is for use with natural gas supply pressure of 7” to 14” w.c. The unit may also utilize propane gas ( If order or after installation of a field conversion kit) with a supply pressure to the valve of 11” to 12” w.c. The rating plate on the furnace must be inspected to make sure the unit is stamped for proper gas. A 1/8” pressure tap should be field supplied by the installer in the piping just ahead of the gas valve. A centrifugal blower that draws in outside air through a protected opening supplies combustion air on MTI model. This induced draft blower introduces the air to the blower tubes, which assures even primary and secondary airflow. Gas heating units use high efficiency dimpled heat exchanger, for MTI series, it has multiple tube heat exchanger, for HTDM series, it has 2-pass drum & tube heat exchanger, for GIDM series, it has 4-pass drum & tube heat exchanger. The instruction of all gas heating system units please refer to the relevant operation & installation manual attached. Figure 4: Gas Heat Exchangers Hot Gas Bypass Systems on DX Units Some DX cooling units may contain Modulating Hot Gas Bypass systems as factory installed options. Piping and valves for this systems will be within the casing of the unit w/ access via a hinged access door. The purpose of external hot gas bypass is to prevent coil freeze-up and compressor damage from liquid slugging during periods of low airflow operation, or with low entering air temperatures. Hot gas bypass is useful when the air conditioning system is subject to variations in load caused by varying air volume or large proportions of outside air. The hot gas bypass valve meters discharge refrigerant gas to the distributor downstream of the expansion valve, and at the entrance to the evaporator distributor tubes. The quantity of the gas varies to control a constant suction pressure, allowing more gas to flow as suction pressure decreases. Hot gas bypass is a standard feature on most ICE models . ICE WESTERN 11 User’s Information Figure5: Hot Gas Bypass System Hot Gas Bypass Valve Filter Sizes The required filter sizes of unit depend upon the different requirements of each Air Handling unit. Please refer to the rating plate of each unit for information about size and quantity of filters. Cabinet Construction All Air Handling units are insulated with 1” – 1 1/2 “lb, 2” – 1 1/2 “lb, 2” – 3”lb fiber glass insulation. All cabinet roof, floor and doors use double-wall satin coat steel. Please refer to figure 6 for more details of casing construction. ICE WESTERN 12 User’s Information Figure 6: High Performance Composite Panel ICE WESTERN 13 Delivery 4. Delivery ALL SHIPMENTS ARE F.O.B. THE FACTORY. IT IS THE RESPONSIBILITY OF THE RECEIVING PARTY TO INSPECT THE EQUIPMENT UPON ARRIVAL. Receipt & Inspection The unit should be inspected for damage that may have occurred in transit. Do the following upon receipt: 1. Inspect all items for internal, external, and concealed damage before accepting. 2. Assure carrier is in compliance with Bill of Lading instructions. If damage is found: 1. Note all damage on Bill of Lading immediately: − Photograph damage if possible − Do not move or discard damaged packaging materials 2. Call carrier immediately to file a freight claim, and to schedule a freight inspection 3. When damage is repairable, contact ICE Western for replacement parts 4. With permission of carrier, make the repairs 5. Stay in contact with carrier to ensure payment of your claim If repairs must be made to damaged goods, the factory must be notified before any repair action is taken. Equipment alteration, repair, or unauthorized manipulation of damaged equipment without the manufacturer’s consent will void all product warranties. Contact the ICE Western for assistance with handling damaged goods, repairs, and freight claims. Verify the equipment against the order documents upon delivery. If what you received does not match your order exactly, then notify your Sales Representative at once. Storage This equipment is designed for indoor or outdoor use. However, if installation will not occur immediately following delivery, then store equipment in a protected area, and in the proper orientation as marked on the packaging with all internal packaging in place. Secure all looseshipped items. ICE WESTERN 14 Installation 5. Installation General The installation of this equipment shall be in accordance with the regulations of authorities having jurisdiction and all applicable codes. It is the responsibility of the installer to determine and follow the applicable codes. NOTE: Low head pressure may lead to poor, erratic refrigerant feed control at the thermostatic expansion valve. The units have automatic control of the condenser fans which should provide adequate head pressure control down to 50ºF (10ºC) provided the unit is not exposed to windy conditions. The system designer is responsible for assuring the condensing section is not exposed to excessive wind or air recirculation. CAUTION Sharp edges on sheet metal and fasteners can cause personal injury. This equipment must be installed, operated, and serviced only by an experienced installation company and fully trained personnel. Handling Be aware of what is contained in the equipment! Dependent upon the optional accessories that were ordered, this equipment may contain fragile components and delicate electronics. Although the unit is constructed of sturdy materials, avoid impacts and handling methods that may damage internal apparatus and structure, or the exterior painted surfaces of the unit. Take care not to apply destructive force to coils, or other parts protruding beyond the extents of the unit casing. Always handle the unit by its exterior casing. Keep equipment free from debris, and construction waste during installation. Foreign materials may adversely affect unit operation resulting in premature failures that will not be covered by the manufacturer’s warranty. Attach all service panels, and cover all exposed equipment when work is not being performed. Leave unit protected from other construction until start-up is to occur. WARNING Always wear hand and eye protection when handling, installing, servicing, or maintaining equipment. Sharp or pointed edges, moving parts, and flying debris may cause personal injury. ICE WESTERN 15 Installation Heating & Cooling Systems Gas Heating System The units are equipped with a direct spark ignition system that proves the burner operation with each call for heat. Power to the ignition control is 24V or 120V. Burner ignition is by a high intensity spark. When heat is called for, the cooling system is inoperable except for the indoor blower motor. Heating is accomplished by firing gas into the heat exchanger assembly. IMPORTANT NOTICE – All gas-fired heat exchangers are completely tested at the factory before shipment. This will remove nearly all of the oils that have been used in the manufacturing process, however trace amounts may remain. When performing the initial start-up at the jobsite, it is highly recommended that people, or any other living animals, that may be sensitive to the residual odors or gases, NOT be present in the conditioned space during start-up. In all cases, including the initial factory firing and testing, all of the gases will be under the minimum acceptable level of concentration for human occupancy. WARNING Those sensitive to odors or gases from trace amounts of residual oils should NOT be present in the conditioned space during the start-up of a gas-fired installation. Electric Heating System Heating is accomplished by passing electrical current through a specified amount of resistance heaters that produce the required heat. The indoor blower motor energizes prior to the heaters. DX Cooling Section All direct expansion refrigeration systems are factory assembled, charged with refrigerant, tested, and operated. These systems include liquid line filter driers, expansion valves, and scroll compressors or semi-hermetic Carlyle compressors. Compressors are equipped with a positive pressure forced lubrication system. The air-cooled condenser coil is constructed of copper tubes and mechanically bonded aluminum fins, and air is pulled through by a propeller fan. The evaporator coil is draw through type constructed of copper tubes and mechanically bonded aluminum fins, and may have optional coating for hazardous locations. Chilled Water or Non-Compressorized Cooling Section Chilled water, or non-compressorized units, have factory-installed coils. Systems are provided with internal header connections for field piping. Coils are constructed of copper tubes and mechanically bonded aluminum fins. ICE WESTERN 16 Installation Service Clearances In addition to providing adequate space around the unit for piping coils and drains, access to at least one side of the unit is always required to allow for regular service and routine maintenance, which includes filter replacement, drain pan inspection and cleaning, fan bearing lubrication, and belt adjustment. Provide sufficient space—at least equal to the length of the coil—on the side of the unit for shaft removal and coil removal. Space, at least equal to the length of the side coil, is required for coil removal. Space, at least equal to the fin height, is required for top coil. See Figure 7 for servicing space requirements. For routine maintenance purposes, access normally is obtained through the access doors or by removing panels. Fan and filter sections are always provided with a service door on one side of the unit. If requested, doors can be provided on both sides of the unit. Optional service doors are available for most section types and are provided based on customer request. If component replacement is required, the top panel also can be removed. If necessary, the unit can be disassembled. Maintain at least 54” of clearance in front of electrical power devices (starters, VFDs, disconnect switches and combination). Electrical power devices that are mounted on the side of the unit typically are up to 12” deep. See Figure 8. Figure 7: Servicing Space Requirements ICE WESTERN 17 Installation Figure 8: Service Clearance for Electrical Power Devices Setting the Unit Units should always be installed level, and above water drainage routes. Outdoor unit operation can be affected by wind. It is good practice to position outdoor unit condensing sections away from prevailing winds. Protective Shipping Brackets Before staring the unit, be sure to remove the protective shipping brackets, or bolts. Ground Setting Set the unit on a solid slab high enough above the soil grade to allow water to drain away from the base of the unit. The unit should be set on a slab that has been placed over compact, level earth. A poured concrete (permanent) slab is recommended. Roof Setting with Curb Mount roof curbs first, and locate so duct connections will clear any structural members of the building. When using the factory curb, make openings in roof decking large enough to allow for duct penetrations and workspace only. Do not make openings larger than necessary. Set the curb to coincide with the openings. CURB MUST BE LEVEL. NOTE: PRIOR TO SETTING UNIT ON CURB – To ensure proper isolation and seal between the unit and the curb, gasket material MUST BE APPLIED to the curb on ALL SURFACES meeting ICE WESTERN 18 Installation with the unit. Hoisting Lifting lugs are provided on the bottom of the unit. If cables or chains are used to hoist the unit, they must be of the appropriate length, and care should be taken to prevent damage to the unit. It is recommended that the unit be hoisted with the outside air hood (if present) in the shipped position. Before lifting unit, be sure that all shipping material is removed. Secure hooks and cables at all lifting points/lugs provided on the unit. Prior to setting the rooftop unit onto the roof curb, be sure that the gasket material has been applied to all curb surfaces meeting with the unit. Hoist unit to a point directly above the curb and duct openings. Carefully lower and align the unit’s utility and duct openings so the unit perimeter fits around the curb. Make sure the unit is properly seated on the curb and is level. Outside Air Hood (Optional) Units equipped with outside air intake will have an outside air hood. The outside air hood must be installed prior to unit operation. Ensure the air hood is properly sealed to prevent leakage. Outdoor air intake adjustments should be made according to building ventilation, or local code requirements. Figure 9: Lifting Lugs ICE WESTERN 19 Installation WARNING DO NOT USE OPEN FLAME OR OTHER SOURCE OF IGNITION FOR LEAK TESTING. When pressure testing the gas supply piping, the furnace must be isolated, or disconnected by closing individual manual shut-off valve from the gas supply. Gas valve can be damaged if subjected to more than 0.5 PSIG pressure. WARNING Install gas fired units so that the flue discharge vent is located a minimum of 120” from openings through which combustion products can enter the building. Never point flue discharge in direction of air intake for other equipment. Unit location must assure combustion and ventilation airflows are never obstructed. Electrical Check the unit data plate to make sure it matches the power supply. Connect power to the unit according to the wiring diagram provided with the unit. The power and control wiring may be brought in through the utility entry. Do not run power and control wires in the same conduit. Protect the branch circuit in accordance with code requirements. The units must be electrically grounded in accordance with the National Electric Code, ANSI/NFPA No. 70. In Canada use current C.S.A. Standard C22.1, Canadian Electric Code Part 1. Connect power wiring to the terminal block, or optional disconnect switch. The manufacturer has done all wiring beyond this point, and cannot be modified without affecting the unit’s agency and/or safety certification, and warranty. Power can be applied to the unit after the control wiring is connected. Standard Control Board This printed circuit board is the central control point for all the electrical components in the unit. Low voltage terminals are provided for connection to the wall mounted thermostat of the customer’s selection, or as furnished by ICE Western. Confirm the optional features that were specified and purchased. This will allow proper selection of the number of control options listed below that may need additional wiring. Each Air Handling Unit has a standard Cooling Lock-out feature that prevents the compressor cooling mode when the outdoor temperature is below 55ºF. Each unit may has a condenser fan cycle feature that delays the start of the condenser fan until there is satisfactory compressor discharge pressure. Eight colored LEDs are furnished on the circuit board to provide status information. Every unit is furnished with a high and low pressure sensor, as well as an outdoor air temperature sensor. These sensors provide a signal to the control board that also present a fault condition or Mode indicator at the LEDs with a code. ICE WESTERN 20 Installation Figure 10: Power and Control Wiring Unit Burner Proving System Optional Control Relay Board Ambistat Temperature Controller HTDM Unit Control Board ICE WESTERN 21 Installation Optional Control Board This Control Relay Board is supplied within the Packaged DX Cooling model when it has been furnished with certain optional features specified by the customer. Among these are an Economizer, Return Air Bypass, Hot Gas Bypass and many other optional features according to the requirements. Thermostat The low voltage room thermostat should be located on an inside wall 4 to 5 feet above the floor where it will not be subjected to drafts, sun exposure or heat from electrical fixtures or appliances. The control wire size must be large enough to prevent excess voltage drop that may cause improper operation of the equipment. The Packaged DX Cooling unit control board has approximately a 1/2 amp current flow through the thermostat. Follow the thermostat manufacturer’s instructions to set the heat anticipator. Table1: Low Voltage Thermostat Field Wiring Size T-stat Load Amps Less than 1.0 50 Ft. 18 ga. Length of Wire Run 100 Ft. 18 ga. 150 Ft. 16 ga. Single Stage Heating & Cooling The terminals on a single stage thermostat should be connected to labeled terminals on the Control Terminal Strip in the Packaged DX Cooling unit. the similarly Multiple Step Compressor Cooling Models - The Packaged DX Cooling models with multiple step cooling compressor may use multiple step cooling thermostat connected to the terminals on the Control Terminal Strip in the Packaged DX Cooling unit. Economizer Option The economizer option is used to provide cooling at lower outdoor air temperatures and to provide a quantity of ventilation air to the occupied space. The economizer option can be selected with either a sensible outdoor air temperature sensor or an enthalpy sensor that measures the heat content in the outdoor air. The economizer controller can be field installed or factory installed by ICE Western as selected by the customer. Supply Air Temperature Sensor A supply air temperature sensor is provided within the equipment. This sensor must be installed in the downstream supply air ductwork at a sufficient distance from the equipment to provide a correctly mixed supply air temperature back to the unit control board. Factory Installed When factory installed the control board will use the outdoor air sensor and the cooling signal ICE WESTERN 22 Installation from the thermostat to provide a first stage of cooling using the outside air when possible before starting the compressor and mechanical cooling cycle. The thermostat wiring to the control board with single or multi-stages should be wired as listed previously. Lockout Modes Gas Heating The heating mode will be locked out if the ignition system safety monitors trip 3 times during a call for heating. Electric Heating The heating mode will be locked out if the high temperature limit switch trips 3 times during a call for heating. Cooling The cooling mode will be locked out if the low pressure switch safety switch trips 3 times during a call for cooling or dehumidification. Cooling operation will be locked out if the Outside Air Sensor is missing or defective. The economizer operation during dehumidification will be locked out if the Air Sensor is defective. To reset the lockout condition, reset the tripped device. If the device trips again, call qualified service technician. Condensate Piping AH Packaged DX Cooling units are equipped with a condensate drain connection, and ‘P’ traps are furnished by others. The drain connection must be used and individually trapped to ensure a minimum amount of condensate accumulation in the drain pans. Although drainage of condensate directly onto the roof may be acceptable in certain areas, is not recommended as it can damage some types of roofing, and roofing materials. Refer to local codes for legalities concerning condensate drainage. Condensate can be piped to a gutter system, or away from the building into other drainage. Ideally, condensate will be piped into the building drainage system, in which case the drainpipe may need to penetrate the roof external to the unit itself. The drain line should be pitched away from the unit with at least 1/8” of slope per foot. On longer runs, an air break should be used to ensure proper drainage. Drain pans in air conditioning equipment have moisture present and require periodic cleaning to remove build up of algae, and/or bacteria. Cleaning the drain pans reduces the probability of plugged drain lines and overflow of the pan itself. All cleaning of the drain pans and inside of the equipment should be done by qualified personnel. ICE WESTERN 23 Installation Figure 11: DX Coil Piping and Condenser Figure 12: Scroll Compressor ICE WESTERN Digital Scroll Compressor 24 Installation Figure 13: Crankcase Heater ICE WESTERN 25 Start-Up 6. Start-Up General ONLY QUALIFIED, AUTHORIZED PERSONNEL SHOULD POWER ON, OR START-UP THIS EQUIPMENT. The use of common sense, and good practice in the installation, and start-up of equipment will prevent many potential problems with the system in the future. Before starting up the equipment, building construction should be complete, and start-up personnel should: - Have a working knowledge of general HVAC and mechanical commissioning procedures and practices; - Be familiar with unit functions, features, optional unit accessories, and all control sequences; - Have appropriate literature on hand for consultation. Procedures EQUIPMENT OPERATION DURING CONSTRUCTION IS NOT RECOMMENDED. CONSTRUCTION SITE POLLUTION CAN AFFECT UNIT OPERATION, AND SERIOUSLY DEGRADE PERFORMANCE. OPERATION DURING CONSTRUCTION WILL VOID ALL MANUFACTURER’S WARRANTIES. Before the structure is occupied, the installation, and/or start-up personnel must take three essential steps: 1. Pre-Startup Check Out 2. Start-Up 3. Commissioning Pre-Startup Check Out All equipment should be thoroughly checked for loose wiring, free spinning condenser fan and blower wheel, and well fitting access panels. Unit should not be operated without proper ductwork, and access panels installed, except as required during start-up and air balancing. Install gauges, voltmeter, and ammeter before start-up. Observe refrigerant pressures during initial operation. Note, and determine the cause of any excessive sound, or vibration. Follow procedures outlined below to start each piece of equipment. 1. Verify that the unit is completely and properly installed with ductwork connected. 2. Verify that all construction debris is removed, and that the filters are clean. 3. Verify that all electrical work is complete and properly terminated. 4. Verify that all electrical connections in the unit control panel and compressor terminal box are tight, and that the proper voltage is connected. 5. Verify all nameplate electrical data is compatible with the power supply. 6. Verify the phase voltage imbalance is no greater than 10%. 7. Verify that gas piping is complete and leak tight. 8. Verify that the shutoff cock is installed ahead of the furnace, and that all air has been bled from the gas line. 9. Manually rotate all fans and verify that they rotate freely. 10. Verify that the belts are tight and the sheaves are aligned. 11. Verify that all setscrews and fasteners on the fan assemblies are still tight. 12. Verify that the evaporator condensate drain is trapped and that the drain pan is level. 13. If unit is curb mounted, verify that the curb is properly flashed to prevent water leakage. 14. Before attempting to operate the unit, review the control layout description to become familiar ICE WESTERN 26 Start-Up with the control locations. 15. Review the equipment and service literature, and the wiring diagrams to become familiar with the functions and purposes of the controls and devices. 16. Determine which optional controls are included with the unit. 17. Before closing (connecting) the power disconnect switch, open (disconnect) the following unit control circuit switches: a. Main Control Panel - Turn system switch to OFF. - Electric heat units: turn switch to OFF. - Turn compressor control circuit switches to OFF. b. Furnace Control Compartment - Turn furnace switch to OFF. - Main Control Panel Switch to OFF. Start-Up NOTE: 1. Failure to adhere to the following start-up procedures will void all manufacturer’s warranties. 2. Completed factory test sheets are in the equipment literature packet shipped inside the unit. Factory run-test readings recorded on the test sheets may be helpful to reference during start-up. CAUTION IMPORTANT FOR 3 PHASE UNITS ONLY! CHECK COMPRESSOR FOR PROPER ROTATION BY STARTING UNIT ONLY AFTER CONNECTING PRESSURE GAUGES TO SUCTION AND DISCHARGE LINES. SCROLL COMPRESSORS WILL BE DESTROYED IF OPERATED IN THE WRONG DIRECTION. Sheave Alignment Mounting: 1. Verify both driving and driven sheaves are in alignment and the shafts are parallel. The center line of the driving sheave must be in line with the center line of the driven sheave. See figure 12. 2. Verify that all setscrews are still tight before starting drive. Check setscrew and belt tension after 24 hours of service. ICE WESTERN 27 Start-Up Figure 14: Sheave Alignment Must be Parallel Bearing Center lines must coincide Motor Adjustable Sheave Must be Parallel Drive Belt Adjustment General Rules of Tensioning 1. The ideal tension is the lowest tension at which the belt will not slip under peak load conditions. 2. Check tension frequently during 24-48 hours of operation. 3. Over tensioning shortens belt and bearing life. 4. Keep belts free from foreign material which may cause slippage. 5. Inspect V-belts on a periodic basis. Adjust tension if the belt is slipping. Do not apply belt dressing. This may damage the belt and cause early failure. Tension Measurement Procedure 1. Measure the belt span. See figure 13. 2. Place belt tension checker squarely on one belt at the center of the belt span. Apply force to the checker, perpendicular to the belt span, until the belt deflection equals to belt span distance divided by 64. Determine force applied while in this position. 3. Compare this force to the values on the drive kit label found on the fan housing. Figure 15: Drive Belt Adjustment ICE WESTERN 28 Start-Up Fan Start-up 1. Verify all duct isolation dampers are open. 2. Verify the fan rotation is correct. 3. a. Put Unit into summer mode at remote panel. b. Dampers should open then end switch will start blower. c. Record motor Amps to verify against rated. 4. If damper do not open: a. Check fuses. b. Check the manual motor protectors or that the circuit breakers have not tripped. c. Check the optional phase monitor. Refrigeration System I. Capacity control adjustments for Carlyle compressor Pressure-Operated Control Valve is controlled by suction pressure and actuated by the discharge pressure. Each valve controls 2 cylinders (one bank). On start-up, controlled cylinders do not load up until differential between suction and discharge pressures is approximately 25 psi. ADJUSTMENTS Control Set Point ( cylinder load-up point ) is adjustable from 0 psig to 86 psig. Turn adjustment nut clockwise to the bottom stop. In this position, the cylinder load-up pressure is 86 psig. Control set point is regulated to desired pressure by turning the adjustment nut counterclockwise. Each full turn clockwise decreases the load-up point by approximately 7.2 psi. Approximately 12 turns changes the pressure from 85 psig to 0 psig. Pressure Differential between cylinder load-up point and unload point is adjustable from 6 psi to 16 psi. Turn adjustment screw counterclockwise to the back-stop. In this position, the differential is 6 psi. Differential is set by turning the adjustment screw clockwise. Each full turn clockwise increases the differential by approximately 0.8 psi. Approximately 5 turns changes the differential from 6 psig to 10 psig Electrically-Operated Control Valve is actuated by an electric solenoid, which must be of the same voltage as the unit control circuit. No adjustments are necessary. When the solenoid is de-energized, the orifices and passage-ways in the valve are aligned for loaded condition, shown in figure 14. When the solenoid is energized, the system is unloaded as shown in figure 14. Suction Cutoff Unload Operation – The capacity control valve shown in figure 14 is the pressure–operated type, which is the one in the following description. In the electrically-actuated valve, the function of a similar poppet valve is the same as in the pressure-operated type but it is moved by a solenoid. The function within the cylinder head is the same for both types of control valve. LOADED When suction pressure rises high enough to overcome control set point spring, the diaphragm snaps to the left and relieves pressure against the poppet valve. The drive spring moves the poppet valve to the left and it seats in the closed position. With poppet valve closed, discharge gas is directed into the unload-piston chamber and pressure builds up against the piston. When pressure against unloader piston is high enough to overcome the unloader valve spring, piston moves valve to the right, opening suction port. Suction gas can now be drawn into the cylinders and the bank is running fully loaded. ICE WESTERN 29 Start-Up UNLOADED As suction pressure drops below set point, control spring expands, snapping diaphragm to right. This forces poppet valve open and allows gas from discharge manifold to vent through base of control valve to suction side. Loss of full discharge pressure against unloader piston allows unloader valve spring to move valve left to closed position. The suction port is blocked, isolating the cylinder bank from the suction manifold. The cylinder bank is now loaded. Figure 16: Suction Cut-Off Unloaded Operation ICE WESTERN 30 Start-Up II. Adjustments for Dual Pressure Control ( JOHNSON CONTROLS: P70, P72, and P170 Series Controls ) All-Range Controls (Low Side Only) The low side of All-Range controls displays the CUT IN and CUT OUT setpoints. Turn the range screw to adjust the cut in and cut out setpoints up or down simultaneously which maintains the set differential value. Turn the differential screw to adjust the cut out setpoint and change the differential value. Dual Pressure Control (High Side) The high side scale plate of the P70, P72, P170 dual pressure controls display only the CUT OUT setpoint. Turn the range screw to adjust the cutout setpoint. The differential is fixed at about 65 psi. To adjust the dual pressure controls: Set low side cut in setpoint by adjusting low side range screw. All-Range Controls: Turn the screw clockwise to raise the cut in setpoint. Adjust the differential screw. All-Range Controls: Turn the screw clockwise to raise the cut out setpoint. Set high side cut out setpoint by adjusting high side range screw. Turn screw clockwise to raise the cut out setpoint. (High side differential is fixed.) III. Hot Gas Bypass Regulator Adjustments Install an accurate pressure gauge at the control (sensing) point at the outlet side of the valve. To adjust the valve, loosen Seal Nut and turn Adjusting Stem clockwise to raise the pressure or counterclockwise to lower the pressure. The regulator should be set under actual operating conditions. For hot gas bypass this condition occurs under minimal system load conditions. The regulator should be adjusted to maintain minimum desired suction pressure. Hot gas flow through the valve can be detected by listening to the gas flow through the regulator or by feeling the outlet pipe for warmth. When it is not possible to simulate minimum load conditions, an approximate setting may be obtained by adjusting the valve until gas flow begins, observing the gauge reading, and then turning the adjusting stem counterclockwise for the required number of turns to obtain the desired minimum pressure. This setting should be checked and readjusted as needed under actual conditions. IV. Typical Malfunctions Of Solenoid Valve ( SPORLAN: Solenoid Valves ) Coil Burnout a. Coils burnouts are extremely rare unless caused by one of the following: b. Improper electrical characteristics. c. Continuous over-voltage, more than 10%. d. Under-voltage of more than 15%. This applies only if the operating conditions are such that reduced MOPD causes stalling of the plunger, which results in excessive current draw. e. Incomplete magnetic circuit due to the omission of parts such as: coil housing, coil sleeves, coil spring, coil housing bottom plate or plunger on the MKC molded model coils. f. Mechanical interference with plunger movement which may be caused by a deformed enclosing tube. g. Voltage spike. h. Valve ambient exceeds 120ºF. i. Fluid or gas temperatures greater than 240 ºF, while the valve ambient is 120 ºF. Failure To Open (Normally Closed Types) a. Coil burned out or an open circuit to coil connections. ICE WESTERN 31 Start-Up b. Improper electrical characteristics. c. In pilot operated valves, dirt, scale or sludge may prevent the piston, disc or diaphragm from lifting. This could also be caused by a deformed body. d. High differential pressure that exceeds the MOPD rating of the valve. e. Diameter reduction of synthetic seating material in pilot port because of high temperatures and/or pressures, or severe pulsations. Failure To Close a. Valve is oversized. b. In pilot operated valves, dirt, scale or sludge may prevent the piston, disc or diaphragm from lifting. This could also be caused by a deformed body. c. Held open by the manual lift stem. d. In pilot operated valves only, a damaged pilot port may prevent closing. e. A floating disc due to severe discharge pulses. f. Have voltage feedback to the coil after the coil de-energizes. V. Superheat Adjustment Of Thermal Expansion Valves ( EMERSON: T-Series Thermal Expansion Valves ) T-Series Thermal Expansion Valves are factory-set for a static superheat. However, the superheat should be adjusted for the application. Improper superheat adjustment may result in system malfunction. To properly adjust thermal expansion valve to other superheat settings: a. Remove seal cap on side of valve. b. Turn the adjusting stem in a clockwise direction to increase the superheat, and counterclockwise to decrease superheat. NOTE: Allow adequate time between adjustments for system to stabilize before checking superheat. c. When the desired superheat setting is achieved, reinstall the seal cap. Gas Heating 1. Ensure that gas lines have been purged of air - wait 5 minutes after purging to allow gas to clear before continuing with startup. 2. Turn the unit power on. 3. Turn the unit blower on, and check for correct rotation. 4. If correct, take blower amp readings, and compare to see if the amp draw is within the safety factor area of the motor. Once correct, turn blower off. 5. Turn on the first stage of heating. 6. Check to see that induced draft motor starts. 7. Check to see that main burner lights within 5 seconds of the heating call. 8. Check gas input and manifold pressure, and adjust if necessary. 9. Ensure blower started after burner ignition. 10. Observe burner flames for light blue color, and even flames across burner (propane flames will have yellow tips). Set with co analyzer. 11. Check temperature rise across heating section while all stages are on. 12. If temperature rise is within range, turn all heating calls off. 13. Check that blower stops after heat turns off. Electric Heating 1. Turn the unit power on. 2. Turn the unit blower on, and check for correct rotation. 3. If correct, take blower amp readings, and compare to see if the amp draw is within the safety ICE WESTERN 32 Start-Up factor area of the motor. Once correct, turn blower off. 4. Turn on the first stage of heating. 5. Check amp draw of each element of each stage. 6. Check temperature rise across heating section while all stages are on. 7. If temperature rise is within range, turn all heating calls off. 8. Check to see that blower stops. Optional Equipment Operation of each of the following, if equipped in the unit, must be checked according to that item’s manufacturer’s specifications: - Clogged filter switch - Supply air smoke detector - Return air smoke detector - Hot gas bypass Commissioning The commissioning of an HVAC system is the process of achieving, verifying, and documenting the performance of that system to meet the operational needs of the building. This may not be a formal process in smaller structures, such as a normal residence, but some form of owner acceptance will occur. Adjustments made during the commissioning phase may include air balancing, or configuration of controls, and operational sequences. Air Balancing High performance systems commonly have complex air distribution and fan systems. Unqualified personnel should not attempt to adjust fan operation, or air circulation, as all systems have unique operating characteristics. Professional air balance specialists should be employed to establish actual operating conditions, and to configure the air delivery system for optimal performance. Water Balancing A hydronic specialist with a complete working knowledge of water systems, controls, and operation must be employed to properly balance the entire system. Unqualified personnel should not attempt to manipulate temperatures, pressures, or flow rates, as all systems have unique operating characteristics, and improper balancing can result in undesirable noises and operation. Controls A variety of controls and electrical accessories may be provided with the equipment. Identify the controls on each unit by consulting appropriate submittal, or order documents, and operate according to the control manufacturer’s instructions. If you cannot locate installation, operation, or maintenance information for the specific controls, then contact your sales representative, or the control manufacturer for assistance. ICE WESTERN 33 Start-Up WARNING Do not alter factory wiring. Deviation from the supplied wiring diagram will void all warranties, and may result in equipment damage or personal injury. Contact the factory with wiring discrepancies. Figure 17: Gas Burner ICE WESTERN 34 Start-Up UNIT START-UP CHECKLIST MODEL NO: DATE: I. SERIAL NO: TECHNICIAN: . . PRE-START-UP: Verify that all packaging materials have been removed from unit Verify installation of outdoor air hood Verify that condensate connection is installed per installation instructions Verify that all electrical connections and terminals are tight Check that indoor-air filters are clean and in place Check that outdoor air inlet screens are in place Verify that unit is level Check fan wheels and propeller for location in housing and verify setscrew is tight Verify that fan sheaves are aligned and belts are properly tensioned Verify that compressors are rotating in the correct direction Verify installation of thermostat/space sensor Verify configuration values for electronic controls Verify that crankcase heaters have been energized for at least 24 hours II. START-UP ELECTRICAL Supply voltage L2-L3 L1-L2 L3-L1 . Compressor AMPS – Compressor A1 – Compressor B1 – Compressor C1 Condenser Fan AMPS – Fan #1 – Fan #2 L1 L1 L1 L1 L1 L2 L2 L2 L2 L2 L3 L3 L3 L3 L3 . . . . . Supply Fan AMPS L1 L2 L3 . TEMPERATURES ºF DB (Dry Bulb) ºF DB ºF Outdoor-air temperature Return-air temperature Cooling supply air ºF WB (Wet Bulb) PRESSURE Refrigerant suction Refrigerant discharge Oil Pressure Circuit A Circuit B Circuit C Circuit A Circuit B Circuit C A PSIG PSIG PSIG PSIG PSIG PSIG PSIG B PSIG REFRIGERANT Type: R22 R407C R410A R134a Verify refrigerant charge using charging charts GENERAL Economizer minimum vent and changeover settings to job requirements ICE WESTERN 35 Operation & Maintenance 7. Operation & Maintenance General Preventive maintenance is the best way to avoid unnecessary expense and inconvenience. Have this system inspected at regular intervals by a qualified service technician. The required frequency of inspections depends upon the total operating time and the indoor and outdoor environmental conditions. Planned Maintenance Routine maintenance should cover the following items: - Tighten all belts, wire connections, and setscrews. - Clean the evaporator and condenser coils mechanically or with cold water, if necessary. Usually any fouling is only matted on the entering air face and can be removed by brushing. - Lubricate the motor and fan shaft bearings. - Align or replace the belts as needed. - Clean or replace the filters as needed. - Check each circuit’s refrigerant sight glass when the circuit is operating under steady-state, full load conditions. The sight glass should then be full and clear. If it is not, check for refrigerant leaks. (A partially full sight glass is not uncommon at part load conditions.) - Check for proper superheat. - Check for proper subcooling. - Check for blockage of the condensate drain. Clean the condensate pan as needed. - Check the power and control voltages. - Check the running amperage of all motors. - Check all operating temperatures and pressures. - Check and adjust all temperature and pressure controls as needed. - Check and adjust all damper linkages as needed. - Check the operation of all safety controls. - Examine the gas furnace. - Check the condenser fans and tighten their setscrews. - Lubricate the door latch mechanisms. Cooling Coils should be inspected and cleaned at least once per year to ensure there is no obstruction to airflow. Evaporator Coil Dirty evaporator coils will eventually freeze up, and often result in a time consuming, and expensive service call. Clean filters will help to prevent dirt from accumulating on the evaporator; however the evaporator should be cleaned annually with a soft bristled brush, and/or a noncorrosive coil cleaning solution. Condenser Coil One of the most overlooked maintenance requirements is the need to keep air moving freely across air-cooled condensing coils. Dirty condensers, like evaporators, can significantly increase cooling costs during the year. As a minimum, clean the condenser coil at the beginning of each cooling season. It is preferable to use a medium pressure water spray from the inside ICE WESTERN 36 Operation & Maintenance of the condenser cabinet with a non-corrosive coil cleaning solution. TURN OFF all power to the unit before cleaning. Comb out any visible exterior fin damage to help maintain unit efficiency. Condenser Fan Always check condenser fan blades to ensure unobstructed, free rotation after manipulating the unit cabinet in any way, and before turning power back on to the condenser. Clean the fan blades if they are dirty. Blower Assembly Clean blower wheels are necessary to reduce electrical use, maintain capacity and reduce stress on the unit. The blower wheel and blower section need to be inspected periodically, and cleaned of dust, or debris. To inspect and clean the blower; set thermostat to the “OFF” position; turn the electrical power to the unit to the “OFF” position at the disconnect switch. Figure 18: Blower Section Gas Furnace Planned maintenance is the best way to avoid unnecessary expense and inconvenience. Have this system inspected at regular intervals by a trained and experienced service technician. The following service intervals are typical for average situations but will have to be adjusted to you’re your particular circumstances. ICE WESTERN 37 Operation & Maintenance Fuel pressure settings and control settings should be made only by persons thoroughly experienced with the burner and control system, and must not be tampered with by persons without such experience. Always replace covers on burner controls and boxes as the electrical contacts are sensitive to dust and dirt. Perform maintenance of controls, gas valves, and other components in accordance with instructions contained in the manufacturer’s bulletins. Monthly Check air filters and replace if dirty. Twice Yearly 1. Burner Air - Check burner fan wheel for dirt buildup and lint. Check combustion air intake louver and flue box for dirt buildup and accumulation of windborne debris. 2. Cleaning - Inspect flue tubes and combustion chamber, cleaning as required. Keep burner vestibule clean. Dirt and debris can result in burner air blockages. Yearly 1. Gas Train - Check all valves, piping and connections for leakage. Inspect and clean flame rod, ignition electrode, and burner manifold. 2. Condensate Pan/Drain/P-Trap – Check pan, drain, and p-traps for accumulation of debris. Check that p-traps are filled with water at the start of each cooling season. Chilled Water Check remote chiller operations as per the manufacturer’s instructions. Check coolant flow valves for correct operation and settings. Filters Open the filter access door. Slide filters towards you to inspect. Replace old filters with the size indicated on each filter. Filters should be checked every 30 days and replaced or cleaned as necessary. IT IS IMPORTANT TO KEEP FILTERS, COILS, AND BLOWERS CLEAN! Figure 19: Filter Section ICE WESTERN 38 Operation & Maintenance Cleaning Inspect and clean unit interior at the beginning of each heating and cooling season and as operating conditions require. Service In the event the unit is not functioning correctly and a service company is required, only a company with service technicians qualified and experienced in both heating and air conditioning should be permitted to service the systems in order to keep warranties in effect. The service tech may call ICE Western if assistance is required. BEFORE CALLING, THE MODEL AND SERIAL NUMBER OF THE UNIT WILL BE NEEDED FOR ICE WESTERN TO HELP ANSWER QUESTIONS REGARDING THE UNIT. ICE WESTERN 39 Pressure – Temperature Chart 8. Pressure – Temperature Chart Temperature ºF ºC R22 PSIG 20 25 30 35 40 45 50 55 60 65 70 75 80 85 90 95 100 105 110 115 120 125 130 135 140 145 150 43.0 48.8 54.9 61.5 68.5 76.0 84.0 92.6 102 111 121 132 144 156 168 182 196 211 226 243 260 278 297 317 337 359 382 -6.7 -3.9 -1.1 1.7 4.4 7.2 10.0 12.8 15.6 18.3 21.1 23.9 26.7 29.4 32.2 35.0 37.8 40.6 43.3 46.1 48.9 51.7 54.4 57.2 60.0 62.8 65.6 ICE WESTERN Liquid Pressure (PSIG) 51.6 58.2 65.2 72.6 80.7 89.2 98.3 108 118 129 141 153 166 180 195 210 226 243 261 280 300 321 342 365 389 - R407C Vapor Pressure (PSIG) 38.0 43.6 49.6 56.1 63.1 70.6 78.7 87.3 96.8 106 117 128 140 153 166 181 196 211 229 247 266 286 307 329 353 - R410A PSIG R134a PSIG 78.3 87.3 96.8 107 118 130 142 155 170 185 201 217 235 254 274 295 317 340 365 391 418 446 476 507 539 573 608 18.4 22.1 26.1 30.4 35.0 40.1 45.5 51.3 57.5 64.1 71.2 78.8 86.8 95.4 104 114 124 135 147 159 171 185 199 214 229 246 263 40 Solenoid Valves 200RB/500RB Model 2 1 R-11 R-12 R-22 R-113 R-114 R-115 R-123 R-124 R-125 R-134a R-401A R-401B R-402A R-402B R-404A R-407A R-407B R-407C R-500 R-502 R-507 200RB 500RB AM AH DM MM ASC2 ü ü ü ü ü ü ü ü Refrigerant Compatibility Verify Coil Compatibilidad con Refrigerantes Verifique la Bobina Compatibilidade do Refrigerante Verifique a bobina Compatibilité du réfrigérant 3 Coil Model 4 Vérifier la bobine 5 Do Not Bend Enclosing Tube Flow Follows Arrow Valve Orientation No doble el casquillo del Embolo de la Aguja El Flujo sigue la Flecha Orientación de Válvulas Não danifique o tubo de apoio da bobina Barra Indica Posição do Fluido Orientação da Válvula Ne pas plier le tube L’écoulement doit suivre la flèche Orientation de la valve 6 T < 250°F (121°C) 7 Type F = SAE Type P = FTP 8 Type T Solder Techniques Use Wrench On Valve Body Only Coil Installation Técnicas para Soldar Utilice la llave sólo en el cuerpo de la Válvula Técnicas de Soldagem No corpo use sómente uma chave de boca Instalación de la Bobina Instalação da bobina Technique de soudure Utiliser la clé a molette sur le corps seulement l’installation de la bobine 9 Coil Electrical Data VAC/Hz Maximum Amps Inrush Holding VA Holding 23 24/50 2.0 0.96 24/60 1.6 0.74 18 Transformer Selection 120/50 0.45 0.21 25 120/60 0.36 0.16 19 Selección del Transformador 208/50 0.19 0.08 17 Selecione transformador capacidade suficiente 208/60 0.15 0.06 12 Sélection du transformateur 220/50 0.24 0.10 24 0.19 0.08 19 0.11 0.05 24 480/60 0.09 0.04 19 t t t t 240/60 480/50 50 in.-lb. (5.6 N•m) Manual Override Vástago de Operación Manual Acionamento manual Ouverture manuel de la tige Emerson Climate Technologies and the Emerson Climate Technologies logo are trademarks and service marks of Emerson Electric Co. © 2004 Emerson Electric Co. PA-00295 Oct 2006 Solenoid Valves 240RA/540RA Models 3 2 1 R-11 R-12 R-22 R-113 R-114 R-115 R-123 R-124 R-125 R-134a R-401A R-401B R-402A R-402B R-404A R-407A R-407B R-407C R-500 R-502 R-507 Coil Model 240RA 540RA AM AH DM MM ASC2 ü ü ü ü ü ü ü ü ü ü Refrigerant Compatibility Verify Coil Compatibilidad con Refrigerantes Verifique la Bobina Compatibilidade do Refrigerante Verifique a bobina Compatibilité du réfrigérant Vérifier la bobine 4 5 Do Not Bend Enclosing Tube Flow Follows Arrow Valve Orientation No doble el casquillo del Embolo de la Aguja El Flujo sigue la Flecha Orientación de Válvulas Não danifique o tubo de apoio da bobina Barra Indica Posição do Fluido Orientação da Válvula Ne pas plier le tube L’écoulement doit suivre la flèche Orientation de la valve 6 T < 250°F (121°C) 7 Coil Electrical Data 8 VAC/Hz Maximum Amps Inrush Holding VA Holding 23 24/50 2.0 0.96 24/60 1.6 0.74 18 120/50 0.45 0.21 25 120/60 0.36 0.16 19 208/50 0.19 0.08 17 208/60 0.15 0.06 12 220/50 0.24 0.10 24 240/60 0.19 0.08 19 480/50 0.11 0.05 24 480/60 0.09 0.04 19 Solder Techniques Coil Installation Transformer Selection Técnicas para Soldar Instalación de la Bobina Selección del Transformador Técnicas de Soldagem Instalação da bobina Selecione transformador capacidade suficiente Technique de soudure l’installation de la bobine Sélection du transformateur t 240RA Only t t t Manual Override Vástago de Operación Manual Acionamento manual Ouverture manuel de la tige Emerson Climate Technologies and the Emerson Climate Technologies logo are trademarks and service marks of Emerson Electric Co. © 2004 Emerson Electric Co. PA-00296 Oct 2006 50 in.-lb. (5.6 N•m) EK, ADK & BOK Filter Drier 2 1 Installation Instructions 3 R-11 R-12 R-22 R-113 R-114 R-115 R-123 R-124 R-125 R-134a R-401A R-401B R-402A R-402B R-404A R-407A R-407B R-407C R-410A R-500 R-502 R-507 Refrigerant Compatibility System Location Compatibilidad con Refrigerantes Compatibilidade do Refrigerante Localización en el Sistema Localização do Sistema Compatibilité du réfrigérant Emplacement du système 4 5 SAE 6 ODF All Positions OK Remove Seals Flow Follows Arrow Todas las Posiciones OK Remueva los Empaques El Flujo sigue la Flecha Todas as Posições São Possíveis Remova os Tampões Barra Indica Posição do Fluido Toute position OK Enlever les capuchons L’écoulement doit suivre la flèche 7 SAE ODF Installation Precautions Pressurize And Check For Leaks Precauciones de Instalación Presurize y Verifique si existen Fugas Precauções na Instalação Pressurize e Verifique Vazamentos Précautions d’insatallation Pressuriser et vérifier pour les fuites Emerson Climate Technologies and the Emerson Climate Technologies logo are trademarks and service marks of Emerson Electric Co. © 2004 Emerson Electric Co. PA-00292 Jul 2006 Instruction Sheet PA-00228 January 2008 HMI Moisture Liquid Indicator HMI Moisture Liquid Indicator General Information Only one indicated element is required for all common refrigerants. This element is highly sensitive to moisture and will gradually change color in direct relation to an increase or decrease in the moisture content of the system. The dry-caution-wet system operating conditions are then easily determined by matching the element color with the two colors displayed on the reference label. Colors change as often as the system moisture content changes. MWP - 680 psig IMPORTANT: 12 hours is recommended after installation of the Moisture Liquid Indicator before attempting to determine the system moisture content. Following installation of a Moisture Liquid Indicator or an EK filter-drier, the system should be allowed to reach equilibrium as previously noted. If a caution or wet system condition is still indicated following this period, the filter-drier or the replaceable cores should be replaced. This practice should be continued until the system has dried and a safe condition is indicated. Safety Instructions 1. Read all instructions thoroughly. Failure to comply can result in valve failure, system damage, or personal injury. 2. The indicator element will indicate an unsafe condition before installation. This is normal and simply reflects the room humidity condition. 3. The exclusive fused glass eyepiece in the Moisture Liquid Indicator provides a clear, wide-angle view of the liquid refrigerant flow so that bubbles or flash gas are easily seen. This indicates an insufficient system charge, low head pressure, insufficient liquid subcooling or some form of restriction in the liquid line. Installation Instructions 1. The Moisture Liquid Indicator may be installed anywhere in the liquid line and in any position. It is normally installed downstream from the filter-drier and immediately ahead of the thermal expansion valve. 2. Extended cooper connections with bar stock body permits use of any soft solder or commonly used brazing alloys. When soldering or brazing, direct the flame away from the body. Wet rags or chill blocks must be used when brazing to prevent damaging the Moisture Liquid Indicator. See Figure 1. Figure 1 CAUTION: This product is intended for use on all CFC, HCFC and HFC refrigerants. Do not use on any unlisted fluid media without prior approval of the Emerson Climate Technologies Flow Controls Division Applications Engineering Department. Use on fluids not listed above could result in deterioration of the moisture indicator element. Not for use on refrigerants classified by ASHRAE standard 34 as Class A1/A2, A2, A3, B2 and B3. www.emersonflowcontrols.com 11911 Adie Road P.O. Box 411400 St. Louis MO 63141 USA CUSTOMER SERVICE (314) 569-4666 PS1 Single High and Low Pressure & PS2 Dual Pressure Refrigeration Controls Instruction Sheet PA-00281 October 2007 PS1 Single High and Low Pressure & PS2 Dual Pressure Refrigeration Controls THE FLEXIBLE CONTROL INSTALLATION INSTRUCTIONS–GENERAL • Emerson Type PS1 Single and PS2 Dual Pressure Controls are designed for cycling, cutout and alarm applications on the high and low pressure sides of refrigeration systems. • Standard pressure ranges and construction are ideally suited to conventional fluorocarbon and new alternative refrigerants (not Ammonia). • High rated single pole double throw (SPDT) switch action on all PS series controls provides either open or close on pressure rise (pressure drop) operation to provide maximum application flexibility. The other switch contact can be used for an alarm or signal function if desired. • A convertible reset feature on selected dual pressure controls allows the user to select either Automatic or Manual Reset Cutout on the high pressure side. • PS2 Dual Pressure Controls incorporate 2 independent SPDT switches with factory installed jumper for conventional operation with high and/or low pressure cutout alarm or signal, if desired. Removal of the jumper on dual pressure controls provides totally independent high and low pressure SPDT switch operation. • The parts package includes a lockplate and knob which allows the user to lock both the range and differential screws or the range or differential screw with a knob on the unlocked screw. 1. Cover Removal—Loosen cover screw and lift cover up. 2. Mounting—Mount the control in a protected area with the included angle mounting bracket and screws, or on a flat surface from the front. CAUTION: If other screws are used, use 8-32 screws that do not penetrate into the control more than 1/8’’. 3. Pressure Connections/Capillary /Pressure Lines: Proper installation of capillary and pressure lines will insure a trouble–free installation. • If the control is mounted on the compressor, all lines must be secured to the compressor so they do not vibrate independently from the compressor. • If the control is mounted remote from the compressor an open coiled vibration loop, 2 to 3 coils, 2 to 3’’ diameter should be provided between the rigid compressor base and the moving compressor. The lines coming from the coil should be secured to the base and compressor so the coil takes all the vibration. Avoid any “violin string” runs of pressure connection lines. • Sharp bends or kinks must be avoided in the capillary or pressure lines. Do not allow the lines to rub and abrade against any moving surface. Avoid any excessive handling or reforming of the copper lines to minimize work hardening of the copper. • A generous loop (3 to 4") should be provided in the capillary below the control. Pressure connections should be self-draining. High and low pressure connections to refrigeration lines should be on the top or now lower than the side of the line to minimize refrigerant oil from entering the line, which slows the control's ability to respond to pressure changes. Pressure connections to the compressor body should be slanted to allow the connection to self-drain to the compressor body. 4. WARNING: Before making any electrical connections, check with a voltmeter as there could be more than one power source. 5. Electrical Connections – Make certain the load to be connected is within the electrical rating of the control. • All wiring should conform to National Electrical Code and local regulations. Use 14AWG or larger copper conductors ONLY. See Switch Connection Diagrams later in this installation instructions sheet. • The terminals are of a clamp design. Loosen the terminal screw with a Phillips head or small screwdriver, insert approximately 3/8’’ stripped wire and tighten. Details of the Emerson "Flexible" Control options are in the installation Instructions. SAFETY INSTRUCTIONS 1. Read all Instructions thoroughly. Failure to comply can result in control failure, system damage or personal injury. 2. Do not use with ammonia or on hazardous or corrosive fluids. 3. Do not install in Hazardous Locations. 4. Disconnect electrical power before installation. Do not reapply power until control installation is complete, wiring connections secured and cover is installed. 5. Before making pressure control connections, depressurize system and make certain lines are at atmospheric pressure. SPECIFICATIONS – SWITCH RATINGS Maximum Load Full Load Amps Locked Rotor Amps Horsepower Pilot Duty NonInductive 120VAC 240VAC 24 FLA 24 FLA 144 LRA 144 LRA 2 HP 3 HP 720VA 720VA 24 amps 24 amps www.emersonclimate.com/flowcontrols 11911 Adie Road P.O. Box 411400 St. Louis MO 63141 USA CUSTOMER SERVICE (314) 569-4666 PS1 SINGLE LOW PRESSURE CONTROL SWITCH CONNECTIONS SINGLE LOW PRESSURE SWITCH RESPONSE LOW PRESSURE CYCLING OR PUMPDOWN LOW PRESSURE CUTOUT/ALARM TO DEFROST TERMINATION SOLENOID UNLOADER CONTROL DEFROST TERMINATION TO UNLOADER PS1 SINGLE HIGH PRESSURE CONTROL SWITCH CONNECTIONS SINGLE HIGH PRESSURE SWITCH RESPONSE HIGH PRESSURE CUTOUT CONDENSER FAN CYCLING TO CONDENSER FAN MOTOR NOTE: In above diagrams, P = Pressure 2 SETTINGS & ADJUSTMENTS Adjustable Range & Differential Controls Adjustable Range Fixed Differential Controls or High Side Dual Pressure Controls may have external adjustments (shown), or internal adjustments. If the control has internal adjustments, the cover must be removed to access the adjustment screws. Procedure 1) Adjust the Range Screw/Pointer to the desired "High Event" setting. 2) Adjust the Differential screw to the desired differential. Low Event = High Event – Differential ✧ Adjustment of the Range Screw changes both high and low events. ✧ Adjustment of the Differential Screw changes the "Low Event" only. Procedure 1) Adjust the Range Screw to the desired "High Event" setting. Low Event = High Event – Fixed Differential ✧ Adjustment of the Range Screw changes both the high and low events. Do not set the Low Event below the lowest allowable event Low Event – High Event = Differential Lowest Allowable Events Low Pressure Control = 27" Hg High Pressure Control = 50 PSIG CONTROL SETTING & CHECKOUT ❍ High Pressure Controls – With a high pressure gauge attached to a high pressure service port, restrict the air flow thru an air-cooled condenser, or reduce the water flow thru a water-cooled condenser to cause discharge pressure to rise. Observe the control's High Event Switch Point and adjust as necessary. Restore normal cooling and observe the control's Low Event Switch Point, adjusting as required. ❍ Low Pressure Controls – With an accurate pressure gauge attached to the suction service valve, slowly close the liquid line valve to allow the system to pump down. Observe the control's Low Event Switching Pressure – slowly open the liquid line to allow suction pressure to rise. Observe the control's High Event Switching Pressure – adjust the control range and differential set points as required to achieve the desired settings. Before leaving a new control installation, it is best to observe a minimum of 3 cycles to assure proper operation. LOCKPLATE AND KNOB KNOB SCREW The lockplate can be used to lock: 1. Both Range and Differential Screws. Neither setting can be adjusted. To use lockplate options 2 or 3, break one end off the lockplate along the creaseline (see exploded view diagram at left). 2. Range Screw Only. Range screw is locked so that high event is fixed – adjusting the differential screw allows low event only to be changed. 3. Differential Screw Only. Differential is locked so that differential is fixed – adjusting range screw moves both high and low event up or down together. KNOB FULL LOCKPLATE LOCKS BOTH RANGE & DIFFERENTIAL Lockplate Installation on Dual Pressure Control NOTE: If only one screw is locked, knob can be applied to unlocked screw. NOTE: The Range Screw(s) and Lockplate attachment screw are cross-drilled to allow the use of a wire seal. 3 SPECIFICATIONS – TEMPERATURE & PRESSURE RANGES CONTROL MOUNTING Dual Pressure Control Illustrated Temperature Range -20°F to +140°F Pressure Range – see control label on box. Maximum Pressure – During installation and service, the control's power element should not be exposed to pressure exceeding those listed in the table below. Control Range Maximum Allowable Pressure 24" to 42 PSIG 230 PSIG 15" to 100 PSIG 360 PSIG 90 to 450 PSIG 500 PSIG SPECIFICATIONS – ENCLOSURE NEMA CLASS I – Mount the control body in an area protected from the weather, water or excessive moisture, dirt, dust and corrosive or explosive atmospheres. MOUNTING DIMENSIONS (Back View) MANUAL OPERATION The control can be easily manually operated as illustrated below CONVERTIBLE RESET CONTROLS The high pressure side of dual pressure controls is furnished with the convertible reset feature that can be changed from manual to automatic reset as illustrated and described below. ❍ With the tab rotated counterclockwise so it does not touch the manual reset tab, the control will operate in the manual mode. With the tab rotated clockwise so it holds the manual reset tab down fully, the control will operate as an automatic reset control. TOP VIEW (cover off) SIDE VIEWS (cover off) 4 MANUAL RESET POSITION AUTO RESET POSITION PS2 DUAL PRESSURE CONTROL SWITCH CONNECTIONS DUAL PRESSURE SWITCH RESPONSE DUAL PRESSURE SWITCH RESPONSE Low Pressure Side – Cycling pumpdown or cutout. Close high. Open low. High Pressure Side – Cutout. Open high. Close low. ISOLATED HIGH/LOW PRESSURE FUNCTIONS – JUMPER REMOVED Isolated Low Pressure Switch can be used in separate circuit for unloading, low pressure cutout with time delay or other functions. CONVENTIONAL HOOKUP WITH ALARM Low Pressure Side – Cycling pumpdown or cutout. Close high. Open low. High Pressure Side – Cutout. Open high. Close low. NOTE: In above diagrams, P = Pressure; LP = Low Side Pressure; HP = High Side Pressure 5 Installation Instructions Issue Date P70 June 12, 2006 P70, P72, and P170 Series Controls for High Pressure Applications Application P70, P72, and P170 Series Controls for High Pressure Applications provide high-side pressure control on commercial refrigeration and air conditioning applications. IMPORTANT: Except for those models listed as Refrigeration Pressure Limiting Controls, use the P70, P72, and P170 Series Controls for High Pressure Applications only as an operating control. Where failure or malfunction of a P70, P72, or P170 pressure control could lead to personal injury or property damage to the controlled equipment or other property, additional precautions must be designed into the control system. Incorporate and maintain other devices such as supervisory or alarm systems or safety or limit controls intended to warn of, or protect against, failure or malfunction of the P70, P72, or P170 pressure control. x P70C, P70D, P170C, and P170D type models with Single-Pole Single-Throw (SPST) Open-High switch action are the most popular models and are typically used as high pressure Cutout controls. The C type models are automatic reset controls. The D type models have a manual reset lockout mechanism. Some P70C, P70D, P170C, and P170D type models are UL Listed as refrigeration pressure limiting controls. See Table 2 for standard models available. x P70A and P170A type models feature SPST Open-Low switch action and typically are used for condenser-fan cycling control. x P70 and P170 Series models with Single-Pole Double-Throw (SPDT), or 4-Wire, 2-Circuit switch action allow users to install alarm devices or other control circuits. x P72 Series models have a Double-Pole Single-Throw (DPST) switch with load-carrying contacts that can provide direct control of 208-240 VAC single-phase motors up to 3 hp, 480 and 600 VAC single-phase noncompressor motors, and 208-220 VAC 3-phase motors up to 5 hp. See Table 6. Controls are available in several pressure ranges and are compatible with most common refrigerants. © 2006 Johnson Controls, Inc. Part No. 24-7664-1938, Rev. D They may also be used on air, water and other noncorrosive fluid applications. Ammonia compatible models are also available. ! CAUTION: Risk of Property Damage. Mount the pressure control separately from the electrical cabinet and seal all electrical piping to prevent ammonia from migrating to electrical components. Where there may be exposure to ammonia, use only ammonia compatible control modules and pressure connections. System shutdown due to improper adjustment may cause property damage. The Manual Reset Lockout mechanism does not allow the pressure control to automatically reset after the control has Cutout, providing shutdown capability for unmonitored equipment. See Manual Reset Operation. NEMA 1 enclosures are standard on most models. NEMA 3R enclosures are also available on quanity orders. Dimensions 2-Mounting Holes 10-32 UNF-2B Thread 3-1/4 83 5/16 8 5/16 8 5/16 8 1-5/16 34 3-1/16 77 4 1/16 101 2 3-1/4 83 1 25 1-1/8 29 3/16 Diameter 1-7/8 5 Mounting Hole 49 3/16 3/16 4 4 2-1/16 53 15/16 24 2-13/16 71 1-1/4 33 15/16 (24) 1-11/16 43 15/16 (24) 3/8 3/16 X 10 5 Diameter Mounting Hole 7/8 (NEMA 1/2 in.) 22 Conduit Hole Figure 1: Dimensions for P70, P72, and P170 Pressure Controls with NEMA 1 Enclosures, in. (mm) 1 www.johnsoncontrols.com Mounting Holes for Flat Vertical Surfaces 5/8 16 79 4-1/16 5/8 104 16 15/16 24 5/8 1-1/4 31 1-5/8 41 1/2 12 4-1/16 104 2-11/16 68 70 2-15/16 74 3/16 4 Mounting Holes 5 5/16 Diameter 8 3/4 in. NPSM Rigid Conduit Hole 1-9/16 40 1/2 13 3/8 10 25 Figure 2: Dimensions for P70, P72, and P170 Pressure Controls with NEMA 3R Enclosures, in. (mm) Mounting Mount the control in an accessible position, where the control and pressure connection are not subject to damage. Mount the pressure control upright and level. Position the pressure connection line to allow drainage away from control bellows. Locate pressure tap points on the top side of the refrigerant lines to reduce the possibility of oil, liquids, or sediment accumulating in the bellows, which could cause control malfunction. Mount controls with NEMA 1 enclosures on horizontal or vertical flat surfaces. Use two screws or bolts through the two outer holes on the back of the control case to mount the control directly to a flat, vertical surface. Use the two inner holes with the Universal Mounting Bracket (and screws supplied) when mounting the control to a flat, horizontal surface. See Figure 3. Mount controls with NEMA 3R enclosures in a level, upright position with the bellows and conduit connection facing down. Ensure that all gaskets are in place. Mounting NEMA 3R enclosures in any position other than upright and level may trap water in the enclosure and submerge internal control components. IMPORTANT: Use only the mounting screws supplied with the Universal Mounting Bracket to avoid damaging internal components. Be careful not to distort or bend the control case when mounting the control to an uneven surface. Using other screws or bending the control case will void the warranty. 2 Use mounting screws provided. Longer screws may damage control. Universal Mounting Bracket (Part No. 271-51) Mount bracket to horizontal surface. Figure 3: Mounting the P70, P72, and P170 Pressure Controls with NEMA 1 Enclosures, in. (mm) Pressure Connections P70, P72, and P170 high pressure controls are connected to the controlled equipment by a capillary (except ammonia models). These controls are available with a variety of pressure connection styles. Follow these guidelines when installing pressure connection lines: IMPORTANT: If these controls are installed on equipment that contains hazardous or regulated materials, such as refrigerants or lubricants, you must comply with all standards and regulations governing the containment and handling of those materials. Avoid Sharp Bends in the Capillary Tube Sharp bends can weaken or kink capillary tubes, which may result in leaks or restrictions. Allow for Slack in the Capillary Tube Leaving a little slack in the capillary tube helps dampen mechanical vibration that can weaken or damage capillary tubes. Coil and Secure Excess Capillary Tubing Carefully loop any excess capillary tubing into smooth, circular coils (approximately 2 to 3 in.[50 to 75 mm] diameter). Securely fasten the coiled tubing. Avoid Contact between the Capillary Tubing and Sharp or Abrasive Objects Vibration of sharp or abrasive objects in contact with capillary tubes can result in leaks. P70, P72 and P170 Series Controls for High Pressure Applications Installation Instructions Do Not Overtighten Flare Nuts on Pressure Connection Line Fittings Overtightening flare connections may damage the threads on the flare nuts or flare connectors, and may result in leaks. Do not exceed 9 ftlb (12 Nm) of torque when tightening brass flare connections. Avoid Severe Pressure Pulsation at Pressure Connections Install pressure connection lines to pressure tap points away from the compressor to minimize the effects of pressure pulsation from reciprocating compressors. IMPORTANT: After installing the control, evacuate pneumatic and pressure connection lines to remove air, moisture and other contaminants in a manner consistent with applicable environmental regulations and standards. L1 L2 Load M1 Line L1 L2 Load M1 Line Open-High switch action: opens on pressure rise. (C and D Models) Figure 4: Typical Wiring for SPST Switch (P70A, B, C, D and P170A, C, D Type Models) L1 L2 Alarm Load 2 Wiring P70, P72, and P170 controls for high pressure applications are available with several switch options and electrical ratings. Check the label inside the control cover for model number, switch action, and electrical rating. See Table 1 for switch actions and models. See Electrical Ratings. Check the wiring terminal designations on the control switch-block, and refer to the following guidelines and applicable wiring diagrams when wiring the control. 1 3 1 to 3 opens, and 1 to 2 closes on pressure rise. Figure 5: Typical Wiring for SPDT Switch (P70E and F Type Models) L1 L2 Alarm Circuit Power Alarm M1 ! WARNING: Risk of Electrical Shock. Disconnect each of multiple power supplies before making electrical connections. More than one disconnect may be required to completely de-energize equipment. Contact with components carrying hazardous voltage can cause electric shock and may result in severe personal injury or death. Load Line Line M2 Main circuit (Line to M2) opens and auxiliary circuit (Line to M1) closes on pressure rise. Figure 6: Typical Wiring for 4-Wire, 2-Circuit Switch (P70J, K and P170K Type Models) L1 L2 *L3 IMPORTANT: Use only the terminal screws that are supplied with the switch-block. Using other screws may cause damage to the switch-block and will void the warranty. IMPORTANT: Use copper conductors only. Make all wiring connections in accordance with local, national, and regional regulations. Do not exceed the controls. Line M2 Line M1 Load Line to M1, and Line to M2 open on pressure rise. (*L3 is third supply line in 3-phase applications.) Figure 7: Typical Wiring for DPST Switch (P72C and D Type Models) Table 1: Pressure Control Switch Action, Low Events, High Events, Model Types, and Electrical Ratings Tables References P70, P72, P170 Series Controls for High Pressure Applications Installation Instructions 3 Switch and Action Low Event High Event Model Types - Electrical Rating Table References Single-Pole Single-Throw (SPST) Open-Low Cutout (Opens Line to M1) Cut In (Closes Line to M1) P70A, P70B, P170A See Table 3. Single-Pole Single-Throw (SPST) Open-High Cut In (Closes Line to M1) Cutout (Opens Line to M1) P70C, P70D, P170C, P170D See Table 3. Single-Pole Double-Throw (SPDT) Opens 1 to 2 and Closes 1 to 3 Closes 1 to 2 and Opens 1 to 3 P70E, P70F See Table 4. 4-Wire, 2-Circuits, 1-NO, 1-NC Open-Low Cutout (Opens M2 to Line and Closes M1 to Line) Cut In (Closes M2 to Line and Opens M1 to Line) P70G, P70H See Table 5. 4-Wire, 2-Circuits, 1-NO, 1-NC Open-High Cut In (Closes M2 to Line and Opens M1 to Line) Cutout (Opens M2 to Line and Closes M1 to Line) P70J, P70K, P170K See Table 5. Double-Pole Single-Throw (DPST) Open-Low Cutout (Opens M1 to Line and M2 to Line) Cut In (Closes M1 to Line and M2 to Line) P72A, P72B See Table 6. (DPST) Open-High Cut In (Closes M1 to Line and M2 to Line) Cutout (Opens M1 to Line and M2 to Line) P72C, P72D See Table 6. Adjustments Adjustments of the P70, P72, and P170 high pressure controls vary, depending on the model. The following guidelines and diagrams illustrate the procedures for adjusting these controls. Refer to the product label inside the control cover for model number and switch action. Refer to Table 1 for switch action, low event, and high event for the various control models. High Pressure Cutout - Automatic Reset High pressure Cutout controls with automatic reset have a scaleplate that displays the Cut In and Cutout setpoints. (See the visible scale on the control.) Turn the range screw to adjust the Cut In and Cutout setpoints up or down simultaneously, while maintaining a constant pressure differential. Turn the differential screw to adjust (only) the low event on the left side of the scale (which changes the differential pressure value). High Pressure Cutout - Manual Reset Lockout High pressure Cutout controls with the Manual Reset Lockout option have a scaleplate that displays the Cutout setpoint. There is no pointer for the Cut In setpoint. (See the visible scale on the control.) Turn the range screw to adjust the Cutout setpoint on the right side of the scale. There is no differential 4 screw on Manual Reset Lockout models. The differential pressure value is fixed. Condenser Fan Cycling - Open-Low Switch Action Condenser fan cycling pressure controls have a scaleplate that displays the Cut In setpoint and Differential setting. (See visible scale on the control.) Turn the range screw to adjust the Cut In setpoint on the right side of the scale. Turn the differential screw to adjust the Differential setting on the left side of the scale (which changes the Cutout pressure value). IMPORTANT: Do not adjust pointers beyond the highest or lowest indicator marks on the control’s pressure scale. Adjusting pointers beyond indicator marks may damage screw threads, may cause inaccurate control operation, and will void the warranty. IMPORTANT: Use the pressure control settings recommended by the manufacturer of the controlled equipment. Do not exceed the pressure ratings of the controlled equipment or any of its components when checking pressure control operation or operating the controlled equipment. P70, P72 and P170 Series Controls for High Pressure Applications Installation Instructions Figure 8: Adjusting P70, P72, and P170 Controls for High Pressure Applications IMPORTANT: After mounting and wiring control, attach a reliable set of gauges to the controlled equipment, and operate the equipment (at least) three cycles at the pressures necessary to verify control setpoints and proper equipment operation. On equipment with locked-out controls, first determine and remedy the cause of the lockout, and allow the sensed pressure to drop at least 70 psig below the Cutout setpoint. Then, press and release the reset button on the front of the control to restore operation of the controlled equipment. Manual Reset Operation Pressure controls with the Manual Reset option lock out when they reach Cutout pressure and must be manually reset by the user to restart the controlled equipment. The manual reset mechanism is trip-free and cannot be overridden by blocking or tying the reset button down. P70, P72, P170 Series Controls for High Pressure Applications Installation Instructions 5 Table 2: Standard P70, P72, and P170 Control Models for High Pressure Applications Model Number P70AA-118 P72AA-27 P170AA-118 Switch Action Range Psig (kPa) Pressure Connection Maximum Working Pressure (MWP) Psi (kPa) Condenser Fan Cycling Control Models (for Noncorrosive Refrigerants) 36 in. Capillary with Minimum 35 100 to 400 1/4 in. Flare Nut (241) SPST psig Maximum 200 Open-Low (690 to 2758) (1379) DPST 100 to 400 Minimum 35 Open-Low psig (241) (690 to 2758) Maximum 200 1/4 in. Male SPST (1379) Flare Connector Open-Low All-Range Control Models (for Noncorrosive Refrigerants) SPST Open-High Minimum 60 (414) Maximum 150 (1034) 4-Wire, 2-Circuit Line-M1 Close-High Line-M2 Open-High Manual Reset Lockout P70CA-2* P70CA-3* Differential Psi (kPa) 475 (3275) 1/4 in. Male Flare Connector P70DA-1* P70KA-1* 36 in. Capillary with 1/4 in. Flare Nut P72CA-2* DPST Open-High 50 to 500 (345 to 3448) P72DA-1* P170CA-3* SPST Open-High P170DA-1* P170KA-1* 4-Wire, 2-Circuit Line-M1 Close-High Line-M2 Open-High Minimum 60 (414) Maximum 150 (1034) manual Reset Lockout Minimum 60 (414) Maximum 150 (1034) Manual Reset Lockout 525 (3620) 1/4 in. Male Flare Connector Ammonia-Compatible Models P70AA-119 P70CA-5* SPST Open-Low SPST Open-High P70DA-2* 50 to 300 50 to 500 (345 to 3448) Minimum 20 (138) Maximum 120 (827) Minimum 60 (414) Maximum 150 (1034) Manual Reset Lockout 1/4 in. SS Female NPT Continued on next page . . . 6 P70, P72 and P170 Series Controls for High Pressure Applications Installation Instructions 525 (3620) Switch Action Model Number Range Differential Pressure Connection Maximum Working Pressure (MWP) High Pressure Control Models for High Pressure Non-corrosive Refrigerants P70AA-400 P170AA-400 Condenser Fan Cycling SPST Opens Low P70CA-400* P170CA-400* 100 to 470 (689 to 3241) Adjustable 35 to 200 (241 to 1379) 200 to 610 (1379 to 4206) Adjustable 60 to 150 (413 to 1034) SPST Opens High P70DA-400* 200 to 610 (1379 to 4206) P170DA-400* Manual Reset Lockout 36 in. Capillary with 1/4 in. Flare Nut 1/4 in. Male Flare Connector 36 in. Capillary with 1/4 in. Flare Nut 1/4 in. Male Flare Connector 36 in. Capillary with 1/4 in. Flare Nut 1/4 in. Male Flare Connector 690 (4757) * Models that are UL Listed as refrigeration pressure limiting controls. For models not included in this table, contact the Refrigeration Application Engineering Group at 1-800-275-5676 for details and availability. Note: See Dimensions and Technical Specifications for additional model information including Maximum Working Pressure. Electrical Ratings Table 3: SPST Electrical Ratings (P70A, B, C, D, and P170A, B, C, D Models) 120 VAC 208 VAC 240 VAC *480 VAC *600 VAC Hermetic Compressor Single-Phase Ratings 208/240 VAC Motor Full-Load Amperes 24 18.7 17 5 4.8 24 Motor Locked-Rotor Amperes 144 112.2 102 30 28.8 144 Non-Inductive Amperes 22 22 22 -- -- -- Standard Single-Phase Ratings Pilot Duty * 125 VA at 120 to 600 VAC; 57.5 VA at 120 to 300 VDC Not for compressor motor loads Table 4: SPDT Electrical Ratings Standard Differential Switch (P70E Models) Standard Single-Phase Ratings 120 VAC 208 VAC 240 VAC *277 VAC Motor Full Load Amperes 16.0 9.2 8.0 7.0 Motor Locked Rotor Amperes 96.0 55.2 48.0 42.0 Non-Inductive Amperes 16.0 16.0 16.0 16.0 Pilot Duty * 125 VA at 120 to 600 VAC 125 VA at 24 to 600 VAC Rating for P70EC models only P70, P72, P170 Series Controls for High Pressure Applications Installation Instructions 7 Table 5: 4-Wire, 2-Circuit Electrical Ratings (P70G, H, J, K, and P170K Models) Standard Single-Phase Ratings 120 VAC Line-M2 (Main Contacts) 208 240 277 *480 VAC VAC VAC VAC Line-M1 (Auxiliary Contacts) 120 208 240 277 VAC VAC VAC VAC *600 VAC Motor Full Load Amperes 16.0 9.2 8.0 -- 5 4.8 6.0 3.3 3.0 -- Motor Locked Rotor Amperes 96.0 55.2 48.0 -- 30 28.8 36.0 19.8 18.0 -- Non-Inductive Amperes 16.0 9.2 8.0 7.2 -- -- 6.0 6.0 6.0 6.0 Pilot Duty (for both sets of contacts) * 125 VA at 24 to 600 VAC; 57.5 VA at 120 to 300 VDC Not for compressor motor loads Table 6: DPST Electrical Ratings (P72A, B, C and D Type Models) Hermetic Compressor Ratings Standard Ratings 120 VAC 1Ø 208 VAC 1Ø 240 VAC 1Ø 208 VAC 3Ø 220 VAC 3Ø *480 VAC 1Ø *600 VAC 1Ø 208 VAC 1Ø 240 VAC 1Ø Motor Full-Load Amperes 24 18.7 17 15.9 15 5 4.8 24 24 Motor Locked-Rotor Amperes 144 112.2 102 95.4 90 30 28.8 144 144 AC Non-Inductive Amperes 24 24 24 24 24 -- -- -- -- DC Non-Inductive Amperes 3 0.5 0.5 0.5 0.5 -- -- -- -- Pilot Duty * 8 125 VA at 120 to 600 VAC; 57.5 VA at 120 to 300 VDC Not for compressor motor loads P70, P72 and P170 Series Controls for High Pressure Applications Installation Instructions Technical Specifications Product P70, P72, and P170 Controls for High Pressure Applications Switch Action P70, P170: SPST; 4-Wire/2-Circuit; or SPDT PENN® switch Pressure Connection P70, P72 Standard Models Various connections available Ambient Temperature P70E and P70F: 50 to 104qF (10 to 40qC) All Other Models: -40 to 140qF (-40 to 60qC) Case and Cover NEMA 1 Enclosures: Case is galvanized steel; cover is plated and painted steel. NEMA 3R Enclosures: Case and cover are plated and painted steel. Dimensions (H x W x D) NEMA 1 Enclosure: 3-1/4 x 4 x 2-1/16 in. (83 x 101 x 53 mm) NEMA 3R Enclosure: 4-1/16 x 4-1/16 x 2-15/16 in. (104 x 104 x 74 mm) Approximate Shipping Weight Individual Pack (NEMA 1): 2.4 lb (1.08 kg); Bulk Pack (NEMA 1, multiples of 25 controls): 60 lb (27.2 kg) Compliance For information on specific models, contact the Refrigeration Application Engineering Group at 1-800-275-5676. Accessories 271-51 Universal Mounting Bracket (supplied with standard controls) P170 Standard Models 1/4 in. SAE male flare P72: DPST Ammonia Compatible Models 1/4 in. stainless steel female NPT connection The performance specifications are nominal and conform to acceptable industry standards. For application at conditions beyond these specifications, contact the Refrigeration Application Engineering Group at 1-800-275-5676. Johnson Controls, Inc. shall not be liable for damages resulting from misapplication or misuse of its products. Controls Group 507 E. Michigan Street P.O. Box 423 Milwaukee, WI 53201 Published in U.S.A. www.johnsoncontrols.com P70, P72, P170 Series Controls for High Pressure Applications Installation Instructions 9 Controles para Aplicaciones de Presión Alta Series P70, P72 y P170 Aplicación Los Controles de las Series P70, P72 y P170 para Aplicaciones de Presión Alta proporcionan control de presión del lado de alta en aplicaciones de refrigeración comercial y de aire acondicionado. IMPORTANTE: Con excepción de los modelos listados como Contoles de Límite de Presión de Refrigeración, el propósito de los controles de las Series P70, P72 y P170 para Aplicaciones de Presión Alta es de controlar equipo bajo condiciones de operación normales. Donde un mal funcionamiento o falla de un control de presión P70, P72, o P170 pueda resultar en una condición anormal de operación, que a su vez pueda causar lesión personal o daño al equipo u otra propiedad, se deben instalar otros aparatos (controles limitadores o de seguridad) o sistemas (de alarma o supervisión) para advertir o proteger contra éstas fallas o mal funcionamiento del control de presión P70, P72, o P170, y mantenerse como parte del sistema de control. x Modelos del Tipo P70C, P70D, P170C y P170D con acción del interruptor de Un Polo – Un Tiro (SPST) con acción Abren en Alta son los modelos más populares y se usan típicamente como controles de Desconexión de presión alta. Los modelos de tipo C son controles con restablecimiento automático. Los modelos de tipo D tienen un mecanismo de bloqueo de restablecimiento manual. Algunos modelos del tipo P70C, P70D, P170C y P170D están Listados por UL como controles de límite de presión de refrigeración. x Los modelos del tipo P70A y P170A están disponibles con interruptor SPST con acción abren en Baja y se usan típicamente para controlar el ciclo del abanico del condensador. x Los modelos de la Serie P70 y P170 tienen un interruptor de Un Polos-Dos Tiro (SPDT), o de 4 Alambres-2 Circuitos que permiten que los usuarios instalen aparatos de alarma u otros circuitos de control. x Los modelos de la Serie P72 tienen un interruptor de Dos Polos-Un tiro (DPST) con contactos para llevar la carga que puede proporcionar control directo a motores de monofásicos de 208-240 VCA hasta 3 HP, motores monofásicos de 480 y 600 VCA no de compresor y motores trifásicos de 208-220 VCA hasta 5 HP. Refiérese a la Tabla 6. Estos controles están disponibles en varios rangos de presión y son compatibles con los refrigerantes más comúnes. También se usan en aplicaciones de aire, agua, y otros líquidos no corrosivos. También tenemos modelos compatibles con amoníaco. ! PRECAUCION: Riesgo de Daño del Equipo. El amoníaco es muy corrosivo a componentes de cobre y latón. En aplicaciones de amoníaco se deben usar sólo modelos de control y conexiones de presión compatibles con amoníaco. El control de presión se debe instalar separadamente del gabinete eléctrico y se deben sellar todos los conductos eléctricos para evitar que el amoníaco se filtre a los componentes eléctricos. El mecanismo de Bloqueo de Restablecimiento Manual no permite que el control se restablezaca automáticamente después de llegar al punto de Desconexión, y proporciona la capacidad de apagado para equipo no monitoreado. Ver Ajuste de Operación de Restablecimiento Manual. Las cajas NEMA 1 son estándares en la mayoría de los modelos. Las cajas NEMA 3R también están disponibles. Dimensiones 2 Orificios Montaje 2 Orificios de de Montaje Hilos 10/32 rosca 10/32 UN/2B UN/2B 3-1/4 83 5/16 8 5/16 8 2-13/16 71 3-1/4 83 1 25 1-1/8 29 5/16 8 3/16 5 3/16 4 1-7/8 49 2-1/16 53 15/16 24 1-5/16 34 3-1/16 77 4 1/16 101 2 3/16 4 1-1/4 33 15/16 15/16 (24) (24) 3/8 3/16 X 10 5 1-11/16 43 Diametro del Orificio de Montaje 7/8 (NEMA ½ pul.) Orificio del Conduit Conductor 22 Orificio Figura 1: Dimensiones para los Controles de Presión P70, P72, y P170 con Cajas NEMA 1, pulg. (mm) 10 P70, P72 and P170 Series Controls for High Pressure Applications Installation Instructions Orificios de Montaje para Superficies Planas y Verticales 5/8 16 Utilize los tonillos de montaje provistos. Los tornillos mas largos pueden dañar el control 79 4-1/16 5/8 104 16 15/16 24 1/2 12 4-1/16 104 5/8 2-11/16 68 25 70 3/8 2-15/16 10 74 3/16 4 Oriificios de Montaje 5 5/16 Diametro 8 1-9/16 40 1-1/4 31 1-5/8 3/4pulg. NPSM Conduit Orificio del Conducto Rígido 1/2 13 Figura 2: Dimensiones para Controles de Presión P70, P72, y P170 con Cajas NEMA 3R, pulg. (mm) Instalación Instale el control en una posición accesible, donde el control y la línea de conexión de presión no se dañen. Instale el control de presión en una posición vertical y nivelada. Coloque la línea de conexión de presión de manera que se pueda drenar lejos del fuelle del control. Los puntos de entrada de la presión se deben localizar en el lado superior de la Lneaa del refrigerante para reducir la posibilidad de que el aceite, líquidos, o sedimento se acumulen en el fuelle, que podría causar un mal funcionamiento del control. Instale los controles con cajas NEMA 1 en superficies planas horizontales o verticales. Use dos tornillos o pernos a través de los dos orificios exteriores en el reverso de la caja de control cuando se instale directamente en una superficie plana y vertical. Soporte de Montaje Universal (Número de Parte 271-51) Instale el soporte a la superficie horizontal Figura 3: Instalación del los Controles de Presión P70, P72 y P170 con Cajas NEMA 1, pulg. (mm) Conexiones de Presión Los controles de presión alta P70, P72 y P170 se conectan al equipo controlado por medio de un capilar (excepto en modelos para amoníaco). Están disponibles en diferentes tipos de conexión de presión. Siga estas pautas al instalar las líneas de conexión de presión: IMPORTANTE: Si estos controles se instalan en equipo que contiene materiales peligrosos o regulados, tal como refrigerantes o lubricantes, el instalador y usuario deben observar todas las reglamentaciones que gobiernan el manejo y contención de esos materiales. Evite Dobleces Agudos en el Tubo Capilar Los dobleces agudos pueden debilitar los tubos del capilar, que resultarían en fugas u obstrucciones. Permita Soltura en el Tubo Capilar Dejar el tubo capilar un poco flojo puede ayudar a amortiguar la vibración mecánica que pueda debilitar o dañar los tubos capilares. Enrolle y Asegure el Exceso del Tubo Capilar Use los dos orificios internos con el soporte de Instalación Universal (y los tornillos provistos), al instalar el control en una superficie plana y horizontal. Ver Figura 3. Cuidadosamente enrolle cualquier exceso de tubo capilar en bobinas lisas y redondas (aproximadamente 2 pulg. de diámetro). Sujete el capilar enrollado. Instale los controles con cajas NEMA 3R en una posición nivelada y vertical, con el fuelle y la conexión conduit hacia abajo. Asegúrese que todos los empaques estén en su lugar. La instalación de cajas NEMA 3R en cualquier posición otra que vertical y nivelada puede atrapar agua en la caja y sumergir los componentes internos del control. Evite el Contacto entre el Tubo Capilar y Objetos Agudos o Abrasivos IMPORTANTE: Use sólo los tornillos de montaje provistos con el soporte de Instalación Universal para evitar daño a los componentes internos. No tuerza la caja del control cuando instale el control a una superficie irregular. La vibración de los objetos agudos o abrasivos que estén en contacto con los tubos capilares pueden resultar en fugas. No Apriete Demasiado las Tuercas Abocinadas en los Conectores de la Línea de Conexión de Presión Si aprieta las conexiones abocinadas demasiado puede dañar los hilos en las tuercas abocinadas o los conectores abocinados, y resultar en fugas. No exceda 9 pies-lbs (12 Nm) de torque al apretar las conexiones de latón abocinadas. Instrucciones de Instalación de Controles de Series P70, P72, P170 para Aplicaciones de Alta Presión 11 Evite la Pulsación de Presión Severa en las Conexiones de Presión L1 L2 Carga Instale las Líneas de conexión de presión que van a los puntos de entrada de presión lejos del compresor para minimizar los efectos de pulsación de presión en los compresores recíprocos. IMPORTANTE: Después de instalar el control, vacíe las líneas del control y conexión de presión de acuerdo con los reglamentos locales, nacionales y regionales aplicables para remover el aire, humedad y otros contaminantes Alambrado Los controles P70, P72 y P170 para aplicaciones de presión alta están disponibles con varias opciones de interruptor y rangos eléctricos. Revise la etiqueta dentro de la tapa del control para el número del modelo, acción del interruptor, y clasificación eléctrica. Ver la Tabla 1 para las acciones de los interruptores y los modelos. Vea Clasificaciones Eléctricas. Revise las designaciones de la terminales alambrado en el interruptor del control, y refiérase a las siguientes pautas y al diagrama de alambrado aplicable cuando se instale el control. M1 Accion de interruptor abierto - bajo: se abre al disminuir la presion (Modelos A y B ) Línea L1 L2 Carga M1 Línea Figura 4: Alambrado Típico para Interruptores SPST (Modelos P70A, B, C, D y P170A, C, D) L1 L2 Alarma Carga 2 1 3 1a 3 abre, y 1 a 2 cierra al incrementar la presión Figura 5: Alambrado Típico para Interruptores SPDT (Modelos P70E y F) ! ADVERTENCIA: Riesgo de Descarga Desconecte la corriente eléctrica antes de iniciar las conexiones eléctricas para evitar una posible descarga eléctrica. Puede ser necesario ejecutar más de una desconexión para desenergizar el control y el equipo. Eléctrica. IMPORTANTE: Use los tornillos de terminal provisos con el interruptor. El uso de otros tornillos de terminal invalidará la garantía y puede dañar el interruptor. IMPORTANTE: Hace todas las conexiones de la instalación eléctrica de acuerdo con las reglamentaciones nacionales, locales, y regionales. Use sólo conductores de cobre. No exceda la clasificación eléctrica del control. L1 L2 Corriente del Circuito de Alarma Alarma M1 Carga Línea Línea M2 Circuito principal (Línea a M2) se abre y el circuito auxiliar (Línea a M1) se cierra al incrementar la presión Figura 6: Alambrado Típico para Interruptores de 4 Alambres - 2 Circuitos (Modelos P70J, K y P170K) L1 L2 *L3 Línea M2 Línea M1 Carga Línea a M1 y Línea a M2 se abren al incrementar la presión (L3 es la tercer línea de suministro en aplicaciones de 3 fases) Figura 7: Alambrado Típico para Interruptores DPST (Modelos P72C y D) 12 Instrucciones de Instalación de Controles de Series P70, P72, P170 para Aplicaciones de Alta Presión Tabla 1: Controles de Presión Sencilla con Acción del Interruptor, Eventos Bajos, Eventos Altos, Tipos de Modelo, y Tabla de Referencia de Clasificación Eléctrica Interruptor y Acción Evento Bajo Evento Alto Un Polo-Un Tiro (SPST) Abre en baja Un Polo-Un Tiro (SPST) Abre en alta Desconexión (Abre Línea a M1) Conexión (Cierra Línea a M1) Abre 1 a 2 y Cierra 1 a 3 Desconexión (Abre M2 a Línea y Cierra M1 a Línea) Conexión (Cierra M2 a Línea y Abre M1 a Línea) Desconexión (Abre M1 a Línea y M2 a Línea) Conexión (Cierra M1 a Línea y M2 a Línea) Conexión (Cierra Línea a M1) Desconexión (Abre Línea a M1) Un Polo-Dos Tiros (SPDT) 4-Alambres, 2-Circuitos, 1 N.A., 1 N.C. Abre en baja 4-Alambres, 2-Circuitos, 1 N.A., 1 N.C. Abre en alta Dos Polos-Un Tiro (DPST) Abre en baja (DPST) Abre en alta Ajustes Los ajustes de los controles de Presión Alta P70, P72 y P170 varían, dependiendo del modelo. Las siguientes pautas y diagramas ilustran los procedimientos para ajustar estos controles. Refiérase a la etiqueta del producto dentro de la tapa del control para el número del modelo y la acción del interruptor. Refiérase a la Tabla 1 para la acción del interruptor, evento bajo, y evento alto de los diferentes modelos de control. Desconexión de Presión Alta – Restablecimiento Automático Los controles de Desconexión de Presión Alta con restablecimiento automático tienen un placa de escala que despliega los puntos de ajuste de Conexión y Desconexión. (Ver la escala visible en el control). Gire el tornillo de rango para cambiar los puntos de ajuste de Conexión y Desconexión, simultáneamente hacia arriba y abajo mientras se mantiene un diferencial de presión constante. Gire el tornillo del diferencial para ajustar (sólo) el evento bajo en el lado izquierdo de la escala (que cambia el valor de presión del diferencial). Desconexión de Presión Alta – Bloqueo del Restablecimiento Manual Los controles de Desconexión de Presión Alta con la opción de Bloqueo de Restablecimiento Manual tienen un placa de escala que despliega el punto de ajuste de desconexión. No existe ningún indicador para el punto de ajuste de Conexión. (Ver la ecala visible en el control.). Gire el tornillo de rango para cambiar el punto de ajuste de Conexión en el lado derecho de la escala. Los modelos de Bloqueo de Restablecimiento Manual Cierra 1 a 2 y Abre 1 a 3 Conexión (Cierra M2 a Línea y Abre M1 a Línea) Desconexión (Abre M2 a Línea y Cierra M1 a Línea) Conexión (Cierra M1 a Línea y M2 a Línea) Desconexión (Abre M1 a Línea y M2 a Línea) Tipos de Modelos – Tabla de Referencia de Clasificación Electrica P70A, P70B, P170A Ver Tabla 3. P70C, P70D, P170C, P170D Ver Tabla 3. P70E Ver Tabla 4. P70G, P70H Ver Tabla 5. P70J, P70K, P170K Ver Tabla 5. P72A, P72B Ver Tabla 6. P72C, P72D Ver Tabla 6. no cuentan con tornillo de diferencial. El valor de la presión del diferencial está fijo. Ciclado del Abanico del Condensador – Acción del Interruptor de Abierto Bajo Los controles de presión que ciclado del abanico del condensador tienen un placa de escala que despliega el punto de ajuste de Conexión y el ajuste del Diferencial. (Ver la escala visible en el control.) Gire el tornillo de rango para cambiar el punto de ajuste de Conexión en el lado derecho de la escala. Gire el tornillo del diferencial para cambiar el ajuste en el lado izquierdo de la escala (que cambia el valor de presión de Desconexión). IMPORTANTE: No ajuste los indicadores más allá de las marcas mas alta o mas baja del indicador en la escala de presión del control. El ajuste de los indicadores más allá de éstas marcas puede dañar los hilos del tornillo y resultar en una operación incorrecta del control. IMPORTANTE: Use los ajustes de control de presión recomendados por el fabricante del equipo que va a ser controlado. No exceda las clasificaciones de presión del equipo controlado ni de cualquiera de sus componentes al verificar la operación de control de la presión o al operar el equipo controlado. Instrucciones de Instalación de Controles de Series P70, P72, P170 para Aplicaciones de Alta Presión 13 Paso 1. Establezca evento alto ajustado el tornillo de rango derecha para incrementar el punto de DESCONEXION Contr oles de Desconex ión de Presión Alta: Gire el tornillo hacia la izquierda Contr oles de Ciclado del Albanico del Condensador: Gire el tornillo hacia la izquierda para disminuir el punto de DESCONEXION. Indicador de Desconexión Abre en Alta (Controles de Desconexión Abierto-Alto Indicador del Punto de Conexión (Controles de Ciclado del Abanico del Condensador) Tornillo de Rango Botón de Restablecimiento Manual (Opción de Bloqueo de Restablecimiento Manual no disponible en todos los modelos.) Tornillo del Diferencial Escala de Presión Visible Indicador de CONEXION (Controles de Desconexión Abre en Alta Modelos de Abierto-Alto. Restabelcimiento Automático solamente) Indicador de Diferencial (Controles de Ciclado del Abanico del Condensador) Tornillo de Tapa Fuelle derecha derecha Figura 8: Ajuste de Controles P70, P72 y P170 para Aplicaciones de Presión Alta IMPORTANTE: Después de montar y alambrar el control, instale un juego de medidores confiables al equipo controlado, y opere el equipo (por lo menos) tres ciclos bajo las presiones necesarias para verificar los puntos de ajuste del control y la operación del equipo apropiada. Operación de Restablecimiento Manual Los controles de presión con la opción de Restablecimiento Manual se bloquean cuando se alcanzan la presión de Desconexión y deben restablecerse manualmente por el usuario para reiniciar el equipo controlado. El mecanismo de restablecimiento manual de movimiento libre y no puede restablecerse al bloquear o sujetar el botón de restablecimiento. En equipo con los controles bloqueados, determine y resuelva la razón del bloqueo, y permita que la presión detectada caiga por lo menos 70 psig más abajo del punto de ajuste de Desconexión. Después, presione y suelte el botón de restablecimiento que se localiza al frente del control para restablecer la operación del equipo controlado. 14 Instrucciones de Instalación de Controles de Series P70, P72, P170 para Aplicaciones de Alta Presión Table 2: Modelos de Control Estándar P70, P72 y P170 para Aplicaciones de Presión Alta Número del Modelo Acción del Interruptor Rango psig (kPa) Diferencial psi (kPa) Conexión de Presión Modelos de Control de Ciclado del Abanico del Condensador (para Refrigerantes No Corrosivos) P70AA-118 P70AA-2 SPST Abre en baja P72AA-27 DPST Abre en baja P170AA-118 SPST Abre en baja 100 a 400 psig (690 a 2758) Mínimo 35 (241) Máximo 200 (1379) 0 a 150 psig (0 a 1034) Mínimo 12 (83) Máximo 70 (482) 100 a 400 psig (690 a 2758) Mínimo 35 (241) Máximo 200 (1379) Capilar de 36 pulg. con Tuerca Abocinada de 1/4 pulg. Conector Abocinado Macho de 1/4 pulg. Modelos de Control de Todo Rango (para Refrigerantes No Corrosivos) P70CA-2* P70CA-3* Mínimo 60 (414) Máximo 150 (1034) SPST Abre en Alta Conector Abocinado Macho de 1/4 pulg. P70DA-1* P70KA-1* P72CA-2* P72DA-1* P170CA-3* P170DA-1* P170KA-1* 4-Alambres, 2-Circuitos Línea-M1 Cierra en Alta Línea-M2 Abre en Alta Restablecimiento Manual 50 a 500 psig (345 a 3448) DPST Abre en Alta Capilar de 36 pulg. con Tuerca Abocinada de 1/4 pulg. Mínimo 60 (414) Máximo 150 (1034) Restablecimiento Manual Mínimo 60 (414) Máximo 150 (1034) SPST Abre en Alta 4-Alambres, 2-Circuitos Línea-M1 Cierra en Alta Línea-M2 Abre en Alta Restablecimiento Manual Conector Abocinado Macho de 1/4 pulg. Modelos Compatibles con Amoníaco P70AA-119 P70CA-5* P70DA-2* SPST Abre en Baja SPST Abre en Alta 50 a 300 psig (345 a 2068) 50 a 500 psig (345 a 3448) Mínimo 20 (138) Máximo 120 (827) Mínimo 60 (414) Máximo 150 (1034) NPT Hembra de Acero Inoxidable de 1/4 pulg. Restablecimiento Manual * Modelos que son listados por UL como controles de límite de presión de refrigeración. Nota: Ver Dimensiones y Especificaciones Técnicas para mayor información del modelo que incluye la Presión Operacional Máxima y las clasificaciones de la Máxima Sobrepresión. Instrucciones de Instalación de Controles de Series P70, P72, P170 para Aplicaciones de Alta Presión 15 Clasificaciones Eléctricas Tabla 3: Clasificaciones Eléctricas SPST (Modelos P70A, B, C, D, y P170A, B, C, D) Clasificaciones de Motores Monofásicos Estándares Clasificaciones para Compresor Hermético Monofásico 208/240 VCA 120 VCA 208 VCA 240 VCA *480 VCA *600 VCA Amperios del Motor con Carga Completa 20 18.7 17 5 4.8 20 Amperios del Motor con el Rotor Bloqueado 120 112.2 102 30 28.8 120 Amperios No Inductivos 22 22 22 -- -- 125 VA de 120 de 600 VCA; 57.5 VA de 120 a 300 VCD Servicio Piloto * -- No es para cargas de motores de compressores. Tabla 4: Clasificaciones Eléctricas del Interruptor de Diferencial Estándar (Modelos P70E) Clasificaciones de Motores Monofásicos Estándares 120 VCA 208 VCA 240 VCA 277 VCA* Amperios del Motor con Carga Completa 16.0 9.2 8.0 7.0 Amperios del Motor con el Rotor Bloqueado 96.0 55.2 48.0 42.0 Amperios No Inductivos 16.0 16.0 16.0 16.0 Servicio Piloto * 125 VA de 24 hasta 600 VCA 125 VA de 120 hasta 600 VCA Clasificaciones para modelos P70EC solamente Tabla 5: Clasificaciones Eléctricas de 4 Alambres – 2 Circuitos (Modelos P70G, H, J, K, y P170K) Clasificaciones de Motores Monofásicos Estándares 120 VCA Línea-M2 208 VCA (Contactos Principales) 240 277 *480 *600 VCA VCA VCA VCA Línea-M1 (Contactos Auxiliares) 120 208 240 277 VCA VCA VCA VCA Amperios del Motor con Carga Completa 16.0 9.2 8.0 -- 5 4.8 6.0 3.3 3.0 -- Amperios del Motor con el Rotor Bloqueado 96.0 55.2 48.0 -- 30 28.8 36.0 19.8 18.0 -- Amperios No Inductivos 16.0 9.2 8.0 7.2 -- -- 6.0 6.0 6.0 6.0 Servicio Piloto (para ambos juegos de contactos * 125 VA de 24 a 600 VCA; 57.5 VA de 120 a 300 VCD No para cargas de motor de compresor 16 Instrucciones de Instalación de Controles de Series P70, P72, P170 para Aplicaciones de Alta Presión Tabla 6: Clasificaciones Eléctricas DPST (Modelos P72A, B, C y D) Rangos del Compresor Hermético Clasificaciones Estándares 120 VCA 1Ø 208 VCA 1Ø 240 VCA 1Ø 208 VCA 3Ø 220 VCA 3Ø *480 VCA 1Ø *600 VCA 1Ø 208 VCA 1Ø 240 VCA 1Ø Amperios del Motor con Carga Completa 24 18.7 17 15.9 15 5 4.8 24 24 Amperios del Motor con el Rotor Bloqueado 144 112.2 102 95.4 90 30 28.8 144 144 Amperios No Inductivos CA 24 24 24 24 24 -- -- -- -- Amperios No Inductivos CD 3 0.5 0.5 0.5 0.5 -- -- -- -- Servicio Piloto * 125 VA de 120 a 600 VCA; 57.5 VA de 120 a 300 VCD No es para cargas del motor de compresor Especificaciones Técnicas Producto Acción del Interruptor Conexión de Presión Máxima Presión Operacional Máxima Sobrepresión (non-recurrente) Condiciones Ambientales Caja y Tapa Controles P70, P72 y P170 para Aplicaciones de Alta Presión P70, P170: SPST; 4-Alambres/2-Circuitos; o Interruptor SPDT PENN® P72: DPST Modelos Estándares P70, P72 disponibles con varias conexiones. Modelos Estándares Modelos Compatibles con P170, conector macho Amoníaco 1/4 pulg. NPT abocinado de 1/4 pulg. conexión hembra de acero SAE inoxidable para rango para rango para rango para rango 50-500 0-150 psig: 150 psig 50-300 psig: 100-400 psig: psig: 500 psig (3448 (1034 kPa) 300 psig (2068 kPa) 400 psig (2758 kPa) kPa) para rango para rango para rango para rango 50-500 0-150 psig: 50-300 psig: 100-400 psig: psig: 525 psig (3620 525 psig (3620 kPa) 400 psig (2758 kPa) 475 psig (3275 kPa) kPa) Tipos P70E y P70F: 50 a 104qF (10 a 40qC) Todos los Otros Modelos: -40 a 140qF (-40 a 60qC) Caja NEMA 1: Caja de acero galvanizado; tapa de acero cromado y pintado. Caja NEMA 3R: Caja y tapa de acero cromado y pintado. Dimensiones (A x A x P) Caja NEMA 1: 3-1/4 x 4 x 2-1/16 pulg. (83 x 101 x 53 mm) Caja NEMA 3R: 4-1/16 x 4-1/16 x 2-15/16 pulg. (104 x 104 x 74 mm) Peso de Embarque Aproximado Empaque Individual (NEMA 1): 2.4 lb (1.08 kg); Empaque Múltiple (NEMA 1, multiplos de 25 controls): 60 lb (27.2 kg) Listados de Agencias Accesorios Para información sobre modelos especificos, contacte al Grupo de Ingeniera de Aplicación de Refrigeración a 1-800-275-5676. Soporte de Instalación Universal 271-51 (provisto con controles estándares) Las especificaciones del desempeño son nominales y de acuerdo a estándares aceptables de la industria. Para aplicación en condiciones que estén fuera de éstas especificaciones, contácte al Grupo de Ingeniería de Aplicación de Refrigeración al 1-800-275-5676. Johnson Controls, Inc. no será responsable de daños que resulten de una aplicación incorrecta o un mal uso de su productos. Controls Group 507 E. Michigan Street P.O. Box 423 Milwaukee, WI 53201 Publicado en EE.UU. www.johnsoncontrols.com Instrucciones de Instalación de Controles de Series P70, P72, P170 para Aplicaciones de Alta Presión 17 B Series Balanced-Port Thermal Expansion Valves Instruction Sheet PA-00266 June 2006 Installation & Service Instructions Safety Instructions Installation Instructions Warning : Before opening any system, make sure the pressure 1. Warning: Before opening any system, make sure the pressure in the system is brought to and remains at atmospheric pressure. Use approved refrigerant recovery methods when necessary. Failure to comply can result in system damage and/or personal injury. in the system is brought to and remains at atmospheric pressure. Use approved refrigerant recovery methods when necessary. Failure to comply can result in system damage and/or personal injury. 1, Read installation instructions thoroughly . Failure to follow instructions may result in valve failure, system damage, or personal injury. 2. Valves may be installed in any position, but should be located as close as possible to the distributor or evaporator inlet. 2. Do not use on service conditions or fluids not specifically cataloged, without prior written approval of the Emerson Climate Technologies Engineering Department. Use of Thermal valves on applications not specifically cataloged can result in valve failure and/or system damage. 3. Protect against excessive vibration, it may cause a tubing break, which will cause valve failure and/or personal injury 4. On valves with solder connections, wrap wet cloths around valve. Direct torch away from valve to avoid valve damage. 5. Do not exceed maximum working pressure of 450 psig. - excess internal pressure could cause damage to diaphragm, resulting in valve malfunction. 6. Do not exceed maximum working temperature (see Table 1) excess temperatures could cause internal damage, resulting in valve malfunction. 3. Foreign matter in the Thermal valve may cause diaphragm failure, flooding, or starving of the valve. Use of an Emerson liquid line filter-drier is strongly recommended. 4. Valves are factory set to a specific superheat. If adjustment is needed, refer to Superheat Adjustment section for proper procedure . Improper adjustment of superheat can result in system damage. 5. Proper valve sizing is important. An oversized valve may result in erratic control. An undersized valve considerably reduces system capacity. 6. Be sure valve is installed with its flow arrow corresponding to the flow direction thru the piping. www.emersonflowcontrols.com 11911 Adie Road P.O. Box 411400 St. Louis MO 63141 USA CUSTOMER SERVICE (314) 569-4666 page 2 B Series Balanced-Port Thermal Expansion Valves Instruction Sheet PA-00266 June 2006 Installation & Service Instructions 7. For BA(E)S, BN(E)S Valves, remove strainer nut and strainer before brazing. Replace strainer nut. 11. Connect one end of the external equalizer line to the valve. Connect the other end to the suction line slightly downstream from the remote bulb location and positioned so that it cannot siphon oil from the suction line. 12. Check for leaks, sufficient system refrigerant charge, and be sure no flash gas is present before attempting to check valve operation. 13. The expansion valve must be free of all contaminants - install an Emerson Climate Technologies liquid line filter-drier before the valve. NOTE:For improve the quality of our valve, we use a neopreon Oring in the strainer nut, the brazing heat would produce extreme damage in the piece. 8. Installing connections to valve. an valves Measuring Superheat 1. Determine the suction pressure with an accurate gauge at the evaporator outlet. with solder connections, wrap wet cloths around valve. to prevent valve damage while brazing. Direct torch away from valve. 9. To replace strainer, remove strainer nut and install new strainer. Replace nut and torque nut to 50 inch pounds. 10. Attach the remote bulb to the suction line as close to the evaporator outlet as possible. Position the bulb at the 4 or 8 o’clock position. Clean surface of suction line where the remote bulb is to be attached, then securely fasten the bulb with straps provided. If the remote bulb can be affected by the surrounding ambient, then the bulb should be insulated with a material that will not absorb water. On self-contained systems, the suction pressure may be read at the compressor suction connection 2. From refrigerant pressure-temperature tables, determine saturation temperature at observed suction pressure (TEMP p). 3. Measure temperature of suction gas at Thermo Valve remote bulb location (TEMPT). 4. Subtract saturation temperature (read from tables in step 2) from temperature measured in step 3, the difference is the superheat of the suction gas. www.emersonflowcontrols.com 11911 Adie Road P.O. Box 411400 St. Louis MO 63141 USA CUSTOMER SERVICE (314) 569-4666 page 3 B Series Balanced-Port Thermal Expansion Valves Instruction Sheet PA-00266 June 2006 Installation & Service Instructions Superheat Adjusment Dimesional Data Emerson’s Thermal valves are factory set to a specific superheat however, the superheat should be adjusted for the application. To adjust the valve to other superheat settings: 1. Remove the seal cap from bottom of valve. 2. Turn the adjustment screw clockwise to increase superheat and counterclockwise to decrease superheat. One complete 360* turn changes the superheat approximately 3-4°F, regardless of the refrigerant type. As much as 30 minutes may be required for the system to stabilize after the adjustment is made. 3. Replace and hand-tighten seal cap. Caution: There are 10 turns on the adjustment stem. When adjusting superheat setting - when stop is reached, any further turning adjustment will damage valve. Nomenclature Selection www.emersonflowcontrols.com 11911 Adie Road P.O. Box 411400 St. Louis MO 63141 USA CUSTOMER SERVICE (314) 569-4666 page 4 B Series Balanced-Port Thermal Expansion Valves Instruction Sheet PA-00266 June 2006 Installation & Service Instructions Application & Operation Dimesional Data The BA(E) valve is currently replacing conventional TXV’s on air conditioning and refrigeration systems with any combination of the following system operating conditions: 1. Widely varying evaporator loads 2. Widely varying head pressures 3. Widely varying pressure drop available across the thermostatic expansion valve and refrigerant distributor 4. Fluctuating or extremely low liquid temps. Severe conditions are those which drastically increase a conventional expansion valve’s maximum capacity: high head pressures for example, also, low liquid temperatures that would be experienced on a system with mechanical sub coolers during summer operation. BA(E) high system performance is possible because the large diaphragm allows the valve to operate with the valve pin controlling very close to the seat. This provides, stable control at minimum changes in stroke, enabling a large port to handle small loads. Problems can occur with refrigeration systems during both high and low ambient conditions when the condensing temperature is allowed to follow the ambient. As the evaporator temperature remains reasonably constant, this results in extreme pressure drop changes across the valve. These pressure drop changes can result in a conventional valve not maintaining a constant superheat at the evaporator outlet. These superheat changes can result in the evaporator starving in low ambient conditions and flooding in the higher ambient, depending on the valve design. Another variable factor for this situation is how low the head pressure is allowed to decrease. This of course depends on whether heat reclaim is utilized for heating purposes, or if hot gas will be used for evaporator defrost. Emerson’s BA(E) Thermal Expansion Valves are designed to meet the specific demands of refrigerated display cases, reach-in & walk-in coolers and freezers, and commercial applications ranging from medium (+50°F)to low(-50°F) temperature, with proper charge. www.emersonflowcontrols.com 11911 Adie Road P.O. Box 411400 St. Louis MO 63141 USA CUSTOMER SERVICE (314) 569-4666 Instruction Sheet PA-00260 June 2007 TRAE+ Balanced Port Thermal Expansion Valve Cage TRAE+ Balanced Port Thermal Expansion Valve Cage SAFETY INSTRUCTIONS CAGE REPLACEMENT INSTRUCTIONS Warning: Before opening any system, make sure the pressure in the system is brought to and remains at atmospheric pressure. Use approved refrigerant recovery methods when necessary. Failure to comply can result in system damage and/or personal injury. 1. Read installation instructions thoroughly. Failure to follow instructions may result in valve failure, system damage, or personal injury. 2. Do not use on service conditions or fluids not specifically cataloged, without prior written approval of the Emerson Climate Technologies Flow Controls Division Applications Engineering Department. Use of thermal expansion valves on applications not specifically cataloged can result in valve failure and/ or system damage. 3. Protect against excessive vibration. If may cause a tubing break which will cause valve failure and/or personal injury. 4. Do not exceed maximum working pressure of 450 psig - excess internal pressure could cause damage to diaphragm, resulting in valve malfunction. 5. Do not exceed maximum working temperature (see table 1) - excess temperature could cause internal damage, resulting in valve malfunction. 6. Warning: Do not place open flame on or near remote bulb. 1. NOMINAL CAPACITIES 12. 13. R-134a Valve Type TRAE9M* TRAE13M TRAE14M TRAE22M TRAE30M R-22/R-407C Valve Type TRAE10H* TRAE15H TRAE20H TRAE30H TRAE40H R-507/R-404A Valve Type TRAE8* TRAE12 TRAE14 TRAE20 TRAE30 2. 3. 4. 5. 6. 7. 8. 9. 10. 11. Cage Kit KT20289 KT20290 KT20291 KT20292 KT20293 Before removing superheat adjustment assembly, make sure system is at atmospheric pressure using EPA approved methods. Failure to comply can result in system damage or personal injury. Remove superheat adjustment assembly, superheat spring and spring guide. Care must be taken not to damage threads or surface area. Remove spool and stem assembly. Using KT20294 toll provided, remove seat turning in a counter clockwise direction. Remove spool and stem assembly from new cage before installing seat in valve. Before installing seat, ensure there is no foreign material inside valve or on seat. Lightly oil all seals with same type oil that is in system. Carefully install seat taking care not to damage seals or threads. Torque cage 60 to 64 inch pounds. Reinstall spool and stem assembly. Reassemble spring guide superheat spring and adjustment assembly. Torque assembly 400 to 425 inch pounds. Before restarting system, turn adjustment stem counter clockwise until it stops. Then turn clockwise 6 full turns. This will be close to factory superheat setting. Leak check valve. Adjust superheat to manufacturers’ recommendations. POWER ELEMENT SEAT (K) * Select correct charge code. Cage Wrench KR20294 Kit Includes: • Cage • Cage Wrench • Instruction Sheet SPOOL AND STEM SPRING GUIDE TABLE 1 Maximum Dehydration Temperature °F REFRIGERANT R12 R22 R502 THERMOSTATIC CHARGE C Z WMOP/CA 190 250 250 160 185 250 150 170 250 SPRING ADJUSTING STEM ASSEMBLY SPOOL AND STEM ASSEMBLY SEAT This Table refers to the maximum dehydration temperatures when the bulb and valve body are subjected to the same temperature. On L, C, and Z charges, 250°F maximum valve body temperature is permissible (if the bulb temperature) does not exceed those shown in the table. www.emersonflowcontrols.com 11911 Adie Road P.O. Box 411400 St. Louis MO 63141 USA CUSTOMER SERVICE (314) 569-4666 REPLACEMENT PARTS Part # Description X-28458 Power Assembly KT20294 Cage Removal Tool 27676-1 Seal Cap MEASURING SUPERHEAT SUPERHEAT ADJUSTMENT 1. Emerson thermal expansion valves are factory set to a specific superheat - however, the superheat should be adjusted for the application. To adjust the valve to other superheat settings: 1. Remove the seal cap from bottom of valve. 2. Turn the adjustment screw clockwise to increase superheat and counterclockwise to decrease superheat. One complete 360° turn changes the superheat approximately 3-4°F, regardless of the refrigerant type. As much as 30 minutes may be required for the system to stabilize after the adjustment is made. 3. Replace and hand-tighten seal cap. Caution: There are 12 turns on the adjustment stem. When adjusting superheat setting - when stop is reached, any further turning adjustment will damage valve. 3. 4. TEMPT 40° – – TEMPP = SUPERHEAT 33° = 7° 69 PSIG = 40°F 59 PSIG = 33°F 59 PSIG = 40°F FIGURE 2 EXTERNAL EQUALIZER 2. Determine the suction pressure with an accurate gauge at the evaporator outlet (see P in figure 2). On selfcontained systems, the suction pressure may be read at the compressor suction connections. From refrigerant pressure-temperature tables, determine saturation temperature at observed suction pressure (TEMPP). Measure temperature of suction gas at thermal expansion valve remove bulb location (TEMPT). Subtract saturation temperature (read from tables in step 2) from temperature measured in step 3; the difference is the superheat of the suction gas. T P 40°F 59 PSIG TX6 Thermo Expansion Valves Technical Data ALCO’s TX6 series of Thermo-Expansion Valves are designed for air conditioning, chillers, rooftops, close control, A/C transportation, heat pumps, industrial cooling process and refrigeration applications. The TX6 is ideal for those applications requiring hermetic / compact size combined with stable and accurate control over wide load and evaporating temperature ranges. Features • Balance port construction for constant superheat operation over a wide application range under variation of condensing pressure • Six sizes up to 97 kW (R410A) • Compact size • Hermetic design • Brazing connections with straight through configuration • Long life laser welded stainless steel power element resists corrosion • Large diaphragm eliminates disturbances to the valve and provides smoother and consistent valve control • Tailored charges for different applications • External equalizer • External superheat adjustment • Brass body TX6 Introduction Construction Thermo-Expansion Valves control the superheat of refrigerant vapour at the outlet of the evaporator. They act as a throttle device between the high and low pressure sides of refrigeration system and ensure the rate of refrigerant flow into the evaporator exactly matches the rate of evaporation of liquid refrigerant. Thus the evaporator is fully utilized and no liquid refrigerant may reach the compressor. The valve body is made from brass, the connections are in a straight through configuration. The diaphragm movement is transferred to a steel metering pin. When the charge pressure increases, the diaphragm will be deflected downward and this motion will be transferred to the pin. The pin will then lift from seat and the liquid can pass through orifice. The pin design gives the balance port feature. Balance port design will eliminate the undesirable variable influence of inlet pressure i.e. condensing pressure during different air ambient temperature in systems with aircooled condenser. The balance port design is only available in one direction as arrow indicates on the valve. This means, when the valve operates as Bi-flow in heat pump applications, the advantage of balance port is given in cooling or heating mode. A spring opposes the force underneath the pin and its tension can be adjusted by the external stem. The static superheat can be adjusted by rotation of the stem. Static superheat increases by turning the stem clockwise and decreased by turning the stem counter clockwise. When the actual superheat is higher than the setpoint, thermo expansion valve feeds the evaporator with more liquid refrigerant. Likewise, the valve decreases the refrigerant flow to the evaporator when the actual superheat is lower than the set point. TX6__35011_EN_R06.doc 1 / 12 17.03.2008 TX6 Thermo Expansion Valves Description of bulb charges The application ranges of Thermo expansion valves are heavily influenced by the selected charge. Liquid charges The behaviour of Thermo-Expansion Valves with liquid charges is exclusively determined by temperature changes at the bulb and not subject to any cross-ambient interference. They feature a fast response time and thus react quickly in the control circuit. Liquid charges cannot incorporate MOP functions. The maximum bulb temperatures is limited and shall not exceed the values, shown in the following table: Table 1: Refrigerant/Charge Performance of TXV with MOP function, gas charge Static superheat MOP Working range Evaporating temperature/ pressure Valve operates as superheat control in normal working range and operates as pressure regulator within MOP range. Maximum bulb temperature R 134a / M0 R 407C / N0 R 22 / H0 Practical hints: Superheat adjustments influence the MOP: • Increase of superheat: decrease of MOP Decrease of superheat: increase of MOP • 88°C 71°C 71°C Gas charges The behaviour of Thermo-Expansion Valves with gas charges will be determined by the lowest temperature at any part of the expansion valve (power assembly, capillary tube or bulb). If any parts other than the bulb are subject to the lowest temperature, malfunction of the expansion valve may occur (i.e. erratic low pressure or excessive superheat). ALCO TX6 with gas charges always feature MOP functions and include ballasted bulbs. Ballast in the bulb leads to slow opening and fast closure of the valve. Maximum bulb temperature is 120°C. MOP (Maximum Operating Pressure) MOP functionality is somewhat similar to the application of a crankcase pressure regulator. Evaporator pressures are limited to a maximum value to protect compressor from overload conditions. MOP selection should be within maximum allowed low pressure rating of the compressor and should be at approximately 3 K above maximum evaporating temperature. Table 2: MOP value, gas charge MOP Upper limit of evaporating temperature °C Code bar °C R407C R22 R 410A R134a N1 H1 M1 Z1 6.9 6.9 3.8 12.1 +17 +15 +14 +16 +14 - +12 - +14 +10 Note: All pressures are gauge pressure TX6__35011_EN_R06.doc 2 / 12 17.03.2008 TX6 Thermo Expansion Valves Heat pump applications There are several ways to apply an expansion valve in a heat pump. The following figures are showing the most popular applications: 1) System with two expansion valves, single Bi-flow filter dryer and two check valves 3) System with single Bi-flow expansion Valve and Alco suction filter dryer ASD Four way valve Four way valve Outdoor coil Outdoor coil Check valve BFK Bi-flow ASD TX6 Compressor Compressor Accumulator Indoor coil Accumulator Indoor coil Check valve This type of system employs two expansion valves and two check valves. In this type of application, it is recommended to locate the external equalizer and bulb on the suction line between reversing valve and suction accumulator (if available) or compressor as shown. Bi-flow application For application of TX6 in Bi-flow as single TXV in heat pumps, the following subjects need to be considered: 2) System with single Bi-flow expansion Valve and Alco Biflow filter dryer(s) BFK • TX6 is balance port only in normal flow direction but not in reverse flow direction • Inlet pressure in reverse flow act on valve pin as closing force. This effect is more significant at higher inlet pressure and lower evaporating temperature Four way valve Outdoor coil • This effect will prevent the valve from desired opening percentage in reverse flow dependant to port size of valve, inlet pressure and evaporating temperature Based on the above facts, it is necessary to evaluate the selection of TX6 in Bi-flow application. The following curves and table are as guidance for proper selection of TX6 in BI-flow application. BFK Bi-flow TX6 Compressor Accumulator Indoor coil TX6-N07, Static superheat shifting Inlet pressure: 8 bar TX6-N02, Static superheat shifting Inlet pressure: 8 bar 8 20 Normal flow Reverse flow 4 2 Reverse flow 12 8 4 0 -30 Normal flow 16 SS, K SS, K 6 -25 -20 -15 -10 -5 0 5 10 15 0 -30 To, °C TX6__35011_EN_R06.doc -25 -20 -15 -10 -5 0 5 10 15 To, °C 3 / 12 17.03.2008 TX6 Thermo Expansion Valves Size of valve Small port size (TX6-..2 /..3) Condition in reverse flow High or low operating inlet pressure High evaporating temperature Low evaporating temperature High or low operating inlet pressure Large port size (TX6-..4 /..5 /..6 /..7) Higher evaporating temperature Impact on operation of valve Application of valve in Bi-flow Consideration for performance improvement Negligible Negligible Recommended None This needs to be evaluated * This needs to be evaluated * - Slightly increase of superheat Increase of superheat Increase of superheat - Lower evaporating temperature Significant increase of superheat Not recommended Lower system capacity in reverse vs. normal flow Reduction of compressor capacity Oversized valve No solution *) During system design and prototype unit test. Other Subjects to be considered in Bi-flow applications: • In an air to water (liquid) systems, it may require a receiver in order to hold excessive refrigerant in one mode of operation • Do not install the Bulb of TXV between accumulator and compressor • It is possible to install several Bi-flow filter dryers in parallel in system with larger capacity • It is important to provide proper refrigerant distribution through liquid distributor at the inlet of evaporator due to distance between TXV and distributor Static superheat setting The factory setting of a TX6 is made with the valve pin just starting to move away from the seat. The superheat increment necessary to get the pin ready to move is called static superheat (SS). An increase of superheat over and beyond the static superheat (factory setting) is necessary for the valve pin to open to its rated capacity. This additional superheat is known as gradient or opening superheat (OS). The working superheat (WS), which can be measured in the field, is the sum of static superheat and opening superheat. The opening superheat of TXV varies if the selected valve operates at higher or lower capacities than the rated capacity. It is highly recommended to select the valve according to the rated capacity. Using reserve capacity leads to larger opening superheat and longer pull down time during start-up or after defrost. Selecting a larger valve than required in a system may lead to smaller opening superheat and/or hunting of TXV. Capacity Qr = Reserve capacity Qmax. Qr Qn Superheat (K) SS OS WS Qr ≈ 15% for TX6-..2/3/4/5/6 Qr ≈ 10% for TX6-..7 TX6__35011_EN_R06.doc 4 / 12 17.03.2008 TX6 Thermo Expansion Valves Standard superheat setting Charge Refrigerant/ charge code Refrigerant M0 R 134a Liquid (no MOP) N0 R 407C H0 R 22 MOP 3.8 bar M1 R 134a MOP 6.9 bar N1 R 407C MOP 12.1 bar H1 R 22 Z1 R 410A Setting Given Bulb temperature Nominal static superheat (SS) Nominal opening superheat (OS*) 0°C 3.3 K 3K *) The given opening superheats valid when the capacity of selected valve is equal to the capacity of system at design / operating conditions. Note : All pressures are gauge pressure. Nomenclature and identification TX6 - N 1 7 Valve series Refrigerant N: R407C H: R22 M: R134a Z: R410A Charge 0: Liquid 1: Gas MOP (see table 2, page 2) Capacity size 2, 3, 4, 5, 6, 7 (see page 6 and 7) TX6__35011_EN_R06.doc 5 / 12 17.03.2008 TX6 Thermo Expansion Valves Selection table Refrigerant R 407C R 22 R 134a R 410A Nominal capacity Qn kW Without MOP Type PCN With MOP *) Type PCN Connection size Equalizer Inlet x Outlet 14.4 14.4 25.6 25.6 35.7 35.7 45.2 45.2 66.9 66.9 87.3 87.3 TX6-N02 TX6-N02 TX6-N03 TX6-N03 TX6-N04 TX6-N04 TX6-N05 TX6-N05 TX6-N06 TX6-N06 TX6-N07 TX6-N07 801 651 801 653 801 652 801 654 801 659 801 663 801 660 801 664 801 661 801 665 801 662 801 666 TX6-N12 TX6-N12 TX6-N13 TX6-N13 TX6-N14 TX6-N14 TX6-N15 TX6-N15 TX6-N16 TX6-N16 TX6-N17 TX6-N17 801 655 801 534 801 656 801 535 801 667 801 536 801 668 801 537 801 669 801 538 801 670 801 539 Ext. 1/4" Ext. 1/4" Ext. 1/4" Ext. 1/4" Ext. 1/4" Ext. 1/4" Ext. 1/4" Ext. 1/4" Ext. 1/4" Ext. 1/4" Ext. 1/4" Ext. 1/4" 12mm x 16mm 1/2" x 5/8" 12mm x 16mm 1/2" x 5/8" 16mm x 22mm 5/8" x 7/8" 16mm x 22mm 5/8" x 7/8" 22mm x 28mm 7/8" x 1-1/8" 22mm x 28mm 7/8" x 1-1/8" 13.3 13.3 23.7 23.7 33.0 33.0 41.8 41.8 61.9 61.9 80.8 80.8 TX6-H02 TX6-H02 TX6-H03 TX6-H03 TX6-H04 TX6-H04 TX6-H05 TX6-H05 TX6-H06 TX6-H06 TX6-H07 TX6-H07 801 551 801 549 801 552 801 550 801 585 801 581 801 586 801 582 801 587 801 583 801 588 801 584 TX6-H12 TX6-H12 TX6-H13 TX6-H13 TX6-H14 TX6-H14 TX6-H15 TX6-H15 TX6-H16 TX6-H16 TX6-H17 TX6-H17 801 555 801 553 801 556 801 554 801 593 801 589 801 594 801 590 801 595 801 591 801 596 801 592 Ext. 1/4" Ext. 1/4" Ext. 1/4" Ext. 1/4" Ext. 1/4" Ext. 1/4" Ext. 1/4" Ext. 1/4" Ext. 1/4" Ext. 1/4" Ext. 1/4" Ext. 1/4" 12mm x 16mm 1/2" x 5/8" 12mm x 16mm 1/2" x 5/8" 16mm x 22mm 5/8" x 7/8" 16mm x 22mm 5/8" x 7/8" 22mm x 28mm 7/8" x 1-1/8" 22mm x 28mm 7/8" x 1-1/8" 10.3 10.3 18.4 18.4 25.6 25.6 32.5 32.5 48.1 48.1 62.8 62.8 TX6-M02 TX6-M02 TX6-M03 TX6-M03 TX6-M04 TX6-M04 TX6-M05 TX6-M05 TX6-M06 TX6-M06 TX6-M07 TX6-M07 801 543 801 541 801 544 801 542 801 569 801 565 801 570 801 566 801 571 801 567 801 572 801 568 TX6-M12 TX6-M12 TX6-M13 TX6-M13 TX6-M14 TX6-M14 TX6-M15 TX6-M15 TX6-M16 TX6-M16 TX6-M17 TX6-M17 801 547 801 545 801 548 801 546 801 577 801 573 801 578 801 574 801 579 801 575 801 580 801 576 Ext. 1/4" Ext. 1/4" Ext. 1/4" Ext. 1/4" Ext. 1/4" Ext. 1/4" Ext. 1/4" Ext. 1/4" Ext. 1/4" Ext. 1/4" Ext. 1/4" Ext. 1/4" 12mm x 16mm 1/2" x 5/8" 12mm x 16mm 1/2" x 5/8" 16mm x 22mm 5/8" x 7/8" 16mm x 22mm 5/8" x 7/8" 22mm x 28mm 7/8" x 1-1/8" 22mm x 28mm 7/8" x 1-1/8" TX6-Z12 TX6-Z12 TX6-Z13 TX6-Z13 TX6-Z14 TX6-Z14 TX6-Z15 TX6-Z15 TX6-Z16 TX6-Z16 TX6-Z17 TX6-Z17 801 510 801 511 801 512 801 513 801 514 801 515 801 516 801 517 801 518 801 519 801 520 801 521 Ext. 1/4" Ext. 1/4" Ext. 1/4" Ext. 1/4" Ext. 1/4" Ext. 1/4" Ext. 1/4" Ext. 1/4" Ext. 1/4" Ext. 1/4" Ext. 1/4" Ext. 1/4" 12mm x 16mm 1/2" x 5/8" 12mm x 16mm 1/2" x 5/8" 16mm x 22mm 5/8" x 7/8" 16mm x 22mm 5/8" x 7/8" 22mm x 28mm 7/8" x 1-1/8" 22mm x 28mm 7/8" x 1-1/8" 16.0 16.0 28.0 28.0 40.0 40.0 50.0 50.0 74.0 74.0 97.0 97.0 Nominal capacities at +38°C saturated condensing temperature, +4°C saturated evaporating temperature and 1 K subcooling at the inlet of the expansion valve. Valve selection for other operating conditions see pages 7 to 11. *) See table 2 on page 2 for MOP values. TX6__35011_EN_R06.doc 6 / 12 17.03.2008 TX6 Thermo Expansion Valves Dimensioning of Thermo-Expansion Valves To apply proper Thermo-Expansion Valves on a system the following design conditions must be available: • Cooling capacity Q0 Effective pressure differential across TXV ∆p • • Evaporating temperature / pressure • Lowest possible condensing temperature / pressure Liquid temperature at the inlet of TXV • Refrigerant type • To facilate valve dimensioning for other than the standard conditions ALCO offers an Excel based Selection Tool. This can be ordered from all Copeland sales offices. See www.eCopeland.com for contact addresses, email or phone numbers. Otherwise the following formula has to be used: Cooling capacity x K∆p x Kt = Nominal capacity of TXV • Select Kt-factor according to refrigerant. liquid and evaporating temperature from tables on pages 9-11. • Determine effective pressure differential across the Thermo-Expansion Valve using condensing pressure. subtract evaporating pressure and all other possible pressure losses. Select K∆p-factor from tables on pages 11 … 12. Example 1 A valve has to be selected for the following conditions: Refrigerant System cooling capacity Evaporating temperature Lowest condensing temperature Liquid temperature Valve without MOP R 22 45 kW +5°C +30°C +25°C Calculation: 1. Theoretical pressure differential: Lowest condensing pressure is Pc = 11.9 bara at +30°C and evaporating pressure is P0 = 5.8 bara at +5°C Differential pressure is Pc - P0 = 11.9 – 5.9 = 6 bar 2. Pressure losses: Across distributor = 1.0 bar Others in piping. solenoid valve. drier. sight glass. fitting. etc. = 0.5 bar Total pressure losses = 1 + 0.5 = 1.5 3. Effective pressure differential across valve: 6.0 – 1.5 = 4.5 bar TX6__35011_EN_R06.doc 4. Correction factors: Correction factor K∆p for the pressure differential 4.5 bar from table on page 9 for R 22 ∆p = 4.5 K∆p = 1.42 Correction factor Kt for liquid and evaporating temperature from table on page 9 for R 22 at +25°C / 5°C Kt = 0.89 5. Calculation of nominal capacity Q0 x K∆p x Kt = Qn 45 x 1.42 x 0.89 = 56.9 kW. You can select the valve from table on page 6. It is a TX6-H06 with a nominal capacity of 61.9 kW. 7 / 12 17.03.2008 TX6 Thermo Expansion Valves Dimensioning of Thermo-Expansion Valves for systems with refrigerant R 407C As opposed to single substances (e.g. R 22. R 134a etc.) where the phase change takes place at a constant temperature / pressure. the evaporation and condensation of zeotropic blend R407C is in a “gliding” form (e.g. at a constant pressure the temperature varies within a certain range) through evaporators and condensers. The condensing / evaporating pressure must be determined at saturated temperatures (bubble / dew points) for dimensioning of Thermo-Expansion Valves. P (bar) R407C 35.5°C 13.6 30°C +5° C 5.5 -1°C h Example 2: System cooling capacity (R407C) Evaporating temperature (dew point) Lowest condensing temperature (bubble) Liquid temperature Valve without MOP 55 kW +5°C +30°C +25°C Calculation: 1. Theoretical pressure differential: Differential pressure is Pc - P0 = 13.6 – 5.5 = 8.1 bar 2. Pressure losses: Across distributor = 1 bar Others in piping, solenoid valve, drier, sight glass, fitting etc. = 0.6 bar Total pressure losses = 1 + 0.6 = 1.6 3. Effective pressure differential across valve: 8.1 - 1.6 = 6.5 bar 4. Correction factors: Correction factor K∆p for the pressure differential 9.39 bar from table on page 9 for R 407C ∆p = 6.5 bar K∆p = 1.31 Correction factor Kt for liquid and evaporating temperature from table on page 9 for R 407C at +25°C / +5°C Kt = 0.85 5. Calculation of nominal capacity Q0 x K∆p x Kt = Qn 55 x 1.31 x 0.85 = 61.2 You can select the valve from table on page 6. It is a TX6-N06 with a nominal capacity of 66.9 kW. Dimensioning of Thermo-Expansion Valves for heat pump applications Example 3: A heat pump with following design conditions: Cooling mode Cooling capacity (R 22) Condensing temperature Evaporating temperature Liquid temerature Valve without MOP 20 kW +45°C +5°C 45°C 1. Theoretical pressure differential: Differential pressure is Pc - P0 = 17.3 – 5.8 = 11.5 bar 2. Pressure losses: total pressure losses = 1.6 3. Effective pressure differential across valve: 11.5 – 1.6 = 9.9 bar 4. Correction factors: ∆p = 9.9 K∆p = 0.96 at +5°C and 45°C Kt = 1.07 5. Calculation of nominal capacity Q0 x K∆p x Kt = Qn 20 x 0.96 x 1.07 = 20.5 kW You can select the valve from table on page 6 Heating mode (Reverse flow) Heating capacity (R 22) 15 kW Condensing temperature +30°C Evaporating temperature -10°C Liquid temperature +30°C 1. Theoretical pressure differential: Differential pressure is Pc - P0 = 11.9 – 3.5 = 8.4 bar 2. Pressure losses: total pressure losses = 1.6 3. Effective pressure differential across valve: 8.4 – 1.6 = 6.8 bar 4. Correction factors: ∆p = 6.8 K∆p = 1.16 at -10°C and 30°C Kt = 0.99 5. Calculation of nominal capacity Q0 x K∆p x Kt = Qn 15 x 1.42 x 0.89 = 17.2 kW. TX6-H03 has sufficient capacity in reverse flow for 17.2 kW. It is a TX6-H03 with a nominal capacity of 23.7 kW. TX6__35011_EN_R06.doc 8 / 12 17.03.2008 TX6 Thermo Expansion Valves Liquid temperature entering valve °C + 60 + 55 + 50 + 45 + 40 + 35 + 30 + 25 + 20 + 15 + 10 +5 0 -5 - 10 Correction factor Kt Evaporating temperature °C R22 +20 + 15 +10 +5 0 -5 -10 -15 -20 -25 -30 -35 -40 -45 1.24 1.25 1.26 1.28 1.30 1.31 1.38 1.58 1.84 2.16 2.56 3.04 3.55 4.23 1.16 1.17 1.19 1.20 1.22 1.23 1.29 1.42 1.72 2.02 2.39 2.83 3.30 3.94 1.10 1.11 1.12 1.13 1.15 1.16 1.21 1.39 1.62 1.89 2.24 2.66 3.10 3.68 1.04 1.05 1.06 1.07 1.08 1.10 1.15 1.31 1.52 1.79 2.11 2.50 2.91 3.46 0.99 1.00 1.01 1.02 1.03 1.04 1.09 1.24 1.45 1.69 2.00 2.37 2.75 3.27 0.94 0.95 0.96 0.97 0.98 0.99 1.03 1.18 1.37 1.61 1.89 2.24 2.60 3.09 0.90 0.91 0.92 0.93 0.94 0.95 0.99 1.13 1.31 1.55 1.83 2.13 2.47 2.93 0.86 0.87 0.88 0.89 0.89 0.90 0.94 1.08 1.25 1.46 1.72 2.03 2.36 2.80 0.83 0.83 0.84 0.85 0.86 0.87 0.90 1.03 1.19 1.40 1.64 1.94 2.25 2.66 0.80 0.81 0.81 0.82 0.83 0.87 0.99 1.14 1.34 1.57 1.86 2.15 2.55 0.78 0.78 0.79 0.80 0.83 0.95 1.10 1.28 1.51 1.78 2.06 2.44 0.75 0.76 0.77 0.80 0.91 1.06 1.23 1.45 1.71 1.98 2.34 0.73 0.74 0.77 0.88 1.02 1.19 1.39 1.65 1.90 2.25 0.71 0.74 0.85 0.98 1.14 1.34 1.58 1.83 2.17 0.72 0.82 0.95 1.10 1.30 1.53 1.77 2.09 Liquid temperature entering valve °C + 60 + 55 + 50 + 45 + 40 + 35 + 30 + 25 + 20 + 15 + 10 +5 0 -5 - 10 Correction factor K∆p ∆p (bar) K∆p ∆p (bar) K∆p Liquid temperature entering valve °C + 55 + 50 + 45 + 40 + 35 + 30 + 25 + 20 + 15 + 10 +5 0 0.5 1 1.5 2 2.5 3 3.5 4 4.5 5 5.5 6 6.5 7 8 9 4.25 3.00 2.46 2.13 1.90 1.74 1.61 1.50 1.42 1.35 1.28 1.23 1.18 1.14 1.06 1.00 10 11 12 13 14 15 16 17 18 19 20 21 22 23 24 25 ∆p (bar) K∆p ∆p (bar) 0.95 0.91 0.87 0.83 0.80 0.78 0.75 0.73 0.71 0.69 0.67 0.66 0.64 0.63 0.61 0.60 K∆p Correction factor Kt Evaporating temperature °C Liquid temperature entering valve °C + 55 + 50 + 45 + 40 + 35 + 30 + 25 + 20 + 15 + 10 +5 0 R407C +20 +15 +10 +5 0 -5 -10 -15 -20 -25 1.23 1.26 1.28 1.31 1.34 1.37 1.40 1.63 1.98 2.42 1.13 1.15 1.17 1.19 1.22 1.24 1.27 1.48 1.79 2.18 1.05 1.06 1.08 1.10 1.12 1.14 1.17 1.35 1.64 2.00 0.98 0.99 1.01 1.02 1.04 1.06 1.08 1.25 1.52 1.84 0.92 0.93 0.94 0.96 0.98 0.99 1.01 1.17 1.41 1.71 0.87 0.88 0.89 0.90 0.92 0.93 0.95 1.10 1.32 1.60 0.82 0.83 0.84 0.85 0.87 0.88 0.90 1.03 1.25 1.51 0.78 0.79 0.80 0.81 0.82 0.84 0.85 0.98 1.18 1.43 0.75 0.76 0.77 0.78 0.80 0.81 0.93 1.12 1.35 0.73 0.74 0.75 0.76 0.77 0.89 1.07 1.29 0.71 0.72 0.73 0.74 0.85 1.02 1.23 0.69 0.70 0.71 0.81 0.98 1.18 Correction factor K∆p ∆p (bar) K∆p ∆p (bar) K∆p 0.5 1 1.5 2 2.5 3 3.5 4 4.5 5 5.5 6 6.5 7 8 9 4.78 3.33 2.72 2.36 2.11 1.92 1.78 1.67 1.57 1.49 1.42 1.36 1.31 1.26 1.18 1.11 10 11 12 13 14 15 16 17 18 19 20 21 22 23 24 25 1.05 1.01 0.96 0.92 0.89 0.86 0.83 0.81 0.79 0.76 0.75 0.73 0.71 0.70 0.68 0.67 TX6__35011_EN_R06.doc 9 / 12 ∆p (bar) K∆p ∆p (bar) K∆p 17.03.2008 TX6 Thermo Expansion Valves Liquid temperature entering valve °C + 60 + 55 +50 + 45 + 40 + 35 + 30 + 25 + 20 + 15 + 10 +5 0 -5 - 10 Correction factor Kt Evaporating temperature °C R134a +20 + 15 +10 +5 0 -5 -10 -15 -20 Liquid temperature entering valve °C + 60 + 55 + 50 + 45 + 40 + 35 + 30 + 25 + 20 + 15 + 10 +5 0 -5 - 10 -25 1.27 1.30 1.33 1.36 1.40 1.44 1.48 1.75 2.08 2.46 1.18 1.21 1.23 1.26 1.29 1.33 1.36 1.60 1.90 2.25 1.10 1.13 1.15 1.17 1.20 1.23 1.26 1.48 1.76 2.07 1.04 1.06 1.08 1.10 1.12 1.15 1.17 1.38 1.63 1.92 0.98 0.99 1.01 1.03 1.05 1.08 1.10 1.29 1.52 1.79 0.92 0.94 0.96 0.97 0.99 1.01 1.03 1.21 1.43 1.68 0.88 0.89 0.91 0.92 0.94 0.96 0.98 1.14 1.35 1.58 0.83 0.85 0.86 0.87 0.89 0.91 0.92 1.08 1.27 1.49 0.80 0.81 0.82 0.83 0.85 0.89 0.88 1.02 1.21 1.41 0.77 0.78 0.79 0.81 0.82 0.84 0.97 1.15 1.34 0.75 0.76 0.77 0.78 0.80 0.93 1.09 1.28 0.73 0.74 0.75 0.76 0.89 1.04 1.22 0.71 0.72 0.73 0.85 1.00 1.17 0.69 0.70 0.82 0.96 1.12 0.68 0.79 0.92 1.07 Correction factor K∆p ∆p (bar) K∆p ∆p (bar) K∆p 0.5 1 1.5 2 2.5 3 3.5 4 4.5 5 5.5 6 6.5 7 7.5 8 3.50 2.48 2.02 1.75 1.57 1.43 1.32 1.24 1.17 1.11 1.06 1.01 0.97 0.94 0.90 0.88 8.5 9 9.5 10 10.5 11 11.5 12 13 14 15 16 17 18 19 20 ∆p (bar) K∆p ∆p (bar) 0.85 0.83 0.80 0.78 0.76 0.75 0.73 0.72 0.69 0.66 0.64 0.62 0.60 0.58 0.57 0.55 K∆p Correction factor Kt Evaporating temperature °C Liquid temperature entering valve °C + 60 + 55 + 50 + 45 + 40 + 35 + 30 + 25 + 20 Liquid temperature entering valve °C + 60 + 55 + 50 + 45 + 40 + 35 + 30 + 25 + 20 R410A + 15 +10 +5 0 -5 -10 -15 -20 -25 -30 -35 -40 1,50 1,51 1,53 1,54 1,57 1,59 1,85 2,16 2,55 3,03 3,64 4,42 1,32 1,33 1,35 1,36 1,38 1,40 1,62 1,89 2,23 2,65 3,17 3,84 1,20 1,20 1,21 1,23 1,24 1,26 1,46 1,70 2,00 2,37 2,83 3,42 1,09 1,10 1,11 1,12 1,13 1,15 1,33 1,55 1,82 2,15 2,57 3,10 1,01 1,02 1,03 1,04 1,05 1,06 1,22 1,43 1,67 1,98 2,36 2,84 0,94 0,95 0,96 0,97 0,98 0,99 1,14 1,32 1,55 1,83 2,18 2,63 0,89 0,89 0,90 0,91 0,91 0,92 1,06 1,24 1,45 1,71 2,04 2,45 0,84 0,84 0,85 0,85 0,86 0,87 1,00 1,16 1,36 1,61 1,91 2,30 0,79 0,80 0,80 0,81 0,81 0,82 0,95 1,10 1,28 1,51 1,80 2,16 Correction factor K∆p ∆p (bar) K∆p ∆p (bar) K∆p 0.5 1 1.5 2 2.5 3 3.5 4 4.5 5 5.5 6 6.5 7 8 9 5,29 3,74 3,05 2,65 2,37 2,16 2,00 1,87 1,76 1,67 1,60 1,53 1,47 1,41 1,32 1,25 10 11 12 13 14 15 16 17 18 19 20 21 22 23 24 25 1,18 1,13 1,08 1,04 1,00 0,97 0,94 0,91 0,88 0,86 0,84 0,82 0,80 0,78 0,76 0,75 TX6__35011_EN_R06.doc 10 / 12 ∆p (bar) K∆p ∆p (bar) K∆p 17.03.2008 TX6 Thermo Expansion Valves Technical data Maximum working pressure TX6-H/M/N.. PS: 31 bar TX6-Z12/13/14/15/16/17 PS: 42 bar Compatibility CFC, HCFC, HFC. Mineral and POE lubricants. Fluid group II Medium temperature range TS -45 to 65°C Charges CFC free Charge Refrigerant N0 H0 M0 N1. MOP 6.9 bar H1. MOP 6.9 bar M1. MOP 3.8 bar Z1 MOP 12.1 bar R 407C R 22 R 134a R 407C R 22 R 134a R 410A CE-Marking according to PED: Not required Seat leakage ≤ 1% nominal capacity Connection Power element Label ODF copper Laser welding, stainless steel Pin printing Recommended evaporating temperature range °C -25 to +20 -45 to +20 -25 to +30 -25 to +14 -45 to +12 -25 to +10 -45 to +14 Maximum bulb temperature °C 71 71 88 120 120 120 120 Shipping weight and pack quantity TX6 Pack quantity Shipping weight TX6__35011_EN_R06.doc 12 pcs 0.65 kg (individual) 11 / 12 17.03.2008 TX6 Thermo Expansion Valves Dimensions TX6-….2/3 TX6-….4/5/6/ 127 127 102 A1 A2 111 B1 A1 B2 A2 B1 B2 A3 64 A3 B3 64 B3 64 Type TX6-…2 TX6-…3 TX6-…4 TX6-…5 TX6-…6 TX6-…7 A1 ∅ 1/2” & 12 mm 1/2” & 12 mm 5/8” & 16 mm 5/8” & 16 mm 7/8” & 22 mm 7/8” & 22 mm B1 mm 9 9 13 13 19 19 A2 ∅ 5/8” & 16 mm 5/8” & 16 mm 7/8” & 22 mm 7/8” & 22 mm 1-1/8” & 28 mm 1-1/8” & 28 mm 64 B2 mm 13 13 19 19 23 23 A3 ∅ 1/4” & 6 mm 1/4” & 6 mm 1/4” & 6 mm 1/4” & 6 mm 1/4” & 6 mm 1/4” & 6 mm ALCO CONTROLS is not to be held responsible for erroneous literature regarding capacities, dimensions, applications, etc. stated herein. Products, specifications and data in this literature are subject to change without notice. The information given herein is based on technical data and tests which ALCO CONTROLS believes to be reliable and which are in compliance with technical knowledge of today. It is intended only Emerson Electric GmbH & Co. OHG ALCO CONTROLS Heerstraße 111 D-71332 Waiblingen Germany Phone ...49-(0)7151-509-0 Fax ...49-(0)7151-509-200 www.eCopeland.com/alcoliterature.cfm TX6__35011_EN_R06.doc B3 mm Capillary tube mm 8 1500 Bulb size Diameter Length mm mm 13 (R410A: 19,2) 89 (R410A: 59) for use by persons having the appropriate technical knowledge and skills, at their own discretion and risk. Since conditions of use are outside of ALCO'S control we can not assume any liability for results obtained or damages occurred due to improper application. This document replaces all earlier versions. Benelux Denmark & Finland Eastern Europe, Turkey & Iran France, Greece, Maghreb Deutschland, Österreich, Schweiz Italia Middle East & Africa Poland Russia & Cis España & Portugal Sweden & Norway UK & Ireland 12 / 12 Phone.: +31 (0)773 240 234 +32 (0)87 305 565 +32 (0)87 305 061 +33 (0)478 668 570 +49 (0)6109 6059 0 +39 02 961 78 1 +97 148 832 828 +48 (0)22 458 9205 +7 495 981 9811 +34 93 4 123 752 +32 (0)87 305 565 +44 (0)1 189 838 000 Fax: +31 (0)773 240 235 +49 24 08 929 568 +32 (0)87 305 506 +33 (0)478 668 571 +49 (0)6109 6059 40 +39 02 961 78 888 +97 148 832 848 +48 (0)22 458 9255 +7 495 981 9816 +34 93 4 124 215 +49 24 08 929 568 +44 (0)1 189 838 001 17.03.2008 Instruction Sheet PA-00211 August 2007 ASC, ASC2, AM, AH, DM, EB, EM, MM, RM Coils ASC, ASC2, AM, AH, DM, EB, EM, MM, RM Coils GENERAL INSTALLATION 6. Dual Voltage Wiring Diagram 1. Verify selection of proper coil type, coil voltage and frequency. This information appears on coil nametag. COIL Emerson Climate Technologies COIL TYPE AM VOLTS 24 WATTS 7 HZ 50-60 2. Always disconnect electrical power source. 240-480 V. COIL 120-240 V. COIL BLACK YELLOW RED BLUE 120V. COIL 120V. BLACK 240V. YELLOW RED BLACK YELLOW RED COIL 240V. BLUE BLUE 240V. COIL 240V. BLACK 480V. YELLOW RED 480V. BLUE INSTALLATION OF ASC OR ASC2 COILS 1. Install coil so that electrical connections are closer to the top of the enclosing tube. 2. Use metal snap cap X-13740-1 and press on until you hear it click into place. 3. Attach electric connector (DIN PLUG) onto coil and tighten screw until snug. INSTALLATION OF RM COILS 3. Install the coil on the enclosing tube of the valve. 1. Install coil on top of the enclosing tube. 2. Attach lockwasher and screw to top and secure tightly. WARNING 4. Coil may be rotated 360° for easy wiring. It is recommended that coil lead connections be soldered on D.C. and 24V/50-60 HZ. 360° A. Caution: Failure to attach ground wire to grounding lug violates certain electrical codes and creates the possibility of shock hazard. B. Caution: Omission of conduit cover locking screw violates certain electrical codes and could cause cover to come off exposing "live" (energized) wires with resulting possibility of fire hazard and/or personal injury. REMOVE 1. Verify selection of proper coil type, coil voltage and frequency. 2. Before removing coil from valve, always disconnect electrical power source. Failure to do so will cause a good coil to burn out and possible personal injury or property damage. 3. Remove old coil. 5. Press firmly to ensure coil is secured. Warning: To avoid any damage to the enclosing tube, use your hands to secure the coil, do not use a hammer or other kind of tool. CLICK www.emersonclimate.com/flowcontrols 11911 Adie Road P.O. Box 411400 St. Louis MO 63141 USA CUSTOMER SERVICE (314) 569-4666 EX4 / EX5 / EX6 / EX7 / EX8 Electrical Control Valves Technical Data ALCO Controls EX4 / EX5 / EX6 / EX7 / EX8 are stepper motor driven valves for precise control of refrigerant mass flow in air conditioning, refrigeration, heat pumps, close control, and industrial process cooling applications. The Control Valves can be used as thermo-expansion duty, liquid injection duty, hot gas bypass, evaporator pressure regulator, crankcase pressure regulator, head pressure regulator, or liquid level control. This data sheet describes only the performance of the valves. Operation of required controllers, driver boards and sensors are part of other documentations (see page 29). EX4 / EX5 / EX6 (Uni-flow/Bi-flow) Features • • • • • • • • • • • • • • • • Multifunction as expansion valves, hot gas bypass, suction gas throttling, head pressure, liquid level actuator etc. Fully hermetic design (no thread joints between valve body and motor compartment) Stepper motor driven Very fast full stroke time (1.5 sec. for EX4/5/6, 3.2 sec. for EX7 and 5.2 sec. for EX8) High resolution and excellent repeatability Bi-flow versions for heat pump applications Positive shut-off function to eliminate the use of an additional solenoid valve Linear flow capacity Extremely wide capacity range (10 … 100%) Continuous modulation of mass flow, no stress (liquid hammering) in the refrigeration circuit Direct coupling of motor and valve for high reliability (no gear mechanism) Ceramic slide and port for accurate flow and minimal wear Balanced force design Corrosion resistant stainless steel body Europe patent No. 0743476, USA patent No. 5735501, Japan patent No. 28225789 Compatible with all CFCs, HCFCs and HFCs EX7 (Uni-flow/Bi-flow) EX8 (Uni-flow) Selection table Type EX4-I21 Part Code Nr. Flow pattern Capacity range Inlet connection Outlet connection 3/8” ODF 5/8” ODF 800 615 EX4-M21 800 616 10 mm ODF 16 mm ODF EX5-U21 800 618 5/8” (16 mm) ODF 7/8” (22 mm) ODF EX6-I21 800 620 7/8” ODF 1-1/8” ODF EX6-M21 800 621 EX7-I21 800 624 Uni-flow 22 mm ODF 28 mm ODF 1-1/8” (28 mm) ODF 1-3/8” (35 mm) ODF Electrical connection M12 plug EX7-M21 800 625 1-1/8” (28 mm) ODF 1-3/8” (35 mm) ODF EX8-M21 801 964 42 mm ODF 42 mm ODF DIN Plug EX8-U21 801 970 1-3/8” (35 mm) ODF 1-3/8” (35 mm) ODF DIN Plug EX4-U31 800 617 5/8” (16 mm) ODF 5/8” (16 mm) ODF EX5-U31 800 619 7/8” (22 mm) ODF 7/8” (22 mm) ODF EX6-I31 800 622 1-1/8” ODF 1-1/8” ODF 10 … 100% Bi-flow (Heat pump) EX6-M31 800 623 28 mm ODF 28 mm ODF EX7-U31 800 626 1-3/8” (35 mm) ODF 1-3/8” (35 mm) ODF M12 plug EX4/5/6/7 is delivered without cable/connector assembly (order separately). EX8 is delivered with electrical DIN plug. EX48_35008_EN_R07.doc 1 / 32 27.09.2006 EX4 / EX5 / EX6 / EX7 / EX8 Electrical Control Valves Cable and connector assembly for EX4 / EX5 / EX6 /EX7 Type EX5-N15 EX5-N30 Part Code Temperature Nr. Range 804 650 -25 … +80°C 804 651 EX5-N60 804 652 EX5-L60 804 655 EX5-C15 804 656 EX5-C30 804 657 EX5-C60 804 658 Length Connector type to valve Connector type to driver board or controller M12 Loose wires for EXD-S / -U / -C and EC3-33x 1.5 m 3.0 m 6.0 m -50 …+80°C 6.0 m M12, low temp. 1.5 m -25 … +80°C Illustration 3.0 m Phoenix type, crimp connection for Alco EC3 controller M12 6.0 m Introduction Guidelines for selection of electrical control valves Thermostatic expansion valves and mechanical regulator valves have been used in the refrigeration and air conditioning industry to control superheat and refrigerant mass flow since its very beginning. As today’s systems require improved energy efficiency, tighter temperature control, wider range of operating conditions and incorporate new features like remote monitoring and diagnostics, the application of electronically operated valves becomes mandatory. Only they offer the controls performance necessary to meet these needs. As more new refrigerants appear on the market requiring an ever increasing number of different charges and settings for thermostatic expansion valves, electrical control valves can solve this problem too. ALCO electrical control valves are the solution for the challenges above. The latest technology and more than 80 years of experience in design and production of flow controls including Thermo® expansion valves have been incorporated in the design of the EX4, EX5, EX6, EX7 and EX8. The following guideline should be taken in to the consideration in order to obtain full advantages of ECV: Published capacities are maximum. There are no reserve capacities. Larger size of valve leads to shorter pull down period and shorter travel time i.e. faster respond. For example, EX7 has maximum 3.2 seconds travel time. The valve has approximately 1.6 seconds travel time at 50% capacity operation. Construction EX4/EX5/EX6/EX7/EX8 consist of two main internal assemblies, the valve and the stepper motor. The stepper motor is connected directly to the slide and cage assembly of the valve. Similar to the technology used in compressors, the motor is exposed to refrigerant and lubricant and the materials used are identical. The housing of the motor and valve assembly is fully hermetic, utilising exclusively brazing and welding technologies and eliminating all gaskets. This design offers several technical advantages. The motor is direct coupled to the valve assembly for easy and reliable movement of the valve slide, no need for any other seals and eliminating the use of bellows and diaphragms which could be subject to lifetime limitations and leaks. Four electrical pins connect the motor to the outside. These pins are applied to the housing using melting-glass process technology. The EX4/5/6/7 pins require a M12 electrical connector. EX8 is supplied with DIN electrical plug. The complete housing of the ECVs is made from stainless steel. EX8 is equipped with rotalock connections. Unlike to mechanical expansion valves, EX4/5/6/7/8 are equipped with ceramic slide port. ALCO Selection Tool For easy and quick selection of Electrical Control Valves an Excel based selection tool can be ordered from the ALCO sales offices, or use the quick selection tables mentioned in this datasheet. Example: System with R407C having two different operating conditions: A) 110 kW capacity at +4°C/+50°C with two stages compressor at 50%/100% capacity B) 137 kW at +4°C/+30°C with two stages compressor at 50%/100% capacity EX6 with 126 kW covers condition A, however is not sufficient to cover condition B. It is recommended to select the larger valve EX7 which offers 337 kW at condition A and 293 kW at condition B. Condition A: Full load ratio = 110 = 33% 337 Partial load ratio = (110 / 2) = 16% 337 Condition B: Full load ratio = 137 = 47% 293 (137 / 2) = 23% 293 The capacity ratios of system to valve are in all conditions higher than 10%. It is recommended to use EX7 rather EX6. Partial load ratio = Features: Wide range regulation (10 … 100%) with one slide orifice for each valve Linear characteristic over entire capacity range Positive shut-off - EX48_35008_EN_R07.doc 2 / 32 27.09.2006 EX4 / EX5 / EX6 / EX7 / EX8 Electrical Control Valves EX4/EX5/EX6/EX7/EX8 nominal and extended capacities as expansion valves and liquid injection valves Nominal Capacities (10% … 100%), kW Valve Type R 407C R 22 EX4 2 ... 17.4 2 ... 16.5 EX5 5 ... 53 5 ... 50 EX6 15 ... 126 15 ... 120 EX7 35 ... 347 35 ... 330 EX8 100 ... 925 90 ... 880 R 134a 1 ... 12.8 4 ... 39 10 ... 93 25 ... 255 70 ... 680 R 404A 1 ... 11.5 4 ... 35 10 ... 84 25 ... 230 60 ... 613 The nominal capacity (Qn) is based on the following conditions: Refrigerant Evaporating temperature R 22, R 134a, R 404A, R 410A +4°C R 407C +4°C dew point R 124 +20°C R 23 -60°C R 744 -40°C R 410A 2 ... 19.3 6 ... 58 15 ... 140 40 ... 385 100 ... 1027 Condensing temperature +38°C +38°C bubble / +43°C dew point +80°C -25°C -10°C Overview of working pressure regardless of applied refrigerant type Valve type Flow pattern Maximum working pressure PS EX4, EX5, EX6, EX7 Uni-flow/Bi-flow 45 bar EX8 Uni-flow 35 bar R 23 2 ... 17.8 5 ... 54 13 ... 130 - R 124 1 ... 9.2 3 ... 28 7 ... 67 - R 744 3 ... 33.5 10 ... 102 24 ... 244 70 ... 670 180 ... 1789 Subcooling 1K 1K 1K 1K 1K Factory test pressure PT 49.5 bar 38.5 bar Capacity Diagrams (kW) Qn, kW 35 30 R744 (33.5 kW) R410A (19.3 kW) 25 R23 (17,8 kW) R407C (17.4 kW) 20 R22 (16.5 kW) R134a (12.8 kW) R404A (11.5 kW) 15 34 EX4 19 18 17 17 R124 (9.2 kW) 13 12 9 10 5 0 0 50 00 100 150 200 250 300 350 400 450 500 550 600 650 700 750 Number of Steps 110 R744 (102 kW) R410A (58 kW) 100 90 EX5 R23 (54 kW) R407C (53 kW) 80 70 Qn, kW 102 R22 (50 kW) R134a (39 kW) R404A (35 kW) 60 50 58 53 54 50 R124 (28 kW) 40 39 35 28 30 20 10 0 0 50 00 100 150 200 250 300 350 400 450 500 550 600 650 700 750 Number of Steps EX48_35008_EN_R07.doc 3 / 32 27.09.2006 EX4 / EX5 / EX6 / EX7 / EX8 Electrical Control Valves 250 244 R744 (244 kW) R410A (140 kW) 200 EX6 R23 (130 kW) R407C (126 kW) R22 (120 kW) Qn, kW 150 140 130 126 120 R134a (93 kW) R404A (84 kW) 100 93 84 67 R124 (67 kW) 50 0 100 0 0 50 150 200 250 300 350 400 450 500 550 600 650 700 750 Number of Steps 700 670 EX7 R744 (670 kW) 600 R410A (385 kW) R407C (347 kW) 500 Qn, kW R22 (330 kW) 400 385 347 330 R134a (255 kW) R404A (230 kW) 300 255 230 200 100 0 0 0 200 400 600 800 1000 1200 1400 1600 Number of Steps 1200 1100 Qn, kW 900 R407C (925 kW) 800 R22 (880 kW) 700 R134a (680 kW) 600 R404A (613 kW) 1027 925 880 EX8 R410A (1027 kW) 1000 680 613 500 400 300 200 100 0 0 0 200 400 600 800 1000 1200 1400 1600 1800 2000 2200 2400 2600 Number of Steps EX48_35008_EN_R07.doc 4 / 32 27.09.2006 EX4 / EX5 / EX6 / EX7 / EX8 Electrical Control Valves Extended capacities as expansion and liquid injection valves The following tables provide the capacity of valves at different conditions considering 1.5 bar pressure drop through liquid line: Condensing temperature °C 60 55 50 45 40 35 30 25 20 15 10 EX48_35008_EN_R07.doc Extended capacity kW R 410A 15 10 5 0 17 51 123 339 18 53 127 350 935 18 53 128 351 936 17 52 124 342 913 16 49 118 324 864 15 45 108 296 789 13 38 93 255 680 10 29 71 195 520 4 13 31 84 225 17 52 126 348 18 55 132 362 965 18 55 133 366 975 18 54 131 361 962 17 52 126 348 927 16 49 118 326 869 15 44 107 294 786 13 38 91 251 669 9 28 68 188 501 3 10 23 64 172 18 53 129 354 19 56 135 370 988 19 57 137 377 1006 19 57 136 375 1001 18 55 133 366 977 18 53 127 349 932 16 49 118 325 866 15 44 106 291 775 12 37 89 244 652 9 27 65 178 475 1 4 10 28 76 18 54 130 358 19 57 137 377 1005 19 58 140 386 1029 19 58 141 387 1031 19 57 138 381 1015 18 55 134 368 981 17 52 126 348 928 16 48 117 321 855 14 43 103 284 758 12 36 86 236 629 8 25 60 166 443 Evaporating temperature °C -5 -10 -15 -20 -25 18 54 131 360 19 57 138 381 1016 20 59 142 392 1045 20 60 144 395 1054 20 59 142 392 1045 19 58 139 382 1019 18 55 133 366 976 17 52 125 344 916 16 47 114 314 837 14 42 100 276 735 11 34 82 225 600 18 54 131 361 19 58 139 383 1021 20 60 144 396 1056 20 60 146 401 1070 20 60 145 400 1067 20 59 143 393 1048 19 57 138 380 1013 18 54 131 361 964 17 51 122 337 898 15 46 111 305 813 13 40 96 265 706 18 54 131 360 19 58 139 383 1023 20 60 145 398 1061 20 61 147 405 1080 20 61 147 406 1082 20 60 146 401 1069 20 59 142 390 1041 19 56 136 375 1000 18 53 129 354 944 16 49 119 327 873 15 44 107 294 783 5 / 32 18 54 130 358 19 58 139 382 1020 20 60 145 398 1062 20 61 148 407 1085 21 62 149 409 1091 20 61 148 406 1083 20 60 145 398 1061 19 58 140 385 1027 18 55 133 367 979 17 52 125 344 917 16 47 115 315 841 18 53 129 354 19 57 138 380 1014 20 60 144 397 1059 20 61 148 407 1085 21 62 149 411 1095 21 62 149 409 1092 20 61 147 403 1075 20 59 143 392 1046 19 57 137 377 1005 18 54 130 357 951 17 50 121 332 885 Valve Type -30 -35 -40 -45 18 53 127 350 19 57 137 377 1005 20 59 143 394 1052 20 61 147 405 1082 21 62 149 411 1095 21 62 149 411 1095 20 61 148 406 1083 20 60 144 397 1058 19 58 139 383 1023 18 55 133 366 976 17 52 125 344 917 17 52 125 344 19 56 135 372 992 20 59 142 391 1043 20 61 146 403 1075 21 62 149 409 1091 21 62 149 410 1095 20 61 148 407 1086 20 60 145 399 1065 19 58 141 388 1034 19 56 135 372 992 18 53 128 352 940 17 51 123 338 18 55 133 366 978 19 58 140 386 1030 20 60 145 399 1064 20 61 148 406 1084 20 62 149 409 1090 20 61 148 406 1084 20 60 146 400 1067 20 59 142 390 1040 19 57 137 376 1003 18 54 130 358 956 17 50 120 331 18 54 131 360 961 19 57 138 380 1015 20 59 143 394 1052 20 61 146 402 1073 20 61 148 406 1082 20 61 147 405 1079 20 60 145 399 1065 20 59 142 390 1042 19 57 137 378 1008 18 55 132 362 965 EX4 EX5 EX6 EX7 EX8 EX4 EX5 EX6 EX7 EX8 EX4 EX5 EX6 EX7 EX8 EX4 EX5 EX6 EX7 EX8 EX4 EX5 EX6 EX7 EX8 EX4 EX5 EX6 EX7 EX8 EX4 EX5 EX6 EX7 EX8 EX4 EX5 EX6 EX7 EX8 EX4 EX5 EX6 EX7 EX8 EX4 EX5 EX6 EX7 EX8 EX4 EX5 EX6 EX7 EX8 27.09.2006 EX4 / EX5 / EX6 / EX7 / EX8 Electrical Control Valves Extended capacities as expansion and liquid injection valves The following tables provide the capacity of valves at different conditions considering 1.5 bar pressure drop through liquid line: Condensing temperature Dew point Bubble point °C °C 64 60 59 55 54 50 50 45 45 40 40 35 35 30 30 25 26 20 21 15 16 10 EX48_35008_EN_R07.doc R 407C Extended capacity kW Valve Evaporating temperature °C (Dew point) Type 15 10 5 0 -5 -10 -15 -20 -25 -30 -35 -40 -45 16 50 119 328 874 17 50 120 330 879 16 50 118 326 869 16 48 115 316 843 15 46 109 300 801 14 42 101 278 742 12 38 90 248 661 10 32 75 207 552 7 23 54 148 395 17 51 120 332 884 17 51 122 336 895 17 51 121 334 891 16 50 119 327 873 16 48 114 315 840 15 45 108 297 793 14 42 99 273 729 12 37 88 241 644 10 30 72 199 530 7 21 50 137 365 17 51 121 333 889 17 52 123 339 904 17 52 123 340 906 17 51 122 336 894 16 50 118 326 870 16 48 113 312 832 15 45 106 292 779 13 41 97 266 710 12 36 85 233 621 9 29 69 189 503 6 19 45 123 329 17 51 121 333 889 17 52 124 341 909 17 52 125 343 915 17 52 124 341 909 17 51 121 334 891 16 49 117 323 860 15 47 111 306 817 14 44 103 285 760 13 39 94 258 687 11 34 81 223 594 9 27 64 176 470 17 51 121 332 885 17 52 124 341 908 17 53 125 345 919 17 53 125 344 918 17 52 123 339 905 17 50 120 330 880 16 48 115 317 844 15 46 108 299 796 14 42 100 276 735 12 38 90 247 658 11 32 76 210 561 17 50 119 329 877 17 52 123 339 904 17 53 125 345 919 17 53 125 346 921 17 52 124 342 913 17 51 122 335 894 16 49 118 324 864 15 47 112 309 823 14 44 105 289 770 13 40 96 265 705 12 36 85 234 624 16 50 118 325 867 17 51 122 336 897 17 52 125 343 914 17 53 125 345 920 17 52 125 344 916 17 52 123 338 901 16 50 119 329 876 16 48 115 316 841 15 46 108 299 796 14 42 101 277 740 13 38 91 251 670 16 49 116 320 854 17 51 121 332 886 17 52 123 340 907 17 52 125 344 916 17 52 125 343 915 17 52 123 339 904 17 51 120 331 883 16 49 116 320 853 15 47 111 305 814 14 44 104 287 764 13 40 96 264 704 16 48 114 314 838 16 50 119 328 873 17 51 122 336 896 17 52 124 341 908 17 52 124 341 910 17 52 123 338 902 17 51 121 332 885 16 49 117 322 860 16 47 112 309 825 15 45 106 293 781 14 42 99 273 727 15 47 112 308 821 16 49 117 322 858 17 51 120 331 883 17 51 122 337 897 17 52 123 338 902 17 51 122 337 897 17 51 120 331 884 16 49 117 323 861 16 48 113 312 831 15 45 108 297 791 14 43 101 279 743 15 46 109 301 802 16 48 114 315 840 16 50 118 325 868 17 51 120 332 884 17 51 121 334 891 17 51 121 334 889 17 50 120 329 878 16 49 117 322 859 16 48 113 312 832 15 46 108 299 796 14 43 103 282 753 15 45 106 293 781 15 47 112 308 821 16 49 116 319 851 16 50 118 326 869 17 50 120 330 878 17 50 120 330 879 16 50 119 326 870 16 49 116 320 854 16 48 113 311 829 15 46 109 299 797 14 43 103 284 757 14 43 103 285 759 15 46 109 301 801 16 48 113 312 832 16 49 116 320 853 16 49 118 324 864 16 50 118 325 866 16 49 117 323 860 16 48 115 317 846 15 47 112 309 824 15 46 108 298 795 14 43 103 284 758 6 / 32 EX4 EX5 EX6 EX7 EX8 EX4 EX5 EX6 EX7 EX8 EX4 EX5 EX6 EX7 EX8 EX4 EX5 EX6 EX7 EX8 EX4 EX5 EX6 EX7 EX8 EX4 EX5 EX6 EX7 EX8 EX4 EX5 EX6 EX7 EX8 EX4 EX5 EX6 EX7 EX8 EX4 EX5 EX6 EX7 EX8 EX4 EX5 EX6 EX7 EX8 EX4 EX5 EX6 EX7 EX8 27.09.2006 EX4 / EX5 / EX6 / EX7 / EX8 Electrical Control Valves Extended capacities as expansion and liquid injection valves The following tables provide the capacity of valves at different conditions considering 1.5 bar pressure drop through liquid line: Condensing R 22 temperature °C 60 55 50 45 40 35 30 25 20 15 10 EX48_35008_EN_R07.doc 15 10 5 0 17 51 123 337 900 16 50 119 328 876 16 48 114 314 838 15 45 107 295 787 13 41 98 270 719 12 36 86 237 632 10 29 70 194 516 7 20 47 130 347 17 52 126 345 921 17 51 123 339 903 16 50 119 327 873 16 47 113 311 830 15 44 106 290 774 13 40 96 264 703 11 35 83 229 611 9 28 67 184 491 6 18 43 117 312 18 53 128 351 936 17 52 126 346 923 17 51 123 337 899 16 49 118 324 864 15 46 111 306 817 14 43 103 284 757 13 39 93 256 682 11 33 80 220 587 9 26 63 173 461 5 15 37 101 269 18 54 129 355 946 18 53 128 352 938 17 52 125 345 919 17 51 121 334 890 16 48 116 319 850 15 45 109 300 799 14 42 100 276 735 12 37 90 246 656 10 32 76 209 557 8 24 58 160 426 4 12 29 80 214 Extended capacity kW Valve Evaporating temperature °C -5 -10 -15 -20 -25 Type -30 -35 -40 -45 18 54 130 357 952 18 54 129 355 948 18 53 127 350 933 17 52 124 341 909 16 50 119 328 875 16 47 113 312 831 15 44 106 291 776 13 40 97 266 709 12 36 85 235 627 10 30 71 196 524 7 22 53 145 386 17 53 127 350 932 18 53 128 353 941 18 54 128 353 942 18 53 127 350 934 17 52 125 345 919 17 51 122 336 896 16 49 118 325 866 16 47 113 311 829 15 45 107 294 784 14 42 100 274 731 13 38 91 251 669 17 52 126 345 921 17 53 127 350 932 18 53 127 351 935 17 53 127 348 929 17 52 125 344 916 17 51 122 336 896 16 49 118 326 869 16 47 114 313 835 15 45 108 298 793 14 42 102 279 745 13 39 94 258 689 17 52 124 340 908 17 52 126 345 921 17 53 126 347 925 17 52 126 346 922 17 52 124 342 911 17 51 122 335 893 16 49 118 326 868 16 48 114 314 837 15 45 109 300 799 14 43 103 283 754 13 40 96 263 702 17 51 122 335 893 17 52 124 340 908 17 52 125 343 914 17 52 124 342 912 17 51 123 339 903 17 50 121 333 888 16 49 118 324 865 16 48 114 314 836 15 46 109 300 801 14 43 104 285 759 13 40 97 267 711 18 54 130 358 954 18 54 130 357 953 18 54 129 354 943 17 52 126 346 923 17 51 122 335 894 16 49 117 321 856 15 46 110 303 808 14 43 102 281 749 13 39 93 254 678 11 34 81 222 593 9 28 66 182 485 18 54 130 357 953 18 54 130 358 955 18 54 129 355 948 17 53 127 349 932 17 52 124 340 907 16 50 119 327 873 16 47 113 312 831 15 44 106 292 779 13 41 98 269 718 12 37 88 241 644 10 31 76 208 554 7 / 32 18 54 129 356 948 18 54 130 357 953 18 54 129 356 949 18 53 128 351 936 17 52 125 343 915 17 50 121 332 885 16 48 116 318 848 15 46 109 301 802 14 42 102 280 747 13 39 93 256 682 11 34 82 227 604 18 53 128 353 941 18 54 129 356 949 18 54 129 355 947 18 53 128 351 937 17 52 125 345 919 17 51 122 335 893 16 49 117 322 859 15 46 112 307 818 14 44 105 288 768 13 40 97 266 710 12 36 87 241 642 EX4 EX5 EX6 EX7 EX8 EX4 EX5 EX6 EX7 EX8 EX4 EX5 EX6 EX7 EX8 EX4 EX5 EX6 EX7 EX8 EX4 EX5 EX6 EX7 EX8 EX4 EX5 EX6 EX7 EX8 EX4 EX5 EX6 EX7 EX8 EX4 EX5 EX6 EX7 EX8 EX4 EX5 EX6 EX7 EX8 EX4 EX5 EX6 EX7 EX8 EX4 EX5 EX6 EX7 EX8 27.09.2006 EX4 / EX5 / EX6 / EX7 / EX8 Electrical Control Valves Extended capacities as expansion and liquid injection valves The following tables provide the capacity of valves at different conditions considering 1.5 bar pressure drop through liquid line: Condensing R 134a temperature °C 60 55 50 45 40 35 30 25 20 15 10 EX48_35008_EN_R07.doc Extended capacity kW Valve Evaporating temperature °C Type 15 10 5 0 -5 -10 -15 -20 -25 -30 -35 -40 -45 13 39 93 255 679 12 38 91 249 663 12 36 87 238 636 11 34 81 223 595 10 31 74 202 539 9 27 63 173 463 7 20 49 133 356 3 10 23 63 169 13 39 94 257 686 13 39 92 253 676 12 38 90 246 655 12 36 85 234 623 11 33 79 217 578 10 30 71 194 517 8 25 60 164 436 6 18 44 121 322 2 5 12 34 90 13 39 94 258 688 13 39 93 256 683 13 38 91 250 668 12 37 88 241 642 11 35 83 227 606 10 32 76 209 556 9 28 67 184 492 8 23 55 152 406 5 16 38 105 281 13 39 94 257 686 13 39 94 257 685 13 39 92 253 675 12 38 90 246 655 12 36 85 234 625 11 34 80 219 584 10 30 73 199 531 9 26 63 173 462 7 21 51 139 370 4 13 32 87 231 13 39 93 255 680 13 39 93 256 683 13 39 93 254 677 12 38 91 248 662 12 37 87 239 638 11 35 83 226 604 11 32 76 210 559 9 29 69 188 501 8 25 58 160 427 6 19 45 123 328 3 9 22 61 162 13 39 92 252 672 13 39 93 254 678 13 39 92 253 676 13 38 91 249 664 12 37 88 242 645 12 35 84 231 616 11 33 79 217 578 10 30 72 198 529 9 27 64 175 467 7 22 53 145 388 5 16 38 104 277 12 38 90 248 661 13 38 92 251 670 13 38 92 251 671 12 38 91 249 663 12 37 89 243 647 12 36 85 234 623 11 34 81 221 590 10 31 75 206 548 9 28 68 186 495 8 25 59 161 428 6 20 47 128 341 12 37 89 243 648 12 38 90 247 659 12 38 91 249 663 12 38 90 247 658 12 37 88 242 646 12 36 86 235 625 11 34 82 224 597 11 32 77 210 560 10 29 70 193 514 9 26 62 171 456 7 22 52 144 384 12 36 87 237 633 12 37 88 242 647 12 37 89 245 653 12 37 89 244 651 12 37 88 240 641 12 36 85 234 624 11 34 82 225 600 11 33 78 213 567 10 30 72 197 526 9 27 65 178 475 8 24 56 155 413 12 35 84 231 616 12 36 86 237 632 12 37 88 240 640 12 37 88 240 641 12 36 87 238 634 12 36 85 232 620 11 34 82 224 599 11 33 78 214 570 10 31 73 200 533 9 28 67 183 488 8 25 59 162 432 11 34 82 224 598 12 35 84 231 616 12 36 86 235 627 12 36 86 236 629 12 36 85 234 625 12 35 84 230 613 11 34 81 223 595 11 33 78 213 569 10 31 73 201 536 9 28 68 186 495 8 26 61 167 445 11 33 79 217 580 11 34 82 225 599 12 35 84 229 611 12 35 84 231 616 12 35 84 230 614 11 35 83 227 604 11 34 80 221 588 11 32 77 212 565 10 31 73 201 535 9 29 68 187 498 9 26 62 170 452 11 32 77 210 560 11 33 80 218 582 11 34 81 223 595 11 35 82 226 602 11 34 82 225 601 11 34 81 223 594 11 33 79 217 580 11 32 76 210 559 10 31 73 199 532 9 29 68 187 498 9 26 62 171 455 8 / 32 EX4 EX5 EX6 EX7 EX8 EX4 EX5 EX6 EX7 EX8 EX4 EX5 EX6 EX7 EX8 EX4 EX5 EX6 EX7 EX8 EX4 EX5 EX6 EX7 EX8 EX4 EX5 EX6 EX7 EX8 EX4 EX5 EX6 EX7 EX8 EX4 EX5 EX6 EX7 EX8 EX4 EX5 EX6 EX7 EX8 EX4 EX5 EX6 EX7 EX8 EX4 EX5 EX6 EX7 EX8 27.09.2006 EX4 / EX5 / EX6 / EX7 / EX8 Electrical Control Valves Extended capacities as expansion and liquid injection valves The following tables provide the capacity of valves at different conditions considering 1.5 bar pressure drop through liquid line: Condensing temperature °C 60 55 50 45 40 35 30 25 20 15 10 EX48_35008_EN_R07.doc R 404A / R 507 Extended capacity kW Valve Evaporating temperature °C Type 15 10 5 0 -5 -10 -15 -20 -25 -30 -35 -40 -45 9 28 68 186 495 10 30 72 198 527 10 31 74 203 541 10 31 74 201 537 10 29 71 193 515 9 27 65 178 474 8 23 56 153 409 6 17 42 114 305 1 3 8 21 56 9 28 68 187 498 10 31 73 201 535 10 32 76 208 555 10 32 77 210 559 10 31 75 205 547 10 30 71 195 519 9 27 65 177 472 8 23 55 150 400 5 16 40 108 289 9 28 68 186 496 10 31 74 202 538 11 32 77 211 564 11 33 79 215 574 11 33 78 214 570 10 31 75 207 551 10 30 71 194 517 9 27 64 174 465 7 22 53 146 388 5 15 37 101 268 9 28 67 184 491 10 31 74 202 537 11 32 78 213 567 11 33 80 219 583 11 33 80 219 585 11 33 79 215 574 10 31 75 206 550 10 29 70 191 510 8 26 62 170 453 7 21 51 139 371 5 14 33 91 242 9 28 66 181 482 10 30 73 200 533 11 32 78 213 567 11 33 80 220 587 11 34 81 223 594 11 34 81 221 590 11 33 78 215 573 10 31 74 204 543 9 28 68 187 499 8 25 60 164 437 7 20 48 131 350 9 27 65 177 471 10 30 72 197 525 11 32 77 211 562 11 33 80 220 586 11 34 82 225 598 11 34 82 225 599 11 34 81 221 588 11 32 78 213 566 10 30 73 200 532 9 28 66 181 484 8 24 57 156 417 9 26 63 172 458 10 29 70 193 514 10 32 76 208 555 11 33 80 219 582 11 34 82 225 598 11 34 83 226 603 11 34 82 224 598 11 33 80 218 582 10 32 76 208 555 10 29 71 194 516 9 26 64 174 464 8 25 61 166 443 9 29 69 188 501 10 31 75 204 545 11 33 79 216 575 11 34 81 223 595 11 34 83 226 604 11 34 83 226 603 11 34 81 222 592 11 33 78 214 571 10 31 74 202 540 9 28 68 186 496 8 24 58 160 425 9 28 67 182 486 10 30 73 200 532 11 32 78 212 566 11 34 81 221 588 11 34 82 225 600 11 34 83 226 603 11 34 82 224 596 11 33 80 218 580 10 32 76 208 555 10 30 71 195 519 8 23 56 153 407 9 27 64 176 470 10 30 71 194 518 10 32 76 208 553 11 33 79 217 578 11 34 81 223 594 11 34 82 225 600 11 34 82 224 597 11 33 80 219 585 11 32 77 212 564 10 31 73 201 535 7 22 53 145 387 8 26 62 169 451 9 29 69 188 501 10 31 74 202 539 11 32 78 213 567 11 33 80 219 585 11 34 81 223 593 11 34 81 223 593 11 33 80 220 585 11 32 78 213 569 10 31 75 204 544 7 21 50 137 366 8 25 59 162 432 9 28 66 181 484 10 30 72 196 524 10 32 76 208 553 11 33 79 215 573 11 33 80 219 584 11 34 80 220 587 11 33 80 218 582 11 33 78 214 569 10 31 75 206 548 6 20 47 129 344 8 23 56 154 411 9 27 64 174 465 9 29 69 190 506 10 31 74 202 538 11 32 77 210 560 11 33 79 215 573 11 33 79 217 579 11 33 79 216 576 11 32 78 213 566 10 31 75 206 549 9 / 32 EX4 EX5 EX6 EX7 EX8 EX4 EX5 EX6 EX7 EX8 EX4 EX5 EX6 EX7 EX8 EX4 EX5 EX6 EX7 EX8 EX4 EX5 EX6 EX7 EX8 EX4 EX5 EX6 EX7 EX8 EX4 EX5 EX6 EX7 EX8 EX4 EX5 EX6 EX7 EX8 EX4 EX5 EX6 EX7 EX8 EX4 EX5 EX6 EX7 EX8 EX4 EX5 EX6 EX7 EX8 27.09.2006 EX4 / EX5 / EX6 / EX7 / EX8 Electrical Control Valves Extended capacities as expansion and liquid injection valves The following tables provide the capacity of valves at different conditions considering 1.5 bar pressure drop through liquid line: Condensing R 23 temperature °C -45 17 53 127 16 50 119 15 45 109 13 40 96 11 33 78 7 22 53 -10 -15 -20 -25 -30 -35 -40 -50 18 55 132 17 52 125 16 48 117 14 44 106 13 38 92 10 30 73 6 19 46 -45 Condensing R 124 temperature °C 100 95 90 85 80 75 70 65 60 EX48_35008_EN_R07.doc -55 19 56 135 18 54 130 17 51 122 15 47 113 14 42 101 12 36 86 9 28 67 5 15 37 30 7 22 53 8 24 57 8 25 61 9 26 63 9 27 64 9 27 64 9 26 62 8 25 60 8 23 56 25 7 21 51 8 23 56 8 25 59 9 26 62 9 27 63 9 27 64 9 26 63 8 26 61 8 24 58 20 7 20 49 7 23 54 8 24 58 8 25 61 9 26 63 9 27 64 9 27 64 9 26 62 8 25 60 15 6 19 47 7 22 52 8 24 56 8 25 60 8 26 62 9 26 63 9 27 63 9 26 63 8 26 61 Extended capacity kW Valve Evaporating temperature °C Type -60 19 57 138 18 55 133 17 53 127 16 49 118 15 45 108 13 40 96 11 33 80 8 25 60 -65 19 58 139 19 56 135 18 54 130 17 51 122 16 47 114 14 43 103 12 37 90 10 30 73 -70 19 58 140 19 57 137 18 55 132 17 52 125 16 49 117 15 45 108 13 40 96 11 34 82 -75 19 58 140 19 57 137 18 55 133 17 53 127 16 50 120 15 46 111 14 42 101 12 37 88 -80 19 58 140 19 57 137 18 55 134 18 53 128 17 51 122 16 47 114 14 43 104 13 39 93 -85 19 58 139 19 57 137 18 55 133 18 53 129 17 51 122 16 48 115 15 44 106 13 40 96 -90 19 57 138 19 57 136 18 55 133 18 53 128 17 51 123 16 48 116 15 45 108 13 41 98 -95 19 57 137 18 56 135 18 55 132 18 53 128 17 51 123 16 48 116 15 45 108 14 41 99 -100 18 56 135 18 55 134 18 54 131 17 53 127 17 51 122 16 48 116 15 45 108 14 41 100 EX4 EX5 EX6 EX4 EX5 EX6 EX4 EX5 EX6 EX4 EX5 EX6 EX4 EX5 EX6 EX4 EX5 EX6 EX4 EX5 EX6 EX4 EX5 EX6 Extended capacity kW Valve Evaporating temperature °C Type 10 6 18 44 7 21 50 7 23 54 8 24 58 8 25 61 9 26 62 9 26 63 9 26 63 8 26 62 5 6 17 42 7 20 47 7 22 52 8 23 56 8 25 59 8 25 61 9 26 62 9 26 62 8 26 62 0 5 16 39 6 19 45 7 21 50 7 23 54 8 24 57 8 25 60 8 25 61 8 26 62 8 26 61 10 / 32 EX4 EX5 EX6 EX4 EX5 EX6 EX4 EX5 EX6 EX4 EX5 EX6 EX4 EX5 EX6 EX4 EX5 EX6 EX4 EX5 EX6 EX4 EX5 EX6 EX4 EX5 EX6 27.09.2006 EX4 / EX5 / EX6 / EX7 / EX8 Electrical Control Valves Extended capacities as expansion and liquid injection valves The following tables provide the capacity of valves at different conditions considering 1.5 bar pressure drop through liquid line: Condensing Extended capacity kW R 744 temperature 8 5 0 -5 10 5 15 36 99 - 12 36 86 237 - 18 55 132 362 12 37 89 244 - 22 68 164 450 19 57 137 376 12 38 90 247 659 0 -5 -10 -15 -10 -15 -20 26 29 31 79 87 94 189 208 225 518 572 617 23 27 29 71 81 90 170 195 215 466 535 589 19 24 27 58 72 83 139 173 198 383 475 544 1023 1267 1452 12 19 24 37 59 73 89 140 174 245 385 477 654 1028 1275 12 19 36 58 87 139 239 382 639 1021 11 35 84 229 613 -20 -25 -30 -35 -40 EX48_35008_EN_R07.doc Type Evaporating temperature °C °C 5 Valve 11 / 32 -25 -30 -35 -40 -45 -50 33 99 238 653 32 96 231 634 30 91 218 598 1598 27 83 199 547 1460 24 72 173 475 1269 19 57 137 376 1003 11 33 79 216 576 34 104 249 683 33 102 244 670 32 98 234 642 1715 30 91 219 601 1604 27 83 198 544 1452 23 71 171 468 1250 18 56 133 365 974 10 30 72 198 528 35 108 257 707 35 106 254 699 34 103 247 677 1809 32 98 234 644 1718 30 91 217 597 1594 27 82 195 536 1431 23 70 166 457 1220 18 53 128 350 935 9 27 64 175 466 36 110 264 726 36 110 263 722 35 107 257 705 1883 34 103 247 678 1809 32 97 233 639 1705 29 89 214 588 1570 26 80 191 523 1398 22 67 161 442 1179 17 51 121 332 887 7 22 53 145 386 37 113 269 740 37 113 269 739 36 111 265 727 1942 35 107 257 705 1881 34 102 245 671 1793 31 96 229 628 1677 29 87 209 574 1532 25 77 185 507 1353 21 64 154 423 1129 16 47 113 310 828 5 16 37 103 275 38 114 273 750 38 115 274 753 37 113 271 744 1987 36 110 264 725 1937 35 106 254 697 1861 33 100 240 660 1761 31 93 223 613 1636 28 85 202 556 1483 24 74 177 486 1298 20 61 146 400 1068 14 43 103 284 759 EX4 EX5 EX6 EX7 EX8 EX4 EX5 EX6 EX7 EX8 EX4 EX5 EX6 EX7 EX8 EX4 EX5 EX6 EX7 EX8 EX4 EX5 EX6 EX7 EX8 EX4 EX5 EX6 EX7 EX8 EX4 EX5 EX6 EX7 EX8 EX4 EX5 EX6 EX7 EX8 EX4 EX5 EX6 EX7 EX8 EX4 EX5 EX6 EX7 EX8 EX4 EX5 EX6 EX7 EX8 27.09.2006 EX4 / EX5 / EX6 / EX7 / EX8 Electrical Control Valves EX4/EX5/EX6/EX7/EX8 Nominal and extended capacities as hot gas bypass regulator Nominal Capacities, kW Valve Type Kv, m3/h EX4 0.21 EX5 0.68 EX6 1.57 EX7 5.58 EX8 16.95 R 22/R 407C 4.9 16 37 131 399 R 134a 3.4 11 26 92 278 R 404A/R 507 4.6 15 35 126 382 Nominal capacities at +4°C, +38°C bubble point for all refrigerants (+43°C dew point for R407C). Remarks: EX4, EX5, EX6, EX7 and EX8 must be installed with motor downward in hot gas line applications. This insures the valve life expectancy. Extended capacities, kW Liquid / Condensing temperature °C R 22 / R 407C R 134a 7 23 54 191 581 6.1 20 46 163 495 4.9 16 38 136 414 4.3 14 32 112 340 60 bubble point for all refrigerants (64 dew point for R407C) 50 bubble point for all refrigerants (54 dew point for R407C) 40 bubble point for all refrigerants (45 dew point for R407C) 30 bubble point for all refrigerants (35 dew point for R407C) 4.9 16 38 135 411 4.3 14 32 115 348 3.7 12 27 95 289 2.8 9 22 78 236 R 404A / R 507 5.8 19 45 161 488 5.5 18 41 147 447 4.9 16 36 130 394 4 13 31 111 336 Valve type EX4 EX5 EX6 EX7 EX8 EX4 EX5 EX6 EX7 EX8 EX4 EX5 EX6 EX7 EX8 EX4 EX5 EX6 EX7 EX8 EX6/EX7/EX8 Nominal and extended capacities as suction pressure regulator (evaporator or crankcase) Nominal Capacities, kW Valve Type R 407C R 22 R 134a R 404A Kv, m3/h EX6 1.57 3.9 4.1 3.1 3.5 EX7 5.58 14 15 11 13 EX8 16.95 42 45 34 38 Nominal capacities at +4°C, +38°C bubble point for all refrigerants (+43°C dew point for R407C) and 0.15 bar pressure drop. Remarks: EX4, EX5, EX6, EX7 and EX8 must be installed with motor downward in suction line applications. This insures the valve life expectancy. Multiply above nominal capacities by following factors to obtain capacities at different pressure drops: ∆P, bar Correction factor 0.10 0.82 0.15 1.00 0.20 1.15 0.30 1.41 Example: EX6 provides 3.5 kW at 0.15 bar pressure drop with R404A: 3.5*1.41 = 4.9 kW capacity at 0.3 bar pressure drop. EX48_35008_EN_R07.doc 12 / 32 27.09.2006 EX4 / EX5 / EX6 / EX7 / EX8 Electrical Control Valves Extended capacities in kW, suction pressure regulator duty Condensing R 22 temperature Extended capacity kW Valve Evaporating temperature °C 0 -10 -20 Type °C 10 5 -30 -40 60 4 13 41 3 12 37 3 11 34 3 9 27 2 7 22 2 5 17 1 4 12 EX6 EX7 EX8 4 15 45 5 16 49 4 13 41 4 15 45 3 12 37 4 13 41 3 10 30 3 11 33 2 8 24 2 9 27 2 6 19 2 7 21 1 5 14 1 5 15 EX6 EX7 EX8 EX6 EX7 EX8 5 17 53 5 19 56 4 16 48 5 17 52 4 14 44 4 15 47 3 12 36 4 13 39 3 9 29 3 10 31 2 7 22 2 8 24 2 5 16 2 6 18 EX6 EX7 EX8 EX6 EX7 EX8 50 40 30 20 Condensing temperature R 407C Extended capacity kW Valve Evaporating temperature °C 0 -10 -20 Type Dew point Bubble point °C °C 10 5 64 60 3 12 36 3 11 33 3 10 29 2 8 23 2 6 18 EX6 EX7 EX8 54 50 45 40 4 14 41 4 15 46 3 12 37 4 14 42 3 11 34 3 12 38 2 9 27 3 10 30 2 7 21 2 8 23 EX6 EX7 EX8 EX6 EX7 EX8 35 30 26 20 5 17 51 5 18 55 4 15 46 5 16 50 4 14 41 4 15 45 3 11 33 3 12 36 2 9 26 3 9 28 EX6 EX7 EX8 EX6 EX7 EX8 EX48_35008_EN_R07.doc 13 / 32 27.09.2006 EX4 / EX5 / EX6 / EX7 / EX8 Electrical Control Valves Extended capacities in kW, suction pressure regulator duty Condensing temperature R 134a Extended capacity kW Valve Evaporating temperature °C 5 0 -10 Type °C 10 60 3 10 30 2 9 27 2 8 24 2 6 18 1 4 13 EX6 EX7 EX8 3 11 34 3 12 38 3 10 30 3 11 34 2 9 27 3 10 30 2 7 21 2 8 23 1 5 15 2 6 17 EX6 EX7 EX8 EX6 EX7 EX8 4 14 41 4 15 45 3 12 37 4 13 40 3 11 33 3 12 36 2 8 26 3 9 28 2 6 19 2 7 21 EX6 EX7 EX8 EX6 EX7 EX8 50 40 30 20 Condensing temperature R 404A / R507 -20 Extended capacity kW Valve Evaporating temperature °C 0 -10 -20 Type °C 10 5 -30 -40 60 3 9 29 2 8 26 2 8 23 2 6 18 1 4 13 1 3 10 1 2 7 EX6 EX7 EX8 3 12 36 4 14 42 3 11 32 3 12 38 3 9 29 3 11 34 2 7 23 3 9 27 2 6 18 2 7 21 1 4 13 1 5 16 1 3 9 1 4 12 EX6 EX7 EX8 EX6 EX7 EX8 4 16 48 5 17 53 4 14 43 4 16 48 4 13 39 4 14 44 3 10 31 3 12 35 2 8 25 3 9 28 2 6 19 2 7 21 1 5 14 1 5 16 EX6 EX7 EX8 EX6 EX7 EX8 50 40 30 20 EX48_35008_EN_R07.doc 14 / 32 27.09.2006 EX4 / EX5 / EX6 / EX7 / EX8 Electrical Control Valves EX5/EX6/EX7/EX8 Nominal and extended capacities as condensing pressure regulator and liquid duty Nominal Capacities, kW Valve Type Kv, m3/h EX5 0.68 EX6 1.57 EX7 5.58 EX8 16.95 R 407C 18 43 153 463 R 22 20 46 162 491 R 134a 18 42 151 458 R 404A 13 30 106 323 Nominal capacities at +4°C, +38°C bubble point for all refrigerants (+43°C dew point for R407C) and 0,35 bar pressure drop. Multiply above nominal capacities by following factors to obtain capacities at different pressure drops. 0.15 0.20 0.35 ∆P, bar Correction factor 0.65 0.76 1.00 Extended capacities, kW Condensing R 22 temperature °C 60 50 40 30 20 10 0 15 36 128 387 17 41 144 439 19 45 161 488 21 50 177 536 23 54 192 584 15 35 124 377 17 40 141 428 19 44 157 477 21 49 173 525 23 53 188 572 Condensing R 134a temperature °C 60 50 40 30 20 EX48_35008_EN_R07.doc 10 0 14 32 115 350 16 37 133 405 18 42 151 458 20 47 168 512 22 52 186 564 13 31 109 332 15 36 127 387 18 41 145 440 20 46 162 493 22 51 180 546 Extended capacity kW Valve Evaporating temperature °C -10 -20 -30 Type -40 15 34 120 365 16 36 129 391 19 43 153 465 20 48 169 513 22 52 184 560 13 30 108 328 15 35 124 377 17 39 140 426 19 44 156 472 21 48 171 519 14 33 116 353 17 39 137 416 18 42 149 453 20 46 165 500 22 51 180 547 14 32 112 341 16 36 129 391 17 41 145 439 19 45 160 486 21 49 175 533 EX5 EX6 EX7 EX8 EX5 EX6 EX7 EX8 EX5 EX6 EX7 EX8 EX5 EX6 EX7 EX8 EX5 EX6 EX7 EX8 Extended capacity kW Valve Evaporating temperature °C -10 -20 -30 Type 13 29 104 315 15 34 121 369 17 39 139 422 19 44 156 474 21 49 173 526 12 27 98 296 14 32 115 350 16 37 133 403 18 42 150 455 20 47 167 507 15 / 32 -40 EX5 EX6 EX7 EX8 EX5 EX6 EX7 EX8 EX5 EX6 EX7 EX8 EX5 EX6 EX7 EX8 EX5 EX6 EX7 EX8 27.09.2006 EX4 / EX5 / EX6 / EX7 / EX8 Electrical Control Valves Extended capacities in kW, condensing pressure and liquid regulator Condensing temperature R 404A/R 507 °C 60 50 40 30 20 Valve Evaporating temperature °C -10 -20 -30 Type 10 0 8 19 66 202 11 24 87 264 13 30 106 321 8 17 62 189 10 23 82 250 12 28 101 306 7 16 58 175 9 22 78 236 12 27 96 291 6 15 53 160 9 20 73 220 11 26 91 276 6 13 48 146 8 19 67 205 10 24 85 260 5 12 43 130 8 17 62 189 10 23 80 243 EX5 EX6 EX7 EX8 EX5 EX6 EX7 EX8 EX5 EX6 EX7 EX8 15 35 123 375 14 33 119 360 14 32 114 345 13 30 108 329 12 29 103 312 12 27 97 295 EX5 EX6 EX7 EX8 17 40 141 427 16 38 136 412 16 37 131 397 15 35 125 380 14 34 120 363 14 32 114 346 EX5 EX6 EX7 EX8 Condensing temperature Dew point Bubble point °C °C 64 60 54 50 45 40 35 30 26 20 EX48_35008_EN_R07.doc Extended capacity kW R 407C 10 Extended capacity kW Evaporating temperature °C 0 -10 -20 -40 Valve Type 14 32 112 340 13 30 108 327 12 29 103 313 12 28 98 298 EX5 EX6 EX7 EX8 16 37 132 402 15 36 128 388 15 35 123 373 14 33 118 358 EX5 EX6 EX7 EX8 18 43 152 460 18 41 147 446 17 40 142 431 17 38 137 415 EX5 EX6 EX7 EX8 21 48 170 517 23 53 189 573 20 47 166 503 22 52 184 558 19 45 160 487 22 50 179 543 19 44 155 471 21 49 173 526 EX5 EX6 EX7 EX8 EX5 EX6 EX7 EX8 16 / 32 27.09.2006 EX4 / EX5 / EX6 / EX7 / EX8 Electrical Control Valves EX6/EX7/EX8 Nominal and extended capacities for hot gas flow such as heat reclaim application Nominal Capacities, kW Valve Type R 22 / R 407C R 134a R 404A/R 507 R 410A Kv, m3/h EX6 1.57 11 9 10 13 EX7 5.58 39 33 36 47 EX8 16.95 119 101 108 144 Nominal capacities are at 0.5 bar pressure drops, +4°C evaporating temperature, +38°C bubble point for all refrigerants (+43°C dew point for R407C) and 0.8 isentropic efficiency of compressor. For other conditions, page 17-20. Remarks: EX6/EX7/EX8 must be installed with motor downward in hot gas line applications. This insures the valve life expectancy. Extended capacities, kW Condensing Pressure temperature drop °C bar 15 10 5 0 -5 -10 -15 -20 -25 -30 -35 -40 -45 0.1 4 15 45 4 14 43 4 14 42 4 13 40 4 13 38 3 12 36 3 11 35 3 11 33 3 10 31 3 10 29 3 9 27 2 8 25 2 8 23 EX6 EX7 EX8 0.5 9 32 99 9 31 95 8 30 92 8 29 88 8 28 84 7 26 80 7 25 76 7 24 72 6 22 68 6 21 64 6 20 60 5 18 56 5 17 52 EX6 EX7 EX8 1 13 45 137 12 44 132 12 42 127 11 40 122 11 39 117 10 37 112 10 35 106 9 33 101 9 31 95 8 29 89 8 27 84 7 26 78 7 24 72 EX6 EX7 EX8 0,1 5 16 49 4 16 47 4 15 46 4 15 44 4 14 43 4 14 41 4 13 40 4 13 38 3 12 36 3 11 35 3 11 33 3 10 31 3 10 30 EX6 EX7 EX8 0.5 10 35 107 10 34 104 9 33 101 9 32 98 9 31 95 8 30 91 8 29 88 8 28 84 7 26 80 7 25 77 7 24 73 6 23 69 6 22 65 EX6 EX7 EX8 1 14 49 149 13 48 145 13 46 141 13 45 136 12 43 131 12 42 127 11 40 122 11 38 117 10 37 112 10 35 107 9 33 102 9 32 96 8 30 91 EX6 EX7 EX8 0.1 5 16 50 4 16 49 4 16 47 4 15 46 4 15 45 4 14 43 4 14 42 4 13 40 4 13 39 3 12 37 3 12 36 3 11 34 3 11 33 EX6 EX7 EX8 0.5 10 36 109 10 35 107 10 34 104 9 33 101 9 32 98 9 31 95 9 30 92 8 29 89 8 28 86 8 27 83 7 26 79 7 25 76 7 24 73 EX6 EX7 EX8 1 14 50 152 14 49 148 13 48 144 13 46 140 13 45 136 12 44 132 12 42 128 11 41 124 11 39 119 11 38 115 10 36 110 10 35 105 9 33 101 EX6 EX7 EX8 0.1 5 16 49 4 16 48 4 15 47 4 15 46 4 15 45 4 14 43 4 14 42 4 13 41 4 13 40 4 13 38 3 12 37 3 12 36 3 11 34 EX6 EX7 EX8 0.5 10 35 108 10 35 105 10 34 103 9 33 101 9 32 98 9 31 95 9 31 93 8 30 90 8 29 87 8 28 84 8 27 81 7 26 78 7 25 76 EX6 EX7 EX8 1 14 49 149 13 48 146 13 47 142 13 46 139 13 45 135 12 43 132 12 42 128 12 41 124 11 40 120 11 38 117 10 37 113 10 36 109 10 34 104 EX6 EX7 EX8 60 50 40 30 EX48_35008_EN_R07.doc R 404A Extended capacity kW Valve Evaporating temperature °C Type 17 / 32 27.09.2006 EX4 / EX5 / EX6 / EX7 / EX8 Electrical Control Valves Extended capacities kW, hot gas flow such as heat reclaim applications Condensing Pressure temperature drop °C bar 15 10 5 0 -5 -10 -15 -20 -25 -30 -35 -40 -45 0.1 5 16 50 5 16 49 4 16 47 4 15 46 4 15 44 4 14 43 4 14 41 4 13 40 4 13 38 3 12 37 3 12 35 3 11 33 3 10 32 EX6 EX7 EX8 0.5 10 36 110 10 35 107 10 34 104 9 33 101 9 32 97 9 31 94 8 30 91 8 29 87 8 28 84 7 26 80 7 25 77 7 24 74 6 23 70 EX6 EX7 EX8 1 14 50 152 14 49 148 13 47 144 13 46 139 12 44 135 12 43 130 12 41 126 11 40 121 11 38 116 10 37 112 10 35 107 9 34 102 9 32 97 EX6 EX7 EX8 0,1 5 16 49 4 16 48 4 15 47 4 15 45 4 14 44 4 14 43 4 14 41 4 13 40 4 13 39 3 12 37 3 12 36 3 11 35 3 11 33 EX6 EX7 EX8 0.5 10 35 108 10 35 105 9 34 102 9 33 99 9 32 97 9 31 94 8 30 91 8 29 88 8 28 85 8 27 82 7 26 79 7 25 76 7 24 73 EX6 EX7 EX8 1 14 49 148 13 48 145 13 46 141 13 45 137 12 44 133 12 43 129 12 41 125 11 40 121 11 39 117 10 37 113 10 36 109 10 34 105 9 33 100 EX6 EX7 EX8 0.1 4 16 47 4 15 46 4 15 45 4 14 44 4 14 43 4 14 42 4 13 40 4 13 39 4 13 38 3 12 37 3 12 36 3 11 34 3 11 33 EX6 EX7 EX8 0.5 10 34 103 9 33 100 9 32 98 9 32 96 9 31 93 8 30 91 8 29 88 8 28 86 8 27 83 7 26 80 7 26 78 7 25 75 7 24 73 EX6 EX7 EX8 1 13 46 141 13 45 138 12 44 134 12 43 131 12 42 128 12 41 124 11 40 121 11 39 117 11 38 114 10 36 110 10 35 107 10 34 103 9 33 100 EX6 EX7 EX8 0.1 4 15 44 4 14 43 4 14 42 4 14 42 4 13 41 4 13 40 4 13 39 3 12 38 3 12 37 3 12 35 3 11 34 3 11 33 3 11 32 EX6 EX7 EX8 0.5 9 32 96 9 31 94 9 30 92 8 30 90 8 29 88 8 28 86 8 28 84 8 27 81 7 26 79 7 25 77 7 25 75 7 24 72 6 23 70 EX6 EX7 EX8 1 12 43 130 12 42 128 12 41 125 11 40 122 11 39 119 11 38 117 11 37 114 10 36 111 10 35 108 10 34 105 9 33 102 9 32 98 9 31 95 EX6 EX7 EX8 60 50 40 30 EX48_35008_EN_R07.doc Extended capacity kW R 134a Valve Type Evaporating temperature °C 18 / 32 27.09.2006 EX4 / EX5 / EX6 / EX7 / EX8 Electrical Control Valves Extended capacities kW, hot gas flow such as heat reclaim applications Condensing Pressure temperature drop °C bar 15 10 5 0 -5 -10 -15 -20 -25 -30 -35 -40 -45 0.1 6 20 59 5 19 58 5 19 57 5 18 55 5 18 54 5 17 53 5 17 51 5 16 50 4 16 48 4 15 47 4 15 45 4 14 44 4 14 42 EX6 EX7 EX8 0.5 12 43 131 12 42 129 12 41 126 11 40 123 11 39 119 11 38 116 10 37 113 10 36 110 10 35 107 10 34 103 9 33 100 9 32 97 9 31 94 EX6 EX7 EX8 1 17 60 183 17 59 179 16 58 175 16 56 171 15 55 167 15 53 162 15 52 158 14 51 154 14 49 149 13 48 145 13 46 140 13 45 135 12 43 131 EX6 EX7 EX8 0,1 5 19 58 5 19 57 5 18 56 5 18 54 5 17 53 5 17 52 5 17 51 5 16 49 4 16 48 4 15 47 4 15 45 4 14 44 4 14 42 EX6 EX7 EX8 0.5 12 42 128 12 41 126 11 40 123 11 40 120 11 39 117 11 38 115 10 37 112 10 36 109 10 35 106 10 34 103 9 33 100 9 32 97 9 31 94 EX6 EX7 EX8 1 17 59 178 16 57 175 16 56 171 15 55 167 15 54 163 15 52 159 14 51 155 14 50 151 14 49 147 13 47 143 13 46 139 13 44 135 12 43 131 EX6 EX7 EX8 0.1 5 18 56 5 18 55 5 18 54 5 17 52 5 17 51 5 16 50 5 16 49 4 16 48 4 15 47 4 15 45 4 15 44 4 14 43 4 14 42 EX6 EX7 EX8 0.5 11 40 123 11 40 120 11 39 118 11 38 115 10 37 113 10 36 110 10 35 108 10 35 105 9 34 103 9 33 100 9 32 97 9 31 94 8 30 92 EX6 EX7 EX8 1 16 56 170 15 55 167 15 54 163 15 53 160 14 52 157 14 50 153 14 49 149 14 48 146 13 47 142 13 46 139 12 44 135 12 43 131 12 42 127 EX6 EX7 EX8 0.1 5 17 53 5 17 52 5 17 51 5 16 50 4 16 49 4 16 48 4 15 46 4 15 45 4 15 44 4 14 43 4 14 42 4 14 41 4 13 40 EX6 EX7 EX8 0.5 11 38 115 10 37 113 10 37 111 10 36 109 10 35 107 10 34 104 9 34 102 9 33 100 9 32 97 9 31 95 9 30 93 8 30 90 8 29 88 EX6 EX7 EX8 1 15 52 159 14 51 156 14 50 153 14 49 150 14 48 147 13 47 144 13 46 141 13 45 138 12 44 134 12 43 131 12 42 128 12 41 124 11 40 121 EX6 EX7 EX8 60 50 40 30 R 22 / R 407C* Extended capacity kW Valve Type Evaporating temperature °C *) Condensing temperatures R 407C: The relation between bubble points and dew points is as follows: Dew point °C Bubble point °C 64 60 54 50 45 40 35 30 EX48_35008_EN_R07.doc 19 / 32 27.09.2006 EX4 / EX5 / EX6 / EX7 / EX8 Electrical Control Valves Extended capacities kW, hot gas flow such as heat reclaim applications Condensing Pressure temperature drop °C bar 15 10 5 0 -5 -10 -15 -20 -25 -30 -35 -40 -45 0.1 6 21 64 6 21 63 6 20 62 6 20 60 5 19 58 5 19 57 5 18 55 5 18 53 5 17 52 5 16 50 4 16 48 4 15 46 4 15 44 EX6 EX7 EX8 0.5 13 47 143 13 46 140 13 45 137 12 44 133 12 43 130 12 41 126 11 40 122 11 39 118 11 38 115 10 36 111 10 35 107 10 34 103 9 32 99 EX6 EX7 EX8 1 19 66 200 18 64 196 18 63 191 17 61 186 17 60 182 16 58 177 16 56 171 15 55 166 15 53 161 14 51 155 14 49 150 13 47 144 13 46 138 EX6 EX7 EX8 0,1 6 22 67 6 22 66 6 21 65 6 21 63 6 20 62 6 20 60 5 19 59 5 19 57 5 18 55 5 18 54 5 17 52 5 17 50 4 16 48 EX6 EX7 EX8 0.5 14 49 149 14 48 146 13 47 143 13 46 140 13 45 137 12 44 133 12 43 130 12 42 126 11 40 123 11 39 119 11 38 115 10 37 111 10 35 108 EX6 EX7 EX8 1 19 69 209 19 67 204 19 66 200 18 64 196 18 63 191 17 61 186 17 60 182 16 58 177 16 57 172 15 55 167 15 53 161 14 51 156 14 50 151 EX6 EX7 EX8 0.1 6 22 67 6 22 66 6 21 65 6 21 63 6 20 62 6 20 60 5 19 59 5 19 58 5 18 56 5 18 54 5 17 53 5 17 51 5 16 50 EX6 EX7 EX8 0.5 14 49 148 13 48 146 13 47 143 13 46 140 13 45 137 12 44 134 12 43 131 12 42 127 11 41 124 11 40 121 11 39 117 11 37 114 10 36 110 EX6 EX7 EX8 1 19 68 207 19 67 203 18 66 199 18 64 195 18 63 191 17 61 187 17 60 182 16 59 178 16 57 173 16 55 168 15 54 164 15 52 159 14 51 154 EX6 EX7 EX8 0.1 6 21 65 6 21 64 6 21 63 6 20 61 6 20 60 5 19 59 5 19 58 5 19 56 5 18 55 5 18 53 5 17 52 5 17 51 5 16 49 EX6 EX7 EX8 0.5 13 47 143 13 46 141 13 45 138 13 45 135 12 44 133 12 43 130 12 42 127 12 41 124 11 40 121 11 39 118 11 38 115 10 37 112 10 36 109 EX6 EX7 EX8 1 18 65 199 18 64 195 18 63 192 17 62 188 17 61 185 17 60 181 16 58 177 16 57 173 16 56 169 15 54 165 15 53 160 14 51 156 14 50 152 EX6 EX7 EX8 60 50 40 30 EX48_35008_EN_R07.doc R 410A Extended capacity kW Valve Evaporating temperature °C Type 20 / 32 27.09.2006 EX4 / EX5 / EX6 / EX7 / EX8 Electrical Control Valves Application of control valves in systems The following schematics show the arrangement of integrated valves for different applications. Legends: TC Pump Thermo Expansion valve Compressor Condenser/Evaporator P Pressure transmitter T Temperature sensor Flow direction Check valve Plate heat exchanger Sight glass Liquid Receiver Solenoid valve Suction accumulator Four way reversing valve Filter dryer Overview applications: Application 1: Expansion valve in cooling system Application 2: Bi-Flow expansion valve in heat pump (except EX8) Application 3: Expansion valve in heat pump (one valve) Application 4: Expansion valve in heat pump (two valves) Application 5: Expansion valve as liquid injection valve for desuperheating Application 6: Expansion valve as liquid injection valve for subcooling Application 7: Capacity control by means of hot gas bypass Application 8: Capacity control by means of suction pressure throttling Application 9: Crankcase pressure control Application 10: Head pressure control Application 11: Liquid level control EX48_35008_EN_R07.doc 21 / 32 page 22 22 23 23 24 24 25 25 26 26 27 27.09.2006 EX4 / EX5 / EX6 / EX7 / EX8 Electrical Control Valves Application 1: Expansion valve in cooling system 2 EC3-X33 1 (1) = Expansion Valve (2) = Superheat controller EC3-X33 Application 2: Bi-Flow expansion valve in heat pump (except EX8) 2 EC3-X33 1 (1) = Bi-Flow Expansion Valve (2) = Superheat controller EC3-X33 EX48_35008_EN_R07.doc 22 / 32 27.09.2006 EX4 / EX5 / EX6 / EX7 / EX8 Electrical Control Valves Application 3: Expansion valve in heat pump (one valve) 2 EC3-X33 1 (1) = Expansion Valve (2) = Superheat controller EC3-X33 Application 4: Expansion valve in heat pump (two valves) 1 1 (1) = Expansion Valve, heating mode (2) = Expansion Valve, cooling mode EX48_35008_EN_R07.doc 23 / 32 27.09.2006 EX4 / EX5 / EX6 / EX7 / EX8 Electrical Control Valves Application 5: Expansion valve as liquid injection valve for desuperheating 4-20mA/0-10V 1 T 2 3 TC (1) = Temperature Controller (2) = Stepper motor driver EXD-U00 (3) = Electrical Control Valve Application 6: Expansion valve as liquid injection valve for subcooling 4-20mA/0-10V 1 2 3 T TC (1) = Temperature Controller (2) = Stepper motor driver EXD-U00 (3) = Electrical Control Valve EX48_35008_EN_R07.doc 24 / 32 27.09.2006 EX4 / EX5 / EX6 / EX7 / EX8 Electrical Control Valves Application 7: Capacity control by means of hot gas bypass 2 3 4-20mA/0-10V 5 1 T TC 4 Remarks: (1) = Temperature Controller (2) = Check Valve: It is important to install a check valve just after T-connection as shown. Check valve will not allow return of liquid refrigerant from condenser through electrical control valve in to the evaporator during power interruption to system. (3) = Hot gas bypass valve must be installed with motor downward. This insures the valve life expectancy. (4) = Liquid Distributor must be selected properly for hot gas mass flow. (5) = Stepper motor driver EXD-U00 Application 8: Capacity control by means of suction pressure throttling 1 T 4-20mA/0-10V 4 TC 2 Remarks: (1) = Temperature Controller (2) = Evaporator temperature regulator. EX6, EX7 and EX8 must be installed with motor downward in suction line applications. This insures the valve life expectancy. EX48_35008_EN_R07.doc (3) This application may require additional liquid injection to suction line for desuperheating of compressor by means of suction line superheat control or discharge line temperature control. Please consult Alco Controls for more details. (4) = Stepper motor driver EXD-U00 25 / 32 27.09.2006 EX4 / EX5 / EX6 / EX7 / EX8 Electrical Control Valves Application 9: Crankcase pressure control 1 4-20mA/0-10V P 3 TC 2 Remarks: (1) = Pressure Controller (2) = Crankcase pressure regulator. ECVs must be installed with motor downward in suction line applications. This insures the valve life expectancy. (3) = Stepper motor driver EXD-U00 Application 10: Head pressure control P 2 1 3 4-20mA/0-10V TC (1) = Pressure Controller (2) = Condensing pressure regulator (3) = Stepper motor driver EXD-U00 EX48_35008_EN_R07.doc 26 / 32 27.09.2006 EX4 / EX5 / EX6 / EX7 / EX8 Electrical Control Valves Application 11: Liquid level control 4-20mA/0-10V 1 3 4-20mA 4-20mA/0-10V 3 2 1 4-20mA 2 (1) = Level Controller (2) = Liquid level sensor (3) = Stepper motor driver EXD-U00 Note: ECVs are not released for use with ammonia. EX48_35008_EN_R07.doc 27 / 32 27.09.2006 EX4 / EX5 / EX6 / EX7 / EX8 Electrical Control Valves Driver and controller In contrary to thermo-expansion and regulator valves, stepper motor driven valves are not self operated actuators and require: a stepper motor driver which generates the digital pulse sequence needed to move the stepper motor in clockwise or counter clockwise direction an algorithm which determines the opening of the valve as a function of system parameters and conditions. Alco Controls offers several solutions for this task: EC3-X33 Superheat controller as stand alone for all applications and EC3-X32 Superheat controller for use in TCP/IP networks. The modules contain all required algorithms for full operation of ALCO ECVs. For further details please refer to EC3X33 or EC3X32 technical data sheet. EC3-33x Cold Room Controller is a digital temperature controller primary for refrigeration applications such as cold rooms. It features temperature control, superheat control and defrost, compressor and fan management where applicable. For further details please refer to EC33x technical data sheet. EXD-U Universal driver is a stepper motor driver which uses an analogue input signal to define the valve opening. It enables the operation of EX4/EX5/EX6/EX7/EX8 as: • Electronic expansion valve • Capacity control by means of hot gas bypass or evaporating pressure regulator • Crankcase pressure regulator • Condenser pressure regulator • Liquid level actuator • Liquid injection valve The input signal for the driver module can be 4…20mA or 0…10V. The output pulses provide the proportional opening/closing of EX4/EX5/EX6/EX7/EX8 and consequently the control of liquid or vapour refrigerant mass flow. The universal driver module can be connected to any controller which provides the analogue signal. This gives system manufacturers the extreme flexibility to use any desired controller in conjunction with the universal driver module to achieve different functionality. For further details please refer to EXD-U technical data sheet. The patented valve control module VCM is a hybrid integrated circuit, which provides the superheat algorithm and the stepper motor driver to those customers, who want to integrate the valve control into their own system controller. This solution is mainly for OEMs having serial mass production systems. The following information is for those customers who want to develop their own driver/controller/algorithms: 2) Valve The gate type valve is optimised to provide a wide range of capacity with a linear relation between flow and positioning of the valve (capacity vs. number of steps). Slide and ports are made from ceramic for precise flow characteristics, high resolution and infinite life. The compliant slide eliminates undesirable horizontal forces caused by differential pressure (across the valve) to the cage assembly and shaft of stepper motor. The internal design of the EX4/5/6/7/8 is patented. Total valve travel is 750 full steps for EX4/5/6, 1600 steps for EX7 and 2600 steps for EX8. A mechanical stop in the fully closed position of the valve acts as reference point. The controller is reset by driving the valve towards the fully closed position against the mechanical stop. By overdriving the valve i.e. applying more than the full number of steps, it can be assured that the reference point is correct. Function 1) Motor A 2-phase bipolar stepper motor drives the EX4/5/6/7/8. This motor follows the basic operating characteristics of any stepper motor i.e. the motor will be held in position unless current pulses from a driver board initiate rotation in either direction. The direction of the rotation depends on the phase relationship of the current pulses, the amount of rotation is dependent on the number of pulses. One pulse will drive the motor one step i.e. the rotor will move by α=1.8°. Successive pulses will lead to continuous rotation. The drive shaft of the rotor is connected to a spindle which transforms the rotation into linear motion of the valve slide. 1α 0 2α 3α Pulse 1 2 3 M Time closed Angular rotation (cross section of shaft) EX48_35008_EN_R07.doc 28 / 32 M open 27.09.2006 EX4 / EX5 / EX6 / EX7 / EX8 Electrical Control Valves 3) Driving of stepper motor There are many different options to drive stepper motors like the one used in the EX4/5/6/7/8. Alco Controls stepper motors need a driver board with chopper drive function (constant current), an interface and a controller. Chopper drive (constant current) The stepper motor of EX4/5/6/7/8 is a bipolar, 2-phase permanent-magnet motor and operates with constant DC current in each phase. A driver board with chopper drive function feeds a DC current as indicated below to the windings of the stepper motor. 4 8 10 9 1 7 6 5 Time in ms Current in A 0,5 2 6 3 0,0 0 0,002 0,004 0,006 0,008 0,01 0,012 0,014 0,016 0,018 0,02 6 4 7 -0,5 8 9 6 10 1 4) Design of customised driver board A suitable driver board must be selected according to the electrical data of the stepper motor and based on the following requirements: • Electrical output (four-stage switching sequence, see next page) • The EX4/5/6/7/8 should be operated in full step mode. • Stepping rate: 500Hz for EX4/5/6/7/8 Chopper function, current: • 5 Current EX4/5/6 EX7 EX8 Operating 500 mA 750 mA 800 mA Holding 100 mA 250 mA 500 mA 6 6 2 3 1 2 3 4 5 6 7 8 9 10 Stainless steel body Stepper motor Electrical connector Cage assembly Shaft Welding and/or brazing Ceramic inlet port Ceramic slide Ceramic outlet port Brass ball EX48_35008_EN_R07.doc 29 / 32 27.09.2006 EX4 / EX5 / EX6 / EX7 / EX8 Electrical Control Valves Sequence for driving of stepper motor and valve Direction Valve Reverse direction Number of steps Identification code of pins for electrical connections to third party drivers/controllers A B C Current direction D + - + - Valve Step 1 is is Step 2 - + + - opening closing Step 3 - + - + Step 4 + - - + Remark ↓ ↓ The sequence is repeated from step 5 to 8 similar to step 1 to 4 Step 5 + - + - Step 6 - + + - Step 7 - + - + Step 8 + - - + Remark The sequence is repeated from step 9 to 12 similar to step 1 to 4 ↓ ↓ EX4/EX5/EX6/EX7/EX8 identification code of pins for electrical connection to third party drivers/controllers DIN plug for EX8 M12 plug and cable assembly (EX5-xxx) for EX4/EX5/EX6/EX7 F A B C D EX48_35008_EN_R07.doc Plug terminal numbers Cable, wire colour 1 3 -/4 2 White Black Blue Brown 30 / 32 27.09.2006 EX4 / EX5 / EX6 / EX7 / EX8 Electrical Control Valves Technical data CE marking EX4/EX5: EX6/EX7/EX8: Compatibility (not released for use with inflammable refrigerants) MOPD (maximum operating pressure differential) Max. working pressure, PS Temperature range: Refrigerant Ambient Salt spray test Humidity Connections not required required, Cat I, Module A CFCs, HCFCs, HFCs, mineral and POE lubricants EX4/EX5/EX6/EX7: 33 bar EX8: 25 bar EX4/EX5/EX6/EX7: 45 bar EX8: 35 bar TS: -50 to +100°C (at motor) -40 to +55°C non-corrosion stainless steel body 5 to 95% r.H. Protection accordance to IEC 529, DIN 40050 EX4/5/6/7: IP68 with Alco supplied cable connector assembly EX8: IP65 with DIN plug Vibration for non-connec- 4g ted and fastened valve (0 to 1000 Hz, 1 octave /min.) Shock Net weight (kg) Accessories Package and delivery (individual) 20g at 11 ms 80g at 1 ms 0.5 kg (EX4), 0.52 kg (EX5), 0.60 kg (EX6), 1.8 kg (EX7), 2.5 kg (EX8) See table on page 2 EX4/5/6/7: without electrical connector EX8: with DIN plug and a pair of rotalock connections External leakage EX4/EX5/EX6/EX7: ODF stainless steel fittings EX8: Rotalock with ODF, plated fittings Seat leakage Stepper motor type Bi-polar, phase current by chopper control (constant current) Phase inductance Electrical connection Reccom. driver supply voltg. 4 pin terminal via plug 24 VDC (nominal) Step mode Step angle Driver supply voltage range 18 … 36 VDC Total number of steps Phase current, operating EX4/EX5/EX6: 500mA max, -10% EX7: 750mA ±10% EX8: 800mA ±10% EX4/EX5/EX6: 100mA EX7: 250mA EX8: 500mA Stepping rate EX4/EX5/EX6: 3.5W EX7/EX8: 5W Full travel time ≤ 3 gram / year Positive shut-off as solenoid valve Electrical data Holding current Nominal input power per phase Winding resistance per phase Reference position EX48_35008_EN_R07.doc 31 / 32 EX4/EX5/EX6: 30 mH ± 25% EX7: 20 mH ± 25% EX8: 22 mH ± 25% 2 phase full step 1.8° per step ± 8% EX4/EX5/EX6: 750 full steps EX7: 1600 full steps EX8: 2600 full steps 500Hz EX4/EX5/EX6: 13Ohm ±10% EX7: 8Ohm ±10% EX8: 6Ohm ±10% EX4/EX5/EX6: 1.5 seconds EX7: 3.2 seconds EX8: 5.2 seconds Mechanical stop at fully close position 27.09.2006 EX4 / EX5 / EX6 / EX7 / EX8 Electrical Control Valves Dimensions EX4 / EX5 / EX6 / EX7 Dimensions EX8 Valve Type Ø A x Ø F (ODF) B C D E H1 H2 EX4-I21 3/8" x 5/8" 8 45 55 11 113 25 EX4-M21 10 x 16 mm 8 45 55 11 113 25 EX4-U31 16 x 16 mm (5/8" x 5/8") 11 55 55 11 113 25 EX5-U21 5/8" x 7/8" (16 x 22mm) 11 55 65 16 113 25 EX5-U31 7/8" x 7/8" (22 x 22mm) 16 65 65 16 113 25 EX6-I21 7/8" x 1-1/8" 16 65 75 19 113 25 EX6-M21 22 x 28 mm 16 65 75 19 113 25 EX6-I31 1-1/8" x 1-1/8" 19 75 75 19 113 25 EX6-M31 28 x 28 mm 19 75 75 19 113 25 EX7-I21 1-1/8" x 1-3/8" 20 77.5 82.5 23 157 42 EX7-M21 28 x 35 mm 20 77.5 82.5 23 157 42 EX7-U31 1-3/8 x 1-3/8 (35 x 35mm) 23 82.5 82.5 23 157 42 EX8-M21 42 x 42 25 119 117 25 78 EX8-U21 1-3/8 x 1-3/8 (35 x 35mm) 25 119 117 25 78 ALCO CONTROLS is not to be held responsible for erroneous literature regarding capacities, dimensions, applications, etc. stated herein. Products, specifications and data in this literature are subject to change without notice. The information given herein is based on technical data and tests which ALCO CONTROLS believes to be reliable and which are in compliance with technical knowledge of today. It is intended only Emerson Electric GmbH & Co. OHG ALCO CONTROLS Heerstraße 111 D-71332 Waiblingen Germany Phone ...49-(0)7151-509-0 Fax ...49-(0)7151-509-200 www.eCopeland.com/alcoliterature.cfm EX48_35008_EN_R07.doc for use by persons having the appropriate technical knowledge and skills, at their own discretion and risk. Since conditions of use are outside of ALCO'S control we can not assume any liability for results obtained or damages occurred due to improper application. This document replaces all earlier versions. Benelux Denmark & Finland Eastern Europe, Turkey & Iran France, Greece, Maghreb Deutschland, Österreich, Schweiz Italia Middle East & Africa Poland Russia & Cis España & Portugal Sweden & Norway UK & Ireland 32 / 32 Phone.: +31 (0)773 240 234 +32 (0)87 305 565 +32 (0)87 305 061 +33 (0)478 668 570 +49 (0)6109 6059 0 +39 02 961 78 1 +97 148 832 828 +48 (0)22 458 9205 +7 495 981 9811 +34 93 4 123 752 +32 (0)87 305 565 +44 (0)1 189 838 000 Fax: +31 (0)773 240 235 +49 24 08 929 568 +32 (0)87 305 506 +33 (0)478 668 571 +49 (0)6109 6059 40 +39 02 961 78 888 +97 148 832 848 +48 (0)22 458 9255 +7 495 981 9816 +34 93 4 124 215 +49 24 08 929 568 +44 (0)1 189 838 001 27.09.2006 EC3-D7x Digital Superheat Controller EC3-D72 with TCP/IP communication capability GB Operating Instructions Description ! Safety instructions: Read installation instructions thoroughly. Failure to comply can result in device failure, system damage or personal injury. • The product is intended for use by persons having the appropriate knowledge and skills. • Disconnect all voltages from system before installation. • Do not operate system before all cable connections are completed. • Comply with local electrical regulations when wiring. Note: The EC3-D7x series contains a lead, acid gel rechargeable battery. The battery must NOT be disposed of with other commercial waste. Instead, it is the user’s responsibility to pass it to a designated collection point for the safe recycling of batteries (harmonised directive 98/101/EEC). For further information contact your local environmental recycling centre. • Technical data Power supply 24VAC ±10%; 50/60Hz; 1A Power consumption Plug-in connector Grounding Protection class COM, TCP/IP connection Connection to optional local ECD-002 Digital Input; Cooling demand 25VA max. including EX4 … EX6 Removable screw terminals wire size 0,14 .. 1,5 mm2 6,3 mm spade earth connector IP20 RJ45 Ethernet ECC-Nxx or CAT5 cable with RJ45 connectors Digital Input; Comp2 running Mounting The EC3-D7x is designed to be mounted onto a standard DIN rail. Electrical installation • • Digital input status is dependant to operation of compressor/0-10V input System 0-10V input from third party Operating Digital Inputs controller condition Comp. 1 & “Cooling demand” ECV remains closed irrespective of Comp.2 in stop open (0V) voltage input value mode “Comp 2 Running” open (0V) ECV active Comp. 1 in run “Cooling demand” Input =0V: digital valve capacity at & Comp.2 in closed (24V) / 10% default capacity. stop mode) “Comp 2 Running” When the digital comp. is in by-pass open (0V) the ECV will: Close when capacity is <70% Be inhibited when the capacity is >70% Comp 1 & “Cooling demand” ECV active Comp. 2 in run closed (24V) / The ECV will always modulate even mode “Comp 2 Running” when the digital compressor is in byclosed (24V) pass mode. Comp.1 in stop “Cooling demand” ECV remains closed irrespective of and Comp. 2 in open (0V) / voltage input value run mode starts “Comp 2 Running” closed (24V) Digital comp. should always be regarded as base load; compressor 1 Wiring 0/24VAC/DC for stop/start function. EX valve closes during stop command. Typically thermostat or third party controller. 0/24VAC/DC typically connected to auxiliary connection. EX valve control loop remains active when input is 24V and the digital scroll is idle. Emerson temperature sensor ECN-N60 or ECN-P60 NTC input; Coil-out temperature sensor 4-20 mA Analog input Emerson PT4-07M / PT4-18M / PT4-30M 4-20 mA Analog output For connection to any 3rd party controller with 12/24VDC power supply and appropriate burden Deviation from input ±8% max signal Output alarm relay SPDT contact 24V AC/DC, 2 Amp inductive load (If L2 = 1) Activated: During normal operation (no alarm condition) Deactivated: During alarm condition or power supply is OFF Output pump down relay SPDT contact 24V AC/DC, 2 Amp inductive load (If L2 = 1) Activated: During normal operation Deactivated: All other conditions ! If the output relays are not utilized, the user must ensure appropriate safety precautions are in place to protect the system against damage caused by a power failure. Output Digital Scroll t 24V or 230V AC output to activate PWM valve on Digital Scroll Triac Stepper motor output for Maximum current 0.6A with nominal 24VDC EX4…EX6 operating voltage Ambient temperature 0 … 60°C range 1 … 25°C (for best battery life time) > 35°C battery life time < 2 years ! In order to provide system protection in the event of power loss, it is recommended to change the battery annually. • Important: Keep controller and sensor wiring well separated from mains wiring. Minimum recommended distance 30mm. Warning: Use a class II category transformer for 24VAC power supply. Do not ground the 24VAC lines. We recommend using individual transformers for EC3 controller and for 3rd party controllers to avoid possible interference or grounding problems in the power supply. Connecting any EC3 inputs to mains voltage will permanently damage the EC3. • EC3-D7x is the superheat controller with TCP/IP connection for stepper motor driven Alco Electrical Control Valves EX4...EX6 and is optimized to operate with the Copeland Digital Scroll series utilising a 010V input from a third party controller. The controller synchronises the PWM digital compressor solenoid valve with the superheat controlled by the electrical control valve; EX series. The EC3-D73 has the same functionality but can only be set-up via the ECD-002 display. It has no external communication functionality. Note: This document contains short form instructions for experienced users. Refer to the electrical wiring diagram for electrical connections. Do not apply voltage to the controller before completion of wiring. Ground the metal housing with a 6.3mm spade connector. EC3-D72_65141_EN_R02.doc Replacement for R01 A: White wire B: Black wire C: Blue wire D: Brown wire E: M12 Plug cable assembly EX5-Nxx for connection to EX4/EX5/EX6 F: 24V/230V Triac output to PWM Digital Scroll valve G: Remote control panel, system controller H: Alarm relay, dry contact. Relay coil is not energised at Alarm or power off ! J: K: L: M: The use of the relay is essential to protect the system in case of power failure if the communications interface N: O: or the ECD-002 are not utilized.. I: Digital input 1: “Cooling demand” (Digital compressor run: (0V/open = P: Stop; 24V/closed = Control Start;) 1/4 Transformer Class II, 24VAC secondary / 25VA min. Model ECT-323 Third party controller (can use the suction pressure (4-20mA) analog output signal from EC3) Pump down relay, dry contact. Relay is energized during normal operation. Digital input 2: “Comp. 2 running” (0V/open = Comp2 stop; 24V/closed = Comp2 running Discharge Temp. Sensor 0-10V Digital Scroll capacity demand signal from system controller ECN-N60 Coil out sensor PCN: 865 019 11.02.2009 EC3-D7x Digital Superheat Controller EC3-D72 with TCP/IP communication capability GB Operating Instructions Preparation for Start-up: Vacuum the entire refrigeration circuit. Warning: Alco Electrical Control Valves EX4...EX6 are delivered at half open position. Do not charge system before closure of valve. • Apply supply voltage 24V to EC3 while the cooling demand digital input is 0V (open). The valve will be driven to close position. • After closure of valve, start to charge the system with refrigerant. • Possibilities of connecting EC3-D72 to a network or PC A TCP/IP Controller Readme file is available on the www.emersonclimate.eu website to provide detailed information about TCP/IP Ethernet connectivity. Please refer to this file if you need information beyond the contents of this instruction sheet. 1) Connect the EC3-D72 using the optional ECC-Nxx cable assembly or a standard CAT5 network cable with RJ45 plugs assembly to a network or router that enables the controller to receive a dynamic TCP/IP address or 2) Connect the EC3-D72 to a computer using a crossover cable plugged directly into the Ethernet port. In this case, the TCP/IP address of the computer must be manually modified to be compatible with the default address of the controller. Refer to the TCP/IP Controller-Readme file for more details. Setting and visualising Data: WebPages (recommended method) Important: Make sure that cooling demand input is 0V (open). Turn the power supply ON. Four parameters i.e. refrigerant type (u0), pressure sensor type (uP), valve type (ut) and control mode can be set only when cooling demand digital input is open (0V) and the power supply is ON (24V). This feature is for added safety to prevent accidental damage of compressors and other system components. All other parameters can be modified at any time. The EC3-D72 has a TCP/IP Ethernet communication interface enabling the controller to be directly connected to a network or a PC via the standard Ethernet port. The EC3-D72 controller has embedded WebPages to enable the user to visualise the parameter lists using real text labels. To view WebPages on the PC, a standard WebBrowser like Internet Explorer® or Mozilla Firefox and JRE Java Runtime Environment is needed. JRE can be downloaded at no charge from the www.java.com website. Open the Internet browser program on the computer and, if EC3-D72 is connected directly to PC with a crossover cable enter the default TCP/IP address of the controller (192.168.1.101) into the address line, or the dynamic address from the DHCP server from network/Router. Refer to the TCP/IP Controller-Readme file if a specific port is required. It is possible to identify the dynamic TCP/IP address assigned by DHCP of the Router or network, refer to the TCP/IP Controller-Readme file. After a few moments, the default monitoring page should be displayed. If the browser does not open the default page or display active data, the user should check the Internet browser “Option” configuration. Refer to the TCP/IP ControllerReadme file. After the parameters have been modified, the complete list of settings can be saved to the memory of the computer and used later to upload into another controller. This can save a considerable amount of time when using multiple controllers and over a period of time, a library can be created containing the parameter lists for equipment for different applications. It is also possible to display live graphical data from the controller. Superheat, evaporating pressure, coil-out temperature and evaporating temperature are available on a 10 minutes rolling chart. Refer to the TCP/IP Controller-Readme file for a complete description of the features available for the TCP/IP series of controllers. Alternative procedure for parameter modification using ECD-002 Note: Some of the functions/parameters (manual control and TCP/IP configuration) cannot be modified when using ECD-002 comparing to a set-up by PC via TCP/IP. Warning: All alarms are disabled during manual control. We do not recommend unattended operation of system during manual control. The parameters can be accessed via the 4-button keypad. The configuration parameters are protected by a numerical password. The default password is “12”. To select the parameter configuration: • Press the PRG button for more than 5 seconds A flashing 0 is displayed • Press or until the password is displayed (default 12). If the password was changed, select the new password • Press SEL to confirm password • Press or to show the code of the parameter that has to be changed; • Press SEL to display the selected parameter value; • Press or to increase or decrease the value; • Press SEL to temporarily confirm the new value and display its code; or to show..." Repeat the procedure from the beginning "press To exit and save the new settings: Press PRG to confirm the new values and exit the parameters modification procedure. To exit without modifying any parameters: Do not press any button for at least 60 seconds (TIME OUT). Special Functions: The Special Functions can be activated by: • Press and together for more than 5 seconds. A flashing 0 is displayed. • Press or until the password is displayed (default = 12). If password was changed, select the new password. • Press SEL to confirm password A 0 is displayed and the Special Function mode is activated. or to select the function. The number of special functions is dynamic • Press and controller dependent. See list below. 0: Reset controller to factory settings (this action is possible only when digital input is 0V i.e. open) 1: Displays the current TCP/IP address 2: Assign temporary 192.168.1.101 as TCP/IP address if EC3-D72 has different address • Press SEL to activate the function without leaving the special function mode. • Press PRG to activate the function and leave the special function mode. ECD-002 display/keypad unit (LEDs and button functions) Blinking: valve is opening ON: valve is fully open Blinking: valve is closing ON: valve is fully close The Monitoring and Alarm WebPages are read only and therefore it is not necessary to enter a username or password. A username and password will be requested upon the initial request to any of the other WebPages. The factory default settings are : Username: “EmersonID” , Password: “12” The default settings may be modified on the Display configuration page. Press the tabs at the top of the Monitoring page with a left click of the mouse button to enter the respective Webpage. The parameters will be visualised in real text together with the program code as defined in the parameter list below. EC3-D72_65141_EN_R02.doc Replacement for R01 Parameters setting/saving ON: demand OFF: no demand Blinking: pump down ON: alarm OFF: no alarm Next parameter/ value (higher) Not applicable for the EC3-D72 Prg & Sel (5 sec) Manual reset for blinking alarm codes 2/4 Next parameter/ value (lower) Selecting/confirming PCN: 865 019 11.02.2009 EC3-D7x Digital Superheat Controller EC3-D72 with TCP/IP communication capability GB Operating Instructions button Field Min Max Factory setting setting Password 1 199 12 System refrigerant 0 7 4 0 = R22; 1 = R134a; 2 = R507; 3 = R404A; 4 = R407C; 5 = R410A; 6 = R124; 7 = R744 (subcritical application) Installed pressure sensor type 0 2 0 0 = PT4-07M (for R22/R134a/R507/R404A/R407C/R124) 1 = PT4-18M (for R410A) 2 = PT4-30M (for R744, subcritical) Installed valve type 1 3 2 1 = EX4; 2 = EX5; 3 = EX6 Start valve opening (%) 10 100 50 Start opening duration (second) 1 30 5 Low superheat alarm function 0 2 1 0 = disable (for flooded evaporator) 1 = enable auto reset 2 = enable manual reset Cut-out at 0.5K (if it maintains 1 min.); Cut-in immediately at 3K Superheat set-point (K) If uL enabled (auto or manual) 3 30 6 If uL disabled 0.5 30 6 MOP function 0 1 1 0 = disable 1 = enable MOP set-point (°C) saturation * * X temperature Factory setting is according to selected refrigerant (u0): +13°C for R22 +15°C for R134a +7°C for R507 +7°C for R404A +15°C for R407C +15°C for R410A +50°C for R124 -5°C for R744 Units conversion 0 1 0 0 = °C, K, bar 1 = °F, R, psig (Psig values are divided by 10. Example: Display 12.5 is 125 psig) Value to show 0 4 0 0 = Measured superheat (K) 1 = Measured evaporator pressure (bar) 2 = Valve opening (%) 3 = Measured coil-out temp. (°C) 4 = Calculated evaporating temperature (°C) from the pressure 5 = Compressor capacity in % Superheat control mode 0 1 0 0 = Standard, 1 = Slow High superheat alarm function 0 1 0 0 = disable, 1 = enable auto reset High superheat alarm setpoint 16 40 30 High superheat alarm delay, min. 1 15 3 Freeze protection cut-out, °C -40 40 0 Freeze protection cut-in, °C -37 43 3 Freeze protection alarm function 0 2 0 0 = disable, 1 = enable auto-reset, 2 = enable manual reset Freeze protection alarm delay, sec. 5 199 30 Pump-down function 0 1 0 0 = disable, 1 = enable auto-reset Pump-down cut-out, barg -0,5 18 0.5 Pump-down time delay, sec. 0 199 30 Low pressure alarm function 0 2 0 0 = disable, 1 = enable auto-reset, 2 = enable manual reset Low pressure alarm cut-out, barg -0,8 17,7 0 Low pressure alarm delay, sec. 5 199 5 Low pressure alarm cut-in, barg -0,5 18 0.3 Code Parameter description and choices H5 u0 uP ut uu u9 uL u5 u2 u3 ┌┘5 ┌┘1 u4 uH uA ud P2 P3 P4 P5 P6 P7 P8 P9 PA Pb Pd Code Parameter description and choices Min Max Factory Field settings settings L2 Output logic 0 3 1 0: Alarm & pump down. = normal 1: Alarm = inverse, pump down. = normal 3: Alarm & pump down. = inverse 2: Alarm = normal, pump down. = inverse b1 Battery error management, when battery 0 3 2 is defective, see below: Alarm display Reset possibility after value Alarm relay Valve recovery/replacement 0 Regulating 1 Ab Regulating 2 Ab Signalling Fully close Auto 3 Ab (blinking) Signalling Fully close Manual ! When setting b1 to option 0 or 1, the user must ensure appropriate safety precautions are in place to protect the system against damage caused by a power failure. /6 Show decimal point; 0=yes, 1 = no 0 1 0 A6 Maximum discharge temperature; °C 100 140 130 A7 Discharge temp. alarm delay; sec. 0 199 30 F2 Minimum capacity; % 10 100 10 F3 Maximum capacity; % 10 100 100 F6 Scroll Valve, PWM cycle time; sec. 10 20 20 t3 Monitor discharge temperature sensor 0 1 0 0 = no, 1 = Yes ru 0-10V input filtering; 0 = off, 1 = on 0 1 *) Min. and Max. setting values are dependant to selected type of refrigerant. Control (valve) start-up behaviour (Parameter uu and u9) % uu EX4/5/6 ≤ 1.5 seconds Sec. u9 EC3-X3 BA.cdr List of parameters in scrolling sequence by pressing Pump down function (if P6=1 and L2=1) Cooling demand status 24V (ON) 0V (OFF) Alarm condition Pump down relay NO NO 0V or 24V YES Activate Deactivate when pressure drops below P7 and after elapsed time P8 Deactivate instantaneously Start-up Start the system and check the superheat and operating conditions. The EC3-D72 is fully functional without connected PC or keypad/display unit. ECD-002. Mounting of ECD-002 ECD-002 can be installed at any time also during operation. • ECD-002 can be mounted in panels with 71x29 mm cutout • Push controller into panel cut-out.(1) • Make sure that mounting lugs are flush with outside of controller housing • Insert Allen key into front panel holes and turn clockwise. Mounting lugs will turn and gradually move towards panel (2) • Turn Allen key until mounting lug barely touches panel. Then move other mounting lug to the same position (3) • Tighten both sides very carefully until keypad is secured. Do not over tighten as mounting lugs will break easily. Error/Alarm handling Alarm Description Related Alarm code parameter relay Pressure transmitter error Signalling E0 Coil-out temperature sensor Signalling E1 error Discharge temp. sensor Signalling E3 error EX4…EX6 electrical Signalling AΠ connection error EC3-D72_65141_EN_R02.doc Replacement for R01 Valve Fully close Fully close Regulating - What to do? Requires manual reset after resolving alarm No No Check wiring connection and measure the signal 4 to 20 mA Check wiring connection and measure the resistance of sensor 10,000ohms @ 25°C Check wiring connections and measure the resistance of the sensor. Also check the status of the I/O configuration (t3) Check wiring connection and measure the resistance of winding No Refer to EX series datasheet: EX58e35008 3/4 PCN: 865 019 11.02.2009 EC3-D7x Digital Superheat Controller EC3-D72 with TCP/IP communication capability GB Operating Instructions Alarm code Ab Alarm relay - Regulating b1: 2 Signalling Fully close Ab blinking b1: 3 Signalling Fully close AE blinking Pump down action can not accomplished P6: 1 Signalling Freeze protection AF AF blinking P4: 1 P4: 2 Signalling Already closed by Pumpdown command Fully close Pumpdown deactivated Fully close Pumpdown deactivated Fully close Pumpdown deactivated Fully close Pumpdown deactivated Fully close Pumpdown deactivated - Ab Description Battery error Related parameter b1: 1 AL AL blinking Low superheat (<0,5K) uL: 1 uL: 2 Signalling AH High superheat uH: 1 Signalling AP AP blinking Low pressure P9: 1 P9: 2 Signalling dA High discharge temp. A6: alarm setpoint Signalling Valve What to do? Battery potentially does not have enough charge to close valve in case of main power supply interruption. May occur temporarily with new controllers or after long storage but should disappear when battery is charged sufficiently (allow 10hrs). If Ab remains active even when battery is charged, battery may be defective and should be replaced. (Replacement kit: 807 790). Allocate the source, which does not let suction pressure drops below desired set-point Requires manual reset after resolving alarm Yes Yes Check the system for cause of low pressure such as insufficient load on evaporator No Yes Check wiring connection and operation of valve No Yes Check the system No Check the system for cause of low pressure such as refrigerant loss No Yes Check the system No Fixed differential = 10°C No Data error display – Data send to the display is out of range. Check temperature and out of range pressure sensor. Note: When multiple alarms occur, the highest priority alarm is displayed until Message being cleared, then the next highest alarm is displayed until all alarms are --- No data to display The display will show an “---” at start up and when no data is send to ECD-002 cleared. Only then will parameters be shown again. Er Checking system operating conditions using local display/keypad ECD-002 The data to be permanently shown on the display can be selected by the user (parameter ┌┘1). It is possible to temporarily display these values. However this function is not available in an alarm condition. The display will show for one second the numerical identifier of the data (see ┌┘1 parameter) and then the selected data. After 5 minutes, the display will return to the value selected by parameter ┌┘1. Service / Troubleshooting Symptom Operating superheat is several degrees higher or lower than set-point Cause Incorrect signal from pressure or temperature sensors Operating superheat is too low i.e. compressor wet running Valve is not fully closed 1- Incorrect wiring of ECV 2- Defective sensors 1- The cooling demand digital input is ON (24V) 2- Wrong ECV selected. Evaporator is designed to operate at higher superheat Wrong wiring between EC3-D72 and valve Stepper motor driven valves require synchronization Unstable superheat (hunting) Valve opens when EC3 commands to close and vice versa Superheat set-point is shifting after several months of uninterrupted operation or permanent jumper of 24V digital input Dimensions EC3-D72/D73 Action 1- Check the sensors 2- Make sure ECN-N60 temperature sensor is used 3- For optimum accuracy, please use: PT4-07M for R22/R134a/R507/R404A/R407C/R124 PT4-18M for R410A PT4-30M for R744 4- Make sure the sensor cables are not installed along with other high voltage cables 1- Check the wiring 2- Check the sensor 1- Valve is shut off only when the digital input is turned off (0V) 2- Check the setting of parameter ut Increase the superheat set-point to a higher value; if system is stable, start to decreasing gradually checking each time for a stable control Check the wiring and obey the colour coding: white/black, blue/brown. Do not apply permanent 24V digital input. Interrupt digital input once every week for 5 seconds if compressor never stops. This has the effect of referencing the valve to the fully closed position. ECD-002 Revision applicable to EC3-D72 software release =>114, rev 6 Emerson Electric GmbH & Co OHG - Postfach 1251 - Heerstraße 111 - D-71332 Waiblingen - Germany - Phone .49-(0)7151-509-0 - Fax .49-(0)7151-509-200 www.emersonclimate.eu EC3-D72_65141_EN_R02.doc Replacement for R01 4/4 PCN: 865 019 11.02.2009 FANs 930, 930.5, 125, 121 Product/Technical Bulletin A350P Issue Date 0899 System 350TM A350P Electronic Proportional Plus Integral Temperature Control The A350P is an electronic, proportional plus integral temperature control with analog 0 to 10 VDC and 0 to 20 mA outputs. The control is equipped with three user-selectable time integration constants and an adjustable throttling range of 2 to 30F° (1 to 17C°). Two models cover a setpoint range of -30 to 130°F (-35 to 55°C) and 90 to 250°F (32 to 121°C). As are all System 350™ products, the A350P control is housed in a NEMA 1, high-impact plastic enclosure. The modular design provides easy, plug-together connections for quick installation and future expandability. Figure 1: A350P Electronic Proportional Plus Integral Temperature Control Features and Benefits ❑ Modular Design Enables stage, display, and power modules to be purchased and installed as needed ❑ Plug-Together Connectors Eliminates wiring between modules, which reduces installation costs ❑ Two Models Cover a Wide Reduces inventory by encompassing temperature ranges required to support the majority of Heating, Ventilation, Air Conditioning, and Refrigeration (HVAC/R) applications ❑ Minimum Output Adjustable Tailors the output to the requirements of the controlled device; can be used to set minimum valve or damper position ❑ Adjustable Throttling Enables the user to tune the system for optimum stable performance ❑ Field-selectable Reverse Works in heating or cooling applications ❑ Three User-Selectable Provides selection of the integration constant for applications requiring proportional plus integral control ❑ Interchangeable Increase versatility and serviceability and 35 mm DIN Rail Mounting Setpoint Range of -30 to 250°F (-35 to 121°C) from 0 to 60% Range of 2 to 30F° (1 to 17C°) or Direct Acting Mode Integration Time Constants Temperature Sensors © 1999 Johnson Controls, Inc. Part No. 24-7664-192, Rev. F Code No. LIT-930020 1 www.johnsoncontrols.com A pplication O peration The A350P Temperature Control can be used as a standalone device or in conjunction with plug-together accessory modules. The addition of S350 Stage Modules allows for the control of multiple stage HVAC/R applications. Typical application for the A350P includes: The A350P control operates on 24 VAC/VDC and provides two simultaneous analog outputs: 0 to 10 VDC and 0 to 20 mA. A cover-mounted, 10-segment Light-Emitting Diode (LED) bar graph indicates percentage of output. Features include: • proportional heating control with staged direct expansion cooling • adjustable setpoint • simple temperature control for air handling units • adjustable minimum output • modulating damper actuators for mixed air control • adjustable throttling range (proportional band) • simple proportional mixed air control • selectable integration time constant • selectable Reverse Acting (RA) or Direct Acting (DA) mode of operation A typical System 350 Temperature Control setup includes the following: IMPORTANT: A350P Temperature Control • A99B Series Temperature Sensor • Y350R Power Module (or 24 VAC Class 2 transformer) • S350 Stage Modules • D350 Digital Temperature Display Module Module Connector Cover Screw (One of Four) Setpoint Dial Throttling Range Potentiometer All System 350 controls are designed for use only as operating controls. Where an operating control failure would result in personal injury and/or loss of property, it is the responsibility of the installer to add devices (safety, limit controls) or systems (alarm, supervisory systems) that protect against, or warn of, control failure. Integration DIP Switch Fast Medium Slow Off On 1 2 3 4 • Integration DIP switch is shown in proportional-only position. THROT MIN RANGE OUTPUT Minimum Output Potentiometer V I SN VDC C 24V LED Indicator (Percent of Output) Reverse Acting (RA) Direct Acting (DA) Operation Mode Jumper Positions V: 0-10 VDC Output I: 0-20 mA Output SN: Sensor Input 24V: 24 VAC (+) C: Common (-) VDC: +5 VDC (not used) Figure 2: Interior View Showing A350P Control’s Features 2 System 350 A350P Electronic Proportional Plus Integral Temperature Control Product/Technical Bulletin Minimum Output Adjustment Throttling Range (Proportional Band) The minimum output adjustment sets the minimum voltage or milliampere output provided by the A350P control. It can be adjusted from 0 to 60% (0 to 6 VDC or 0 to 12 mA) of the output range. The throttling range is the range over which a control is active. Throttling range for the A350P control can be adjusted from 2 to 30F° (1 to 17C°). Make the adjustment at the throttling range potentiometer marked THROT RANGE (see Figure 2). Example: A controlled device responding to a 4-20 mA output would require the minimum output to be adjusted to 20% or 4 mA. (See Figure 3.) The minimum output adjustment may also be used to set valves or dampers to minimum positions. 0% 20% 50% 20 Output 10 (mA) 4 Throttling Range 0 0 2 4 6 8 10 12 14 16 18 20 Deviation Above Setpoint (F°) Integration Function Proportional-only controls cannot hold a process at the exact setpoint. A proportional offset is always present because the control output is 0% at setpoint. Any load on the system will cause the control point to be offset from the setpoint. The greater the load on the system, the further the control point will be offset from the setpoint. (This is commonly referred to as proportional offset, and under maximum load this error will approach the throttling range.) Some proportional-only controls are designed with their setpoint located midway through the proportional band to help compensate for this offset. This results in a plus/minus error from the setpoint rather than a single-ended error. Refer to Figure 4. Figure 3: Output vs. Deviation from Setpoint for: Minimum Output = 0, 20, and 50%, Throttling Range = 20°F (DA) Make the adjustment at the minimum output potentiometer marked as MIN OUTPUT. (See Figure 2.) For each 10% increase in output, the next bar on the LED indicator will light (only one bar is lit at any time). Note: Before setting the minimum output potentiometer, verify that the control reads zero output (that is, no LEDs are lit). System 350 A350P Electronic Proportional Plus Integral Temperature Control Product/Technical Bulletin 3 Temperature Proportional Only Control System Load Proportional Offset Load Change Control Point Follows the Load Throttling Range Setpoint Time Proportional Plus Integral Control Temperature Proportional Offset = 0 System Load Load Change Integration adjusts the proportional output to bring the process to setpoint regardless of load. Setpoint Time Figure 4: Comparison Between Proportional Only and Proportional Plus Integral Control The A350P control has an integration feature that forces the control point to match the setpoint. Over time, the A350P will control the heating/cooling equipment to balance the system load at the control setpoint. (See Figure 4.) On traditional proportional plus integral controls, the amount of correction will become too large if the system load exceeds the capacity of the equipment. When the actuated device (valve or damper) is fully open or closed and the setpoint still cannot be reached, the integration error continues to grow. The result is called integral windup. The A350P control avoids integral windup with a patented circuit that puts a dynamic ceiling on the integrator. This resets the integration error when the sensor goes just above the setpoint plus the throttling range (in DA mode) or just below the setpoint minus the throttling range (in RA mode). This allows the process to recover from an out-of-range condition without a large overshoot. The A350P control has three field-selectable integration constants and an off position. The integration DIP switch selects the integration constant. (See Figure 2 for location.) The field-selectable integration constants include: • OFF: Switch 1 to On position, all others Off provides proportional-only operation. Note: In open-loop (without feedback) applications, select OFF (proportional-only) operation. • Slow (C3): Switch 2 to On position, all others Off is the slowest integration constant (26 minute), and is suitable for most proportional plus integral applications. Slow is the recommended initial setting. • Medium (C2): Switch 3 to On position, all others Off selects a 13-minute integration constant. If the rate of system recovery to setpoint is sluggish with the control set to slow, and if the system has enough capacity to drive the process to setpoint at a faster rate, the medium setting may be used. • Fast (C1): Switch 4 in On position, all others Off is the fastest integration constant (6.5 minutes). Use fast only in instances where the rate of change at the sensor is extremely rapid and system capacity can compensate for that rapid change. 4 System 350 A350P Electronic Proportional Plus Integral Temperature Control Product/Technical Bulletin Reverse or Direct Acting Operation With the operation jumpers in the Reverse Acting (RA) position, the analog output increases as the temperature drops below setpoint. (See Figure 5.) With the operation jumpers in the Direct Acting (DA) position, the analog output will increase as the temperature rises above the setpoint. Select the RA/DA mode by positioning the operation jumpers vertically or horizontally. (See Figure 2.) Position the operation jumpers vertically for RA and horizontally for DA. The RA/DA operation jumpers are installed in the RA mode at the factory. Note: Dashed areas show throttling range possibilities from minimum to maximum. Reverse Acting 10 20 VDC mA RA - 0 20 10 10 0 0 30 25 20 15 10 5F° Setpoint Throttling Range Direct Acting DA + 0 5 10 15 20 25 30F° Setpoint Throttling Range Figure 5: RA and DA Proportional Bands Shown in Proportional-Only Mode A dd-on Modules The maximum number of add-on modules is listed in Table 1. Table 1: Maximum Number of S350 Stage Modules per A350P Number of Number S350A or of S350A S350C or S350C Modules Stage (with Modules Allowed One S350P) Allowed Power Source Number of S350A or S350C Modules (with Two S350Ps) Allowed Y350R 4 2 0 External Class 2 Transformer 9 8 7 S350A On-Off stage modules receive power, setpoint, and sensor input from the A350P control. S350A stage modules perform switching functions based on the control’s setpoint and sensor information, as well as the offset and differential selected at the S350A stage module. For more information on these modules, refer to the TM System 350 S350 Temperature, S351 Humidity, and S352 Pressure On/Off Stage Modules Product/Technical Bulletin (LIT-930080). S350C Slave Stage Module S350C slave stage modules receive power and sensor input from the A350P control. S350C slave stage modules perform switching functions based upon the control’s sensor information, as well as the setpoint and differential selected at the S350C stage module. mA VDC 10 S350A On-Off Stage Modules For more information on these modules, refer to the TM System 350 S350C Temperature Slave Stage Module Product/Technical Bulletin (LIT-930084). S350P Proportional Stage Modules S350P proportional stage modules receive power, setpoint, and sensor input from the A350P control. The S350P stage module responds with an analog 0 to 10 VDC and 0 to 20 mA output signal. This is based upon the control’s setpoint and sensor information, as well as the offset, throttling range, and minimum output selected at the S350P stage module. For more information on these modules, refer to the TM System 350 S350P Proportional Plus Integral Temperature Stage Module Product/Technical Bulletin (LIT-930086). System 350 A350P Electronic Proportional Plus Integral Temperature Control Product/Technical Bulletin 5 D imensions 3/16 (4) Mounting Slots for No. 6 Screws 1/2 (13) 5 (127) 2 15/16 (75) 1 9/16 (40) A350P 4 (102) 2 3/8 (61) DIN Rail Mount 7/16 (11) 1 3/16 (31) 3 (76) Sensor 1/4 (6) 9 3/4 (248) 2 3/8 (61) 2 (50) 7/8 (22) Conduit Hole 7/8 (22) Figure 6: A350P Control and Sensor Dimensions, in. (mm) I nstallation and Wiring Celsius Scale Conversion A Celsius scale throttling range decal is included with the A350P control. If the Celsius scale is desired: 1. Locate the throttling range and minimum output potentiometers on the main PC board. (See Figure 2.) Carefully remove the knobs and the existing decal. 2. Apply the Celsius scale decal in the same place as the original decal. The A350P Temperature Control is housed in a compact NEMA 1 plastic enclosure designed for standard 35 mm DIN rail mounting. Four key-slot mounting holes on the back of the control case are provided should surface mounting be required. If a Y350R is used, it should be mounted immediately to the right of the control. Any S350 modules would follow on the right, with the D350 being the last module mounted, also on the right. Note: 3. Rotate both knob stems completely counterclockwise (CCW). 4. Reinstall the potentiometer knobs so the arrows point to the minimum values. ! When mounting any System 350 module to rigid conduit, attach the hub to the conduit before securing the hub to the control enclosure. WARNING: Risk of Electrical Shock. Disconnect power supply before making electrical connections to avoid possible electrical shock or equipment damage. 6 System 350 A350P Electronic Proportional Plus Integral Temperature Control Product/Technical Bulletin Wiring Terminals Sensor Connection Install all wiring to conform to the National Electrical Code and local regulations. For maximum electrical rating of control, refer to the label inside the control cover. Terminals will accept 12 to 26 AWG wire. Use only copper conductors. Shielded cable is not generally required for sensor wiring on runs of less than 50 feet. When using shielded cable, isolate and tape the shield at the sensor. Connect the shield to Terminal C on the A350P control. 1. Use a 1/8 in. (3 mm) flat-blade screwdriver to push the clamp arm down. Refer to Table 3 for the maximum recommended cable lengths for particular sizes of wire. 2. Insert the appropriate wire into the opening. Refer to Table 2 for terminal designations. Table 3: Maximum Recommended Sensor Cable Lengths 3. Release the clamp arm to secure the wire. See Figure 7. • V I V 0 to 10 VDC output I 0 to 20 mA output SN Temperature sensor input 14 AWG 800 244 16 AWG 500 152 18 AWG 310 94 20 AWG 200 61 22 AWG 124 38 • The sensor must be mounted so that it can accurately sense the temperature of the controlled medium. Table 4: A350P Controls And Sensors Control Sensor Included Sensor Lead Length is 9-3/4 in. (0.25 m) A350PS-1C A99BB-25C; Range: -40 to 212°F (-40 to 100°C) Common for power supply, temperature sensor, and outputs A350PS-1CM A99BB-25C; Range: -40 to 212°F (-40 to 100°C) 24 Volts AC A350PS-2C A99BC-25; Range: -40 to 248°F (-40 to 120°C) A350PS-2CM A99BC-25; Range: -40 to 248°F (-40 to 120°C) A350PT-1C No Sensor Included A350BA-2C A99BC-25; Range: -40 to 248°F (-40 to 120°C) VDC 5 VDC power supply (not used) C 24V Note: Description Meters The sensor must be connected to Terminals SN and C. (See Figure 2.) The sensors are not polarity sensitive. Table 2: Terminal Designations Terminal Feet Various A99B Series Temperature Sensors and mounting hardware are available for use with A350P Series controls. SN VDC Figure 7: Cage Clamp Terminal Block Shielded Cable Length Wire Gauge Output signals from the A350P control vary from 0 to 10 VDC and 0 to 20 mA. (Both outputs can be used simultaneously.) Connections can be made to both the V and I terminals, allowing the control to drive two outputs from the same RA or DA ramp simultaneously. This feature can be used to drive motor actuators of different types in a single application. • For more information regarding sensor options and installation, refer to the A99B Series Temperature Sensors Product/Technical Bulletin (LIT-125186). System 350 A350P Electronic Proportional Plus Integral Temperature Control Product/Technical Bulletin 7 A djustments Follow this procedure to set up the A350P control for the types of operation desired. 1. Remove its cover by loosening the four captive cover screws. (See Figure 2.) 2. Set the RA/DA operation jumpers to the desired mode of operation. Position the operation jumpers vertically for RA (Reverse Acting) or horizontally for DA (Direct Acting). (See Figure 2.) 3. Adjust the throttling range potentiometer to desired setting. Rotate Clockwise (CW) to increase the throttling range. 5. Make sure the system is stable in the proportional mode before selecting integration. Refer to the Checkout Procedure section. 6. Reinstall the cover and secure in place with the four captive cover screws. 7. Adjust the setpoint dial to the desired setpoint. If using the D350 Display Module, press and hold the setpoint button on the D350 while rotating the setpoint dial. Note: Notes: Included with the control is a Celsius scale throttling range decal. If the Celsius scale is desired, refer to the Celsius Scale Conversion section for decal installation instructions. If the A350P is to be used in proportional plus integral control, the initial throttling range adjustment is seldom set below 6F° (3C°). A narrow proportional band used in conjunction with the integration may result in unstable control. 4. If minimum output is required, set the minimum output potentiometer (see Figure 2) to the desired position. The 10-segment front LED panel or a voltmeter can be used to read the minimum output. (The minimum setting for the control is designated by the 0 on the decal.) Notes: Before adjusting the minimum output potentiometer, verify that the control reads zero output (that is, no LEDs are lit). For each 10% increase in output, the next bar will light on the LED bar graph (only one bar is lit at anytime). In a milliampere application, each bar equals 2 mA. In a voltage application, each bar equals 1 VDC. (Refer to Figure 3.) Example: To set the control for a minimum output of 4 mA, turn the minimum output potentiometer clockwise until the second LED segment just lights. The control’s setpoint is factory calibrated at midscale to a tolerance of ±1F° (0.6C°). The setpoint tolerance at the extreme ends of the setpoint scale may be ± 4F° (2.2C°). The D350 Display Module is unaffected by this tolerance shift. Use the D350 for the most accurate setpoint selection. C heckout Procedure Follow this procedure to verify the A350P control is connected and functioning properly. 1. Before applying power, make sure that the installation and wiring connections are according to job specifications. 2. Set up the system for proportional mode (Integration = OFF), and make any necessary adjustments to the setpoint, throttling range, and minimum output. Then select Reverse or Direct Acting mode. 3. After making adjustments and electrical connections, apply power to the system, and observe it for stable operation. 4. If integration is required, select the fast (C1), medium (C2), or slow (C3) integration constant. Slow is the recommended initial setting. (Refer to the Integration Function section.) 5. Put the system back into operation. If instability occurs, consider increasing the throttling range. 8 System 350 A350P Electronic Proportional Plus Integral Temperature Control Product/Technical Bulletin T roubleshooting If the control system does not function properly, verify that the proper operation mode is selected on each module (DA or RA), and perform the following procedures to determine the cause of the problem: 1. Check for proper voltages on the A350P control. a. Connect a digital voltmeter (DVM) between Terminals 24V (+) and C (-) located on the A350P’s terminal block. (See Figure 2.) If an external transformer is used, select AC volts on the DVM. Verify that the voltage is between 20 and 30 VAC. If a Y350R Power Module is used, select DC volts on the DVM. Verify that the voltage is between 16 and 38 VDC. If an external DC power supply is used, select DC volts on the DVM. Verify that the voltage is between 22 and 29 VDC. b. If the DVM reading is within the indicated voltage range, select DC volts on the DVM (DVM must be accurate to +/-0.01 VDC), and connect the (+) lead to Terminal VDC and the (-) lead to Terminal C. 2. Check sensor for proper resistance at a given temperature. (The resistance across the sensor changes with the temperature of the sensor.) a. Disconnect power from the A350P control. b. Disconnect the sensor from the control and measure the resistance across sensor leads. c. d. Refer to Figure 8 to determine the optimal resistance for the measured temperature. e. If the measured resistance varies substantially from the optimal resistance for that temperature, the sensor or wiring must be replaced. f. c. If the DVM voltage is below 4.9 VDC, check the control using the following procedure. Disconnect all loads from the A350P control. (If in Direct Acting mode with power on, the system will go to full output when the sensor is disconnected. Thus, ensure that any loads are disconnected before disconnecting the temperature sensor.) Disconnect the temperature sensor completely, and recheck the DVM voltage. If the DVM voltage rises to a value between 4.9 and 5.1 VDC, replace the sensor. If the DVM voltage is still below 4.9 VDC, replace the A350P control. If the sensor’s resistance conforms to the chart in Figure 8, reconnect the sensor to the control. g. Reconnect power to the control. Note: If the DVM voltage is between 4.9 and 5.1 VDC, proceed to Step 2. If the DVM voltage is above 5.1 VDC, replace the A350P. When measuring the sensor’s resistance, use an accurate thermometer to measure the temperature at the sensor. °F The sensor reading indicated by the D350 may differ somewhat from thermometer readings due to sensor tolerances, time constants, thermometer accuracy, and other factors. Temperature °C 260 120 240 220 100 200 180 80 160 140 60 120 40 100 80 20 60 40 0 20 0 -20 -20 -40 -40 500 700 900 1100 1300 1500 1700 1900 2100 Resistance (Ohms) Figure 8: Temperature vs. Resistance Chart for the A99B Series Sensor System 350 A350P Electronic Proportional Plus Integral Temperature Control Product/Technical Bulletin 9 3. Check the A350P control for proper operation. Note: Perform Steps 1 and 2 first. a. Reconnect the sensor to the control and re-apply power. b. Turn the throttling range and the minimum output to minimum by turning both potentiometers counterclockwise. c. Switch off the integration. d. Select the RA mode. e. Connect the DVM (+) lead to the A350P control’s Terminal SN and the (-) lead to Terminal C. If the sensor voltage is less than 1.8 VDC on model A350PS-1C or less than 2.3 VDC on model A350PS-2C, go to Step 3g. f. If the voltage is greater than 1.8 VDC on model A350PS 1C or greater than 2.3 VDC on model A350PS-2C, adjust the setpoint to 120°F (49°C) on model A350PS-1C or 240°F (116°C) on model A350PS-2C. The output Terminal V should be less than 0.1 VDC, and all LEDs in the bar graph display should be off. If not, replace the A350P. 1. Adjust the minimum output to the maximum by turning the potentiometer CW. As the potentiometer is turned CW, the LEDs in the bar graph should turn on from left to right until the fifth or sixth bar is on. If not, replace the A350P control. 2. Adjust the minimum output to zero again, and select the DA mode. g. If the sensor voltage is above 1.1 VDC on A350PS-1C or above 1.6 VDC on A350PS-2C, adjust the setpoint to match the actual temperature (Ts). The output Terminal V should be less than 0.1 VDC, and all LEDs in the bar graph should be off. Note: Some tolerance error is present between the setpoint scale and the setpoint knob pointer. Refer to the Adjustments section. 1. Make sure the A350P control is in RA mode. 2. Increase the setpoint in increments of 2F° (1C°). 3. As the setpoint is increased, the control’s Terminal V output voltage should go from 0 to 10 VDC, the Terminal I output current should go from 0 to 20 mA, and the LEDs should turn on, one at a time from left to right. 4. If the LEDs do not turn on and if the outputs of terminals V and I do not change as described above, replace the control. h. Readjust the A350P control to the desired control settings. R epairs and Replacement Do not make field repairs or perform calibration. A99B Temperature Sensors and replacement controls are available through the nearest Johnson Controls representative. (See Tables 5 and 6 for ordering information.) 3. If the right most LED in the bar graph is on (Terminal V = 10 VDC, Terminal I = 20 mA), go to Step 3h. If the LED is not on, replace the A350P. 10 System 350 A350P Electronic Proportional Plus Integral Temperature Control Product/Technical Bulletin O rdering Information Table 5: System 350 Products Item Product Code Number A350P Proportional Plus Integral Temperature Controls Description A350PS-1C Range: -30 to 130°F (-35 to 55°C) Throttling Range: 2 to 30 F° (1 to 17C°) (Includes the A99BC-25C Temperature Sensor) A350PS-2C Range: 90 to 250°F (30 to 120°C) Throttling Range: 2 to 30 F° (1 to 17C°) (Includes the A99BC-25C Temperature Sensor) A350PT-1C Range: -30 to 130°F (-35 to 55°C) Throttling Range: 2 to 30F° (1 to 17C°) (Sensor not included) Display Modules D350AA-1C D350BA-1C Digital Temperature Display Module (Fahrenheit Scale) Digital Temperature Display Module (Celsius Scale) On/Off Stage Modules S350AA-1C S350AB-1C Fahrenheit Scale Celsius Scale Slave Stage Module S350CC-1C Dual Scale (°F and °C) Proportional Stage Module S350PQ-1C Dual Scale (°F and °C) Power Module Y350R-1C 120 or 240 VAC, 50/60 Hz Input, Rectified Class 2, 24 VAC Output Table 6: System 350 Accessories Item Product Code Number Description Wall Mount Plate TE-6001-4 Includes sensor mounting clip Cover T-4000-2644 For wall mount plate Mounting Clip A99-CLP-1 Surface mounting clip for the A99B Temperature Sensor Duct Mounting TE-6001-1 Duct-mounting hardware with handy box Duct Mounting TE-6001-11 Duct-mounting hardware without handy box Conduit Adaptor ADP11A-600R 1/2 in. snap-fit EMT conduit adaptor (box of 10) Immersion Well WEL11A-601R For liquid sensing applications Sun Shield SHL10A-603R For use with outside sensors in sunny locations DIN Rail Sections BKT287-1R BKT287-2R 12 in. (0.3 m) long 39-1/3 in. (1.0 m) long DIN Rail End Clamp PLT344-1R Consists of two end clamps Cables for Remote Mounting of D350 Display Module WHA29A-600R* WHA29A-603R WHA29A-604R 3 ft (0.9 m) 25 ft (7.6 m) 50 ft (15.2 m) *WHA29A-600R may be used to daisy chain S350 modules together. System 350 A350P Electronic Proportional Plus Integral Temperature Control Product/Technical Bulletin 11 Specifications Product Supply Voltage Power Consumption A350P Proportional Plus Time Integral Temperature Control Y350R Power Module: Input: 120/240 VAC 50/60 Hz Output: 24 VDC, unfiltered, 10 VA External Source: 24 VAC, 50/60 Hz, Class 2 (20-30 VAC) Note: Only one supply voltage source may be used. 3.2 VA maximum Ambient Temperature Operating: Shipping: Humidity (all modules) 0 to 95% RH non-condensing; maximum dew point 85°F (29°C) Setpoint Adjustment Range Throttling Adjustment Range Analog Outputs A350PS-1C: A350PS-2C: A350PT-1C: -30 to 150°F (-34 to 66°C) -40 to 185°F (-40 to 85°C) -30 to 130°F (-35 to 55°C) 90 to 250°F (30 to 120°C) -30 to 130°F (-35 to 55°C) 2 to 30F° (1 to 17C°) 0 to 10 VDC (550 ohm load minimum) and 0 to 20 mA (600 ohm load maximum) Minimum Output Adjustable from 0 to 60% of the output Output Indication A ten segment LED bar graph indicates percentage of output. Control Action Integration Constant Sensor Material Agency Listing Direct or reverse action is jumper selectable. Four selectable rates: fast, medium, slow, and off Replaceable positive temperature coefficient sensor Reference resistance 1035 ohms at 77°F (25°C) Case and cover: NEMA 1 high-impact thermoplastic UL Listed, CCN XAPX, File E27734 UL Listed for Canada, CCN XAPX7, File E27734 The performance specifications are nominal and conform to acceptable industry standards. For application at conditions beyond these specifications, consult Johnson Controls Application Engineering at (414) 274-5535. Johnson Controls, Inc. shall not be liable for damages resulting from misapplication or misuse of its products. Controls Group 507 E. Michigan Street P.O. Box 423 Milwaukee, WI 53201 Printed in U.S.A. www.johnsoncontrols.com 12 System 350 A350P Electronic Proportional Plus Integral Temperature Control Product/Technical Bulletin