1
SI'EII18H IESOLUTIOIelLIUI e11E11
1
USER'S
MANUAL
Thanks for purchasing our product.Before
operating the unit, please read the instructions
carefully and keep this manual for future reference.
Table of Contents
1.1ntroduction----------------------------------------------1
2.Featu res--------------------------------------------------1
3.Cautions-------------------------------------------------- 2
4.1nstallation&Auto 1ris connector----------------------3
5.Key---------------------------------------------------------6
6.Menu Functio ns·······----·-··-··-----------------·-··---6
7.Specifications------------------·-·-·-·-····--··-----···-16
The Super High Resolution Colour Camera adopt ad.vanced D~gital
Signal Processor (DSP) technology, wh!ch enhances pl~ture to high
quality and high resolution greatly, provides great function and more
vivid image.
1. Adopt 1/3" SONY Super HAD CCD
2.540 TVL Super High Horizontal Resolution
3. OSD menu programmable set
4. Minimum illumination: 0.3Lux/F1.2 (colour mode)
0.08Lux/F1.2 (B/W mode)
5. Automatically change between colour mode and B/W mode
according to the light inputting(Only the IR Cut filter removal
Day/Night Camera)
6. Built-in function
a. Mirror function
b. Back light compensation mode
c. Dynamic period: max 50dB
d. 8 mask areas
e. Auto and Manual White Balance
f. Auto and Fixed Electronic Shutter
g. Auto and Fixed Gain Control
h. Electronic sensitivity extendible function
i. Anti-color rolling function
j. Flickerless function
- 1-
1. Before installing and operating the unit, please read the manual
carefully.
2. Precision components are contained in the camera,so please
avoid violent vibration during the course of transit, maintenance
and installation. For the sake of safety, please do not connect to
power before installation completion.
3. Please abide by all the electric codes when using the unit.
4. Do not use corrosive or abrasive detergent for cleaning.
Use lens paper or cotton stick with alcohol to clean the sensor
board.
5. Under no circumstances to direct the camera to the sunlight or
strong light sources, in order to avoid any damage to the lens and
sensor.
6. Do not use the camera in situations beyond the rated operating
temperature(·1 0·C-50"C),humidity(less 95%) or power source.
7. In times of malfunction, do not attempt to dismantle and service
the camera by yourself .Please refer to qualified serving personnel to repair or contract our technical department to solve the
problems.
Warning: Prohibit the products to be rained or wet in case of
fire or getting an electric shock.
-2-
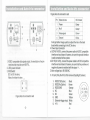
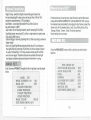
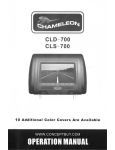
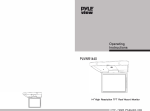
Figure:Auto iris connector Jack
Pin Video iris lens
lil
(!J1!lt!)
\I
4
@AC2~'2V
IRIS
~r;.0~
4
2
1
5
VIDEO
1/0
3
1. VIDEO: composite vidio signal output, the resolution of recom
mend monitor must be over 600TVL.
2. LED: power indicator
3. IRIS Switch:
DC: for DC-iris lens,
Video:f" video-iris,e[i]:
Figure:Auto iris connector Jack
-3-
DC iris lens
Damp-
2
Power
Null
3
Video signal
Drive+
4
Ground
Drive-
1
Damp+
It will get better image quality to adjust the iris on the back
board while connecting to the DC iris lens.
4. Power input connector
a. AC24V{16-30V), connect the power cable to AC/DC compatible
interface on back board of camera, be sure the ground interface
is well connected to the system.
b.DC12V{9.1-20V), connect the power cable to ACIDC compatible
interface on back board of camera, be sure that the positive and
negative of power is matched with the signal +, -.
C.Main voltage input: 90-240VAC.
5. I/O port (Only the IR Cut filter removal Day/Night Camera)
1,
2,
3,
4,
5,
6,
7,
8,
RS232TX{Option)
RX232 Rx{Option)
RS232GND
NC
NC
GND
Externalr-trigger input
+5 V
Black
Brown
Orange
Blue
Green
Yellow
White
Red
-4-
I/O port function:
RS232 is connect to Rs232 interface of PC(Option);
1, Second PIN of RS232seriai port (Option)
2, Third PIN of Rs232serial port(Option)
3, RS232GND
4, NC null unused
5, NC null unused
6, GND
7, External-trigger:external-trigger change Day/Night
mode, set "DAY AND NIGHT" as EXT(external-trigger
mode),low level effective, connect to PIN 6
(Yellow)effective.
8, +5V power
II
Center selection button to enter a menu or exit the menu.
••
Move the icon vertically between the menus and options.
••
Press the two keys to move the icon horizontally between
the menus and options or enter submenus.
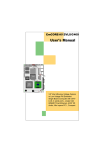
MAIN
MENU
GENERAL
SET
BACKLIGHT
OFF
DAY AND NIGHT
AUTO
PRIVACY
OFF
WBC MODE
PUSH
AE
AE
MODE
INITIAL
EXIT:PRESS MENU KEY
-5-
-6-
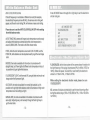
default is ON, the resolution will be540TVL,
it will be effective after restart while change setting.
HI-RESOLUTION,
set ON, image will be crisper, has three grades: Low,
Middle, High, default is OFF.
SHARPNESS,
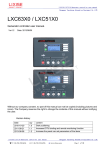
Select GENERAL SET on the main menu, press left or right key to
enter GENERAL MENU for normal mode setup.
GENERAL
CAMERA ID
COLOR
MIRROR
HI-RESOLUTION
SHARPNESS
COLOR SUPPRESS
APERTURE SUPPRESS
EXIT:PRESS MENU KEY
COLOR SUPPRESS, default is OFF, while it is ON, the image will
change into B/W on low light to enhance idetification of the images.
APERTURE SUPPRESS, default is OFF, set ON, the overlap offine
OFF
ON
OFF
ON
OFF
OFF
OFF
articles on low light can be reduced.
Enter the BACKLIGHT MODE SET menu through left or right key to
set the backlight compensation mode
BACKLIGHT MODE SET
BACKLIGHT MODE
OFF
EXIT:PRESS MENU KEY
AE MODE
MUST BE AE
CAMERA lD,set camera No. (000-255) through left and right key
under Camera 10, the No. will be shown on the right top coner,
default is OFF.
COLOR, set OFF, while AGC works, image will be changed into B/W
<-
Remember to set the AE MODE ON while setting the backlight mode!
to remove the splash which will appear with low light, default is ON.
MIRROR, default is OFF.
-7-
-8-
CENTER, LOWER 113,CENTER LEFT, CENTER RIGHT, UPPER 1/3. If
BACKLIGHT MODE SET
BACKLIGHT MODE
SENS
GAIN <xO-x4>
040
EXIT:PRESS MENU KEY
AE MODE MUST BE AE
BACKLIGHT MODE SET
BACKLIGHT MODE
AREAl
UNWEIGHTED LEVEL
000
EXIT:PRESS MENU KEY
AE MODE MUST BE AE
Set SENS OFF, the shutter work first, means the electronic shutter
will adjust automatically, and gain only works when the shutter
enhanced to 1/50s, (the period of gain is between 0-30dB), Set ON,
the gain work first, means the gain will adjust automatically(period
is between 000-255, default value is 40), and the electronic shutter
will be 1/50s.
AREA MODE, total is 5 reference areas:
choose the CENTER as the reference area, means the average
light in the AREA 1 will be the standard. Setup way: set the
CENTER ON, then set the dynamic period of the other four areas
on UNWEIGHTED LEVEL, the dynamic range is between 000-015,
000 is minimum, 015 is the maximal (50dB)
J
DAY AND NIGHT..
Enter the DAYAND NIGHT mode set(Only the IR Cut filter removal
Day/Night Camera)
DAY AND NIGHT
DAY AND NIGHT
AUTO
DAY TO NIGHT VALUE 212
NIGHT TO DAY VALUE 170
EXIT:PRESS MENU KEY
IDAY AND NIGHT MODE SET
AREA5
AREA3
AREAl
AREA2
-9-
DAY AND NIGHT MODE SET: AutolDay/Night/external
trigger Mode optional. For external-trigger details
refer to page 4-5.
AREA4
Auto Mode:
Day to Night: switch to Night mode while gain higher
than the set value(day to night value can be set
from195 to 230 based on requirements).212by
default.
-10-
Night to Day: switch to Night mode while gain lower than
the set value(night to day value can be set from 155-to 185
based on requirements).170 by default.
Auto Mode: auto day/night switch IR Cut filter. Color at
day and change to B/W.
Day mode: turn off day/night switch ,won't removing IR Cut filter.
Day/Night mode: removing IR Cut filter in night switch to night mode,
high quality B/W picture.
External trigger: removing Day/Night IR Cut filter according to external
trigger signal.
Note: only Day/Night Mode camera will be induct IR, and improve
the night effect by removing IR Cut filter. Do not too close to object
in case of infrared light. Or it may cause to removing IR Cut filter
over and over again. Therefore choose the suitable infrared light
and adjust suitable angle according to environment in using.
I MASK
SET..
Enter the menu PRIVACY through the left or right key to set the mask
mode.
MASK
SET
MASK NUMBER<1-8>
001
MASK SET
OFF
H.START POSITION
H.END POSITION
V.START POSITION
V.END POSITION
MASK COLOR
HOLD
EXIT:PRESS MENU KEY
-11-
8 mask areas can be set at most, step (if want to set the first mask
area):set the MASK NUMBER 001; set the MASK SET ON; recover
the masked area completely by changing the four frames; select the
shown colorforthe masked area, Lock, Grey, White, Black, Red,
Orange, Yellow. Green. Blue, Purple etc optional.
Same setting the next areas.
Enter the WBC MODE menu by left or right key to set the white
balance.
WBC MODE SET
ANTI-COLOR ROLLING
AUTO TRACE WB
PUSH
INDOOR
FLUORESCENT LIGHT
OUTDOOR
MANUAL WB
EXIT:PRESS MENU KEY
-12-
OFF
OFF
ON
OFF
OFF
OFF
ADJ
IJ'"11'
ANTI-COLOR
ROLLING
If the AC frequency is not stable or different too much(for example,
the electricity frequency is less 49.9Hz), the serious color rolling will
appear, set the anti-color rolling ON, will remove or ease color rolling.
Please be sure to set the ANTI-COLOR ROLLING OFF while setting
the white balance mode.
AUTO TRACE WB, camera will inspect color temperature continuously
and adjust white balance automatically while color temperature is
around 2,600-6,000K. The mode is the first chosen mode.
Enter AE MODE menu through left or right key to set the electronic
shutler and gain.
AE MODE SET
FLICKERLESS
AE
AI
AE SHUTTER
MANUAL
EXIT:PRESS MENU KEY
OFF
ON
OFF
OFF
OFF
PUSH, while the color temperature is around 2,300-1 O,OOOK,set the
PUSH ON, white balance can be adjusted exactly to get the real image
color.
INDOOR, the mode is available for the indoor circumstance with
daylight lamp, but if have lights of different color temperature indoor, it
is possible not to get right white balance.
FLUORESCENT LIGHT, set the mode ON, can get better and much real
image under the fluorescent light.
OUTDOOR, the mode is available for normal light outside, but it's
possible not to get right white balance under circumstance of high color
temperature such as setting sun light.
MANUAL WB, the mode is available to the stable circumstance with
same light. Adjusting way: set manually through left and right key to
get the best state.
-13-
FLiCKERLESS, while video system of the camera doesn't match with
the light frecency of the using circumstance (PAL for 60Hz, NTSC for
50Hz), flicker will apear. To avoid this, need modify the electronic
shutler to 1/1205 for PAL, 1/1005 for NTSC.
While setting the electronic
FLiCKLESS OFF.
shutter
mode, please
be sure
AE, camera will adjust automatically to get the best blooming effect
during the stable range (11505-1/100,0005 for PAL, 1/605-100,0005
forNTSC).
-14-
AI, while using auto-iris lens, setAl ON, electronic shutler will be
1/50s for PAL, 1/60s for NTSC.
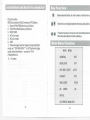
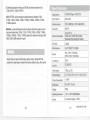
Image Sensor
1/3"SONY Super HAD CCD
1/120s, 11100s, 1I250s, 1/5005, 111000s, 1I2000s,1/4000s,1/10Ks,
1/1 OOKsoptional.
Signal System
PALINTSC
Effective Pixels
752 X 582(PAl)
MANUAL, under the Manual mode, electronic shutler and gain control
can be set same time, 1/50s, 1/120s, 111OOs,1/250s, 1I500s, 1I1000s,
1I2000s, 1I4000s, 1/1 OKs, 1/1 OOKsoptional for electronic shutler, 5dB,
13dB, 22dB, 30dB optional for gain.
Resolution
540TVl
Minimum illumination
0.3lux/F1.2
0.08luxlF1.2,With
IR cut filter
Removal(Only Day/NiQht model)
SIN Ratio
>50dB
White Balance
AUTO 2000 TO 10000K
Shutter
PAL: 1/50-111 OO,OOOs
NTSC:1/60-1I100,OOOs
Lens Mount
C/CS
Auto Iris
DCIVIDEO
AE SHUTTER, set the camera's stable electronic shutler, 1I50s,
Select this will restore the factory default value. Select INITIAL,
press left or right key to restore the factory default value, then reset.
Video Output
1.0Vp p,75Q
Power Supply
DC12V/AC24Vor
Power Consumption
-15-
768 X 494(NTSC)
ACll
OV/AC220V
<3.5W
Dimension
62x60X121mm
Weigh
500g
Operatingtemperature
-10'C-+50'CRH95%MAX
Control
On-screen dispaly (OSD)
-16-
V.580CIW·E·071113B