1
This handbook helps you quickly master and use this Digital
Touch Pen series; the specific user’s guide has been clearly
explained in our CD-ROM that we enclosed as for the product
reference.
The MyScript Stylus 3.2 converts natural handwriting into
digital text in real time. Write in MyScript Stylus 3.2 with a
touch screen or tablet and your writing becomes text in the
active document (text editor, spreadsheet, calendar, mail editor
and so on).
You can write text in several styles, write numbers, symbols and
even open a keyboard to enter text or mathematics. You can
correct or delete text as you write.
1. Product Instruction
1.1Brief description
The Digital Touch Pen is a new type input device, combining
natural handwriting trace, the storage of electronic handwritings
and mouse operation. It can be used in desktop, Net-book and
laptop computers, and also can be used without a PC. Users can
write on PowerPoint, Word, Excel, One Note, and Adobe
Acrobat and so on, realizing the function of the authentic
handwriting input, comment, signature, drawing, editing,
storage and other features in electronic documents.
1.2 Application description
The MyScript Stylus 3.2 means handwriting input in here,
Features below refers always to release 3.2 of MyScript Stylus,
1
The MyScript Stylus3.2 converts natural handwriting into digital
text in real time. Write in MyScript Stylus 3.2 with a touch
screen or tablet and your writing becomes text in the active
document (text editor, spreadsheet, calendar, mail editor and so
on).
You can write text in several styles, write numbers, symbols and
even open a keyboard to enter text or mathematics. You can
correct or delete text as you write.
MyScript Stylus 3.2 recognizes gestures to improve the user
experience: Carriage return/Insert space/Backspace/Split word in
2 words/Merge 2 words/Deletion of characters via: cross-out,
strike-through, scribble-out.
The software Interface and Help files in almost all the supported
languages:
Arabic,Chinese(Simplified/Traditional)
English(CA/UK/US),
,
French
,
,Japanese,
,Dutch
,
,
,
,Norwegian,Polish,Portuguese
(BR/POR), Russian, Spanish (SP/MEX), Swedish, Turkish etc.
System requirements:
CPU: Minimum Pentium 1 GHz
Recommended RAM: 512 MB
Operating Systems:
2
Microsoft Windows Vista, Windows XP, Seven
MAC OS (Intel processor only) Hard Disk Space: 100 MB
Screen Resolution: 1024 x 768 minimum
1.3 Product Composition
The Digital Touch Pen consists of the Receiver, Pen, USB
Cable,
User
manual,
CD-ROM,
Refill,
Refill
Clamp,
Screen-writing Partner and AG3 Button Batteries.
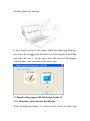
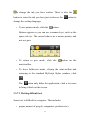
2. Installation Guide
2.1 Installing the Digital Touch Pen Application Software
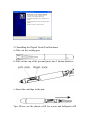
Insert the CD-ROM to the computer, the installation program
will automatically run, and follow the tips to install; it spends
appr.3 minutes, and users can choose running the application
immediately.
This is software install interface of DP100, and it is same with
the DP204, resulting in what is shown below picture for your
reference.
3
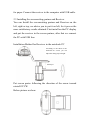
2.2 Installing the Digital Touch Pen Hardware
a>Take out the writing pen:
b>Pull out the cap of the pen and press into 3 button batteries:
c>Insert the cartridge in the pen:
Tips: Please use the plastic refill for screen and ballpoint refill
4
for paper. Connect the receiver to the computer with USB cable.
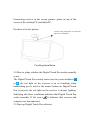
2.3 Installing the screenwriting partner and Receiver
You can Install the screenwriting partner and Receiver on the
left, right or top, we advice you to put it on left, for it proves the
more satisfactory results obtained. First install on the PC display
and put the receiver in the screen partner, after that we connect
the PC with USB line.
Installation Method for Receiver in the notebook PC
According to the thick of the
notebook PC screen, you can
adjust the clamp proper height
Interlayer
Put screen parter following the direction of the arrow inward
rotate90°CCW
Below picture as show:
5
Make the receiver fix to the left of screen (pick up the signals in
the best place),
On show as below picture:
Connecting PC with USB
Finishing Installation
Installation Method for Receiver in the Tablet PC and Desktop
PC
Put screen parter following the
direction of the arrow inward
rotate90°CCW
Paster
6
Connecting receiver in the screen partner, paster in top of the
screen of the desktop PC and tablet PC.
On show as below picture:
To paste using with paster one side affix
top screen of computer
Finishing Installation
2.4 How to judge whether the Digital Touch Pen works normally
or not
The Digital Touch Pen control center icon in system taskbar is
or
, the red light on the receiver is on or twinkling when
handwriting pen is used or the mouse button on Digital Touch
Pen is pressed, the red light on the receiver is always lighting.
Satisfying the above conditions indicates that Digital Touch Pen
works normally. If the icon is , it indicates that receiver and
computer are disconnected.
2.5 Start up Digital Touch Pen software
7
The Digital Touch Pen software will automatically start up with
computer. If you want to activate it manually, following the
sequential steps: Click system taskbar(start) → (program) →
(Digital Touch Pen software)→ (Startup Digital Touch Pen).
DP100 Toolbar
Click the button
will enter the following menu display:Select
it and click each icon button into the corresponding operation
for you.
★
Sometime when connect the PC and the receiver to start
8
working, the screen will appear below picture prompt content,
You need wait a minute as a system of automatic installation
is completed, then you can start using the digital touching pen.
Notes: This process not every time appears.
When you are using the digital touch pen, In the screen bottom
task bar of the computer appear working state tips:
Disconnect
Write on screen
Write on paper
Notes: In the Software installation process, If have anti-virus software to
prevent normal operation, please click allow installation.
3. Ways of using the Digital Touch Pen
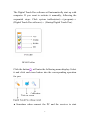
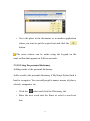
3.1 Screen Calibration
Screen calibration before using, first click the icon
left key of the Digital Touch Pen and click the icon
with the
in the
same way; it will display the following interface. Click the
position point on the screen one by one according to prompt and
click “Apply” after finishing it; click “Reset” to make position
again.
9
Actual pictures on the screen of the PC as below:
3.2 Screen writing mode
Place the receivers on the left side of the screen. Change for a
“plastic ball”. Write and make computer operation on the
computer screen directly, so you can use ordinary computer as
writing computer.
Similarly, you can use any plain medium (such as paper,
10
desktop, glass) for writing.
If you want to write on the paper, make the following Settings:
first click the icon
with the left key of the Digital Touch Pen
and click the icon
in the same way; the screen will display
below picture, you can choose the write type.
3.3 Handwriting input with MyScript Stylus 3.2
3.3.1 Introduce and software Installation
Write in MyScript Stylus 3.2 with a touch screen or tablet and
11
your writing becomes text in the active document (text editor,
spreadsheet, calendar, mail editor and so on).
You can write text in several styles, write numbers, symbols and
even open a keyboard to enter text or mathematics. You can
correct or delete text as you write.
You should be installed MyScript Stylus 3.2 software before
use, The software is in the CD driver, the installation steps as
below picture shown:
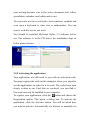
3.3.2 Activating the application
Your application was delivered to you with an activation code.
You must register the code on the computer where you intend to
use the application, in order for it to work. The codes have been
clearly written in our Card that we enclosed, you can find it.
One code can only be installed in one computer.
To register your application, click the
button and choose the
Registration option. This opens a dialog box. To activate the
application, click the Activate button. You will be asked how
you want to activate: Automatically via Internet or manually via
12
your mailbox. Wherever possible, you should choose the
automatic
activation.
Automatic
activation:
Choose
the
Automatically via Internet option and click Next. Two kinds of
registration shall be connected network mode in the network so
that it can be registered successfully.
You are prompted to enter your activation code: type it in and
click the Activate button.
Your license information will be sent over the Internet. If all
goes well, your application will then be active. Please note that
no confidential information is sent. Manual activation: If for any
reason you cannot activate via the Internet directly, you will
need to choose the manually via your mailbox option.
1. Activation wizard, please select the first option.
2. The codes have been clearly written in our Card that we
enclosed, input activation code to the blank.
13
3.3.3 Interface
After activate software completion, you can use the handwritten
input function normally, the software operate interface as below:
Right-click the application window for a shortcut menu
containing various options:
14
3.3.4 Hiding and waking up MyScript Stylus
In panel mode
To hide MyScript Stylus, click its
To wake it up and bring the panel back to the window,
click the quick access floating icon
button.
that pops up as soon
as you click in a text editing area.
You can also click the
icon on the Windows taskbar.
The hide function has different options available in the Settings
dialog box (
, Settings option, Panel Access tab): for example
you can choose to reduce the window to a bar on either edge of
the screen:
15
You can enable/disable the quick access floating icon
from the Settings dialog box(
, Settings option, Panel Access):
You can also fade the panel when not in use from the Settings
dialog box(
, Settings option, Panel Access):
In fullscreen mode
To wake up Stylus in fullscreen mode, you can click in a
text editing area so that the
or click the
cursor appears on the screen,
icon on the taskbar.
3.3.5 Docking the MyScript Stylus window
You can make the MyScript Stylus window stay at the bottom of
the desktop: this is called "docking".
, Panel Access tab, activate the Docked at the bottom of
the screen option.
16
The MyScript Stylus window stays at the bottom of the
screen.
To make it a floating window again,
, Panel Access tab,
deactivate the Docked at the bottom of the screen option.
3.3.6 Setting the ink/writing area options
Changing the ink thickness
Open the settings by clicking the
Under the Ink tab, use the Ink thickness option.
Click OK.
Ink set to a thickness of 1:
17
tool.
Ink set to a thickness of 8:
Changing the ink color
Click
.
Under the Ink tab, use the Ink color box.
In the color picker, choose a color.
Click OK.
Changing the input area background color
Click
.
Under the Ink tab, use the Background color box.
18
Confirm with OK.
Showing the keypad
The keypad for editing text is open by default but you can turn it
off if you wish.
Click
.
Under the Ink tab, use the Show keypad when writing area
is empty option.
Note that in fullscreen mode, you can use the
mini-toolbar to close and open the keypad.
3.3.7 Writing
3.10.7.1 Writing in panel mode
19
button on the
If you want to write naturally, click the
button.
Write in cursive (joined-up) style; it does not matter if you
join up every letter, just remember to space words well.
As you write, guidelines appear, to help you and your text
is converted as an animation, before being sent to the
application, automatically, or with the
button
.
If you want to write proper names, acronyms, abbreviations, or
unusual text like Web or e-mail addresses, use the
letter-by-letter mode.
Remember to add words to your personal dictionary, if MyScript
Stylus often gets them wrong.
20
You can edit the text while you are writing: see the
"Correcting natural writing" page.
3.3.7.2 Writing in full screen mode
In fullscreen mode, you can write on any part of the screen. The
results are displayed as an animation and then appear in your
document.
To open fullscreen mode, click the
button on the main
Stylus window.
By default, pen mode is active: a pen cursor
appears on
the screen: drag with this cursor to write wherever you
like. Once you start writing, a small toolbar appears.
As you write, the ink is converted as an animation, before being
sent automatically to the text area (or manually with the
button that appears on the mini-toolbar). You can use gestures
(see the "Correcting natural writing" page) or the editing wizard
21
to change the ink you have written. There is also the
button to erase the ink you have just written or the
button to
change the writing language
To use pointer mode, click the
button.
Buttons appear so you can use common keys, such as the
space, tab etc. The cursor behaves as a mouse pointer, and
not as a pen.
To return to pen mode, click the
button on the
mini-toolbar.
To leave fullscreen mode, closing the mini-toolbar and
returning to the standard MyScript Stylus window, click
.
The
button only hides the application: click a text area
to bring it back on the screen.
3.3.7.3 Writing difficult text
Some text is difficult to recognize. This includes:
proper names (of people, companies, products etc.),
22
acronyms,
abbreviations,
Web site or e-mail addresses,
codes of various types.
When you want to write these kinds of text, use
in panel
mode.
Click the
button and choose the
mode to write in a
mixture of letters, numbers and symbols.
Write your text using one box for each character. You
cannot write in a cursive style (in joined-up writing).
To change to another mode, click another button (
write only letters,
or
to write digits or
to
to write symbols
to write naturally).
Remember that many words could be easily recognized in
mode if you simply add them to your dictionary.
23
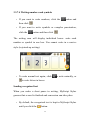
3.3.7.4 Writing numbers and symbols
If you want to write numbers, click the
then click
button and
.
If you want to write symbols or complex punctuation,
click the
button and then click
.
The writing area will display individual boxes: write each
number or symbol in one box. You cannot write in a cursive
style (in joined-up writing).
To write normal text again, click
to write naturally, or
to write letters in boxes.
Sending recognized text
When you make a short pause in writing, MyScript Stylus
guesses that a word is finished and conversion can take place.
By default, the recognized text is kept in MyScript Stylus
until you click the
button.
24
You can decide to send the recognized text automatically:
o
Click
.
o
Under the Ink tab, in Delay before clearing the ink,
check the Send Input Automatically option.
o
move the cursor towards Slow, to leave more time
before conversion, or towards Fast to clear the screen
more quickly.
o
Click OK.
3.3.7.5 Changing the writing language
Click
, Languages tab to open the settings.
Choose a short list of working languages: you will be able
to see your list the next time you click
25
.
Click OK.
When you want to write in a different language, click to
open its list and choose the language you need to write in.
3.3.7.6 Tips for writing
Follow these tips for better writing conversion.
Space letters and words comfortably, avoid very cramped
words, or spaces that are too large within words.
If you use multiple lines, space the lines well and write in
a straight line.
Use the correct content type for what you are writing:
26
natural cursive writing.
In
mode:
letter-by-letter writing (use this for proper names,
abreviations, acronyms etc).
numbers.
symbols, complex punctuation.
If MyScript Stylus seems to find it hard to convert certain
words, add them to your personal dictionary.
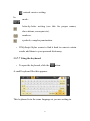
3.3.7.7 Using the keyboard
To open the keyboard, click the
button.
A small keyboard like this appears:
This keyboard is in the same language as you are writing in.
27
There is a Standard keyboard
, or a Math keyboard
that
you can use to enter maths and scientific equations.
Use your stylus or pointing device to "click" each key to
enter text.
To close the Keyboard, click another writing mode button
(
or
).
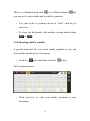
3.3.8 Inserting math’s symbols
A special keyboard lets you insert maths symbols so you can
write maths operations in a document.
Click the
button and then click the
button.
This keyboard opens:
Click each key to write your maths operation in your
document.
28
Switch to another mode (
or
) to close the
keyboard.
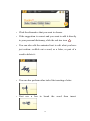
3.3.9 Editing
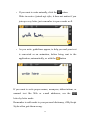
3.3.9.1 Correcting natural writing
You can use these actions when you write in
mode or when
you write in fullscreen mode.
When you write, Stylus converts your text in its window,
as an animation.
If the suggested conversion is not correct, click the word to
see alternatives:
29
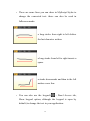
Click the alternative that you want to choose.
If the suggestion is correct and you want to add it directly
to your personal dictionary, click the red star icon
.
You can also edit the animated text to edit what you have
just written: scribble out a word, or a letter, or part of a
word to delete it:
You can also perform other tasks like inserting a letter:
First use a bar to break the word then insert.
30
If you want help on correcting quickly, click the
icon:
editing hints appear in the text and you can just click them
to delete words, add or remove spaces etc.
If you want to be able to correct the word letter-by-letter,
click the
button.
You can also correct the text once it has been sent to your
document too (see the Correcting text once it has been sent
page).
Remember to add words to your personal dictionary, if
MyScript Stylus often gets them wrong.
3.3.9.2 Correcting in letter-by-letter modes
As long as a character can still be seen in a box, you can correct
it. This works in any mode with individual boxes, such as
number or symbol mode.
31
In
writing mode, write your letters in the boxes.
They are converted to text and, for now, appear in the
boxes.
Writing over a letter
If a letter is wrong, write over the top of it with a new
letter.
The new result appears, ready to be sent.
Erasing a letter
To clear a letter, scribble over it (make a big scribble, right
out of the box):
32
Adding a space
To add a space between two letters, draw a long vertical
stroke between the two boxes:
3.3.9.3 Correcting text once it has been sent
There are two ways to correct the text once it has been
converted: You can modify the text animation that appears after
you have written or you can modify the text that has been
converted and sent to your application. See the "Correcting
natural writing" page to see how to edit the text as you are
writing. Once the text is in the application, you can use editing
gestures or use the keypad buttons.
33
There are some lines you can draw in MyScript Stylus to
change the converted text: these can also be used in
fullscreen mode:
a long stroke from right to left deletes
the last character written.
a long stroke from left to right inserts a
space.
a stroke downwards and then to the left
makes a new line.
You can also use the keypad (
- Panel Access tab,
Show keypad option, although the keypad is open by
default) to change the text in your application:
34
Backspace: erases the last character entered.
Del: erases the selected text or the character just after
the cursor if no text is selected.
Tab: adds a tab to the text.
Enter: starts a new line.
Space: inserts a space into the text.
Left and Right: move the cursor to the left or the right.
Copy: copies the selected text.
Paste: pastes the copied text.
Some editing buttons have matching gestures that perform
the same task: if you tick the Show ink sample for gestures
option (
- Ink tab), when you use an editing button of
this type (for example, Backspace), the corresponding
gesture will be displayed as an on-screen animation, to
remind you.
You can correct individual letters when you write in
letter-by-letter, number or symbol modes.
3.3.9.4 Deleting text as you write
To delete your handwriting as you write, you can:
scribble out a letter or a word,
35
if available, use the
feature to edit text with simple
clicks,
if available, click the
button to clear the whole writing
area.
You can also delete text that has been sent to your
application.
3.3.9.5 Copying and pasting text
Once the text has been converted, you can copy it on the screen
and paste it somewhere else. The keypad must be open to do
this.
Once you have converted your text, select it in your
application and click the
button in MyScript Stylus:
36
Go to the place in the document, or in another application
where you want to put the copied text and click the
button.
The same actions can be made using the keypad on the
mini-toolbar that appears in Fullscreen mode.
3.3.10 Using the personal dictionary
Adding words to the personal dictionary
Add a word to the personal dictionary if MyScript Stylus finds it
hard to recognize. You can add people's names, names of places,
schools, companies etc.
Click the
button and click the Dictionary tab.
Enter the new word into the Enter or select a word text
box:
37
Click
or press the Enter key to confirm.
Click OK.
You can also enter a word straight into the personal
dictionary, as you are editing your handwriting, by clicking the
icon.
Deleting words from the personal dictionary
If you no longer need a word that is in your personal dictionary,
you can remove it.
Click the
button and click the Dictionary tab.
Click the word you wish to delete in the list of words.
Click the
button (take care, you cannot undo the
deletion).
Click OK.
38
Editing words in the personal dictionary
Click the
button and click the Dictionary tab.
In the list of words, select the word you want to edit and
click the
button.
The selected word appears in the text box and has an
insertion point blinking in it.
Make the changes you wish to make and click
confirm.
If
you
change
modification, you can click
your
mind
about
to
your
to cancel it
If you are done, click OK.
3.3.10.1 Exporting/importing a personal dictionary
You can export your personal dictionary as a simple text file of
words, and import an exported dictionary or a text file too.
Exporting
To export the current dictionary, click
and choose
Dictionary.
Click the Export button on the dialog box.
Open the folder where you want to save the dictionary and
type a name in the File name box.
This saves the dictionary as a text file.
39
Click the Save button to confirm.
Click OK to close the dialog box.
Importing
You can import an exported dictionary or a plain text file.
To import a file into the dictionary, click
and choose
Dictionary.
Click the Import button on the dialog box.
Find the dictionary or text file in your folders then select it
and click Open or double-click its name.
Please note that you can only import dictionaries saved in
UTF-8 format. If an error occurs, you should save your file in a
text editor, with UTF-8 encoding and try again.
3.3.11 Training MyScript Stylus for your handwriting
By writing some letters, numbers, and symbols, you can help
MyScript Stylus convert your own handwriting easily. This
takes some time and patience! But you only need to do this if
you have used MyScript Stylus for a while and your writing
seems to be quite hard to convert.
40
Open the training program by clicking the
button, and
opening the Languages tab.
Click the Start training button.
You are going to do training on the current language: this
dialog box shows you which language is active:
If this is not the correct language, click No, go back and choose
the correct language (
, click the language in the list).
If you click Yes, the MyScript Stylus window opens a
training session.
Write each letter shown in its box. Write naturally, the way
you normally would.
If you make a mistake, scribble out the letter. When it
disappears, write it again.
Click the arrows to go on to the next boxes.
41
When you get to the end of a series, the orange arrow turns
grey. You should then click Next to go to the next series.
Once you have finished, click Launch training and then
OK on the dialog box so MyScript Stylus can complete the
training process.
Your individual profile is now attached to the language, so
that MyScript Stylus can recognize your writing more
easily. That language will be noted as "Customized" when
you click the
button.
3.3.12 Calculator
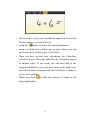
3.3.12.1 Making calculations
With the Calculator, you can write simple calculations, view
and/or send the result or the whole formula, and even ask it to
solve problems with unknown values for you.
To open the Calculator, click the
button.
Write your calculation: the calculation and its result appear
as text in the Stylus window. Write as horizontally as
possible, using the grid to guide you:
42
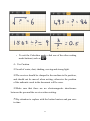
If you need to, once your calculation appears as text in the
Stylus window, you can edit it by:
using the
button to delete the whole calculation,
using a scribble-out to delete one or more items: you can
write new items in their place if you wish.
Once you have written your calculation, the Calculator
solves it for you. The parts added by the Calculator appear
in another color. If you wish, you can then add to the
original calculation: just write new items in the input area,
the colored items disappear and the Calculator is ready to
solve a new problem.
When you click
or after the timeout, it sends to the
target application.
43
You can choose whether to send only the result, or to send the
whole calculation, in your choice of format, using
Calculator tab:
44
-
The option you choose becomes the default send method. These
options can be useful, for example, to send a whole formula in
order to save it in Excel.
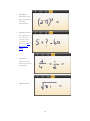
You can write:
Whole numbers
All these digits are
accepted:
1234567890
Decimals
The accepted
separator may be a
period or a comma.
This depends on the
input language.
Operators
All these operators are
accepted:
+ - x * / ÷=
45
Symbols
Brackets and
the pi symbol
(Π) are
accepted.
Question mark
This represents
an unknown
number, that
you want to
discover (see
the Solver
page).
Fractions
Make sure the
fraction divider is
horizontal.
Square roots
46
Exponentiation
("raised to the
power of")
Note that you cannot write:
Divisions by zero,
Infinity (∞),
Letters (algebra is not recognized).
If you write an unauthorized character, it will not be recognized
in Calculator mode. You may also see an error message if the
calculation you want to make is not acceptable.
To edit your calculations as you write, you can use the
button to delete the whole calculation, or use a scribble-out
to delete one item.
47
To exit Calculator mode, click another writing mode
button (such as
).
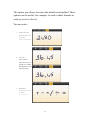
3.3.12.2 Using the solver functionalities
You can enter problems with unknown values into the calculator
and ask it to find the unknown value for you.
To open the Calculator, click the
button.
Write your calculation, using either a space or a question
mark to represent the unknown value: the problem and its
result appear as text in the Stylus window. Make sure that
you give the solver enough elements so it can solve the
problem correctly:
Correct solver question
Incorrect solver question
You can use all of the usual numbers and operators
accepted by the Calculator: whole numbers, decimals,
operators (+ - x * / ÷ =), fractions, square roots,
exponentiation.
Some examples:
48
To exit the Calculator mode, click one of the other writing
mode buttons (such as
).
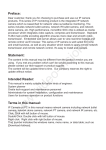
4、Use Caution
1 Avoid of water, dust, shaking, curving and strong light.
○
2 The receiver should be clamped to the medium to fix position,
○
and should not be moved when writing; otherwise the position
of the authentic work in the document will be error.
3 Make sure that there are no electromagnetic interference
○
between the pen and the receiver when writing.
4 Pay attention to replace with the button barriers and pen core
○
in time.
49
5 The computer connected with the Digital Touch Pen should
○
be in good grounding.
6 Avoid using Digital Touch Pen in the serious electromagnetic
○
interference occasions.
7 Avoid dropping the receiver and pen from the high places.
○
5. Limited Liability
The manufacturer 、 importer and dealer can not be held
responsible for accidental damage, including personal injury or
any other damage due to inappropriate usage of the product.
Information in the user manual is written for the current
specification of the product. The manufacturer continues to
provide additional functions and apply new technology to it. All
specifications may be changed without prior notice to individual
user. Manufacturer should not be liable for any special,
incidental or consequential damages. Even if informed of
possibility there of in advance.
Furthermore, warranty does not apply to:
Damages or problems resulting from misuse、 abuse、accident、
alteration or incorrect electrical 、incorrect voltage、any product
tampered-with damaged warranty seal or serial number barcode
or serial number label、any product without a warranty or serial
number barcode or serial number label.
50