1
$JLOHQW0$
+HDUWVWUHDP;/'HILEULOODWRU0RQLWRU
8VHU·V*XLGH
User’s Guide
0$+HDUWVWUHDP;/
'HILEULOODWRU0RQLWRU
1RWLFH
About This Edition
Edition 1
Printed in the USA
Publication number M4735-91900
The information in this guide applies to
the M4735A Heartstream XL, release
A.00. This information is subject to
change without notice.
Agilent Technologies shall not be liable
for errors contained herein or for incidental or consequential damages in connection with the furnishing,
performance, or use of this material.
Edition History
Edition 1, September, 2000
Copyright
Copyright © 2000
Agilent Technologies, Inc.
3000 Minuteman Road
Andover, MA USA 01810-1099
(978) 687-1501
This document may not be photocopied,
reproduced, or translated to another language without prior written consent of
Agilent Technologies.
SMART Biphasic is a registered
trademark of Agilent Technologies.
iv
Use of supplies or accessories other
than those recommended by Agilent
Technologies may compromise product
performance.
THIS PRODUCT IS NOT INTENDED
FOR HOME USE.
IN THE U.S., FEDERAL LAW
RESTRICTS THIS DEVICE TO
SALE ON OR BY THE ORDER
OF A PHYSICIAN.
Medical Device Directive
The M4735A Heartstream XL Defibrillator/Monitor complies with the
requirements of the Medical Device
Directive 93/42/EEC and carries the
0123 mark accordingly.
Authorized EU-representative:
Agilent Technologies
Deutschland GmbH
Herrenbergerstr.130
D 71034 Boeblingen, Germany
Fax: +49-7031-14-2346
Warning
Radio frequency (RF) interference from
nearby transmitting devices may
degrade the performance of the
M4735A Heartstream XL Defibrillator/
Monitor. Electromagnetic compatibility with surrounding devices should be
assessed prior to using the defibrillator/
monitor.
Index
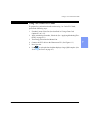
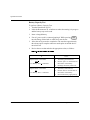
This guide uses the following conventions:
:$51,1*
&$87,21
127(
Warning statements describe conditions or actions that can result
in personal injury or loss of life.
Caution statements describe conditions or actions that can result in
damage to the equipment or loss of data.
Notes contain additional information on usage.
7(;7
6RIWNH\
represents messages that appear on the display
represents softkey labels that appear on the display above or
below the button to which they correspond
v
vi
Contents
Introduction
Overview ............................................................................................................................... 1-2
Intended Use ......................................................................................................................... 1-4
Defibrillation Therapy .......................................................................................................... 1-4
Indications for AED Therapy ......................................................................................... 1-5
Contraindications for AED Therapy ............................................................................... 1-5
Indications for Manual Defibrillation Therapy ............................................................... 1-6
Contraindications for Manual Defibrillation Therapy .................................................... 1-6
Precautions for Manual Defibrillation Therapy .............................................................. 1-6
Noninvasive Pacing Therapy (Optional) .............................................................................. 1-7
Indications ....................................................................................................................... 1-7
Contraindications ............................................................................................................ 1-7
SpO2 Monitoring (Optional) ................................................................................................ 1-7
Indications ....................................................................................................................... 1-8
Contraindications ............................................................................................................ 1-8
Safety Considerations ........................................................................................................... 1-8
Documentation and Training ................................................................................................ 1-9
vii
Contents
Getting Started
Getting Acquainted ............................................................................................................... 2-2
Basic Orientation ............................................................................................................ 2-2
Manual Mode Controls .................................................................................................. 2-5
Display Buttons ............................................................................................................... 2-6
Display Layout ................................................................................................................ 2-7
Connecting to Power ............................................................................................................. 2-9
Inserting the Battery ...................................................................................................... 2-10
Removing the Battery ................................................................................................... 2-11
Low Battery Warning ................................................................................................... 2-12
Using a Data Card (Optional) ............................................................................................. 2-13
Inserting a Data Card .................................................................................................... 2-14
Removing a Data Card .................................................................................................. 2-15
Defibrillating in AED Mode
Overview ............................................................................................................................... 3-3
Defibrillation (using the default configuration) .............................................................. 3-4
Defibrillation (with a modified configuration) ............................................................... 3-5
Preparation ............................................................................................................................ 3-6
Defibrillating ......................................................................................................................... 3-7
Automatic Re-analysis On ...................................................................................... 3-13
Automatic Re-analysis Off ..................................................................................... 3-13
Pausing for CPR .................................................................................................................. 3-14
Monitoring Rhythm ............................................................................................................ 3-16
ERC Protocol ...................................................................................................................... 3-18
Troubleshooting .................................................................................................................. 3-20
viii
Contents
Monitoring the ECG
Overview ............................................................................................................................... 4-2
Connecting the ECG Patient Cable ....................................................................................... 4-3
Applying Monitoring Electrodes .......................................................................................... 4-4
Electrode Placement ....................................................................................................... 4-5
Selecting the Lead ................................................................................................................. 4-7
Setting the Heart Rate Alarm ................................................................................................ 4-9
Disabling the HR Alarm ..................................................................................................... 4-10
Adjusting the ECG Size ...................................................................................................... 4-10
Adjusting the ECG Volume ................................................................................................ 4-10
Troubleshooting .................................................................................................................. 4-11
Monitoring SpO2
Introduction ........................................................................................................................... 5-2
Understanding Pulse Oximetry ............................................................................................. 5-3
Selecting a Sensor ................................................................................................................. 5-4
Reusable Sensors ............................................................................................................ 5-5
Disposable Sensors ......................................................................................................... 5-5
Applying the Sensor .............................................................................................................. 5-6
Connecting the Sensor Cable ................................................................................................ 5-7
Monitoring ............................................................................................................................ 5-8
Setting Alarms ...................................................................................................................... 5-9
Responding to an Alarm ....................................................................................................... 5-9
Discontinuing SpO2 Monitoring ........................................................................................ 5-10
Caring for Sensors .............................................................................................................. 5-10
Troubleshooting .................................................................................................................. 5-11
ix
Contents
Defibrillating in Manual Mode
Manual Mode Display .......................................................................................................... 6-2
Enabling Manual Mode ........................................................................................................ 6-2
Defibrillating in Manual Mode ............................................................................................. 6-3
Using External Paddles ................................................................................................... 6-3
Using Multifunction Defib Electrode Pads ..................................................................... 6-5
Defibrillation Procedure ................................................................................................. 6-6
1. Select Energy ........................................................................................................ 6-6
2. Charge ................................................................................................................... 6-7
3. Shock .................................................................................................................... 6-8
Entering AED Mode ............................................................................................................ 6-9
Performing Synchronized Cardioversion
Using Multifunction Defib Electrode Pads ........................................................................... 7-2
Using 3 or 5-wire ECG Leads ............................................................................................... 7-3
Using External Paddles ......................................................................................................... 7-4
Delivering a Synchronized Shock ......................................................................................... 7-5
Using External ECG Monitors .............................................................................................. 7-7
Delivering Additional Synchronized Shocks ........................................................................ 7-7
Disabling Sync Mode ............................................................................................................ 7-7
x
Contents
Pacing (Optional)
Pacing Operational Controls ................................................................................................. 8-2
Demand Mode Versus Fixed Mode ...................................................................................... 8-2
Monitoring During Pacing .................................................................................................... 8-3
Preparing for Pacing ............................................................................................................. 8-3
Performing Pacing ................................................................................................................ 8-5
Changing Pacing Modes ....................................................................................................... 8-8
Defibrillating During Pacing ................................................................................................ 8-8
Troubleshooting .................................................................................................................... 8-9
Storing, Retrieving & Printing
Overview ............................................................................................................................... 9-2
Marking Events ..................................................................................................................... 9-3
Events Recorded ................................................................................................................... 9-4
Creating a Patient Record ..................................................................................................... 9-6
Printing the Internal Event Summary ................................................................................... 9-7
Printing Events ...................................................................................................................... 9-9
xi
Contents
Setting Up and Configuring the Heartstream XL
Connecting/Disconnecting Patient Cables .......................................................................... 10-2
Pads/Paddles Patient Cable ........................................................................................... 10-3
SpO2 Patient Cable ....................................................................................................... 10-5
ECG Patient Cable ........................................................................................................ 10-6
Configuring the Heartstream XL ........................................................................................ 10-7
Accessing the Configuration Menu .............................................................................. 10-7
Configurable Parameters ............................................................................................... 10-8
Modifying the Configuration ...................................................................................... 10-13
Returning to the Default Configuration ...................................................................... 10-13
Saving Settings to a Data Card ................................................................................... 10-14
Loading Settings from a Data Card ............................................................................ 10-14
Printing Settings .......................................................................................................... 10-14
xii
Contents
Maintaining the Heartstream XL
Operational Checks ............................................................................................................. 11-2
Every Shift .................................................................................................................... 11-2
Every Month ................................................................................................................. 11-2
Every Three Months ..................................................................................................... 11-2
Using External Paddles ................................................................................................. 11-3
Using Pads .................................................................................................................... 11-4
Battery Capacity Test .................................................................................................... 11-6
Battery Maintenance ........................................................................................................... 11-7
Recharging Batteries ..................................................................................................... 11-8
Battery Capacity ........................................................................................................... 11-9
Battery Life Expectancy ............................................................................................... 11-9
Storing Batteries ........................................................................................................... 11-9
Discarding Batteries ...................................................................................................... 11-9
Loading Printer Paper ....................................................................................................... 11-10
Cleaning Instructions ........................................................................................................ 11-12
Cleaning the Heartstream XL ..................................................................................... 11-12
Cleaning the Printer Printhead .................................................................................... 11-12
Cleaning Paddles, Pads, Electrodes & Cables ............................................................ 11-13
Supplies & Accessories .................................................................................................... 11-14
Disposing of the Heartstream XL ..................................................................................... 11-17
xiii
Contents
Troubleshooting
System Messages ................................................................................................................ 12-2
Momentary Messages ................................................................................................... 12-5
Troubleshooting Tips .......................................................................................................... 12-7
Calling for Service .............................................................................................................. 12-8
United States of America .............................................................................................. 12-8
Canada .......................................................................................................................... 12-8
Other International Areas .............................................................................................. 12-8
Specifications & Safety
Specifications ...................................................................................................................... 13-2
Defibrillator .................................................................................................................. 13-2
ECG Monitoring ........................................................................................................... 13-5
...................................................................................................................................... 13-7
Display .......................................................................................................................... 13-8
Battery ........................................................................................................................... 13-8
Thermal Array Printer ................................................................................................... 13-9
Noninvasive Pacing .................................................................................................... 13-10
SpO2 Pulse Oximetry ................................................................................................. 13-11
Event Storage .............................................................................................................. 13-11
Environmental ............................................................................................................. 13-12
Symbol Definitions ........................................................................................................... 13-14
Clinical Performance Summary ........................................................................................ 13-19
Methods ...................................................................................................................... 13-19
Results ......................................................................................................................... 13-19
Conclusion .................................................................................................................. 13-20
Safety Considerations ....................................................................................................... 13-21
Electromagnetic Compatibility ......................................................................................... 13-25
Reducing Electromagnetic Interference ...................................................................... 13-26
Restrictions for Use .................................................................................................... 13-27
Immunity Level ........................................................................................................... 13-27
xiv
1 Introduction
1
The M4735A Heartstream XL Defibrillator/Monitor is designed to meet your
resuscitation and monitoring needs. This guide provides instructions for safe
and proper operation, set-up, configuration, and care of your
M4735A Heartstream XL Defibrillator/Monitor.
In this chapter, you’ll find general information that you should become familiar with before using the defibrillator/monitor.
M4735A Heartstream XL Defibrillator/Monitor
1-1
Overview
Overview
The M4735A Heartstream XL Defibrillator/Monitor is a lightweight, portable, semi-automatic external defibrillator. It offers two modes of operation for
defibrillation:
l
l
Automated External Defibrillation (AED) Mode
Manual Mode
Both modes incorporate a low energy SMART Biphasic waveform for
defibrillation.
In AED Mode, the M4735A Heartstream XL Defibrillator/Monitor analyzes
the patient’s ECG and advises you whether or not to deliver a shock. Voice
prompts guide you through the defibrillation process by providing instructions and patient information. Voice prompts are reinforced by messages that
appear on the display.
In Manual Mode, the M4735A Heartstream XL Defibrillator/Monitor turns
control of the defibrillation process over to you. You analyze the patient’s
ECG, and select the energy setting for defibrillation if necessary. Manual
Mode also allows you to perform synchronized cardioversion and offers
noninvasive pacing (optional).
Defibrillation is performed through attached paddles or multifunction defib
electrode pads. Monitoring is available in AED and Manual Mode through
pads, 3-lead ECG monitoring electrodes, or optional 5-lead ECG monitoring
electrodes. Optional pulse oximetry (SpO 2) monitoring is also available in
AED and Manual Modes. While monitoring ECG or SpO2, you may set heart
rate and/or SpO2 alarms to alert you when these parameters are outside the
defined limits.
1-2
Introduction
Overview
The M4735A Heartstream XL Defibrillator/Monitor automatically stores critical events in its internal memory, such as shocks and alarm violations. Additional events of interest may also be marked for storage. These events can be
printed as they occur or as part of an Event Summary. The M4735A Heartstream XL Defibrillator/Monitor also enables you to store data and events on
an optional Data Card for downloading to CodeRunner Web Data Management Systems.
The versatile M4735A Heartstream XL Defibrillator/Monitor is highly configurable to better meet the needs of diverse users. The messages and softkeys
vary, depending on how the M4735A Heartstream XL Defibrillator/Monitor
is configured. Be sure to familiarize yourself with your configuration before
using the M4735A Heartstream XL Defibrillator/Monitor (see “Configuring
the Heartstream XL” on page 10-7).
The M4735A Heartstream XL Defibrillator/Monitor is powered by AC power
and a rechargable sealed lead acid (SLA) battery which allows the defibrillator to charge to 200 joules in less than three seconds. Proper care of your batteries will ensure that they have the energy required to operate the M4735A
Heartstream XL Defibrillator/Monitor and to deliver the appropriate therapy.
(See “Battery Maintenance” on page 11-7.) Similarly, performing the specified operational checks will ensure that the M4735A Heartstream XL
Defibrillator/Monitor is functioning properly and ready for use. (See “Operational Checks” on page 11-2.)
M4735A Heartstream XL Defibrillator/Monitor
1-3
1
Intended Use
Intended Use
The M4735A Heartstream XL Defibrillator/Monitor is for use in the hospital
by qualified medical personnel trained in the operation of the device and qualified by training in basic life support, advanced cardiac life support, or
defibrillation. It must be used by or on the order of a physician.
When operating as a semi-automatic external defibrillator in AED Mode, the
M4735A Heartstream XL Defibrillator/Monitor is suitable for use by medical
personnel trained in basic life support that includes the use of an AED.
When operating as a defibrillator/monitor in Manual Mode, the M4735A
Heartstream XL Defibrillator/Monitor is suitable for use by emergency medical personnel trained in advanced cardiac life support.
Defibrillation Therapy
Defibrillation therapy is the definitive method for termination of a variety of
potentially fatal arrhythmias. The M4735A Heartstream XL Defibrillator/
Monitor provides this therapy through the application of a brief biphasic pulse
of electricity to the cardiac muscle. This electrical energy is transferred
through attached paddles or disposable multifunction defib electrode pads
applied to the patient’s bare chest.
NOTE
1-4
Successful resuscitation is dependent on many variables specific to the
patient’s physiological state and the circumstances surrounding the patient
event. Failure to have a successful patient outcome is not a reliable indicator
of defibrillator/monitor performance. The presence or absence of a muscular
response to the transfer of energy during electrical therapy is not a reliable
indicator of energy delivery or device performance.
Introduction
Defibrillation Therapy
Indications for AED Therapy
An AED is to be used in the presence of a suspected cardiac arrest on patients
of at least 8 years of age that are:
l
l
l
Unresponsive
Not breathing
Pulseless
Contraindications for AED Therapy
An AED is not to be used on patients that exhibit one or any combination of
the following:
l
l
l
Responsiveness
Spontaneous breathing
Palpable pulse
Precautions for AED Therapy
The AED algorithm is not designed to handle erratic spiking problems caused
by a properly or improperly functioning pacemaker. In patients with cardiac
pacemakers, the M4735A Heartstream XL Defibrillator/Monitor may have
reduced sensitivity and not detect all shockable rhythms.
NOTE
The AED algorithm is not intended for children under 8 years of age. For children older than 8 years, the American Heart Association recommends that
standard operating procedures for AEDs be followed. American Heart Association Textbook of Advanced Cardiac Life Support. Dallas, Texas.:
AHA; 1997.
M4735A Heartstream XL Defibrillator/Monitor
1-5
1
Defibrillation Therapy
Indications for Manual Defibrillation Therapy
Asynchronous defibrillation is the initial treatment for ventricular fibrillation
and ventricular tachycardia, in patients who are pulseless and unresponsive.
The SMART Biphasic waveform utilized in the M4735A Heartstream XL
Defibrillator/Monitor has undergone clinical testing in adults. These trials
support the waveform’s effectiveness for defibrillation of ventricular tachyarrhythmias at the 150J
In manual mode operation, the M4735A Heartstream XL Defibrillator/Monitor incorporates some user selectable lower energy levels that were not used in
the clinical trials.
There are currently no clinical studies related to the use of the SMART
Biphasic waveform in pediatric applications or in direct defibrillation of the
heart during open chest surgery.
Contraindications for Manual Defibrillation Therapy
Asynchronous defibrillation therapy is contraindicated in patients that exhibit
one or any combination of the following:
l
l
l
Responsiveness
Spontaneous breathing
Palpable pulse
Precautions for Manual Defibrillation Therapy
Defibrillating asystole can inhibit the recovery of natural pacemakers in the
heart and completely eliminate any chance of recovery. Asystole should not
be routinely shocked.
1-6
Introduction
Noninvasive Pacing Therapy (Optional)
Noninvasive Pacing Therapy (Optional)
The M4735A Heartstream XL Defibrillator/Monitor provides noninvasive
transcutaneous pacing by delivering a monophasic, electrical stimulus to the
heart. This stimulus is intended to cause cardiac depolarization and myocardial contraction. The medical care provider selects the stimulus current and
rate settings. The energy is delivered through multifunction defib electrode
pads applied to the patient’s bare chest.
Indications
Noninvasive pacing is one method of treating patients with symptomatic
bradycardia. It can also be helpful in patients with asystole, if performed
early.
Contraindications
Noninvasive pacing is contraindicated in the treatment of ventricular fibrillation. Noninvasive pacing in the presence of severe hypothermia may be contraindicated.
SpO2 Monitoring (Optional)
A pulse oximeter is a noninvasive device that indicates the oxygen saturation
(SpO 2) of arterial blood. This measurement is obtained through a probe that
directs red and near infrared light through arterial beds. Hemoglobin absorbs
these lights differently when it is bound with oxygen. Pulse oximetry measures this difference and translates the measurement into a saturation percentage that is displayed as an SpO 2 reading.
M4735A Heartstream XL Defibrillator/Monitor
1-7
1
Safety Considerations
Indications
SpO2 monitoring is indicated for use when it is beneficial to assess a patient’s
oxygen saturation level.
Contraindications
There are no known contraindications for SpO2.
NOTE
Readings should be carefully considered in the presence of certain circumstances. Inaccuracies may result from the use of pulse oximeters in the presence of certain circumstances, such as hemoglobin saturated with compounds
other than oxygen, (such as carbon monoxide), hypothermia, hypovolemia,
patient movement, nail polish and excessive ambient light.
Safety Considerations
General warnings and cautions that apply to use of the M4735A Heartstream
XL Defibrillator/Monitor are provided in Chapter 13. Additional warnings
and cautions specific to a particular feature are provided in the appropriate
section of this guide.
1-8
Introduction
Documentation and Training
Documentation and Training
Documentation for the M4735A Heartstream XL Defibrillator/Monitor
includes:
l
l
l
1
M4735A Heartstream XL Defibrillator/Monitor User Guide,
M4735A Heartstream XL Defibrillator/Monitor Quick Reference
Card, and
About Sealed Lead Acid Batteries, an application note on battery
maintenance.
Training tools available for use with the M4735A Heartstream XL include:
l
l
Using the M4735A Heartstream XL Defibrillator/Monitor, a workbook
Heartstream XL User Training CD-ROM (optional)
For additional online documentation and training, please visit our website:
www.agilent.com/healthcare/heart
Available online training materials include:
l
l
l
AED Application Note
SpO2 Concept Guide
Pacing Application Note
M4735A Heartstream XL Defibrillator/Monitor
1-9
Documentation and Training
1-10
Introduction
2 Getting Started
Congratulations on purchasing your Heartstream XL!
This chapter will give you a quick tour of your new defibrillator/monitor’s
controls and display.
2
The Heartstream XL ships complete with paddles and the cables necessary for
easy operation. This chapter will help you get your Heartstream XL up and
running by following a few easy steps, including:
l
l
l
127(
Connecting to AC Power
Inserting the battery
Inserting the optional Data Card (if desired).
To connect cables to the Heartstream XL, refer to “Setting Up and Configuring the Heartstream XL” in chapter 10.
M4735A Heartstream XL Defibrillator/Monitor
2-1
Getting Acquainted
Getting Acquainted
This section provides an overview of the Heartstream XL controls, connections, and display layout. A review of control functionality is also provided.
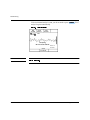
Basic Orientation
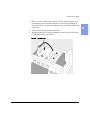
Review the figure for a general layout of the controls, where the patient cables
connect, and where to insert the battery and Data Card.
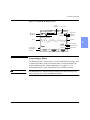
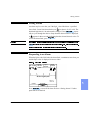
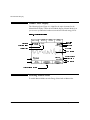
Figure 2-1 Basic Orientation (Front)
Mark
AC Power
Batt Charge
Print Strip
Energy Select Knob
Event
Summary
Volume
ECG Size
Pacer
Rate
Mode
Speaker
Start/Stop
Output
Battery
Patient Cable Connector
Data Card
2-2
Getting Started
Getting Acquainted
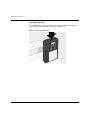
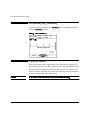
Figure 2-2 Heartstream XL (Back)
Printer
ECG Connector
SpO 2 Connector
ECG Input Jack
2
AC Power
127(
If your Heartstream XL does not have the SpO2 or Pacing option, disregard
these controls and the related information described in this section.
M4735A Heartstream Defibrillator/Monitor
2-3
Getting Acquainted
Defibrillation Controls
Defibrillation controls consist of an energy select knob and a set of softkeys
that perform the function displayed as a label above each button. These
controls assist in both AED and Manual Mode defibrillation.
Audiovisual Controls
Adjusts the volume of voice prompts and the QRS beeper.
Adjusts the size of the ECG waveform displayed, printed, and
stored. Pressing
and
simultaneously generates a
1 mV calibration pulse.
To completely turn the QRS beeper off, it must be changed from the configuration menu.
Monitoring Controls
Monitoring controls consist of a set of softkeys that perform monitoring
functionality. These functions are displayed in the softkey label below each
button. Monitoring softkeys also control heart rate and SpO2 alarms, and
selection of the ECG source to monitor.
2-4
Getting Started
Getting Acquainted
Print Controls
Print controls perform the function shown above each button. The print
controls from are:
Strip
Summary
Mark
Prints ECG data, defibrillation events, and marked events
real-time or with a 6 second delay (as configured). Press to
start printing; press again to stop printing.
Prints the Event Summary. (See “Storing, Retrieving & Printing”
for more information.) Printing may be stopped by pressing the
Summary or Strip button.
Inserts a time-stamped annotation in the Event Summary. May
be configured to print an annotated ECG strip when pressed.
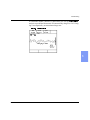
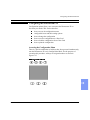
Manual Mode Controls
Manual Mode controls provide access to manual defibrillation, and
synchronized cardioversion and optional pacing functionality.
Figure 2-3 Manual Mode Controls: Energy Select Knob and Pacing Controls
M4735A Heartstream Defibrillator/Monitor
2-5
2
Getting Acquainted
Display Buttons
Energy
Select
Knob
Can enable both Manual Mode and AED Mode. The AED
On position activates AED Mode. Manual On enables
Manual Mode, synchronized cardioversion and pacing
(optional).
Button below the display (far left) that enables
synchronized cardioversion when first pressed in Manual
Mode; disables synchronized cardioversion when pressed
again.
Pacer
Activates the pacing function buttons (as indicated by the
green LED), allowing you to use the buttons below to
define pacing rate, mode, and current output. Also turns off
the Pacer function when pressed a second time.
Rate
Adjusts the pacing rate.
Start
Stop
Starts pacing. Delivers pacer pulses when
first pressed; stops pacing when pressed
again.
Mode
Selects Demand or Fixed Mode for pacing.
Output
127(
2-6
Adjusts the current output for pacing.
Synchronized cardioversion and pacing controls only function when Manual
Mode is enabled.
Getting Started
Getting Acquainted
Display Layout
The following figures show the layout of the display in:
l
l
l
127(
AED Mode, with ECG and SpO2 monitoring capabilities enabled
AED Mode, with ECG and SpO2 monitoring capabilities disabled
Manual Mode
ECG and SpO2 monitoring capabilities for AED Mode may be enabled and
disabled independently in the configuration.
2
Figure 2-4 AED Mode Display Layout (ECG and SpO2 Enabled)
Lead
Displayed
Heart Rate
HR Alarm
HR ALARM
LEAD
SELECT
132
Lead II
SpO2
ON/OFF
SpO2 value
SpO2
ALARM
86
Pulse 130
System Message
Momentary Message
ECG
ECG Gain
User Message
114J
Shocks: 0
00:15:02
Defibrillation
Soft Keys
SpO2 alarm
Pleth Bar
Pulse Rate
PAUSE
ANALYZE
Current Charge
Shocks Delivered
Incident Timer
SHOCK
The Incident Timer shows the elapsed time since the Heartstream XL was
turned on, provided patient contact was established. If the Heartstream XL is
powered on after being off for less than two minutes, the Incident Timer
resumes where it left off. If power is off for more than two minutes, the Incident Timer resets to zero (
). If an Event Summary is printed, the incident timer will be set to zero the next time the unit is turned on.
M4735A Heartstream Defibrillator/Monitor
2-7
Getting Acquainted
Figure 2-5 AED Mode Display Layout (ECG and SpO2 disabled)
System Message
Momentary Message
ECG
ECG Gain
User Message
150J
Shocks: 0
00:15:02
Defibrillation
Soft Keys
PAUSE
ANALYZE
Current Charge
Shocks Delivered
Incident Timer
SHOCK
User messages accompany voice prompts to guide you through the defibrillation process.
System and Momentary Messages:
l
l
l
alert you to conditions that require your attention,
provide status information, or
offer recommendations.
A System Message remains on the display until the condition that generated
the message no longer exists. A Momentary Message is temporary and
appears on the display for a minimum of 3 seconds. For a list of system and
momentary messages, see Chapter 12.
2-8
Getting Started
Connecting to Power
Figure 2-6 Manual Mode Display Layout
Lead
Displayed
HR ALARM
Heart Rate
HR Alarm
132
LEAD
SELECT
Lead II
SPO2
ON/OFF
System Message
Momentary Message
SpO2 value
SPO2
ALARM
86
Pulse 130
ECG
SpO2 alarm
Pleth Bar
Pulse Rate
ECG Gain
2
Sync Display
Defibrillation
Softkeys
Sync
SYNC
ON/OFF
CHARGE
114J
Current Charge
Shocks: 0
00:15:02
Shocks Delivered
Incident Timer
SHOCK
Connecting to Power
The Heartstream XL is powered by AC Power and the M3516A battery. Prior
to inserting the battery, make sure that the battery is charged and has been
properly maintained (See “Battery Maintenance” on page 11-7). It is
recommended that a second, charged battery be available at all times.
127(
The Heartstream XL will take longer to charge to the desired energy level
when using only AC Power and without the battery.
M4735A Heartstream Defibrillator/Monitor
2-9
Connecting to Power
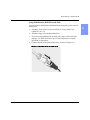
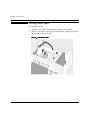
Inserting the Battery
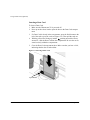
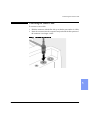
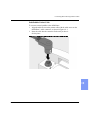
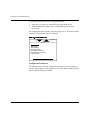
To insert the battery, slide it into the battery receptacle as shown in Figure 2-7.
Then push the battery in until you hear an audible click.
Figure 2-7 Inserting the Battery
2-10
Getting Started
Connecting to Power
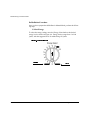
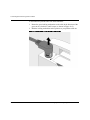
Removing the Battery
To remove the battery from the Heartstream XL, press the black battery eject
button and pull the battery out, as shown in Figure 2-8.
Figure 2-8 Removing the Battery
2
M4735A Heartstream Defibrillator/Monitor
2-11
Connecting to Power
Low Battery Warning
The message /RZ%DWWHU\ is displayed when the battery is low and needs
recharging. This message indicates that the battery has sufficient remaining
capacity to provide only about ten minutes of monitoring time and five shocks
before the Heartstream XL shuts off. Replace the battery or get access to AC
power as soon as possible.
If the power is off for less than 2 minutes, while you change the battery, the
Heartstream XL assumes that you are continuing to treat the same patient,
provided patient contact was established and the Event Summary was not
printed prior to turning the power off. It continues to store data on the Data
Card if being used and append events to the existing Event Summary. Alarms
set prior to the power loss remain active.
If power remains off for more than 2 minutes, the Heartstream XL assumes
you are treating a different patient and assigns a new incident number. A new
Event Summary begins when patient contact is made.
2-12
Getting Started
Using a Data Card (Optional)
Using a Data Card (Optional)
If you would like to collect patient information on a Data Card, the card must
be inserted into the Heartstream XL before
l
l
the device is turned on, and
the incident has begun.
The recommended practice is to use one Data Card per patient. Once a Data
Card fills, recording stops; a second Data Card may not be inserted for the
current incident. Data cards hold up to two hours of patient information.
Multiple incidents can be recorded on a single Data Card. Each incident is
assigned a unique incident number.
127(
127(
Patient data from a Data Card may be downloaded to a CodeRunner Web data
management system. CodeRunner Web also allows you to erase patient data
from a Data Card, allowing the card to be reused for another patient.
It’s recommended that you use a designated data card to configure one or
more defibrillator/monitor.
M4735A Heartstream Defibrillator/Monitor
2-13
2
Using a Data Card (Optional)
Inserting a Data Card
To insert a Data Card:
1. Make sure the Heartstream XL is powered off.
2. Press up on the release latch to open the door to the Data Card compartment.
3. If a Data Card is already in the compartment, press the black button to the
left of the card to eject the card (see Figure 2-9). Then pull the card out.
4. With the yellow label facing up and the
pointing towards the Heartstream XL, slide the Data Card into the compartment. Be sure the card is
seated securely within the compartment.
5. Close the Data Card compartment door. Make sure that you hear a click,
indicating that the door is latched shut.
Figure 2-9 Inserting a Data Card
Eject Button
2-14
Getting Started
Using a Data Card (Optional)
Removing a Data Card
To remove the Data Card, press the black eject button (see Figure 2-9) and
pull the Data Card from the compartment.
Figure 2-10 Removing the Data Card
2
M4735A Heartstream Defibrillator/Monitor
2-15
Using a Data Card (Optional)
2-16
Getting Started
3 Defibrillating in AED Mode
The Heartstream XL’s AED Mode is designed to guide you through standard
treatment algorithms for cardiac arrest, including those provided by the American Heart Association and the European Resuscitation Council. Configuration choices allow you to customize AED Mode to better follow a specific
treatment algorithm and to meet the unique needs of your life-saving team.
This chapter describes how to use the Heartstream XL to defibrillate in AED
Mode. It explains the prompts that guide you through the defibrillation process and describes how prompts vary depending upon the disposition of the
patient and the configuration of your device.
For information on storing, retrieving, and printing patient information
acquired in AED Mode, see Chapter 9.
M4735A Heartstream XL Defibrillator/Monitor
3-1
3
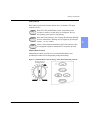
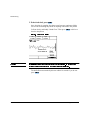
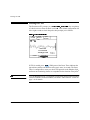
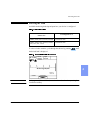
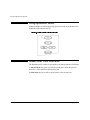
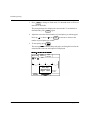
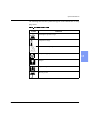
)LJXUH$('0RGH2YHUYLHZ
If Patient is:
l Unresponsive
l Not Breathing
l Pulseless
Attach Pads
Insert Data Card
(Optional)
Rotate Energy Select Knob
to AED On
If Instructed,
Press
$1$/<=(
No Shock
Advised
Shock
Advised
Press
6+2&.
Check Patient
at completion of shock series
within a shock series
No Pulse
Press
3$86(
Do CPR
Pulse
Ventilate
if Rhythm Monitoring on
3-2
Defibrillating in AED Mode
Overview
Overview
An overview of the AED Mode defibrillation process is shown in Figure 3-1.
The process begins only after you have:
l
l
l
l
assessed that the patient is unresponsive, not breathing, and pulseless,
turned the Energy Select knob to AED On
prepared for defibrillation by attaching pads and cables, and
inserting a Data Card (if desired).
3
M4735A Heartstream XL Defibrillator/Monitor
3-3
Overview
The defibrillation process is dependent upon the configuration of your Heartstream XL, as described in the following paragraphs.
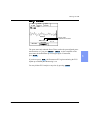
Defibrillation (using the default configuration)
In its default configuration, the defibrillation process is:
Turn the Energy Select knob to AED On.
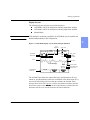
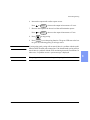
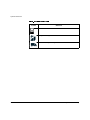
)LJXUH(QHUJ\6HOHFW.QRE
Manual On
AED On
AED On
Manual On
The Heartstream XL checks to see if the pads patient cable and multifunction
defib electrodes pads are properly connected. If either connection is compromised, you are prompted to fix the problem.
Analysis begins automatically - there is no need to press
$1$/<=(
.
Once analysis is complete, the Heartstream XL tells you 6KRFN$GYLVHG
or 1R6KRFN$GYLVHG.
If a shock is advised, press
6+2&.
.
After the first shock is delivered, the Heartstream XL automatically
begins analyzing the ECG and the process repeats until a shock series
is complete or no shock is advised. At this point, you are prompted to
check the patient.
3-4
Defibrillating in AED Mode
Overview
Defibrillation (with a modified configuration)
Chapter 10 details the configurable parameters for AED Mode. Three parameters significantly impact the defibrillation process. They are:
Device Initiated Analysis - initiates ECG analysis when the Heartstream XL
is first turned on. The default configuration setting is On. If you choose to set
this parameter to 2II, you need to press
to initiate analysis in step 2
of the defibrillation process.
$1$/<=(
Automatic Re-analysis - initiates ECG analysis in between shocks within a
shock series. The default configuration setting is 2Q. If you choose to set this
to initiate analysis in between
parameter to 2II, you need to press
shocks within a shock series (i.e. after the first and second shock of a three
shock series).
$1$/<=(
Rhythm Monitoring - monitors the ECG for potentially shockable rhythms
when the Heartstream XL is not analyzing, defibrillating, or paused. The
default setting is 2QIf you choose to set this parameter to 2II, the Heartstream
XL will not look for potentially shockable rhythms during these idle times.
Idle times also include:
l
l
power on, when Device Initiated Analysis is off.
in between shocks within a shock series, when Auto Re-analysis is
off.
If Rhythm Monitoring is off, you need to observe the patient during idle times
.
and determine when to press
$1$/<=(
The following sections describe the defibrillation process in detail. They also
describe what happens at the completion of a shock series and if a shockable
rhythm is not detected.
M4735A Heartstream XL Defibrillator/Monitor
3-5
3
Preparation
Preparation
If the patient is:
l
l
l
unresponsive
not breathing
pulseless
Then:
1. Apply multifunction defib electrode pads to the patient, as directed on the
package. Use the anterior-apex electrode placement.
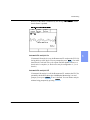
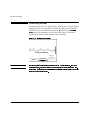
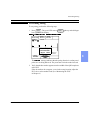
2. Connect the pads to the pads patient cable, as shown in Figure 3-3.
3. If needed, insert a Data Card (as described in “Using a Data Card
(Optional)” on 2-13).
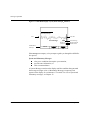
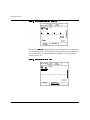
)LJXUH&RQQHFWLQJ3DGVWRWKH3DWLHQW&DEOH
3-6
Defibrillating in AED Mode
Defibrillating
Defibrillating
Follow the voice and screen prompts as they guide you through the following
steps:
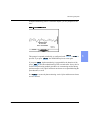
1. Turn the Energy Select knob to AED On.
In this first step of the defibrillation process, the Heartstream XL checks to
see if the pads patient cable and the pads are connected. If they are, it proceeds to step 2.
If the pads patient cable is not properly attached, you are prompted to
&RQQHFW3DGV&DEOH .
)LJXUH&RQQHFW3DGV&DEOH'LVSOD\
3
Connect
Pads
Cable
Shocks: 0
00:00:02
M4735A Heartstream XL Defibrillator/Monitor
3-7
Defibrillating
Once the cable is connected, the Heartstream XL will ensure the pads have
adequate contact with the patient’s skin. Contact quality is measured by
monitoring the electrical impedance between the two pads.
If the pads have not been applied or are not making proper contact with the
patient, you are prompted to $SSO\3DGV and &KHFN&RQQHFWLRQV.
)LJXUH$SSO\3DGV'LVSOD\
Apply
Pads
Shocks: 0
00:00:03
3-8
Defibrillating in AED Mode
Defibrillating
2. If instructed, press
$1$/<=(
.
If device-initiated analysis is off, the Heartstream XL monitors the rhythm
provided Rhythm Monitoring is on. The Heartstream XL prompts you to
press
if a potentially shockable rhythm is detected.
$1$/<=(
)LJXUH3UHVV$1$/<=('LVSOD\
HR
120
LEAD
SELECT
Lead II
SpO2
ON/OFF
Press Analyze
Shocks: 0
00:15:02
PAUSE
127(
ANALYZE
3
ECG Analysis is always performed through multifunction defib electrode
pads. Analysis can not be performed through monitoring electrodes.
M4735A Heartstream XL Defibrillator/Monitor
3-9
Defibrillating
If device-initiated analysis is on, you do not need to press
analysis begins automatically.
$1$/<=(
; ECG
)LJXUH$QDO\]LQJ'LVSOD\
HR
ALARM
120
LEAD
SELECT
Pads
SpO2
ON/OFF
Analyzing
Do Not Touch Patient
Shocks: 0
00:00:08
STOP
ANALYSIS
:$51,1*
+DQGOLQJRUWUDQVSRUWLQJWKHSDWLHQWGXULQJ(&*DQDO\VLVFDQFDXVHLQFRUUHFWRU
GHOD\HGGLDJQRVLV
3-10
Defibrillating in AED Mode
Defibrillating
If a shockable rhythm is detected, as indicated by the message 6KRFN$GYLVHG,
analysis stops and the Heartstream XL automatically charges to 150J. Charging is accompanied by an intermittent charge tone.
)LJXUH&KDUJLQJ'LVSOD\
HR
ALARM
120
LEAD
SELECT
Pads
SpO2
ON/OFF
Charging to 150J
97J
Shocks: 0
00:00:10
3
M4735A Heartstream XL Defibrillator/Monitor
3-11
Defibrillating
3. If shock advised, press
6+2&.
.
Once charging is complete, the charge tone becomes continuous. Make
sure no one is touching the patient or anything connected to the patient.
Call out clearly and loudly "Stand Clear." Then press
to deliver a
shock to the patient.
6+2&.
)LJXUH3UHVV6+2&.'LVSOD\
HR
ALARM
120
LEAD
SELECT
Pads
SpO2
ON/OFF
Stand Clear!
Press SHOCK
150J
Shocks: 0
00:00:14
SHOCK
:$51,1*
'HILEULOODWLRQFXUUHQWFDQFDXVHRSHUDWRURUE\VWDQGHULQMXU\'RQRWWRXFKWKH
SDWLHQWRUHTXLSPHQWFRQQHFWHGWRWKHSDWLHQWGXULQJGHILEULOODWLRQ
The defibrillator automatically disarms within 30 seconds if you do not
press
.
6+2&.
3-12
Defibrillating in AED Mode
Defibrillating
Delivery of the shock is confirmed by the message 6KRFN'HOLYHUHG and the
shock counter is updated.
)LJXUH6KRFN'HOLYHUHG'LVSOD\
HR
ALARM
120
LEAD
SELECT
Pads
SpO2
ON/OFF
Shock Delivered
Shocks: 1
00:00:40
3
Automatic Re-analysis On
If Automatic Re-analysis is on, the Heartstream XL analyzes the ECG following delivery of the shock. You are prompted to press
, if an additional shock is advised. This cycle repeats until the rhythm converts or a
shock series is complete. (A shock series may be configured to 2, 3, or 4
shocks.)
6+2&.
Automatic Re-analysis Off
If Automatic Re-analysis is off, the Heartstream XL monitors the ECG for
potentially shockable rhythms provided Rhythm Monitoring is on and
prompts you to press
if one is detected. You can initiate analysis
without being prompted by pressing
.
$1$/<=(
$1$/<=(
M4735A Heartstream XL Defibrillator/Monitor
3-13
Pausing for CPR
Pausing for CPR
The Heartstream XL prompts you to &KHFN3DWLHQW&KHFN3XOVHDt the completion
of a shock series or when no shock is advised. This default configuration will
allow eight seconds to check the pulse, then prompts you as follows:
)LJXUH3UHVV3DXVH'LVSOD\
HR
ALARM
120
LEAD
SELECT
Pads
SpO2
ON/OFF
If Needed
Press PAUSE
And Begin CPR
PAUSE
Shocks: 1
00:00:50
ANALYZE
If CPR is needed, press
. While paused, the Pause Timer indicates the
elapsed time and the total duration of the pause state, in seconds. The Pause
Timer is configurable to meet your local CPR protocol needs. Rhythm, SpO 2
and heart rate monitoring alarms are suspended for the duration of the pause.
3$86(
127(
3-14
* If your Heartstream XL is configured to support the European Resuscitation
Council Guidelines for Resuscitation, refer to the “ERC Protocol” section on
page 3-18 for details.
Defibrillating in AED Mode
Pausing for CPR
)LJXUH3DXVH'LVSOD\
HR
ALARM
120
LEAD
SELECT
Pads
SpO2
ON/OFF
Paused
Timer: 21 / 60
RESUME
Shocks: 3
00:01:40
Elapse Time
Total Pause Duration
ANALYZE
The pause state ends when the Pause Timer reaches the preconfigured pause
state duration, or if you press
or
. At the completion of the
pause state, the defibrillation process begins again. If instructed,
press
.
5(680(
$1$/<=(
$1$/<=(
If you do not press
, the Heartstream XL begins monitoring the ECG
rhythm provided Rhythm Monitoring is on.
3$86(
You may initiate ECG analysis at any time by pressing
M4735A Heartstream XL Defibrillator/Monitor
$1$/<=(
.
3-15
3
Monitoring Rhythm
Monitoring Rhythm
When the Heartstream XL is not analyzing, defibrillating, or paused, Rhythm
Monitoring alerts you to potentially shockable rhythms (provided Rhythm
Monitoring is set to the default configuration, 2Q). The message 0RQLWRULQJ
5K\WKP appears on the display to let you know this feature is active and
remains on the display for the duration of the monitoring.
)LJXUH0RQLWRULQJ5K\WKP'LVSOD\
Monitoring Rhythm
Shocks: 3
00:00:49
PAUSE
:$51,1*
ANALYZE
7KHUHFRPPHQGHGFRQILJXUDWLRQVHWWLQJIRU5K\WKP0RQLWRULQJLV2Q,I5K\WKP
0RQLWRULQJLVRII\RXDUHQRWDOHUWHGZKHQDSDWLHQW·VUK\WKPFKDQJHVIURPQRQ
VKRFNDEOHWRVKRFNDEOHDVLQUHILEULOODWLRQRUDQLQLWLDOO\QRQVKRFNDEOHUK\WKPWKDW
FRQYHUWVWRDVKRFNDEOHUK\WKP
3-16
Defibrillating in AED Mode
Monitoring Rhythm
If Rhythm Monitoring detects a shockable rhythm, you are prompted as follows:
)LJXUH6KRFNDEOH5K\WKP
Check Patient
If No Pulse
Press ANALYZE
Shocks: 3
00:00:55
ANALYZE
PAUSE
This prompt is repeated periodically, as configured, until
or
pressed. If you press
, the defibrillation process starts again.
$1$/<=(
3$86(
is
$1$/<=(
, rhythm monitoring is suspended for the duration of the
If you press
pause.
is used when administering CPR, as noted earlier. It may also be
useful when performing medical procedures or encountering artifact during
patient transport. Active SpO2 and heart rate alarms are suspended during the
pause duration, as well.
3$86(
3$86(
Press
to restore rhythm monitoring. Active SpO2 and heart rate alarms
are also restored.
5(680(
M4735A Heartstream XL Defibrillator/Monitor
3-17
3
ERC Protocol
ERC Protocol
The Heartstream XL can be configured to support the European Resuscitation
Council (ERC) Guidelines for Resuscitation. If (XURSHDQ3URWRFRl is configured
to 2Q, the defibrillation process described in this chapter is the same, with the
exception of how the Pause state functions (see “Pausing for CPR” on 3-14).
As described, you can enter a Pause state:
l
l
at the completion of a shock series, or
when no shock is advised
In both cases, the ERC protocol prompts you to Check Patient. Then it
prompts you as follows:
)LJXUH&KHFN3DWLHQW0HVVDJH
If Needed
Press PAUSE
And Begin CPR
PAUSE
127(
3-18
Shocks: 1
00:00:50
ANALYZE
Using the ERC protocol, you are not prompted (or given time) to check the
patient’s pulse.
Defibrillating in AED Mode
ERC Protocol
If CPR is needed, press
. While paused, a timer indicates the elapsed
time and the total duration of the Pause state, as shown:
3$86(
)LJXUH'LVSOD\LQ3DXVHG6WDWH
Paused
Timer: 35 / 60
RESUME
Shocks: 3
00:01:40
Elapsed Time
Total Pause Duration
in Seconds
ANALYZE
The total pause duration depends on the event preceding the Pause state. If
you entered the Pause state:
l
l
at the completion of a shock series or shortly after a shock is delivered, the duration is equal to the 3RVW6KRFN&357LPHU configuration setting (the default setting is 60 seconds).
when no shock was advised, the duration is equal to the 16$7LPHU
configuration setting, where NSA is an acronym for No Shock
Advised (the default setting is 180 seconds).
M4735A Heartstream XL Defibrillator/Monitor
3-19
3
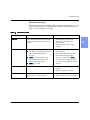
Troubleshooting
Troubleshooting
When the Heartstream XL detects a problem, it provides display and/or voice
prompts to guide you to resolution. The table below lists the prompts you may
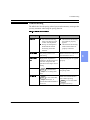
encounter in AED Mode, the cause, and the suggested corrective action.
Prompts related to the battery and Data Card are discussed in Chapter 12.
7DEOH7URXEOHVKRRWLQJLQ$('0RGH
Prompt
Possible Cause
Pads Off
(display)
or
Apply Pads
(voice)
l The multifunction defib elec-
Pads Cable
Off
(display)
or
Apply Pads
(voice)
l The pads cable is not connected
Artifact
Detected/
Do Not
Touch
Patient
l Patient motion interferes with
trode pads are not properly
applied to the patient.
to the defibrillator.
3-20
l Check that the pads are applied
to the patient’s bare chest, as
directed on the pads’ package.
Replace the pads if the prompt
continues.
l Check that the defibrillation
pads connector is locked in
place.
l Attempt to eliminate patient
analysis.
l Electrical sources are causing
interference.
Shock
Canceled
Corrective Action
l Shock key not pressed within 30
seconds.
l
motion. Avoid analyzing while
transporting or performing CPR.
Move suspected devices away
from the defibrillator, when possible.
l Press within 30 seconds of
prompt.
Defibrillating in AED Mode
Troubleshooting
7DEOH7URXEOHVKRRWLQJLQ$('0RGH
Prompt
Possible Cause
Corrective Action
No Shock
Delivered
l Pads are not properly connected
l Check pads connection.
Key
Inactive
l The key pressed only functions
l Turn the Energy Select knob to
to the patient.
l
l
in Manual Mode.
The key pressed does not function during analysis or charging.
The key pressed does not function while in a pause state.
l
Manual on prior to pressing the
key.
Wait for analysis or charging to
complete prior to pressing the
key.
l Press
5(680(
prior to pressing
the key.
3
M4735A Heartstream XL Defibrillator/Monitor
3-21
Troubleshooting
3-22
Defibrillating in AED Mode
4 Monitoring the ECG
This chapter will provide information about:
l
l
l
l
applying monitoring electrodes,
selecting the correct lead,
setting and disabling the heart rate (HR) alarm, and
adjusting the ECG size.
For information on how to apply multifunction defib electrode pads, follow
the directions on the pads packaging.
127(
For information on storing, and retrieving, and printing patient information
acquired while monitoring, see Chapter 9.
4
M4735A Heartstream XL Defibrillator/Monitor
4-1
Overview
Overview
The Heartstream XL can be used for short or long-term ECG monitoring. The
ECG monitoring function allows you to monitor through:
l
l
multi-function defib electrode pads, or
3- or 5-lead ECG monitoring electrodes, as configured.
When the Heartstream XL is turned on, the ECG acquired is shown on the display. ECG monitoring allows you to continue to monitor through the pads or
to select a lead from an alternate ECG source. (3- or 5-lead). ECG monitoring
also displays the heart rate (HR) and allows you to set HR alarms. ECG
monitoring is always active in Manual Mode. In AED Mode, ECG monitoring
is only active if /HDG6HOHFWis configured to on (the default is on). Plug the
3 or 5-lead ECG patient cable into the connector marked ECG as shown in
Figure 4-1.
A new, fully-charged battery provides approximately 100 minutes of continuous monitoring.
4-2
Monitoring the ECG
Connecting the ECG Patient Cable
Connecting the ECG Patient Cable
To connect a 3- or 5-lead ECG patient cable:
1. Align the keyed patient cable connector with the slot on the ECG
receptacle, as shown in Figure 4-1.
2. Push the patient cable firmly into the ECG receptacle, until the white portion is no longer visible.
)LJXUH(&*3DWLHQW&DEOH&RQQHFWRU5HFHSWDFOH
4
To disconnect the ECG patient cable, gently pull the white patient cable
connector out of the ECG receptacle.
M4735A Heartstream XL Defibrillator/Monitor
4-3
Applying Monitoring Electrodes
Applying Monitoring Electrodes
Proper application and placement of electrodes is essential for reliable monitoring. Good contact between the electrode and the skin reduces the effects of
motion artifact and signal interference.
:$51,1*
%HVXUHWKDWWKHHOHFWURGHVGRQRWFRPHLQFRQWDFWZLWKRWKHUFRQGXFWLYHPDWHULDOV
HVSHFLDOO\ZKHQFRQQHFWLQJRUGLVFRQQHFWLQJWKHHOHFWURGHVWRIURPWKHSDWLHQW
To apply electrodes:
1. Identify the appropriate electrode sites. (See Figure 4-2 and Figure 4-3.)
2. Shave the electrode sites, if necessary.
3. Clean and abrade the skin at the electrode sites.
4. Dry the skin at the electrode sites.
5. Open a new package of M2202A Radio-Translucent Monitoring
Electrodes; verify that the "Use Before" date has not passed.
6. Apply the electrodes by peeling them, one at a time, from the protective
backing and sticking them firmly to the patient’s skin. Press around the
entire edge of each electrode to ensure that they are secure.
7. Snap the lead wires onto the electrodes. Make sure the lead wires do not
pull on the electrodes.
127(
4-4
If monitoring for long periods of time, new monitoring electrodes and multifunction defib electrode pads may need to be changed periodically. Refer to
the manufacturer’s documentation for how often.
Monitoring the ECG
Applying Monitoring Electrodes
Electrode Placement
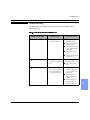
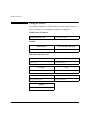
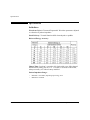
Figure 4-2 shows typical electrode placement for the limb leads of a 3- or
5-lead patient cable. The V/C lead of the 5-lead cable can be placed in any of
the precordial lead positions (V1/C1 through V6/C6) shown in Figure 4-3.
)LJXUH/LPE/HDG(OHFWURGH3ODFHPHQW
AHA Labels
RA/R
LA/L
RL/N*
LL/F
IEC Labels
RA Right Arm
R Right
LA Left Arm
L Left
RL Right Leg*
N Negative*
LL Left Leg
F Foot
* Not used for 3-lead.
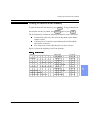
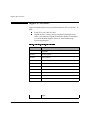
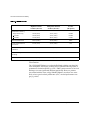
7DEOH/HDG(&*/HDG)RUPDWLRQ
Lead
+
-
reference
I
LA
RA
LL
II
LL
RA
LA
III
LL
LA
RA
M4735A Heartstream XL Defibrillator/Monitor
4
4-5
Applying Monitoring Electrodes
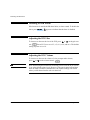
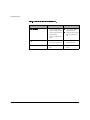
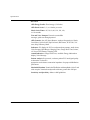
)LJXUH3UHFRUGLDO/HDG(OHFWURGH3ODFHPHQW
Lead
1
2
3
5
4
Location
V1
C1
forth intercostal space, at right sternal
margin
V2
C2
forth intercostal space, at left sternal
margin
V3
C3
midway between V2/C2 and V4/C4
V4
C4
fifth intercostal space, at left
midclavicular line
V5
C5
same level as V4/C4, on anterior
axillary line
V6
C6
same level as V4/C4, at left mid
axillary line
6
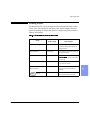
7DEOH/HDG(&*/HDG)RUPDWLRQ
Lead
I
LA - RA
II
LL - RA
III
LL - LA
aVR
aVF
aVL
Vx
4-6
Lead Formation
RA -
LA + LL
2
LL -
RA + LA
2
LA -
RA + LL
2
V/C -
RA + LA + LL
2
Monitoring the ECG
Selecting the Lead
Selecting the Lead
Available monitoring leads depend upon how your device is configured.
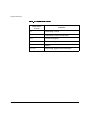
7DEOH/HDG6HOHFW&KRLFHV
Lead Select
Choices are:
If Configured for a:
Paddles, Pads, Lead I, Lead II, Lead III
3-lead ECG cable
Paddles, Pads, Lead I, Lead II, Lead III,
aVR, aVL, aVF, V lead.
5-lead ECG cable
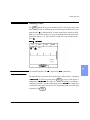
To select a lead to monitor, cycle through the choices by pressing
the desired lead is displayed.
/($'
6(/(&7
until
)LJXUH(&*0RQLWRULQJ'LVSOD\LQ$('0RGH
HR ALARM
LEAD
SELECT
78
Lead II
SpO2
ON/OFF
Monitoring Rhythm
4
Shocks: 3
00:00:49
PAUSE
127(
ANALYZE
To change to a different V Lead, move the electrode rather than pressing the
Lead Select softkey.
M4735A Heartstream XL Defibrillator/Monitor
4-7
Selecting the Lead
)LJXUH(&*0RQLWRULQJ'LVSOD\LQ0DQXDO0RGH
HR ALARM
78
LEAD
SELECT
SpO2
ON/OFF
Pads
87J
Shocks:0
00:00:08
Sync
SYNC
ON/OFF
DISARM
The message /HDGV2II is displayed in the System Message area accompanied
by a beep when a lead is disconnected or the electrodes have poor patient contact. A dashed line on the display indicates that there is no ECG signal as
shown in Figure 4-6.
)LJXUH/HDGV2II'LVSOD\LQ$('0RGH
HR ALARM
---
LEAD
SELECT
Lead II
SpO2
ON/OFF
Leads Off
__ __ __ __ __ __ __ __ __ __
Shocks:0
00:00:08
PAUSE
4-8
ANALYZE
Monitoring the ECG
Setting the Heart Rate Alarm
Setting the Heart Rate Alarm
The computed heart rate (the number of detected QRS complexes per minute)
is displayed below the
softkey, next to the . The heart rate represents the number of QRS complexes detected in a minute. If configured to on,
a QRS beeper identifies each QRS complex detected.
+5$/$50
:$51,1*
+HDUWUDWHDODUPVDQGPHWHUVIXQFWLRQZLWKLQWHUQDODQGH[WHUQDOSDFHPDNHUVEXW
WKH\FDQEHXQUHOLDEOH2EVHUYHWKHSDWLHQWFORVHO\LISDFHPDNHUVDUHXVHG
The HR alarm may be configured to alert you when the heart rate is outside
the specified limits. Limit choices are listed in Table 4-5: HR Alarm Limit
Choices.
7DEOH+5$ODUP/LPLW&KRLFHV
Alarm If Under:
Or Over:
30
100
60
140
90
160
120
200
To set a HR alarm, cycle through the limit choices by pressing
until
the desired limits are shown. The
then appears next to the heart rate value
to indicated that the HR alarm is set.
+5$/$50
:$51,1*
+HDUWUDWHDODUPVDUHWHPSRUDULO\VXVSHQGHGLQ$('0RGHGXULQJ(&*DQDO\VLVRU
ZKHQ
3$86(
LVSUHVVHGIRUWKHGXUDWLRQRIWKHSDXVHGSHULRG+HDUWUDWHDODUPVDUH
DOVRVXVSHQGHGZKLOHFKDUJLQJIRUGHILEULOODWLRQDQGGHOLYHULQJDVKRFN
M4735A Heartstream XL Defibrillator/Monitor
4-9
4
Disabling the HR Alarm
Disabling the HR Alarm
If the heart rate is outside the HR alarm limits, an alarm sounds. To disable the
alarm, press
+5$/$50
.
appears to indicate that the alarm is disabled.
Adjusting the ECG Size
To increase or decrease the size of the ECG, press
or
on the gain con-
trol,
. Preset ECG sizes are x.25, x.5, x1.0, x2.0, and x4.0. The default
setting at power on is x1.0.
Adjusting the ECG Volume
To increase or decrease the volume of voice prompts and/or alarms,
press
127(
4-10
or
on the volume control,
.
Note: When using the Heartstream XL during a new event, the ECG volume
is set at the default volume level. However, if the unit is turned off and then
back on within 2 minutes (continued use), the volume settings will remain
where you left them when the unit was turned off.
Monitoring the ECG
Troubleshooting
Troubleshooting
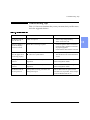
Table 4-6 provides troubleshooting tips for ECG Monitoring.
7DEOH7URXEOHVKRRWLQJZKHQ0RQLWRULQJWKH(&*
Situation
/HDGV2II
message
or
dashed line (------)
3DGV2II
message
Cause
l The monitoring elec-
l Check that the monitoring
trodes are not applied
or are not making
proper contact with the
patient.
l The monitoring cable is
not connected.
electrodes are properly
applied.
l Check that the monitoring
cable is properly connected.
l The pads are not mak-
l Check that the pads are
ing proper contact with
the patient.
Poor ECG signal
quality
M4735A Heartstream XL Defibrillator/Monitor
Solution
properly applied.
l The monitoring elec-
l Check that the monitoring
trodes are not making
proper contact with the
patient.
l The monitoring electrodes are outdated or
dried-out.
l Radio frequency interference (RFI) is causing
artifact.
electrodes are properly
applied. If necessary, prepare the patient’s skin and
apply new electrodes.
l Check the date code on
the electrodes. Do not
open the electrode package until immediately
prior to use.
l Relocate or turn off equipment that may be causing
RFI.
4-11
4
Troubleshooting
Situation
4-12
Cause
Solution
QRS Volume
l No sound
l Too low
l Too loud
l Adjust the volume.
l Check configurations.
QRS beeper inaudible or beeps do
not occur with
each QRS complex.
l The QRS beeper is con-
l Check that the QRS
figured to Off.
l The amplitude of the
QRS complex is too
small to detect.
beeper is configured to
On.
l Adjust the volume.
l Adjust the size of the
ECG.
Monitoring the ECG
5 Monitoring SpO2
This chapter will provide information about:
l
l
l
how pulse oximetry works
selecting and applying the correct sensor
monitoring SpO2
l
discontinuing SpO2
5
M4735A Heartstream XL Defibrillator/Monitor
5-1
Introduction
Introduction
Pulse oximetry is a noninvasive method of continuously measuring oxygen
saturation (SpO 2) in arterial blood. The resultant SpO2 reading indicates the
percentage of hemoglobin molecules in the arterial blood which are saturated
with oxygen. SpO2 monitoring is one of the tools available to assist in assessing a patient’s cardiac and respiratory systems. This chapter explains how
pulse oximetry works and describes how to use the Heartstream XL to monitor SpO 2.
SpO2 monitoring is always available both in AED and Manual Mode (if the
option is purchased).
For information on printing, storing, and retrieving patient information
acquired while monitoring, see Chapter 9.
:$51,1*
'RQRWUHO\VROHO\RQ6S2 UHDGLQJVDVVHVVWKHSDWLHQWDWDOOWLPHV6S2UHDGLQJV
PD\EHLQDFFXUDWHLQWKHSUHVHQFHRIVLJQLILFDQWOHYHOVRIFDUER[\KHPRJORELQRU
PHWKRPRJORELQLQSDWLHQWVZLWKUHVWULFWHGEORRGIORZWRWKHH[WUHPLWLHVVXFKDV
WKRVHLQVHYHUHVKRFNRUK\SRWKHUPLDRULQWKHSUHVHQFHRIH[FHVVLYHPRWLRQ
5-2
Monitoring SpO2
Understanding Pulse Oximetry
Understanding Pulse Oximetry
A pulse oximetry sensor sends light through patient tissue to a receiver on the
other side of the sensor. As Figure 5-1 shows, light emitting diodes transmit
red and infrared light through peripheral areas of the body, such as a finger.
)LJXUH3XOVH2[LPHWU\6HQVRU
Light Emitting
Diodes
Photodetector
A photodector positioned opposite the light emitting diodes compares light
absorption before and after pulsation. The amount of light getting through
reflects the blood flow in the arterioles. This measurement of light absorption
during pulsation is translated into an oxygen saturation percentage and an
SpO2 value is displayed.
For accurate SpO2 measurements, the following conditions must apply:
l
l
l
l
l
The patient must have perfusion in that extremity.
The light emitter and the photodetector must be directly opposite each
other.
All of the light from the emitter must pass through the patient’s tissue.
The sensor site should be free of vibration and excessive motion.
Power cables should be kept away from the sensor cable and connector.
M4735A Heartstream XL Defibrillator/Monitor
5-3
5
Selecting a Sensor
Selecting a Sensor
Table 5-1 shows the SpO 2 sensors that may be used with the Heartstream XL.
7DEOH$SSURYHG6HQVRUV
Sensor
127(
5-4
Type
Patient
Patient Size
Ideal Site
M1191A
Reusable
Adult
> 50 kg
Finger
M1192A
Reusable
Small adult
Pediatric
15-50 kg
Finger
M1194A
Reusable
Pediatric
Adult
> 40 kg
Fleshy part
of ear
M1903A/B
(Nellcor D-20)
Disposable
Pediatric
10-50 kg
Toe/Finger
To use Nellcor sensors, you must connect the M1943A Nellcor Adaptor
patient cable to the Heartstream XL. (See “Connecting the SpO2 Patient
Cable” on page 10-5.)
Monitoring SpO2
Selecting a Sensor
The most important factor when selecting a sensor is the position of the light
emitting diodes in relation to the photodetector; when a sensor is applied, the
diodes and the photodetector must be opposite each other. Sensors are
designed for patients within a specific weight range and for specific sites. Be
sure to:
l
l
l
Select a sensor appropriate for the patient’s weight.
Select a sensor site with adequate perfusion.
Avoid application to sites with edematous tissue.
Reusable Sensors
Reusable sensors may be reused on different patients after they have been
cleaned and disinfected (see the manufacturer’s instructions supplied with the
sensor).
Disposable Sensors
Disposable sensors should be used only once and then discarded. They can be
relocated to a different application site on the patient if the first location does
not give the desired results. Disposable sensors must not be reused on different patients.
5
M4735A Heartstream XL Defibrillator/Monitor
5-5
Applying the Sensor
Applying the Sensor
Follow the manufacturer’s directions for applying and using the sensor, making sure to observe any warnings or cautions. For the best results:
l
l
l
l
l
l
:$51,1*
Make sure the sensor is dry.
If the patient is moving, secure the sensor cable loosely to the patient.
Avoid excessive pressure at the sensor site; ensure that circulation is
not obstructed.
Keep power cables away from the sensor cable and connection.
Avoid placing the sensor in an environment with bright lights (if necessary, cover the sensor with opaque material).
Avoid placing the sensor on any extremity with an arterial catheter,
blood pressure cuff, or intravascular venous infusion line.
)DLOXUHWRDSSO\WKHVHQVRUSURSHUO\PD\UHGXFHWKHDFFXUDF\RIWKH6S2 PHDVXU
PHQW
:$51,1*
,QVSHFWWKHVHQVRUDSSOLFDWLRQVLWHDWOHDVWHYHU\WZRKRXUVIRUFKDQJHVLQVNLQTXDO
LW\FRUUHFWRSWLFDODOLJQPHQWDQGSURSHUVHQVRUDSSOLFDWLRQ,IVNLQTXDOLW\LVFRP
SURPLVHGFKDQJHWKHVHQVRUVLWH0RUHIUHTXHQWFKHFNLQJPD\EHUHTXLUHGGXHWRDQ
LQGLYLGXDOSDWLHQW·VFRQGLWLRQ
5-6
Monitoring SpO2
Connecting the Sensor Cable
Connecting the Sensor Cable
To connect a sensor cable:
1. Hold the connector with the flat side up so that the part number is visible.
2. Insert the connector into the receptacle and push until the blue portion of
the connector is no longer visible.
)LJXUH&RQQHFWLQJWKH6HQVRU&DEOH
5
M4735A Heartstream XL Defibrillator/Monitor
5-7
Monitoring
Monitoring
To monitor SpO2:
1. If the Heartstream XL is not on, turn the Energy Select knob to
AED On or Manual On.
2. Apply the appropriate sensor to the patient.
3. Make sure the sensor cable is connected to the Heartstream XL.
4. Press
to turn on SpO2 monitoring.
6S2 212))
A dashed line (---) is displayed under
, while the oxygen saturation
is measured and an SpO2 value is calculated. In a few seconds the SpO 2 value
is displayed in place of the dashed line. As the patient’s oxygen saturation
changes, the SpO2 value is updated continuously.
6S2 $/$50
)LJXUH6S2 0RQLWRULQJ'LVSOD\LQ$('0RGH
HR ALARM
78
LEAD
SELECT
Pads
SpO2
ON/OFF
SpO2
ALARM
98
Pulse 78
Monitoring Rhythm
Shocks: 3
00:00:49
PAUSE
ANALYZE
To the right of the SpO 2 value, a pleth bar and SpO2 alarm indicator are displayed. The pleth bar should be observed for fluctuation. It is an indication of
pulsation detected by the sensor. The pleth bar should not be used as the sole
indicator of pulsation because it can be influenced by movement and artifact.
The
symbol indicates no alarm is set.
Below the SpO 2 value is the pulse rate derived from the pulse oximetry.
5-8
Monitoring SpO2
Setting Alarms
Setting Alarms
An alarm may be set to alert you if the SpO2 value falls below a specified
lower limit. Lower limit alarm choices are
(no alarm), 90, 85, or 80. The
defaulted high limit is 100 and cannot be changed. Press
repeatedly to cycle through the choices. Stop when the desired choice is displayed.
6S2
$/$50
A
appears in three seconds, indicating that the selected alarm is active. To
review the alarm limit, press
.
6S2
:$51,1*
$/$50
6S2 DODUPVDUHWHPSRUDULO\VXVSHQGHGLQ$('0RGHGXULQJ(&*DQDO\VLVRUZKHQ
3$86(
LVSUHVVHGIRUWKHGXUDWLRQRIWKHSDXVHGSHULRG6S2 DODUPVDUHDOVRVXV
SHQGHGZKLOHFKDUJLQJIRUGHILEULOODWLRQDQGGHOLYHULQJDVKRFN
Responding to an Alarm
When the SpO 2 value falls below the alarm limit, a continuous tone alerts you
and the SpO2 value is displayed in inverse video.
)LJXUH6S2 $ODUP7ULJJHUHG
HR ALARM
LEAD
SELECT
78
Pads
SpO2
ON/OFF
SpO2
ALARM
87
Pulse 78
Monitoring Rhythm
Shocks: 3
00:00:49
5
ANALYZE
PAUSE
Press
to turn off the alarm. Refer to “Setting Alarms” if subsequent alarms are desired.
6S2
$/$50
M4735A Heartstream XL Defibrillator/Monitor
5-9
Discontinuing SpO2 Monitoring
Discontinuing SpO2 Monitoring
To shut off SpO2 monitoring, press
below the
softkey.
6S2 212))
once. Nothing should appear
6S2 $/$50
)LJXUH6S2 0RQLWRULQJ2II
HR ALARM
LEAD
SELECT
78
Pads
SpO2
ON/OFF
Monitoring Rhythm
Shocks: 3
00:00:49
PAUSE
ANALYZE
Caring for Sensors
Refer to the manufacturers instructions for care and cleaning of sensors. To
get the best results from your SpO2 reusable sensors, always handle the sensor
and cable with care and protect them from sharp objects. The sensor sleeve
houses a sensitive electronic device that can be damaged. Harsh treatment of
sensors will drastically reduce their lifetime.
:$51,1*
5-10
'RQRWXVHDGDPDJHGVHQVRURURQHZLWKH[SRVHGHOHFWULFDOFLUFXLWV
Monitoring SpO2
Troubleshooting
Troubleshooting
The table below lists system messages that you may encounter when
monitoring SpO2.
7DEOH7URXEOHVKRRWLQJZKHQ0RQLWRULQJ6S2
Problem or Message
1RQ3XOVDWLOH
Possible Cause
Corrective Action
l Pulse absent or too
l Check the sensor is
weak to be detected.
applied properly.
l Make sure the sensor
site has a pulse.
l Relocate the sensor to
l
l
6S2 /RZ6LJQDO
l SpO2 signal is too low
to give an accurate reading.
a site with improved
circulation.
Try another sensor
type.
Make sure nail polish
is not present.
l Check the sensor is
applied properly.
l Try another sensor
type.
6S2
1RLV\6LJQDO
l Excessive patient move-
l Minimize patient
ment, electrical interference, RF interference,
or optical interference.
l
l
M4735A Heartstream XL Defibrillator/Monitor
motion or apply sensor to site with less
movement.
Secure the sensor
cable loosely to the
patient
Reduce sources of
electrical, RFI, or
optical interference.
5-11
5
Troubleshooting
7DEOH7URXEOHVKRRWLQJZKHQ0RQLWRULQJ6S2
Problem or Message
6S2
/LJKW,QWHUI
Possible Cause
l The level of ambient
light is so high that the
sensor cannot obtain an
SpO2 reading.
l Sensor or cable is dam-
Corrective Action
l Cover sensor with an
opaque material.
l Check sensor for damage; try another sensor.
aged.
6S2
&DEOH2II
l The SpO2 cable is not
connected to the device.
6S2
6HQVRU)DLO
l The transducer is broken.
5-12
l Attach the cable to the
Heartstream XL.
l Apply a new transducer.
Monitoring SpO2
6 Defibrillating in Manual Mode
6
In Manual Mode you analyze the ECG, decide if defibrillation is indicated,
select the energy level, charge the device, and deliver the shock. The defibrillation process is under your control. There are no voice prompts. However,
system and momentary messages provide relevant information throughout the
process. It is important to be attentive to these messages.
This chapter describes how to defibrillate using Manual Mode. For Manual
Mode features such as synchronized cardioversion and pacing, see
Chapter 7: Performing Synchronized Cardioversion and
Chapter 8: Pacing (Optional).
For information on storing, retrieving, and printing patient information
acquired in Manual Mode, see Chapter 9: Storing, Retrieving, and Printing.
M4735A Heartstream XL Defibrillator/Monitor
6-1
Manual Mode Display
Manual Mode Display
The following figure (Figure 6-1) identifies the major elements for the
Manual Mode display. Unlike the AED Mode display, Manual Mode gives
you access to synchronized cardioversion and self-selected energy levels.
)LJXUH0DQXDO0RGH'LVSOD\
HR ALARM
LEAD
SELECT
SpO2
ON/OFF
Sp02
ALARM
6S 9DOXH
Pads
+HDUW5DWH
3OHWK%DU
Pulse
+HDUW5DWH$ODUP
&XUUHQW/HDG
3XOVH5DWH
(&**DLQ
(&*:DYHIRUP
Sync
SYNC
ON/OFF
6KRFNV
6KRFN&RXQWHU
(ODSVHG7LPH
CHARGE
SHOCK
6KRFN6RIWNH\
&KDUJH'LVDUP6RIWNH\
Enabling Manual Mode
To enable Manual Mode, turn the Energy Select knob to Manual On.
6-2
Defibrillating in Manual Mode
Defibrillating in Manual Mode
Defibrillating in Manual Mode
This section will explain how to prepare for and perform asynchronous
defibrillation in Manual Mode using multifunction defib electrode pads, and
paddles.
127(
In Manual Mode, defibrillation is always performed through paddles or pads.
However, during defibrillation, you may choose to monitor leads acquired
through an alternate ECG source (3- or 5-lead monitoring electrodes).
Using External Paddles
In preparation for defibrillation in Manual Mode using external paddles, perform the following steps:
1. If needed, insert a Data Card (as described in “Using a Data Card
(Optional)” on 2-13).
2. Turn the Energy Select knob to Manual On.
3. Remove paddles by simultaneously pulling them up and out of
the holders.
M4735A Heartstream XL Defibrillator/Monitor
6-3
6
Defibrillating in Manual Mode
4. Apply conductive matter.
127(
Do apply conductive matter by rubbing paddles together. Improper usage will
result in a "Paddles On" event that will be registered in the Event Summary
and may damage paddles.
5. Apply paddles to patient’s chest, using the anterior-apex placement.
127(
To optimize patient contact, adjust paddle pressure and placement. Once
proper contact has been made, the patient contact indicator (PCI) located on
the Sternum paddle will show a green LED. (See Figure 6-2).
)LJXUH3DWLHQW&RQWDFW,QGLFDWRURQ6WHUQXP3DGGOH
3DWLHQW&RQWDFW,QGLFDWRU
6-4
Defibrillating in Manual Mode
Defibrillating in Manual Mode
Using Multifunction Defib Electrode Pads
In preparation for defibrillation in Manual Mode using pads, perform the following steps:
1. If needed, insert a Data Card (as described in “Using a Data Card
(Optional)” on 2-13).
2. Turn the Energy Select knob to Manual On.
3. If you are using multifunction electrode pads, apply as directed on the
package. Use either the anterior-apex or anterior-posterior electrode
placement, as appropriate.
4. Connect the pads to the pads patient cable, as shown in Figure 6-3.
)LJXUH&RQQHFWLQJ3DGVWRWKH3DWLHQW&DEOH
M4735A Heartstream XL Defibrillator/Monitor
6-5
6
Defibrillating in Manual Mode
Defibrillation Procedure
Once you have prepared to defibrillate in Manual Mode, perform the following steps.
1. Select Energy
To select the energy setting, move the Energy Select knob to the desired
energy level as shown in Figure 6-4. Energy choices range from 2 to 200
joules, with the suggested level for adults being 150 joules.
)LJXUH(QHUJ\6HOHFW.QRE
0DQXDO2Q
6-6
$('2Q
Defibrillating in Manual Mode
Defibrillating in Manual Mode
2. Charge
Press
&+$5*(
or charge button on paddles.
As the defibrillator charges, the current charge is displayed above the
shock counter (if configured on) as shown in Figure 6-5. A charging tone
beeps until the desired energy level is reached, at which point you’ll hear a
continuous charge tone.
)LJXUH&KDUJLQJ'LVSOD\
HR ALARM
LEAD
SELECT
SpO2
ON/OFF
Sp02
ALARM
Pads
Pulse
47J
6KRFNV
SYNC
ON/OFF
DISARM
You may increase or decrease the selected energy level after pressing the
button. Simply move the Energy Select knob to desired energy
level as before.
&+$5*(
The defibrillator charges to the selected energy level automatically.
:$51,1*
:DLWXQWLOWKHFXUUHQWFKDUJHUHDFKHVWKHVHOHFWHGHQHUJ\OHYHOEHIRUHUHDGMXVWLQJ
WKHVHOHFWHGHQHUJ\OHYHO
M4735A Heartstream XL Defibrillator/Monitor
6-7
6
Defibrillating in Manual Mode
3. Shock
Confirm that a shock is still indicated. Make sure no one is touching the
patient or anything connected to the patient. Call out loudly and clearly
"Stand Clear!"
If using pads paddles, press
6+2&.
to deliver a shock to the patient.
If using external paddles, simultaneously press the shock buttons located
on the paddle/s until the shock is delivered.
)LJXUH0DQXDO0RGH6KRFN'LVSOD\
HR ALARM
LEAD
SELECT
Sp02
ALARM
SpO2
ON/OFF
Pads
Pulse
6KRFNV
SYNC
ON/OFF
DISARM
To disarm the defibrillator, press
. If
or the shock buttons are
not pressed within 30 seconds, the defibrillator disarms automatically.
',6$50
6+2&.
If additional shocks are indicated, repeat the defibrillation process.
:$51,1*
'HILEULOODWLRQFXUUHQWFDQFDXVHRSHUDWRURUE\VWDQGHULQMXU\'RQRWWRXFKWKH
SDWLHQWRUHTXLSPHQWFRQQHFWHGWRWKHSDWLHQWGXULQJGHILEULOODWLRQ
6-8
Defibrillating in Manual Mode
Entering AED Mode
Entering AED Mode
To enter AED Mode from Manual Mode, simply turn the Energy Select knob
from Manual On to AED On.
ECG and/or SpO2 monitoring are defaulted enabled in AED Mode. If these
settings are still active, the alarms set in Manual Mode remain active when
you switch to AED Mode.
M4735A Heartstream XL Defibrillator/Monitor
6-9
6
Entering AED Mode
6-10
Defibrillating in Manual Mode
7 Performing Synchronized Cardioversion
Synchronized cardioversion is a Manual Mode function that allows you to
synchronize the defibrillator shock with the R-wave of the ECG being monitored.
There are three ways to monitor ECG for synchronized cardioversion:
l
l
l
multifunction defib electrode pads,
3- or 5-lead monitoring electrodes, or
external paddles attached to the M4735A Heartstream XL
You may also use an external Agilent or Hewlett Packard ECG monitor while
performing synchronized cardioversion.
When selecting a lead, choose the best lead that displays a large QRS complex. The synchronized shock is delivered through the mulifunction defib
electrode pads, or external paddles regardless of the lead being monitored.
This chapter describes how to perform synchronized cardioversion with the
Heartstream XL.
127(
See chapter 4, “Monitoring the ECG” for information on how to apply electrodes and select a lead.
M4735A Heartstream XL Defibrillator/Monitor
7-1
7
Using Multifunction Defib Electrode Pads
Using Multifunction Defib Electrode Pads
To prepare for synchronized cardioversion using multifunction defib electrode
pads, perform the following steps:
1. If needed, insert a Data Card (as described in “Using a Data Card
(Optional)” on 2-13).
2. Apply monitoring electrodes, if desired. (See “Applying Monitoring Electrodes” on page 4-4.)
3. Turn Energy Select knob to Manual On.
4. Apply multifunction defib electrode pads to the patient as directed on the
package. Use either the anterior-apex or anterior-posterior placement, as
appropriate.
5. Connect the pads to the patient cable. (See Figure 6-3.)
6. Press the Sync On/Off button to turn synchronized cardioversion functionality on.
7. Use
to select the best lead that displays a large QRS complex. (See
“Selecting the Lead” on page 4-7.)
/($'
6(/(&7
7-2
Performing Synchronized Cardioversion
Using 3 or 5-wire ECG Leads
Using 3 or 5-wire ECG Leads
To prepare for synchronized cardioversion using 3 or 5-wire ECG leads,
perform the following steps:
1. If needed, insert a Data Card (as described in “Using a Data Card
(Optional)” on 2-13).
2. Apply monitoring electrodes, if desired. (See “Applying Monitoring Electrodes” on page 4-4.)
3. Turn Energy Select knob to Manual On.
4. Connect the ECG cable to the Heartstream XL. (See Figure 6-3.)
5. Press Sync On.
6. Use
to select the best lead that displays a large QRS complex. (See
“Selecting the Lead” on page 4-7.)
/($'
6(/(&7
M4735A Heartstream XL Defibrillator/Monitor
7-3
7
Using External Paddles
Using External Paddles
To prepare for synchronized cardioversion using external paddles,
perform the following steps.
1. If needed, insert a Data Card (as described in “Using a Data Card
(Optional)” on 2-13).
2. Apply monitoring electrodes, if desired. (See “Applying Monitoring Electrodes” on page 4-4.)
3. Turn the Energy Select knob to Manual On.
4. Remove paddles from pockets by simultaneously pulling out and up
Apply conductive material.
127(
Do not apply conductive matter by rubbing paddles together. Improper usage
will result in a "Paddles On" event that will be registered in the Event Summary and may cause paddle damage.
5. Apply paddles.
6. Press Sync On.
7. Use
to select the best lead that displays a large QRS complex. (See
“Selecting the Lead” on page 4-7.)
/($'
6(/(&7
:$51,1*
$UWLIDFWLQWURGXFHGE\SDGGOHPRYHPHQWPD\UHVHPEOHDQ5ZDYHDQGWULJJHUD
GHILEULOODWLRQVKRFN:KHQSHUIRUPLQJV\QFKURQL]HGFDUGLRYHUVLRQSDGVDUHVXJ
JHVWHG
7-4
Performing Synchronized Cardioversion
Delivering a Synchronized Shock
Delivering a Synchronized Shock
Once you are properly prepared to perform synchronized cardioversion, perform the following steps.
1. Press
located below the Sync On/Off display to enable Sync
Mode. The message 6<1& appears on the display.
2. Use the gain control,
, to adjust the ECG size so that the marker dot
appears only with each R-wave.
3. Select the desired energy level.
4. Press
or the yellow charge button located on the Apex paddle. Wait
until the current charge has reached the energy level selected and you hear
a continuous charge done tone.
&+$5*(
)LJXUH&KDUJLQJLQ6\QF0RGH
HR ALARM
LEAD
SELECT
78
Pads
SpO2
ON/OFF
SpO2
ALARM
87 J
Shocks:0
00:00:8
Sync
SYNC
ON/OFF
M4735A Heartstream XL Defibrillator/Monitor
DISARM
7-5
7
Delivering a Synchronized Shock
If desired, you may increase or decrease the selected energy level after
by moving the Energy Select knob until the desired
pressing
energy level is displayed. The defibrillator charges to the modified energy
level automatically. Wait until the current charge reaches the selected
energy level before proceeding.
&+$5*(
5. Make sure no one is touching the patient or anything connected to the
patient. Call out clearly and loudly "Stand Clear!" Then press
.
6+2&.
If you are using external paddles, deliver the shock by pressing and simultaneously holding the orange keys on both external paddles.
127(
:$51,1*
It is important to continue to hold
(or the buttons) down until the shock
is delivered. The defibrillator shocks with the next detected R-wave.
6+2&.
'HILEULOODWLRQFXUUHQWFDQFDXVHRSHUDWRURUE\VWDQGHULQMXU\'RQRWWRXFKWKH
SDWLHQWRUHTXLSPHQWFRQQHFWHGWRWKHSDWLHQWGXULQJGHILEULOODWLRQ
7-6
Performing Synchronized Cardioversion
Using External ECG Monitors
Using External ECG Monitors
When the patient is already connected to the bedside monitoring equipment,
there is an external monitoring cable which plugs into the ECG Output jack
of the bedside monitor and connects to the M4735A Heartstream XL ECG
Input for monitoring.
To use an external monitor with the Heartstream XL, perform the
following steps:
1. Select Lead I or Lead II on the Heartstream XL.
2. Plug the cable into the external monitor ECG Output jack and plug the
input end of the cable into the ECG Input plug on the Heartstream XL.
7
Delivering Additional Synchronized Shocks
If additional synchronized shocks are indicated, make sure Sync Mode is still
enabled and repeat steps 2-5. In its default configuration, the Heartstream XL
remains in Sync Mode after a shock is delivered, as indicated by the message
6\QF on the display.
The Heartstream XL can be configured to exit Sync Mode after each shock is
delivered.
Disabling Sync Mode
To disable Sync Mode, press
located below the 6\QFdisplay. The
message 6\QF is no longer displayed. Sync Mode is also disabled when you
exit Manual Mode.
M4735A Heartstream XL Defibrillator/Monitor
7-7
Disabling Sync Mode
7-8
Performing Synchronized Cardioversion
8 Pacing (Optional)
Noninvasive transcutaneous pacing is a Manual Mode function that is used to
deliver paced pulses to the heart. Paced pulses are delivered through multifunction defib electrode pads that are applied to the patient’s bare chest.
This chapter explains the pacing option available with the Heartstream XL
and describes how to perform pacing.
8
M4735A Heartstream XL Defibrillator/Monitor
8-1
Pacing Operational Controls
Pacing Operational Controls
In Manual Mode, the following pacing operational controls are displayed on
the handle of the Heartstream XL.
)LJXUH3DFLQJ&RQWUROV0DQXDO0RGHRQO\
Demand Mode Versus Fixed Mode
The Heartstream XL can deliver paced pulses in either demand or fixed mode.
In demand mode, the pacer only delivers paced pulses when the patient’s
heart rate is lower than the selected pacing rate.
In fixed mode, the pacer delivers paced pulses at the selected rate.
8-2
Pacing (Optional)
Monitoring During Pacing
Monitoring During Pacing
Multifunction defib electrode pads cannot be used to monitor the ECG and
deliver paced pulses simultaneously. When pacing in demand or fixed mode,
you must monitor the patient through either 3- or 5-lead monitoring electrodes. The Heartstream XL uses the R-wave detection from this monitoring
source to determine if a paced pulse should be delivered.
:$51,1*
8VHGHPDQGPRGHSDFLQJZKHQHYHUSRVVLEOH8VHIL[HGPRGHSDFLQJZKHQPRWLRQ
DUWLIDFWRURWKHU(&*QRLVHPDNHV5ZDYHGHWHFWLRQXQUHOLDEOH
:$51,1*
+HDUWUDWHPHWHUVDQGDODUPVIXQFWLRQGXULQJSDFLQJEXWWKH\FDQEHXQUHOLDEOH
2EVHUYHWKHSDWLHQWFORVHO\ZKLOHSDFLQJ'RQRWUHO\RQKHDUWUDWHDODUPVRUWKH
LQGLFDWHGKHDUWUDWHDVDPHDVXUHRIWKHSDWLHQW·VSHUIXVLRQVWDWXV
8
Preparing for Pacing
To prepare for pacing, perform the following steps.
1. Apply multifunction defib electrode pads as directed on the package. Use
either the anterior-apex or anterior-posterior placement, as appropriate.
2. Connect the pads to the patient cable. (See Figure 6-3.)
3. If needed, insert a Data Card (as described in “Using a Data Card
(Optional)” on 2-13).
4. Turn the Energy Select knob to Manual On.
M4735A Heartstream XL Defibrillator/Monitor
8-3
Preparing for Pacing
In addition, for demand mode pacing:
1. Apply monitoring electrodes. (See “Applying Monitoring Electrodes” on
page 4-4.)
2. Use
to select the best lead with an easily detectable R-wave (See
“Selecting the Lead” on page 4-7.) If you do not select a lead (i.e. pads is
the selected ECG source), /HDG, is automatically selected when the pacing
function is turned on.
/($'
6(/(&7
127(
8-4
If pacing for long periods of time, new monitoring electrodes and multifunction defib electrode pads may need to be applied periodically. Refer to the
manufacturer’s documentation for recommendations regarding frequency.
Pacing (Optional)
Performing Pacing
Performing Pacing
To use pacing, perform the following steps.
1. Press Pacer . The green LED next to
box appears on the display.
Pacer
lights up and a dialogue
)LJXUH3DFLQJZLWK(&*0RQLWRULQJ(OHFWURGHV'LVSOD\
HR ALARM
LEAD
SELECT
78
Lead II
SpO2
ON/OFF
Pacer Stop
Demand Mode
70ppm 30mA
SYNC
ON/OFF
Shocks:0
00:00:8
8
CHARGE
The 3DFHU6WRS message indicates that the pacing function is on but paced
pulses are not being delivered. The pacer turns on in the mode last used.
2. Verify that the dot markers appears near the middle of the QRS complexes
of the ECG.
If the dot markers do not appear, or are in the wrong location, adjust the
ECG size or select another lead. (See “Monitoring the ECG”
in Chapter 4.)
M4735A Heartstream XL Defibrillator/Monitor
8-5
Performing Pacing
3. Press
Mode
to change to fixed mode, if in demand mode or if R-wave
detection is unreliable.
The pacing dialogue box displays the current mode. To switch back to
demand mode, press
Mode
again.
4. Adjust the rate to the desired number of paced pulses per minute (ppm).
Press up ( ) or down ( ), on Rate
number of paced pulses per minute.
5. To start pacing, press
Start
Stop
to increase or decrease the
.
The message 3DFLQJ indicates that paced pulses are being delivered in the
selected mode at the rate and output level displayed.
)LJXUH3DFLQJZLWK3DGV'LVSOD\
HR ALARM
LEAD
SELECT
78
Pads
SpO2
ON/OFF
Pacer Stop
Demand Mode
70ppm 30mA
SYNC
ON/OFF
8-6
Shocks:0
00:00:8
CHARGE
Pacing (Optional)
Performing Pacing
6. Increase the output until cardiac capture occurs.
Press
on
Output
to increase the output in increments of 10 mA.
7. Decrease the output to the lowest level that still maintains capture.
Press
8. Press
on
Start
Stop
Output
to decrease the output in increments of 5 mA.
to stop pacing.
9. Press Pacer to exit the pacing function. The green LED next to the button goes out, indicating pacing is no longer active.
127(
127(
If pacing using pads, pacing will not start if there is a problem with the multifunction defib electrode pads connections. If in demand mode, pacing will not
start if there is a problem with the ECG monitoring electrodes connections. In
either case, if a problem occurs a system message is displayed.
8
The pacing window remains on as long as the pacing function is enabled.
M4735A Heartstream XL Defibrillator/Monitor
8-7
Changing Pacing Modes
Changing Pacing Modes
If paced pulses are being delivered, you must stop pacing before changing the
pacing mode. For example:
1. Press
Start
Stop
2. Press
Mode
to stop pacing.
to change the Mode.
3. Adjust the rate, if needed.
4. Press
Start
Stop
to resume pacing.
5. Adjust the output, as needed to obtain capture.
Defibrillating During Pacing
If the patient must be defibrillated during pacing, follow the procedure for
defibrillating in Manual Mode on page 6-1.
Pacing is automatically turned off when you charge the defibrillator and the
pacing dialogue box is removed from the display. After a shock, pacing
remains off.
To resume pacing, refer to “Performing Pacing” on page 8-5. When you
resume, settings selected prior to defibrillation (rate, mode, and output)
remain the same.
8-8
Pacing (Optional)
Troubleshooting
Troubleshooting
The table below lists the pacing-related system and momentary messages that
you may encounter when using the pacing function.
7DEOH3DFLQJ6\VWHP0HVVDJHV
Message
/HDGV2II
3DFHU)DLOXUH
3DFHU2XWSXW
/RZ
6WRS3DFHU
.H\,QDFWLYH
M4735A Heartstream XL Defibrillator/Monitor
Possible Cause
Corrective Action
l The selected monitoring
l Check that the monitoring
lead is not making proper
contact with the patient.
l Pacing was attempted in
demand mode without
monitoring electrodes
attached.
electrodes are properly
applied.
l Check that the monitoring
cable and electrodes are
properly connected.
The pacing system is not
functioning.
Remove the device from active
use and call for service.
High patient impedance is
resulting in the delivering less
current to the patient than
specified in the output current
setting.
Check that the pads are applied
properly.
Mode
Stop pacing before changing
the pacing mode.
Pacer
Make sure Manual Mode is
active before pressing
is pressed while
paced pulses are being delivered.
, or one of the other
pacing function keys, is
pressed when Manual Mode is
not active.
Pacer
or one of the other
pacing function keys.
8-9
8
Troubleshooting
8-10
Pacing (Optional)
9 Storing, Retrieving & Printing
This chapter describes how the Heartstream XL creates an Event Summary, or
patient record, for later retrieval and printing. Marking events for storage in
the Event Summary and printing individual events as they occur are also discussed.
9
M4735A Heartstream XL Defibrillator/Monitor
9-1
Overview
Overview
The Heartstream XL automatically creates an Event Summary for each
patient. The Event Summary is stored in both internal memory and on a Data
Card (if one is used).
The Heartstream XL’s internal Event Summary stores:
l
l
up to 300 events (pieces of critical information), and
50 ECG strips (at 11 seconds each).
Events include things such as charging, shocks, and alarm violations. You also
trigger an event each time you press
Mark
or
Strip
.
Storage on a Data Card is limited only by available space on the card. In addition to storing all of the events that occur, a continuous copy of the displayed
ECG and Patient Contact Impedance are stored.
You can print the internal Event Summary at any time. You can also configure
your Heartstream XL to print individual events automatically as they occur.
Finally, you can activate printing of individual events and patient information
at any time by pressing
Strip
.
To print an Event Summary stored on the Data Card, the information must
first be downloaded to the Agilent Technologies CodeRunner Web data management system. Refer to the CodeRunner Web User’s Guide for download
instructions.
9-2
Storing, Retrieving & Printing
Marking Events
Marking Events
The Mark button allows you to annotate the ECG strip at the point in time
the button is pressed. In AED Mode, when monitoring is disabled, the event is
marked with a . In Manual Mode, or when monitoring is enabled in AED
Mode, you can use the softkeys to select the annotation from the choices displayed (See Figure 9-1)*. If no selection is made, the event is marked with
just a .
)LJXUH$QQRWDWLRQV
EPI
ATRO
72
Pads
LIDO
OTHER
Shocks:0
00:00:8
CHARGE
127(
9
* In Australia and the U.K., (3, is replaced by $'51 (adrenaline).
The marked event is stored in the Event Summary. If the printer is configured
to 3ULQWRQ0DUN, an ECG strip prints when Mark is pressed. If the printer is
configured to VHFRQGGHOD\, the strip is 9 seconds and includes 6 seconds preceding the event and 3 seconds following the event. If 1R'HOD\ is configured, a
3 second ECG strip prints in real time. To stop printing before the entire strip
is printed, press
M4735A Heartstream XL Defibrillator/Monitor
Strip
.
9-3
Events Recorded
Events Recorded
The following events and related information are stored in the Event Summary:
7DEOH(YHQW,QIRUPDWLRQ
Event Types
9-4
Related Information Stored
Power Change
Power on, Power off, Continued use, Battery
low.
Pads Change
Pads on, Pads off.
AED Mode Analysis
Analyzing, Analysis Stopped, Artifact
Detected, Cannot Analyze, Shock Advised,
No Shock Advised.
Mode Change
AED Mode or Manual Mode.
Rhythm Monitoring
Check Patient, Pause, Resume.
Charging
ECG waveform, Energy charged to.
Shock
ECG waveform, Shock#, Delivered energy,
Peak current, and Patient impedance.
Shock Failed
No Shock Delivered.
Disarm
ECG waveform.
ECG Monitoring
Leads on/off, Lead change, Gain change.
Heart Rate Alarm Violation
Lead, Heart Rate, and Heart Rate alarm limits.
Storing, Retrieving & Printing
Events Recorded
7DEOH(YHQW,QIRUPDWLRQ
Event Types
Related Information Stored
SpO2 Violation
SpO2 value and SpO2 alarm limit.
Mark
ECG waveform with annotation (
, Epi,
Atro, Lido, or Other).
Print Strip
ECG waveform.
Sync
Sync on, Sync off, Sync pace marker.
Pacing
Pacer start, Pacer stop, Pacer settings.
9
M4735A Heartstream XL Defibrillator/Monitor
9-5
Creating a Patient Record
Creating a Patient Record
The Heartstream XL creates an Event Summary patient record for each new
patient. Each record is assigned a unique incident number. The Heartstream
XL keeps the Event Summary in its internal memory until you begin caring
for a new patient. It assumes the following:
7DEOH3RZHU6WDWXVDQG3DWLHQW5HFRUGV
If:
Then:
Power is off for more than 2 minutes
and a new event is recorded
The Heartstream XL assumes you are
caring for a new patient. The last internal Event Summary is deleted; a new
Event Summary is started and a new
incident record is created
Power is off less than 2 minutes
The Heartstream XL assumes you are
continuing to care for the same patient.
Additional events are appended to the
Event Summary; the annotation "Continued Use" is printed on the Event
Summary, provided it wasn’t printed
prior to turning the Heartstream XL off
and/or patient contact was never made.
If the Heartstream XL is off for more than two minutes and turned on with no
new event the data is saved.
The Continued Use feature allows you to change batteries or shut the Heartstream XL off briefly (for 2 minutes or less), while preserving the current
patient record. Events recorded after the power interruption are appended to
the patient record. Continued use also preserves alarm settings.
9-6
Storing, Retrieving & Printing
Printing the Internal Event Summary
Printing the Internal Event Summary
To print the internal Event Summary, press
the complete summary is printed, press
Summary
Summary
. To stop printing before
again or press
Strip
.
The Event Summary includes the following information, in the order listed:
l
l
l
a header with a place for you to write in the patient’s name and the
operator’s name.
a directory list of events that occurred during the incident and the
time of their occurrence.
ECG strips of the events in the directory list, where relevant.
Figure 9-2 shows the beginning of an Event Summary.
)LJXUH(YHQW6XPPDU\
Patient ___________________
Operator __________________
Device On
03 Jan 00 12:41:00
Last Event
03 Jan 00 01:09:04
Total Shocks 2
Incident: 0000045
Serial Number 123456789
M4735A Heartstream XL Defibrillator/Monitor
Device On
AED Mode
Pads On
Leads On
Analyzing
Shock Advised
Shock #1
Analyzing
Shock Advised
Shock #2
Manual Mode
12:41:00
12:41:00
12:41:01
12:41:03
12:41:03
12:41:11
12:41:17
12:41:24
12:41:31
12:41:38
12:41:42
9
9-7
Printing the Internal Event Summary
The Event Summary also includes waveforms and the appropriate annotation
for each of the following events:
7DEOH(YHQW6XPPDU\,QIRUPDWLRQ
Event
Waveform Information Stored
Shock Advised
11 seconds of ECG just prior to the
message 6KRFN$GYLVHG
No Shock Advised
11 seconds of ECG just prior to the
message 1R6KRFN$GYLVHG
Cannot Analyze
11 seconds of ECG just prior to the
message &DQQRW$QDO\]H
Shock Delivered
11 seconds; 3 seconds prior to the
shock, plus 8 seconds after the shock.
Strip
pressed
11 seconds; 3 seconds prior to
Strip
being pressed, plus 8
seconds after
Mark
pressed
being pressed, plus 8
seconds after
9-8
is pressed.
11 seconds; 3 seconds prior to
Mark
Heart Rate or SpO2 Alarm
Strip
Mark
is pressed.
11 seconds; 3 seconds prior to the
alarm, plus 8 seconds after the alarm.
Storing, Retrieving & Printing
Printing Events
Printing Events
The Heartstream XL can be configured to print automatically when certain
events occur. The table below lists these events and the length of the strip
printed, depending on whether the printer is configured to print real-time or
with a 6-second delay.
7DEOH&RQILJXUDWLRQVIRU/HQJWKRI3ULQWHG6WULSV
Event
Real-Time
Strip Length
Delayed
Strip Length
Defibrillator charges
continuous
6 seconds just prior to charging, plus
continuous printing throughout the
charge duration.
Shock Delivered
12 seconds
6 seconds just prior to shock, plus 12
seconds after shock.
Shock Failed
6 seconds
6 seconds just prior to the message
, plus 6 seconds after
the message.
1R6KRFN'HOLYHUHG
Defibrillator disarmed
6 seconds
6 seconds just prior to disarm, plus
6 seconds after disarm.
SpO2 or Heart Rate
Alarm Violation
6 seconds
6 seconds just prior to alarm violation, plus 6 seconds after alarm
violation.
Mark
pressed
M4735A Heartstream XL Defibrillator/Monitor
6 seconds
9
6 seconds just prior to marking, plus
6 seconds after button pressed.
9-9
Printing Events
Printing is configured independently for each of these events. You can stop
the printing before it has printed the entire strip by pressing
Strip
.
To print additional events that you observe in the course of caring for your
patient, press
127(
.
An ECG strip will print continuously until you press Strip a second time
to stop printing. If the printer is configured to have a 6-second delay, the printout contains an additional 6 seconds of the ECG that occurred just prior to
pressing
9-10
Strip
Strip
.
Storing, Retrieving & Printing
10 Setting Up and Configuring the Heartstream XL
This chapter describes how to set-up and configure your Heartstream XL.
Chapter 10 covers:
l
l
Connecting Patient Cables
Configuring the Heartstream XL
10
M4735A Heartstream XL Defibrillator/Monitor
10-1
Connecting/Disconnecting Patient Cables
Connecting/Disconnecting Patient Cables
This section describes how to connect and disconnect the:
l
l
l
10-2
Pads/Paddles Patient Cable
ECG Patient Cable (3- or 5-lead)
SpO2 Patient Cable
Setting Up and Configuring the Heartstream XL
Connecting/Disconnecting Patient Cables
Pads/Paddles Patient Cable
To connect external paddles to the defibrillator:
1. Align the white arrow on the patient cable with the white arrow on the
defibrillator’s cable connector, as shown in Figure 10-1.
2. Insert the cable into the connector. Push until you hear it
click in place.
)LJXUH$WWDFKLQJWKH3DWLHQW&DEOHIRU3DGVDQG([WHUQDO3DGGOHV
10
M4735A Heartstream XL Defibrillator/Monitor
10-3
Connecting/Disconnecting Patient Cables
To disconnect the patient cable from the defibrillator:
1. Rotate the green locking mechanism on the cable in the direction of the
green arrow (clockwise), until it stops (as shown in Figure 10-2).
2. Hold the locking mechanism in this position as you pull the cable out.
)LJXUH'LVFRQQHFWLQJWKH3DGV3DGGOHV3DWLHQW&DEOH
10-4
Setting Up and Configuring the Heartstream XL
Connecting/Disconnecting Patient Cables
SpO2 Patient Cable
To connect the SpO 2 patient cable:
1. Hold the connector with the flat side facing away from the
Heartstream XL, as shown in Figure 10-3.
2. Insert the connector into the receptacle and push until the blue portion
of the connector is no longer visible.
)LJXUH&RQQHFWLQJWKH6S2 3DWLHQW&DEOH
To disconnect the SpO2 patient cable, gently pull the connector out of the
SpO2 receptacle.
10
M4735A Heartstream XL Defibrillator/Monitor
10-5
Connecting/Disconnecting Patient Cables
ECG Patient Cable
To connect a 3- or 5-lead ECG patient cable:
1. Align the keyed patient cable connector with the slot on the ECG
receptacle, as shown in Figure 10-4.
2. Push the patient cable firmly into the ECG receptacle, until the white portion is no longer visible.
)LJXUH(&*3DWLHQW&DEOH&RQQHFWRU5HFHSWDFOH
To disconnect the ECG patient cable, gently pull the white patient cable
connector out of the ECG receptacle.
10-6
Setting Up and Configuring the Heartstream XL
Configuring the Heartstream XL
Configuring the Heartstream XL
Configuration options allow you to customize the Heartstream XL to
best meet your needs. This section describes:
l
l
l
l
l
l
how to access the configuration menu
configurable items and their setting options
how to change the configuration
how to save the configuration to a Data Card
how to load the configuration from a Data Card
how to print the configuration
Accessing the Configuration Menu
There is a special combination of softkeys that, when pressed simultaneously,
turn the Heartstream XL on in Configuration Mode. For the purposes of
executing this procedure, softkeys are assigned numbers as shown in
Figure 10-5.
)LJXUH6RIWNH\1XPEHUV
10
M4735A Heartstream XL Defibrillator/Monitor
10-7
Configuring the Heartstream XL
To turn the Heartstream XL on in Configuration Mode:
1. If the device is already on, turn the Energy Select knob to Off.
2. While holding down softkeys 4 & 5, turn the Energy Select knob
to AED On.
The configuration menu appears as shown in Figure 10-6. The menu lists the
categories of settings that may be configured.
)LJXUH&RQILJXUDWLRQ0HQX
ENTER
MAIN
General Settings
AED Settings
Manual Settings
ECG Filter Settings
Save Settings to Data Card
Load Settings from Data Card
Print All Settings
Turn Off To Exit Configuration
Configurable Parameters
The following tables show the configurable parameters for each category of
settings. A description of each parameter is provided, along with the possible
choices. Default settings are in bold.
10-8
Setting Up and Configuring the Heartstream XL
Configuring the Heartstream XL
7DEOH*HQHUDO6HWWLQJV
Parameter
'DWHGGPPP\\\\
7LPHKKPP
3ULQWRQ0DUN
3ULQWRQ&KDUJH
Current date, where GG is the day, PPP is
the month, and \\\\ is the year.
any valid date
Current time, where KK is the hour and PP
is the minutes. Time is based on a 24 hour
clock.
any valid time
Prints a 3 second strip when
pressed.
3ULQWRQ$ODUP
3ULQWHU'HOD\
3DFH3XOVH0DUNHUV
(&*/HDG&DEOH
456%HHSHU
M4735A Heartstream XL Defibrillator/Monitor
Mark
is
Prints a continuous strip during charging.
Printing continues until a shock is delivered, the device is disarmed, or
is pressed.
3ULQWRQ6KRFN
Setting
Choices
Description
On / Off
On / Off
Strip
Prints a 12 second strip when a shock is
delivered.
On / Off
Prints a 6 second strip during alarms.
On / Off
Captures what you just saw. All printed
strips, including those generated by an
event (mark, charge, shock or alarm),
include an additional 6 seconds of information - the 6 seconds of information that
occurred just prior to printing being initiated.
6 Sec Delay /
No Delay
Shows pace pulse markers on the ECG
displayed, if an internal pacemaker is
detected.
Leads & Pads /
Leads Only
Selects the monitoring electrodes source.
3-lead / 5-lead
Provides an audible beep with each QRS
complex detected.
On / Off
10-9
10
Configuring the Heartstream XL
7DEOH$('6HWWLQJV
Parameter
$('6KRFN6HULHV
6KRFN6HULHV7LPHU
'HYLFH,QLWLDWHG
$QDO\VLV
$XWRPDWLF
5HDQDO\VLV
5K\WKP0RQLWRULQJ
/HDG6HOHFW
6S2
&KHFN3DWLHQW
7LPHU
10-10
Description
Setting
Choices
Defines the maximum number of shocks to
deliver before prompting &KHFN3DWLHQW&KHFN
3XOVH,I1HHGHG%HJLQ&35.
2, 3, 4
Defines the number of seconds that must pass
before the next shock is considered the first
shock of a new shock series, rather than the
next shock of the current shock series.
30, 60, 90,
120, 150, 180,
210, Off
Initiates ECG analysis when the Heartstream
XL is turned on in AED Mode for new use.
On, Off
Initiates ECG analysis in between shocks
within a shock series.
On, Off
Monitors the ECG for potentially shockable
rhythms when the Heartstream XL is not analyzing, defibrillating, or paused.
On, Off
Turns on ECG monitoring via ECG Leads.
On, Off
Turns on SpO2 monitoring. Only listed as a
configurable item if the SpO 2 option was purchased.
On, Off
Defines how often (in seconds) the &KHFN
3DWLHQW prompt is repeated when Rhythm Monitoring detects a potentially shockable rhythm.
30, 45, 60, 90,
Off
Setting Up and Configuring the Heartstream XL
Configuring the Heartstream XL
7DEOH$('6HWWLQJV
Parameter
3DXVH7LPHU
Description
Defines the duration of the pause time (in seconds), when
is pressed (when (XURSHDQ
3URWRFRO is set to Off). Appears only when
European Protocol is configured off. Pause
Timer is the default.
30, 60, 120,
180
Modifies Pause state prompts and replaces
the Pause Timer with either the Post Shock
CPR Timer or the "NSA" Timer, depending
on the event preceding the Pause state.
Off/On
Appears only when European Protocol is on.
Defines the duration of the Pause time (in seconds) when
is pressed and the time
since the last shock is less than or equal to the
6KRFN6HULHV7LPHU setting - typically at the completion of a shock series.
30, 60, 120,
180
Appears only when European Protocol is on.
Defines the duration of the Pause time (in seconds) when
is pressed. Also defines
the time since the last shock is greater than the
6KRFN6HULHV7LPHU setting when 1R6KRFN$GYLVHG
30, 60, 120,
180
3$86(
(XURSHDQ3URWRFRO
3RVW6KRFN&35
7LPHU
Setting
Choices
3$86(
16$7LPHU
3$86(
* If (XURSHDQ3URWRFRO is set to 2II, the Pause Timer is used during the Pause state
and appears as a configurable parameter. If (XURSHDQ3URWRFROis set to 2Q, either
the 3RVW6KRFN&357LPHU or the 16$7LPHU are used during the Pause state and
appear as configurable parameters in place of 3DXVH7LPHU.
10
127(
If (XURSHDQ3URWRFRO is set to 2Q, the setting for the 6KRFN6HULHV7LPHU must be <
3RVW6KRFN&357LPHU < 16$7LPHU. Also, the 6KRFN6HULHV7LPHU can not be configured to either 2II or .
M4735A Heartstream XL Defibrillator/Monitor
10-11
Configuring the Heartstream XL
7DEOH0DQXDO6HWWLQJV
Parameter
6\QF$IWHU6KRFN
'LVSOD\6KRFN
&RXQWHU
'LVSOD\,QFLGHQW
7LPHU
Description
Choices
Determines if the Sync function stays on
after a synchronized shock is delivered.
On, Off
Determines if the number of shocks
delivered appears on the display during
an event.
On, Off
Determines if the elapsed time appears on
the display during an event.
On, Off
7DEOH(&*)LOWHU6HWWLQJV
Item
$&/LQH)LOWHU
3DGV(&*IRU
'LVSOD\
3DGV(&*IRU
3ULQWHU
/HDGV(&*IRU
'LVSOD\
/HDGV(&*IRU
3ULQWHU
10-12
Description
Setting Choices
Selects the setting used to filter out
AC line noise.
60 Hz, 50 Hz
Selects the display filter frequency
for the therapy cable attached.
Monitor (.15-40Hz),
EMS (1-30 Hz)
Selects the printer filter frequency
for the therapy cable attached.
Monitor (.15-40Hz),
EMS (1-30 Hz)
Selects the display filter frequency
for the monitoring electrodes ECG.
Monitor (.15-40Hz),
EMS (1-30 Hz)
Selects the printer filter frequency
for the monitoring electrodes ECG.
Diag (.05 - 150 Hz),
EMS (1 - 30 Hz,
Monitor (.15 - 40 Hz)
Setting Up and Configuring the Heartstream XL
Configuring the Heartstream XL
Modifying the Configuration
To modify the configuration, from the main menu:
1. Use the softkeys (
and
) to highlight the desired category
of settings.
2. Press
.
3. Use the softkeys to highlight the item you want to change.
4. Press
.
5. Use the softkeys to select the desired setting.
to save the change. To exit without making the change, press
6. Press
(17(5
&+$1*(
6$9(
&$1&(/
7.
Press
.
0$,1
to return to the main menu.
To make additional changes, repeat steps 1-7.
Returning to the Default Configuration
Press
and
on
simultaneously, while in the main configuration
menu, to return all settings to their default settings. Although there is no visible change in the display, default settings are restored.
10
M4735A Heartstream XL Defibrillator/Monitor
10-13
Configuring the Heartstream XL
Saving Settings to a Data Card
Configuration settings may be saved to a Data Card and used to load the same
configuration into other Heartstream XLs or to restore the configuration, if
necessary.
To save the configuration:
1. Make sure a Data Card is in the Heartstream XL before you turn the
defibrillator/monitor on.
from the main configuration menu.
2. Select
3. Press
in response to the question
6DYH6HWWLQJVWR'DWD&DUG
6$9(
6DYH6HWWLQJVWR'DWD&DUG"
The Heartstream XL saves the configuration settings to the Data Card and
returns to the main configuration menu.
127(
To avoid possible confusion, designate one Data Card as the "Configuration
Card" and label it clearly. Keep this card physically separate from cards
used for storing patient data.
Loading Settings from a Data Card
To load configuration settings:
1. Make sure a Data Card is in the Heartstream XL before you turn the
defibrillator/monitor on.
from the main configuration menu.
2. Select
.
3. Press
in response to the question
/RDG6HWWLQJVIURP'DWD&DUG
/2$'
/RDG6HWWLQJVIURP'DWD&DUG"
The Heartstream XL loads the configuration settings from the Data Card and
returns to the main configuration menu.
Printing Settings
To print the configuration settings, select
uration menu.
10-14
3ULQW$OO6HWWLQJV
from the main config-
Setting Up and Configuring the Heartstream XL
11 Maintaining the Heartstream XL
11
This chapter describes how to care for your Heartstream XL Defibrillator/
Monitor and its accessories, including:
l
l
l
l
l
l
operational checks
battery maintenance procedures
instructions on loading printer paper
cleaning instructions
a list of approved supplies and accessories, and
instructions for disposal of the device
The operational checks described must be performed at the specified intervals
in order to help prevent and detect electrical and mechanical problems. The
battery maintenance procedures specified must be strictly adhered to in order
to ensure that your batteries have the energy required to operate the defibrillator and deliver the appropriate therapy.
M4735A Heartstream XL Defibrillator/Monitor
11-1
Operational Checks
Operational Checks
The following operational checks are intended to quickly verify the viability
of the Heartstream XL. Perform these checks regularly, at the intervals specified, along with visual inspection of the device and all cables, controls, accessories and supplies. Also regularly check expiration dates of all supplies, such
as multifunction defib electrode pads and monitoring electrodes.
Every Shift
Perform a "Shift/System Check" every shift (see “Using External Paddles” on
page 11-3) to verify that the Heartstream XL is functioning properly and to
ensure that necessary supplies and accessories are present and ready for use.
Every Month
Check expiration dates on multifunction defib electrode pads and monitoring
electrodes every month. Replace them if the expiration date has passed.
Every Three Months
Perform a "Battery Capacity Test" on each battery, every three months, to
ensure that your batteries meet the specifications for safe and effective use.
11-2
Maintaining the Heartstream XL
Operational Checks
Using External Paddles
To perform the Shift/System Check using external paddles:
1.
2.
3.
4.
5. While pressing
to start the test.
127(
11
Turn the Heartstream XL off.
If routinely used, insert a Data Card into the Heartstream XL.
Unplug the AC power cord.
Insert a charged battery.
Strip
, turn the Energy Select knob to Manual On
If the paddles are in the holders and the message "Place Paddles in Pockets"
appears, adjust the paddles to improve contact. Poor contact may be due to
due to clinical use (e.g. oxidation or residue on either the connectors or paddles). If the message continues to appear, contact a certified technician.
6. Follow the prompts on the display to proceed with the test. If the
message 6HUYLFH8QLW appears, do not use the device, and call for service.
The test takes less than a minute to complete. When it is done, a report
is printed, as shown in Figure 11-1.
)LJXUH6KLIW6\VWHP&KHFN5HSRUW8VLQJ([WHUQDO3DGGOHV
Shift/System Check
Last Checked 25 Nov 00
Current Tests:
General System Test:
ECG Test:
Backup Power Test:
SpO2 Test:
Data Card Test:
Defib Test:
Pacer Test:
:$51,1*
8 Jan 1999 13:52:17
M4735A Serial Number:00000001
1:25:30 Pass
Qty/Check List:
Pass
___ Defibrillator Inspection
Pass
___ Cables/Connectors
Pass
___ Paddles/Pads
Pass
___ Monitoring Electrodes
Pass
___ Charged Batteries
2:07 (h:mm remaining)
___ AC Power Cord
Pass/External Paddles
___ Printer Paper
Not tested
___ Data Card
___ Ancillary Supplies
___ SpO2 Sensor
%HVXUHWRVDIHO\GLVFKDUJHH[WHUQDOSDGGOHV
M4735A Heartstream XL Defibrillator/Monitor
11-3
Operational Checks
Using Pads
To perform the Shift/System Check using multifunction defib electrode pads:
1. Turn the Heartstream XL off.
2. Connect the M1781A 50 ohm test load to the pads patient cable
(instead of pads).
3. If a Data Card is routinely used, insert a Data Card into the
Heartstream XL.
4. Unplug the AC power cord.
5. Insert a charged battery.
6. While pressing Strip , turn the Energy Select knob to AED On to start
the test.
7. Follow the prompts on the display to proceed with the test. If the
message 6HUYLFH8QLW appears, do not use the device, and call for service.
The test takes less than a minute to complete. When it is done, a report is
printed, as shown in Figure 11-2.
)LJXUH6KLIW6\VWHP&KHFN5HSRUW8VLQJ3DGV
Shift/System Check
Current Tests:
General System Test
ECG Test
Backup Power Test
Data Card Test
Defib Test
Pacer Test
11-4
8 Jan 1999 13:52:17
Pass
Pass
Pass
Pass
Pass
Pass
Pass
SN:00000001
Qty/Check List:
___ Defibrillator Inspection
___ Cables/Connectors
___ Defibrillation Pads/Paddles
___ Monitoring Electrodes
___ Charged Batteries
___ AC Power Cord
___ Printer Paper
___ Data Card
___ Ancillary Supplies
___ Pads
Maintaining the Heartstream XL
Operational Checks
The Shift/System Check report lists the results of the test and additional
checks that you should do. Perform each of these checks and record the
results. The guidelines for completing the checks are as follows:
Defibrillator Inspection - make sure the Heartstream XL is clean, clear of
objects on top and has no visible signs of damage.
Paddles/Cables/Connectors - make sure there are no cracks, broken wires,
or other visible signs of damage. Make sure the connectors engage
securely.
Battery - make sure:
l
l
l
a charged battery is in the Heartstream XL
another battery is charged or being charged
the batteries have no visible signs of damage
AC Power
1. Make sure a battery is in the Heartstream XL.
2. Plug the power cord into a power outlet and connect it to the Heartstream XL.
3. Verify that the power and charging indicators on the front of the
defibrillator/monitor are lit.
4. Remove the battery from the Heartstream XL and verify that the
charging indicator on the front of the defibrillator/monitor is no
longer lit. Replace the battery.
Printer - make sure the printer:
l
l
has sufficient paper
prints properly
M4735A Heartstream XL Defibrillator/Monitor
11-5
11
Operational Checks
Battery Capacity Test
To perform a Battery Capacity Test:
1. Turn the Heartstream XL off.
2. Label the Heartstream XL to indicate to others that testing is in progress
and the battery may not be used.
3. Insert a charged battery.
4. If an AC power cord is connected, unplug it. While pressing Mark ,
turn the Energy Select knob to AED On to start the test.
5. Allow the test to proceed to completion. The test takes approximately
three hours and is complete when test results print out and the device
turns itself off.
6. Review the test results and take the appropriate action, as follows:
7DEOH%DWWHU\&DSDFLW\7HVW5HVXOWV
If
Elapsed Time > 85 minutes
and
Low Battery Time > 10 minutes
Then...
1.
2.
3.
Elapsed Time < 85 minutes
or
Low Battery Time < 10 minutes
1.
2.
3.
11-6
The battery passed the test.
Record "pass CT" and the date on
the bottom of the battery.
Recharge the battery before use.
The battery failed the test.
Record "fail CT" and the date on
the bottom of the battery.
Discard the battery appropriately.
Maintaining the Heartstream XL
Battery Maintenance
Battery Maintenance
The Heartstream XL uses the M3516A Battery Pack. It is a rechargeable
sealed lead acid battery. Battery maintenance begins when you receive a new
battery and continues throughout the life of the battery. Detailed information
on battery care is provided in the application note "About Sealed Lead Acid
Batteries," that came with your Heartstream XL.
Table 11-2 lists battery maintenance activities and when they should be performed.
7DEOH%DWWHU\0DLQWHQDQFH$FWLYLWLHV
Activity:
When to Perform:
Perform a visual inspection
Daily, as part of the Shift/System
Check.
Charge the battery
After each use, or if the message /RZ
%DWWHU\ is displayed.
Perform a Battery Capacity Test
At the time of purchase and every three
months thereafter.
Store the battery appropriately
When not in use.
M4735A Heartstream XL Defibrillator/Monitor
11-7
11
Battery Maintenance
Recharging Batteries
You may charge batteries while they are in either the Heartstream XL or the
optional M4747A Battery Charger Kit.
If the battery is being charged while in the defibrillator/monitor (with the
Heartstream XL powered off) a discharged battery will typically be
90% charged after 3 hours (at 25oC), as indicated by the Batt Charge LED on
the front panel turning from amber to green. After the LED turns green, the
battery will typically be fully recharged after an additional 12 hours at (25oC).
&$87,21
The battery should be fully charged whenever possible. Repeated charges to
just the 90% level will degrade the battery, reducing its life and capacity.
Refer to the charging procedures provided in the operating instructions for the
Battery Charger Kit.
11-8
Maintaining the Heartstream XL
Battery Maintenance
Battery Capacity
A new, fully-charged M3516A battery, operating at room temperature (25oC),
provides 100 minutes of monitoring or more than 50 200-joule charge-shock
cycles.
Battery Life Expectancy
Life-expectancy of a battery depends on the frequency and duration of use.
When properly maintained and stored, the life-expectancy of a battery is
about 1.5 years. For more aggressive use models, life-expectancy may be less.
The date of manufacture is located at the bottom of the battery’s back label.
Storing Batteries
Batteries should be used regularly and rotated to distribute the use evenly.
When storing batteries, make sure that the battery terminals do not come in
contact with metallic objects.
Batteries should not be stored without charging for more than one month, if
installed in the defibrillator, or more than three months, if not installed in the
defibrillator. Storage at temperatures between 15oC (59 oF) and 30 oC (86oF) is
recommended to maximize life expectancy.
&$87,21
Storing at temperatures above 40oC (104oF) for extended periods of time will
significantly reduce a battery’s life-expectancy.
Discarding Batteries
Batteries should be discarded if there are visual signs of damage or if they fail
the Battery Capacity Test. Batteries should be discarded in an
environmentally safe manner. Properly dispose of batteries according
to local regulations.
:$51,1*
'RQRWGLVDVVHPEOHSXQFWXUHRULQFLQHUDWHEDWWHULHV%HFDUHIXOQRWWRVKRUWWKH
EDWWHU\WHUPLQDOVEHFDXVHWKLVFRXOGUHVXOWLQDILUHKD]DUG
M4735A Heartstream XL Defibrillator/Monitor
11-9
11
Loading Printer Paper
Loading Printer Paper
To load printer paper:
1. Slide the printer door to the right until the paper roller pops up.
2. If there is an empty or low paper roll in the printer, pull up on the plastic
removal tab to remove the roll.
)LJXUH2SHQLQJWKH3ULQWHU
11-10
Maintaining the Heartstream XL
Loading Printer Paper
3. Place a new roll of printer paper (40457C/D) into the printer paper well,
positioning the roll so that the end of the roll is on the top and the grid
faces down. Be sure to push the roll down so that it is firmly seated in the
paper well.
4. Pull the end of the paper past the paper roll.
5. Slide the printer door to the right and hold it open. Press the roller down
over the paper and release the door.
)LJXUH/RDGLQJ3DSHU
M4735A Heartstream XL Defibrillator/Monitor
11-11
11
Cleaning Instructions
Cleaning Instructions
Cleaning the Heartstream XL
The following cleaning products may be used to clean the exterior surfaces of
the Heartstream XL, as well as the battery and data card:
l
l
l
l
Isopropyl alcohol (70% in water)
Mild soap and water
Chlorine bleach (3% in water)
Quaternary ammonium compounds, such as Lysol (10% in water)
When cleaning, be sure to avoid pouring fluids on the device and do not allow
fluids to penetrate the exterior surfaces of the device. Use of a soft cloth is
recommended for cleaning the display, to prevent scratching.
&$87,21
The Heartstream XL may not be autoclaved, ultrasonically cleaned, or
immersed. Do not use abrasive cleaners or strong solvents such as acetone or
acetone-based cleaners.
Cleaning the Printer Printhead
If the printout has light or varying density printing, clean the printhead to
remove any buildup of paper residue.
To clean the printhead:
1. Slide the printer door to the right until the paper roller pops up.
2. Pull up on the plastic removal tab to remove the roll of paper.
3. Clean the printhead surface (above the brush) with a cotton swab dipped
in rubbing alcohol.
4. Replace the roll of paper (see “Loading Printer Paper” on page 11-10).
11-12
Maintaining the Heartstream XL
Cleaning Instructions
Cleaning Paddles, Pads, Electrodes & Cables
Defibrillation pads and monitoring electrodes are single use and do not
require cleaning.
11
The paddles, paddles cable, and pads patient cable may be cleaned with:
l
l
l
l
l
&$87,21
Alcohol-free hand soap
2% gluteraldehyde solution (such as Cidex)
Sodium hypochlorite (chlorine bleach) solution 10% in water
Quaternary ammonium compounds (such as Lysol)
Isopropyl alcohol
The paddles and paddles cable may not be ultrasonically cleaned or
immersed. Nor may they be autoclaved or steam sterilized.
The ECG cable may be cleaned by wiping it with any of the following:
l
l
l
&$87,21
2% gluteraldehyde solution (such as Cidex®)
Alcohol-free hand soap
Chlorine bleach (100ml/l)
Do not ultrasonically clean, immerse, autoclave or steam sterilize the pads or
ECG cable. Do not clean the ECG cable with alcohol. Alcohol can cause the
plastic to become brittle and may cause the cable to fail prematurely.
To clean the SpO2 sensor and cable, follow the manufacturer’s instructions.
127(
For information about paddle sterilization procedures, see the
M4741-91000 Agilent Technologies Sterilizable Paddles Owner’s Guide.
M4735A Heartstream XL Defibrillator/Monitor
11-13
Supplies & Accessories
Supplies & Accessories
Approved supplies and accessories for the Heartstream XL are listed in l. To
order:
l
l
In the USA, call 1-800-225-0230.
Outside the USA, contact your local Agilent Technologies Sales
Office, your authorized Agilent Technologies Dealer or Distributor,
or visit our Medical Supplies website at: www.healthcare.agilent.com/mpgsupplies/.
7DEOH8SJUDGHV6XSSOLHVDQG$FFHVVRULHV
Part Number
Description
Upgrades
M4738A
Pacing Upgrade
M4739A
SpO 2 Upgrade
Defibrillation Pads/Electrodes
M3501A
Multi-function Defib Adult Electrodes, AAMI
M3502A
Multi-function Defib Adult Electrodes, IEC
M3503A
Multi-function Defib Pediatric Electrodes, IEC
M3504A
Multi-function Defib Pediatric Electrodes, AAMI
DP2
Heartstream Defibrillation Pads: 2-Pack
DP6
Heartstream Defibrillation Pads: 5-Pack
Paper
11-14
Maintaining the Heartstream XL
Supplies & Accessories
7DEOH8SJUDGHV6XSSOLHVDQG$FFHVVRULHV
Part Number
Description
40457C
50 mm Strip Chart Thermal Paper -1 box (10 rolls)
40457D
50 mm Strip Chart Thermal Paper -1 box (80 rolls)
11
External Paddles (PCI/Sterilizable)
M4745A
Sterilizable External Paddles
M4746A
External Paddles with PCI
M17898
Adult Adapter (clips onto external paddle)
Pads Cables
M3507A
Agilent Pad Connector Cable
M3508A
Heartstream Pad Connector Cable
05-10200
Heartstream Pads Adapter (DP2 & DP6), use with M3507A
M4735A Heartstream XL Defibrillator/Monitor
11-15
Supplies & Accessories
7DEOH8SJUDGHV6XSSOLHVDQG$FFHVVRULHV
Part Number
Description
ECG Cables
M1500A
3-lead ECG Trunk Cable (AAMI)
M1605A
3-lead ECG Lead Set with Snaps (AAMI)
M1510A
3-lead ECG Trunk Cable (IEC)
M1615A
3-lead ECG Lead Set (IEC)
M1520A
5-lead ECG Trunk Cable (AAMI)
M1625A
5-lead ECG Lead Set with Snaps (AAMI)
M1530A
5-lead ECG Trunk Cable (IEC)
M1635A
5-lead ECG Lead Set with Snaps (IEC)
Sync Cable
M1783A
12-pin Sync Cable
Monitoring Electrodes
M2202A
11-16
High-Tack Foam ECG Electrodes - 5 electrodes/pouch
(300 electrodes/case)
Maintaining the Heartstream XL
Disposing of the Heartstream XL
7DEOH8SJUDGHV6XSSOLHVDQG$FFHVVRULHV
Part Number
Description
11
SpO2 Cables/Sensors
M1191A
Adult Reusable SpO2 Sensor
M1192A
Pediatric Reusable SpO2 Sensor
M1194A
Adult/Pediatric Ear Clip, Reusable SpO 2 Sensor
M1943A
Nellcor SpO2 Sensor Adapter Cable
Data Card
M3510A
Data Card
Battery
M3516A
Sealed Lead Acid Battery
M4747A
Battery Charger Kit
Test Load
M1781A
50 ohm defibrillator test load
User Training CD-ROM
M4735-91000
User Training CD-ROM Kit
Disposing of the Heartstream XL
Prior to disposing of the Heartstream XL, remove the battery. Then dispose of
the device and its accessories in accordance with local regulations.
:$51,1*
'LVSRVDORIWKHGHYLFHZLWKWKHEDWWHU\LQVHUWHGSUHVHQWVDSRWHQWLDOVKRFNKD]DUG
M4735A Heartstream XL Defibrillator/Monitor
11-17
Disposing of the Heartstream XL
11-18
Maintaining the Heartstream XL
12 Troubleshooting
If the Heartstream XL detects an error or potential problem during use, it displays a system or momentary message. These messages are often accompanied by a voice prompt. This chapter describes the messages and what you
should do in response. In addition, this chapter provides general troubleshooting tips and information on calling for service.
127(
For instructions for repair or for further technical information, refer to the
M4735-90900 Heartstream XL Service Manual.
M4735A Heartstream XL Defibrillator/Monitor
12-1
12
System Messages
System Messages
System messages remain on the display until the specified action is taken or
no longer relevant. Each new message displayed is accompanied by three
beeps to alert you. Table 12-1 lists system messages.
7DEOH6\VWHP0HVVDJHV
Message
&RQILJXUDWLRQ/RVW
Description
The configuration is reset to the default
settings.
Corrective Action
l Reconfigure the Heartstream XL.
l Check to see if the battery is properly
charged.
l Replace the battery.
l If the message persists, call for
service.
'DWD&DUG'LVDEOHG
(&*)DXOW
/RZ%DWWHU\
12-2
The Data Card is not in use because it is
full, incompatible, absent, or inserted
after the Heartstream XL was turned on.
If possible, turn the Heartstream XL off
for more than 2 minutes, insert an empty,
compatible Data Card, and turn the
device on.
You may also enter configuration mode
and turn the machine off, then on again.
The ECG data acquisition system failed
and data is unavailable from the 3- or 5wire monitoring electrodes.
Remove the device from active use and
call for service.
The battery has sufficient capacity
remaining to provide only about ten minutes of monitoring time and 5 shocks
before the Heartstream XL shuts off.
l Replace the battery with a fully
charged battery.
l Plug in AC power.
Troubleshooting
System Messages
7DEOH6\VWHP0HVVDJHV&RQWLQXHG
Message
/HDGV2II
Description
l The monitoring electrodes are not
applied.
l The monitoring electrodes are not
making proper contact with the
patient.
l The monitoring cable is not connected.
1R3DGV
3DGV&DEOH2II
3DGV2II
3DFHU)DLOXUH
3DFHU2XWSXW/RZ
1R3DGGOHV&RQQHFWHG
Corrective Action
l Check the monitoring electrodes are
properly applied.
l Check the monitoring cable is properly connected.
12
The multifunction defib electrode pads
are not properly connected to the Heartstream XL.
Check the pads cable connection.
The pads cable is not connected to the
defibrillator.
Check pads connector is locked in place.
The pads are not making proper contact
with the patient.
Make sure the pads are properly applied
to the patient.
The pacing system is not functioning.
Remove the device from active use and
call for service.
High patient impedance is resulting in the
pacer delivering less current to the patient
than specified in the output current setting.
Check the pads are applied properly.
The paddles are not properly connected to
the Heartstream XL.
Check that external paddles are connected.
M4735A Heartstream XL Defibrillator/Monitor
12-3
System Messages
7DEOH6\VWHP0HVVDJHV&RQWLQXHG
Message
6S2&DEOH2II
6S2/LJKW,QWHUI
Description
Corrective Action
The SpO 2 cable is not connected to the
device.
Attach the SpO2 cable to the Heartstream
XL.
The level of ambient light is so high that
the sensor cannot obtain an SpO2 reading
or the sensor or cable is damaged.
l Cover the sensor with an opaque
material.
l Check the sensor for damage; try
another sensor.
1RQ3XOVDWLOH
6S2/RZ6LJQDO
6S21RLV\6LJQDO
6S26HQVRU)DLO
12-4
The patient’s pulse is absent or too weak
to be detected.
l Check that the sensor is applied prop-
SpO2 signal is too low to give an accurate
reading.
l Check the sensor is applied properly.
l Try another sensor type.
Excessive patient movement, electrical
interference, or optical interference is
present.
l Minimize patient movement or apply
The SpO 2 transducer is broken.
Try another sensor.
erly.
l Make sure the sensor site has a pulse.
l Relocate the sensor to a site with
improved circulation.
l Try another sensor.
the sensor to a site with less
movement.
l Secure the sensor cable loosely to the
patient.
l Reduce sources of electrical or optical
interference.
Troubleshooting
System Messages
Momentary Messages
Momentary messages are temporary and only appear on the display for a few
seconds. Each message is accompanied by a three second beep to alert you.
Table 12-2 lists momentary messages.
7DEOH 0RPHQWDU\0HVVDJHV
Message
$WWDFK3DGV
'HILE'LVDUPHG
Possible Cause
The multifunction defib electrode pads
are not making proper contact with the
patient.
l Check the pads are applied to
l The pads connection is compromised.
l The mode is changed from Manual to
l Check the pads are applied to the
AED while the defibrillator is
charged.
l
l
1R6KRFN'HOLYHUHG
Corrective Action
or shock buttons are not
pressed within 30 seconds of the
defibrillator being charged.
6+2&.
',6$50
is pressed.
Patient impedance is too high.
the patient, as directed on the
pads’ package.
l Replace the pads if the prompt
continues.
12
patient properly.
l If a shock is indicated, deliver the
shock before changing modes.
l To deliver a shock, press
6+2&.
or shock buttons on paddles within
30 seconds of the defibrillator being
charged.
l Make sure the pads are applied
properly.
l Replace the pads, if necessary
&KHFN3ULQWHU
Printer paper is absent or jammed; the
printer door is not closed properly.
M4735A Heartstream XL Defibrillator/Monitor
l Reload printer paper.
l Make sure the door is closed properly.
12-5
System Messages
7DEOH&RQWLQXHG0RPHQWDU\0HVVDJHV
Message
'DWD&DUG)XOO
Possible Cause
l The incident is more than 2 hours in
duration, causing the Data Card to fill.
l An empty Data Card was not inserted
for the incident, causing the Data Card
to fill sooner.
'DWD&DUG,QWHUUXSWHG
The Data Card is removed during an incident.
Corrective Action
l None. A new Data Card can not be
inserted during an incident.
l Use one Data Card per incident/
patient to decrease the chance of the
card filling.
l None. The Data Card can not be reinserted during an incident.
l Do not remove the Data Card during
an incident.
The Data Card is inserted while the Heartstream XL is on.
None. A Data Card must be inserted prior
to turning the Heartstream XL on for the
current patient.
A Data Card other than the M3510A is
inserted.
Use only M3510A Data Cards.
1R'DWD&DUG3UHVHQW
A Data Card is not in the Heartstream XL.
Turn the Heartstream XL off and insert a
Data Card prior to the first event for the
patient.
.H\,QDFWLYH
The key pressed is currently inactive (i.e.
Use the appropriate mode for the key.
'DWD&DUG1RW,Q6HUYLFH
,QFRPSDWLEOH'DWD&DUG
Pacer
6WRS3DFHU
$WWDFK&DEOH
12-6
is inactive in AED Mode).
Mode
is pressed while pacing pulses
are being delivered.
Patient cable is not properly attached to
Heartstream XL.
Stop pacing before changing the pacing
mode.
Check cable connections.
Troubleshooting
Troubleshooting Tips
Troubleshooting Tips
Table 12-3 lists some situations that you may encounter, their possible causes,
and a few suggested solutions.
7DEOH7URXEOHVKRRWLQJ7LSV
Situation
Cause
Possible Solution
The Heartstream XL
does not turn on.
There is no power.
l Insert a fully charged battery.
l Attach AC Power cord.
There is a dashed (----)
line on the display
instead of an ECG.
ECG data is not being acquired.
l Check the patient cable is connected.
l Check the pads, paddles or electrodes
The Heartstream XL
does not appear to be
functioning properly.
l The battery is low.
l There is a system failure.
The displayed time is
incorrect.
The time was not correctly set in the configuration.
Set the time in the General Settings menu
of the Configuration Mode.
The printed date is
incorrect.
The date was not correctly set in the configuration.
Set the time in the General Settings menu
of the Configuration Mode.
The Heartstream XL
will not power on.
Corrupt data card may prevent the unit
from powering on.
Take the Data Card out replace it with
new Data Card, if possible. Then, attempt
to turn the Heartstream XL on.
are properly applied.
l Check that the desired lead is selected.
l Change the battery.
l Take the device out of use and call for
service.
M4735A Heartstream XL Defibrillator/Monitor
12-7
12
Calling for Service
Calling for Service
For telephone assistance, call the Response Center nearest to you, or
visit our website at: www.healthcare.agilent.com/mpgcsd/.
United States of America
Medical Response Center
Tel: (800) 548-8833
Canada
Eastern Region
Tel: (800) 361-9790
Central & Western Regions
Tel: (800) 268-1221
Other International Areas
Australia
Tel: 131147
France
Tel: 0803 35 34 33
Germany
Tel: 0130-4730
Italy
Tel: 0292 122999
Netherlands
Tel: (0) 20-547-6333
United Kingdom
Tel: 44-344-36633
Belgium
Tel: 32 2 778 35 31
12-8
Troubleshooting
13 Specifications & Safety
This section provides:
l
l
l
l
l
Specifications for the Heartstream XL
Symbol definitions for symbols appearing on the Heartstream XL
Clinical Performance Summary data
Safety related information
Electromagnetic compatibility information
13
M4735A Heartstream XL Defibrillator/Monitor
13-1
Specifications
Specifications
Defibrillator
Waveform: Biphasic Truncated Exponential. Waveform parameters adjusted
as a function of patient impedance.
Shock Delivery: Via multi-function defib electrode pads or paddles.
Delivered Energy Accuracy:
Charge Time: Less than 3 seconds to 200 Joules with a new, fully charged
M3516A SLA battery pack at 25º C. Less than 15 seconds to 200 Joules,
when powered by AC with no battery installed.
Patient Impedance Range:
•
•
13-2
Minimum: 10-25 Ohm, depending upon energy level
Maximum: 180 Ohm
Specifications & Safety
Specifications
Manual Mode
Manual Output Energy (Delivered): 2, 3, 5, 7, 10, 20, 30, 50, 70, 100,
150, 200 Joules.
Controls: Manual/AED On/Energy Select knob, Charge/Disarm, Shock,
ECG Lead Select, SpO2 On/Off, SpO2 Alarm, HR Alarm, Sync On/Off,
Pacer, Pacer Start/Stop, Pacer Rate, Pacer Current, Pacer Mode, ECG
Gain, Volume, Strip, Summary, Mark.
Indicators: EL display for ECG waveform and text prompts, Audio alerts,
QRS Beeper, Charging tones (for sync and asychronous modes), AC
Power LED, Battery Charging LED, Sync LED, Pacer LED.
Armed Indicators: Charge done tone and available energy indicated on
display.
Energy Selection: Front panel rotary knob.
Charge Control: Front panel "2" key or buttons on paddles.
13
Shock Control: Front panel "3" key or buttons on paddles.
Synchronizer: SYNC message appears on the monitor and is annotated on
the printer (if printing while in Sync mode) An audible beep sounds with
each detected R-wave, while a tick mark on the monitor and printed strip
indicate the discharge points. Synchronizer delay is less than 60 msec from
peak R-wave to peak current of the defibrillation discharge.
M4735A Heartstream XL Defibrillator/Monitor
13-3
Specifications
AED Mode
AED Energy Profile: Fixed energy (150 Joules).
AED Shock Series: 2, 3, or 4 shocks per series.
Shock Series Timer: off, 30, 60, 90, 120, 150, 180,
or 210 seconds.
Text and Voice Prompts: Extensive text/audible
messages guide user through protocol.
AED Controls: On, Off, Pause/Resume, Analyze/Stop Analysis, Shock,
Lead Select, SpO2 On/Off, SpO2 Alarms, HR Alarms, ECG Gain, Volume, Strip, Summary, Mark.
Indicators: EL display for ECG waveform and text prompts, Audio alerts,
Voice Prompts, QRS Beeper, Charging Tone, Charge Done Tone, Printer,
AC Power LED, Battery Charging LED.
Armed Indicators: Charge Done Tone, Available Energy indicated on
display, Voice Message.
Patient Analysis: Per protocol, evaluates patient ECG and signal quality
to determine if a shock is
appropriate and evaluates connection impedance for proper defibrillation
pad contact.
Shockable Rhythms: Ventricular Fibrillation with amplitude>100 uV and
wide complex ventricular tachycardia with rates greater than 150 bpm.
Sensitivity and Specificity: Meets AAMI guidelines.
13-4
Specifications & Safety
Specifications
ECG Monitoring
Inputs: Single channel ECG may be viewed on display and printed. Pads
ECG is obtained through 2 multifunction defibrillation electrode pads. Lead
I, II, or III is obtained through the 3 lead ECG cable and separate monitoring
electrodes. With a 5 lead cable, lead aVR, aVL, aVF, or V can also be
obtained.
Lead Fault: LEADS OFF message and dashed line appear on the display if
an electrode or lead wire becomes disconnected.
Paddle Fault: NO PADDLES CONNECTED message and dashed line
appear on the display if paddles become disconnected.
Pad Fault: PADS OFF message and dashed line appear on the display if a pad
becomes disconnected.
Heart Rate Display: Digital readout on display from 15 to 300 bpm, with an
accuracy of ±10%.
Heart Rate Alarms: Configurable pairs of low and high heart rate alarm limits: 30 to 100, 60 to 140, 90 to 160, and 120 to 200 bpm.
Hands Free Defibrillation Patient Cable Length: 7 ft (2.13 m).
ECG Cable Length: 12 ft (3.7 m).
Common Mode Rejection: Greater than 90 dB measured per AAMI standard
for cardiac monitors (EC 13).
M4735A Heartstream XL Defibrillator/Monitor
13-5
13
Specifications
ECG Size: 2.5, 5, 10, 20, 40 mm/mV.
Frequency Response:
AC Line Filter:
60 Hz or 50 Hz.
Pads ECG for Display:
Monitor (.15-40 Hz) or
EMS (1-30 Hz).
Pads ECG for Printer:
Monitor (.15-40 Hz) or
EMS (1-30 Hz).
Leads ECG for Display: Monitor (.15-40 Hz) or
EMS (1-30 Hz).
Leads ECG for Printer:
Diagnostic (.05-150 Hz) or EMS (1-30 Hz) or
Monitor (.15-40 Hz).
Patient Isolation (defibrillation proof):
13-6
ECG:
Type CF
SpO2:
Type CF
Defib:
Type BF
Specifications & Safety
Specifications
(&*$QDO\VLV3HUIRUPDQFH
5+<7+0&/$66
(&*7(67
6$03/(
$6,=(
120,1$/63(&,),&$7,216
Shockable Rhythm —
ventricular fibrillation
600
Meets AAMI DF39 requirement and AHA recommenda-
Shockable Rhythm —
ventricular tachycardia
300
Meets AAMI DF39 requirement and AHA recommendationb (sensitivity >75%) for adult defibrillation
Non-Shockable Rhythm —
Normal Sinus Rhythm
250
Meets AAMI DF39 requirement (specificity > 95%) and
AHA recommendationb (specificity >99%) for adult
defibrillation
Non-Shockable Rhythm —
Asystole
500
Meets AAMI DF39 requirement and AHA recommendationb (specificity >95%) for adult defibrillation
Non-Shockable Rhythm —
All other non-shockable
rhythms
600
Meets AAMI DF39 requirement and AHA recommendationb (specificity >95%) for adult defibrillation
tionb (sensitivity >90%) for adult defibrillation
13
a. From Agilent Technologies ECG rhythm databases.
b. American Heart Association (AHA) AED Task Force, Subcommittee on AED Safety & Efficacy.
Automatic External Defibrillators for Public Access Use: Recommendations for Specifying and
Reporting Arrhythmia Analysis Algorithm Performance, Incorporation of New Waveforms, and
Enhancing Safety. American Heart Association (AHA) AED Task Force, Subcommittee on AED
Safety & Efficacy. Circulation 1997;95:1677-1682.
M4735A Heartstream XL Defibrillator/Monitor
13-7
Specifications
Display
Size: 115 mm x 86 mm
Type: EL - Electroluminescent
Resolution: 320 x 240 pixels
Sweep Speed: 29 mm/s nominal (stationary trace;
sweeping erase bar).
Viewing Time: 4 seconds.
Battery
Type: 2 Ah, 12V, rechargeable, Sealed Lead Acid.
Dimensions: 2.4" (H) x 0.94" (W) x 7.2" (D) (61.7mm x 23.9mm x 182mm).
Weight: 1.4 lb. (0.65 kg).
Charge Time: Approximately 14.5 hours to 100%. Approximately 3 hours to
90%, indicated by LED on front panel.
Capacity: 100 minutes ECG monitoring or 50 full-energy discharges or 75
minutes ECG monitoring while pacing (with a new, fully charged battery at
room temperature, 25º C).
Battery Indicators: LOW BATTERY message appears on display when at
least 10 minutes of monitoring time and 5 maximum energy discharges
remain (with a new battery at room temperature, 25º C).
Battery Storage: Should not be stored above 40º C for extended periods of
time.
Charger Output: Unit can be operated using only AC Power, with no battery
installed.
13-8
Specifications & Safety
Specifications
Thermal Array Printer
Continuous Real Time Strip: User starts and stops the strip. The strip prints
the selected ECG lead with the following data:
Header 1: Date, Time, Heart Rate, the SPO2 Value (if available), and the text
"Delayed" if printing has been configured for Delayed Mode. Prints every 12
seconds.
Header 2: Current mode (AED/Manual), Lead, Gain, filter setting, the text
"Sync" (if Sync has been enabled), and Pacer Settings (consisting of the Pacer
Mode, Rate, and Current, if presently pacing the patient). Prints every 12 seconds, with Header 1.
Header 3: Changes in Mode, Gain, Lead, Sync, and Pacer Settings.
Footer: Drug Annotations, HR/SpO2 limits on a Limit Alarm, the Results of
Analysis in AED Mode (No Shock Advised, Shock Advised, or Cannot Analyze), Charging to xxx J, Shock Delivered, No Shock Delivered, Disarm, Battery Low.
Symbols: Mark Triangle (for presses of the Mark key), an Alarm Bell (Alarm
Limit Violations), Lightning Bolt (Shock Delivered; followed by b for biphasic), Vertical Stripe Boundaries/Pacer/Sync Tick Marks.
Event Printing: Mark key automatically documents ECG and events during
defibrillation episodes. The Mark key can annotate the event with one of the
following labels: Epinephrine (Adrenaline), Atropine, Lidocaine, and Other.
M4735A Heartstream XL Defibrillator/Monitor
13-9
13
Specifications
Auto Printing: The printer can be configured to automatically print on Mark,
Charge, Shock and Alarm.
Delayed Printing: The printer can be configured to run real time or with a 6
second delay.
Reports: The following can be printed: Event Summary, Configuration,
Extended Self Test, System Log, Battery Capacity Test, Shift/System Check.
Speed: 25 mm/s with an accuracy of ± 5%.
Amplitude Accuracy: ± 10% or ± 50 uV, whichever
is greater.
Paper Size: 50 mm by 30 m (100 ft).
Noninvasive Pacing
Waveform: Monophasic Truncated Exponential.
Current Pulse Amplitude: 10 mA to 200 mA (5 mA resolution); accuracy 10
mA to 50mA ± 5mA, 50mA - 200mA± 10%.
Pulse Width: 20 ms with accuracy +0, -5 ms.
Rate: 30 ppm to 180 ppm (10 ppm increments); accuracy ± 1.5%.
Modes: Demand or Fixed Rate.
Refractory Period: 340 msec (30 to 80 ppm); 240 msec (90 to 180 ppm).
13-10
Specifications & Safety
Specifications
SpO2 Pulse Oximetry
Accuracy with:
M1191A sensor - 1 standard deviation 70% to 100%, ± 2.5%.
M1192A sensor - 1 standard deviation 70% to 100%, ± 2.5%.
M1194A sensor - 1 standard deviation 70% to 100%, ± 4.0%.
NELLCOR sensors - 1 standard deviation 80% to 100%, ± 3.0%.
Resolution: 1%.
Sp02 Alarm Limits: Three preset low alarm limits: 90%, 85%, and 80%.
INOP Alerts: Triggered by disconnected sensor, noisy signal, light interference or low signal (non-pulsatile).
Event Storage
Internal Event Summary: The internal Event Summary stores up to 300
events and up to 50 waveforms.
Events can be marked with a Mark symbol and, if configured for drug annotation, the following labels can be added: Epinephrine (Adrenaline in U.K. &
Australia), Atropine, Lidocaine, or Other.
The Summary key on the front panel is used to print the internal Event Summary.
M4735A Heartstream XL Defibrillator/Monitor
13-11
13
Specifications
Data Card Event Summary: The Data Card stores continuous ECG waveforms and events on a Type II PCMCIA card, SanDisk SDP3B 8MB ATA
FlashDisk. One 8MB card can store approximately 2 hours of continuous
ECG waveforms and events.
General
Dimensions:
19.0 cm(H) x 37.6 cm(W) x 34.6 cm(L)
(7.5 in. x 14.8 in. x 13.7 in.)
Weight: Standard Configuration weighs 6.5 kg (14.3 lbs.) including battery,
full roll of paper, and external paddles.
Environmental
Temperature: 0º C to 55ºC operating, -20º to 70ºC storage.
l
l
Charging the battery at temperatures above 35ºC may degrade battery life
Storing the battery for extended periods at temperatures above 40ºC
will reduce battery capacity and degrade battery life.
Humidity: Up to 95% Relative Humidity
l
l
13-12
Printer paper may jam if paper is wet.
Thermal Printer may be damaged if wet paper
is allowed to dry while in contact with printer
elements.
Specifications & Safety
Specifications
Altitude:
Operating: up to 15,000 ft.
Storage: up to 15,000 ft.
Shock: Agilent Technologies, Section 760 Class B1 Drop Test
(200 G’s, < 3 msec pulse).
Vibration: Agilent Technologies, Section 759 Class B1 Vibration.
Water Resistance: Meets IEC 601-2-4, IPX0.
EMC: Meets EN 60601-1-2.
Safety: Meets IEC 601-1 (EN 60601-1), UL 2601-1, CAN/CSA C22.2 No.
601-1.
Other Considerations: Equipment not suitable for use in the presence of a
flammable anesthetic mixture with air, oxygen, or nitrous oxide.
Mode of Operation: Continuous.
13
AC Line Powered: 100-240 VAC, 50/60 Hz, 1.5 A (Class 1)
Battery Powered: 12 V Rechargeable, SLA
M4735A Heartstream XL Defibrillator/Monitor
13-13
Symbol Definitions
Symbol Definitions
The following table lists the meaning of each symbol shown on the
Heartstream XL and the M3516A battery:
7DEOH'HILEULOODWRUDQG%DWWHU\6\PEROV
Symbol
Definition
Defibrillation Shock.
!
Attention - See operating instructions in user’s guide.
Input.
Meets IEC type BF leakage current requirements and is defibrillator protected (Patient Applied Part is isolated and defib-proof
suitable for direct patient contact except the heart or major
arteries.)
Meets IEC type CF leakage current requirements and is defibrillator protected (Patient Applied Part is isolated and defib-proof
suitable for direct patient contact including the heart and major
arteries).
Alarms are active.
Alarms are inactive.
Recyclable material.
13-14
Specifications & Safety
Symbol Definitions
7DEOH'HILEULOODWRUDQG%DWWHU\6\PEROV
Symbol
Definition
Biphasic energy is being used.
b
Must be recycled or disposed of properly.
Unlock.
13
Audio Speaker
Protective earth ground.
Alternating current.
Dangerous voltage.
M4735A Heartstream XL Defibrillator/Monitor
13-15
Symbol Definitions
7DEOH$EEUHYLDWLRQVDQG$FURQ\PV
Abbreviation/
Acronym
13-16
Definition
AC
Alternating Current
AED
Automated External Defibrillator
ECG
Electrocardiogram
SpO2
Pulse oximetry
Batt
Battery
ECG Out
Monitoring Signal from Defibrillator
Specifications & Safety
Symbol Definitions
The following table lists the symbols that appear on the Heartstream XL shipping carton:
7DEOH6KLSSLQJ&DUWRQ6\PEROV
Symbol
Definition
Atmospheric pressure range.
Temperature range.
Relative humidity range.
Recyclable paper product.
13
Fragile.
Right side up.
Do not get wet.
M4735A Heartstream XL Defibrillator/Monitor
13-17
Symbol Definitions
7DEOH6KLSSLQJ&DUWRQ6\PEROV
Symbol
Definition
Shelf life.
Long-term storage conditions.
Short-term transport storage.
13-18
Specifications & Safety
Clinical Performance Summary
Clinical Performance Summary
An international, multicenter, prospective, randomized, clinical study was
conducted to assess the effectiveness of the SMART Biphasic waveform in
out-of-hospital sudden cardiac arrests (SCAs), as compared to monophasic
waveforms. The primary objective of the study was to compare the percent of
patients with ventricular fibrillation (VF) as the initial monitored rhythm that
were defibrillated in the first series of three shocks or less.
This section summarizes the methods and results of this study.
Methods
Victims of out-of-hospital SCA were prospectively enrolled in four emergency medical service (EMS) systems. Responders used either 150J SMART
Biphasic AEDs or 200-360J monophasic waveform AEDs. A sequence of up
to three defibrillation shocks were delivered. For the biphasic AEDs, there
was a single energy output of 150J for all shocks. For monophasic AEDs, the
shock sequence was 200, 200, 360J. Defibrillation was defined as termination
of VF for at least five seconds, without regard to hemodynamic factors.
Results
Randomization to the use of monophasic or SMART Biphasic automatic
external defibrillators (AEDs) was done in 338 SCAs from four emergency
medical service systems. VF was observed as the first monitored rhythm in
115 patients. The biphasic and monophasic groups for these 115 patients were
similar in terms of age, sex, weight, primary structural heart disease, cause or
location of arrest, and bystanders witnessing the arrest or performing CPR.
The 150J SMART Biphasic waveform defibrillated 98% of VF patients in the
first series of three shocks or less, compared with 69% of patients treated with
monophasic waveform shocks. Outcomes are summarized in Clinical
SummaryTable 13-4:
M4735A Heartstream XL Defibrillator/Monitor
13-19
13
Clinical Performance Summary
7DEOH&OLQLFDO6XPPDU\
Biphasic Patients
Number/(Percent)
Monophasic Patients
Number/(Percent)
P Value
(chi-square)
Defibrillation Efficacy
Single shock only
<2 shocks
<3 shocks
52/54 (96%)
52/54 (96%)
53/54 (98%)
36/61 (59%)
39/61 (64%)
42/61 (69%)
<0.0001
<0.0001
<0.001
Patients Defibrillated
54/54 (100%)
49/58 (84%)
0.003
Return of Spontaneous
Circulation
41/54 (76%)
33/61 (54%)
0.01
Survival to Hospital
Admission
33/54 (61%)
31/61 (51%)
0.27
Survival to Hospital
Discharge
15/54 (28%)
19/61 (31%)
0.69
CPC = 1 (Good)
13/15 (87%)
10/19 (53%)
0.04
Conclusion
The 150J SMART Biphasic waveform defibrillated at higher rates than 200360J monophasic waveforms, resulting in more patients achieving return of
spontaneous circulation (ROSC) (p=0.01). EMS system outcomes of survival
discharge were not significantly different statistically. However, patients
resuscitated with the lower energy SMART Biphasic waveform were more
likely to have good cerebral performance (CPC, cerebral performance category) (p=0.04).
13-20
Specifications & Safety
Safety Considerations
Safety Considerations
The following general warnings and cautions apply to use of the
Heartstream XL. Additional warning and cautions specific to a
particular feature are provided in the appropriate section.
:$51,1*
7KH+HDUWVWUHDP;/LVQRWLQWHQGHGWREHGHSOR\HGLQVHWWLQJVRUVLWXDWLRQVWKDW
SURPRWHXVHE\XQWUDLQHGSHUVRQQHO2SHUDWLRQE\XQWUDLQHGSHUVRQQHOFDQUHVXOW
LQLQMXU\RUGHDWK
:$51,1*
5HPDLQDWWHQWLYHWRWKHSDWLHQWGXULQJWKHGHOLYHU\RIWKHUDS\'HOD\LQ
GHOLYHULQJDVKRFNPD\UHVXOWLQDUK\WKPWKDWZDVDQDO\]HGDVVKRFNDEOH
FRQYHUWLQJVSRQWDQHRXVO\WRQRQVKRFNDEOHDQGFRXOGUHVXOWLQLQDSSURSULDWH
GHOLYHU\RIDVKRFN
:$51,1*
8VHRQO\WKHPXOWLIXQFWLRQGHILEHOHFWURGHSDGVEDWWHU\DQGDFFHVVRULHVOLVWHG
LQ´2XWVLGHWKH86$FRQWDFW\RXUORFDO$JLOHQW7HFKQRORJLHV6DOHV2IILFH\RXU
DXWKRUL]HG$JLOHQW7HFKQRORJLHV'HDOHURU'LVWULEXWRURUYLVLWRXU0HGLFDO6XSSOLHV
ZHEVLWHDWZZZKHDOWKFDUHDJLOHQWFRPPSJVXSSOLHVµRQSDJH6XEVWLWX
WLRQVPD\FDXVHWKH+HDUWVWUHDP;/WRIXQFWLRQLPSURSHUO\
:$51,1*
8VHPXOWLIXQFWLRQGHILEHOHFWURGHSDGVSULRUWRWKHLUH[SLUDWLRQGDWH'LVFDUGSDGV
DIWHUXVH'RQRWUHXVHSDGV'RQRWXVHIRUPRUHWKDQKRXUVRIFRQWLQXRXVSDFLQJ
:$51,1*
,Q$('0RGHWKHPXOWLIXQFWLRQGHILEHOHFWURGHSDGVPXVWEHLQWKHDQWHULRUDSH[
SRVLWLRQDVVKRZQRQWKHSDFNDJLQJ7KH+HDUWVWUHDP;/ZDVQRWGHVLJQHGWR
DVVHVVGDWDDFTXLUHGIURPSDGVLQDQDQWHULRUSRVWHULRUSRVLWLRQ
:$51,1*
8VHRQO\ZLUH$&SRZHUFRUGVZLWKSURQJHGJURXQGHGSOXJV
:$51,1*
.HHSKDQGVDQGIHHWFOHDURISDGGOHHOHFWURGHHGJHV8VH\RXUWKXPEV
WRGHSUHVVWKHVKRFNEXWWRQVRQWKHSDGGOHKDQGOH
M4735A Heartstream XL Defibrillator/Monitor
13-21
13
Safety Considerations
&$87,21
:$51,1*
Conductive parts of electrodes and associated connectors for applied parts,
including the neutral electrode, should not contact other conductive parts
including earth.
'RQRWDOORZPXOWLIXQFWLRQGHILEHOHFWURGHSDGVWRWRXFKHDFKRWKHURUWRWRXFK
RWKHU(&*PRQLWRULQJHOHFWURGHVOHDGZLUHVGUHVVLQJVHWF&RQWDFWZLWKPHWDO
REMHFWVPD\FDXVHHOHFWULFDODUFLQJDQGSDWLHQWVNLQEXUQVGXULQJGHILEULOODWLRQDQG
PD\GLYHUWFXUUHQWDZD\IURPWKHKHDUW
:$51,1*
'XULQJGHILEULOODWLRQDLUSRFNHWVEHWZHHQWKHVNLQDQGPXOWLIXQFWLRQGHILEHOHFWURGH
SDGVPD\FDXVHSDWLHQWVNLQEXUQV7RKHOSSUHYHQWDLUSRFNHWVPDNHVXUHWKHSDGV
FRPSOHWHO\DGKHUHWRWKHVNLQ'RQRWXVHGULHGRXWSDGVGRQRWRSHQSDGVSDFNDJH
XQWLOMXVWSULRUWRXVH
:$51,1*
1HYHUWRXFKWKHSDWLHQWRUDQ\HTXLSPHQWFRQQHFWHGWRWKHSDWLHQWLQFOXGLQJ
WKHEHGRUJXUQH\GXULQJGHILEULOODWLRQ
:$51,1*
1HYHURSHUDWHWKH+HDUWVWUHDP;/LQVWDQGLQJZDWHU
'RQRWLPPHUVHRUSRXUIOXLGVRQDQ\SRUWLRQRIWKH+HDUWVWUHDP;/
:$51,1*
'RQRWXVHWKH+HDUWVWUHDP;/LQDIODPPDEOHRUR[\JHQULFKDWPRVSKHUH
7KLVFDQFDXVHDQH[SORVLRQKD]DUG
13-22
Specifications & Safety
Safety Considerations
:$51,1*
$YRLGFRQQHFWLQJWKHSDWLHQWWRVHYHUDOGHYLFHVDWRQFH/HDNDJHFXUUHQWOLPLWVPD\
EHH[FHHGHG'RQRWXVHDVHFRQGGHILEULOODWRURQWKHSDWLHQWZKLOHSDFLQJZLWKWKH
+HDUWVWUHDP;/
127(
:$51,1*
The Heartstream XL can be operated with only AC line power, only
12v M3516A SLA Battery or AC power and M3516A SLA battery
simultaneously.
$YRLGFRQWDFWEHWZHHQWKHSDWLHQWDQGFRQGXFWLYHIOXLGVDQGRUPHWDOREMHFWV
VXFKDVWKHJXUQH\&RQWDFWZLWKPHWDOREMHFWVFRXOGFDXVHXQLQWHQWLRQDO
FXUUHQWSDWKZD\V
:$51,1*
2SHUDWLQJWKH+HDUWVWUHDP;/RULWVDFFHVVRULHVLQFRQGLWLRQVRXWVLGHWKH
HQYLURQPHQWDOVSHFLILFDWLRQVFDQUHVXOWLQGHYLFHRUDFFHVVRU\PDOIXQFWLRQ
13
:$51,1*
0HGLFDOHOHFWULFDOHTXLSPHQWZKLFKGRHVQRWLQFRUSRUDWHGHILEULOODWRUSURWHFWLRQ
VKRXOGEHGLVFRQQHFWHGGXULQJGHILEULOODWLRQ
:$51,1*
(OHFWULFVKRFNKD]DUGVH[LVWLQWHUQDOO\'RQRWUHPRYHDVVHPEO\VFUHZV
5HIHUVHUYLFLQJWRTXDOLILHGSHUVRQQHO
M4735A Heartstream XL Defibrillator/Monitor
13-23
Safety Considerations
&$87,21
This device has not been evaluated for use with electrosurgery equipment.
127(
This device and accessories are not intended for home use.
&$87,21
Do not discharge the defibrillator with the paddles shorted together.
:$51,1*
3URSHUO\GLVSRVHRIRUUHF\FOHGHSOHWHGEDWWHULHVDFFRUGLQJWRORFDOUHJXODWLRQV'R
QRWSXQFWXUHGLVDVVHPEOHRULQFLQHUDWHEDWWHULHV
:$51,1*
:KHUHWKHLQWHJULW\RIWKHH[WHUQDOSURWHFWLYHHDUWKFRQGXFWRULVLQGRXEWWKH
GHYLFHVKDOOEHRSHUDWHGIURPLWVLQWHUQDOSRZHUVRXUFH
127(
&$87,21
:$51,1*
13-24
For operation in the U.S., the attachment plug must be the proper NEMA type
for connection to the alternative voltage.
Be aware of patient cables, including ECG monitoring equipment when used
with high frequency surgical equipment.
7REUHDNFRQQHFWLRQZLWKPDLQSRZHUUHPRYHSOXJIURPZDOORXWOHW
Specifications & Safety
Electromagnetic Compatibility
Electromagnetic Compatibility
When using the M4735A Heartstream XL Defibrillator/Monitor, electromagnetic
compatibility with surrounding devices should be assessed.
A medical device can either generate or receive electromagnetic interference.
Testing for electromagnetic compatibility EMC with and without the appropriate
accessories has been performed according to the international standard for EMC for
medical devices (IEC 60601-1-2). This IEC standard has been adopted in Europe as
the European Norm (EN 60601-1-2).
The EMC standards describe tests for both emitted and received interference.
Emission tests deal with interference generated by the device being tested.
:$51,1*
5DGLRIUHTXHQF\5)LQWHUIHUHQFHIURPQHDUE\WUDQVPLWWLQJGHYLFHVPD\GHJUDGH
SHUIRUPDQFHRIWKH0$+HDUWVWUHDP;/'HILEULOODWRU0RQLWRU(OHFWURPDJQHWLF
FRPSDWLELOLW\ZLWKVXUURXQGLQJGHYLFHVVKRXOGEHDVVHVVHGSULRUWRXVLQJWKH
13
GHILEULOODWRU
M4735A Heartstream XL Defibrillator/Monitor
13-25
Electromagnetic Compatibility
Reducing Electromagnetic Interference
The M4735A Heartstream XL Defibrillator/Monitor and associated accessories are
susceptible to interference from other RF energy sources and continuous, repetitive,
power line bursts. Examples of other sources of RF interference are medical devices,
cellular products, information technology equipment and radio/television
transmission. Should interference be encountered, as demonstrated by artifact on the
ECG or dramatic variations in SpO2 values, attempt to locate the source. Assess:
• Is the interference intermittent or constant?
• Does the interference occur only in certain locations?
• Does the interference occur only when in close proximity to certain medical
devices?
• Does the SpO2 value change dramatically when the AC line cord is unplugged?
Once the source is located, attempt to attenuate the EMC coupling path by distancing
the defibrillator from the source as much as possible. If assistance is needed, call your
local service representative.
13-26
Specifications & Safety
Electromagnetic Compatibility
Restrictions for Use
Artifact on the ECG caused by electromagnetic interference should be evaluated by a
physician or physician authorized personnel to determine if it will negatively impact
patient diagnosis or treatment.
Immunity Level
The EMC standards state that manufacturers of patient-coupled equipment must
specify immunity levels for their systems. It is recognized that the Heartstream XL
defibrillator/monitor is designed to receive and amplify low level signals in the same
bandwidth as the interference.
Immunity is defined in the standard as the ability of a system to perform without
degradation in the presence of an electromagnetic disturbance. Degradation in ECG
quality is a qualitative assessment which can be subjective.
Caution should, therefore, be taken in comparing immunity levels of different
devices. The criteria used for degradation is not specified by the standard and may
vary with the manufacturer.
127(
For additional information about compliance with the EMC standards, please
see the Declaration of Conformity Statement available at:
http://www.healthcare.agilent.com/mpg-reginfo/conformity.html.
M4735A Heartstream XL Defibrillator/Monitor
13-27
13
Electromagnetic Compatibility
13-28
Specifications & Safety
Index
A
Accessories
arranging 10-5
checking 11-4
ordering 11-17, 13
AED Mode 3-1
configuring 3-4, 10-9
CPR 3-12
defibrillation process
3-6
display 2-5, 2-7
ECG monitoring 4-1
enabling from Manual
Mode 6-6
events recorded 9-3
Events Summary 9-2
indications for use 1-5
overview 1-2, 3-2, 3-3
pausing 3-12, 3-15
preparation 3-5
re-analysis 3-11
rhythm monitoring 314
specifications 13-3
SpO2 monitoring 5-1
training required 1-4
troubleshooting 3-18
Alarms
heart rate 4-6, 8-2
interruption of power
9-5
SpO2 monitoring 5-8
symbols 11
Analysis 3-8
AED Mode 3-8
re-analysis 3-11
settings 3-4
Arrhythmias 1-6
Artifact Detected message
3-18
Asynchronous
defibrillation 1-6
Asystole 1-6
pacing 1-7
Attach Pads message 12-5
Audiovisual controls 2-2,
2-3
Automatic Re-analysis 311
setting 3-4, 10-10
B
Batteries 1-3, 2-9
charging 11-7
checking 11-5
inserting and
removing 2-9
maintenance 11-7
operational checks 112
ordering 11-19
specifications 11-8,
13-6
storing and discarding
11-8
symbols 10
troubleshooting 12-2
See also Power supply
Battery Capacity Test 116
Battery charger 11-19
Bradycardia 1-7
xxix
Index
C
Cables
checking 11-4
cleaning 11-13
connecting 2-2, 3-6
ECG 10-3
ordering 11-18
Pads 3-6, 10-2
SpO2 5-6, 5-11, 10-4
Cal Pulse 2-3
Check Patient Timer
setting 10-11
Check Printer message
12-5
Cleaning
Heartstream XL 11-11
pads, electrodes &
cables 11-13
power modules 11-12
printer printhead 1112
CodeRunner Web 2-11, 91
xxx
Configuration 10-6
accessing menu 10-6
AED Mode 3-4
Automatic Reanalysis 3-4
default 10-14
Device Initiated
Analysis 3-4
ECG filters 10-13
heart rate alarm 4-6
list of configurable
items 10-7
modifying 10-14
printing settings 10-15
Rhythm Monitoring 34, 3-14
saving and loading
from Data Card
10-15
Configuration Lost
message 12-2
Continued Use feature 95
Controls 2-2
CPR 3-12
D
Data Card 2-11
downloading and
erasing
information 9-1
inserting and
removing 2-11
ordering 11-19
saving and loading
settings 10-15
specifications 13-8
troubleshooting 12-2,
12-6
Date 10-8, 12-7
Default settings. See
Configuration
Defib Disarmed message
12-5
Defib electrode pads. See
Pads
Defibrillation 1-2
AED Mode 3-3, 3-6
defined 1-4
Manual Mode 6-4
pacing 8-6
Defibrillation controls 2-3
Defibrillator. See
Heartstream XL
Device Initiated Analysis
settings 3-4, 10-10
Index
Display
AED Mode 2-7
controls 2-2
layout 2-5
Manual Mode 2-8
specifications 13-5
troubleshooting 12-7
E
ECG analysis. See
Analysis
ECG cables
cleaning 11-13
connecting 10-3
ordering 11-18
See also Cables
ECG electrodes. See
Electrodes
ECG Fault message 12-2
ECG Filter Settings 10-13
ECG monitoring 4-1
controls 2-3
electrodes 4-2, 10-9
events recorded 9-3
heart rate alarm 4-6
leads 4-5
settings 10-9, 10-10,
10-13
signal quality 4-8
size 4-7
specifications 13-4
synchronized
cardioversion 7-1
troubleshooting 4-7
Electrode pads. See Pads
Electrodes
applying 4-2
checking 11-2
cleaning 11-13
ordering 11-18
placing 3-5, 4-3
settings 10-9
Electromagnetic
compatibility (EMC)
16
Environmental
specifications 13-9
safety precautions 14,
15
Erratic spiking 1-5
European 10-11
European Protocol 10-11
Event Summary 9-1
events recorded 9-3
information included
9-6
interruption of power
9-5
marking events 9-2
printing 9-6, 9-8
specifications 13-8
F
Failure message 8-7
H
Heart rate alarm
disabling 4-7
events recorded 9-3
interruption of power
9-5
pacing 8-2
settings 4-6
specifications 13-4
See also ECG
monitoring
xxxi
Index
Heartstream XL 1-2
assessment of 1-4
cleaning 11-11
configuring 10-6
controls 2-2
operational checks 112, 11-3
safety precautions 14
specifications 13-2,
13-8
symbols 13-10
training materials 1-8
training required 1-4
troubleshooting 12-7
HR alarm. See Heart rate
alarm
Hypothermia
pacing 1-7
SpO2 monitoring 5-1
I
Incident number. See
Event Summary
Incident Timer 2-6
Incompatible Data Card
message 12-6
Indications for use
AED mode 1-5
Manual Mode 1-6
pacing 1-7
SpO2 monitoring 1-7
INOP Alerts 7
xxxii
K
Key Inactive message 318, 8-7, 12-6
L
Leads
formation 4-3
Lead Select setting
10-10
selecting 4-5, 7-1, 8-3
troubleshooting 4-7,
8-7, 12-2
Leads Off message 4-7, 87, 12-2
Loading
printer paper 11-9
settings from Data
Card 10-15
Low Battery message 122
M
Maintenance
batteries 11-7
cleaning 11-11
operational checks 112
supplies and
accessories 11-17
Manual Mode 6-1
controls 2-2, 2-4
current charge 6-4
defibrillation process
6-4
delivering shock 6-5
display 2-5, 2-8
ECG monitoring 4-1
enabling 2-5, 6-2
energy setting 6-4
Events Summary 9-2
indications for use 1-6
overview 1-2
preparation 6-3
returning to AED
Mode 6-6
settings 10-9
specifications 13-2
SpO2 monitoring 5-1
training required 1-4
Marking events 9-2
See also Event
Summary
Messages
defined 2-7
list of 12-2
Momentary messages 2-7
list of 12-5
Monitoring. See ECG
monitoring
Index
Monitoring electrodes.
See Electrodes
Monitoring Rhythm. See
Rhythm Monitoring
Multifunction defib
electrode pads. See
Pads
N
Nellcor sensors 5-3
No Data Card Present
message 12-6
No Pads message 12-3
No Shock Advised Timer
3-17, 10-11
No Shock Delivered
message 3-18, 12-5
Non Pulsatile message 510, 12-4
Noninvasive
transcutaneous
pacing. See Pacing
O
Operational checks 11-2
Output Low message 8-7
Oxygen saturation. See
SpO2 monitoring
P
Pace Pulse Markers 10-9
Pacemakers
AED therapy 1-5
heart rate alarm 4-6
Pacing 8-1
defibrillation 8-6
defined 1-6, 8-1
demand v. fixed mode
8-2, 8-4, 8-6
ECG monitoring 8-2
events recorded 9-4
function buttons 2-5
indications for use 1-7
messages 12-3
preparation 8-3
procedure 8-4
selecting leads 8-3, 87
specifications 13-7
system messages 8-7
troubleshooting 8-5,
8-7, 12-6
Pads
applying 3-6, 13, 14
cleaning 11-13
ECG monitoring 4-1,
4-7
events recorded 9-3
safety precautions 13
troubleshooting 3-18,
12-3, 12-5
Pads Cable Off message
3-18, 12-3
Pads cables
cleaning 11-13
connecting 10-2
ordering 11-18
See also Cables
Pads Off message 3-18, 47, 12-3
Paper. See Printer paper
Patient information. See
Data Card
Pausing
AED Mode 3-12, 3-15
settings 10-11
Pediatric care 1-5
Post 10-11
Post Shock CPR Timer 317, 10-11
Power supply
checking 11-5
events recorded 9-3
interruption of power
9-5
overview 2-9
specifications 13-2
troubleshooting 12-7
See also Batteries
xxxiii
Index
Precautions 13
asystole 1-6
batteries 11-8
defibrillation current
(shock) 3-10
ECG analysis 3-9
electrodes 4-2
electromagnetic
compatibility 16
heart rate alarms 4-6,
8-2
pacemakers 1-5, 4-6
rhythm monitoring 314
safety symbols 10
sensors 5-5, 5-9
SpO2 alarm 5-8
SpO2 monitoring 5-1
Print strip
contents 5
controls 2-2
events recorded 9-4
settings 10-8
See also Event
Summary
Printer
checking 11-5
cleaning printhead 1112
specifications 13-5
xxxiv
Printer paper
loading 11-9
ordering 11-17
specifications 13-9
troubleshooting 12-5
Printing
controls 2-3
Event Summary 9-6
events automatically
9-8
settings 10-15
Pulse, checking 3-12, 510
Pulse oximetry
defined 1-7, 5-1
described 5-2
specifications 13-7
See also SpO2
monitoring
Q
QRS beeper 4-6
adjusting 2-2
settings 10-9
troubleshooting 4-8
R
Radio frequency (RF)
interference 16
Re-analysis 3-4, 3-11
Recording events. See
Event Summary
RF interference 16
Rhythm Monitoring 3-4,
3-14
AED Mode 3-8
configuring 3-14, 1010
events recorded 9-3
S
Safety precautions. See
Precautions
Saving settings to Data
Card 10-15
Semi-Automatic External
Defibrillation. See
AED Mode
Sensors 5-3
applying 5-5
caring for 5-9
cleaning 11-13
ordering 11-18
selecting 5-3
troubleshooting 5-11,
12-4
Service 12-8
Settings. See
Configuration
Shipping carton symbols
12
Index
Shock
AED Mode 3-9
events recorded 9-3
settings 10-10
troubleshooting 3-18,
12-5
Shock Series Timer 10-10
Softkeys 2-3
See also Controls
Specifications
AED Mode 13-3
batteries 13-6
defibrillator 13-2
display 13-5
ECG monitoring 13-4
environmental 13-9
Event Summary 13-8
Heartstream XL 13-8
Manual Mode 13-2
pacing 13-7
power supply 13-2
printer 13-5
SpO2 monitoring 13-7
SpO2 alarm 5-8
specifications 13-7
SpO2 cable
cleaning 11-13
connecting 10-4
ordering 11-18
SpO2 Cable Off message
5-11
SpO2 Light Interf
message 5-11
SpO2 Low Signal
message 5-10
SpO2 monitoring 5-1
cable connection 5-6
controls 2-3
defined 1-7, 5-1
discontinuing 5-9
events recorded 9-4
inaccuracies 1-7
indications for use 1-7
noisy signal 5-10
procedure 5-7
process 5-2
sensors, applying 5-5
sensors, caring for 5-9,
11-13
settings 10-10
specifications 13-7
troubleshooting 5-10,
12-4
SpO2 Noisy Signal
message 5-10
SpO2 Sensor Fail
message 5-11
Stop message 8-7
Stop Pacer message 12-6
Strip. See Print strip
Supplies
checking 11-4
ordering 11-17
Symbols, list of 10
Sync After Shock setting
10-12
Sync control 2-5
Synchronized
cardioversion 7-1
delivering shock 7-2
disabling Sync Mode
7-4
enabling 2-5
indications for use 1-6
preparation 7-2
selecting leads 7-1
synchronizer
specifications 132
System Failure Service
Unit message 12-3
System messages 2-7
list of 12-2
System tests. See
Maintenance
T
Telephone assistance 12-8
Test load, ordering 11-19
Thermal Array Printer.
See Printer
Time 10-8, 12-7
xxxv
Index
Training materials 1-8
Training required 1-4, 13
Troubleshooting 12-1
AED Mode 3-18
Data Card 12-6
display 12-7
ECG monitoring 4-7
pacing 8-5, 8-7, 12-3,
12-6
SpO2 monitoring 510, 12-4
time and date 12-7
U
User messages 2-7
V
Ventricular fibrillation
manual defibrillation
1-6
pacing 1-7
Ventricular tachycardia 16
W
Warnings. See
Precautions
Web site 12-8
xxxvi
&RS\ULJKW
(GLWLRQ
$JLOHQW7HFKQRORJLHV,QF
0
3ULQWHGLQWKH86$6HSWHPEHU