1
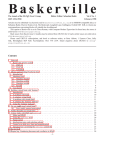
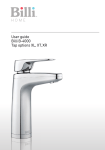
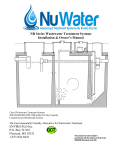
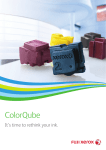
Crew Cut
Model VSM7565A
Crew CuT
The VS For Men Crew Cut is a revolution in home hair cutting. The Super
Crew Cut has an enhanced lithium ion power system for advanced cutting
performance and precision engineered hardened Japanese steel blades
with a unique super sharp cutting angle for smooth, effortless cutting. The
clipper’s unique rotary blades mean that it can be used in any direction
over the head to maintain an all over even cut for grades 1-4.
FEATURES
•M
ains or cordless operation.
•P
recision engineered hardened Japanese steel blades with a unique super
sharp cutting angle for smooth, effortless cutting.
• L ithium-ion technology gives sustained power performance for reliable
cordless use, even at lower charge levels.
•E
rgonomic design – it fits into the palm of your hand.
• Adjustable lock-in length comb guides for cutting grades 1-4
• Includes separate battery operated trimmer for ears, neckline and
sideburns with a 5-position comb guide for cutting lengths 3mm, 6mm,
9mm, 12mm, 15mm.
• Barber’s comb.
• Cleaning brush.
• Scissors.
• Storage pouch.
• Oil.
• 3 Year guarantee.
SAFETY CAUTIONS
WARNING! Polythene bags over the product or packaging may be
dangerous. To avoid danger of suffocation, keep away from babies and
children. These bags are not toys.
•T
his appliance should only be used as described within this instruction
book. Please retain for reference.
•D
o not immerse the appliance in water or other liquids.
•A
lways inspect the appliance before use for noticeable signs of damage.
Do not use if damaged or if the appliance has been dropped.
•O
nly use the attachments supplied with this appliance.
•D
o not leave the appliance unattended when switched on.
•D
o not place the appliance on any surface whilst in operation.
• S pecial care is required when using the appliance close to the ears, eyes
and face.
•T
his appliance should not be used by adults whose reduced physical, sensory
or mental capabilities, or whose lack of experience and knowledge, might
cause a hazard, unless they have been correctly instructed to understand
the safe use and hazards involved and are adequately supervised.
•C
areful adult supervision is required when this appliance is used on or
near children. Do not use on very young children.
•T
his appliance should not be used, cleaned or maintained by children.
Keep out of reach of children.
•A
lways ensure that this appliance is kept out of the reach of children at
all times, particularly during use and whilst cooling.
• Allow the appliance to cool before storing away.
•T
his appliance complies with the requirements of Directives 2004/108/
EC (Electromagnetic Compatibility) and 2006/95/EC (Electrical Safety of
Domestic Appliances).
•T
he battery should be removed for safe disposal at the end of its life.
•W
hen the battery has run down, it should be disposed of at a recycling
centre to safeguard the environment. If the battery leaks, avoid touching
it and dispose of it at a recycling centre.
The clipper is perfect for maintaining a short all over even length. It has
been designed with a unique rotary cutting system and circular comb guides
to give a guaranteed even finish. Because of this revolutionary technology
the cutting technique differs somewhat to that of a normal clipper, in fact
this cutting technique is much simpler!
The Crew Cut clipper is designed for cutting grades 1-4 to an all over
even length. It is not however, suitable for layering or grading. There is
one adjustable comb guide is for grades 1-4. To tidy up your neckline and
sideburns just use the trimmer provided.
Hair longer than grade 4 will need to be precut before using the crew cut.
INSTRUCTIONS FOR USE - CLIPPER
Charging Instructions
IMPORTANT! Super Crew Cut is so easy to use, but before you do anything
you must take your time to charge the unit for 3 hours before its first use.
Even if you want to use it plugged in straight from the mains, this initial
super-charge ensures optimum power performance to give smooth fast
cutting every time.
Only use the adaptor supplied with this appliance. Using other adaptors
may cause a hazard.
• Before using for the first time, the appliance should be fully charged
continuously for 3 hours. Maximum battery capacity will only be reached
after 3 charging and discharging cycles.
• Ensure the appliance is switched off.
• Insert the small plug on the charging adaptor into the socket on the side
of the appliance.
• Plug the charging unit into a suitable mains socket.
• The red charging indicator light on the power handle will illuminate
when the appliance is correctly connected to the mains. When it is fully
charged, indicator light will remain on.
• A full charge will supply enough power for approximately 60 minutes of
cordless use.
• A quick charge of 30 minutes will give 15 minutes use
Oiling Instructions
IMPORTANT! It is highly recommended before each use to oil the circular
blades with the oil provided. This ensures optimum cutting performance.
For the first use you will need to use the oil supplied with the product,
unscrew the cap and cut off the very end of the plastic tube with a pair of
scissors to release the oil.
To oil the blades ensure the unit is switched on. Gently
squeeze the oil tube and apply 5 drops of oil around
the circular blades. Leave the unit on for a further few
seconds to allow the oil to thoroughly spread around
the entire circumference of the blades. Switch off the
unit and remove any excess oil by gently dabbing with
a cloth.
Preserving the batteries
• In order to maintain the optimum capacity of the rechargeable batteries,
the appliance has to be fully discharged and then recharged for 3 hours
every 6 months approximately.
Comb Guides
This appliance is supplied with 1 adjustable comb guides that provide 4
cutting lengths from grades 1-4.
Cutting Length Grade
3mm #1
6mm #2
9.5mm #3
12mm #4
Attaching a comb guide
To attach the comb guide, make sure the appliance is switched off. Hold
the clipper with the blades facing upwards and place the comb guide over
the top of the clipper with the teeth of the comb facing upwards.
Release the comb guide locking mechanism, located on the side of the
appliance, by sliding it away from the comb guide. Line up position
A on the comb guide (fig.1) with position B on the clipper (fig.2) then
gently rotate the comb guide in a clockwise direction until it clicks into
place. Make sure that the locking mechanism is in the locked position and
the comb guide is securely in place before using the clipper.
A
B
Fig. 1
Fig. 2
Fig. 3
Changing the comb guide length setting
The comb guides will be marked with its grade settings (fig.4). In order to
change the grade setting release the comb guide locking mechanism found
on the side of the clipper (fig.5) and rotate the comb guide either clockwise
or anti-clockwise as appropriate (fig.6). Line up the grade setting you want
with the ‘I’ mark on the clipper. Make sure that the locking mechanism is
in the locked position and the comb guide is securely in place before using
the clipper.
Fig. 4
Fig. 5
Fig. 6
Removing a comb guide
To remove the comb guide unclip the guide-locking mechanism found
on the side of the clipper and rotate the comb guide in an anti-clockwise
direction until it is completely free of the clipper.
Preparation for Use
• Always inspect the appliance for noticeable signs of damage.
• Always inspect the appliance before use to ensure the clipper blades are
free from hair, debris etc. (see Cleaning & Maintenance of clipper).
• Ensure the appliance is well oiled (see Oiling Instructions).
• Ensure the appliance is sufficiently charged or plugged into the mains.
• For best performance use on clean, dry hair that has been combed until
tangle-free.
• If hair is long, use the scissors and comb provided to cut the hair prior to
using the clipper.
• Prior to use always inspect the head for warts, moles, spots and broken
skin. If using the clipper on yourself either use mirrors or ask another
person to check for you. Special care should be taken when cutting hair
in areas that have warts, moles, spots or broken skin, to prevent injury.
• Remove any head jewellery such as earrings and necklaces before use.
NOTE: The appliance should not be used for longer than 20 minutes when
operated from the mains.
WARNINGS:
The clipper is for use only on the head. Never use the clipper on the face or
any other area of the body.
IMPORTANT: Do not attempt to trim hair close to your ears with the clipper.
Never allow ears to enter the ring of the clipper blade.
A separate trimmer has been provided to trim around the ears, the neckline
and sideburns.
CLIPPING
• Attach the comb guide and select the cutting lengths e.g .1=3mm,
2=6mm, 3=9.5mm and 4=12mm.
• Switch on the clipper using the on/off sliding switch located on top of
the clipper and the blades will start to move and the green LED will
illuminate.
• Begin cutting on the top of your head. Slowly and gently steer the clipper
around the scalp, taking care on areas where there may be warts, moles,
spots and broken skin and keep away from the ears. For best results use
in a sweeping motion:
• The clipper can be moved in any direction to cut your hair, for best results
we advise you start cutting the back of the head and with a sweeping
motion run from the back to the front of your head concentrating on one
area until you reach the desired length.
• Once you have completed this over your whole head you should then
finish using circular motions as this ensures you achieve a perfect even
finish.
• Only apply gentle pressure. Never force the clipper – if resistance is
experienced lift clipper away from the head, empty hair from the clipper
and resume clipping.
• If using on areas where there are folds of skin, ensure the skin is stretched
taught prior to cutting hair in this area.
• If you experience any discomfort stop using immediately.
• Note: Hair will collect in the area inside the blade ring. This may need to
be emptied before all the hair has been cut. Switch the clipper off and
remove any hair by simply tapping gently on the top of the clipper.
• If you require a grade 0 cut, the clipper can be used without a comb guide
attached.
Please Note: When you first begin cutting your hair you may notice that
some hair is being cut and other hairs are left long.
This is perfectly normal, especially if you are cutting longer hair.
This is because hair grows in different directions and the Super Crew Cut
clipper is designed to be used in all directions against the hair growth. So
continue cutting in a back and forth sweeping motion until all hair is cut
to length, then the use of circular motions over the whole head will ensure
an even finish.
CLEANING & MAINTENANCE OF CLIPPER
To maintain optimum performance, the appliance should be cleaned after
each use:
• Remove the comb guide after use. Rinse the comb guide under running
water and dry thoroughly before storage or use.
• Never place the clipper under running water.
• After each use ensure hair is emptied from the blade area and use the
cleaning brush to clean thoroughly.
• It is highly recommended to apply a small amount of oil (provided) to the
blades before each use.
• Wipe the outside with a damp cloth and dry thoroughly before use or
storage.
INSTRUCTIONS FOR USE - TRIMMER
•T
he battery compartment cover is located on the underside of the
trimmer.
• Push the tab downwards and slide it open, then remove the cover.
• Insert 2xAA batteries as indicated in the battery compartment.
•R
eplace the battery cover by placing it over the compartment and slide
up until it clicks shut.
• If the appliance remains unused for a while or if the batteries have run
down, remove them from the appliance. This will increase the life of the
product.
•W
hen the batteries have run down, they should be disposed of at a
recycling centre to safeguard the environment. If the batteries leak avoid
touching them and dispose of them at a recycling centre.
Preparation for Use
•A
lways inspect the appliance before use for noticeable signs of damage.
Do not use if damaged.
•E
nsure the heads are free from hair and debris and that the blades are
properly oiled (refer to Cleaning & Maintenance of Trimmer section for
further information).
•U
se on clean, dry hair that is tangle-free.
Trimming
To trim hair
• Ensure the appliance is switched off.
•A
ttach the 5-position comb guide as required. This provides the following
cutting lengths (3, 6, 9, 12, 15mm).
• S lide the comb guide onto the front of the Precision Trimmer head until
the guide can be pushed no further.
•T
he 5-position comb guide will be set to the shortest of the five cutting
lengths.
•T
o adjust the cutting length, push and click the guide forward to the
required position as marked on the side of the comb guide i.e 1=3mm,
2=6mm, 3=9mm.
•T
o remove the comb guide, push the guide forward and off the precision
trimmer head.
•H
old the trimmer with the teeth of the trimmer pointing upwards, yet
flat against the skin.
•M
ove through the hair, against the direction of hair growth, using only
light pressure.
•T
he trimmer will work most efficiently when cutting through hair at its
own speed. Never force the trimmer.
• Never switch the appliance off whilst in the hair.
To outline
• Do not attach a comb guide.
• Hold the trimmer upside down, gently flat against the skin.
• Move the trimmer in a downward direction.
•H
aving defined the outline, hold the trimmer with the teeth pointing
upwards, yet flat against the skin and move the trimmer upwards against
the direction of hair growth. This will trim the unwanted hair adjacent
to the outline.
CLEANING & MAINTENANCE OF TRIMMER
To maintain optimum performance, the trimmer should be cleaned after
each use.
• Remove comb guide after use.
• Use the cleaning brush to remove any hair from the guide.
• The guide may be rinsed under running water, but must be completely
dry before storage or use.
• Do not place the trimmer itself under running water.
Trimmer Head:
• Ensure the appliance is switched off.
• To remove the trimmer head, hold the handle of the appliance with one
hand, with the blades facing upwards and carefully push the head away
from the trimmer handle.
• Use the cleaning brush to remove any hair from the trimmer head and
blades.
• Once the head has been removed from the trimmer handle only the head
can be rinsed under the tap using tepid water, but must be completely
dry before storage or use.
• Use the cleaning brush to remove any hair from the trimmer head and
blades.
• After cleaning, switch on and oil blades using a few drops of the
lubricating oil supplied. Only use the lubricating oil supplied with the
appliance as this is specifically formulated for high speed trimmers and
does not evaporate or slow the blades. Wipe off any excess oil.
BATTERY DISPOSAL
The appliance contains Li-ion battery. To protect the environment, the
appliance must be disposed of safely at the end of its useful life. Please
take the appliance to a recycling centre, where the internal rechargeable
battery should be removed by a professional and recycled separately.
Li-ion
For more information about the recycling of electrical and battery operated
appliances, please contact your local council office or your household waste
disposal service.
LIMITED THREE YEAR WARRANTY
This product is subject to the express warranty given on the warranty card
included with the product, as may be amended by reference to and in
accordance with the terms of the warranty cards displayed on VS For Men
website www.vsformen.com.au
Please retain a copy of your purchase receipt as proof of purchase within
the warranty period.
Vidal Sassoon and related logos are trademarks of
The Procter & Gamble Company used under licence
by Conair
®
©2014
Conair Australia Pty. Ltd.
Suite 101, 18 Rodborough Rd
Frenchs Forest NSW, 2086
Australia
Customer Service Hotline (Australia): 1800 650 263
Customer Service e-mail: [email protected]
Conair New Zealand Limited, PO BOX 251159,
Pakuranga, Auckland
1706 New Zealand
Customer Service Hotline (New Zealand): 0800 266 247