1
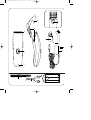
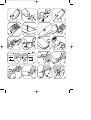
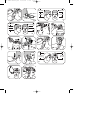
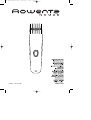
NOT TOND 030052.QXD
31/03/04
030052 - 17/03 HC080
17:09
Page 1
NOT TOND 030052.QXD
31/03/04
17:09
Page 2
B
C
D
E
I
H
G
A
F
L
J
K
NOT TOND 030052.QXD
31/03/04
17:09
Page 3
1
2
3
4
5
6
7
8
9
10
11
12
3
21 mm
21 mm
6/9 mm
6/9 mm
3 mm
3 mm
13
16
17
14
15
18
19
NOT TOND 030052.QXD
31/03/04
17:09
Page 4
9/12 mm
9/12 mm
3 mm
3 mm
21
20
doigts/fingers
22
doigts/fingers
A
A
9/12/21 mm
9/12/21 mm
3/6 mm
3 mm
24
23
26
26
27
A
3 ou/of
21 mm
29
32
30
33
31
25
28
A
3 ou/of
21 mm
NOT TOND 030052.QXD
31/03/04
17:09
Page 11
You have chosen this clipper with a view to cutting and tidying hair easily and conveniently.
The quality of the product and its precisely adjusted cutting lengths make it a professional-grade tool.
Please read the instructions before using the appliance, to avoid any risk arising from improper use.
GB
1. DESCRIPTION OF THE CLIPPER AND ITS ACCESSORIES
A. On/off button
B. Adjustable comb attachment
C. Cutting-length adjustment button
D. Cutting-length indicator (3-6-9-12-15-18-21).
E. Cutting head
F. Power "on" indicator
G. Adapter
H. Cleaning brush
I. Lubricating oil
J. Barber's comb (with certain models only)
K. Pair of scissors (with certain models only)
L. Storage pouch (with certain models only) + Instruction booklet.
2. PREPARING FOR USE
Voltage:
• Your appliance has been designed to use 220-240V only.
• Check that this voltage matches the voltage of your electricity supply.
You have chosen a rechargeable appliance, designed for use with mains power or in autonomous
(cordless) mode.
A. Mains operation:
• Switch the On/Off button to 0 (Fig. 2)
• Plug the connector into the appliance (Fig. 3) and the adapter into the mains socket (Fig. 4)
• Turn the appliance on (Fig. 5)
■ During use, the appliance does not recharge.
B. Cordless operation:
The appliance functions with its accumulators.
• Before using it for the first time, charge the appliance with the adapter for 14 hours. The next 3 times
you use your clipper, it is important to let it discharge completely.
The recommended charging time is 8 hours. When the charging indicator is red, your appliance is
charging.
• Once the transformer has been unplugged, the appliance is ready for 40 minutes of cordless operation.
IMPORTANT:
1) To optimise the cutting power of your blades,
it is essential to oil them before each use. See paragraph 7.
2) To avoid damaging the accumulators:
• Never charge them for longer than 20 hours at a time.
• Only charge the accumulators when there is a noticeable drop in the appliance's performance, or if the
appliance has not been used for over 6 months.
3. SAFETY PRECAUTIONS
• Unplug the appliance before removing the comb attachment, lubricating the blades, etc. and after
use.
• Any error when connecting the appliance can cause irreparable harm, not covered by the guarantee.
• Do not use or recharge the clipper near baths, basins, showers or other recipients containing
water.
• Your appliance is designed for use in the home only. Do not use the clipper for more than
10 minutes without a pause.
• Important: the clipper and the adapter must not be immersed or held under running water.
• Do not leave the appliance for long periods at temperatures below 0°C or above 40°C (behind glass in
full sunlight, for example).
• Do not expose the appliance to direct sunlight for long periods.
• Do not use an extension lead in your bathroom.
• Keep the cord, appliance and accessories away from any source of heat.
NOT TOND 030052.QXD
31/03/04
17:09
Page 12
• Never use the appliance if it is not working correctly, or if it has fallen (invisible damage to the
appliance could put your safety at risk).
• When you are using the clipper, keep it well away from eyelashes, clothes and any other object, to
avoid any risk of injury or blockage.
• If the clipper is used by several people, the cutting head should be cleaned appropriately.
• Close supervision is necessary when the appliance is used on or in the presence of children or disabled
people.
• Never leave the clipper within the reach of children.
• Be careful when you are using the clipper for the first time. Take your time. Use slow, controlled gestures.
• Do not use the clipper on animals.
• Do not use the appliance:
- on injured skin.
- if you have dermatological problems: eczema, varicose veins, skin inflammations, moles, acne, warts,
birth marks, etc.
• Special tools are required to dismantle this appliance. Any maintenance work must be carried out by the
manufacturer, its after-sales service or a person with similar qualifications, to avoid all danger.
• Cutting and styling advice is offered purely as a guide, and Rowenta can not be held responsible in the
event that the results obtained do not fulfil the user's expectations.
• For any malfunctions, see "Troubleshooting", or contact our Customer Helpdesk or your dealer.
GB
4. 7-SETTING ADJUSTABLE COMB ATTACHMENT
• Your clipper is fitted with a comb attachment that allows you to choose the cutting length.
• To select one of the settings: push the comb to align it with the desired setting (Fig. 6).
• The cutting length (in mm) is shown on the sides of the clipper (Fig. 7) (3,6,9,12,15,18 or 21 mm).
These values are purely indicative; the actual cutting length may vary according to the angle at which
the clipper is held.
5. USING THE CLIPPER WITHOUT THE COMB ATTACHMENT
• For shaved-head cuts or outlining, you can remove the comb attachment by sliding it off as shown in
fig. 8.
6. CLEANING
• The clipper requires very little cleaning. You can clean it with a slightly damp cloth. To clean the adjustable comb attachment, remove it as shown in fig. 8 and use the cleaning brush to remove any hair
(Fig. 9).
• After each use, the cutting blades should be cleaned with the cleaning brush (Fig. 10).
7. LUBRICATION
• To maintain the performance of your clipper, it is essential to oil the cutting blades before each use
with the lubricating oil provided, or failing this, with a sewing-machine oil.
• Before lubricating the appliance, unplug it and use the cleaning brush to remove any hair caught in
the cutting blades (Fig. 10).
• Lubricate the blades at the positions indicated (Fig. 11): a single drop at each position is sufficient.
• Operate the clipper for a few seconds.
• Wipe off any excess oil with a cloth.
8. ENVIRONMENTAL PROTECTION
At the end of your product's useful life, please take it to a waste-collection centre for
recycling.
9. TROUBLESHOOTING
• The clipper doesn't cut any more: Have you lubricated the blades? (see paragraph 7)
• The clipper won't start (in cordless operation) or no longer has sufficient autonomy:
Have you recharged it?
NOT TOND 030052.QXD
31/03/04
17:09
Page 13
10. A FEW TIPS ON CLIPPING
GB
• Use the clipper on hair that is clean and dry.
• Dry your hair in the style you are aiming to achieve.
• Check that the clipper is correctly lubricated.
• Position the person whose hair you are going to cut in such a way that you can easily see the top of
their head (Fig. 12).
• Place a towel around their neck and on their shoulders.
• Before clipping, use a comb to make sure that the hair is not tangled.
• Before you start clipping, take note of:
- the way the hair grows and any tufts,
- the hollows and bumps on the head, often situated at the base of the neck (if you apply the clipper
directly onto a bump, it will leave a clear patch).
• Make sure the clipper always stays at an angle to the head.
• To start with, cut only a small amount of hair at a time, until you are familiar with the length left by
the comb's different settings.
• To obtain an even cut, never force the clipper to move too quickly through the hair by pushing it.
• Never stop moving the clipper in the middle of the hair.
• Start by using the comb's maximum setting (i.e. the one that leaves the greatest length of hair)
before trying the others.
Key:
= easy,
= requires some experience of clipping,
= difficult.
11. TECHNIQUE FOR A CREW CUT
BASIC TECHNIQUE
With this technique, the cut follows the shape of the head.
• Adjust the cutting setting in function of the desired hair length (Fig. 13).
• Don't forget to adjust the comb's setting at the different stages of the cut.
1st STAGE: THE CUT
a) The neck.
• Comb the hair.
• Start by clipping the hair on the neck from the base up,
using the 21 mm setting.
• Hold the clipper firmly against the hair, with the teeth of the comb pointed slightly upwards (Fig. 14).
• Slowly move the clipper up and away from the hair, cutting only a small amount of hair at a time.
• When the hair on the neck is evenly cut to 21 mm, change the setting to the desired length and
repeat the first 3 steps (Fig. 15).
• Stop clipping at regular intervals, comb the hair and check the result obtained..
b) Sides and top
• Repeat the procedure to clip the sides.
• Change the comb settings as you clip different zones (see Fig. 13).
• For the top, use the same technique, working from the forehead to the crown of the head and
moving against the direction of hair growth (Fig. 16). Then, even up the top and sides.
2nd STAGE: OUTLINING
a) The neck and the sideburns.
• Comb the hair.
• Remove the comb attachment.
• Trim around the hairline, holding the clipper upside-down and perpendicular to the head, and moving
downwards. Use short strokes (Fig. 17 and 18).
• Repeat the procedure for the sideburns (Fig. 19).
NOT TOND 030052.QXD
31/03/04
17:09
Page 14
b) Around the ears
• Carefully comb the hair around the ear. Remove the comb attachment.
• Hold the clipper at an angle but use only one corner of the cutting unit, slowly shaping
the desired outline and following the direction of the cut (Fig. 20).
GB
Advice:
• When you use the clipper without the comb attachment, keep your movements light and steady.
• When outlining, keep the clipper perpendicular to the skin to avoid injury (Fig. 21).
12. TECHNIQUE FOR AN AMERICAN-STYLE CUT
Very very short sides and neck, and very short on top.
• Adjust the cutting setting in function of the desired hair length (Fig. 22).
• Don't forget to adjust the comb's setting at the different stages of the cut.
1st STAGE: THE CUT
• To cut the hair on the sides and neck, see the "Crew cut" section. To finish the
cut, use the 3 mm setting to shave the head.
• For the zone on top of the head
(see Fig. 22), use the 9 or 12 mm settings to keep a greater length. Cut the hair
from the front towards the back.
2nd STAGE: OUTLINING
• See the paragraph on "Outlining" in the "Crew cut" section.
13. TECHNIQUE FOR CUTTING OVER A STYLING COMB OR FINGERS
(flat-top cut)
This cut gives a flat surface on the top of the head.
• Adjust the cutting setting in function of the desired hair length (Fig. 23).
• Don't forget to adjust the comb's setting at the different stages of the cut.
1st STAGE: THE CUT
• For this type of cut, the preliminary hair-drying is very important (Fig. 24).
• When drying your hair, work against the way the hair grows so that the hair
stands upright.
• Start cutting on the sides and the neck, using the cutting lengths indicated in
fig. 23. (For the cutting technique, see the "Crew cut" section.)
• To obtain perfectly flat hair on the top, use a barber's comb or your fingers (Fig. 25 and 26):
- remove the comb attachment,
- using a barber's comb (or your fingers), lift a small section of hair (the hair should be held vertical),
- move the comb or your fingers along the hair to the desired length,
- use the clipper to cut the hair above the comb or your fingers, using the latter as a guide,
- the length of the last section of hair cut will guide you in cutting the rest of the hair,
- continue the procedure, section by section, working from the crown of the head towards the front.
- comb regularly to remove cut hair and check the result,
- to obtain a perfect transition between the zone on the top of the head and the sides (shown at A on Fig.
23), tilt the comb slightly and cut the hair that sticks out (Fig. 27).
2nd STAGE: OUTLINING
• See the paragraph on "Outlining" in the "Crew cut" section
14. TECHNIQUE FOR TRIMMING AND TIDYING UP
This is how to trim a haircut that is starting to get untidy, particularly on the neckline, the sideburns
and around the ears.
THE CUT
For this technique, use the clipper without the comb attachment.
NOT TOND 030052.QXD
31/03/04
17:09
Page 15
a) Around the ears (Fig. 28 and 29).
Comb the hair into the desired style.
Place the upside-down clipper between the sideburns and the ear,
making sure that the corner of the blade is on the hairline (use only the edge
of the clipper). Move the clipper slowly above, around and behind the ears.
b) The neckline (Fig. 30)
• For the neckline, hold the upside-down clipper lightly against the hair.
• Operate as shown on the drawing, with small, downward strokes.
c) The sideburns (Fig. 31).
Hold the clipper upside-down, with the cutting edge perpendicular to the head,
and work downwards. Use small strokes.
GB
15. TECHNIQUE FOR A "SHORT BACK AND SIDES"
With this technique, you clip only the sides and neck, and keep the hair long on top.
• The cutting settings to use: 3 to 21 mm, in function of the desired length (Fig. 32).
1st STAGE: THE CUT
• Clip the hair on the neck and the sides (using the technique described in the
"Crew cut" section) up to the point A (Fig. 32), using the clipper fitted with the
adjustable comb
attachment (3 to 21 mm in function of the desired length).
• Above the point A (situated a few cm above the ears), use a barber's comb
to obtain a perfectly tidy transition. Hold the comb at an angle to the head
(Fig. 33) and cut any hair sticking out from the comb, using the clipper
without the adjustable comb attachment.
Use the barber's comb to guide the clipper (Fig. 34).
• Do not clip the hair on top of the head.
2nd STAGE: OUTLINING
• See the paragraph on "Outlining" in the "Crew cut" section.
WIRING INSTRUCTIONS - FOR U.K. ONLY.SAFETY NOTES FOR REWIREABLE OR MOULDED PLUG
GB
The mains lead of this appliance may be already fitted with a BS 1363 13 A plug. Should the fuse need to be replaced, a 13 A ASTA
approved BS 1362 fuse must be used.
If your socket outlet is not suitable for the plug, then the plug must be removed (cut off if it is a moulded on plug) and an appropriate
one fitted. Warning : dispose of a plug that has been cut from the power supply cord, as such a plug is hazardous if inserted in a live
13 A socket outlet elsewhere in the house.
Always replace the fuse cover after fitting a fuse. The plug must NOT be used if the cover is omitted or lost until a replacement is
obtained - make certain that only the correct fuse cover is used and fitted.
For plugs with a detachable fuse cover the replacement must be the same as the colour insert in the base of the plug, or as directly
by the embossed wording on the base of the plug.
If the detachable fuse cover is lost, a replacement may be purchased from an approved Rowenta Service Centre (see enclosed
Service Information leaflet). Information for supply may also be obtained from the plug manufacturer.
U.K ONLY - FITTING A PLUG
Important : the wires in this lead are coloured in accordance with the following codes Blue, Neutral, Brown, live. Please read the
instructions given below before connecting the cord to a plug. If in doubt, please consult a qualified electrician. As the colours of
the wires in the mains lead of this appliance may not correspond with the coloured markings identifying the terminals in your plug,
proceed as follows :
• the wire which is coloured BLUE must be connected to the terminal which is marked with the letter " N " or
Brown
coloured BLACK.
or red L
Fit correct
• the wire which is coloured BROWN must be connected to the terminal which is marked with the letter " L " or
Blue or
fuse
N black
coloured RED.
Use cable
gripper
Neither core is to be connected to the earth terminal of a three-pin plug.
This appliance requires a 13 fuse ASTA approved to BS 1362.
SERVICE- SPARE PARTS. (U.K. ONLY)
Rowenta (U.K.) Ltd has a network of Service Agents throughout the country. To telephone your nearest Rowenta Service Centre see
enclosed Service Information leaflet. These Service Agents carry-out in-guarantee repairs (free of charge) and out of guarantee
repairs
(chargeable) on behalf of Rowenta. Should service be required, or the appliance appear faulty, consult your local Rowenta Service
Agent
in the first instance. If a product develops a fault during the guarantee period it is the responsibility of the consumer to supply to the
Service Agent proof of the date of purchase of the appliance (eg. Completed guarantee card and/or receipt showing the date of purchase).