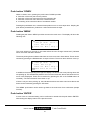
1
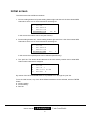
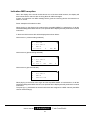
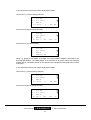
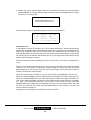
User’s Manual
JOHANNUS
Classic Sound Module CSM-128
Document information
Document Code
CSMV102US.wpd
Document Title
User’s Manual JOHANNUS Sound Module CSM-128
Issue date
Oct. 1999
Version
1.2
© Copyright 1999 JOHANNUS Orgelbouw b.v. The Netherlands.
All rights reserved. No part of this publication may be reproduced and/or published by print, microfilm, audiotape,
electronically, mechanically or any other means, or stored in an information retrieval system, without prior written
permission from JOHANNUS Orgelbouw.
The information in this document is subject to change without any notice and should not be considered a
commitment by Johannus Orgelbouw b.v. No responsibility is assumed for any error which may be appear in this
document.
User’s manual
JOHANNUS
Classic Sound Module
Introduction
Congratulations on your choice and the purchase of this JOHANNUS CLASSIC SOUND MODULE.
The sound module (CSM-128) enables you to add 48 extra instruments (organ stops, classical
instruments and effects) to your organ.
This User’s manual contains a lot of useful information. First we will connect the sound module and put
it into use. After that we will go through all the possibilities.
In a number of chapters we will enter at length into selecting instruments, MIDI channels and presets,
setting up the sound module, adjusting instruments, etc.
In the appendices you will find technical specifications as well as a MIDI implementation chart, a menu
survey and a list of instruments.
User’s manual
JOHANNUS
Classic Sound Module
Table of Contents
Set up . . . . . . . . . . . . . . . . . . . . . . . . . . . . . . . . . . . . . . . . . . . . . . . . . . . . . . . . . . . . . . . . . . . . . . .
Connections . . . . . . . . . . . . . . . . . . . . . . . . . . . . . . . . . . . . . . . . . . . . . . . . . . . . . . . . . . . .
Connecting the mains adapter . . . . . . . . . . . . . . . . . . . . . . . . . . . . . . . . . . . . . . . . . . . . . . .
Connecting the organ . . . . . . . . . . . . . . . . . . . . . . . . . . . . . . . . . . . . . . . . . . . . . . . . . . . . .
Switching on . . . . . . . . . . . . . . . . . . . . . . . . . . . . . . . . . . . . . . . . . . . . . . . . . . . . . . . . . . . .
1
1
1
2
3
Control functions . . . . . . . . . . . . . . . . . . . . . . . . . . . . . . . . . . . . . . . . . . . . . . . . . . . . . . . . . . . . . . .
Front panel . . . . . . . . . . . . . . . . . . . . . . . . . . . . . . . . . . . . . . . . . . . . . . . . . . . . . . . . . . . . .
On/off switch . . . . . . . . . . . . . . . . . . . . . . . . . . . . . . . . . . . . . . . . . . . . . . . . . . . . . . . . . . . .
Display . . . . . . . . . . . . . . . . . . . . . . . . . . . . . . . . . . . . . . . . . . . . . . . . . . . . . . . . . . . . . . . .
Push button ‘UP’ . . . . . . . . . . . . . . . . . . . . . . . . . . . . . . . . . . . . . . . . . . . . . . . . . . . . . . . . .
Push button ‘DOWN’ . . . . . . . . . . . . . . . . . . . . . . . . . . . . . . . . . . . . . . . . . . . . . . . . . . . . . .
Push button ‘MENU’ . . . . . . . . . . . . . . . . . . . . . . . . . . . . . . . . . . . . . . . . . . . . . . . . . . . . . .
Push button ‘ENTER’ . . . . . . . . . . . . . . . . . . . . . . . . . . . . . . . . . . . . . . . . . . . . . . . . . . . . .
4
4
5
5
5
6
6
6
Initial screen . . . . . . . . . . . . . . . . . . . . . . . . . . . . . . . . . . . . . . . . . . . . . . . . . . . . . . . . . . . . . . . . . . 7
Indication MIDI reception . . . . . . . . . . . . . . . . . . . . . . . . . . . . . . . . . . . . . . . . . . . . . . . . . . 8
Memory . . . . . . . . . . . . . . . . . . . . . . . . . . . . . . . . . . . . . . . . . . . . . . . . . . . . . . . . . . . . . . . . . . . . . 11
Settings . . . . . . . . . . . . . . . . . . . . . . . . . . . . . . . . . . . . . . . . . . . . . . . . . . . . . . . . . . . . . . . . . . . . .
Volume . . . . . . . . . . . . . . . . . . . . . . . . . . . . . . . . . . . . . . . . . . . . . . . . . . . . . . . . . . . . . . .
Change instrument . . . . . . . . . . . . . . . . . . . . . . . . . . . . . . . . . . . . . . . . . . . . . . . . . . . . . .
MIDI channel select/change . . . . . . . . . . . . . . . . . . . . . . . . . . . . . . . . . . . . . . . . . . . . . . .
Tremulant off/on . . . . . . . . . . . . . . . . . . . . . . . . . . . . . . . . . . . . . . . . . . . . . . . . . . . . . . . .
Mute off/on/solo . . . . . . . . . . . . . . . . . . . . . . . . . . . . . . . . . . . . . . . . . . . . . . . . . . . . . . . .
Receiving MIDI messages . . . . . . . . . . . . . . . . . . . . . . . . . . . . . . . . . . . . . . . . . . . . . . . .
Instrument Changes . . . . . . . . . . . . . . . . . . . . . . . . . . . . . . . . . . . . . . . . . . . . . . .
Preset Changes . . . . . . . . . . . . . . . . . . . . . . . . . . . . . . . . . . . . . . . . . . . . . . . . . .
General Volume . . . . . . . . . . . . . . . . . . . . . . . . . . . . . . . . . . . . . . . . . . . . . . . . . .
Expression Pedal . . . . . . . . . . . . . . . . . . . . . . . . . . . . . . . . . . . . . . . . . . . . . . . . .
Advanced settings . . . . . . . . . . . . . . . . . . . . . . . . . . . . . . . . . . . . . . . . . . . . . . . . . . . . . . .
Factory settings . . . . . . . . . . . . . . . . . . . . . . . . . . . . . . . . . . . . . . . . . . . . . . . . . .
Instrument Volume . . . . . . . . . . . . . . . . . . . . . . . . . . . . . . . . . . . . . . . . . . . . . . . .
Instrument Bass . . . . . . . . . . . . . . . . . . . . . . . . . . . . . . . . . . . . . . . . . . . . . . . . . .
Instrument Treble . . . . . . . . . . . . . . . . . . . . . . . . . . . . . . . . . . . . . . . . . . . . . . . . .
Instr. Volume Left . . . . . . . . . . . . . . . . . . . . . . . . . . . . . . . . . . . . . . . . . . . . . . . . .
Instr. Volume Right . . . . . . . . . . . . . . . . . . . . . . . . . . . . . . . . . . . . . . . . . . . . . . . .
Instrument C-Cis . . . . . . . . . . . . . . . . . . . . . . . . . . . . . . . . . . . . . . . . . . . . . . . . .
Instr. Trem Depth . . . . . . . . . . . . . . . . . . . . . . . . . . . . . . . . . . . . . . . . . . . . . . . . .
Instr. Trem Speed . . . . . . . . . . . . . . . . . . . . . . . . . . . . . . . . . . . . . . . . . . . . . . . . .
Instrument Tuning . . . . . . . . . . . . . . . . . . . . . . . . . . . . . . . . . . . . . . . . . . . . . . . .
Play demo song . . . . . . . . . . . . . . . . . . . . . . . . . . . . . . . . . . . . . . . . . . . . . . . . . . . . . . . .
Module data . . . . . . . . . . . . . . . . . . . . . . . . . . . . . . . . . . . . . . . . . . . . . . . . . . . . . . . . . . .
13
13
13
15
17
19
21
21
22
24
25
27
27
28
29
31
33
35
36
38
40
42
44
45
Maintenance . . . . . . . . . . . . . . . . . . . . . . . . . . . . . . . . . . . . . . . . . . . . . . . . . . . . . . . . . . . . . . . . . 46
Warranty . . . . . . . . . . . . . . . . . . . . . . . . . . . . . . . . . . . . . . . . . . . . . . . . . . . . . . . . . . . . . . . . . . . . 46
Appendices . . . . . . . . . . . . . . . . . . . . . . . . . . . . . . . . . . . . . . . . . . . . . . . . . . . . . . . . . . . . . . . . . .
Technical specifications . . . . . . . . . . . . . . . . . . . . . . . . . . . . . . . . . . . . . . . . . . . . . . . . . .
MIDI Implementation chart . . . . . . . . . . . . . . . . . . . . . . . . . . . . . . . . . . . . . . . . . . . . . . . .
Menu survey . . . . . . . . . . . . . . . . . . . . . . . . . . . . . . . . . . . . . . . . . . . . . . . . . . . . . . . . . . .
Instrument list . . . . . . . . . . . . . . . . . . . . . . . . . . . . . . . . . . . . . . . . . . . . . . . . . . . . . . . . . .
User’s manual
JOHANNUS
Classic Sound Module
47
47
48
49
50
Set up
The complete sound module consists of:
! Sound module
! Mains adapter 9Vdc/1A
! MIDI cable (DIN cord)
! Audio cable
Connections
All connections can be found at the back of the sound module (see drawing).
Connecting the mains adapter
Before connecting the mains adapter check first whether:
1. The on/off switch of the sound module is off. The on/off switch is to be found on the front of
the sound module.
2. The voltage indication on the mains adapter corresponds to the correct mains voltage.
Then first connect the mains adapter to the sound module.The mains adapter connection is
indicated as: 9Vdc.
After this connect the mains adapter to a wall socket.
User’s manual
JOHANNUS
1
Classic Sound Module
Connecting the organ
Basically you are supposed to connect the sound module to your JOHANNUS organ. It is also
possible to connect the sound module to another device fitted with MIDI functionality.
Before you start connecting the sound module to your organ with the help of the MIDI cable and
the audio cable, we will give you a brief description of what MIDI is.
MIDI is the abbreviation of Musical Instruments Digital Interface. With MIDI musical instruments
can be coupled, to each other, to a computer or to another MIDI device.
It is possible, e.g. to play simultaneously your organ, a synthesizer or an expander (sound
module). The MIDI standard is a description of the way in which music and sound are translated
and communication takes place between devices fitted with MIDI functionality.
The (mostly) three MIDI connections of a device have the following functions:
MIDI IN
For receiving MIDI codes from other devices.
MIDI THRU
For relaying incoming MIDI codes from other devices.
MIDI OUT
For sending MIDI codes to other devices.
Connect the sound module as follows:
1. With the help of the MIDI cable (DIN cord) connect MIDI OUT of the organ with MIDI IN of
the sound module.
N.B. In organs fitted with programmable MIDI the MIDI cable must be connected to the
output MIDI MOD. instead of the output MIDI OUT.
2. With the help of the Audio cable connect the AUDIO OUT L and the AUDIO OUT R of the
sound module with the AUX IN L and the AUX IN R of the organ.
User’s manual
JOHANNUS
2
Classic Sound Module
Switching on
First switch on the sound module with the on/off switch.
After switching on, the display will show four lines of text. This text will be shown just after a
couple of seconds after switching on. This is because the various electronic circuits in the sound
module need some time to reach the correct settings.
Do not switch on the organ until the display of the sound module shows four lines of text.
This order of switching on is important, to ensure that the sound module is ready to receive all
the initial settings which the organ sends to the connected MIDI devices, via the MIDI OUT. The
organ can then be switched on.
User’s manual
JOHANNUS
3
Classic Sound Module
Control functions
Front panel
All the control functions are located on the front of the sound module, as illustrated below.
1. On/off switch
2. 4x20 character display (LCD)
3. Push button ‘UP’
4. Push button ‘DOWN’
5. Push button ‘MENU’ (store selected setting and back to main menu)
6. Push button ‘ENTER’ (store selected setting and back to previous menu)
User’s manual
JOHANNUS
4
Classic Sound Module
On/off switch
With the on/off switch the sound module can be switched on or off. When the sound module is
switched on, the display will show a text.
First switch on the sound module and then the organ. This is to allow the sound module to
receive all the initial settings of the organ.
Display
When the sound module is switched on, the display will show four lines of text in the initial
screen after a couple of seconds.
The top three lines indicate the three highest MIDI channels to which an instrument has been
assigned and what instrument it is.
In the following example the FLUTE is assigned to MIDI channel 1.
The PICCOLO is assigned to MIDI channel 2.
The RECORDER is assigned to MIDI channel 3.
Not indicated are the instruments assigned to higher MIDI channels.
The left part of the bottom line indicates volume setting. This is always set at 0 on switching on
the sound module.
The right part of the bottom line indicates the selected preset. This is always set at M1 on
switching on the sound module.
1
FLUTE
2
PICCOLO
3
RECORDER
Volume:
0
PR:M1
Throughout this guide, when there is a reference to a text shown on the display, this text will be
marked grey. As shown in the above example with the volume setting 0 and the selected preset
M1.
Push button ‘UP’
Within a chosen menu, pressing the push button ‘UP’ provides
! Selection of a previous part from the part list.
! Selection of a previous instrument from the instrument list.
! Selection of a previous menu item belonging to a selected menu.
! An increase of the numerical value of a selected number.
Pressing the push button once, or several times produces one or more steps up. Keeping the
push button pressed down, provides a continuous increment in steps.
User’s manual
JOHANNUS
5
Classic Sound Module
Push button ‘DOWN’
Within a chosen menu, pressing the push button ‘DOWN’ provides
! Selection of the next part from the part list.
! Selection of the next instrument from the instrument list.
! Selection of the next menu item from a selected menu.
! A lowering of the numerical value of a selected number.
Pressing the push button once, or several times produces one or more steps down. Keeping the
push button pressed down, produces a continuous decrease in steps.
Push button ‘MENU’
Pressing the push button ‘MENU’ provides access to the main menu. The display will show the
following text:
>Change
Change
Part
Instruments
Midi
Chan's
Settings
Receive
Midi
Msg's
^
The arrow pointing to the right (in this case before the text “Change Instruments”) indicates
which menu item has been selected.
The arrow pointing down indicates that there are even more menu items below. These can be
reached by pressing the DOWN button a couple of times. The menu items will then move up.
^
Change
Part
Midi
Chan's
Settings
Receive
Midi
>Advanced
Msg's
Settings
^
In addition to the arrow pointing to the right, the display now shows one arrow pointing down and
one pointing up. This indicates the presence of more menu items both above and below the four
menu items displayed. These can be reached by pressing the UP or the DOWN button as
necessary. The menu items will move down or up.
If there is only an arrow pointing up, this indicates that there are other menu items above and
these can be reached by pressing the UP button.
The ‘MENU’ push button can be used to go back to the main menu from a submenu (escape
function).
Push button ‘ENTER’
A menu item or a selected setting can be confirmed or stored with the push button ‘ENTER’.
After storing the display returns to the previous menu.
User’s manual
JOHANNUS
6
Classic Sound Module
Initial screen
The initial screen has 3 different readouts:
1. Volume setting bottom left, preset setting bottom right and above it the three lowest MIDI
channels to which one or more instruments are assigned.
1
FLUTE
2
RECORDER
3
PANFLUTE
Volume:
0
PR:M1
In this screen the volume can be set (see Volume).
2. Preset setting bottom left, volume setting bottom right and over it the three lowest MIDI
channels to which one or more instruments are assigned.
1
FLUTE
2
RECORDER
3
PANFLUTE
Preset:
M1
Vol:
0
In this screen the required preset can be selected (see Memory).
3. The “part” list. This shows what instrument is at each memory location and to what MIDI
channel each instrument is assigned.
1
FLUTE
6
CHOIR
8
ENGLISH
11
RANKET
1
HORN
8'
By means of the UP and DOWN buttons it is possible to run through the “part” list.
From the initial screen, any of the three different readouts can be selected, with the ENTER
button:
! Volume setting
! Preset setting
! Part list
User’s manual
JOHANNUS
7
Classic Sound Module
Indication MIDI reception
When the display of the sound module shows one of the three initial screens, the display will
also indicate which channels are receiving Note On MIDI messages.
A Note On instruction is a MIDI message which gives the receiving device the instruction to
switch on a tone.
Some examples will make this clear:
When playing on the Great of the organ and the stop MIDI GREAT1 is switched on, for all the
instruments assigned to MIDI channel 1, two quavers will be displayed briefly behind the musical
instrument.
In the three initial screens this will be displayed as shown below:
Initial screen 1 (volume setting selected).
1
2
3
FLUTE
+
+ PICCOLO
OBOE
Volume:
0
PR:M1
Initial screen 2 (preset setting selected).
1
2
3
FLUTE
+
+ PICCOLO
OBOE
Preset:
M1
VOL:
0
Initial screen 3 (part list selected).
1
FLUTE
2
PICCOLO
3
OBOE
2
PANFLUTE
+
When playing on the Swell of the organ and the stop MIDI SWELL 2 is switched on, for all the
instruments assigned to MIDI channel 2, two quavers will be displayed briefly behind the musical
instrument.
The plus sign (+) indicates that several instruments are assigned to a MIDI channel (see MIDI
channel select/change).
User’s manual
JOHANNUS
8
Classic Sound Module
In the three initial screens this will be displayed as follows:
Initial screen 1 (volume setting selected).
1
2
3
FLUTE
+ PICCOLO
+
OBOE
Volume:
0
PR:M1
Initial screen 2 (preset setting selected).
1
2
3
FLUTE
+ PICCOLO
+
OBOE
Preset:
M1
VOL:
0
Initial screen 3 (part list selected).
1
FLUTE
2
PICCOLO
3
OBOE
2
PANFLUTE
+
+
When, e.g., playing on the GREAT of the organ, the coupler SWELL-GREAT is switched on and
the stops MIDI GREAT 1 and MIDI SWELL 2 are switched on, for all the instruments assigned
to MIDI channel 1 and MIDI channel 2, two quavers will be displayed briefly behind the musical
instrument.
In the three initial screens this will be displayed as follows:
Initial screen 1 (volume setting selected).
1
2
3
FLUTE
+
+
+ PICCOLO
OBOE
Volume:
0
PR:M1
Initial screen 2 (preset setting selected).
1
2
3
FLUTE
OBOE
Preset:
User’s manual
+
+
+ PICCOLO
M1
VOL:
JOHANNUS
9
0
Classic Sound Module
Initial screen 3 (part list selected).
1
FLUTE
2
PICCOLO
3
OBOE
2
PANFLUTE
+
+
+
N.B. On organs fitted with programmable MIDI, the MIDI channel number does not have to
correspond to the number indicated on the MIDI stop.
This MIDI reception indication makes it possible to simply check whether the MIDI connection
between sound module and the sending device (organ) is correct.
User’s manual
JOHANNUS
10
Classic Sound Module
Memory
The sound module has 16 presets (from M1 to M8 and from G1 to G8). Each preset, in turn, has
16 parts. On switching on the sound module the selected preset is always M1.
1
FLUTE
2
RECORDER
3
PANFLUTE
Volume:
0
PR:M1
All the changes you now make and store will be stored in this selected preset M1.
If you do not wish to store the changes in preset M1, but in another preset you can select
another preset.
1. Press the ENTER button until the initial screen shows the preset setting bottom left (see
Initial screen point 2).
1
FLUTE
2
RECORDER
3
PANFLUTE
Preset:
M1
Vol:
0
2. With the UP and DOWN buttons another preset can be selected (e.g. G2).
1
FLUTE
2
RECORDER
3
PANFLUTE
Preset:
G2
Vol:
0
All the changes that are made and stored, after selecting a memory, will automatically be
stored in the selected memory.
If the correct preset has been selected, the part list going with the selected memory can be
displayed by pressing ENTER. (see also Initial screen).
1
FLUTE
6
CHOIR
1
8
ENGLISH
11
RANKET
HORN
8'
With the UP and DOWN buttons the part list can be scanned.
User’s manual
JOHANNUS
11
Classic Sound Module
By pressing ENTER another time the initial screen is reached again, displaying the freshly
selected preset (in this example G2) on the right and the volume setting on the left.
1
FLUTE
2
RECORDER
3
PANFLUTE
Volume:
0
PR:G2
The presets from G1 to G8 can be recalled, on the sound module itself, but also with the free
combination buttons (1 to 8) of the organ (G1 with the free combination button 1, G2 with the
free combination button 2, etc.) if the item “Preset Changes” is switched to “receive” (see
receiving MIDI-messages, Preset Changes).
If one of the separate free combinations is pressed (on organs with free combinations per
division) or one of the presets, the sound module will return to the latest preset (from M1 to M8
or from G1 to G8) that had been selected by hand.
User’s manual
JOHANNUS
12
Classic Sound Module
Settings
In the following paragraphs all the setting possibilities of the sound module will be explained,
step by step.
Unless otherwise stated, the explanation of the settings always starts with the initial screen as
displayed when the sound module is switched on. Of course, grey marked texts may vary,
dependent on the settings selected.
When you are in a certain menu you can always return fast to the initial screen by pressing the
MENU button once or several times (escape function).
Volume
The volume of the whole sound module can be changed when the volume setting is displayed
at bottom left in the initial screen.
1
FLUTE
2
RECORDER
3
PANFLUTE
Volume:
0
PR:M1
The correct initial screen can be reached when the display shows one of the other initial
screens, by pressing ENTER once or twice.
You can get to the initial screen when the display shows a (menu) item by pressing MENU once
or several times (escape function).
When the sound module has been switched on, the volume setting of the whole sound module
can immediately be changed with the push buttons UP and DOWN. The volume level can be
set from -5 to +5, in 11 steps.
When the sound module is switched on again, the volume for the entire module will
automatically be set to 0.
Change instrument
Changing an instrument of one of the several parts in a chosen preset, is done as follows:
1. Press the MENU button to get to the main menu.
>Change
Change
Part
Instruments
Midi
Chan's
Settings
Receive
Midi
Msg's
^
2. Select with the UP and DOWN buttons the menu item “Change Instruments”.
User’s manual
JOHANNUS
13
Classic Sound Module
3. Next press ENTER. The display will now show the part list of the selected preset. Select with
the UP and DOWN buttons the part of which you wish to change the instrument.
1
FLUTE
6
CHOIR
8
11
1
>ENGLISH
RANKET
HORN
8'
4. Then press ENTER. A flashing cursor indicates that you can change the instrument of the
selected part now.
1
6
8
11
FLUTE
CHOIR
1
> $NGLISH
RANKET
HORN
8'
5. With the UP and DOWN buttons the required instrument for the part concerned can now be
selected. Press enter when you have selected the required instrument for the selected part.
The flashing cursor will now disappear.
1
FLUTE
6
CHOIR
8
11
1
>RECORDER
RANKET
8'
6. If you would like to change another instrument of another part you could go further through
the part list with the UP and DOWN buttons to select another part.
7. After changing the instruments of one or more parts, all the changes can be confirmed in one
go, by pressing MENU. The changes will be stored in the selected preset. To indicate that
a selection is being stored, the display will briefly show the text “Storing Data”.
Storing
User’s manual
Data...
JOHANNUS
14
Classic Sound Module
After the data has been stored, you are automatically returned to the main menu.
>Change
Change
Part
Instruments
Midi
Chan's
Settings
Receive
Midi
Msg's
^
MIDI channel select/change
Before explaining how a MIDI channel can be changed, we will first, on the basis of an example,
give an explanation of why an instrument is assigned to a certain MIDI channel.
The MIDI connection between instruments is divided into 16 “logical” channels (each MIDI
message is given the channel number belonging to it as an identification). This way several
devices can be “operated”, independently, with a simple connection.
A (sending) MIDI instrument can usually be set in such a way that this instrument can send MIDI
messages through each of the 16 channels.
A (receiving) MIDI device can usually be set in such a way that this instrument can receive
messages only from certain channels, selected previously.
Let’s assume that the sound module has been connected to a 2 manual JOHANNUS organ with
MIDI stops. If the MIDI stop of the division in question is switched on, the division concerned will
send MIDI codes to the sound module through its own channel. The Great sends MIDI codes
to the sound module through channel 1. The Swell uses channel 2 and the pedalboard uses
channel 3.
By assigning on the sound module, e.g. the HARPSICHORD to channel 1, the PANFLUTE to
channel 2 and the RANKET 8' to channel 3, the HARPSICHORD can be played from the Great
if the MIDI stop of the Great is switched on. The PANFLUTE can be played from the Swell if the
MIDI stop of the Swell is switched on and/or the RANKET 8' from the pedalboard if the MIDI stop
of the pedalboard is switched on.
In this way an extra stop has been added to each division.
Changing a MIDI channel of one or several “parts” in the selected preset is done as follows:
1. Press the MENU button to get to the main menu.
Change
>Change
Part
Instruments
Midi
Chan's
Settings
Receive
Midi
Msg's
^
2. Select the menu item Change “Midi Chan’s” (change MIDI channels) with the UP and DOWN
buttons.
User’s manual
JOHANNUS
15
Classic Sound Module
3. Then press ENTER. The display will now show the part list of the selected preset. Select with
the UP and DOWN buttons the part of which you wish to change the MIDI channel.
7
FLUTE
6
<CHOIR
1
8
ENGLISH
11
RANKET
HORN
8'
4. Then press ENTER. A flashing cursor indicates that you can change the MIDI channel of the
selected part now.
7
FLUTE
$
<CHOIR
1
8
ENGLISH
11
RANKET
HORN
8'
5. With the UP and DOWN buttons, the required MIDI channel (from 1 to 16) for the part
concerned can now be selected. Press enter when you have selected the required MIDI
channel for the selected part. The flashing cursor will now disappear.
7
FLUTE
9
<CHOIR
1
8
ENGLISH
11
RANKET
HORN
8'
6. If you now wish to change another MIDI channel of another “part” you can go further through
the part list with the UP and DOWN buttons to select another part.
7. After changing the MIDI channels of one or several “parts” all the changes can be confirmed
in one go by pressing MENU. The changes will be stored in the selected preset. To indicate
that your selection is being stored, the display will then briefly show the text “Storing Data”.
Storing
User’s manual
Data...
JOHANNUS
16
Classic Sound Module
After storing the data you will automatically be returned to the main menu.
>Change
Change
Part
Instruments
Midi
Chan's
Settings
Receive
Midi
Msg's
^
It is also possible to assign several instruments to one MIDI channel. This can be done by
selecting the same MIDI channel for two (or more) “parts”, as indicated in the example below.
2
FLUTE
2
CHOIR
8
ENGLISH
11
RANKET
1
HORN
8'
In this example both the FLUTE (orchestra flute) and CHOIR 1 (choir sound) will be heard when
sending MIDI codes through channel 2.
If several instruments are assigned to one MIDI channel, this is indicated in the initial screen
with a plus sign (+).
2
+ FLUTE
8
RECORDER
11
PANFLUTE
Volume:
0
PR:M1
The above example shows that, in addition to the FLUTE, one or more other instruments are
assigned to channel 2.
Tremulant off/on
With certain instruments the tremulant can be switched on or off. Instruments with this possibility
are marked with an asterisk (*) behind the instrument number in the instrument list (see
Appendices).
Switching the tremulant on or off is done as follows:
1. Press the MENU button to get to the main menu and select the menu item “Part Settings”
with the UP and DOWN buttons.
Change
Instruments
Change
Midi
>Part
Chan's
Settings
Receive
Midi
Msg's
^
2. Then press ENTER. The display will now show the (sub)menu below.
User’s manual
JOHANNUS
17
Classic Sound Module
With the UP and DOWN buttons select the menu item “Tremulant Off/On” and then press
ENTER.
>Tremulant
Mute
Off/On
Off/On/Solo
3. If a “part” with an instrument for which it is not possible to switch the tremulant on or off
(instruments without a tremulant) is selected, the fourth line will show the text “(Tremulant:
NO)”.
Select
Part
Part
2
1
CLARINET
(Tremulant:
NO)
If a “part” with an instrument for which it is possible to switch the tremulant on or off (instruments
with a tremulant) is selected, the display will show the text “(Tremulant: ON)” or
“(Tremulant: OFF)“ depending on whether this is switched on or off.
Select
Part
Part
2
GOSPEL
2
ORGAN
(Tremulant:
1
ON)
4. With the UP and DOWN buttons select the part of which you wish to switch the tremulant ON
or OFF and then press ENTER. The display will now show the following text.
Change
Tremulant
Part
2
GOSPEL
2
ORGAN
Tremulant:
1
ON
5. By pressing the UP or DOWN buttons the tremulant of the selected part can be switched on
or off.
User’s manual
JOHANNUS
18
Classic Sound Module
6. Changing a tremulant can be confirmed by pressing ENTER. The change will then be stored
in the selected preset. To indicate that the selection is being stored, the display will now,
briefly show the text “Storing Data”.
Storing
Data...
After storing the data you will automatically be returned to the submenu.
>Tremulant
Mute
Off/On
Off/On/Solo
Mute off/on/solo
The mute setting, in fact, matters only when several instruments are assigned to the same MIDI
channel.
When four instruments have been assigned to one MIDI channel, for example, one or more
instruments can be turned off temporarily with the mute function, without changing the
instruments of the MIDI channels in the part list.
There are three mute functions
! Mute Off
Suppression off, instrument on.
! Mute On
Suppression on, instrument off.
! Mute Solo All “parts” are turned off except those “parts” whose mute function is set to
Solo. The Solo function especially comes in handy for quickly turning off all
“parts” but one.
Changing the mute setting is done as follows:
1. Press the MENU button to get to the main menu and select the menu item “Part Settings”
with the UP and DOWN buttons.
Change
Instruments
Change
Midi
>Part
^
User’s manual
Chan's
Settings
Receive
Midi
JOHANNUS
19
Msg's
Classic Sound Module
2. Then press ENTER. The display will now show the (sub)menu below.
Select the menu item “Mute Off/On/Solo” with the UP and DOWN buttons, then press
ENTER.
Tremulant
>Mute
Off/On
Off/On/Solo
3. The display will then show the text “(Mute: OFF)”, “(Mute: ON)” or “(Mute: SOLO)” depending
on the selected mute function.
Select
Part
Part
2
GOSPEL
1
ORGAN
(Mute:
1
OFF)
4. Select the “part” whose mute function you wish to change with the UP and DOWN buttons,
then press ENTER. The display will now show the following text.
Change
Mute
Part
2
GOSPEL
2
ORGAN
(Mute:
1
OFF)
5. The required mute function can now be selected with the UP and DOWN buttons.
6. Setting the correct mute function for a certain “part” can be confirmed by pressing the
ENTER button. The change will be stored in the selected preset. To indicate that the
selection is being stored, the display will briefly show the text “Storing Data”.
Storing
Data...
After storing the data you will automatically be returned to the submenu.
>Tremulant
Mute
User’s manual
Off/On
Off/On/Solo
JOHANNUS
20
Classic Sound Module
Receiving MIDI messages
In treating the menu “Receive Midi Msg’s” it is assumed that users are reasonably familiar with
the possibilities of MIDI.
Apart from key information, other MIDI messages, e.g. volume settings and “patch changes”
(messages to turn on instruments) can be sent to the sound module.
If you do or do not want the sound module to react to certain MIDI messages it can be set in
such a way that it reacts to certain MIDI messages or not.
With the menu “Receive Midi Msg’s” (MIDI messages) the following items can be turned on or
off:
! Instrument Changes
! Preset Changes
! General Volume
! Expression Pedal
Instrument Changes
Turning on or off the item “Instrument Changes” determines whether the sound module reacts
to “patch changes” (select an instrument, turn on) or not.
If “Instrument Changes” is on (- Receive -) the sound module will react to received “patch
changes” and if “Instrument Changes” is off (- Don’t Receive -) the sound module will not react
to “patch changes”.
N.B. To prevent undesired changes, the sound module has been designed in such way that
only those “parts” react to “patch changes” which have a MIDI channel number
corresponding to the “part” number.
Turning on or off the item “Instrument Changes” is done as follows:
1. Press the MENU button to get to the main menu and select the menu “Receive Midi Msg’s”
(MIDI messages) with the UP and DOWN buttons.
Change
Instruments
Change
Midi
Part
Chan's
Settings
>Receive
Midi
Msg's
^
2. Then press ENTER. The display will now show the (sub)menu below.
Select the item “Instrument Changes” with the UP and DOWN buttons, then press ENTER.
>Instrument
Preset
General
Volume
Expression
User’s manual
Changes
Changes
Pedal
JOHANNUS
21
Classic Sound Module
3. The display will then show the text “- Receive -” or “- Don’t Receive -” with under it the text
“Instrument Changes”, depending on the setting of the item “Instrument Changes”,
-
Don't
Reiceive
Instrument
-
Changes
4. By pressing the UP or DOWN buttons the item “Instrument Changes” can be turned on (Receive -) or off (- Don’t Receive -).
5. Changing the item “Instrument Changes” can be confirmed by pressing ENTER. The change
will be stored for the entire sound module. To indicate that the selection is being stored, the
display will then, briefly show the text “Storing Data”.
Storing
Data...
After storing the data you will automatically be returned to the submenu.
>Instrument
Preset
General
Changes
Changes
Volume
Expression
Pedal
Preset Changes
Turning on or off the “Preset Changes” only makes sense if the sound module is used in
combination with a JOHANNUS organ.
The sound module has been designed in such a way that it reacts to MIDI messages (System
Exclusive Codes) sent by the organ when a free combination or a preset on the organ is
activated.
If one of the free combinations from 1 to 8 is activated, one of the presets from G1 to G8 on the
sound module will be selected, when the item “Preset Changes” is on (when activating free
combination 1, preset G1, when activating free combination 2, preset G2, etc.).
If one of the separate free combinations (on organs with free combinations per division) or one
of the fixed combinations (presets) is pressed, the sound module will return to the latest preset
(from M1 to M8 or from G1 to G8) which was selected by hand.
User’s manual
JOHANNUS
22
Classic Sound Module
The item” Preset Changes” offers the possibility to store/recall not only stop combinations of the
organ with the free combinations, but also to add instrument combinations of the sound module.
Turning on or off the item “Preset Changes” determines whether the sound module will or will
not react to MIDI messages sent when a free combination on the organ is activated.
Turning on or off the item “Preset Changes” is done as follows:
1. Press the MENU button to get to the main menu and select the menu item “Receive Midi
Msg’s” (MIDI messages) with the UP and DOWN buttons.
Change
Instruments
Change
Midi
Part
Chan's
Settings
>Receive
Midi
Msg's
^
2. Then press ENTER. The display will now show the (sub)menu below.
Select the item “Preset Changes” with the UP and DOWN buttons and then press ENTER.
Instrument
>Preset
General
Changes
Changes
Volume
Expression
Pedal
3. The display will then show the text “- Receive -” or “- Don’t Receive -” with under it the text
“Preset Changes”, depending on the setting of the item “Preset Changes”.
-
Don't
Preset
Receive
-
Changes
4. By pressing the UP or DOWN buttons the item “Preset Changes” can be turned on
Receive -) or off (- Don’t Receive -).
(-
5. Changing the item “Preset Changes” can be confirmed by pressing ENTER. The change will
be stored for the entire sound module. To indicate that the selection is being stored, the
display will then, briefly, show the text “Storing Data”.
Storing
User’s manual
Data...
JOHANNUS
23
Classic Sound Module
After storing the data you will automatically be returned to the submenu.
>Instrument
Preset
Changes
Changes
General
Volume
Expression
Pedal
General Volume
Turning the item “General Volume” on or off, determines whether the sound module will or will
not react to MIDI messages which are sent whenever the general volume setting of the organ
(controller 11) is changed.
If “General Volume” (- Receive -) is on, the volume of the sound module will react to changes
in the general volume of the organ and if “General Volume” (- Don’t Receive -) is off, the sound
module will not react to changes in the general volume.
Turning the item “General Volume” on or off is done as follows:
1. Press the MENU button to get to the main menu and select the menu item “Receive Midi
Msg’s” (MIDI messages) with the UP and DOWN buttons.
Change
Instruments
Change
Midi
Part
Chan's
Settings
>Receive
Midi
Msg's
^
2. Then press ENTER. The display will now show the (sub)menu below.
Select the item “General Volume” with the UP and DOWN buttons, then press ENTER.
Instrument
Preset
Changes
Changes
>General
Volume
Expression
Pedal
3. The display will then show the text “- Receive -” or “- Don’t Receive -” with under it the text
“General Volume”, depending on the setting of the item “General Volume”.
-
Receive
General
-
Volume
4. By pressing the UP or DOWN button the item “General Volume” can be turned on
Receive -) or off (- Don’t Receive -).
User’s manual
JOHANNUS
24
Classic Sound Module
(-
5. Changing the item “General Volume” can be confirmed by pressing ENTER. The change will
then be stored for the entire sound module. To indicate that the selection is being stored, the
display will then, briefly, show the text “Storing Data”.
Storing
Data...
After storing the data you will automatically be returned to the submenu.
>Instrument
Preset
General
Changes
Changes
Volume
Expression
Pedal
Expression Pedal
Turning the item “Expression Pedal” on or off, determines whether instruments of the sound
module will react to MIDI messages sent when an expression pedal of the organ (controller 7)
is used.
When “Expression Pedal” is on (- Receive -) not all the instruments of the sound module will
react when an expression pedal is used. When an expression pedal belonging to a certain
division is used, only the instruments of the sound module which can be played from that
division will react. In other words, the volume of the instruments of the sound module which are
played from e.g. the Swell will only be changed if the expression pedal of the Swell is used.
If “Expression Pedal” is off (- Don’t Receive -) no instrument of the sound module will react when
an expression pedal of the organ is used.
Turning on or off the item “Expression Pedal” is done as follows:
1. Press the MENU button to get to the main menu and select the menu item “Receive Midi
Msg’s” (MIDI messages) with the UP and DOWN buttons.
Change
Instruments
Change
Midi
Part
^
User’s manual
Chan's
Settings
>Receive
Midi
JOHANNUS
25
Msg's
Classic Sound Module
2. Then press ENTER. The display will now show the (sub)menu below.
Select the item “Expression Pedal” with the UP and DOWN buttons, then press ENTER.
Instrument
Preset
General
Changes
Changes
Volume
>Expression
Pedal
3. The display will then show the text “- Receive -” or “- Don’t Receive -” with under it the text
“Expression Pedal”, depending on the setting of the item “Expression Pedal”.
-
Receive
Expression
Pedal
4. By pressing the UP or DOWN button the item “Expression Pedal” can be turned on (Receive -) or off (- Don’t Receive -).
5. Changing the item “Expression Pedal” can be confirmed by pressing ENTER. The change
will be stored for the entire sound module. To indicate that the selection is being stored, the
display will then, briefly, show the text “Storing Data”.
Storing
Data...
After storing the data you will automatically be returned to the submenu.
>Instrument
Preset
General
Changes
Volume
Expression
User’s manual
Changes
Pedal
JOHANNUS
26
Classic Sound Module
Advanced settings
With the menu “Advanced Settings” a number of characteristics of each instrument can be
changed (voicing). Namely:
! Instrument Volume
! Instrument Bass
! Instrument Treble
! Instrument Volume Left
! Instrument Volume Right
! Instrument C-Cis
! Instrument Tremulant Depth
! Instrument Tremulant Speed
! Instrument Tuning
With these instrument settings the settings of the instrument itself are changed. An instrument
change does not depend on the selected preset. A change in a certain instrument setting is
automatically applied to all the presets. If, for instance, a PICCOLO has been selected in both
preset M1 and preset M2, and an instrument setting of the PICCOLO in M1 is changed, the
setting of the PICCOLO in M2 will change along with it.
Factory settings
By changing the advanced settings, many characteristics of the instruments can be changed.
It might even be exaggerated, so that certain instruments no longer sound as they should and
it is almost impossible to restore their original character.
Should this happen, there is always a possibility to recover the original factory settings for the
ENTIRE sound module. The factory settings can be restored as follows.
1. Switch off the sound module.
2. Press BOTH buttons UP and DOWN.
3. Switch the sound module on, while keeping BOTH buttons UP and DOWN pressed down.
During the time that the factory settings are being restored, the display will show the following
text:
Writing
To
Intonation
Flash...
4. Release both buttons UP and DOWN only when the display has returned to the initial screen.
1
2
3
FLUTE
+ PICCOLO
OBOE
Volume:
0
PR:M1
The factory settings for all the instruments have now been restored.
Instrument Volume
User’s manual
JOHANNUS
27
Classic Sound Module
Independent of the volume of the entire sound module, the volume can be set with the item
“Instrument Volume”, in (at most) 128 steps from 0 to 127 included, The lower limit does not
have the value 0 for all the instruments. This is due to “scaling” which is determined during the
factory voicing process.
Changing the volume setting of an instrument is done as follows:
1. Press the MENU button to get to the main menu and select the menu item “Advanced
Settings” with the UP and DOWN buttons.
^
Change
Part
Midi
Chan's
Settings
Receive
Midi
>Advanced
Msg's
Settings
^
2. Then press ENTER. The display will now show the (sub)menu below.
Select the item “Instrument Volume” with the UP and DOWN buttons, then press ENTER.
>Instrument
Volume
Instrument
Bass
Instrument
Treble
Instr
Volume
Left
^
3. The display will now show the text below.:
Select
Voice
Nr.:
1
FLUTE
(
Volume:
64
)
4. Select the instrument whose volume is to be changed with the UP and DOWN buttons and
then press ENTER. The display will now show the following text.
Voice:
1
RECORDER
Volume:
64
Depending on the selected instrument and the volume set (previously) for the selected
instrument, the grey marked text may differ from the example.
User’s manual
JOHANNUS
28
Classic Sound Module
5. The required volume for the selected instrument can be set with the UP and DOWN buttons.
Because the lower limit does not have the value 0 for all the instruments, the display
indicates with the word “MINIMUM” that the lower limit of the volume of the selected
instrument has been reached.
Voice:
3
RECORDER
MINIMUM
Volume:
11
When the volume for the selected instrument has reached the maximum value (127), the
display shows the word "MAXIMUM".
Voice:
3
RECORDER
MAXIMUM
Volume:
127
6. Setting the correct volume for the selected instrument, can be confirmed by pressing ENTER.
To indicate that the selection is being stored, the display will then, briefly, show the text
“Storing Data”.
Storing
Data...
After storing the data you will automatically be returned to the submenu.
>Instrument
Volume
Instrument
Bass
Instrument
Treble
Instr
Volume
Left
^
Instrument Bass
With the item “Instrument Bass” the character of an instrument can be changed by changing the
amount of "low" of the instrument concerned.
This function is similar to the BASS button of a stereo.
The character of an instrument can thus be made “thinner” or “thicker”, by changing the Bassvalue.
The value can be changed in 64 steps from 0 (a minimum of "low") to 63 (a maximum of "low").
User’s manual
JOHANNUS
29
Classic Sound Module
Changing the bass setting of an instrument is done as follows:
1. Press the MENU button to get to the main menu and select the menu item “Advanced
settings” with the UP and DOWN buttons.
^
Change
Part
Midi
Chan's
Settings
Receive
Midi
>Advanced
Msg's
Settings
^
2. Then press ENTER. The display will now show the (sub)menu below.
Select the item “Instrument Bass” with the UP and DOWN buttons and then press ENTER.
Instrument
Volume
>Instrument
Bass
Instrument
Instr
Treble
Volume
Left
^
3. The display will now show the text below:
Select
Voice
Nr.:
1
FLUTE
(Bass:
63)
(The value 63 may be different.)
4. Select the instrument whose bass setting is to be changed with the UP and DOWN buttons
and then press ENTER. The display will now show the following text.
Voice:
3
RECORDER
Bass:
63
Depending on the selected instrument and the (previously) changed bass setting for the
selected instrument, the grey marked text may differ from the example.
5. The bass-setting of the selected instrument can be changed with the UP and DOWN buttons.
User’s manual
JOHANNUS
30
Classic Sound Module
6. Setting the correct bass value for the selected instrument can be confirmed by pressing
ENTER. To indicate that the selection is being stored, the display will then, briefly, show the
text “Storing Data”.
Storing
Data...
After storing the data you will automatically be returned to the submenu.
>Instrument
Volume
Instrument
Bass
Instrument
Treble
Instr
Volume
Left
^
Instrument Treble
With the item “Instrument Treble” the character of an instrument can be changed by changing
the amount of "high" of the instrument concerned.
This function is similar to the TREBLE button of a stereo.
The character of an instrument can thus be made "rounder" or "sharper", by changing the treble
value.
The value can be changed in 64 steps from 0 (a minimum of "high") to 63 (a maximum of
"high").
Changing the treble-setting of an instrument is done as follows:
1. Press the MENU button to get to the main menu and select the menu item “Advanced
Settings” with the UP and DOWN buttons.
^
Change
Part
Midi
Chan's
Settings
Receive
Midi
>Advanced
Msg's
Settings
^
2. Then press ENTER. The display will now show the (sub)menu below.
Select the item “Instrument Treble” with the UP and DOWN buttons and then press ENTER.
Instrument
Instrument
>Instrument
^
User’s manual
Instr
Volume
Bass
Treble
Volume
JOHANNUS
31
Left
Classic Sound Module
3. The display will now show the text below:
Select
Voice
Nr.:
1
FLUTE
(Treble:
63)
(The value 63 may be different.)
4. Select the instrument whose treble setting is to be changed with the UP and DOWN buttons,
then press ENTER. The display will now show the following text.
Voice:
3
RECORDER
Treble:
63
Depending on the selected instrument and the treble setting for the selected instrument
(previously) changed, the grey marked text may differ from the example.
With the UP and DOWN buttons you can change the treble setting of the selected instrument.
5. Setting the correct treble value for the selected instrument can be confirmed by pressing
ENTER. To indicate that the selection is being stored, the display will then, briefly, show the
text “Storing Data”.
Storing
Data...
After storing the data you will automatically be returned to the submenu.
>Instrument
^
User’s manual
Volume
Instrument
Bass
Instrument
Treble
Instr
Volume
JOHANNUS
32
Left
Classic Sound Module
Instr. Volume Left
All the instruments can be set in such a way that they are reproduced both through the left
channel (AUDIO OUT L) and through the right channel (AUDIO OUT R).
Independent of all other volumes (set volume of the sound module, set instrument volume,
transmitted general volume or transmitted swell volume) the volume left (Instr. Volume Left) and
right (Instr. Volume Right) of each of the instruments can be set separately.
With the functions “Instr. Volume Left” and “Instr. Volume Right” you can decide through which
channel(s) an instrument will have to be reproduced in whole or in part . The value can be
changed in 64 steps from 0 to 63.
When the value is 0, the instrument will not at all be reproduced through the channel in question.
At value 63, the instrument will be reproduced in full through the channel concerned.
Depending on the position of the channels/loudspeakers in the organ or in the front, an
instrument can be moved "from left to right" (the same effect as the PANPOT control in audio
equipment).
N.B. Bear in mind that "equalizing" the volumes of both channels (left and right) of the
instruments without C-Cis effect or whose C-Cis effect has been turned off (see C-Cis) will
have a negative effect on the "stereoscopic image”.
With instruments whose C-Cis effect is turned on (see C-Cis) it is exactly important that
the volumes of both channels (left and right) are the same. If only to prevent imbalance
between the C side and the Cis side.
Changing the “Instr. Volume Left” setting of an instrument is done as follows:
1. Press the MENU button to get to the main menu and select the menu item “Advanced
Settings” with the UP and DOWN buttons.
^
Change
Part
Midi
Chan's
Settings
Receive
Midi
>Advanced
Msg's
Settings
^
2. Then press ENTER. The display will now show the (sub)menu below.
Select the item “Instr. Volume Left” with the UP and DOWN buttons, then press ENTER.
^
User’s manual
Instrument
Volume
Instrument
Bass
Instrument
Treble
>Instr
Volume
JOHANNUS
33
Left
Classic Sound Module
3. The display will now show the text below:
Select
Voice
Nr.:
1
FLUTE
(Volume
Left:
63)
(The value 63 may be different.)
4. Select the instrument whose “Volume Left” value is to be changed with the UP and DOWN
buttons, then press ENTER. The display will now show the following text.
Voice:
3
RECORDER
Volume
Left:
63
Depending on the selected instrument and the “Volume Left” setting for the selected
instrument (previously) changed by you, the grey marked text may differ from the example.
5. With the UP and DOWN buttons the “Volume Left” value of the selected instrument can be
changed.
6. Setting the correct “Volume Left” value for the selected instrument can be confirmed by
pressing ENTER. To indicate that the selection is being stored, the display will, briefly show
the text “Storing Data”.
Storing
Data...
After storing the data you will automatically be returned to the submenu.
>Instrument
^
User’s manual
Volume
Instrument
Bass
Instrument
Treble
Instr
Volume
JOHANNUS
34
Left
Classic Sound Module
Instr. Volume Right
The function “Instr. Volume Right” is basically the same as the function “Instr. Volume Left” (see
Instr. Volume Left).
Changing the “Instr. Volume Right” setting of an instrument is done as follows:
1. Press the MENU button to get to the main menu and select the menu item “Advanced
Settings” with the UP and DOWN buttons.
^
Change
Part
Midi
Chan's
Settings
Receive
Midi
>Advanced
Msg's
Settings
^
2. Then press ENTER. The display will now show the (sub)menu below.
Select the item “Instr. Volume Right” with the UP and DOWN buttons, then press ENTER.
^
Instrument
Bass
Instrument
Treble
Instr
Volume
Left
>Instr
Volume
Right
^
3. The display will now show the text below:
Select
Voice
Nr.:
1
FLUTE
(Volume
Right:
63)
(The value 63 may be different.)
4. Select the instrument whose “Volume Right” value is to be changed with the UP and DOWN
buttons, then press ENTER. The display will now show the following text.
Voice:
3
RECORDER
Volume
Right:
63
Depending on the selected instrument and the “Volume Right” setting for the selected
instrument (previously) changed by you, the grey marked text may differ from the example.
5. With the UP and DOWN buttons, the “Volume Right” value of the selected instrument can
be changed.
User’s manual
JOHANNUS
35
Classic Sound Module
6. Setting the correct “Volume Right” value for the selected instrument can be confirmed by
pressing ENTER. To indicate that the selection is being stored, the display will then, briefly,
show the text “Storing Data”.
Storing
Data...
After storing the data you will automatically be returned to the submenu.
>Instrument
Volume
Instrument
Bass
Instrument
Treble
Instr
Volume
Left
^
Instrument C-Cis
It is possible to turn the C-Cis effect on or off for certain instruments. These instruments are
marked with an asterisk(*) behind the instrument number in the instrument list (see Appendices).
When on an instrument of the sound module the function “Instrument C-Cis” is turned on, the
tones that are played will sound through the left and right channels alternatively (C sounds left,
C# sounds right, D sounds left, D# sounds right, etc.). Pipe organs are often built this way to
realize a wide sounding instrument.
The sound module has the possibility to turn the C-Cis function of a number of instruments on
or off.
When the C-Cis function is turned off, all the tones can sound through both the left and the right
channels. To what extent an instrument sounds through the left or the right channel is
determined by the “Instr. Volume Left” and “Instr. Volume Right” values set by you (see Instr.
Volume Left and Instr. Volume Right).
When the C-Cis function is turned on, you can choose from the possibilities C-Cis or Cis-C.
When you choose possibility C-Cis, the C will sound left, the C# right, the D left, the D# right, etc.
When you choose possibility Cis-C, the C will sound right, the C# left, the D right, the D# left, etc.
This choice makes it possible to make the sound module always sound wide. This is possible,
e.g. when two instruments (with the C-Cis function) of the sound module are played
simultaneously from the organ and one instrument is set as C-Cis, whereas the other one is set
as Cis-C (if so desired with a third instrument added without C-Cis function or whose C-Cis
function has been turned off).
Changing the C-Cis-setting of an instrument is done as follows:
User’s manual
JOHANNUS
36
Classic Sound Module
1. Press the MENU button to get to the main menu and select the menu item “Advanced
Settings” with the UP and DOWN buttons.
^
Change
Part
Midi
Chan's
Settings
Receive
Midi
>Advanced
Msg's
Settings
^
2. Then press ENTER. The display will now show the (sub)menu below.
Select the item “Instrument C-Cis” with the UP and DOWN buttons, then press ENTER.
^
Instrument
Treble
Instr
Volume
Left
Instr
Volume
Right
>Instrument
C-Cis
^
3. When an instrument whose C-Cis function cannot be turned on or off has been selected, the
fourth line will read “(C-Cis: No )”.
Select
CHOIR
Voice
Nr.:
19
2
(C-Cis:
NO
)
When an instrument whose C-Cis function can be turned on or off (instruments with C-Cis
function) has been selected, the display will show the following text:
Select
Voice
HARMONIC
Nr.:
FLUTE
(C-Cis:
OFF
34
8'
)
Depending on the setting of the item C-Cis (previously) changed by you, the grey marked text
will show the text “OFF”, “C-Cis” or “Cis-C”.
User’s manual
JOHANNUS
37
Classic Sound Module
4. Select the instrument whose C-Cis-setting is to be changed, with the UP and DOWN buttons,
then press ENTER. The display will now show the following text.
Voice:
34
HARMONIC
C-Cis:
FLUTE
8'
OFF
Depending on the selected instrument and the C-Cis setting (previously) changed by you, the
grey marked text may differ from the example.
5. With the UP and DOWN buttons the C-Cis-setting of the selected instrument can be
changed.
6. Selecting the correct C-Cis setting can be confirmed by pressing ENTER. To indicate that the
selection is being stored, the display will then, briefly, show the text “Storing Data”.
Storing
Data...
After storing the data you will automatically be returned to the submenu.
>Instrument
Volume
Instrument
Bass
Instrument
Treble
Instr
Volume
Left
^
Instr. Trem Depth
It is possible to turn a tremulant on or off for certain instruments. These instruments are marked
with an asterisk(*) behind the instrument number in the instrument list (see Appendices).
On instruments with the possibility of turning a tremulant on or off, the tremulant depth can be
set (when the tremulant of an instrument is ON).
The value of the tremulant depth can be changed in 64 steps from 64 (no tremulant depth) to
127 (very deep tremulant).
User’s manual
JOHANNUS
38
Classic Sound Module
Changing the “Trem Depth” (tremulant depth) of an instrument is done as follows:
1. Press the MENU button to get to the main menu and select the menu item “Advanced
Settings”, with the UP and DOWN buttons.
^
Change
Part
Midi
Chan's
Settings
Receive
Midi
>Advanced
Msg's
Settings
^
2. Then press ENTER. The display will now show the (sub)menu below.
Select the item “Instr. Trem Depth”, with the UP and DOWN buttons, then press ENTER.
^
Instr
Volume
Left
Instr
Volume
Right
Instrument
>Instr.
C-Cis
Trem
Depth
^
3. When an instrument whose tremulant cannot be turned on or off (and whose depth cannot
be set) has been selected, the fourth line will read “(TremulantDepth:No )”.
Select
CHOIR
Voice
Nr.:
19
2
(TremulantDepth:NO
)
When an instrument whose tremulant can be turned on or off (instruments with tremulant)
has been selected, the display will show the present value of the tremulant depth.
Select
GOSPEL
Voice
Nr.:
ORGAN
(TremulantDepth:80
User’s manual
JOHANNUS
39
20
1
)
Classic Sound Module
4. With the UP and DOWN buttons select the instrument whose tremulant depth is to be
changed, then press ENTER. The display will now show the following text.
Voice:
20
GOSPEL
Tremulant
ORGAN
1
Depth:
80
Depending on the selected instrument and the tremulant depth (previously) set by you, the
grey marked text may differ from the example.
5. With the UP and DOWN buttons the value of the tremulant depth of the selected instrument
can be changed.
6. Setting the correct value for the tremulant depth, can be confirmed by pressing ENTER. To
indicate that the selection is being stored, the display will then, briefly, show the text “Storing
Data”.
Storing
Data...
After storing the data you will automatically be returned to the submenu.
>Instrument
Volume
Instrument
Bass
Instrument
Treble
Instr
Volume
Left
^
Instr. Trem Speed
It is possible for certain instruments to turn a tremulant on or off. These instruments are marked
with an asterisk(*) behind the instrument number in the instrument list (see Appendices).
On instruments with the possibility of turning a tremulant on or off, the tremulant speed can be
set.
The value of the tremulant speed can be changed in 128 steps from 0 (no change in pitch) to
127 (about 9 changes per second, a very fast tremulant).
User’s manual
JOHANNUS
40
Classic Sound Module
Changing the “Trem. Speed” (tremulant speed) of an instrument is done as follows:
1. Press the MENU button to get to the main menu and select the menu item “Advanced
Settings”, with the UP and DOWN buttons.
^
Change
Part
Midi
Chan's
Settings
Receive
Midi
>Advanced
Msg's
Settings
^
2. Then press ENTER. The display will now show the (sub)menu below.
Select the item “Instr. Trem Speed” with the UP and DOWN buttons, then press ENTER.
^
Instr
Volume
Instrument
Speed
C-Cis
Instr.
Trem
Depth
>Instr.
Trem
Speed
^
3. When an instrument whose tremulant cannot be turned on or off (and consequently whose
speed cannot be set either) has been selected, the fourth line will read “(TremulantSpeed:No
)”.
Select
CHOIR
Voice
Nr.:
19
2
(TremulantSpeed:NO
)
When an instrument whose tremulant can be turned on or off (instruments with tremulant)
has been selected, the display will show the present value of the tremulant speed.
Select
Voice
Nr.:
GOSPEL
ORGAN
1
(TremulantSpeed:40
User’s manual
JOHANNUS
41
20
)
Classic Sound Module
4. With the UP and DOWN buttons, select the instrument whose Tremulant speed is to be
changed, then press ENTER. The display will now show the following text.
Voice:
20
GOSPEL
Tremulant
ORGAN
1
Speed:
40
Depending on the selected instrument and the tremulant speed (previously) set by you, the
grey marked text may differ from the example.
5. With the UP and DOWN buttons the value of the tremulant speed of the selected instrument
can be changed.
6. Setting the correct value for the tremulant speed, can be confirmed by pressing ENTER. To
indicate that the selection is being stored, the display will then, briefly, show the text “Storing
Data”.
Storing
Data...
After storing the data you will automatically be returned to the submenu.
>Instrument
Volume
Instrument
Bass
Instrument
Treble
Instr
Volume
Left
^
Instrument Tuning
To prevent the sound module from becoming a too rigid and sterile sounding device, the sound
module has been devised in such a way that the various instruments can be slightly detuned
with respect to each other, or to the device to which they are connected. This gives the sound
module (if necessary in combination with the device to which the sound module is connected)
a "wider","livelier" character.
An instrument is tuned at A=440Hz (the standard pitch for musical instruments) when the value
of “Instrument Tuning” is 0.
At an “Instrument Tuning” value of -64 the instrument is about half a tone lower than the
standard pitch whereas at a value of +64 the instrument is about half a tone higher.
User’s manual
JOHANNUS
42
Classic Sound Module
Changing the “Instrument Tuning” (pitch) of an instrument is done as follows:
1. Press the MENU button to get to the main menu and select the menu item “Advanced
Settings”, with the UP and DOWN buttons.
^
Change
Part
Midi
Chan's
Settings
Receive
Midi
>Advanced
Msg's
Settings
^
2. Then press ENTER. The display will now show the (sub)menu below.
Select the item “Instrument Tuning”, with the UP and DOWN buttons, then press ENTER.
^
Instrument
Instr.
Trem
Instr.
Trem
>Instrument
C-Cis
Depth
Speed
Tuning
3. The display will now show the text below:
Select
Voice
Nr.:
1
FLUTE
(Tuning
Voice:
+5
)
(The value 5 may be different.)
4. Select the instrument whose tuning voice is to be changed, with the UP and DOWN buttons,
then press ENTER. The display will now show the following text.
Vo i c e :
20
GOS P E L
Tun i n g
ORGA N
Vo i c e :
1
+ 5
Depending on the selected instrument and the tuning voice (previously) set by you, the grey
marked text may differ from the example.
5. With the UP and DOWN buttons the value of the item “Instrument Tuning” (pitch) of the
selected instrument can be changed.
User’s manual
JOHANNUS
43
Classic Sound Module
6. Setting the correct value for “Instrument Tuning”, can be confirmed by pressing ENTER. To
indicate that the selection is being stored, the display will then, briefly, show the text “Storing
Data”.
Storing
Data...
After storing the data you will automatically be returned to the submenu.
> I n s t r ume n t
V o l ume
I n s t r ume n t
Ba s s
I n s t r ume n t
T r eb l e
Instr
Volume
Left
^
Play demo song
The sound module can automatically play (back) one demo(nstration) melody. Playing the demo
song will give an impression of the tonal wealth of the sound module.
Playing the demo song can also be used to check whether the audio connection between the
sound module and the reproduction device (organ) is correct (no MIDI connection is needed to
play the demo song).
The demo song can be played back like this:
1. Press the MENU button to get to the main menu and select the menu item “Play Demo
Song”, with the UP and DOWN buttons.
^
Part
Settings
Receive
Midi
Advanced
>Play
Msg's
Settings
Demo
Song
^
2. Then press ENTER. The display will now show the text below and start playing the demo
song straight away.
Playing
Press
To
User’s manual
Demo
Any
Song
Key
Stop
JOHANNUS
44
Classic Sound Module
3. The playing of the demo song can be stopped by pressing one of the four buttons. The sound
module will immediately stop playing the demo song and return to the main menu.
>Change
Instrument
Change
Part
Midi
Chan's
Settings
Receive
Midi
Msg's
^
Module data
If the last item of the main menu is selected, the display will show the major data of the sound
module.
This is done as follows:
1. Press the MENU button to get to the main menu and select the menu item “About The
Module” (Module data) with the UP and DOWN buttons.
^
Receive
Midi
Advanced
Play
Demo
>About
Msg's
Settings
The
Song
Module
2. Then press ENTER. The display will show the text below.
JOHANNUS
CLASSIC
SOUND
MODULE
CSM-128
Version
1.2
On a sound module with a renewed program, the grey marked text may show another date.
3. This screen can be left again by pressing one of the four buttons. The sound module will then
return to the main menu.
>Change
Change
Part
^
User’s manual
Instrument
Midi
Chan's
Settings
Receive
Midi
JOHANNUS
45
Msg's
Classic Sound Module
Maintenance
The wooden case is finished partly in veneer and partly in solid wood.
The case can be wiped off dry with an ordinary duster or with a slightly damp cloth or a shammy.
After this, it can be rubbed dry with a non-fluffy cloth.
We advise against the use of furniture polish, because this will damage the varnish. Direct
sunlight may cause the case to discolour. This applies especially to natural oak cases.
Warranty
You were given a warranty when you bought your sound module. Please, read the warranty
conditions with care and send the bottom part of the warranty as soon as possible to
JOHANNUS Orgelbouw b.v. at Ede. Once again we want to draw your attention to the fact that
the warranty does not cover damage caused by alterations to the sound module or improper
use.
User’s manual
JOHANNUS
46
Classic Sound Module
Appendices
Technical specifications
Instruments (max. 128 polyphonic) . . . orchestral instruments
electronic instruments
keyboard instruments
percussion instruments
organ stops
special effects
12
11
4
4
13
4
Memory . . . . . . . . . . . . . . . . . . . . . . . . 128 (8 x 16, M1 to M8)
128 (8 x 16, G1 to G8, callable with capture pistons of the organ)
MIDI channels . . . . . . . . . . . . . . . . . . . 16
MIDI compatibility . . . . . . . . . . . . . . . . . MIDI specification 1.0
General Volume setting . . . . . . . . . . . . 11 steps
Tremulant . . . . . . . . . . . . . . . . . . . . . . . On/Off (17 instruments)
Mute modes . . . . . . . . . . . . . . . . . . . . . On/Off/Solo (per instrument)
MIDI message switches . . . . . . . . . . . . Instrument Changes On/Off (programmable)
Preset Changes On/Off (programmable)
General Volume On/Off (programmable)
Expression Pedal On/Off (programmable)
Voicing possibilities . . . . . . . . . . . . . . . Volume setting (per instrument, programmable)
Bass setting (per instrument, programmable)
Treble setting (per instrument, programmable)
Volume left setting (per instrument, programmable)
Volume right setting (per instrument, programmable)
C-Cis effect Off/C-Cis/Cis-C (17 instruments, programmable)
Tremulant depth (per instrument, programmable)
Tremulant speed (per instrument, programmable)
Detuning (per instrument, programmable)
Demo song . . . . . . . . . . . . . . . . . . . . . . 1
Supply voltage . . . . . . . . . . . . . . . . . . . 9Vdc (mains adapter)
Max. power consumption . . . . . . . . . . . 6Watts
Stereo output (RCA) . . . . . . . . . . . . . . 10kÙ/50mV
MIDI connections . . . . . . . . . . . . . . . . . 3 (IN - THRU - OUT)
Display . . . . . . . . . . . . . . . . . . . . . . . . . 4x20 character LCD
Control buttons . . . . . . . . . . . . . . . . . . 4 (UP, DOWN, MENU, ENTER)
Dimensions (W x H x D) . . . . . . . . . . . 21,6 x 9,5 x 19,3cm (8½ x 3¾ x 7½inch)
Weight . . . . . . . . . . . . . . . . . . . . . . . . . 1,6kg (3,5lbs)
Accessories . . . . . . . . . . . . . . . . . . . . . Mains adapter 9Vdc/1A
Audio cable
MIDI cable
User’s manual
JOHANNUS
47
Classic Sound Module
MIDI Implementation chart
JOHANNUS Expander Module
CSM-128
Functions
Transmitted
Recognized
Basic
Channel
Default
Changes
N
N
1 - 16
1 - 16 each
Mode
Default
Messages
Altered
N
N
* * * * * * * *
Mode 3
N
N
True voice
N
* * * * * * * *
36 - 96
36 - 96
Note ON
Note OFF
N
N
9nH v=1 - 127
9nH v=0, 8nH v=*
Keys
Channels
N
N
N
N
N
N
N
N
N
N
Y
Y
Y
Y
N
* * * * * * * *
0 - 47
0 - 47
System Exclusive
Y
Y
:Song Pos
Common :Song Sel
:Tune
N
N
N
N
N
N
System
:Clock
Real Time :Commands
N
N
N
N
N
N
N
N
N
N
N
Y
N
N
Note
Number
Velocity
After
Touch
Pitch Bend
7
11
100/101/6
100/101/6
Control
Change
Program
Change
Aux
:True#
:Reset All Controller
:Local On/OFF
:All Notes OFF
:Active Sense
:Reset
Date: Oct. 1999
Version 1.20
MIDI Implementation Chart
Remarks
Memorized
*=irrelevant
General volume
Expression pedals
Pitch
Transposer
Capture settings
Notes
Mode 1: OMNY ON, POLY
Mode 3: OMNY OFF, POLY
Mode 2: OMNY ON, MONO
Mode 4: OMNY OFF, MONO
User’s manual
JOHANNUS
48
Y = YES
N = NO
Classic Sound Module
Menu survey
This survey indicates how to move to a certain screen to reach a required menu or an item to
change a setting.
Initial screen
( Main menu
( Change instruments
( Part list
( Store Data
( Change Midi Chan’s
( Part list
( Store Data
( Part Settings
( Tremulant Off/On
( Select Part
( Change Tremulant
( Store Data
( Mute Off/On/Solo
( Select Part
( Change Mute
( Store Data
( Receive Midi Msg’s
( Instrument Changes
( Receive/Don’t Receive Instrument Change
( Store Data
( Preset Changes
( Receive/Don’t Receive Preset Change
( Store Data
( General Volume
( Receive/Don’t Receive General Volume Change
( Store Data
( Expression Pedal
( Receive/Don’t Receive Expr. Volume Change
( Store Data
( Advanced Settings
( Instrument Volume
( Select Part
( Volume
( Store Data
( Instrument Bass
( Select Part
( Bass
( Store Data
( Instrument Treble
( Select Part
( Treble
( Store Data
( Instrument Volume Left
( Select Part
( Volume Left
( Store Data
( Instrument Volume Right
( Select Part
( Volume Right
( Store Data
( Instrument C-Cis
( Select Part
( C-Cis
( Store Data
( Instr. Trem Depth
( Select Part
( Tremulant Depth
( Store Data
( Instr. Trem Speed
( Select Part
( Tremulant Speed
( Store Data
( Instrument Tuning
( Select Part
( Tuning Voice
( Store Data
( Play Demo Song
( Playing of the demo song
( About the module
( Module data
User’s manual
JOHANNUS
49
Classic Sound Module
Instrument list
With the sound module 48 extra instruments can be added to your organ.
The instruments can be divided into various kinds as shown below.
INSTRUMENT
NUMBER
1
2
3
4
5
6
7
8
9
10
11
12
13
14
15
16
17
18
19
20 *
21 *
22 *
23
24
25
26
27
28
29
30
31
32
33 *
34 *
35 *
36 *
37 *
38 *
39 *
40 *
41 *
42 *
43 *
44 *
45 *
46 *
47
48
INSTRUMENT
NAME
FLUTE
PICCOLO
RECORDER
PANFLUTE
HORN
CLARINET
ENGLISH HORN
OBOE
TRUMPET
CELLO
VIOLIN
TIMPANI
ORCH. STRINGS
WARM STRINGS
SYNTH STRINGS
BRIGHT STRINGS
BELL STRINGS
CHOIR 1
CHOIR 2
GOSPEL ORGAN 1
GOSPEL ORGAN 2
TIBIA ORGAN
HARPSICHORD
CELESTA 1
CELESTA 2
HARP
GLASSHARP
WOODHARP
HANDBELLS
CHRYSOGLOTT
CHIMES
CARILLON
REED ORGAN
HARMONIC FLUTE 8'
FLUTE CELESTE 8'
VIOLA CELESTE 8'
ENGLISH HORN 8'
CLARINET 8'
RANKET 8'
TUBA 8'
CHAMADE 8'
TERZIAN II
SESQUIALTERA II
CANT. FIRM. II-IV
FLUTE 8' + 2'
PLENUM
TRACKER ACTION 1
TRACKER ACTION 2
User’s manual
TYPE OF INSTRUMENT
orchestral instrument
orchestral instrument
orchestral instrument
orchestral instrument
orchestral instrument
orchestral instrument
orchestral instrument
orchestral instrument
orchestral instrument
orchestral instrument
orchestral instrument
orchestral instrument
electronic instrument
electronic instrument
electronic instrument
electronic instrument
electronic instrument
special effect
special effect
electronic instrument
electronic instrument
electronic instrument
keyboard instrument
keyboard instrument
keyboard instrument
orchestral instrument
orchestral instrument
orchestral instrument
orchestral instrument
percussion instrument
percussion instrument
percussion instrument
keyboard instrument
organ stop
organ stop
organ stop
organ stop
organ stop
organ stop
organ stop
organ stop
organ stop
organ stop
organ stop
organ stop
organ stop
spec. effect (organ noise)
spec. effect (organ noise)
JOHANNUS
50
Classic Sound Module