1
Installation and Configuration Guide
Version 16
Case CATalyst Installation and Configuration Guide
© 2002 - 2015 by Stenograph. All Rights Reserved. This material is protected by Federal Copyright Law and is not to be copied or
reproduced in any form or medium without prior written authorization from Stenograph. Published 2002, Twelfth Edition February
2015
STENOGRAPH PROPRIETARY:This material constitutes proprietary and trade secret information of Stenograph, and shall not be
disclosed to any third party, nor used by the recipient, except under the terms and conditions of the license agreement between the
customer and Stenograph.
Changes may be made periodically to the information in this publication. Such changes will be incorporated in any new edition of this
manual.
Stenograph is a Pettibone Company.
Stenograph, Case CATalyst, CATalyst, Premier Power and the Stenograph logo are registered trademarks of Stenograph.
e-Key and Case AudioSync are trademarks of Stenograph.
TurboCAT and CAPtivator are trademarks of Cheetah Systems, Inc.
Windows is a registered trademark of Microsoft Corporation. Windows Vista is a trademark of Microsoft Corporation.
Acrobat Reader is a registered trademark of Adobe Systems Inc.
All other trademarks are the property of their respective owners.
ii
© 2015 Stenograph
Contents
Chapter 1: Introduction..................................................................................................... 5
Who Should Read This Guide ................................................................................................................. 5
User Guide Overview............................................................................................................................... 5
Where To Go For More Information......................................................................................................... 6
Chapter 2: Installation Requirements.............................................................................. 7
Chapter 3: Installation....................................................................................................... 9
Installing the Software ............................................................................................................................. 9
Set Compatibility Properties.............................................................................................................. 15
e-Key Activation ................................................................................................................................ 15
Case CATalyst Update Installation ........................................................................................................ 17
Uninstall Case CATalyst Software......................................................................................................... 18
Training Tools ................................................................................................................................... 20
Sample Voice Files ........................................................................................................................... 22
Chapter 4: Configuration ................................................................................................ 23
Changing Users .....................................................................................................................................
Convert Dictionaries ..............................................................................................................................
Add Delete and Flush Strokes to Dictionaries .......................................................................................
Error Messages .....................................................................................................................................
23
23
25
27
Chapter 5: Troubleshooting ........................................................................................... 27
Stenograph Technical Support .............................................................................................................. 30
Appendix A: Update Case CATalyst Software.............................................................. 31
Update Case CATalyst Program Files................................................................................................... 31
Downloading the Update ....................................................................................................................... 32
Appendix B: Network Keyless Access .......................................................................... 35
Installing Network Keyless Access ................................................................................................... 35
NKA Server ....................................................................................................................................... 36
Things to know.............................................................................................................................38
Running Case CATalyst for the first time.....................................................................................38
About Case CATalyst NKA..........................................................................................................38
Uninstalling Network Keyless Access..........................................................................................39
Appendix C: Network Installation .................................................................................. 41
Network Setup Guidelines ..................................................................................................................... 41
Network Setup Scenarios ...................................................................................................................... 42
Install Case CATalyst and User Files on the Network ...................................................................... 42
Install Case CATalyst on Workstations/User Files on Network ........................................................ 42
Install Case CATalyst on Network/User Files on Workstations ........................................................ 43
Install Case CATalyst and User Files on Each Workstation ............................................................. 43
Workstation Setup ................................................................................................................................. 44
Install Case CATalyst on the Network Drive ..................................................................................... 45
Run the Workstation Setup Program ................................................................................................ 46
© 2015 Stenograph
iii
Case CATalyst Installation and Configuration Guide
iv
© 2015 Stenograph
Chapter 1
Introduction
The Case CATalyst® Installation and Configuration Guide explains how to install Case CATalyst on a
computer and activate your e-Key™. If you purchased the CATalyst Broadcast Captioning Suite (BCS)
or CATalyst VP, follow the Case CATalyst installation instructions.
This guide also describes troubleshooting steps if you encounter difficulties. Additional information about
updating Case CATalyst software and Case CATalyst network installation is available in the appendices.
Who Should Read This Guide
Court reporters, scopists, captioners and others installing Case CATalyst, CATalyst BCS or CATalyst VP
can use this guide for step-by-step instructions to install and customize the program. Those responsible
for keeping the system up and running can use this guide to troubleshoot any issues that may arise.
User Guide Overview
The Case CATalyst Installation and Configuration Guide consists of:
Chapter 1, Introduction, explains how the guide is organized along with references to additional
resources.
Chapter 2, Installation Requirements, explains the computer hardware necessary to run Case
CATalyst.
Chapter 3, Installing Case CATalyst, explains how to install the Case CATalyst software and activate
your e-Key.
Chapter 4, Case CATalyst Setup, explains how to start the software, change users, convert
dictionaries and add delete strokes to your dictionary.
Chapter 5, Troubleshooting, lists Case CATalyst error messages along with the most likely reason
they appear and potential solutions.
Appendix A, Updating Case CATalyst Software, explains how to use the Case CATalyst, Check for
Updates, feature to install updates to your computer and download the update for installation onto a
computer not connected to the internet.
Appendix B, Installing Case CATalyst Network Keyless Access, explains how to setup Case
CATalyst using NKA (Network Keyless Access) on a server.
Appendix C, Installing Case CATalyst on a Network, explains how to setup Case CATalyst on a
network and network workstations.
© 2015 Stenograph
5
Case CATalyst Installation and Configuration Guide
Where To Go For More Information
In addition to the Case CATalyst Installation and Configuration Guide, you may want to refer to the
following resources. For additional details, see “Training Tools” on page 20.
Case CATalyst Help (F1) for Case CATalyst, CATalyst BCS, CATalyst VP
Case CATalyst Manual with CATalyst BCS and CATalyst VP Information
Case CATalyst Command Summary Cards
CATalyst BCS Command Summary Cards
CAT4 Command Summary Cards
Interactive Video Training: Essential Skills and Productivity Boosters
Self-Study Guides
Exceptional Extras
Sample Voice Files
Stenograph Help Desk (www.stenograph.com)
6
© 2015 Stenograph
Chapter 2
Installation Requirements
Congratulations on your purchase of Case CATalyst, Stenograph’s most successful computer-aided
transcription (CAT) software with optionally purchased CATalyst BCS, a contemporary captioning
solution, or CATalyst VP. Before installing Case CATalyst software on your computer, confirm your
computer meets or exceeds the hardware requirements listed in this chapter. If your computer system
meets the listed requirements, install Case CATalyst, as described in the Installation chapter on page 9.
IMPORTANT: For Case CATalyst to operate properly, it is imperative that your computer meet the
following minimum recommended hardware requirements. If you are installing CATalyst BCS or
CATalyst VP, contact Stenograph Technical Support for specific hardware requirements.
Operating System:
One of the following operating systems:
•
Windows® 8 - 32-bit or 64-bit
•
Windows 7 - 32-bit or 64-bit.
•
Windows Vista™, 32-bit or 64-bit.
Windows XP is not recommended. Microsoft ended support of Windows XP in 2014 and will no longer
provide security updates or support information. Stenograph strongly recommends using a current
Operating System due to security concerns and limited ability to troubleshoot XP related issues.
Computer processor
•
Windows 8 / Windows 7 / Windows Vista - Pentium processor speed of 2GHz or higher. A
Pentium D, Core 2 Duo, i3, i5, i7 or AMD equivalent processor is strongly recommended.
RAM Memory
RAM, Random Access Memory, is the amount of space on your computer that is devoted to processing.
The more RAM your computer has, the more space it has to work and the faster it can respond.
•
Windows 8 / Windows 7 / Windows Vista - 2GB RAM or more.
If using CATalyst VP, at least 4GB of RAM is recommended but please contact Stenograph’s
Technical Support Department for the optimal performance hardware recommendations.
Hard Drive
•
Windows 8 / Windows 7 / Windows Vista - At least a 40GB hard drive with at least 20GB free
space. An 80GB or more hard drive is strongly recommended.
Optical Drive
DVD drive for software installation.
Ports
A USB port for the writing machine to write realtime, update the writing machine dictionary and update
the writing machine software.
© 2015 Stenograph
7
Case CATalyst Installation and Configuration Guide
A 9-pin Serial port or USB port for a USB to serial port compatible adapter to connect to the writing
machine. Depending on your steno machine, a 9-pin serial port may be optional.
Video Card
Windows Vista and Windows 7 - A DirectX 9-capable video card with video drivers and a minimum of
256 VRAM.
Display
SVGA monitor with 1024 x 768 or higher display.
Audio Card
A Windows compatible sound card for audio recording at 8Kz, 16-bit.
Microphone
A Windows compatible external, self-powered microphone.
Mouse
Mouse or other pointing device. Some features, such as customizing the toolbar, may be difficult to
implement without a mouse.
Keyboard
Text input device. Many editing commands rely on the Function Keys (F1 - F12), especially relying on
F4 when inserting format symbols. Stenograph suggests you purchase a PC that has Function Keys.
External Floppy Drive (Optional)
Legacy writing machines may require an optional external 3 1/2” diskette drive for reading notes and
importing and exporting files.
Network compatibility
TCP/IP protocol is required for specific communications features.
8
© 2015 Stenograph
Chapter 3
Installation
This chapter details the Case CATalyst software installation process. CATalyst BCS and CATalyst VP
install with Case CATalyst software. CATalyst BCS and CATalyst VP are each optional purchases. Your
e-Key code includes access to the software when purchased.
After successfully installing Case CATalyst on a computer running Windows 8, Windows 7 or Windows
Vista, Case CATalyst must be set to run as “administrator.” Instructions to set Case CATalyst to run as
“administrator” are included in this chapter.
Your e-Key requires activation the first time Case CATalyst Version 16 or higher opens following
installation and seamless reauthorization on a quarterly basis. Initial activation instructions are included
in this chapter. As your renewal date approaches, Case CATalyst may prompt you to update the license
file depending on your settings. Internet access is necessary to update the file.
The User Account Control or Permissions message box displays during Case CATalyst software
installation. The User Account Control (UAC) is an important security feature of Windows 8, Windows 7
and Windows Vista. It prompts you for permission to run the displayed program name or service being
accessed. The current Windows user must have administrative rights to permit the installation. If the
current user does not have Administrative rights, the UAC prompts you for the Administrator user name
and password. Stenograph does not recommend disabling the UAC.
Installing the Software
The Case CATalyst installation program provides step-by-step instructions to guide you through the
Case CATalyst DVD software installation process. If you are updating to Case CATalyst Version 16,
ensure your e-Key license or security device is updated before installation.
If you are currently running Case CATalyst Version 12.54 or higher, you can quickly update to Version
16 via the Internet. See Case CATalyst Update Installation on page 17.
Install Case CATalyst
1. Start your computer. Make sure it is fully booted.
2. Close all Windows programs before running the install program.
© 2015 Stenograph
9
Case CATalyst Installation and Configuration Guide
3. Insert the Case CATalyst DVD into the DVD drive. When the AutoPlay dialog box displays, click Run
autorun.exe.
If your computer settings do not allow for “auto run” or “auto play,” or the Case CATalyst Installation
screen does not display, you can initiate the installation process manually:
a. From the Windows Start menu, select Run.
To add the Run command to the Windows 7 or Windows Vista Start menu, right click the Start
menu and select Properties. Click the Start Menu tab and select Customize. Depending on
your operating system, check the box, Run command or Display Run command and press OK.
Click OK in the Taskbar and Start Menu Properties dialog box.
b. On the Command line, type d:\setup and then press Enter. If your DVD drive is designated by a
letter other than “d,” substitute the appropriate letter in the command line.
c. Continue with Step 5 on page 10.
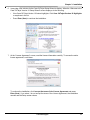
4. The Case CATalyst Installation screen displays with the following options. To continue with the Case
CATalyst software installation, click Install Case CATalyst.
•
Install Case CATalyst - Begin the Case CATalyst Version 16 software installation.
•
Installation and Configuration Guide - Display the step-by-step installation instruction in PDF
format.
•
Browse for Drivers, Release Notes and more - View the contents of the Case CATalyst V16
Installation DVD.
5. When active, the User Account Control (UAC), a security feature in Windows 8, Windows 7 and
Windows Vista, prompts you for permission to allow the Case CATalyst installation. Select Yes or
Continue.
The current Windows user must have Administrator rights. If the current Windows user does not
have Administrator rights, the UAC prompts you to enter the Administrator user name and password.
10
© 2015 Stenograph
Chapter 3: Installation
6. It may take a few minutes for the Case CATalyst Setup Wizard to display. When the “Welcome to the
Case CATalyst Version 16 Setup Wizard” screen displays, do the following:
•
View Case CATalyst Version 16 feature highlights. Click Case CATalyst Version 16 Highlights
or anywhere in the list.
•
Press Enter (Next) to continue the installation.
7. At the “License Agreement” screen, read the license information carefully. To access the entire
license agreement, scroll down.
To continue the installation, click I accept the terms of the License Agreement and press
Enter (Next). If you select, I do not accept the terms of the License Agreement, the installation
cancels and the Setup screen closes.
© 2015 Stenograph
11
Case CATalyst Installation and Configuration Guide
8. At the “Case CATalyst Security” screen, press Enter (Next).
Your PKC was e-mailed to you. Type your PKC in the Your PKC: field. At the end of the installation,
if you have internet access, CATalyst will attempt to authorize your e-Key. If you do not type your
PKC or do not have internet access at the time of the installation, the first time you start CATalyst
you will be prompted to activate your e-Key. For more information, see e-Key activation on Page 15.
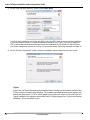
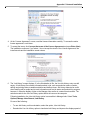
9. At the “Choose Components” screen, select the installation options that best suits your needs.
Typical
Install Case CATalyst software and the Integrated Video Training onto the hard drive with a Case
CATalyst shortcut created on the Desktop. The Installation process determines the location and
creates the folder name, C:\CAT4. When updating from a previous version of Case CATalyst, the
Typical installation only replaces the existing Case CATalyst program files. Typical is the easiest
installation. This is the default choice.
12
© 2015 Stenograph
Chapter 3: Installation
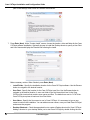
Custom
Install Case CATalyst software based on selected options. Choose your location, drive and folder
for installation. Optionally choose to install the Integrated Video Training, create a Case CATalyst
Desktop shortcut, specify a User Root and User Name and display the Readme file following the
install. Custom installation is designed for advanced users.
Select Custom and click Next to display the Custom Install screen and make entries.
-
Install Folder - Specify the installation location for the Case CATalyst software. Use the
Browse button to navigate to the desired location.
-
Install Integrated Video Training - Check this box to install the Integrated Video Training
that includes Essential Skills and Productivity Boosters training modules. Essential Skills are
designed for new users to quickly learn Case CATalyst basics. Productivity Boosters provide
additional advanced training. You can use the Case CATalyst option, Create Training User,
to create a user with sample files that work in conjunction with the Essential Skills Integrated
Video Training for hands-on practice.
-
User Root - Specify the location for the Case CATalyst user files. Use the Browse button to
navigate to the desired location. A user root folder is the first hierarchical level in the Case
CATalyst file structure that contains user names and files. The default user root is
C:\CAT4\usr. Case CATalyst requires at least one User Root folder.
-
User Name - Specify the User name to use in Case CATalyst. It is necessary to type a user
name to continue the installation. You can add more user names, once you install Case
CATalyst and access the program.
-
Desktop Shortcuts - Check the appropriate box to create a Desktop shortcut for Case
CATalyst. Adding a shortcut to your desktop allows you to start Case CATalyst by double
clicking the icon.
© 2015 Stenograph
13
Case CATalyst Installation and Configuration Guide
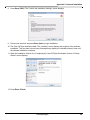
10. Press Enter (Next). The “Confirm the Installation Settings” screen displays with the type of
component selected, Typical or Custom with specified options.
11. Review your selection and press Enter (Install) to begin installation. If it is necessary to make a
change, click Back.
12. The Case CATalyst software installs. The “Installing” screen displays the progress of the software
installation. This could take a few minutes. Messages may display for extended periods of time until
the software installation completes.
13. When the installation finishes, the “Completing the Case CATalyst Version 16 Setup Wizard” screen
displays.
14. Do any of the following:
•
Select or deselect the Run Case CATalyst option and click Finish.
•
Select or deselect the View Readme option and click Finish. The Readme provides a link to the
Release Notes which give detailed information about new features and software modifications.
15. Set Case CATalyst to run as “administrator. See Set Compatibility Properties on page 15. After
setting the compatibility properties, follow the instructions to activate your e-Key on on page 15.
Continue with the instructions to activate your e-Key. See e-Key Activation on page 15.
14
© 2015 Stenograph
Chapter 3: Installation
If you entered a PKC during installation but did not have Internet access and you selected to not run
Case CATalyst immediately after installing, the following message displays. Run Case CATalyst and
see e-Key Activation on Page 15.
Set Compatibility Properties
It is necessary to set the compatibility properties on Windows 8, Windows 7 and Windows Vista systems
for Case CATalyst Version 16 to run as “administrator.” Setting Case CATalyst to run as “administrator”
prevents potential performance issues.
To change the compatibility properties:
1. Right click the Case CATalyst shortcut and select Properties in the drop down menu. The Case
CATalyst Version 16 Properties dialog box displays.
2. Select the Compatibility tab.
3. Under Privilege level, check the option, Run this program as an administrator.
4. Click the button, Show settings for all users.
5. The User Account Control dialog box displays. Click Continue. The Compatibility for all users tab
displays.
6. Under Privilege level, check the option, Run this program as an administrator.
7. Click OK to close the tab and then click OK again to close the Case CATalyst Version 16 Properties
dialog box.
e-Key Activation
If you did not type your PKC during installation or did not have Internet access, your e-Key requires
activation the first time Case CATalyst Version 16 is run following installation.
To activate e-Key:
1. Start Case CATalyst, do one of the following:
•
Double click the Case CATalyst icon on your desktop.
•
Click the Start button. From the Start Menu, select Programs/Stenograph/Case CATalyst.
© 2015 Stenograph
15
Case CATalyst Installation and Configuration Guide
2. The e-Key Setup dialog box displays. If the Product Key Code field is empty, type the Product Key
Code you received via e-mail. Case CATalyst automatically fills in the Registration Code.
Depending on your Internet connection status, do the following:
Internet Access
a. Click Automatic e-Key. A message displays prompting you to wait. The download may take up
to a minute.
b. Once the download is complete, the Options Setup dialog box displays.
c. Click Finished. Case CATalyst opens.
d. At the Manage Jobs screen, highlight the user name you created during installation and press
Enter.
No Internet Access
a. Click Manual e-Key. The Manual e-Key dialog box displays.
b. Click Save License Request File. The Save Authorization Request To File dialog box opens to
the last accessed location. Insert a thumb drive or other removable media device into the
computer.
c. Navigate to the thumb drive or removable media device and click Save. A reminder message
displays prompting you to re-open Case CATalyst after installing the authorization file.
16
© 2015 Stenograph
Chapter 3: Installation
d. Press Enter (OK) to close the reminder message. Case CATalyst closes.
e. On a computer with an active Internet connection, insert the thumb drive or removable media
device with the Authorization Request File and open the browser to:
https://www.stenograph.com/ManualUpdate.aspx
f.
Follow the instructions on the web page to download the authorization file to the thumb drive or
removable media.
g. Return to the Case CATalyst computer. Copy the downloaded authorization file from the thumb
drive or removable media device to the computer's desktop.
h. Double click the authorization file to install it. Once the download is complete, the Options Setup
dialog box displays.
i.
Click Finished. Case CATalyst opens.
j.
At the Manage Jobs screen, highlight the user name you created during installation and press
Enter.
Case CATalyst Update Installation
Case CATalyst users running Version 12.54 or higher can use the Case CATalyst, Check for Updates,
feature to install Version 16. Your e-Key license must be updated for Version 16.
1. From Case CATalyst, select Help/Check for Updates. A message displays while Case CATalyst
connects and checks for updates.
2. The “Choose the update you want to apply” message displays.
3. Click the Update button. By default, the Integrated Video Training files are selected to install with the
update. Integrated Video Training includes short Essential Skills and Productivity Boosters videos.
Essential Skills are designed for new users to quickly learn Case CATalyst basics. Productivity
Boosters show additional advanced features. You can use the Case CATalyst option, Create
Training User, to create a user with sample files that work in conjunction with the Essential Skills
Integrated Video Training for hands-on practice.
Deselect the option, Include Integrated Video Training, if you do not want to copy the video files.
4. Select Update. Case CATalyst closes and updating to Version 16 begins.
© 2015 Stenograph
17
Case CATalyst Installation and Configuration Guide
5. When the update completes, the “Case CATalyst Updater is successful” dialog box displays.
6. By default, the Run Case CATalyst option is selected. Press Enter (Finish) to start CATalyst.
Uninstall Case CATalyst Software
In the rare instances it is necessary to remove the Case CATalyst software, the uninstall process
removes only program files, however, Stenograph strongly recommends that you back up your files
before removing the Case CATalyst software. From the Case CATalyst Manage Jobs screen,
press Ctrl + b (Tools/Backup). Check the box next to your user name to backup all your files. For
additional Backup information refer to the Case CATalyst Help.
Complete the following steps to uninstall Case CATalyst software:
1. Start your computer. Make sure Case CATalyst is not running.
2. From the Start Menu, select Programs/Stenograph/Uninstall Case CATalyst.
3. At the “Welcome to the Case CATalyst Version 16 Uninstall Wizard” screen, press Enter (Next).
18
© 2015 Stenograph
Chapter 3: Installation
4. At the “Uninstall Case CATalyst Version 16” screen, press Enter (Uninstall). The Uninstalling from
field reflect the current Case CATalyst installation folder.The “Uninstalling” screen displays the
progress of the uninstall.
5. At the “Completing the Case CATalyst Version 16 Uninstall Wizard” screen, press Enter (Finish) to
complete the uninstall.
6. To install the Case CATalyst Version 16 software, continue with Installing the Software on page 9.
© 2015 Stenograph
19
Case CATalyst Installation and Configuration Guide
Training Tools
Case CATalyst includes an online help, an electronic user’s manual and integrated training videos. The
Help system, manual and training videos target the Full Version of Case CATalyst. If you installed the
Edit or Student version of Case CATalyst software, some features may not exist in your version.
Additional learning aides are accessible from the Help menu. These include the ability to create a
training user with Essential Skills practice files, self-study guides and specialized sample dictionaries,
macros, templates and other Case CATalyst files.
Online Help
The Case CATalyst Help, including the CATalyst BCS and CATalyst VP Help, is accessed from the Help
menu, by pressing F1 or by clicking Help in a dialog box. CATalyst BCS and CATalyst VP are optional
programs.
Manual
The Case CATalyst Manual, in PDF format, is available from the Help menu. The Case CATalyst manual
also contains information for the optional CATalyst BCS and CATalyst VP programs.
Integrated Video Training
Case CATalyst integrated video training, accessible from the Help menu, includes short video lessons
on select Case CATalyst features. Essential Skills training videos provide instruction on basic steps
necessary to produce a transcript, conduct dictionary and file maintenance, modify page layout settings
and create include files. Additional video modules, Productivity Boosters, provides training on Case
CATalyst features beyond the basics such as compressing and e-mailing job files, Seating Chart setup,
modifying global definitions and using the Cat Scratch pane.
When you select Typical installation, the Case CATalyst training videos automatically install onto the
hard drive of your computer when Case CATalyst software installs. When Custom installation is chosen,
the training videos install on your computer hard drive only when the Install Integrated Video Training
option is selected to install with the Case CATalyst software.
Create Training User
The Create Training User feature, available from the Help menu, automatically creates a new user with
the name, “Training,” followed by the current user name. For example, you are in the user “Mike” and
select Create Training User. Case CATalyst creates the user, “Training Mike,” and automatically opens
the user. The training user contains sample files for hands-on practice to accompany the Essential Skills
Integrated Video Training.
Command Summary Cards
The Command Summary Cards, available from the Help menu, provide quick reference to Case
CATalyst or CATalyst BCS default keyboard commands. There are basic, intermediate and advanced
level cards. All Command Summary Cards display in PDF format with the ability to create printed copies.
You can open the cards and switch the display between the cards and Case CATalyst by
pressing Alt + Tab.
20
© 2015 Stenograph
Chapter 3: Installation
Personal Command Summary Cards
You can also view and/or print Command Summary Cards based on your keyboard map assignments. If
you are in a keyboard map, simply select View, Personal Command Summary Card and select the level
of card you want to view. As an alternative, from the Help menu you can select Personal Command
Summary Cards, select the card level and then select the keyboard map. Your Personal Command
Summary Card opens in your Internet Browser.
When printing the Personal Command Summary Cards from your browser, it is best to select Landscape
as the Print Orientation.
Self-Study Guides
The Case CATalyst self-study guides, accessible from the Help menu, can assist you in learning how to
use basic Case CATalyst skills and other Case CATalyst features. These guides, in PDF format, include:
AudioSync Self-Study Guide - Learn how to set up and use AudioSync to create a synchronized audio
(.wav) of realtime sessions. The guide covers using AudioSync with Case CATalyst Version 16; using
AudioSync On The Go with the Diamante®, élan Mira A3® or the Stentura® Fusion; and working with
audio files recorded on another device.
Automatic Indexing Self-Study Guide - Learn the Indexing format symbols and how to create
customized index pages for your transcripts using the Build Index feature.
Basic Realtime Self-Study Guide - Discover the basics of realtime translation, including setup and how
to make use of Case CATalyst features to improve realtime translation accuracy.
Fields Self-Study Guide - Gain an understanding of how fields can help to quickly and efficiently insert
information for standard pages, parentheticals, headers and footers.
Essential Skills Self-Study Guide - Learn the essential skills of transcript production and file
maintenance.
Index Template Wizard Self-Study Guide - Learn to use the Index Template Wizard feature to create
customized index templates for use with the Build Index feature.
Number Conversion Self-Study Guide - Learn how the Case CATalyst Automatic Number Conversion
feature and number conversion definitions can help convert combinations of numbers and words such
as time, dates, addresses and measurements to a specific format.
Speaker Features Self-Study Guide - Learn to identify speakers before and during translation using the
EZ Speakers Dictionary; easily add and modify speakers in Edit using the Speaker List; and take
advantage of the Seating Chart during Realtime.
Exceptional Extras
The Case CATalyst Exceptional Extras, available from the Help menu, include step-by-step instructions
along with keyboard maps, dictionaries, macros and index templates to assist you in effectively taking
advantage of features beyond the basic. All instructions are in PDF file format.
© 2015 Stenograph
21
Case CATalyst Installation and Configuration Guide
Sample Voice Files
The Case CATalyst DVD contains sample voice files to assist you in getting started with basic
CATalyst VP features and transcript production. You can use these sample files in CATalyst VP, making
any necessary individualized modifications. To use the files, copy them from the Case CATalyst DVD to
the appropriate location on your computer in Case CATalyst. See below for instructions.
The sample files contained in the Sample Voice Files folder include: UserLayout.SGCUL, Sample 1
VoiceCommands.sgvcd and Sample 2 VoiceCommands.sgvcd and VP Keyboard.sgkbd.
The Sample Voice Files Document, in PDF format, provides information about the files and how to use
them.
Copying Sample Voice Files
1. Insert the Case CATalyst Installation DVD into the DVD drive.
2. When the Case CATalyst installation screen displays, click Drivers, Release Notes and More.
3. Double click the folder, Sample Voice Files.
4. Using Windows conventions, copy each file you are using to the specified Case CATalyst location:
22
•
UserLayout.SGCUL - System Files case.
•
Sample 1 VoiceCommands.sgvcd - Copy to the System Files case. A sample voice dictionary
can be renamed, Personal VoiceCommands.sgvcd, for use with CATalyst VP only. CATalyst
VP automatically uses this dictionary during voice translation. The dictionary name must be,
Personal VoiceCommands.sgvcd and reside in the System Files case for CATalyst VP to use it
automatically. You can also create a new voice dictionary with the name, Personal
VoiceCommands.sgvcd.
•
Sample 2 VoiceCommands.sgvcd - Copy to the System Files case. This sample voice
dictionary can be renamed, Personal VoiceCommands.sgvcd, for use with CATalyst VP only.
CATalyst VP automatically uses this dictionary during voice translation. This dictionary must be
named, Personal VoiceCommands.sgvcd and reside in the System Files case for CATalyst VP to
use it automatically. You can also create a new voice dictionary with the name, Personal
VoiceCommands.sgvcd.
•
VP Keyboard.sgkbd - Copy to the System Files case. Keyboard maps must reside in the
System Files case.
•
Sample Voice Files Document.pdf - Copy to any location on your computer. Double click to
view from the DVD. This document provides information and use regarding the contents of the
Sample VoiceCommands dictionaries.
© 2015 Stenograph
Chapter 4
Configuration
Once you complete the Case CATalyst installation, you may want to import your dictionary. This chapter
explains how to change users, import your dictionary and how to add delete and flush strokes to your
dictionary.
Changing Users
To change to another user directory, do one of the following:
•
From the User Level, in the Manage Jobs screen double click the user name.
•
From within a user directory, return to the User Level screen. In Manage Jobs, press Alt + t, s
(Tools/Users Level) and double click the user name.
Convert Dictionaries
To use a dictionary created in another CAT software program, it may be necessary to export the
dictionary from the other CAT system to import it into Case CATalyst. You can import dictionaries in
Case CATalyst Version 3.x format, Premier Power format, dictionaries converted to RTF/CRE or
dictionaries converted to Stentura format.
When importing a backed up Case CATalyst Version 3.x dictionary, use the Restore feature. If the Case
CATalyst Version 3.x dictionary is not backed up, use the Import function.
If you sent your dictionary to Stenograph to be converted, use the instructions included with your
converted dictionary to restore it into Case CATalyst.
1. Sign on to the user name in which you want to import the dictionary.
2. Press Alt + u, i (Function/Import) to display the Import dialog box.
3. In the Import Source field, select the type of import:
•
Case CATalyst 3.0 — If the Case CATalyst Version 3.x dictionary is backed up, use the Case
CATalyst Restore function.
•
RTF/CRE — Select RTF/CRE if the dictionary has been exported to RTF/CRE format and has a
“.RTF” extension.
•
Stentura dictionary
•
Premier Power — If possible, Stenograph recommends that you optimize your dictionary in
Premier Power before importing it.
4. Confirm that the Import From field displays the location of the dictionary you want to import. If it is
incorrect, select the Browse button to locate the correct source location. If the file is on diskette,
make sure the diskette is in the diskette drive.
© 2015 Stenograph
23
Case CATalyst Installation and Configuration Guide
5. To display only dictionaries in the current location, in the Files of Type field, click the Down Arrow to
make your selection.
•
RTF/CRE Dictionary Files — Import a RTF/CRE formatted dictionary.
When importing an RTF dictionary from Eclipse, Case CATalyst may prompt you to import the AI
(artificial intelligence) information. Selecting Yes, imports the information and stores it in the
Case CATalyst SecondChoice database which is used for CATalyst’s Second Choice conflict
resolution. Second Choice conflict resolution option is available on the Input tab of the Translate
Options dialog box.
•
Case CATalyst 3.0 Dictionary Files (*.dct) — Import a Case CATalyst Version 3.x dictionary.
•
Stentura Dictionary — When importing a Stentura dictionary no file selection window displays
so no Files of Type field is available. You can choose to import the JDEFINES.JOB Stentura job
dictionary. For more information on the JDEFINES.JOB dictionary, see your Stentura
documentation.
•
Premier Power Dictionary Files (*.dct; *.job) — Import a Premier Power dictionary.
6. Use one of the following methods to select dictionaries.
•
Select an individual dictionary — Highlight the dictionary.
•
Select consecutive dictionaries — Press and hold Shift and click the first dictionary in the list
you want to select. Move your cursor to the last dictionary you want to select and click it. Release
Shift. All dictionaries between the first and the last dictionary selected are chosen for import.
•
Select non-consecutive dictionaries — Press and hold Ctrl. Click each dictionary you want to
select and then release Ctrl.
8. Case CATalyst defaults to keeping the original name of the dictionary when importing. Select OK to
begin the Import process.
If you import an RTF/CRE dictionary created by Cheetah TurboCAT, the following message displays:
The dictionary dictionaryname.rtf was exported by TurboCAT.
Please select whether this was from TurboCAT or by CAPtivator™.
Use my selection for all other dictionaries I’m importing right now.
TurboCAT
CAPtivator
Select the type of dictionary. Your selection determines how Case CATalyst imports specific
dictionary entries concerning format symbols for captioning.
If you are importing your Personal Dictionary, be sure to save it in the System Files case and name it
Personal Dictionary. If you deselected the Keep same filename as original system option, a Save As
dialog box displays for you to name each selected dictionary.
9. When the import completes, a message box displays confirming the number of files imported.
24
© 2015 Stenograph
Chapter 4: Configuration
Add Delete and Flush Strokes to Dictionaries
Case CATalyst and CATalyst BCS do not have a preset delete stroke. After importing your dictionary,
add your entry for a Delete stroke, such as * (asterisk) and a Caption Flush stroke, such as, the pound
sign followed by an asterisk (#*) for CATalyst BCS.
If you import a Case CATalyst Version 3.x dictionary that contains the {Delete} entry, the delete stroke
entry already exists in your Case CATalyst dictionary.
To define your Delete and Flush strokes:
1. At the Manage Jobs screen, highlight the dictionary to which you want to add the delete stroke and
press Enter.
Stenograph recommends adding the strokes to the Personal Dictionary. Your Personal Dictionary is
stored in the System Files case. Double click the System Files case and then double click Personal
Dictionary.
2. Once the dictionary opens, press Ctrl + i (Edit/Insert) to display the Insert dialog box.
3. In the Steno field, type the steno for the delete stroke.
4. In the Text field, press Alt + f (FS) to display the list of Format Symbols.
5. Use the arrow keys to locate and highlight the translate command, {Delete}.
6. Press Enter to insert the {Delete} command into the Text field.
7. Click OK. Define any additional {Delete} strokes as necessary.
To define two asterisks as a paragraph, in the Steno field type two asterisks separated by a forward
slash (*/*). In the Text field, press F4 P to insert the <Continuation Paragraph> format symbol.
If applicable, define any steno outlines used to force text to the encoder using the format symbol,
<Caption: Flush> in the Text field.
8. When finished inserting entries, click Cancel to exit the Insert dialog box.
9. Press Ctrl + F4 (File/Close) to exit the Manage Dictionary function. At the Save Changes prompt,
select Yes to save the new entries.
© 2015 Stenograph
25
Case CATalyst Installation and Configuration Guide
26
© 2015 Stenograph
Chapter 5
Troubleshooting
Error Messages
If you encounter problems or receive error messages when using Case CATalyst, CATalyst BCS or
CATalyst VP, refer to the following information to discover the possible causes of the problem and what
you can do to fix them. You might also want to check Case CATalyst Help for error messages.
Case CATalyst is not activated yet, to finish the activation process, please run Case CATalyst.
1. You need to activate your e-Key. Your personal PKC (Product Key Code) was sent to you via
e-mail. Run Case CATalyst and type your PKC in the Product Key Code field, the Registration
Code field will automatically fill in.
2. Click Automatic e-Key if you are connected to the Internet. If you do not have an Internet
connection, select Manual e-Key and follow the on-screen instructions.
3. Complete the remaining steps for activation. See e-Key Activation, Step 2 on page 16.
e-Key Setup dialog box
The e-Key Setup dialog box is empty after installing Case CATalyst V16.
Action
1. Your e-Key needs activation after installing Case CATalyst V16. Your personal PKC (Product
Key Code) was sent to you via e-mail Type you PKC in the Product Key Code field. Case
CATalyst automatically fills in the Registration Code.
2. Click Automatic e-Key if you are connected to the Internet. If you do not have an Internet
connection, select Manual e-Key and follow the on-screen instructions.
3. Complete the remaining steps for activation. See e-Key Activation, Step 2 on page 16.
Case CATalyst appears to be open. Please close all instances of Case CATalyst and click Retry
to continue with the installation.
1. A version of Case CATalyst is open and needs to close before you can continue with the
installation. On the taskbar, click the Case CATalyst icon and close it.
2. Click Retry to continue with the install.
Archive Not Created by CATalyst
The file you are attempting to Restore is not a Case CATalyst backup.
Action
Extract the files using the original compressing program or try extracting the files using WinZip® or
Windows compressed folders.
© 2015 Stenograph
27
Case CATalyst Installation and Configuration Guide
Auto recover file, filename, exists for this transcript
Translate and Edit or Edit was terminated abnormally while this file was in use.
Action
Auto Recover has saved a copy of the transcript up to the most recent auto save due to the abnormal
termination in Edit. Double click the file name of the job you were working on to open the transcript.
CATalyst will rename the recovered file to the same name as the original file. You will be prompted
that the file name of the job you were working on is available with the original name followed by
_Original1.
To change your Auto Recover settings, in Edit select Tools/Options/Auto Recover.
Exception 3
Exception 3 errors occur anytime a Windows GPF (General Protection Fault) error would normally
occur. The Exception 3 error gathers detailed information about the GPF and creates a file and
stores it in the Support Info Files case within the System Files case.
Action
Press Enter (OK) to save the Exception 3 error information. Note your actions, step-by step, at the
time of the error. If possible, contact Technical Support when the exception 3 error occurs. Technical
Support will ask you to send the generated Exception 3 error file and possibly the file you were
working with at the time of the error.
To send the exceptions file to Stenograph, use the Zip & e-mail feature available from Manage Job’s
File menu. Be sure to check the box, Include Support Info Files to automatically add the exception
file to the zip file. Please include your name and customer number in the body of the e-mail.
Cannot update Case CATalyst Software
Updater errors include the inability to connect to the Internet when attempting to update Case
CATalyst software using the Check for Updates feature or the Case CATalyst Updater; an
unexpected error while attempting to update using Check for Updates or the Updater; or unable to
access Case CATalyst software after updating via Check for Updates or the Updater.
Action
There are several possible causes for an update error.
•
Reboot your system and try again. Try running Check for Updates or the Updater before
accessing any other program.
•
Check the Stenograph Help Desk at www.stenograph.com for step-by-step instructions.
•
Contact the Stenograph Help Desk or Technical Support.
No captions display on the television (BCS)
No captions may result from an incorrect encoder selection or when an external USB modem is
used.
Action:
28
•
Check the current Profile to confirm an encoder is selected.
•
Try an internal modem or another external serial modem.
© 2015 Stenograph
Chapter 5: Troubleshooting
Cannot connect encoder or TV screen displays odd characters or garbage (BCS)
No captions or odd characters may result from an incorrect encoder selection.
Action:
•
Check the current Profile to confirm the correct encoder is selected. If a particular encoder is not
listed in BCS, it is best to choose EEG compatible rather than SmartEncoder.
Experiencing line drops (BCS)
Line drops may result from an incorrect or too fast Baud rate setting.
Action:
Change the Baud rate setting to 1200 on both the sending and receiving systems.
CATalyst BCS cannot dial out and connect to the encoder when starting a session (BCS)
The Profile does not have an encoder selected or the telephone line is not available.
Action:
•
Verify the line on which you are dialing out is not in use.
•
Check the current Profile to confirm an encoder is selected. If None is listed, CATalyst BCS does
not dial out.
•
Check your setting with those provided by the television station. These settings include the
encoder type and modem number with area code.
•
If the telephone line has a Call Waiting feature, add *70 to the phone number in the Profile. This
temporarily disables call waiting during transmission. For example, *70,6302791847.
Encoder not receiving captions (BCS)
An incorrect Parity setting can prevent the encoder from receiving caption text even when an established
modem connection exists.
Action:
Verify specific Parity instructions with station. If specific Parity settings are not available, try the
following settings:
•
Parity: None
•
Stop bits: 1
•
Data bits: 8
© 2015 Stenograph
29
Case CATalyst Installation and Configuration Guide
Stenograph Technical Support
Stenograph On-line Help Desk
Stenograph On-line Help Desk provides a searchable database of on-line documents to assist you in
troubleshooting. You can access the On-line Help Desk at: www.stenograph.com/Support/Helpdesk
Technical Support Representatives
If you need additional assistance with Case CATalyst, contact our Technical Support Representatives at:
1.800.323.4247 or 1.630.532.5100 and then press 2
Monday through Friday
8:00 a.m. to 6:00 p.m. (Central Time)
Excluding Stenograph holidays
Hours are subject to change.
30
© 2015 Stenograph
Appendix A
Update Case CATalyst Software
Updating Case CATalyst program files ensures the best results from your Case CATalyst software.
Stenograph recommends using the Case CATalyst, Check for Updates, feature approximately once a
month to check for updates to the Case CATalyst program files. When selected, Check for Updates
automatically connects to a special Stenograph internet site that compares your Case CATalyst program
files against the most current files. If your program files are not current, you are prompted to install the
new program files directly onto your computer.
An active Internet connection is required to update Case CATalyst software. If you do not have an
Internet connection on the Case CATalyst computer, you can download the Update files to a memory
stick or flash drive using another computer connected to the Internet and then install them to the Case
CATalyst computer.
Case CATalyst displays an Update Reminder message if the, Check for Updates Enabled, option is
active and you have not used the Check for Updates feature within 60 days of installing your current
software version. When the Update Reminder message displays, you can choose check for an update or
select another reminder time. The reminder time increments are: Tomorrow, Two Days, Three Days,
One Week, Two Weeks, One Month, Two Months, Three Months.
Update Case CATalyst Program Files
The Application/Computer Option, Check for Updates Enabled, must be active to display the Check for
Updates feature on the Case CATalyst Help menu. You can use the Check for Updates feature any time.
Check for Updates
1. From Case CATalyst, press Alt + h, u (Help/Check for Updates). Case CATalyst begins checking
for updates.
2. If an update is available, a message displays prompting you to update the software. Select Yes.
3. Case CATalyst automatically closes and the program files install.
The update must completely finish installation before any of your system files are updated. If you
lose connection to the Case CATalyst web site before the update completes, your current version is
not modified. When you reestablish connection, and use the Check for Updates feature, the update
continues from the point the connection was lost.
4. When installation completes, the Case CATalyst Updater screen displays. By default, the option to
run Case CATalyst when finished is selected.
5. Click Finish to close the dialog box.
Any existing application files replaced by the update are stored in the Case CATalyst folder within the
subfolder, SGUpdateBackup. The Case CATalyst folder is the location where Case CATalyst is
installed, such as CAT4.
© 2015 Stenograph
31
Case CATalyst Installation and Configuration Guide
Downloading the Update
Case CATalyst provides the option to download the CaseCATalystUpdate.exe file for transfer to a
computer without internet access. Stenograph recommends that you download the file directly to the
Windows desktop, memory stick or flash drive for transfer to another computer. Downloading directly to
a memory stick or flash drive may significantly increase the download time.
Copy the SGDLUpdate.exe file
1. On the Case CATalyst computer, using Windows Explorer or My Computer, navigate to the folder
where Case CATalyst is installed. This is often the CAT4 folder.
2. Locate the SGDLUpdate.exe file. Depending on your Windows settings you may not see the ".exe"
extension.
3. Using Windows conventions, copy the SGDLUpdate.exe file to your flash drive or memory stick.
4. Remove the flash drive or memory stick from the Case CATalyst computer and insert it into the
computer with Internet access and availability.
Download the CaseCATalystUpdate.exe file
5. On the computer with Internet access and availability, establish an Internet connection.
6. Make sure all applications are closed.
7. Double click the SGDLUpdate.exe file. Depending on your Windows settings you may not see the
“.exe” extension.
When active, the User Account Control (UAC), a security feature in Windows 8, Windows 7 and
Windows Vista, prompts you for permission to allow the Case CATalyst update. Select Yes or
Continue.
8. The Case CATalyst Version 16 Download Update screen displays. To read about changes in the
software before downloading, click Click here to view the Readme before updating!
9. Click Next. The Choose Save Location screen displays. The Destination Folder indicates the
location where the downloaded file is saved. The default is the Desktop.
If necessary, use Browse to identify a different location, such as the drive in which the memory stick
or flash drive is located. Downloading directly to a memory stick or flash drive may significantly
increase the download time.
10. Click Download. CaseCATalyst Update.exe downloads to the specified location. This may take a
few minutes. The download speed depends on your internet connection.
11. At the Completing Case CATalyst Version 16 Download Update screen, click Finish.
12. Copy the CaseCATalystUpdate.exe to the flash drive or memory stick. When the copy is complete,
remove the flash drive or memory stick from the computer.
32
© 2015 Stenograph
Appendix A: Update Case CATalyst Software
Install the Case CATalyst Update
13. Insert the flash drive or memory stick into the Case CATalyst computer. Depending on your
operating system, use My Computer, Computer or Windows Explorer to copy the
CaseCATalystUpdate.exe onto the computer.
14. Double click the CaseCATalystUpdate.exe file. The Case CATalyst Version 16 Update Installation
screen displays.
When active, the User Account Control (UAC), a security feature in Windows 7 and Windows Vista,
prompts you for permission to allow the Case CATalyst update. Select Yes or Continue.
15. Click Next. The Choose Previously Installed Location screen displays.
16. Confirm the current location of Case CATalyst. For example, C:\CAT4. If necessary, use Browse to
locate a different directory.
17. Click Update to install the update. The Installing screen displays with a progress bar as the updated
files install.
18. At the Completing the Case CATalyst Version 16 Update Installation screen, click Finish.
Any existing application files replaced by the update are stored in the Case CATalyst folder within the
subfolder, SGUpdateBackup. The SGUpdateBackup folder is located where Case CATalyst is
installed, such as CAT4.
19. To review changes in the software, start Case CATalyst and select Help, View Readme.
© 2015 Stenograph
33
Case CATalyst Installation and Configuration Guide
34
© 2015 Stenograph
Appendix B
Network Keyless Access
Case CATalyst Network Keyless Access (NKA) is designed to give workstations access to Case
CATalyst Version 16 via e-Key. NKA is only available in specific situations. CATalyst NKA runs as a
service. If you are loading Case CATalyst on the server for the first time, Stenograph suggests you load
the Case CATalyst NKA before loading Case CATalyst. Network Keyless Access e-Key authorization
can be obtained during Stenograph’s business hours, Monday - Friday, 8:00 a.m. - 6:00 p.m. CT,
excluding company holidays.
If you are replacing a previous Network Keyless Installation, see Uninstalling Network Keyless Access
on page 39.
Installing Network Keyless Access
1. On the server, extract the contents of the NKA_3.0Setup zip file to the desktop. Double click the
NKA_3.0 folder and then double click the Setup.exe. The Welcome screen displays.
2. To continue, press Enter or click Install.
The installation begins, the e-Key Setup dialog box displays. Type the PKC you were supplied with in
the Product Key Code file. Capitalization doesn’t matter and you do not need to type dashes. The
Registration Code field automatically populates. If this is your first time installing NKA 3.0 and
you were not supplied an NKA e-Key, please send an e-mail to [email protected] that
includes your customer number. NKA Support can be obtained during Stenograph business
hours, Monday - Friday, 8:00 a.m. - 6:00 p.m. CT, excluding company holidays.
Highlight and copy the Registration Code and go to Step 3.
© 2015 Stenograph
35
Case CATalyst Installation and Configuration Guide
3. To obtain access to Case CATalyst, send an e-mail to [email protected]. Include your
customer number and the pasted Registration Code. NKA authorization can be obtained during
Stenograph’s business hours, Monday - Friday, 8:00 a.m. - 6:00 p.m. CT, excluding company
holidays. Leave this dialog box open. You will receive an e-mail from [email protected]
with a .sgmac attachment that is tied to the registration code you sent.
4. When you will receive an e-mail from Stenograph with a *.sgmac file attachment, save the
attachment and drag it over the e-Key Setup dialog box and release the mouse button and then click
Done.
5. The Completing the NKA Server 3.0 Setup Wizard dialog box displays in the background and the
NKA Server dialog box displays in the foreground. In the NKA Server dialog box, click the Start
Service button.
6. At the Completing the NKA Server 3.0 Setup Wizard dialog box, press Enter or click Finish.
NKA Server
The NKA Server dialog box is the interface for configuring NKA. Once the NKA service has been
installed, the NKA Server dialog box is available from the Start Menu. Depending on the current state of
the service, some options may not be available.
36
© 2015 Stenograph
Appendix B: Network Keyless Access
Configuration... displays the Configuration dialog box and
allows you to configure NKA.
•
UPD Listens on Port option should not require any
modification and should be left at the default setting
unless otherwise directed by Stenograph’s Technical
Support Department.
•
TCP Listens on Port option should not require any
modification and should be left at the default setting
unless otherwise directed by Stenograph’s Technical
Support Department.
•
Max Number of connections option may require
modification depending on the number of licenses
(workstations) active at one time. For example, if you
have a small number of workstations running at one time, i.e. 25, you may want to reduce the
default number 100 to 50. If you have more than 100 workstations running at one time, you would
want to increase the default number 100 to perhaps 150.
•
Max License Duration option allows you to set the maximum time a license can be used/held at
one time by a client. The default setting is 8 hours. The maximum is 72 hours. If a client has held
the license for more than the allotted time and there are other clients waiting for a license, the
current client’s license will be suspended and the client will be added to the waiting list.
•
Waiting license check back every option allows you to set how often the NKA service checks for
available licenses to become available. The default setting is 10 seconds.
•
Create debugging log option should only be selected if the NKA service is not operating correctly
and Stenograph’s Technical Support Department has instructed you to select this option.
•
Delete logging every night option automatically deletes the debugging log nightly.
•
Restore Defaults option sets the configuration options back to the original (default) settings
License Details displays the Enter NKA number to enable the license server dialog box. If you have not
obtained a NKA number, you need to obtain the NKA number in order to activate the service.
View Debug Log displays the Debug log if NKA is configured to run in Debug. It is only necessary to
select Create debugging log if the service is not operating correctly and requested by Stenograph’s
Technical Support Department.
Delete Debug Log allows you to manually delete the debug log..
Start Service option is available if the NKA service is not running. If the service is running, this option is
grayed out.
Stop Service option is available if the NKA service is running. If the service is not running, this option is
grayed out.
Realtime Info displays how many licenses are currently being used.
OK when you are finished configuring the NKA service.
© 2015 Stenograph
37
Case CATalyst Installation and Configuration Guide
Things to know
•
When the Case CATalyst NKA Server dialog box is displayed, click the Case CATalyst icon in
the upper left hand corner and select About Case CATalyst NKA Server... The current version
along with the Command Line Switches display.
•
To install Case CATalyst Version 16, download the version 16 setup.exe by going to
www.stenograph.com, click Support, then Downloads.
•
For information on workstation setup, see Workstation Setup on page 48.
Running Case CATalyst for the first time
Once you have installed Case CATalyst, on the Shortcut tab of the Case CATalyst icon properties, add
/NKA at the end of the Case CATalyst path to instruct Case CATalyst to look for the server.
If the server is going to offer more than one license type, it will be necessary to include the options you
want for each license type in the Case CATalyst path following /NKA. There are three main license
types: Student (s), Full (f) and Edit (e). To specify the license type, after the /NKA you must include one
of the following: s, f or e. For example, if you server has a full license and a student license, you need to
create two shortcuts. One shortcut path would indicate /NKA f for the Full system and the other path
would indicate /NKA s for the Student version. Along with the three license types, other parameters are
available: CATalyst BCS (b), AudioSync (a) and Voice (v). For example, if your server offers both a Full
version with AudioSync and a Student version with CATalyst BCS, one shortcut path would indicate
/NKA fa for Full with AudioSync and the other shortcut path would include /NKA sb (Student with
CATalyst BCS).
The first time you start Case CATalyst, Case CATalyst will look for the NKA server. If found, Case
CATalyst will start. If the NKA server is not found, the NKA Settings dialog box displays where you can
manually type the server address.
About Case CATalyst NKA
To see NKA server information, in Case CATalyst click Help, About and then double click the e-Key icon.
38
© 2015 Stenograph
Appendix B: Network Keyless Access
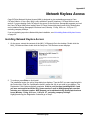
The NKA Info dialog box displays:
NKA Server Not Found
If NKA cannot locate the server, the NKA Settings dialog box displays. Manually type the IP address of
the NKA server in the NKA Server Address field.
Uninstalling Network Keyless Access
It is important to stop the NKA service before uninstalling NKA. To stop the NKA service, do the
following:
1. Open the License Server Helper application.
Click Start, All Programs, Stenograph, Case CATalyst License Server Helper.
2. In the Case CATalyst NKA Service Helper dialog box, click Stop Service.
3. Click Close.
With the NKA service no longer running, the NKA service can be uninstalled. Do the following:
1. Access Programs and Features inside Control Panel.
Click Start, Control Panel, Programs and Features.In the list of installed programs, double click
© 2015 Stenograph
39
Case CATalyst Installation and Configuration Guide
Network Keyless Service 2.x. At the Are you sure you want to completely remove Network Keyless
Service 2.x and all of its components? prompt, click Yes.
2. The Network Keyless Service 2.x was successfully removed from your computer message displays.
Click OK.
40
© 2015 Stenograph
Appendix C
Network Installation
When installing Case CATalyst to any type of network or shared drive, the speed of Case CATalyst
depends on the speed and efficiency of the network and how the network is configured by the network
administrator or other knowledgeable network person.
Stenograph highly recommends that a knowledgeable network person is available on staff when a firm
or location installs and uses a network to share applications and files. A knowledgeable network person
can better optimize the performance of the network providing you with a faster more efficient system.
This individual should have a professional network certification, such as MCP, MCSE, MCNE, etc. If
having a certified individual on staff is not possible, Stenograph recommends consulting with a certified
network professional before and after the network installation.
Network Setup Guidelines
Case CATalyst Version 16.x requires Windows Vista, Windows 7 or Windows 8 for installation on a
Windows server.
•
Use 100BaseT Ethernet or higher. 100BaseT is approximately 10 times faster than 10BaseT,
and performs significantly better when sharing applications using very large files, such as those
used by CAT programs, over the network.
•
When installing more than 25 workstations on the network, use Switching at the backbone level
of the network to better optimize traffic. For more information on Switching technologies and
benefits, contact a certified network professional.
•
Carefully configure network settings, such as IP Address and DNS entries. A slow network may
result if these settings are not configured properly. For more information on these settings,
contact a certified network professional.
•
Use caution when loading additional third-party programs, such as anti-virus software that may
create additional network traffic which can contribute to overall slowness on the network and
workstations.
•
Consider additional RAM memory for workstation computers to minimize swapping which can
contribute to slowdowns. When you open a file located on the network drive, the file opens into
the RAM on the local workstation drive. When there is insufficient RAM to hold the entire file, a
portion of the file is saved to RAM and the remaining portion is swapped out and stored on the
local workstation hard drive. Swapping requires repeated requests over the network for more
data which could result in a noticeable slowdown. This is a general network issue, not specific to
Case CATalyst.
•
Initially install and maintain current version updates for your operating system. For example, load
each Service Pack and patch that Microsoft releases for your Windows server operating system.
Microsoft may have patches available on a regular basis.
© 2015 Stenograph
41
Case CATalyst Installation and Configuration Guide
Network Setup Scenarios
Review the network setup guidelines and then review the following network installation scenarios before
installing Case CATalyst on a network. Stenograph provides specific network recommendations for each
situation to assist you in determining the best network setup for your office or organization:
•
Install Case CATalyst and user files on the network.
•
Install Case CATalyst on workstations/user files on the network.
•
Install Case CATalyst on the network/users files on workstations.
•
Install Case CATalyst and user files on each workstation.
Auto Recover and Auto Save in Case CATalyst
Auto Recover and Auto Save allow you to automatically save the Case CATalyst transcript file while
translating and editing. Case CATalyst saves the file at the user specified time frequency.
Auto Recover, when active, creates a temporary file of the job while editing. When the user files are
located on a network drive, the temporary file created while translating or editing is copied over the
network. If this file is large, the cursor may change to reflect the busy state and the copying takes a
longer time.
Auto Save, when active, saves the changes to the original file instead of creating a temporary file.
Depending on the time frequency set for, there may be times when you cannot exit the file without
saving. You may want to use the Auto Save option for more efficient processor use.
When using an Auto Recover option, Stenograph recommends setting the frequency of the Auto
Recover or Auto Save time to a minimum of 5 minutes. This helps minimize potential slowdowns. For
more information about Auto Recover options see the Case CATalyst Help.
Install Case CATalyst and User Files on the Network
Stenograph recommends installing Case CATalyst and all user files on the network drive when using a
high bandwidth network setup. A high bandwidth network uses 100BaseT or higher. Using 10BaseT is
not recommended as it significantly reduces the efficiency of the network and may not provide consistent
results.
For this setup, you must run the Workstation Setup on each workstation used with Case CATalyst.
Backup
This setup, when correctly configured, allows the automatic backup of user files when performing a
network backup.
Install Case CATalyst on Workstations/User Files on Network
Stenograph recommends installing Case CATalyst on the local drive of each workstation and user files
on the network drive when using a high bandwidth network setup that carries a large amount of network
traffic in addition to Case CATalyst users. For example, a large courthouse might have several non-CAT
users accessing the same network on which Case CATalyst is loaded.
A high bandwidth network uses 100BaseT or higher. Using 10BaseT is not recommended as it
significantly reduces the efficiency of the network and may not provide consistent results.
42
© 2015 Stenograph
Appendix C: Network Installation
Backup
This setup, when correctly configured, allows the automatic backup of user files when performing a
network backup.
Install Case CATalyst on Network/User Files on Workstations
Stenograph recommends installing Case CATalyst on the network drive and user files on each local
workstation drive when using a smaller and slower network setup. This reduces network traffic as user
files do not travel back and forth between the network and workstation. User files are opened on each
workstation.
Setting up user files on a workstation is an option anytime users experience long delays opening large
Edit files or large Dictionaries. To allow a user to save files to their local drive, create a new user on the
C: drive of the workstation for that user.
Backup
This setup allows the automatic backup of user files when performing a network backup by using one of
the two following options:
1. Create a “mirror” or duplicate user on the network drive. For example, you have Case CATalyst
installed on the network drive H: and the SMITH user on a workstation drive. Create a new user,
SMITH on the H: drive. When finished working with the SMITH user at the end of the day, copy the
SMITH files from the workstation drive to SMITH on the network H: drive.
2. Use the Case CATalyst Backup feature to backup the files from the local drive of a workstation to the
network drive. Using the Case CATalyst backup feature you can easily backup and restore Case
CATalyst files to any drive letter, including a network drive. For more information on backup, see the
Case CATalyst Help.
Install Case CATalyst and User Files on Each Workstation
Stenograph recommends installing Case CATalyst and all user files on the local drive of each
workstation when using very slow networks or a peer-to-peer setup. This setup allows users access to
all networked Windows features and printers. To share files via the network, create a “mirror” user on the
network. See the following Backup section for creating a “mirror” user.
Backup
This setup allows the automatic backup of user files when performing a network backup by using one of
the two following options:
1. Create a “mirror” or duplicate user on the network drive. For example, you have Case CATalyst
installed on the network drive H: and the SMITH user on a workstation drive. Create a new user,
SMITH on the H: drive. When finished working with the SMITH user at the end of the day, copy the
SMITH files from the workstation drive to SMITH on the network H: drive.
2. Use the Case CATalyst Backup feature to backup the files from the local drive of a workstation to the
network drive. Using the Case CATalyst backup feature you can easily backup and restore Case
CATalyst files to any drive letter, including a network drive. For more information on backup, see the
Case CATalyst Help.
© 2015 Stenograph
43
Case CATalyst Installation and Configuration Guide
Workstation Setup
The Case CATalyst DVD includes the workstation setup program for networks. The Case CATalyst
workstation setup program installs the Stenograph RTF/CRE Shell Extensions, Infotips and PDF printer
information in the correct location on the local workstation drive. It also allows you to place a Case
CATalyst shortcut on the workstation's Desktop. This workstation setup is only for a Case CATalyst
installation.
Workstations and RAM
Network workstations can benefit from an increase in RAM due to potential increased swapping. When
you open a file located on the network drive, the file opens into the RAM on the local workstation drive.
When there is insufficient RAM to hold the entire file, a portion of the file is saved to RAM and the
remaining portion is swapped out and stored on the local workstation hard drive. Swapping requires
repeated requests over the network for more data which could result in a noticeable slow down. This is a
general network issue, not specific to Case CATalyst.
Customize Workstation Setup
Located in the Workstation folder is the file, workstation.ini. The workstation.ini file controls the
workstation setup installation prompts. You can modify the contents of this file, customizing the
workstation setup to your environment. Access the workstation.ini using the method with which you are
most familiar.
Make changes as necessary. Type the appropriate information for each prompt following the equal sign.
[InstallLocation]
Case CATalyst=
Type the directory where Case CATalyst is installed.
[InstallComponents]
Use Job History=
Type Y to install the feature. Type N to not install the feature.
[DesktopShortcuts]
Case CATalyst=
Type Y to install a desktop shortcut for Case CATalyst. Type N to not install a desktop shortcut. No entry
allows the user to select the desktop shortcuts during installation.
[BeforeReboot]
ViewReadme=
Type Y to display the Readme file after installation. Type N or leave blank to not display the Readme file.
[UserInformation]
UserRoot=
UserName=
44
© 2015 Stenograph
Appendix C: Network Installation
After the equal sign for UserRoot, type the name of the UserRoot root directory. Following the equal sign
for UserName, type the user name for the workstation user. No entry allows the user to enter the
information during installation.
Install Case CATalyst on the Network Drive
Install Case CATalyst Version 16.x on the network drive. Complete the steps for either a Silent Install or
a Regular Install.
Regular Install
1. On the network server, insert the Case CATalyst installation DVD into the DVD drive. Do one of the
following:
•
If your computer is set to “autorun,” the Case CATalyst installation screen displays. Select the
Browse option.
•
If your computer is not set to “autorun,” browse the contents of the Case CATalyst DVD to locate
the Setup.exe file. Depending on your operating system, use My Computer, Computer or
Windows Explorer.
2. Right click on the Workstation folder and select Copy.
3. Paste the Workstation folder on a drive accessible to all workstations. This is often the same drive
where Case CATalyst is installed.
Silent Install
You can use the silent install for an individual or network installation. The silent install allows you to
perform the Case CATalyst Version 16 installation using the following defaults, without prompting for any
user interaction:
•
Install Case CATalyst and place a shortcut on the Desktop.
•
Integrated Video Training is not installed.
•
The Registry is set to Use Job History.
•
No user root or users are created.
When using a silent install, the installation sets the defaults and then checks the Workstation.ini file
directory path. The Workstation.ini directory path supersedes path information in a command line and
changes to the silent install defaults. The Workstation.ini is located in the Workstation folder on the Case
CATalyst 16.x DVD. If you are modifying the Workstation.ini for a silent install, you must copy the entire
Case CATalyst DVD contents to the hard drive and then modify the Workstation.ini to meet your needs.
The Workstation.ini includes instructions for setting the workstation defaults.
Do one of the following:
Workstation.ini Modified
To use the following command, you must have modified the workstation.ini file, specifying the
directory path for the installation location of Case CATalyst. The installation sets the defaults and
then checks the Workstation.ini file for the directory path and any changes to the silent install
defaults.
© 2015 Stenograph
45
Case CATalyst Installation and Configuration Guide
1. From a command line, type the path and the install commands. The path is where you copied the
contents of the Case CATalyst DVD. The command is case sensitive and specific to an individual
or network installation. Use one of the following:
setup.exe /S (for individual installation)
setup.exe /N /S (for network installation)
Example
c:\CATalyst16\setup.exe /N /S
2. When the installation is complete, reboot the system.
Workstation.ini Not Modified
Case CATalyst uses the default instruction unless otherwise specified in the Workstation.ini. If a path
is specified in the Workstation.ini, the silent install uses that path information. Use the /D attribute
when you have not modified the workstation.ini file and are installing to computer where you want to
specify the path.
If you are installing for a large group of workstations, it is recommended you modify the
workstation.ini file to fit your needs and include the path information.
1. Insert the Case CATalyst Version 16.x DVD into your DVD drive.
2. The Case CATalyst install is set to “autorun.” At the Install Software screen, click Exit.
3. From the Windows Start menu, click Run.
4. Type one of the following commands:
d:\setup.exe /S /D=directorypath (for individual installation)
d:\setup /N /S (for network installation)
d:\ setup.exe /N /S /D=directorypath (for network installation)
When using the /D attribute, it must be the last parameter used in the command line and must not
contain any quotes, even if the path contains spaces. If installing from a drive other than d,
replace the letter d in the command line with the appropriate drive letter.
5. When the installation is complete, reboot the system.
6. Remove the Case CATalyst Version 16 DVD and store it in a safe location.
Run the Workstation Setup Program
Perform the following steps on each workstation drive. The steps assume no modifications have been
made to customize the wssetup.ini file which affects workstation setup. Close all Windows programs
before running this setup program.
1. Open the Workstation folder located on the network drive.
2. Double click Setup.exe.
3.
46
At the “Welcome to the Case CATalyst Workstation Version 16 Setup” screen, press Enter (Next).
© 2015 Stenograph
Appendix C: Network Installation
4. At the “License Agreement” screen, read the license information carefully. To access the entire
license agreement, scroll down.
5. To accept the terms, click I accept the terms of the License Agreement and press Enter (Next).
The installation continues. If you select, I do not accept the terms of the License Agreement, the
install cancels and the installation screen closes.
6. The “Job History” screen displays if, in the Workstation.ini file, the Use Job History entry was left
empty. A Job History file contains information about a job, such as production status, creation,
editing and printing dates, translation statistics and backup times. Job history data can be useful
when working with a scopist and to track information such as job status and productivity progress,
however, it slows the display of jobs on the Manage Jobs screen in a network environment. The
selection made for the Use Job History option affects all users on the computer.
Following installation, the Use Job History option is accessible in Manage Jobs. Select Tools,
Options, Manage Jobs/General, Job History.
Do one of the following:
•
To use Job History on this workstation, select the option, Use Job History.
•
Deselect the Use Job History option to inactivate Job History and improve the display speed of
© 2015 Stenograph
47
Case CATalyst Installation and Configuration Guide
jobs on the Manage Jobs screen in a network environment.
7. Press Enter (Next). At the “Custom Install” screen, choose the location, drive and folder for the Case
CATalyst software installation. Optionally choose to install the Desktop shortcut, specify a User Root
and User Name and display the Readme file following the install.
Make necessary entries. When finished, press Enter (Next).
48
•
Install Folder - Specify the installation location for the Case CATalyst software. Use the Browse
button to navigate to the desired location.
•
User Root - Specify the location for the Case CATalyst user files. Use the Browse button to
navigate to the desired location. A user root folder is the first hierarchical level in the Case
CATalyst file structure that contains user names and files. The default user root is C:\CAT4\usr.
Case CATalyst requires at least one User Root folder.
•
User Name - Specify the User name to use in Case CATalyst. It is necessary to type a user
name to continue the installation. You can add more user names, once you install Case CATalyst
and access the program.
•
Desktop Shortcuts - Check the appropriate box to create a Desktop shortcut for Case CATalyst.
Adding a shortcut to your desktop allows you to start Case CATalyst by double clicking the icon.
© 2015 Stenograph
Appendix C: Network Installation
8. Press Enter (Next). The “Confirm the Installation Settings” screen displays.
9. Review your selection and press Enter (Next) to begin installation.
10. The Case CATalyst software installs. The “Installing” screen displays the progress of the software
installation. This may take a few minutes. Messages may display for extended periods of time until
the software installation completes.
11. When the installation finishes, the “Completing the Case CATalyst Workstation Version 16 Setup
Wizard” screen displays.
12. Press Enter (Finish).
© 2015 Stenograph
49
Case CATalyst Installation and Configuration Guide
50
© 2015 Stenograph