1
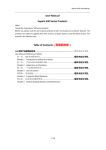
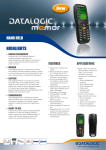
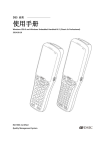
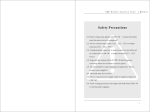
Supoin S10 User Manual
User Manual
Supoin S10 Series Products
Hello!
Thanks for choosing our S10 series products.
Before use, please read the user manual carefully to learn more about our products' features. The
products are subject to upgrade from time to time, so please contact us for the latest version. This
manual is for reference only.
Table of Contents(需重新排版)
S10 系列产品使用说明书 ........................................................................... 错误!未定义书签。
User Manual of S10 Series Products
第一章、
Chapter 1
第二章、
Chapter 2
S10 系列设备简介 .........................................................................错误!未定义书签。
Introduction to S10 Series Products
产品外观介绍及硬件功能..........................................................错误!未定义书签。
Appearance and Hardware
第三章、 产品使用说明介绍......................................................................错误!未定义书签。
Chapter 3 Use Instructions
第四章、 常见问题 .......................................................................................错误!未定义书签。
Chapter 4 Frequently Asked Questions
第五章、 注意事项及维护保养....................................................................错误!未定义书签。
Chapter 5 Matters Needing Attention and Maintenance
1 / 17
Supoin S10 User Manual
Chapter 1 Introduction to S10 Series Products
1.1
Overview
S10 series products are industrial grade handheld terminals independently researched, developed,
designed and produced according to the characteristics of each industry, and feature ergonomic
design, compact size, anti-shock and anti-fall design, long standby time and stable operation.
Moreover, the S10 series boasts IP65-rated robustness against adverse environments because it is
waterproof, dustproof, shatter-resistant, electrostatic prevention and anti-high and low
temperature.
1.2
Scope of Application
Mainly used in the fields of shoes, clothes, channels, logistics, drug supervision and etc.
1.3
Technical Specifications
Product Model
S10
CPU
Samsung S3C2416 ARM9 400MHz
Operating System
Windows Embedded CE 5.0
Memory
128MB ROM
Display
Scanner
128MB RAM
3.2-inch QVGA (240x320), TFT-LCD
1D Laser Scanner (Moto SE955)
Symbologies
All major 1D barcode
Reading Accuracy
≥3mil
Scan Depth of Field
3.81 cm - 60.98 cm
Scan Angle
47°± 3° (Standard)
Scan Speed
114 ± 10 scans/sec.
Communication Transmission
Wi-Fi 802.11b/g
Operating Environment
Operating Temp. -15℃ ~ 45℃;5 ~ 95% RH;Drop
Spec. 2.5-meter drops to concrete ground
Dimensions (LxWxD)
191.8mm x 72 mm x 37.7 mm;
Weight
320 g (standard battery included)
Battery
3.7V 3200 mAh polymer lithium batteries
2 / 17
Supoin S10 User Manual
Expansion Slot
Mini SD card, up to 32 GB, Micro SD slot
Vibration Motor
Built-in programmable vibration motor
Charger Port
1 (Charging interface at the bottom)
Keypad
26-key
Accessories
Universal adapter Battery, USB Cable,
pen, Hand strap,
Programming Environment
Touch
MicroSD (TF) Card of 4G
Tool:Microsoft Visual Studio 2005/2008; Language:
C++ / C# / VB.NET
CE,
Qualification
RoHS,
IP65,
ISO9001
1.4 Battery Life (hours)
Test Item
S3C2416
Continuous 1D scan+sound
12
Continuous 1D scan +WI-FI(powermode=1)upload +sound
11.24
Continuous 1D scan +WI-FI(powermode=0)upload +sound
7.5
Dormancy and standby (WI-FI Off)
About 300
Dormancy and standby (WI-FI On)
About 100
Chapter 2 Appearance and Hardware
2.1 Appearance
S10 型手持智能终端
S10 handheld mobile terminal
整机功能按键及扩展接口说明
Function keys and extended interfaces
扫描键 Scan key 开机键 Power key
删除键 Delete key 退出键 Return key Enter
key 确定键 方向键 Arrow key 用户自定义功能键 User-defined function keys
* and # (special function keys) 电池后盖 Battery cover 扫描头 Scan head
扫描头 Scan head 电池后盖 Battery cover usb&充电接口 USB & Charging Port
Figure 1-1 Front view of Supoin S10
Figure 1-2Front view of Supoin S10
3 / 17
Supoin S10 User Manual
Figure 1-3 Rear view of Supoin S10
2.2 Functions of Keys
Power key: Long press the ON/OFF button to power the terminal on or off. If you want to leave
your terminal unused but powered on for a long time, tap the red ON/OFF button in the upper left
corner of the display area. Then, the screen will turn black, indicating that the terminal has been in
a standby state (shallow dormancy). To make it standby, tap the red button again.
Reset key: If you want a program, circuit, etc. to run in its initial state, press the Reset button,
which is a small red button on the lower left of the Arrow button.. Note: Pressing the Reset button
of PXA 310 will reset the terminal, while pressing this button of S3C 2416 series will turn it off.
Scan key: Press the Scan button to scan barcodes.
Enter key: Press OK to execute the selected function. It is equal to the ENTER key, with the
decimal key value of 13.
Return key: Press this button to return or exit the current interface. It is equal to the ESC key,
with the decimal key value 27
Delete key: It functions the same as the Backspace button when you are typing a barcode and
characters. Its decimal key value is 8.
Arrow key: Press the Arrow buttons to move up, down, left, and right.
Up: Decimal key value 38
4 / 17
Supoin S10 User Manual
Down: Decimal value 40
Left: Decimal key value 37
Right: Decimal key value 39
User-defined function keys: Function buttons, which can be defined as shortcut buttons by
user programs.
F1: Decimal key value 112
F2: Decimal key value 113
F3: Decimal key value 114
F4: Decimal key value 115
* and # (special function keys): Press the * button to enter ”.”, and the # button to change an input
method.
USB and Charging Port: Through this port, you can use a USB cable to connect the terminal and a
computer for data transmission, or connect the terminal to a charger for charging.
Loudspeaker Orifice: The loudspeaker will make a warning sound and tone towards an operation
error or barcode scan.
Battery Cover: Fix the battery cover.
2.3 TF Card Slot and SIM Card Slot
Installing a TF Card:
Open the battery cover and remove the battery, and insert the TF card into the slot on a lower part
of the back and push it inward. Then you can connect the terminal with a computer via the USB
port to store information in the TF card.
Installing a SIM Card:
The installation of a SIM card is similar to that of a TF card, but you should make sure that the SIM
card is properly loaded and it has been registered. After installing the SIM card, install the battery
and make the terminal read the SIM card for dial-up access and download, which will be detailed
below.
5 / 17
Supoin S10 User Manual
Chapter 3 Use Instructions
Then we will introduce the software function of S10 series devices in detail, mainly on the use of
PDA configuration tool.
3.1 PDA Desktop
The terminal will be turned on by pressing the power button for 3 to 5 seconds after putting in
the battery; the following interface will be displayed:
Of all the three indicating lights in the top right corner, the one in the leftmost will light after
turning on, the middle one will turn to red after plugging in power, and turn to green after the
battery is filled. For example, the red marker box in the above picture displays battery level and
signal strength. Battery level indicate: Normal
above 30%; insufficient 10%-30%; low power
less than 10%.
Note: you shall charge at once at low power, please turn off the terminal if you can’t charge
immediately, otherwise it will cause the battery can’t be charged then.
Choose Start > Programs, and the following shortcut will appear: IE browser, Media Player,
Microsoft WordPad, Windows Resource Manager, Command Prompt, Synchronous and Remote
Desktop Connection.
6 / 17
Supoin S10 User Manual
3.2 Use Instructions for PDA Tools
3.2.1
Main Menu of PDA Device
7 / 17
Supoin S10 User Manual
3.2.2 Wi-Fi Setting
Turn on/off the Wi-Fi module: Set whether the Wi-Fi module runs on startup
of the terminal.
A) An icon will appear in the taskbar after Wi-Fi access is enabled.
B) If "Run on Startup" is selected, the Wi-Fi module will be loaded automatically in the boot
process of your terminal.
3.2.3 Bluetooth Setting(Optional)
Turning On/Off Bluetooth
A) Open or close the window of Bluetooth Manager
B) The bluetooth icon
will appear in the taskbar after opening.
C) Double click the icon in the taskbar
; the Bluetooth Manager window will
be activated.
D) Click the
in Bluetooth Manager window, the window will be minimized to the
taskbar.
E) Click “close bluetooth”, quit Bluetooth Manager, the icon
disappear.
8 / 17
in the taskbar will
Supoin S10 User Manual
3.2.4 Barcode 1D Setting
Open/close and various parameter setting of barcode 1D auto scanning tools
A) “Open scan head”: open the autoscan function, input barcode in the focal position of other
application program. After opening this funtion, this function will be automatically launched at
each boot.
B) “Advance options”: set the code system and output model of Barcode 1D.
C) “The initialization of scan head”: restore factory setting of the scan head.
Note:
When you click “open the scan head”, the auto scan function will remain scan when you exit the
program, press the scan button, and the focus of the current input box will output barcode.
If you want to call API in the program to achieve the barcode output, you must “shut down the
scan head”, otherwise it will have a impact on the program barcode output.
9 / 17
Supoin S10 User Manual
3.2.5 USB Setting
Set data synchronization or USB disc loading (note: this item is only existed in 2416 plan
device, remember not to connect with the USB line before setting, or the setting is invalid)
A) Synchronization: The PC shall install Microsoft ActiveSync, and the PC taskbar will appear
after connecting USB line, and then the data can be updated.
B) U Disc Mode
1 Use FLASH as U disc: will be displayed as “local disc” in the PC.
○
2 Use TF card as U disc: will be displayed as “movable disc” in the PC.
○
C) Operating Mode:
Step 1: Pull the USB line, and restart PDA.
Step 2: Set in the USB Set interface.
Step 3: Restart PDA.
10 / 17
Supoin S10 User Manual
3.2.6 Serial Port Setting
Set the application mode of the serial, and it will come into force after restarting.(note:
the devices of PXA310 plan has no this function)
A) “Connect the BlueTooth devices”: connect buletooth printer.
B) “Output debugging information”: output the debugging information of the application program
to PC through serial.
C)“Connect other serial devices”: use the customized serial tool wire to connect other serial
devices.
3.2.7 Screen Setting
Set the brightness and calibration of the screen.
A) Adjust the brightness through shift the scroll bar.
B) Press the center of “+”, and click OK button to store the brightness after finishing the setting.
11 / 17
Supoin S10 User Manual
3.2.8 Sound Setting
Set the volume and sounds
A) Adjust the volume through shift the scroll bar.
B) Set the sound plan of the system
12 / 17
Supoin S10 User Manual
3.2.9 Dormancy Setting
Set dormancy and wake up parameter of the system
A)“Auto close screen” time: the screen will close automatically when the system is in idle status,
and the time interval reaches.
B)“System dormancy” time: the terminal will enter into system dormancy when the system is in
idle status, and the time interval reaches, at this point, the system is working in low power
consumption, and most of the hardwares are in standby status.
C)“Allow power button to close screen”: If the choice is selected, the screen will be closed by
pressing the left upper button of the device.
D)“Prohibit dormancy when synchronous”: If the choice is selected, the system will not enter into
dormancy status when synchronizing data by plugging in USB wire.
E)“Allow keyboard to wake up system” : if the choice is selected, any button can wake up the
system when the system is in close status or dormancy, or only the power button in the upper left
can wake up the system.
3.2.10
Lock Setting
Set relevant parameter when locking the screen
A)“Lock screen”: if the choice is selected, the screen will be locked automatically if you press * and
# key in order, a picture of a lock will appear in the screen, and then the screen will be unlocked if
you press * and # key in order.
B)“Close screen when screen is lock”: if the choice is selected, the screen will close automatically
when locking.
C)“OK button is valid when screen is lock”: if the choice is selected, OK button is valid when locking
the screen, but other buttons are invalid.
13 / 17
Supoin S10 User Manual
3.2.11 On and off Setting of the Modular
Set on or off of each hardware modular in PDA
A) WI-FI: turn on or turn off WI-FI modular, WI-FI Manager icon
will appear in the taskbar
after turning on
B) GSM/3G Power: Turn on or turn off GSM Modular or 3G Modular.
C) Barcode 1D: turn on or turn off the autoscan program of barcode 1D scan head..
D) Barcode 2D: turn on or turn off the autoscan program of barcode 2D scan head.
14 / 17
Supoin S10 User Manual
3.2.12 Autorun Setting
Set the operating programs and shortcuts of autorun.
A)”Desktop shortcut”: set up shortcut in the desktop.
B)Start menu shortcut”: set up shortcut in the start menu.
C)“Delete shorcut”: all shortcuts setted in A and B.
D)“Publish autorun app”: publish application program, which will autorun in the boot after
successful setting.
E)“Cancel autorun app”: cancel autorun software published in D.
3.2.13 Input Method Setting
Set ”#” to change the input method
A) “Soft keyboard”: allow”#” key to activate the input panel of soft keyboard
B) “Keyboard input letter”: allow”#” to activate keyboard to input letter.
C) “Pinyin input method”: allow”#” to activate Pinyin input method.
D) “Hand-writing input method”: allow”#” to activate Chinese hand-writing input method.
15 / 17
Supoin S10 User Manual
3.2.14 Setting Information
Display all informatin of the current device.
3.2.15 Restore Factory
Restore Factory setting (note: all data in the device will be emptied, please operate
16 / 17
Supoin S10 User Manual
carefully, this function is used under the circumstance of abnormal condition in the customers
device, and normal method can’t solve.)
A) For device of S3C 2146 plan, can restore by putting password in the interface.
B)For device of PXA310 plan, according to the indication of the interface, press F3 in the boot,
when ”Recover system?” appears in the top left corner, press [OK] key at once, and then the
system will appear ”Please wait……”, which means in the process of restore factory, and the system
will be restored successfully within about 3 minutes, then please carry on touch calibration
according to the indications.
© Shenzhen Supoin Technology Corp. All Rights Reserved.
This guide is prepared by Shenzhen Supoin Technology Corp., according to the existing
information. The content in this document is subject to update without notice.
Without written approval of Shenzhen Supoin Technology Corp., no one shall copy, extract,
back up, modify, spread, or translate any part of this document in any form or method or
use the whole or part of this document for business purposes.
If you have any question, you are free to send an email to [email protected]
17 / 17