1
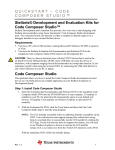
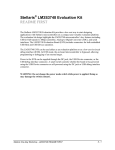
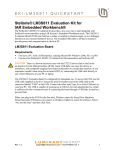
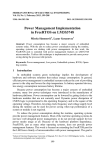
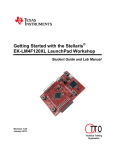
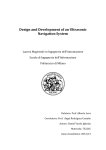
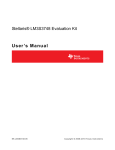
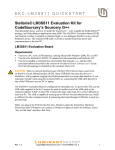
03-QUICKSTART – CODE COMPOSER™ STUDIO Stellaris® Development and Evaluation Kits for Code Composer™ Studio The Stellaris Development and Evaluation Kits provide a low-cost way to start designing with Stellaris microcontrollers using Texas Instruments’ Code Composer Studio development tools. The evaluation boards can function as either a complete evaluation target or as a debugger interface to any external Stellaris device. Requirements You have a PC with a USB interface, running Microsoft® Windows XP (SP2 or greater) or Vista You have the Workshop Installation Software Flash Drive CAUTION: There is a known electrical issue with the FT2232 device that is used in the on-board In Circuit Debug Interface (ICDI). Some USB hubs can cause the device to misbehave, with symptoms ranging from failed enumeration to corrupt data transfers. If you experience trouble when using the on-board ICDI, try connecting the USB cable directly to one of the USB ports on your PC or laptop. Code Composer Studio This quickstart shows you how to install the Code Composer Studio development tool and how to use it to build and run an example application on your Stellaris Evaluation or Development Board. Step 1: Install Code Composer Studio 1. Disconnect any evaluation board that you have connected to your PCs USB port(s). Insert the Workshop Installation Flash Drive into a free USB port. 2. Using Windows Explorer, find the setup_CCS_4.1 folder on the Flash drive and double-click on the file named setup_CCS_n.n.n.n.exe. 3. Follow the instructions in the Code Composer Studio installation program. Select the Platinum Edition for installation when the Product Configuration dialog window appears. Click Next. 3-1 QUICKSTART – CODE COMPOSER STUDIO 4. In the Choose ISA dialog, if you are attending a Stellaris only workshop, make sure that only the Stellaris Cortex-M3 MCU and ARM checkboxes are selected. If you are also attending an MSP430 workshop, check that checkbox too. Click Next. 5. In the Select Components dialog, uncheck the Target Content and Emulators checkboxes. If you are attending a Stellaris only workshop, click Next. If you are attending a MSP430 workshop too, check the MSP430 USB FET checkbox and click Next. The installation should take less than 10 minutes to complete. 3-2 QUICKSTART – CODE COMPOSER STUDIO If you’ve been tasked with installing Code Composer only, please stop here and ask your instructor for further directions. 3-3 QUICKSTART – CODE COMPOSER STUDIO Step 2: Install the StellarisWare® Package A full set of C-based peripheral drivers is provided, covering all peripherals and functionality of the Stellaris devices. The StellarisWare package includes various example applications with project files for all major tool vendors that support Stellaris, including Code Composer Studio. To install StellarisWare components, follow these steps: 1. Make sure that the Workshop Installation Flash Drive is inserted into one of your PC’s USB ports. 2. Using Windows Explorer, open the Flash drive and find the StellarisWare installation file that matches your board. • • LM3S3748 board LM3S8962 board SW-EK-LM3S3748-5451.exe SW-EK-LM3S8962-5451.exe Double-click on the file for your board and select the default installation location when prompted. If you intend to run the labs for both boards, you will need the drivers and StellarisWare for both boards installed. If you run a second (or more) StellarisWare installation, use the default installation directory. The board files will be installed in separate folders for each board. When you are warned about overwriting files, click Yes to all. All the overwritten files are the same. NOTE: Check the www.ti.com/Stellaris web site for the latest software updates. 3-4 QUICKSTART – CODE COMPOSER STUDIO Step 3: Start Code Composer Studio and Open a Workspace 1. Start the Code Composer Studio IDE by selecting it from the Windows Start menu or double-clicking the icon installed on your desktop. When the IDE loads, it asks you where to open the workspace folder. To keep your projects separated, you should use a workspace for each board. If you are using the LM3S3748 board, name your workspace workspace_3748. If you are using the LM3S8962 board, name your workspace workspace_8962. Do not check the Use this as the default and do not ask again checkbox. While it’s possible to switch back and forth in the IDE, it’s best to select your workspace at the start to prevent confusion. Click OK. 3-5 QUICKSTART – CODE COMPOSER STUDIO 2. If this is the first time you have run Code Composer Studio IDE, a dialog box may appear like the one shown below. If the dialog appears, select Evaluate Code Composer Studio for 30 days unless you already have a license that you wish to activate. Click OK to continue. NOTE: If you have previously installed a Code Composer evaluation disk, you may not be able to move beyond this screen. Ask your instructor for assistance. 3-6 QUICKSTART – CODE COMPOSER STUDIO 3. Code Composer Studio may now open with the welcome page. If so, close out the welcome page by clicking the link in the upper right or by clicking the X on the tab. You should now have an empty workspace like that shown below. Maximize the window. 3-7 QUICKSTART – CODE COMPOSER STUDIO Step 4: Import Libraries 1. From the menu bar, click on Project, and then select Import Existing CCS/CCE Eclipse Project. 3-8 QUICKSTART – CODE COMPOSER STUDIO 2. The Import dialog appears. Browse to the root directory of the driver library (C:\StellarisWare\driverlib) and click OK. Be sure that the checkbox next to driverlib in the Project pane is checked and that Copy projects into workspace is unchecked. Click Finish. 3-9 QUICKSTART – CODE COMPOSER STUDIO 3. Skip this step if you are using the LM3S8962 board. Select Import Existing CCS/CCE Eclipse Project from the Project menu again. Browse to the root directory of the USB library (C:\StellarisWare\usblib) and click OK. Be sure that the checkbox next to usblib in the Project pane is checked and that Copy projects into workspace is unchecked. Click Finish. 3-10 QUICKSTART – CODE COMPOSER STUDIO 4. Skip this step if you are using the LM3S8962 board. Select Import Existing CCS/CCE Eclipse Project from the Project menu again. Browse to the root directory of the graphics library (C:\StellarisWare\grlib) and click OK. Be sure that the checkbox next to grlib in the Project pane is checked and that Copy projects into workspace is unchecked. Click Finish. 3-11 QUICKSTART – CODE COMPOSER STUDIO Step 4: Import Board Example 5. Select Import Existing CCS/CCE Eclipse Project from the Project menu again. Browse to the root directory for your chosen board ... • C:\StellarisWare\boards\ek-lm3s3748 for the 3748 board • C:\StellarisWare\boards\ek-lm3s8962 for the 8962 board Browse to the root directory of the hello project and click OK. The example screen shot below has the EK-LM3S3748 board as the chosen board. (C:\StellarisWare\boards\ek-lm3s3748). Be sure that the checkbox next to hello in the Project pane is checked and that Copy projects into workspace is unchecked. Click Finish. 3-12 QUICKSTART – CODE COMPOSER STUDIO 6. All of the imported projects now appear in the Projects Explorer pane. Since the hello project was the last one imported, it becomes the Active Project. Otherwise, you can right-click on it a set it as the Active Project. 3-13 QUICKSTART – CODE COMPOSER STUDIO Step 5: Building and Debugging a Project 1. Make sure that the power switch on your development board is in the SELF position, if your board has a switch. Then connect your development boards DEBUG USB port to your laptops USB port. Don’t change the position of this switch while the board is powered as you may damage the switch’s internal contacts. 2. On the menu bar, click on Project and select Rebuild Active Project. The build may take a few moments. As the project builds, messages scroll by in the console window. When the build is complete, the words Build complete for project hello will appear in the console window. 3-14 QUICKSTART – CODE COMPOSER STUDIO 3. On the menu bar, click on Target and select Debug Active Project. Alternatively, you can simply click the Debug Launch icon on the menu bar. Code Composer Studio should switch to the Debug Perspective. If it does not, click the Debug Perspective button in the upper right. 3-15 QUICKSTART – CODE COMPOSER STUDIO 4. The Code Composer Studio debugger automatically connects to your evaluation board, programs the Flash memory, and runs to the beginning of the main() function. From here, you can examine and modify memory, program variables and processor registers, set breakpoints, step, and perform other typical debugging activities. To run the program, select Run from the Target pull-down menu or click the Run button on the menu bar. Note the display on your board. If everything has worked properly, you should see Hello World on the display. Don’t worry about the preprogrammed application that came with the board, we’ll re-flash it in the Flash Programmer section later. Click the C/C++ Perspective button in the upper right of your display to return to the editor perspective. Right-click on hello in the Project pane and select Close Project from the list. If you are not going to run the next lab section, Close Code Composer Studio now. 3-16 QUICKSTART – CODE COMPOSER STUDIO Optional! The following section should only be attempted if you have sufficient time to complete it. Let your instructor know that you’re ready to start this section. Otherwise, you can complete it at home. Creating a New Project Once you have gone through the StellarisWare example applications, you may want to create your own project to begin development. While you can always start with an existing, simple project, sometimes you may want to start fresh. The example provided below creates a fresh project, copies code from an existing project, and builds the new project. 1. To add a new project to your workspace, go to File Æ New Æ CCS Project. 3-17 QUICKSTART – CODE COMPOSER STUDIO 2. Code Composer Studio prompts you with a dialog asking you to name the project (how about my_project) and specify the location of the project. Name your project, specify the location (your default workspace will do), and click Next. 3-18 QUICKSTART – CODE COMPOSER STUDIO 3. The next dialog asks for the project type and configurations. Select ARM as the project type, check both the Debug and Release configurations, and click Next. 3-19 QUICKSTART – CODE COMPOSER STUDIO 4. The next dialog allows you to define any inter-project dependencies. If your project will be using driverlib, usblib, or grlib, now is a good time to define that dependency. Select those libraries and click Next. 3-20 QUICKSTART – CODE COMPOSER STUDIO 5. On the next dialog, select the appropriate Stellaris device, little endian, the TI code generation tool, ELF output format, and the rtsv7M3_T_le_eabi.lib runtime library. Click Finish. 6. A new project has now been created, but the project does not include any source code. The next step is to add some startup code to the project. Using Windows Explorer, copy the startup_ccs.c file from an existing example directory in StellarisWare (such as C:\StellarisWare\boards\<board>\blinky) to your new project directory created in step 2 above (in your My Documents folder). 3-21 QUICKSTART – CODE COMPOSER STUDIO 7. Create a new C source file by going to File Æ New Æ Source File. 8. In the dialog box that pops up, name the file main.c and click Finish. 3-22 QUICKSTART – CODE COMPOSER STUDIO 9. Code Composer Studio will open the main.c file for editing. Add a main() function to main.c as shown below. Save the file by clicking the Save button. 10. Both files, main.c and startup_ccs.c, should have automatically been added to the project. If not, right-click on my_project in the Project pane, select Add Files to Project and browse to the files. 11. Build the new project by selecting Project Æ Rebuild Active Project. With your project created, all you really need to do is add your own code. Use the existing StellarisWare board examples as a reference. 3-23 QUICKSTART – CODE COMPOSER STUDIO NOTE: To set up your project to output a binary file (.bin) to be used with tools such as LM Flash Programmer, copy the post-build step from an existing StellarisWare example project. 3-24 QUICKSTART – CODE COMPOSER STUDIO Conclusion You have now installed the Code Composer Studio development tools and used them to build and load an example application on your Stellaris Evaluation Board. From here, you can experiment with the debugger or start creating your own application using the example projects as a reference. For further information on Code Composer Studio, go to the CCS Developer Site. Close Code Composer Studio now. References The following references are included on the Stellaris Evaluation Kit Documentation and Software DVD and are also available for download at www.ti.com/Stellaris: Stellaris Evaluation Kit User's Manual StellarisWare Software, Order Number SW-LM3S StellarisWare Peripheral Driver Library User’s Guide, Order Number SW-DRL-UG In addition, the following website may be useful: Code Composer Studio website at http://www.ti.com/ccstudio 3-25 QUICKSTART – CODE COMPOSER STUDIO 3-26