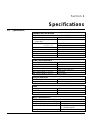
1
GraphXMaster User Manual Table of Contents Section Contents Page 1.1 The Projector ..................................................................................... 1-2 1 Introduction 2 Operation 2.1 2.2 2.3 2.4 2.5 2.6 2.7 2.8 2.9 Introduction......................................................................................... 2-1 How to Operate the Projector............................................................... 2-1 Navigating the Menus.......................................................................... 2-6 Adjusting the Image............................................................................. 2-6 User Menu1......................................................................................... 2-7 User Menu2......................................................................................... 2-8 Adjusting Focus................................................................................. 2-10 Memory Locations............................................................................. 2-10 Broadcasting to One or Multiple Projectors........................................ 2-10 3 Troubleshooting 3.1 3.2 Overview............................................................................................. 3-1 Troubleshooting Guide ....................................................................... 3-1 4 Specifications 4.1 Specifications..................................................................................... 4-1 5 Appendices A B Glossary ........................................................................................... A-1 Menu Tree .........................................................................................B-1 NOTE: Due to constant research, the information in this manual is subject to change without notice 1999 GraphXMaster User Manual 54-017113-01P Section 1 Introduction Section Contents: 1.1 Using this manual This manual provides the user with information necessary to effectively operate the GraphXMaster. It is recommended that you read the following information prior to operating the projector for the first time. The Projector ...................................................................................... 1-2 Installation and Setup instructions are provided in a separate Installation and Maintenance manual. Typographical Conventions The following typographical conventions are used in this manual: ◊ ◊ ◊ ◊ ◊ ◊ ◊ ◊ ◊ ◊ Warning messages alert readers to situations that may result in serious injury or death such as the presence of non-insulated “dangerous voltage with the projector. Caution messages alert readers to situations that may result in minor or moderate injury. Caution messages with an exclamation mark alert the readers to situations that may result in equipment damage. NOTE: messages provide supplementary information, emphasize a point or provide a tip for easier operation. Bold text and/or Italic text emphasize important information or terms. Numbered items indicate a step by step procedure. Bullets indicate listed items where order is of no significance. Software and on-screen messages appear in “quotation marks”. BUTTON AND KEY names appear in SMALL CAPS or boxed. Eg. The physical state of an item (ON, OFF) appear in LARGE CAPS. 1999 –GraphXMaster User Manual 1- 2 I Section 1: Introduction Disclaimer Every effort has been made to ensure that the information in this manual is accurate and reliable. Due to constant research, however, information is subject to change without notice. Christie Digital Systems assumes no responsibility for omissions or inaccuracies. 1.1 The Projector GraphXMaster is a professional-quality DLP projector that uses Digital Light Processing™ technology from Texas Instruments. Its single chip configuration and XGA resolution provides uniform brightness for video wall applications. GraphXMaster requires no convergence and has an outstanding ability of achieving ultimate color matching between screens. Features include: • 1024 X 768 pixels resolution • 500 ANSI lumens brightness for GraphXMaster RPM • 180 ft lamberts (max.) for GraphXMaster C50 • contrast ratio of 300:1 full field • no convergence required • intuitive on-screen menus for setup and control • IR remote control keypad • One standard RGBHV analogue input with BNC connectors • keypad selectable input switching • 16 memory locations – to store image setting parameters • RS-232 input for computer or controller control • RS-422 inputs and outputs for network control • 40” to 80” diagonal image size (GraphXMaster RPM version) • short throw distance • 6-axis adjustable How the Projector Works GraphXMaster accepts XGA input signals from an external source. Projected light, generated by an internal 100 watt UHP lamp, travels through a rotating color wheel that alternately passes red, green and blue light to the single DMD (digital micromirror device) chip. Reflected light from the DMD chip is then displayed on the external display screen. GraphXMaster is typically operated as a direct rear screen projection system, rear screen projection system, or in a cube configuration. 1999 –GraphXMaster User Manual Section 2 Operation Section Contents: 2.1 2.2 2.3 2.4 2.5 2.6 2.7 2.8 2.9 2.1 Introduction This section provides instructions for operating the GraphXMaster. It is recommended that you read through the following section before using the projector for the first time. 2.2 How to Operate the Projector Commands are transmitted to the projector via the keypad. The keypad supplied in the user’s kit can be configured as an IR remote or wired keypad. Either way, the keypad operates in the same manner and enables the user to enter commands that generates an immediate response by the projector. Keypad control enables the user to access menus and adjust various image settings. Read the descriptions below to determine which method of keypad control is most suitable for your projection environment. Introduction ........................................................................................ 2-1 How to Operate the Projector .............................................................. 2-1 Navigating the Menus ......................................................................... 2-6 Adjusting the Image ............................................................................ 2-6 User Menu1 ........................................................................................ 2-7 User Menu2 ........................................................................................ 2-8 Adjusting Focus ................................................................................ 2-10 Memory Locations ............................................................................ 2-10 Broadcasting to One or Multiple Projectors ....................................... 2-10 IR Remote Keypad An IR remote keypad gives you the freedom to move within the projection room and still control the projector. This method of wireless communication works on the principle that the commands transmitted by the keypad are received by one of the two IR sensors on the projector and relayed to the internal electronics of the projector for processing. It is important that the keypad is pointed in the direction of the projector when entering commands. Ambient lighting and your location in the room will affect the transmission of commands. If the projector does not respond immediately to the keypad commands entered, check your location in relation to the projector and the amount of light present in the transmission path. Wired Keypad An IR remote keypad can be converted into a wired keypad by connecting the 30 ft extension cable provided in the user’s kit between the keypad and projector. This method of control is suitable when the projection room has a large amount of light that would prevent normal IR transmission. The advantage of using a wired keypad is that you can control a single projector while facing any direction when entering commands. 1999 GraphXMaster User Manual 2- 2 I Section 2: Operation If you are using a wired keypad and decide to switch to remote, you must not only unplug the cable from the top of the keypad, but from the REMOCON jack on the input panel also. The projector will not respond to any commands sent from the remote keypad while the extension cable is still plugged into the control unit. Depending on projector accessibility, this option may or may not be suitable. Replacing the batteries The keypad works on 4 AA size alkaline batteries. Periodically these batteries require replacement. (Batteries are required for both IR and wired keypad configurations.) To replace batteries: 1) Turn the keypad over to access the small battery compartment cover. 2) Push the small tab in and up at the same time - lifting the cover completely off. 3) Remove the four old batteries from within the compartment and properly discard. 4) Orient and place each new battery into the compartment indicated by the diagram etched into the compartment. 5) Insert the bottom edge of the cover into the rim of the compartment and gently push the upper portion of the cover down until it snaps into place. If you don’t hear a “click” the cover is not in position. Remove the cover and try again ensuring the bottom edge of the cover gets inserted into the rim. Keypad Guidelines There are several keypad guidelines to follow when using the keypad: 1999 GraphXMaster User Manual • Press one key at a time when entering keypad commands. • Hold down the arrow key to continuously repeat the action. For example when increasing or decreasing the setting of a menu item. • Do not delay between key presses when entering commands. Some commands require each key press to be made within one second of each other to be valid. • If using the IR remote, point the keypad toward the screen. Section 2: Operation I 2- 3 Keypad Commands The following segment identifies and defines all the keys available on the keypad. 1999 GraphXMaster User Manual 2- 4 I Section 2: Operation Illumination Switch Toggle the ILLUMINATION switch, located on the side of the keypad, to turn the keys back-lighting ON or OFF. This is useful when you are operating in a dark projection environment. If no input is detected within 20 seconds of the last key press, the back-lighting will turn OFF. Power ON/OFF Power ON/OFF Press and hold Power ON/OFF for two seconds to turn the projector ON or OFF. When power is first turned on, the lamp cooling fan turns on and the image is displayed on screen within a few minutes. When the power is turned OFF the image immediately disappears from the screen. The fans continue working and automatically turn off after approximately 2 minutes when the lamp has cooled. NOTE: It is recommended that 30 minutes elapse after powering up the projector before any adjustments are made to the image. Pic Mute to turn the projected image ON or OFF. When is toggled Press OFF, the image is no longer displayed and the screen is black and remains that way until the key is toggled back ON. Display Use the key to display the properties of the projector. A small window is displayed on screen with the following information: current software version, current date, total number of hours the projector has been in use, total number of hours the lamp has been in use, type of input selected, and the projector ID number. Input Keys (A, B, Video and Y/C) Use the input keys to select available input signals. Press VIDEO to select the standard analogue RGB input. If using digital input (an option available for future use), press A. There is no input signal associated with the keys B and Y/C. If you select one of these keys during operation, your screen will go blank. Reselect the correct input key, to return to the image. Menu 1 to display User Menu1. Menu1 provides you with menu options Press necessary to fine adjust an image. You can adjust Brightness, Contrast, White Balance, Gamma, Dithering and Color Space Control. See 2.5 User Menu1. Menu 2 Press to display User Menu2. Menu2 provides you with menu options that are usually adjusted when switching to a new source, prior to fine adjustment. You can adjust Clock, Phase, Clamp, and Auto White. See 2.6 User Menu2. 1999 GraphXMaster User Manual Section 2: Operation I 2- 5 Mem List A technician may use the key to create up to16 different memory locations. These memory blocks are used to store customized setups for all available menus into the projectors internal memory. This feature is useful when using various external sources. See 2.8 Memory Locations. , , R,G,B The R, G, B keys are generally used by technicians, during initial setup and testing, to turn the red, green and blue color component of an image ON or OFF. During normal operation, the R, G, B keys should be active (ON). To toggle the state of an RGB key ON or OFF, press the key once. Function key to select extended functions. For example, press Use the to view a projector’s remote ID number. and Esc to move the cursor back one field or to cancel a keypad command Press and return to presentation level. For example, to exit a menu and return to the displayed image, press . Note: Settings are saved when exiting a menu. Enter Use the key to select a menu item for adjustment or to accept a new value entered for a menu item. Arrow Keys and keys to navigate within a menu and the Use the increase or decrease the value of an adjustable menu item. and keys to Test Setup technicians use the performance of the projector. key during installation and setup to verify color A single key press displays a completely white image at the current intensity settings. A second key press displays the same white image, but with all colors at full intensity. A third key press displays the image at presentation level. Normal Press the key to reset the present setting for Bright, Contrast, Clock, Phase and Clamp to the original factory setting. NOTE: As a precaution, the projector prompts the user to accept the condition that resetting is about to take place before the action is completed. This gives the user the opportunity to decline and return to presentation level without affecting the settings. Number Keys Use the number keys on the keypad to enter numerical data for items such as memory locations or Remote ID number. 1999 GraphXMaster User Manual 2- 6 2.3 I Section 2: Operation Navigating the Menus There are two user menus available from which you can adjust the image. Menu2 items usually require adjustment when a new source has been selected and Menu1 items can be adjusted at any point during operation. When a user menu is accessed the projector is no longer considered in presentation level – even though the image can be seen in the background. To . return to presentation level you must exit the menu by pressing Refer to the menu tree in Appendix B. To access a user menu: or . A small window is displayed in the foreground with all the available menu options and the memory location at the top. 1) Press To navigate a menu: 1) Press or keys until the desired menu item is highlighted. 2) Press to select. The selected menu item or a separate window with related adjustable items is displayed. 3) Press to exit the menu and return to presentation level. NOTE: For Menu1 only. Once a menu item is selected, the menu window disappears and only the selected menu item is displayed on screen. You can navigate to the next menu item, without returning to the full menu, by pressing the or arrow keys. 2.4 Adjusting the Image The difference in frequency signals between external sources can sometimes affect the way the image is displayed. For example, the display from two computer sources may be different. Since the user menus are easily accessible the display can be modified to suit the external source or a users preference. To adjust a menu item setting: 1) Access a user menu and select a menu item. Refer to 2.3 Navigating the Menus. 2) Use the and/or keys to increase or decrease the setting. Adjustments made to most menu items in Menu1 or Menu2 can be seen immediately on the projection screen. Since there is no quick way of returning to the old setting once you start adjusting, it is recommended that you note the settings before you change them. 3) Press to exit the menu and return to presentation level. New settings are saved into the internal memory of the projector when exiting a menu item. 1999 GraphXMaster User Manual Section 2: Operation I 2- 7 Bright, Contrast, Clock, Phase and Clamp are the only user menu items that can be reset to the original factory settings. Before you reset any of these items it is recommended that you write down the current settings. By doing this you can quickly return to those settings if you reset in error. To reset a menu item to its original factory default: or on the keypad. (Make sure you are in the correct memory location.) Use the and/or arrow keys and highlight the menu item you want to reset. Press to select the menu item. Press RESET OK?”. . To cancel and return to To accept and continue with resetting, press presentation level, press . 1) Press 2) 3) 4) 5) 2.5 User Menu1 Brightness Adjusts the amount of perceived light in the dark areas of the image. An image that appears too dark (black background) requires an increase in brightness level. An image that appears “washed out”, where the noticeably black areas of the image appear gray, requires a decrease in brightness level. You can adjust brightness in the range of –64 to 63. The original factory setting is 0. Contrast Adjusts the ratio between the maximum and minimum brightness values in an image. If the light parts of an image lack detail, the contrast setting may be set too high. If the image does not seem bright enough, the contrast setting may be set too low. You can adjust contrast in the range of 0 to 150. The original factory setting is 100. White Balance Adjusts the amount of color that appears in white. Three presets are available, Low, Middle and High. A technician during installation and setup determines the percentage of red, green and blue that is added to a pure color. Technicians can adjust the presets if necessary by accessing the Service menu. With original factory settings, a White Balance set to Low makes the whites in the image appear reddish. An image with White Balance set to Middle or High appears sharp with little change in the whites of the image. The original factory and recommended setting is Middle. Gamma Adjust to emphasize detail in an image. When gamma is set correctly there should be a smooth transition between white and black color levels. There are six gamma presets available. If the image appears dull, the gamma setting is probably set too high. The transition from white to black is unbalanced (there are more white color levels than black). If the image appears too dark, the gamma setting is probably set too low. The transition between white and black is also unbalanced with more black color levels and very little white. 1999 GraphXMaster User Manual 2- 8 I Section 2: Operation The original factory and recommended setting for gamma is 2. Dither The dither setting can either be ON or OFF. To create a smooth transition between colors in the displayed image, dither should be ON. In general, when dither is ON various colored pixels are placed side by side in a pattern to simulate a color. For example, the human eye will perceive alternating black and white pixels as gray. The original factory setting for dither is ON. CSC There are three CSC (Color Space Control) presets available: Normal, White or RGB. Each preset displays a different color purity variation. For example, red can be pure red or it can have a certain percentage of blue and green added to it. This also applies to the colors green and blue. A setup technician normally adjusts the variation in color purity for each CSC preset during installation and setup, by accessing the Service menu. The original factory and recommended setting is Normal. 2.6 User Menu2 Clock Adjusts the timing of the pixel sampling clock to match the timing of the incoming signal for RGB inputs. It is necessary to adjust Clock when the image appears unstable with strong vertical banding. Clock usually requires adjustment when a new external source is used. When Clock is selected a smaller window appears with DIV and FINE options. The best method of adjusting Clock is to display a test pattern with strong vertical lines and adjust the DIV setting first. Adjust DIV until the vertical bands in the image are as far apart from each other as they can be. Notice that the image clears and if the DIV setting is adjusted further, in the same direction, the vertical bands reappear and the image returns to the same state it once was. Once the correct DIV setting is achieved, highlight and select FINE. Adjust this setting until all “noise” disappears. Note the setting and continue to adjust FINE until the “noise” reappears. Note this setting. Determine what the middle setting is between these two values and set FINE as this value. DIV setting ranges from 1200 to 1600 and FINE setting ranges from 0 to 31. The original factory settings for DIV and FINE are 1344 and 15, respectively. (NOTE: The factory default settings are usually very close to the optimum settings required for your source.) 1999 GraphXMaster User Manual Section 2: Operation I 2- 9 Phase Adjusts the position of the image on the screen. To move the image horizontally (side to side), adjust H-Position. To move the image vertically (up or down), adjust V-Position. You can adjust the H-Position setting in the range of 50 to 200 and adjust the VPosition setting in the range of 3 to 60. The original factory setting for HPosition is 131 and V-Position is 23. Clamp Adjusts the clamp position of the analog input signal. When Clamp is selected a smaller window appears with Clamp Start or Clamp End options. If the image displays horizontal streaking or appears dim it may be because the clamp position requires modification to match the timing of the signal. You can adjust Clamp-Start in the range of 1 to 228 and Clamp-End settings can range from 28 to 255. The original factory and recommended setting for Clamp-Start is 60 and Clamp-End is 90. Qualified service technicians should make adjustment to these settings. Auto White Auto-White is an automatic feature that adjusts the way variations in white levels are displayed based on the current input signal. For example, if the lightest part of the image lacks detail, the input signal may be too large or if the image appears too dark, the input signal may be too small. Auto-White adjustment should be performed when switching to a new source. For best results, display a completely white image from the source before performing the Auto-White adjustment. 1999 GraphXMaster User Manual 2 - 10 I Section 2: Operation When Auto-White is selected a smaller window appears with the question “AutoWhite Start?”. You can continue the Auto-White adjustment by pressing or cancel it by pressing . 2.7 Adjusting Focus The lens can be mechanically adjusted to focus the display. A technician, during installation and setup, would normally adjust the lens. Therefore, if achieving a quality image through keypad commands fails, call a technician for support. 2.8 Memory Locations Memory locations can be created if you are constantly switching between various external sources. Since these sources usually generate different input signals it may be suitable to create a memory location to store customized settings for that source. Memories do not automatically switch based on the source. You manually select them each time that source is used. A memory location can also be created to store customized settings for certain presentations or to suit a user’s preference. By setting up a memory location you can quickly and easily adjust the presentation by recalling the settings stored in that memory block. Up to 16 memory locations can be created. To create a memory location: on the keypad. The message, “Memory Select 01”appears on screen. Using the number keys on the keypad enter a new two-digit code. (eg. The message, “Memory Select 02” appears on screen). + The image will be displayed with the original factory settings. If you entered a code that was previously created, the image will be displayed with the customized settings saved for that memory location. to clear the message from the screen. From this point you can 2) Press access a menu and make any adjustments necessary. Any adjustments you make will be saved in the current memory location when you exit the menu. 1) Press To recall a memory location: and enter the two-digit code to recall the customized settings already saved in a memory location. You will notice the projector refreshes and displays the image with the saved settings. 1) Press Tips: 1) Ensure you are in the correct memory location before you begin modifying user menu items. The first line displayed in a user menu window identifies the current memory location. 2) Keep track of the various memory locations created to eliminate the guesswork when trying to achieve a customized setup that has already been created to suit a user’s preference or a specific source. 2.9 Broadcasting to One Depending on the type of installation, you can select to send keypad commands or Multiple to a single projector or simultaneously send commands to all projectors in a Projectors network. Each projector is identified by a two-digit ID number, which is typically assigned by a technician during installation and setup. To control a single projector in a network: 1) Press and enter the two-digit code assigned to the projector you want to control within one second. If the correct ID number was successfully entered the message “Remote ID ##, Enable” appears. If an incorrect ID number was entered all projectors in the network become disabled and the 1999 GraphXMaster User Manual Section 2: Operation I 2 - 11 message “Remote ID ##, Disabled” is displayed on each screen in red. NOTE: The ID number (##) displayed is the number entered. If the projector is already enabled and you press Remote ID” is displays on screen in yellow 2) From this point, you can continue with normal operation. To broadcast to all projectors: and enter the two-digit code within one second. This will enable all projectors for control. The message “Remote ID, Clear” appears on all projection screens. 2) Continue with normal operation. 1) Press To enable a projector that has been disabled: When you disable a projector you are limited to the commands that you can enter and . using the keypad. The only active keys on the keypad are 1) Press FUNCTION and immediately after press . The projector ID number is displayed on screen. and enter the correct two-digit code assigned to the projector 2) Press within one second. NOTE: There is no indication that the command is actually being transmitted because, the message “Remote ID” is not displayed like it normally would be when the projector is already enabled and the key is pressed. Once enabled, continue with normal operation. NOTES: 1) Enter the two-digit projector ID number within one second after pressing . 2) The projector must be enabled to turn the power off. 1999 GraphXMaster User Manual 2 - 12 I Section 2: Operation NOTES: 1999 GraphXMaster User Manual Section 3 Troubleshooting Section Contents: 3.1 3.2 3.1 Overview Use the information in this section as a guide to assist you in correcting common problems associated with image quality and projector use. It is recommended that you note all the symptoms of the problem before attempting to correct it. If you are unable to resolve the problem yourself, contact a technician or dealer for technical support 3.2 Troubleshooting Guide Use the following segment to determine what the problem is. Find the symptom that best describes the situation. Read and then follow the recommended actions carefully. Overview ............................................................................................ 3-1 Troubleshooting Guide ....................................................................... 3-1 NOTE: Some of the symptom descriptions include the possible state of the LED indicators, although they can’t be seen unless you access the projectors control unit. Sympton: The projection unit will not turn ON when POWER ON is pressed. The STAND-BY indicator is not lit. Cause/Action: 1) The power cord may be disconnected. Check the power connection at the wall outlet and the projector. Ensure the . MAIN POWER ON/OFF switch is ON before you press Sympton: The projection unit will not turn ON when POWER ON is pressed. The STAND-BY indicator is lit and red. Cause/Action: 1) The batteries to the IR remote control unit may be weak. Check and if necessary replace the batteries. Refer to Section 2 – Operation. 2) The sensors may be blocked and no signal is being transmitted. Ensure the sensors are not blocked. 3) The keypad may be damaged. Try using a different keypad, if available. 4) The lamp cover may not be in place. Ask a technician to check that the lamp cover is on and secured correctly. 1999 – GraphXMaster User Manual 3- 2 I Section 3: Troubleshooting Sympton: The projection unit will not turn ON when POWER ON is pressed. An error code is displayed. Cause/Action: 1) Not enough time has passed between powering the projector down and up again. Wait approximately 5 minutes after the lamp fan has turned off before attempting to turn the projector on again. 2) There is an error code LED on the control unit of the projector. It is possible that an internal error has occurred which requires the attention of a technician. Call a technician for support. Sympton: The projection unit will not turn OFF when POWER OFF is pressed. Cause/Action: and to 1) The projector may be disabled. Press see the status of the projector. If the projector is disabled, press and within one second enter the two-digit set ID number to enable the projector. Sympton: No image is displayed. Cause/Action: 1) The main power is ON, but the key has not been , projector fans should immediately pressed yet. Press turn on. 2) An incorrect source has been selected. For analog input press the VIDEO key. 3) The cable has not been connected to the external source. Have a technician check that the connections between the external source and the projector are secure. to 4) The contrast level may be set too low. Press access the user menu and adjust the contrast level using the key. 5) Lamp life has expired. Lamp replacement is required. Call a technician for support. 6) Have a technician check to ensure the lens cap is not on. Sympton: An all white screen displays during normal operation. Cause/Action: 1) The key accidentally may have been pressed. To display the original image, press the key. Continue with normal operation. NOTE: Depending on the number of times you accidentally pressed , one keypress may not return you to presentation level. Press the key again. 1999 – GraphXMaster User Manual Section 3: Troubleshooting I 3 - 3 Sympton: The image is too dark. Cause/Action: 1) The brightness and contrast settings are too low and need adjustment. Press and . Brightness is the first menu item selected. Use the arrow key to increase the arrow key to select Contrast brightness level. Press the and use the arrow key to increase the contrast level. Adjust these two settings until the desired display is achieved. Sympton: The image is too faint. Cause/Action: 1) The brightness setting is too high and needs adjustment. and . Brightness is selected. Use the Press arrow key and lower the brightness level. Press the arrow key to select Contrast and use and arrow keys to adjust the contrast levels, if desired. 2) Another light source (room or outdoor lighting) is being reflected onto the screen. Limit the amount of the light in the projection room. 3) Lamp brightness may be affecting the image. Call a technician for support. Sympton: The image is jittery or unstable. Cause/Action: 1) Clock and Phase settings may require adjustment. From Menu2, select and adjust Clock and Phase until the desired image is displayed. 2) Synchronization signals from the source are inadequate. Sympton: The display is missing a color component(s). Cause/Action: 1) Is it possible one of the R, G, B keys on the keypad were accidentally turned off? Use the following chart to determine which color component(s) are on or off. (Display a white image from the source first.) 2) Check RGB input connections. Ensure all cables are connected to the projector and the source. 1999 – GraphXMaster User Manual 3- 4 I Section 3: Troubleshooting Sympton: The projector stops responding to keypad commands after it has been in use for a period of time. No error code exists. Cause/Action: 1) Check that there is nothing blocking the sensors. 2) You may be too far away from the projector. Move closer to the projector and point the keypad directly at the screen. 3) Is it possible you were trying to select another projector to control and entered the incorrect remote ID number disabling the projector you are currently in control of? Press and to see the status of the projector. If disabled, press and within one second enter the twodigit set ID number to gain control of the projector. Try selecting another projector again. 3) The batteries in the remote control need replacement. Refer to Section 2 – Operation for details. Sympton: The transition between colors in an image is too harsh (black to white – no gray). Cause/Action: 1) Turn dither in Menu2 ON. Sympton: The picture sometimes appears blue or red when power is turned on. Error code is “-”. Cause/Action: 1) The appearance of an all blue or red picture is not an indication that a problem exists with the projector. If there is no signal supplied to the digital input terminal then the picture appears blue. If there is no signal supplied to the analog input terminal then the picture appears red. Sympton: Cannot achieve a clear focused image. Cause/Action: 1) The lens may not have been focused properly during setup and requires further manual adjustment. Call a technician for support. 1999 – GraphXMaster User Manual Section 4 Specifications 4.1 Specifications OVERALL SPECIFICATIONS Resolution Pixel Format (H x V) Maximum Digitizing Sample Rate Brightness for GraphXMaster RPM XGA (1024 x 768) 80 MHz Contrast Ratio Gray Scale Number of Displayable Colors Color Temperature Color Wheel Pattern 500 ANSI lumens (max.) 180 ft lamberts (max.) 300:1 full field 8 bit A/D (10-bits after dither) 16.7 million Adjustable range 3200K to 9300K Blue/Red1/Green/Red2 POWER REQUIREMENTS Power Supply Operating Range Line Frequency Noise Level Power Consumption Max. inrush current (@ 100V/240V) Max. inrush current (@ 100V/240V) AC 100V to 240V ±10%, 50-60 Hz 50 – 60 Hz < 52dB 220W ± 10% (300VAC) 30/60 amps 3.0/1.5 amps PROJECTION LENS Throw Ratio Image Size Range 0.73:1 nominal 40” to 80” (diagonal) LAMP Lamp Type Lamp Life Power UHP 8000 hours typical 100 watts GraphXMaster C50 INPUT COMPATIBILITY RGB (analogue) Horizontal Frequency Vertical Frequency Pixel Clock Rate Impedance Range Range 46 – 50 kHz 59 – 61 Hz 40 – 67 MHz (analog) 42 – 60 MHz (digital) 75 ohms 1999 GraphXMaster User Manual 4- 2 I Section 4: Specifications INPUT COMPATIBILITY Sync Impedance Type Sync Polarities Input Levels Control Ports RS-232 C (bi-directional) RS-422A In (between projectors) RS-422A Out (between projectors) Contact switch Wired Remote Input Infrared Remote SOURCE SELECTIONS Analog Input Type Digital Input Analog Timing Recommendation 1K ohms / 75 ohms Separate H and V Positive and Negative 0-0.5V (low) / 2.5-5.0V (high) D-Sub 9 pin male D-Sub 9 pin female D-Sub 9 pin female D-Sub 9 pin female Φ 3.5 Jack (mono 1/8” mini) IR Receiver 1 RGBHV (B.N.C. X 5) 1 LVDS 24 bit version (for future use) VESA Standard XGA Horizontal 48kHz Vertical 60Hz COMMUNICATIONS AND CONTROL Communication Terminals (1) Inputs RS-232/ RS 422 A Output RS 422A for system command control Communication Terminals (2) Relay Terminal Input (D-sub 9pins) Communication Terminals (3) Wired Remote Control Input Remote Control Hand Unit IR Remote Keypad COMPLIANCE Safety EMI / EMC ENVIRONMENTAL SPECIFICATION Temperature (storage) Humidity (storage) Temperature (operating) Humidity Range (operating) Altitude (operating) 1999 GraphXMaster User Manual C.S.A. C22 2.950(M94) approved to U.L. 1950 by NRTL (Semko) EN60950,CE 47CFR 2&15(FCC) Class A – US – Conducted and Radiated Emissions Stds. CRC 1374 (DOC) Class A – Canadian Conducted and Radiated Emissions Stds. Emissions per EN50081-1, Immunity EN50082-1, CE -20°C to +50°C 0% - 95% non condensing 10°C to +40°C 20% to 90% non-condensing 0 to 3000 meters Appendix A Glossary This appendix defines the specific terms used in this manual as they apply to the GraphXMaster. Also included are other general terms commonly used in the projection industry. Ambient Light Rejection ' The ability of a screen to reflect ambient light in a direction away from the "line of best viewing". Curved screens usually have good ambient light rejection. Flat screens usually have less ambient light rejection. Aspect Ratio ' The ratio of the width of an image to its height, such as the 4:3 aspect ratio common in video output. Bandwidth ' The frequency range of the projector's video amplifier. Baud Rate ' The speed at which serial communications travel from their origin. The GraphXMaster can be set at a baud rate of 9600 bps or 19200 bps. Brightness ' In projection, brightness usually describes the amount of light emitted from a surface such as a screen. It is measured in ANSI lumens, foot-lamberts or candelas per square meter. Candela or Candle ' Unit of measure for measuring intensity of light. Color Temperature ' The coloration (reddish, white, bluish, greenish, etc.) of white in an image, measured using the Kelvin (K) temperature scale. Higher temperatures output more light. Contrast (ratio) ' The degree of difference between the lightest and darkest areas of the image. Controller ' Controllers are network based graphics systems that operate as a single node on a network. Controller manage multiple inputs and displays them on a display wall as one screen Convergence ' The alignment of the red, green, and blue elements of a projected image. DMD ' Digital Micromirror Device used in the GraphXMaster for processing red, green, and blue color data. Diffused Screen ' A type of rear-projection screen which spreads the light striking it. Screen gain is less than 1 but audience viewing angles are increased. Foot-candle ' The intensity of visible light per square foot. 1999 GraphXMaster User Manual A -2 I Appendix A: Glossary Foot-lambert ' The luminance (brightness) which results from one foot-candle of illumination falling on a perfectly diffuse surface. Horizontal Frequency ' The frequency which scan lines are generated that varies between sources. Also called horizontal scan rate or line rate. Hot Spot ' A circular area of a screen where the image appears brighter than elsewhere on the screen. The hot spot always appears along the line of sight and "moves" with the line of sight. High gain screens and rear screens designed for slide or movie projection usually have a hot spot. Image Setting ' An adjustment that affects the display of an image. Such image settings include contrast, brightness, tint, blanking, focus, etc. Input ' A physical connection route for a source (input) signal. Input Signal ' Signal sent from a source to the projector. Interface ' A device that accepts an input signal for display by the projector. Interlace ' A method used by video tape players and some computers to double the vertical resolution without increasing the horizontal line rate. If the resulting frame rate is too low, the image may flicker depending on the image content. Keypad ' A small push-button device which allows the user to control projector settings and operation. There is one keypad that can be configured to IR remote or Wired remote. For more information, refer to Section 2. Keystone ' A distortion of the image that occurs when the top and bottom borders of the image are of different lengths. Side borders slant in or out, producing a keystone shaped image. Linearity ' The reproduction of the horizontal and vertical size of characters and/or shapes over the entire screen. Line of Best Viewing ' When light from a projector is incident on a screen, the light reflects from the screen such that the angle of reflection equals the angle of incidence. The Line of Best Viewing is along the line of reflection. Lumen ' The amount of visible light emitted by a light source is measured in lumens. Lux ' The amount of visible light per square meter incident on a surface. 1 lux = 1 lumen/square meter = 0.093 foot-candles Menu ' A list of selectable items displayed on the screen. Pincushion ' A distortion of the image which occurs when the borders are concave or convex. Pixel (picture element) ' The smallest discernible element of data from a computer-generated image. Pixel Phase ' The phase of the pixel sampling clock relative to incoming data. Pixel Tracking ' The frequency of the pixel sampling clock. 1999 GraphXMaster User Manual Appendix A: Glossary I A -3 Presentation Level ' The projector is at presentation level when only the image from a source is displayed. When you are adjusting image settings you are not in presentation level, although you can see the image in the background. Projector-to-Screen ' The distance between the projector's front feet and the screen. Also called Distance "Throw Distance”. Rear Screen ' A translucent panel for screen projection. Incident light travels through the incident surface of a rear screen and forms an image on the other surface. Resizing ' The ability to manipulate through software commands the physical size, placement and/or aspect ratio of an image. Resolution (lens) ' The maximum number of alternate white and black horizontal lines that can be distinguished on a screen when a photographic target is placed between the lens and a light source, and illuminated by that light source. Resolution (projector) ' The maximum number of pixels that the projector can display horizontally and vertically across an image. RS-232 ' A common asynchronous data transmission standard recommended by the Electronics Industries Association (EIA). Also called serial communication. RS-422 ' A relatively rare asynchronous data transmission standard in which balanced voltage is specified. RS-422 is used for exceptionally long distances only. Scan Frequency ' The horizontal or vertical frequency at which images are generated. Scan Line ' One horizontal line on the display. Source ' The device, such as a computer or controller, connected to the projector for display.. Switcher ' A signal selector that can be connected to a projector for the purpose of adding more sources. Sync ' This term refers to the part of the video signal that is used to stabilize the picture. Sync can occur in three forms: 1) "Composite sync": the horizontal and vertical components are together on one cable. 2) "Sync-on-green": the sync is part of the green video. 3) "Separate sync" or "H.SYNC and V.SYNC": the horizontal and vertical components of the sync are on two separate cables. Sync Width ' The duration of each sync pulse generated by a computer. The sync width is part of the blanking time. TTL Video ' A type of RGB video with digital characteristics. Throw Distance ' The distance between the front feet of the projector and the screen. Also called "Projector-to-Screen Distance”. Vertical Frequency ' The frequency at which images are generated. Vertical frequencies vary amongst sources. Also called vertical scan rate. 1999 GraphX Master User Manual A -4 I Appendix A: Glossary Viewing Angle ' Screens do not reflect equally in all directions. Most light is reflected in a conical volume centered around the "line of best viewing". Maximum brightness is perceived if you are within the viewing cone defined by the horizontal and vertical viewing angles. White Balance ' The color temperature of white used by the projector. White Field ' The area of an image that is white only. For example, a full white field is an image that is white everywhere. A 10% white field is a white area (usually rectangular) that occupies 10% of the image; the remaining 90% is black. 1999 GraphXMaster User Manual Appendix B Menu Tree 1999 GraphXMaster User Manual B -2 I Appendix B: Menu Tree NOTES: 1999 GraphXMaster User Manual