1
AOGUI User Manual
Jure Skvarč
for version 20131113
Table of Contents
Introduction...........................................................................................................................................5
Deployment...........................................................................................................................................5
Starting and running..............................................................................................................................7
General GUI layout...............................................................................................................................7
Big messages...........................................................................................................................8
Operational control panel........................................................................................................9
Centre pickoff probe.........................................................................................................10
Auto-centre.......................................................................................................................10
Centre spots......................................................................................................................10
Calibration panel...................................................................................................................11
Calibrate responses...........................................................................................................11
Calibrate actuators............................................................................................................11
Calibrate pickoff probe.....................................................................................................11
Mirror and spot configurations..................................................................................................12
Save offsets.......................................................................................................................12
Load offsets......................................................................................................................12
Zero offsets.......................................................................................................................12
Load mirror.......................................................................................................................12
Load raw...........................................................................................................................12
Save mirror.......................................................................................................................12
Observing panel.........................................................................................................................12
Adaptive optics......................................................................................................................13
Close loop / Open loop.....................................................................................................13
Static aberrations..............................................................................................................13
Telescope control...................................................................................................................13
Start guiding / Stop guiding..............................................................................................13
Start packets / Stop packets..............................................................................................13
Segment, FSM and pickoff probe control..................................................................................14
Selecting the segments.....................................................................................................14
Observing segment status.................................................................................................14
Changing segment status..................................................................................................15
Moving the FSM..............................................................................................................15
Moving the pickoff probe.................................................................................................15
Zernike decomposition...............................................................................................................15
Program parameters...................................................................................................................16
Status..........................................................................................................................................18
Sequencer...................................................................................................................................18
Real time control panel..............................................................................................................19
Configuration........................................................................................................................19
Reconstructor........................................................................................................................20
Camera control......................................................................................................................20
Autowhite panel.........................................................................................................................21
Simplex panel.............................................................................................................................23
Running simplex procedure..............................................................................................24
Camera selection and image viewing...............................................................................24
Light path page..........................................................................................................................25
NCU...........................................................................................................................................26
FSM..................................................................................................................................26
DM....................................................................................................................................26
WFS..................................................................................................................................26
OASIS mirror...................................................................................................................26
Dichroic............................................................................................................................27
Lucky mirror.....................................................................................................................27
Filter focus........................................................................................................................27
Camera widget..................................................................................................................27
Tutorials..........................................................................................................................................28
Starting and quitting the application..........................................................................................28
Starting the AOServer................................................................................................................28
Starting the real time software on the PC..................................................................................28
Flattening the mirror using aogui...............................................................................................28
White light flattening.................................................................................................................30
Removing non-common path errors..........................................................................................30
Moving the segments manually ................................................................................................30
Inspecting segment and spot status............................................................................................31
Wavefront analysis using Zernike decomposition.....................................................................31
Calibration of strain gauges.......................................................................................................31
Calibration of the pickoff probe.................................................................................................31
Observing...................................................................................................................................31
NAOMI troubleshooting guides.....................................................................................................33
Mechanisms...............................................................................................................................33
WFS mechanisms do not respond or................................................................................33
WFS status keeps red Error or blue Busy status...............................................................33
Mechanisms are not initialised.........................................................................................35
GUIs...........................................................................................................................................35
AOGUI stops responding.................................................................................................35
AOGUI gets stuck or is very slow....................................................................................36
Real time system........................................................................................................................36
Some or all segments are extremely inclined and can not be moved...............................36
The real time system refuses to change the camera readout mode or speed....................37
The SG loop can not be closed or opened or....................................................................38
Segment fringes on the Segment page are static even if it is implied that the SG is closed
(the SG button has a command Open) or.........................................................................38
Segments can not be moved manually ............................................................................38
Try to open and close the SG loop. Check that the fringes move when loop is closed.
Load the latest mirror configuration ("Load mirror")......................................................38
Real time system computer aopc1 not running................................................................38
Real time process on aopc1 not running...........................................................................39
NaomiRestart aocontrol1 does not finish properly...........................................................39
Autoguider status is Error and shown in red....................................................................42
Harmless messages in the terminal.......................................................................................42
Appendix A..........................................................................................................................................44
Calculation of fringes on the segments...............................................................................................44
Appendix B..........................................................................................................................................45
Calculation of strain gauge gain and offset values..............................................................................45
Appendix C: Setting up the terminal server daemon..........................................................................46
.............................................................................................................................................................47
Glossary...............................................................................................................................................48
DAC demands.......................................................................................................................48
Final demands.......................................................................................................................48
Strain gauges.........................................................................................................................48
Shack-Hartmann....................................................................................................................48
WFS.......................................................................................................................................48
TCS........................................................................................................................................48
Introduction
NAOMI, the adaptive optics system at the WHT, has undergone a major upgrade of the real time image
analysis computer and of operational procedures. In addition a new user interface application, called
aogui, has been created to support new calibration and observing modes and to control the system.
This document describes the functionality of aogui and provides tutorials for the tasks which are
performed by engineers and observers to prepare the system for observations and to actually perform
observations. In addition, a troubleshooting guide is added which extends its reach to other
components of the AO system. Main differences between the old and the new operational model are
outlined in the following paragraphs.
One of the most important tasks in preparing the NAOMI adaptive optics system for observations is
optimisation of the deformable mirror (DM) so that it produces a diffraction limited spot on the
science camera, Generally the process consists of three steps:
1. Co-alignment of the DM segment normals with the optical axis
2. Co-phasing of the segments using white light interferometry.
3. Removal of the non-common path errors using simplex optimisation of the spot on the science
camera.
In the original NAOMI system step 1 is performed using a laser double-pass interferometer called
FISBA and a special software called FisbaGui. This method is very sensitive both in positive and
negative way. The positive side is that it can align segments very well. On the negative side it is very
sensitive to any vibrations present on the optical bench and requires for operation that the optical bench
is floating on air cushions. Although the software procedure which aligns the segments does its job
quite quickly, the process of floating and then fixing the bench takes about 10-15 minutes. In contrast
to this, aogui uses spots on the wavefront sensor to align the segments. This method is much faster and
does not require to float the optical bench.
The cophasing step, known as AutoWhite, has been adopted from the original NAOMI software.
Previously this has been a command line application while now it is integrated into aogui.
Removal of the common-path errors is done by a non-linear optimisation method known as "simplex".
The mathematical part of this method is also the same as in NAOMI, but the GUI is new and is also
integrated into aogui.
Aogui includes light path monitoring and control.
Finally, the observing interface is also enhanced by including control of the autoguiding and status of
the telescope.
This document describes application deployment and the user interface functions. Users interested in
practical use should follow the tutorials in this manual.
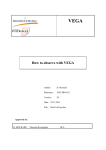
Deployment
Aogui is written in Python and uses wxPython GUI framework. There are many source files which are
part of the application. In addition to this, aogui also uses many external libraries. Due to ING's
transition to the PC Linux operating system, the application is only targeting this platform. The
application runs on one of the aodisplay computers, which will be either aodisplay2 or aodisplay1. The
application is installed locally so it is not deployed through the OSCAR software control system.
Aogui depends on several services, files and applications.
●
To communicate with the remains of the C40-based real time computer (RTC) an application
AOServer must be running on the AO host machine aocontrol1. The communication between
aogui and AOServer is by CORBA framework. AOServer is a Python application and uses
NAOMI libraries to communicate with the C40 RTC. aogui will recover and reestablish
connection if AOServer is restarted, so there is no need to restart the GUI itself. Exception to
this is the very invocation of the application. In case whern aogui is started and AOserver is not
running there will be an error message in a graphical window, the application window will
appear.
●
The CORBA name service (omninames) for this application is running on whtcns.ing.iac.es
(alias for taurus) computer and is the same as for other ING applications.
●
It is required that on aodisplay machine the directory viss04:/export/Electra-save-dir is
mounted on /software/Electra/save with read/write permissions for the user under which
account the application is run.
●
Directory aopc1:/home/tiptilt/.tiptilt must be mounted locally on /home/tiptilt/.tiptilt
●
Configuration file .spotalignrc must exist in the home directory and must contain all
parameters that aogui uses. Aogui is run under user name whtobs.
●
A small daemon process called terminalServer.py is required to run under root privileges. This
is necessary to allow communication of the aogui with the terminal which opens on taurus and
is used to send commands like run and similar. The terminal server is part of the aogui
distribution. It needs to be started from the upstart system. The configuration file for this is
in /etc/event.d. Newer version of Linux have the configuration files in /etc/init. The content of
the configuration file is described in Appendix C.
●
An application dchgServer.py must be running on aodisplay2 to provide communication
between aogui and the dichroic changer. This application is started by aogui if it is not running
already.
The software is installed by copying the source tree to the machine where we want to install it, and
running from the top level directory of the source tree the installation script like this:
install_scripts/installOnAodisplay2.py
or similar for other computers. For historical reasons the top level directory of the source is called
spotAlign and not aogui.
Illustration 1: Deployment diagram for aogui
Starting and running
The application is started by typing aogui in the command line. If we want to run aogui in engineering
mode, we invoke it by aogui –engineering=True. This allows saving of the working parameters.
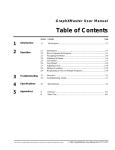
General GUI layout
The GUI has a layout divided into two major panels. Each of the panels is divided into further
subpanels, etc, until a single widget such as a button or input field. The left panel contains a display
panel which presents the WFS image, and some buttons for executing the mirror flattening. The
display panel allows some control of the image appearance.
Illustration 2: Aogui after starting up
On the right side there are different utility windows which allow finer control or monitoring of the AO
system. Changing between these panels is by using tabs in the upper part of the GUI.
Big messages
Under the WFS image is a panel with "big messages". These are selected essential parameters of the
AO system which must be within certain limits or have specific values to allow safe observing with the
AO. Generally, the loop can only be closed if all messages are on a green background.
Illustration 3: Big messages
Operational control panel
The main actions on the AO system are performed from the control panel which located on the bottom
of the main panel. There are two tabs, one for calibrations and the other for observing.
Illustration 4: Calibration panel
Before any calibration or observing task is performed it is necessary to configure several mechanisms
and instruments. There are some other tools at the ING useful for this task, such as Obstool, however it
is the idea of aogui to be eventually self sufficient and to improve efficiency by removing the need to
use any other applications for the basic functionality it provides. Configuring will be done using the
sequencer tool, however in the current version this operation is not yet supported because the actions
have not been defined. For this reason the following paragraph is obscured.
XXXXXXXXXXXXXXXXXXXXXXXXXXXXXXXXXXXXXX
To
configure the adaptive optics system for certain actions, click on Prepare
XXXXXXXXXXXXXXXXXXXX
and select the appropriate
sequence with regard what you want to do. The application will load a sequence from the database andX
XXXXXXXXXXXXXXXXXXXXXXXXXXXXXXXXXXXXXXXXXXXXXXXXXXXXXXXXX
open the page with the graphical representation of the sequence. The sequence needs to be started afterX
XXXXXXXXXXXXXXXXXXXXXXXXXXXXXXXXXXXXXXXXXXXXXXXXXXXXXXXXXX
that from the sequencer page.
XXXXXXXXXXXXXXXXX
Centre pickoff probe
Practical use of aogui has proven that this action is actually rarely need to be used, so it is marked with
strike-through effect.
The correct position of the pickoff probe is of critical importance for the final success of mirror
flattening procedure. Although aogui will always accurately centre the spots as long as they are
initially within their subapertures the segments may still have incorrect orientation relative to the
optical axis. This only becomes apparent in later stages of mirror-flattening when it is not possible to
achieve a good spot on the science camera.
The correct pickoff probe position is therefore found experimentally before each AO run and recorded.
After that it is enough to have the spots from the central four segments inside their subapertures and
click on Centre pick. Aogui will steer the pickoff probe so that the central four spots again occupy
previously recorded positions. This procedure must be repeated after any pickoff probe movement. It
is important to have high SNR spots for this, which means calibration lamp iris setting of 0.
The success of the pickoff centring action can be best properly judged by an experienced operator
which is why this action is triggered from the GUI and not from the sequencer.
Auto-centre
The Auto-centre button is used to centre the pickoff probe in the wavefront sensor. Aogui will calculate
the current average offset of the spots (except central 4) and move the pickoff probe so that this offset
becomes zero. No segment needs to be selected for this action. This action is useful to obtain an
approximate pickoff probe position when we start mirror-flattening from scratch or when we want to
recover the pickoff probe position after it has been moved.
Centre spots
Mirror alignment based on spot centring replaces mirror flattening using FISBA interferometer. Once
the mechanisms are configured and the spots are within their subapertures it is necessary to select the
the segments which we want to centre on the Segments page on the right side of the GUI. Typically
these will be all segments. The selected segments turn green on the GUI. Then click on Centre spots
and in few seconds the spots will be centred. This procedure uses a fixed number of iterations while
centring the spots. If it looks that some of the spots are not well centred, simply repeat the procedure.
As a matter of fact, the spots are not necessarily simply centred – instead they are brought to their
offset position. The offset in context means the distance of the spot from the subaperture centre. In
practice there has been little evidence that it really makes a difference whether the spots are exactly in
the centre or slightly off . There the offsets can always remain 0.
Calibration panel
Aogui allows certain calibration actions. As they are potentially dangerous for regular operations, these
actions are only enabled when aogui is in the engineering mode. Unsuccessful or incorrect use of the
the calibration actions can render the aogui or even the AO system inoperable so calibration should
only be performed by trained individuals who are able to recover the system to a working state.
Calibrate responses
By segment responses we define the amount of spot movement on the WFS sensor in x or y direction
when the tip and tilt values for a segment are changed by one (transformed DAC) unit. The unit of
movement on the WFS is pixels. The segment responses are needed so that aogui can know how much
to move a segment in order to centre its spot. If the response is missing for any of the spots, the
segment can't be moved. The values are saved in
/software/Electra/save/spotAlign/segmentResponses.dat.
After clicking on Cal. responses aogui will move all selected segments (except the central four) and
find out the responses. This procedure takes few minutes and is not likely to be needed very often.
Calibrate actuators
Actuator calibration, which is actually calibration of the strain gauges, is very important for proper
operation of the AO system. The main purpose of this action is to find the relation between raw
actuator DAC values and strain gauge readout values. Once this relation is determined correctly,
setting the DAC demands to the middle position will put 0 volts on the mirror regardless of whether the
strain gauge loop is closed or open.
This calibration is only needed occasionally when the strain gauge response changes because of
environmental reasons such as big humidity swings. The files which are changed after executing this
procedure are /software/Electra/save/StrainGauge/calOffsets and
/software/Electra/save/StrainGauge/calGains.
No light source is needed to make this calibration. After clicking on Cal. actuators aogui will open the
strain gauge loop, apply different DAC demands, read the strain gauge values and calculate the
transformation between the two. The procedure takes few minutes. There is a progress window on the
screen during calibration, indicating how much time is left until the end. If the user clicks Cancel, the
action is aborted and not change in the system is made. The progress of the procedure is seen in the
terminal window. The GUI progress indicator has been suspended temporarily because of occassional
communication probelems.
Calibrate pickoff probe
By calibrating the pickoff probe we mean recording of current spot positions in the central 4
subapertures. These values are later used in the pickoff probe centering. The spot positions are
recorded after clicking on the Cal. pickoff button. This action is performed only after a good quality
spot is obtained on the science detector. The calibration source must be on and bright so that the SNR
of spots is as high as possible, but care is needed that they are not saturated.
Mirror and spot configurations
Note that offsets are not practically need so they should be always kept at 0.
Save offsets
When the positioning of the spots in the subaperture centres is not enough for good image quality, it is
necessary to save the optimal offset spot positions by clicking on Save offsets. This action is
performed after a good quality spot is achieved. The application saves the offsets of spot positions
from centres of the subapertures. The files are in /software/Electra/save/spotAlign with names in
format YYYYmmdd-HHMMSS.offsets. These offsets only achieves reproducible alignment if the
pickoff probe is in the same position.
Load offsets
After clicking on Load offsets a file selector will appear and offer to load any of the previously saved
offsets. After they are loaded the spot centring routine will centre to that positions, not to the
geometrical centres of the subapertures.
Zero offsets
Clicking on Zero offsets will set all offsets to zero. Any information on the previous offsets is lost.
Zero offsets are also present when the real time system starts.
Load mirror
By clicking Load mirror a file selector is presented which allows loading of previously saved DAC
demands. The file selector presents the files in a chronological order so it is usually best to press on
"Modified" column label to reverse the order and so access the latest flat files more easily.
Load raw
This command is not likely to be used in normal operation.
This command is similar to Load mirror, however, there is an important difference. Using this
command the final values are loaded when the SG loop is open, the strain gauge response is read back
and then the DAC demands are calculated using known relation between DAC demands and strain
gauge feedback. After that the loop is closed.
Please read about the distinction of two types of DAC values – demands and final values in the
Glossary.
Save mirror
Both current DAC demands and the final values are saved to disk. No file selector is presented.
Observing panel
The observing panel is used during observations. It allows control of the AO loop and of the telescope
autoguider. I also shows the status of the telescope and the autoguider.
Illustration 5: Observing panel
Adaptive optics
Close loop / Open loop
The adaptive optics loop can be open or closed using this button. The label depends on the current
state of the AO loop. When the loop is open, the button will have a label Close loop and when the loop
is closed, the button will have a label Open loop
Static aberrations
Note that this still needs to be tested on-sky - so this option has been disabled.
The purpose of this function is to correct any static telescope aberrations by averaging the Zernike
terms of the wavefront and applying the correction on the DM. This could be useful for open-loop
lucky imaging applications. The procedure uses spot positions from the Shack-Hartmann WFS which
are recorded while the telescope is pointing at a bright guide star. A large number of positions is
averaged to remove the effect of seeing. After that the program calculates the aberrations using Zernike
decomposition and applies a piston correction to the DM. Then the tiptilt correction is applied using
normal spot positions directly.
Telescope control
Start guiding / Stop guiding
This button sends Autoguide on/off command to the TCS, depending on the current state. If the
telescope is not the state which would allow autoguiding, and error message will appear if we want to
start guiding. Transition to guiding is only possible from the tracking mode.
Start packets / Stop packets
The TCS does not actually switch to the guiding mode until it has received guiding packets from the
serial port. Sending of the packets is enabled or disabled by this button. If the Guide off button is
pressed, the TCS will stop guiding even if the packets are still arriving.
Segment, FSM and pickoff probe control
Deformable mirror segments can be controlled individually or in groups within the aogui application.
This is done from the Segments page. Ideally there should be no need to move the segments manually
for operational purposes. This is because the DM in its relaxed state produces spots which fit well into
their subapertures on the WFS. However, sometimes this need exists and therefore this possibility
exists within aogui. These action are accessible when the tab “Segments” is selected.
Illustration 6: Segment control together with FSM and pickoff probe control
Selecting the segments
Most operations related to segments perform only on segments which are selected. A segment can be
selected individually by clicking on it. It is possible to select all segments by clicking on Select all,
deselect all segments and toggle their state. The selected segments appear green on the GUI.
The button No response can be used to select the segments for which no response has been determined.
The central four segments always belong to this group. If any other segments are shown to be without
a valid response, an action must be taken to determine the responses again.
Observing segment status
This can be done in two ways: when a single segment is selected the most important parameters related
to its status are shown in the fields on the left side of the Segments page. The content will disappear
when more than one segment is selected or if no segment is selected.
Another option is to check the Show live info check box and then hover the mouse cursor over the
segment of interest. A window with live updated information about that segment will appear. This
information is much more comprehensive than the information presented in the GUI.
Changing segment status
Segment status can be changed individually when only a single segment is selected. This is done by
entering numbers into Demand and XYZ fields. The change is made when Return key is pressed or
the input field loses focus. A segment can be tilted by pressing on the target-like icon. The segment
will be tilted so that the spot will move in the direction of the radius vector between the centre of the
target and the cursor position. By pressing H and L buttons the segment is moved in piston.
There are also collective functions for segment control: Midrange will apply demands in the middle of
the DAC range. Note that these are demands and not necessarily the final (real) values. When the
strain gauge loop is closed and the strain gauges are not properly calibrated there may be a significant
difference between the two. Zero pistons is somewhat different function: It will make all segments
have the average piston value equal 0, but will preserve whatever existing tip and tilt. The loop control
button changes the label depending on the actual state of the strain gauge loop. If the loop is open it
will have a label Close loop, if the loop is closed it will a label Open loop. In case that the loop state
is unknown, it will change the label to display this. No action can be taken when the SG loop state is
unknown.
Moving the FSM
The Fast Steering Mirror (FSM) can be controlled from the segment page either by entering the values
between 0 and 8191 into the input fields, by clicking on the target-like icon or by pressing the
Midrange button.
Moving the pickoff probe
The pickoff probe in the WFS unit moves the image on the WFS. For proper DM flattening it is very
important to have it in the exactly right position. The pickoff probe position can be changed by
entering a value into the input fields, followed by pressing the Apply button. The units are arcseconds.
Zernike decomposition
Zernike decomposition page is a tool for analysing the WFS Shack-Hartmann pattern. It presents a
number of Zernike terms in graphical and numerical format and will also calculate and draw the
wavefront. The tool can be used to record any wavefront aberrations which is quite useful in on-sky
operations, especially for detecting defocus. It is possible to switch between different modes of
presentation, but normally the Wavefront will be selected.
Bar graphs on the right side of the panel show values of individual Zernike terms. On the bottom are
the wavefront error RMS and the Strehl ratio, calculated for the wavelength defined in the Parameters
panel.
Illustration 7: Zernike decomposition panel
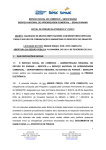
Program parameters
This page should NOT be used by end users.
Parameters for the aogui application are stored in $HOME/.spotslignrc. The contents of this file is
editable from the Parameters page. Here are stored many program parameters. Full understanding of
the program operation is required before a change is made, otherwise the application might be rendered
useless. From this panel values of the aogui working parameters can be checked, changed and saved
to the configuration file.
Illustration 8: Parameter panel
Status
Illustration 9: System status panel
The status page presents live status of mechanisms and services which are used by aogui. As this page
has been designed when the scope of aogui was much more narrow, it does not currently provide the
range of useful information which required for the variety of use cases. It should therefore not be used
for observing.
Sequencer
Note 14. 5. 2010: This has not been sufficiently tested yet within the spotAlign environment. It does
not work well if the sequences are executed repeatedly (which is normally not needed), Sometimes it
appears to cause too many open files error and spotAlign must be restarted in this case.
The sequencer executes sequences of steps of an arbitrary length. It can be very useful for instrument
configuration and similar tasks of sequential nature which don't require complex flow control. Each
step in the sequence can contain any number of actions. Each action is followed by a number of
checks. When the sequence is executed, the results of actions are checked and any errors are displayed.
All the user needs to know is which sequence to use for a certain task. Then click on the Run button
and wait until the sequence finishes. The sequence has been completed successfully if there are no
check fields in red or white.
Illustration 10: Sequencer panel
Real time control panel
From the real time control panel it possible to monitor and control the PC-based real time system.
Configuration
A set of working parameters which define the behaviour of the real time system is defined as a
configuration. It is possible to define different configurations suitable for different observing
conditions or calibration tasks and store them in the database. All of the real time system parameters
are then changed simultaneously just by selecting the desired configuration. This is the recommended
method to configure the real time system. Changing individual parameters on the fly can cause bad
performance if not carefully tested. When any of the real time system parameters differs in value from
the default for the current configuration the configuration status will changed from OK to Mismatched.
This is indicates that the system is not properly configured and it should not be used for observations.
Ideally, all configurations needed for observing should be prepared and tested in advance and the
observations should be made with predefined configurations.
Reconstructor
Several parameters define the behaviour of the reconstructor. Currently the only type of the
reconstructor is based on Zernike polynomial decomposition. It be used up 6th radial order of the
Zernike polynomials. Apart from the polynomial order, it is also possible to change Control loop
gains. There are separate gains for tip-tilt of the segments (XY), piston of the segments (Piston) and
tip-tilt of the fast-steering mirror (FSM). Changing of the gains is very dangerous because it can cause
instability of the system. It is not realistic to think that an ad-hoc change of the gains can give better
results than values obtained with tests using turbulence simulator or on-sky tests.
There are some other parameters related to the reconstructor which are presented in the GUI but can
not be changed because they relate to physical properties of the electrical, mechanical and optical
systems and are therefore constant until the components themselves change.
Camera control
The WFS camera has few parameters that can be changed. Normally they should be changed as a part
of configuration. The basic operational parameter of the camera is the readout mode. There are four
readout modes. Naomi mode 80x80 is the usual readout mode and allows frame rates up to 137 Hz.
Naomi mode 40x40 is a binned readout mode with 40x40 pixels and is intended for fast framing
applications. The maximum practical frame rate is 270 Hz. Above this limit the C40 processors in the
SG ring can't handle the incoming data anymore and crash. Tiptilt mode 40x40 is identical to Naomi
mode 40x40 except for the different header flag which allows the real time computer automatically
switch to tip-tilt only correction using a single guide star. Long exposure 40x40 is just like tiptilt
40x40 except for the way the images are buffered in the controller.
Illustration 11: Real time process control panel
Autowhite panel
Illustration 12: AutoWhite panel
After the spots are centred within their subapertures the segments need to be put in phase. This is done
by the procedure called AutoWhite. The procedure is almost entirely based on the original NAOMI
code, however it is integrated in another panel within aogui. Controls are very simple. The procedure
can be started by clicking on Start button and when it is running, it can be either paused or stopped.
Results of the processing are written in the panel. The resulting new mirror configuration is not
automatically saved on disk. This must be done manually. No configuration changes in the instrument
take place before the start of procedure. This also has to be done either manually or by running an
appropriate script within the sequencer.
Simplex panel
Illustration 13: Non-common path error correction panel
The final mirror alignment stage is done to remove the remaining non-common path errors, i.e. the
difference in the optical aberrations between the WFS camera and the science camera. This is done
from the Simplex panel which is named after the numerical algorithm used to optimise the image.
Again, as in the case of AutoWhite, the algorithm is the same as in the original NAOMI. However, the
user interface has changed quite significantly.
Running simplex procedure
The left side of the GUI contains the image viewer and buttons to start or stop the procedure. The
values of the measured parameters are displayed while the procedure is running. As with AutoWhite,
the instrument has to be configured before the procedure is started.
Camera selection and image viewing
The right side of the GUI consists of a general purpose image viewer for any on the AO related
cameras: AG3, OASIS, INGRID and LUCKY. It is possible to change between them easily using the
combo box. If the camera server is not available, this will be indicated in the server status.
INGRID and LUCKY can be used for removal of the non-common path aberrations. For each camera,
the readout window and binning factor can be defined. The exposure time is given in milliseconds. In
addition, for Lucky camera (Andor) the electron multiplying gain and the cooling temperature can be
defined from the GUI. To see the light on the LUCKY camera, the shutter has to be opened explicitly
by clicking on the Open button. For INGRID this is not necessary because it doesn't have a shutter.
When the calibration spot is not in the centre of the image but it is still in the field of view, it is enough
to press Centre light once or twice and the spot will be centred.
It is possible to execute run commands from the GUI. When pressing on one of the Run, Arc, Dark,
Flat or Bias buttons, a terminal will be opened on taurus and the command will be executed. This
assumes that the camera in question is properly configured in the observing system. When the terminal
window already exists it will be reused. It is also possible to type observing system commands into
that terminal.
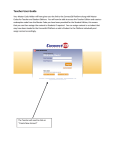
Light path page
Illustration 14: Light path panel
The light path page provides a visual overview of the most of the mechanisms and light sources present
in the NAOMI system. Apart from monitoring it also possible to change values and move mechanisms.
Here we describe the elements of the light path page
NCU
The NAOMI Calibration Unit (NCU) unit consists of pinholes on a moving stage. Each pinhole is
illuminated by a light source. The moving stage can bring into the light path also the acquisition
camera or pass the light from the telescopes into the AO system. The positions of the pinholes are in
the database so it is possible to move the stage to any of the named positions or to a numerical position
which is manually entered. The stage starts to move after the position in the combo box is clicked or
when the numerical position is confirmed by pressing the return key.
The intensity of light on the pinholes is regulated by irises. The iris is changed by entering a numerical
value and pressing return or the tabulator while the cursor is in the input field. The iris mechanism can
be initialised by pressing the Init button. While the mechanism is moving, the current position field
turns to blue. When the current position matches the demand the current position is green. In case of
error the current position value is replaced by ERR on a red background.
Lamps can be switched on and off. When a lamp is on, its name appears on a yellow background.
FSM
The fast steering mirror status is indicated by the current numerical values and graphically by a spot on
a small graph. The widget shows the last 20 acquired positions. The positions are samples about once
a second so the graph is useful to see long-term drifts of the FSM positions and not for real time
monitoring. It is possible to enter values and move the FSM or to centre it. The widget will not allow
to enter values which exceed the DAC range.
DM
The deformable mirror display shows the virtual mirror shape calculated from the current demand
values. This is opposed to the similar display on the segment page which is normally showing strain
gauge positions. The purpose of this configuration is to catch attention when the real time system is
actively controlling the DM. The pistons are largely magnified in this presentation. It is possible to
record the current DM configuration and use is as a reference so that only offsets to that are displayed.
WFS
The WFS widget allows control of the pickoff probe related mechanisms, the lenslet array and the WFS
shutter. The shutter can be either open or closed. The lenslet wheel can be moved to any of the named
positions. The mechanisms start to move after the named position is selected in the combo box. The
user tab allows entering of the pickoff probe positions in arc-seconds.
OASIS mirror
The OASIS mirror redirects the light either to INGRID, when out, or to OASIS/LUCKY, when in. It
can only be in one of these two positions. To move the mirror, the target instrument is selected from
the combo box. The current position is displayed next to the combo box. In the brief moments during
the mirror movement the Current position displays the status of the mechanism, e.g. "Moving".
Dichroic
The dichroic widget shows the currently deployed dichroic and allows selection of other dichroics,
parking the mechanism or its initialisation. When a specific dichroic is deployed in the light path, it
shows a schematic representation of the transmittance curve which is a useful reminder of which
dihroic is currently deployed.
Lucky mirror
This widget works exactly the same as the OASIS mirror, except that it directs the light either to
OASIS (mirror out) or to LUCKY (mirror in).
Filter focus
The filter focus mechanism is moved by a motor which can be controlled from this widget. The focus
position can be selected either from a list of named positions or by manually entering a number. The
focus moves when a named position is selected or the return key is pressed.
Camera widget
In the bottom right corner of the light path panel is the science camera widget. It shows important
status information from the science camera which is currently in the light path. The name of the
camera is calculated according to the positions of the OASIS and Lucky mirrors.
Tutorials
Starting and quitting the application
AOGUI runs on AO display computer, such as aodisplay2. The observer must log in as user whtobs.
AOGUI is started by typing aogui in a terminal window. There may be other instances of aogui
running anywhere on the network. There should be no interference between these instances when they
are just displaying information. Any change in the AO system which is monitored by aogui is reflected
in all GUIs. However, when complex operations are started, such as calibration of actuators, no such
action should be started in other instances as no interlocking of mechanisms is implemented. Under
realistic usage scenarios this should not present a problem.
To quit aogui, press the Quit button and confirm your decision. Alternatively, it is possible to kill the
window using standard X Windows actions or by typing ^C in the terminal where it was started.
Starting and quitting aogui does not affect the real time AO system or the mechanisms in any way.
Starting the AOServer
Although AOServer is not part of aogui, it must be running for AO system to function correctly. It is
running on aocontrol1 computer. It is necessary to start-up the C40 system first. The commands to
start software on aocontrol1 are:
NaomiRestart aocontrol1
AOServer
The order in which the commands are executed is not important. Only if there are persistent errors
with NaomiRestart it might be better to to kill AOServer and start it again when the restart
succeeds. This measure is more for the piece of mind than because of any evidence that it really helps.
Starting the real time software on the PC
The real time software for image analysis and DM control (dm_control) runs on the computer called
aopc1. It is started automatically when the computer starts and also restarted automatically if it is
killed. The status of this computer and the real time process is visible on the aogui's Status page.
Normally it should never be necessary to restart dm_control but if the need appears the right method is
to log into aopc1 computer under shut account and reboot it.
Flattening the mirror using aogui
This task assumes that:
●
The AOServer is up and running.
●
The WFS camera which is currently in use is working.
●
The optics covers are off.
●
Database and name servers must be up and running.
Steps to be taken when starting from scratch:
1. Configure all mechanisms manually from the light path panel. Note that the complete sequence
of actions below is necessary only if you are starting from scratch, with all mechanisms in some
random positions. If you already see the spots approximately centred within their subapertures
and SNR at lease 30, you can go to the next step.
•
Go to the "Light path" panel.
•
Set pickoff probe position x=1, y=-1. This will bring the spots somewhere to their
subapertures.
•
Set the NCU to "Simplex" position.
•
Select Dichroic 50/50 or IR. This is normal for mirror flattening.
•
Switch on the "White light" lamp.
•
Set the white lamp iris to 0.
•
Go to the "Segments" panel.
2. Centre the pickoff probe more precisely:
•
Open the SG loop, select all segments and press "Midrange" button. This will bring the
mirror to the nominal position.
•
Use "Auto-centre" button to centre the pickoff.
•
Close the SG loop.
3. At this step there should be a Shack-Hartmann pattern displayed on the GUI. The preparation
sequence should have positioned the pickoff probe so that the pattern is centred on the image
display. If the central 4 spots are not within their subapertures you must move the pickoff
probe so that the spots are at least roughly centred.
4. a) For practical reasons it is often desired that the flattening procedure starts by using
previously stored mirror shape which was known to produce good quality PSF. In this case we
load the mirror by clicking the Load mirror button and selecting the required file from the file
selector. b) When we want to start from the relaxed mirror (zero volt demands), we click on
Select all and then Midrange. Note again that the SG loop must be closed at this stage.
5. Finally, to flatten the mirror, click on Select all and then Centre spots. If it looks like the spots
are not well centred, simply repeat the step.
6. Check that none of the spots is missing or is not centred. In this case you must bring the spot to
its subaperture by selecting it alone on the GUI and move it around by pressing on the controls.
For details of how do this refer to "Moving the segments manually".
7. Save the DAC values by clicking on Save mirror. The values will be stored automatically with
current time as the name.
White light flattening
The white light flattening procedure is very simple to perform. The spots must be centred and have the
SNR of about 70 - 100. This is achieved by setting the iris to 0 and the exposure time of the WFS
camera to 50 ms. The dichroic must be either 50/50 or IR. Select the AutoWhite tab on the GUI. After
that just press Start and wait until the procedure finishes. The new mirror configuration is applied to
the DM but it is not saved. You must save the configuration by clicking on Save mirror.
Removing non-common path errors
The non-common path errors are removed after the AutoWhite procedure has been finished. Go to the
light path page and change the iris to a value of about -220.
Select the tab named "Simplex". From there select the camera which will be used for this operation.
This will be either ANDOR1 or INGRID. Centre the spot by pressing Centre light button few times.
When using ANDOR1, the exposure time should be 35 ms, the electron-multiplying gain 20 and the
temperature -40 degrees C. Window size should be 42 x 42 pixels.
With INGRID, set the exposure time to 50 ms and the window size to 32 x 32 pixels.
Press Start and wait until the procedure is finished or the spot looks good enough. If the spot doesn't
look good by the iteration 3000, it is best to terminate the procedure by pressing Stop and start again.
Good values for the merit function are -0.008 or less (more or absolute value) for ANDOR1 and -0.06
or less for INGRID. The best FWHM achievable is about 2.7 and 1.7 pixels for ANDOR1 and
INGRID, respectively. You should always consider the profile and 2D isophote representation before
deciding that the spot is good enough.
Moving the segments manually
The segment positions can be individually changed manually by entering the DAC demand values or
the transformed X, Y, Z (tip, tilt, piston) values into the appropriate fields which are clearly marked on
the GUI. Alternatively, a segment can be moved by pressing on the target-like icon which is located
left of the graphical representation of the mirror. Steps are the following:
1. Make sure that exactly one segment is selected (marked in green). If there are several segments
marked, click on Deselect all and then click on the segment you want to move.
2. Enter the desired numbers into the Demand or XYZ fields. Note that these fields are in principle
changing in real time. For example if the values are changed by an external application they
will change in aogui too. However, when the input field has focus, it will not reflect the actual
value of the system so that the user can enter own value.
3. Alternatively, click inside the coloured area of the target-like icon. The target is divided into
several zones. Clicking on black or white zone has no effect. Clicking on blue, green or red
zone will move the segment so that the spot moves in the direction parallel to the vector
connecting the centre of the target and the mouse pointer position. The amount of movement
depends on the colour of the zone and is higher in the outside zone.
Inspecting segment and spot status
There are basically two ways to inspect the value corresponding to a single segment.
1. When a single segment is selected (green), some of the values related to the segment and the
corresponding spot are shown in the fields left to the graphical representation of the mirror.
2. When Show live info check box is selected it is enough to hover with the mouse over a segment
and all available information related to this segment will appear in a yellow tooltip window.
Warning! The tooltip window may not appear or will be flickering if the application window is
not entirely contained on the desktop.
Wavefront analysis using Zernike decomposition
Aogui is able to reconstruct the wavefront using spot offsets from their nominal position which is
usually the centre of the subaperture. The wavefront reconstruction is done using Zernike
decomposition, based on the slopes inferred from the spot positions. The values of coefficients are
presented as numbers or as bars in the “Wavefront statistics” panel. In addition, the reconstructed
wavefront is drawn on the GUI.
Calibration of strain gauges
Calibration of the strain gauges should only be performed by trained people who understand well the
consequences of changing the parameters of the system and are able to detect and correct possible error
while calibrating. This action need to be performed sporadically, after the AO system underwent
changes in environment, such as humidity and temperature.
The calibration itself is very simple. No light source is necessary as the procedure is not analysing the
images.
Simply press Cal. Actuators button and wait until the procedure finishes. The progress of the
procedure is printed in the terminal window indicating current step in the procedure.
During the calibration all segments are moved in piston by applying DAC final values from 1000 to
7000 and then back. The gain and offset for each channel are calculated using expressions in Appendix
B.
Calibration of the pickoff probe
XXXXXXXXXXXXXXXXXXXXXXXXXXXXXXXXXXXXXXXXXXXXXXXXXXXXXXXXX
When
the image on the science camera is accepted to be good, it is a good idea to record the positions
of the central four spots, to used later as a reference for alignment of the mirror which requires the
XXXXXXXXXXXXXXXXXXXXXXXXXXXXXXXXXXXXXXXXXXXXXXXXXXXXXXX
pickoff probe to be exactly positioned. When the spots are bright enough (SNR >~ 100), press the Cal.
XXXXXXXXXXXXXXXXXXXXXXXXXXXXXXXXXXXXXXXXXXXXXXXXXXXXXXX
XXXX
XXXXX
pickoff
XXXXXXXXXXXXXXXXXXXXXXXXXXXXXXXXXXXXXXXXXXXXXXXXXXX
button and the positions will be saved to a file. This action is supposed to be done during
preparation for the run so this function is only available in engineering mode to avoid accidental savingX
XXXXXXXXXXXXXXXXXXXXXXXXXXXXXXXXXXXXXXXXXXXXXXXXXXXXXXXXXX
of incorrect positions.
XXXXXXXXXXXXX
XXXXXXXXXXXXXXXXXXXXXXXXXXXXXXXXXXXXXXXXXXX
The
Shack-Hartmann pattern can then be centred on the WFS by clicking on XXXXXXXX
Center pick.XXXXXXX
button. Of
course, for this to work, the central 4 spots must already be within their subapertures.
XXXXXXXXXXXXXXXXXXXXXXXXXXXXXXXXXXXXXXXXXXXXXXX
Observing
For observations the user selects the Observing tab. On the right-hand panel, select the "Light path"
page.
First the guide star has be acquired by the telescope operator. When the star is centred in the WFS, the
loop should be closed by pressing Close loop and autoguiding started by Guide on. Also, sending of
the autoguiding packets must be enabled by clicking on Start packets button. After the loop is closed,
it is a good idea to wait a little and check that the FSM is not near saturation. If it is, the offload to the
autoguider should correct this in about 20 seconds. Until the observations are finished, sending of
packets can be left active. The AO loop and the autoguiding loop are opened and closed as needed.
During observations, the observer and the OSA should be aware of the big indicators on left side of the
GUI. They should be all green (green meaning ready) before closing the loop. When the loop is
closed, the AO loop state indicator turns light blue to indicate that the system is active. Take care that
the SNR remains within safe limits and that the spots on the WFS have not exited their subapertures.
NAOMI troubleshooting guides
The troubleshooting guides here include also some of the systems which are not part of AOGUI, but
AOGUI communicates with them and therefore we need to fix those system in order to continue
operation.
After any troubleshooting action always check that you see a perfect spot on the science
camera when using the calibration lamp! If you achieve this, most of the subsystems are
automatically confirmed to working.
Mechanisms
WFS mechanisms do not respond or
WFS status keeps red Error or blue Busy status
Rate of incidence
Once per week or two. Seems to depend on frequency of use.
Summary
Both errors above are related and will typically appear simultaneously. They indicate that the WFS
mechanism control computer does not function properly any more. The cause for this faults is
unknown and is not likely to be ever identified. A very similar system which is used for control of the
mechanisms on the optical bench does not exhibit this kind of problems.
Scenario
The problem usually becomes apparent when trying to move the pickoff probe either manually by the
operator through the GUI or by an automated procedure like AutoWhite. The pickoff probe would not
move in spite of the command being given. This also sometimes happens when the lenslet wheel is
moved during the AutoWhite procedure. The wheel does move, however the application does not
detect that the wheel has not reached the intended position yet and continues with further steps.
Diagnosis
•
The WFS mechanisms behave erratically as described above
•
The status in the WFS widget on the Light path page stays in Error (red) or Busy (blue)
•
The Epics engineering GUI of the pickoff probe also shows Error or Busy status without
changing to IDLE.
Recovery
•
Go to GRACE electronics room
•
Switch off the naomiomc VME-based control computer (green switch in the middle rack)
•
Switch off the two motor driver units (green switches protected by transparent plastic cover)
•
Wait 30 seconds
•
Switch on the motor drivers
•
Switch on naomiomc
•
Wait until the green LED on naomiomc comes on
•
Go back to the control room and from aogui reinitialise the mechanisms and then put them to
their working positions.
Verification
Check that the operation which was failing before now works.
Mechanisms are not initialised
Rate of incidence
Very rarely.
Summary
Some or all of the mechanisms are not initialised.
Scenario
This kind of fault does normally not occur unexpectedly. Typically this may be the consequence of a
(either scheduled or unexpected) power cut in GRACE (normally it is protected by a UPS) or
somebody power-cycling the control computers.
Diagnosis
The mechanisms appear uninitialised.
Recovery
On the light path page of aogui hit the Init buttons of all uninitialised mechanisms.
Verification
Check that normal NAOMI operations can be performed.
GUIs
AOGUI stops responding
Rate of incidence
Rare, maybe every few weeks. Typically related to some other problems which the GUI doesn't handle
well.
Summary
AO GUI crashes but remains on screen.
Scenario
This happens sometimes when communication errors between aogui and the real time system occur.
Diagnosis
In the terminal where aogui was started a segmentation fault message appears an the prompt is returned
to the terminal. Aogui stops responding.
Recovery
•
First kill the existing GUI. This is done by clicking on the cross-like "kill window" icon in the
upper right of the GUI window. The system will ask for confirmation, to which we agree. If
this doesn't work for any reason, type xkill in the terminal window and click on the aogui
window with the death-depicting icon.
•
Start a new instance of aogui in the terminal.
Verification
Aogui should now run OK.
AOGUI gets stuck or is very slow
Rate of incidence
Rare.
Summary
Under some circumstances aogui response might become very sluggish or might appear to be stuck.
This always indicates some communication problems which may be also affecting other parts of the
observing system.
Scenario
Normally this is not a consequence of user action. Aogui response to actions such as changing pages is
very slow, the WFS image is updated very slowly.
Diagnosis
Try to establish if other network applications are performing well. Run the web-based GUI at
http://aopc1/~tiptilt/dm_controlGUI.html and see if it responds normally. Check by pinging that the
machines with which aogui communicates are running and responsive: aopc1, naomiomc, usp, taurus.
Check if the rest of the observing system is performing OK.
Recovery
Terminate and restart aogui.
Power-cycle any computers if they are not responding.
Verification
Check that aogui response time is as usual.
Real time system
Some or all segments are extremely inclined and can not be moved
Rate of incidence
Rare. Always related to some electrical activity in GRACE.
Summary
One or all segments appear strongly tilted and can not be forced to the neutral position any more.
Scenario
This only happens when there is some activity in GRACE which disturbs normal electrical
consumption: using vacuum cleaner, switching on and off other large electric loads, etc.
Diagnosis
The segments on the Segment page of aogui are strongly tilted so that the bottom side is visible. The
actuator values read either 300 or 7891 and can not be changed.
Recovery
The recovery is rather straightforward and involves simply running NaomiRestart aocontrol1 on aocontrol1 computer. After the restart process is successfully finished, all segments will assume the
neutral position within seconds. It is not necessary to restart AOserver (unless restart fails, see the
troubleshooting guide for this). Make sure to close the SG loop after that and load the latest flat again.
Verification
Check that you can move the segments manually or configure the DM using "Load mirror" button.
The real time system refuses to change the camera readout mode or speed
Rate of incidence
Medium
Summary
When on the Real time page or Light path page, the requested configuration change doesn't happen.
Scenario
This typically happens when the current exposure times are very long - in order of seconds.
Diagnosis
After the change of configuration is requested, which typically includes a change of the exposure time,
nothing happens and the system continues with the same readout mode.
Recovery
Sometimes the change is just very slow. Allow 10 - 30 seconds to make sure that the change takes
place.
Try to change the mode few more times.
If the problem persists, use "Stop" button on the real time page to stop framing and when it stops, issue
the command again.
If even this doesn't help, restart the real process by using the "Kill" button on the web based GUI at
http://aopc1/~tiptilt/dm_controlGUI.html. In this case you will have to reload the DM configuration.
Verification
Check that the system is running with the required readout time and mode.
The SG loop can not be closed or opened or
Segment fringes on the Segment page are static even if it is implied that the SG is closed (the SG
button has a command Open) or
Segments can not be moved manually
Rate of incidence
Once every few days or week.
Summary
The SG controller regularly blocks all communications after it has been running for several days. This
seems to be a bug in the old NAOMI C40-based strain-gauge controller, apparently after some counter
overflows.
Scenario
After few days or week of normal operations the SG loop status can not be controlled.
Diagnosis
The system does not respond when the operator tries to open or close the SG loop. Segment fringes are
static even if the loop seems to be closed.
Recovery
Run NaomiRestart aocongtrol1 on aocontrol1.
Verification
Try to open and close the SG loop. Check that the fringes move when loop is closed. Load the latest
mirror configuration ("Load mirror").
Real time system computer aopc1 not running
Rate of incidence
Very rarely. Possible problems restarting the computer.
Summary
Aopc1 is not running
Scenario
This does not just happen spontaneously but there are two possible scenarios which lead to that.
First would be that there is a power failure in GRACE. This is rather unlikely because everything there
is connected to a UPS, however it has happened before. If this happens, many more things on the
observatory will not be working. The obvious solution is to switch on AOPC1 once the power is
restored.
Second scenario is more likely. It has been observed before that when the WFS camera is streaming
images the computer with the PCI camera does not want to start, for example, after a simple reboot via
a shut account.
Diagnosis
Aopc1 does not respond to ping.
Recovery
Power cycle the camera's power supply which is at the bottom of the middle rack in GRACE
electronics room and reset aopc1 again.
A solution is in preparation to allow remote power-cycling of the camera and some other controllers in
GRACE. For controlled shutdown we have set up a script which stops the camera before the computer
reboots or shuts down.
Verification
Aopc1 responds to ping again.
Real time process on aopc1 not running
Rate of incidence
Very rarely.
Summary
The real time process on aopc1 may not be running.
Scenario
This may happen for various reasons, possibly because the camera controller is off, faulty or is not
connected to the computer.
Diagnosis
Aopc1 responds to pings but all big indicators on aogui are either red or orange.
Recovery
The simplest solution is to log into aopc1 with ssh using "shut" account and reboot the computer. The
real time process should restart again automatically after reboot.
Verification
The bottom two big indicators "Camera framing" and "Conf." (configuration) should be green. The
image in the WFS image panel should be changing.
NaomiRestart aocontrol1 does not finish properly
Rate of incidence
Frequent.
Summary
When the command "NaomiRestart aocontrol1" on aocontrol1 machine is invoked the procedure
doesn't finish.
Scenario
When the C40 system stops communicating, it needs to be restarted. This is done in a terminal opened
under naomi account on aocontrol1 by "NaomiRestart aocontrol1". This command often fails to
complete.
Diagnosis
Verify if the Python error message as shown below appear after restart.
SendBoot 4 9 /software/Electra/bin/c40Diag.x40
Booting Strain Gauge C40 Ring
host: aocontrol1
DynSendBoot 0 12 /software/Electra/bin/SGBSP2.x40
DynSendBoot 0 13 /software/Electra/bin/SGBSP2.x40
DynSendBoot 0 15 /software/Electra/bin/SGBSP2.x40
DynSendBoot 0 18 /software/Electra/bin/SGBSP2.x40
DynSendBoot 18 11 /software/Electra/bin/SGBSP2.x40
DynSendBoot 13 14 /software/Electra/bin/SGBSP2.x40
DynSendBoot 15 16 /software/Electra/bin/SGBSP2.x40
DynSendBoot 14 17 /software/Electra/bin/SGBSP2.x40
**Target CPU failed to respond**
Traceback (innermost last):
File "/software/Electra/bin/c40Run", line 22, in ?
c40Run.Run(config, verbose = 1) File "/software/Electra/lib/python/c40Run.py", line 51, in Run
SGlib.Run(SWconfig, verbose)
File "/software/Electra/lib/python/SGlib.py", line 1361, in Run
SGring.Boot(SWconfig)
File "/software/Electra/lib/python/RTlib.py", line 108, in Boot
c40Boot.BootNet(bt)
File "/software/Electra/lib/python/c40Boot.py", line 74, in BootNet
BootOne(fromCPU,toCPU,programs[toCPU])
File "/software/Electra/lib/python/c40Boot.py", line 58, in BootOne
raise error, "Exec'd program returned an error"
Boot error: Exec'd program returned an error
aocontrol1 : Local and remote Naomi services restarted
Recovery
There is no solution other than to repeat the restart command until it succeeds. Sometimes it may take
20 - 30 attempts. Kill AOServer by control-C in the window where it is running. When the restart
succeeds, start AOServer again.
Verification
The output from a successful restart should look like this (ending with "Recording configuration"):
Booting Wavefront Sensor C40 Ring and diagnostic CPU
host: aocontrol1
DynSendBoot 0 2 /software/Electra/bin/NaomiGenericBSP.x40
DynSendBoot 0 3 /software/Electra/bin/NaomiGenericBSP.x40
DynSendBoot 0 5 /software/Electra/bin/NaomiGenericBSP.x40
DynSendBoot 0 8 /software/Electra/bin/NaomiGenericBSP.x40
DynSendBoot 8 1 /software/Electra/bin/NaomiGenericBSP.x40
DynSendBoot 3 4 /software/Electra/bin/NaomiMirrorBSP.x40
DynSendBoot 5 6 /software/Electra/bin/NaomiGenericBSP.x40
DynSendBoot 4 7 /software/Electra/bin/NaomiGenericBSP.x40
CPU 8 is alive
CPU 7 is alive
CPU 6 is alive
CPU 5 is alive
CPU 4 is alive
CPU 3 is alive
CPU 2 is alive
CPU 1 is alive
DynSendBoot 4 9 /software/Electra/bin/c40Diag.x40
Booting Strain Gauge C40 Ring
host: aocontrol1
DynSendBoot 0 12 /software/Electra/bin/SGBSP2.x40
DynSendBoot 0 13 /software/Electra/bin/SGBSP2.x40
DynSendBoot 0 15 /software/Electra/bin/SGBSP2.x40
DynSendBoot 0 18 /software/Electra/bin/SGBSP2.x40
DynSendBoot 18 11 /software/Electra/bin/SGBSP2.x40
DynSendBoot 13 14 /software/Electra/bin/SGBSP2.x40
DynSendBoot 15 16 /software/Electra/bin/SGBSP2.x40
DynSendBoot 14 17 /software/Electra/bin/SGBSP2.x40
CPU 15 is alive
CPU 14 is alive
CPU 13 is alive
CPU 12 is alive
CPU 11 is alive
CPU 18 is alive
CPU 17 is alive
CPU 16 is alive
Recording Configuration
aocontrol1 : Local and remote Naomi services restarted
Autoguider status is Error and shown in red
Rate of incidence
Medium. After reboot of aopc1 or portserver9.
Summary
Aopc1 can't connect to portserver9 with its drpd daemon any more so no autoguiding is possible.
Scenario
After
Diagnosis
aogui shows big "Autoguider error" label on red background. In the Telescope panel the value next to
the "Packets:" label is also "Autoguider error" on red background.
Recovery
At the time of writing this can only be recovered by the computing group. Luis should be contacted.
We are working on a more solid solution with dedicated portserver for NAOMI.
After the portserver connection has been established again it is usually necessary to restart the real time
system. Load the web-based engineering GUI and press the "Kill" button. Confirm the decision in the
pop-up window that appears. The application will restart itself immediately. Mirror configuration has
to be reloaded again and the working configuration has to be loaded.
Verification
About 10 seconds after the restart the "Autoguider error" label should turn to "Autoguider idle" on
green background.
Harmless messages in the terminal
Here are some error messages and warnings which may appear in the terminal where aogui was started:
At startup:
*** The executable "caRepeater" couldn't be located
**** because of errno = "No such file or directory".
**** You may need to modify your PATH environment variable.
**** Unable to start "CA Repeater" process.
Error in reading the naming service host, taking default whtcns.ing.iac.es
Error in reading the naming service port, taking default 35777
Creating server
CA client library is unable to contact CA repeater after 50 tries.
Silence this message by starting a CA repeater daemon
or by calling ca_pend_event() and or ca_poll() more often.
When switching between tabs:
CORBA.COMM_FAILURE(omniORB.COMM_FAILURE_WaitingForReply, CORBA.COMPLETED_MAYBE)
Traceback (most recent call last):
File "/usr/local/aoSoftware/lib/python/aoguiDir/WFSImage.py", line 638, in grabLoop
el = historyServer.objref.getElement(1)
File "/usr/local/aoSoftware/lib/python/dm_control_idl.py", line 371, in getElement
return _omnipy.invoke(self, "getElement", _0_dm_controlIDL.HistoryServer._d_getElement, args)
COMM_FAILURE: CORBA.COMM_FAILURE(omniORB.COMM_FAILURE_UnMarshalResults, CORBA.COMPLETED_YES)
CORBA.TRANSIENT(omniORB.TRANSIENT_CallTimedout, CORBA.COMPLETED_MAYBE
These messages can be ignored as they have no impact on functionality of aogui and NAOMI in
general.
Appendix A
Calculation of fringes on the segments
In the three-dimensional representation of segments it possible to superimpose an image of calculated
interference fringes on top of each segment. These are similar as would be seen using FISBA
interferometer. However, as they are calculated and not obtained by real laser interferometer, there is a
significant amount of arbitrariness on how they are going to look like. We can decide to use raw (also
referred to as final) DAC values to the segments, we can use demand values, or we can use spot
positions within subapertures. Any of these methods can be using absolute values or values relative
some zeroset values, for example, taken after the spot on the science sensor is optimised.
Regardless of the method, it is necessary to obtain the piston value of the segment (distance of the
segment centre from the zero plane) and the normal vector to the segment plane.
Let's assume that actuators A, B and C have coordinates (0, 0, zA), (xB, yB, zB) and (xc, yc, zC),
respectively. Then the normal n to the plane is perpendicular to vectors AB, AC and BC, so we get a
system of equations:
x B n x y b n y z B−z A n z=0
x C n x yC n y z C −z A n z =0
x C − x B n x yC − y B n y z C − z B n z =0
We can set nZ=1 and get
x B n x y b n y =− z B −z A
x C n x yC n y =− z C − z A
with the solution:
y C z A−z B y B −z Az C
−x C y B x B y C
x −z A z B x B z A− z C
n y= C
−x C y B x B y C
nx=
To get normalised vector n', we divide all components by the norm of n,
n
n
' =
∣n∣
∣n∣= n 2x n2y n2z
−x C −z Az B x B z A−z C 2 y c z A −z B y B −z A z C 2
∣n∣=
1
−x C y B x B y C 2
The phase difference between the reflected waves in zero and tilted position is
=−2
2
h x y
with the following meaning of symbols:
δ
Phase difference in radians
λ
Laser wavelength
γ
β
x
X coordinate in the plane of untilted segment
y
Y coordinate in the plane of untilted segment
h
Segment offset in z direction
The intensity in the interferogram at the position x, y is then proportional to (Born & Wolf)
I 0I 1 cos
2
2
,
where I0 and I1 are positive constants. As the only part that matters is dependence on δ, it is enough to
draw properly scaled value of
2
cos
2
.
Appendix B
Calculation of strain gauge gain and offset values
Each of the actuators that move the segments is mechanically coupled with a corresponding strain
gauge. This is to provide proper feedback to the real time control system of the current mirror shape.
Without it the hysteresis of the piezoelectric actuators would cause significant deviation between the
desired and actual mirror shape, thus rendering the system useless. The strain gauges have almost
linear response in the entire range of actuator movement. The feedback appears to the system as a
value in the ADC converter, denoted here as a . We consider this to correspond to the real position of
the actuator in a linear relation. The part of the real time system which calculates the wavefront
aberrations, sends a demand, denoted by d , to the mirror control system. From this we calculate the
strain gauge response a and the mirror control system changes the actual, final demand until the
desired response is achieved.
Fig. 1: Response of an actuator ot increasing (green) and
decreasing (red) values of the DAC demand. The blue line
represents a fit to the average.
Appendix C: Setting up the terminal server daemon
In order to allow aogui to send commands to an open terminal window, it is required to have a running
program a user root which inserts characters into the keyboard queue. This program is started
automatically by the operating system. At the moment of writing this documentation the mechanisms
of starting programs at certain events is managed by the system called upstart. As it is being developed
quickly, there are different ways how to use in different Linux distributions. On Fedora 11, the
configuration file is in directory /etc/event.d and is called terminalServer. On some newer
distributions, the configuration file is in directory /etc/init and is called terminalServer.conf. In both
cases it has the same content, given in the frame below. Obviously, the program teminalServerXML
must exist and be executable in directory /usr/local/aoSoftware/bin. If it is stored in any other
location, the configuration file must be changed accordingly.
# terminalServer
#
start on runlevel [345]
respawn
exec /usr/local/aoSoftware/bin/terminalServerXML.py
Glossary
DAC demands
These are the values submitted by client applications to the mirror controller and have the same range
as final demands (see below). When the application submits the demands and the strain gauge loop is
closed, the mirror controller moves the actuator until the value which is read out from the strain gauges
corresponds to the demand value. The feedback value is calculated with a linear transformation from
the ADC value using previously determined calibration coefficients.
Final demands
These are actual values in DAC outputs, so they are directly proportional to the voltages applied to the
actuators. In the closed loop operation these values are constantly changing.
Strain gauges
These are electromechanical components which change their resistance proportionally to the strain.
They are used to assure more linear response of the actuators. For proper operation they require very
stable temperature and especially humidity which should always be between 30 and 40 %.
Shack-Hartmann
A type of WFS which senses the wavefront using an array of small lenses.
WFS
Wavefront sensor is an optical device used to measure wavefront aberrations.
TCS
Telescope control system. Communicates with external processes using DRAMA. However, all
communication from the clients is done using CORBA, via software interface called
corbaDramaInterface.