1
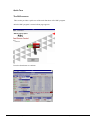
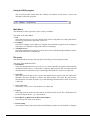
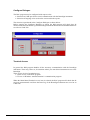
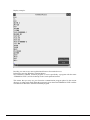
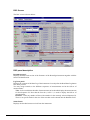
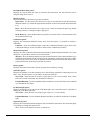
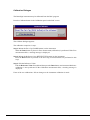
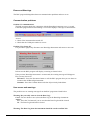
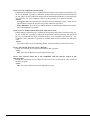
RSC Road Sensor Control User's Manual DELTA Light & Optics RSC - Road Sensor Control DISCLAIMER The information contained in this document is subject to change without notice. DELTA LIGHT & OPTICS MAKES NO WARRANTY OF ANY KIND WITH REGARD TO THIS MATERIAL, INCLUDING, BUT NOT LIMITED TO, THE IMPLIED WARRANTIES OF MERCHANTABILITY AND FITNESS FOR A PARTICULAR PURPOSE. DELTA LIGHT & OPTICS SHALL NOT BE LIABLE FOR ERRORS CONTAINED HEREIN OR FOR INCIDENTAL OR CONSEQUENTIAL DAMAGES IN CONNECTION WITH THE FURNISHING, PERFORMANCE OR USE OF THIS MATERIAL. Version 1.6 /2008 RSC - Road Sensor Control DELTA Light & Optics INDEX General Information System Requirements Setup and Uninstallation Files 1-1 1-1 1-1 1-2 Quick Tour The RSC-screens The RSC-Reports 2-1 2-1 2-4 Using the RSC-program Main Menu File menu Configure Dialogue Terminal Access RSC Screen RSC panel description Calibration Dialogue 3-1 3-1 3-1 3-3 3-3 3-5 3-5 3-8 Errors and Warnings Communication problems No communication New Sensor Id User errors and warnings Do you really want to clear the Data Log The Data Log from the instrument should be saved The Data Log or Remarks are changed The Data Log from the instrument should be read into Error in Zero measurement Error in Calibration measurement The selected file is not a legal *.RSC file The selected *.RSC file is not compatible with the present ver 4-1 4-1 4-1 4-1 4-2 4-2 4-2 4-2 4-3 4-3 4-4 4-4 4-4 DELTA Light & Optics RSC - Road Sensor Control General Information The purpose of the RSC-program is to provide an easy interface to the RetroSign instrument. The main features of the RSC-program are: Reading and display of the measurements stored in the RetroSign instrument. Adding remarks to the sequences of measurements as defined during the use of the instrument. Printing reports of the contents and status of the instrument. Saving the contents of the instrument to a file for later inspection, analysis and printout. System Requirements The recommended minimum requirements: Processor 486 8 MB RAM Minimum 2 MB free disk space 800x600 screen resolution, 256 colours. One free COM-port. Windows 3.x Setup and Un-installation To setup the RSC-program do the following: Install the program from the instrument CD. Follow the on-screen instructions. An RSC group is created and program icons for the RSC-program and the Uninstall program are placed in it. To start the RSC-program, double-click on the RSC-program icon. To Uninstall the RSC-program double-click on the RSC-Uninstall icon. The files created during the last run of the RSC-Setup program will be deleted. However, files produced during the use of the RSC-program will NOT be deleted. RetroSign Retrometer Files During setup the following files are created in the destination directory as specified in the RSCSetup program: <destination dir>\RSC.EXE - The RSC-program UNINST.EXE - The RSC-Uninstall program. BIVBX11.DLL - System file SAXCOMM.VBX - System file RSC_xx.LNG - Language files, where “xx” = a language code (for example UK=UK English) During the use of the RSC-program the following file is created in the Windows directory: <windows dir>\RSC.INI - A file containing RSC configuration data. The following file types are created in the RSC work directory: <work dir>\*.RSC - The status and measurement from a RetroSign instrument saved in a encoded form. <work dir>\*.RTX - The measurements from a RetroSign instrument exported in ASCII format - to be used for further processing, analysis etc. in a general purpose spread sheet program or the like. DELTA Light & Optics RetroSign Retrometer Quick Tour The RSC-screens This section provides a quick tour of the main functions of the RSC-program. After the RSC-program is started a front page appears: Press the Start button to continue. DELTA Light & Optics RetroSign Retrometer The RSC working screen appears: If the RetroSign instrument is connected to the COM-port on the PC (as specified in the Configure Menu), the instrument status will be shown on the screen. Note, that the contents of the Data Log in the instrument will not be read by the RSC-program until the Read Data Log button is pressed. This is because the reading can be rather time consuming if several hundreds of measurements are stored in the instrument, so the reading is inconvenient if you only want to use the RSC-program to get the general status of the instrument. Now, if you wish to read the Data Log, select the Read Data Log button. The contents of the Data Log will be read into the RSC-program and shown in the table to the right on the screen. Below the table there is one or more “tabs” corresponding to the Sequence Id’s that the user may have defined during the recording of the measurements. Select one of the tabs to show the measurements for the corresponding Sequence Id. Now it is possible, to add or edit some remarks for the set of measurements belonging to the selected Sequence Id in the field below the tabs. Note, that the first tab is always the “*ALL*” tab - meaning that the full set of measurements are shown in the table, and - similarly - that the Remarks applies to the full set. Finally, from the Main Menu select: File|Print RSC-Log Report - to print the status and measurements of the RetroSign instrument. File|Save As - to save the status and measurements as an *.RSC-file. File|Exit - to end and exit from the RSC-program. RetroSign Retrometer The RSC-Reports The RSC-program may produce two types of reports based on the contents and status of a RetroSign instrument. Below is shown a sample of each type of report. DELTA Light & Optics RetroSign Retrometer RetroSign Retrometer Using the RSC-program This section provides details about the contents and function of the menus, screens, and dialogues of the RSC-program. Main Menu The Main Menu at the top of the screen is always available: The items on the Main Menu: File Select the File item to get access to further items where saving data to or reading data from a file may be performed, to print RSC-reports etc. Configure Select the Configure item to display a dialogue where the RSC-program can be configured with respect to COM-port settings and selection of language. Terminal Access Select the Terminal Access item if you want direct access to the RetroSign instrument (see the RetroSign manual for command set). File menu The Main Menu|File item provides sub-items for reading, saving and print of data. The items of the Main Menu|File: Instrument Select the Instrument item if you want to (re-) connect the RSC-program to the RetroSign instrument. Before the (re-) connection is made the RSC-program will check that all read measurements from the Data Log of a RetroSign instrument are saved to an *.RSC-file. Open File Select the Open File item if you want to read old data from a stored *.RSC-file. Before the Windows file-select dialogue is shown, the RSC-program will check that all previous measurements read from the Data Log of the RetroSign instrument have been saved to an *.RSC-file. Save or Save As Select Save or Save As to save the data to an *.RSC-file Export Select Export if you want to save the data to an ASCII text file *.RTX. The *.RTX format can be used as import data to, e.g. a spread sheet. Print RSC-Log Report, Print RSC-Status Report Select the type of report to be printed. Printer Setup Select Printer Setup if the setup of the default Windows printer is to be defined or changed. DELTA Light & Optics RetroSign Retrometer Exit Select Exit to end the RSC-program. Before ending the RSC-program will check that all measurements from the Data Log of the RetroSign instrument have been read and that all data are save to an *.RSC-file. 6 RetroSign Retrometer Configure Dialogue The RSC-program may be configured with respect to the: Selection of COM-port for the serial communication with the RetroSign instrument. Selection of language to be used on the screen and in the reports. The selection is performed in the Configure Dialogue as shown below. Before entering the Configure Dialogue as shown the RSC-program will check that all measurements from the Data Log of the RetroSign instrument have been read and that all data are saved to an *.RSC-file. Terminal Access In general the RSC-program handles all the necessary communication with the RetroSign instrument. There may, however, be situations where you want direct instrument access to the RetroSign. There are two levels of terminal access: 1: Quick access via the RSC-program. 2: Access via Windows' standard terminal / communication program. When the Main Menu|Terminal Access item is selected, the RSC-program will check that all previous measurements read from the Data Log of the RetroSign instrument are saved to an *.RSC-file. DELTA Light & Optics RetroSign Retrometer Display example: Possibly you want to use more sophisticated features for terminal access. In that case press the Windows Terminal button. Now Window's standard Terminal program (or more specifically: a program with the name “TERMINAL.EXE”) will be looked up in the search path and started. This means that you may use your favourite communication program placed in the current directory or in the search path. When this program is given the name TERMINAL.EXE it will be used instead of Windows' standard Terminal program. 8 RetroSign Retrometer RSC Screen The RSC screen is shown below: RSC panel description Instrument panel: Displays the name and version of the firmware of the RetroSign instrument together with the Sensor Id identification. Log Data panel: Displays the contents of the Data Log of the instrument - but only after the Read Data Log button have been pressed. You may assign remarks to the different sequences of measurements and to the full set of measurements: Tabs - Select a tab below the table of measurements to let the table display the measurements for that Sequence Id. Note that the first tab (“*ALL*”) is used to display the full set of measurements. Remarks - Enter any number of lines with remarks for the currently selected Sequence Id. There is no specific limit for the size of the text that can be entered into the Remarks field. Status Panel: Displays the decoded status received from the instrument. DELTA Light & Optics RetroSign Retrometer Instrument Date/Time panel: Displays the current Date and Time as read from the instrument. The date and time can be changed using the box below. Data Log panel: Displays the status of the Data Log of the instrument. Open/Close - Use the Open/Close check box to open or close the Data Log in the instrument. When the Data Log is closed subsequent measurements are NOT stored in the instrument Data Log. Reset - Press the Reset button if you want to reset (clear) the instrument Data Log. Before resetting is done, a warning message is displayed. Read Data Log - Press the Read Data Log button to read the full set of measurements from the instrument Data Log. Calibration panel: Displays the instrument calibration status. Also, from this panel, it is possible to initiate a calibration. Calibrate - Press the Calibrate button to open the Calibration Dialogue (please refer to the Calibration Dialogue section for further details on the calibration procedure) Measurement panel: Displays the value of the last measurement performed by the RetroSign instrument. Also, from this panel, it is possible to initiate a new measurement. Measure - Press the Measure button to perform a measurement. If the instrument Data Log is OPEN the measurement will be registered in the instrument, and the measured value will be shown on the screen. Note, however, that this last measurement will not be read into the RSCprogram before the Read Data Log button is pressed. Battery panel: Displays the status of the battery and the set point for low battery warning. Off Timer panel: Displays the number of seconds currently set for the Off timer (automatic instrument power off time). Also, from this panel, it is possible to change the Off Time: New Value - Enter the time in seconds (Legal values are: 60 to 599 seconds). Note, values below 60 seconds will disable the automatic off function. Enabled/Disabled - Use the Enabled/Disabled checkbox to set the Off Timer value to default or to Disable the Off Timer. LCD Back light panel: Displays the on-time in seconds for the LCD Back light. Also, from this panel, it is possible to change the LCD Back light time: New Value - Enter the time in seconds (Legal values are: 1 to 20 seconds). Enabled/Disabled - Use the Enabled/Disabled checkbox to enable or disable the LCD Back light. Sequence Id panel: Displays the current measurement Sequence Id as read from the instrument. Also, from this panel, it is possible to change the Sequence Id: New - Enter a new Sequence Id (max. 6 characters). 10 RetroSign Retrometer Undefine - Press the Undefine button to clear the Sequence Id. DELTA Light & Optics RetroSign Retrometer Calibration Dialogue The RetroSign instrument may be calibrated from the RSC-program. Press the Calibrate button in the Calibration panel on the RSC screen. The Calibrate dialogue appears: The calibration comprises 3 steps: Step 1: Mount the Zero Cap (DARK bottom) on the instrument. When the Done button is pressed a Zero measurement (calibration) is performed. If the Zero measurement fails, a warning message is displayed. Step 2: Mount the Reference Cap (REFLECTIVE bottom) on the instrument. Press the Done button to proceed to the next step (no measurements are performed in this step). Step 3: Edit the Reference Value. Edit the Reference Value if needed and then press the Done button. An instrument Reference calibration is now performed. If the Calibration measurement fails, a warning message is displayed. If one of the two calibrations’ fails no changes to the instrument calibration is made. 12 RetroSign Retrometer Errors and Warnings The RSC-program distinguishes between communication problems and user errors. Communication problems Problem: No communication. The RSC-program checks the connection with the RetroSign instrument every 1 second. It the RSC-program detects that nothing is received it displays a message as shown below: Actions: Check if the instrument has turned off. Check that the COM-port number is correct. Problem: New Sensor Id. It is possible to physically disconnect one RetroSign instrument and connect a new one. In that case the RSC-program will display a warning as shown below: If the previous RetroSign instrument is reconnected, the warning message will disappear. Else you may choose to: Reconnect - Press the Reconnect button to tell the RSC-program that you are about to reconnect the old RetroSign instrument. Continue - Press the Continue button to delete all previously loaded data. User errors and warnings The possible error or warning messages from the RSC-program are listed below: Warning: Do you really want to clear the Data Log? Cause: You are about to reset (clear) the Data Log in the RetroSign instrument. Actions: Yes - Press the Yes button if you are sure that the Data Log should be cleared. No - The Data Log should not be cleared Warning: The Data Log from the instrument should be saved to an RSC-file. DELTA Light & Optics RetroSign Retrometer Cause: You are about to exit the RSC-program, select an old *.RSC file or the like. Before this is done the data should be saved. Actions: Save Now - Press the Save Now button if you want the data to be saved before you proceed. Continue Without Save - Press the Continue without Save button to proceed without saving anything. Warning: The Data Log or Remarks are changed; they should be saved to an RSC- or RTX-file. Cause: The RSC-program has detected some changes in the Data Log or in one or more of the remarks since the data was read into the program. Actions: Save Now - Press the Save Now button to save before you proceed. Continue Without Save - Press the Continue without Save button if you want to proceed without saving anything. Warning: The Data Log from the instrument should be read into the RSC program. Cause: The RSC-program has only read some of the measurements from the instrument Data Log. Possibly the user has cancelled a Read Data Log operation or the like. Actions: Read Now - Press the Read Now button to let the RSC-program read the contents of the Data Log. Continue - Press the Continue button to proceed without reading the Data Log. Error: Error in Zero measurement. Cause: During calibration step 1 (Zero measurement on the dark bottom on the cap) an error was detected. Typically a Zero measurement was performed on the reflective bottom of the cap. This is the first calibration attempt after an instrument initialisation, so the instrument does not know any “old” zero value. Actions: Try Again - Make sure that the cap is mounted correctly and then try again. - Press the Try Again button to repeat step 1 of the calibration procedure. Exit Calibration - Press the Exit Calibration button to abandon the calibration procedure. No R’ measurements are possible. Error: Error in Zero measurement; Old value is used. Cause: During calibration step 1 (Zero measurement with dark bottom on the cap) an error was detected. Typically a Zero measurement was performed on the reflective bottom of the cap. A Calibration has been performed before, so the instrument does know an “old” zero value. It is now possible to continue the calibration using the old Zero value - or abandon the calibration. Actions: Continue - Press the Continue button to continue the calibration using the old Zero value. Exit Calibration - Press the Exit Calibration button to abandon the calibration procedure. 14 RetroSign Retrometer Error: Error in Calibration measurement. Cause: During calibration step 3, Calibration measurement on the reflective bottom of the cap, an error is detected. Typically a Calibration measurement is performed on the dark bottom of the cap. This is the first calibration attempt after an instrument initialisation, so the instrument does not know any “old” calibration value. It is only possible to try again or abandon. Actions: Try Again - Make sure that the cap is mounted correctly and then try again. - Press the Try Again button to repeat the previous step of the calibration procedure. Exit Calibration - Press the Exit Calibration button to abandon the calibration procedure. No R' measurements is possible. Error: Error in Calibration measurement; Old value is used. Cause: During calibration step 3, Calibration measurement with reflective bottom of the cap, an error is detected. Typically a Calibration measurement is performed on the dark bottom of the cap. A Calibration has been performed before, so the instrument does know an “old” calibration value. Therefore it is possible to continue measurements with the old calibration value. Actions: Press the Continue or Exit Calibration button. The old calibration value will be used. Error: The selected file is not a legal *.RSC file. Cause: The selected file was not created with the RSC-program. Action: OK - Press the Ok button to acknowledge this message. Error: The selected *.RSC file is not compatible with the present version of the RSC-program. Cause: The selected file was an *.RSC file. However, it was created with an “old” version of the RSC-program. Action: OK - Press the Ok button to acknowledge this message. DELTA Light & Optics RetroSign Retrometer