1
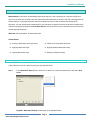
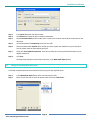
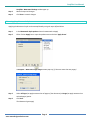
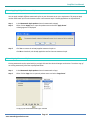
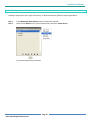
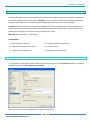
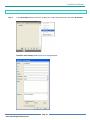
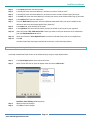
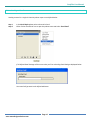
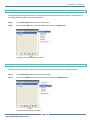
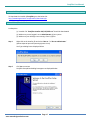
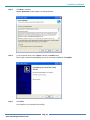
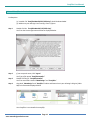
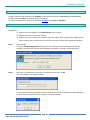
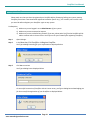
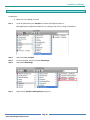
User Manual of ProofPlus for InDesign CS4/CS5/CS5.5 Windows Macintosh ProofPlus User Manual www.metadesignsolutions.com Page 2 ProofPlus User Manual Table of Contents 1. Introduction ................................................................................................................................................................... 4 1.1. Key Features of ProofPlus ...................................................................................................................................... 4 1.2. How ProofPlus can help you… ............................................................................................................................... 4 2. Legal Disclaimer ............................................................................................................................................................ 5 3. About Company ............................................................................................................................................................. 5 4. Links ............................................................................................................................................................................... 6 5. Supported Environment ................................................................................................................................................. 6 6. Product Cost .................................................................................................................................................................. 6 7. Watermark Styles Presets.............................................................................................................................................. 7 8. 9. 7.1 Creating a New Watermark Style Preset ............................................................................................................... 7 7.2 Editing an Existing Watermark Style ..................................................................................................................... 8 7.3 Applying Watermark Style..................................................................................................................................... 9 7.4 Applying Multiple Watermark Styles................................................................................................................... 10 7.5 Copying Watermark Style .................................................................................................................................... 10 7.6 Deleting a Watermark Style ................................................................................................................................ 11 Email Styles Presets ..................................................................................................................................................... 12 8.1 SMTP Settings for ProofPlus ................................................................................................................................ 12 8.2 Creating a New Email Style Preset ...................................................................................................................... 13 8.3 Editing an Existing Email Style Preset .................................................................................................................. 14 8.4 Sending an Email ................................................................................................................................................. 15 8.5 Copying an Email Style Preset ............................................................................................................................. 16 8.6 Deleting an Email Style Preset ............................................................................................................................. 16 Download ProofPlus .................................................................................................................................................... 17 10. Install ProofPlus in Windows ....................................................................................................................................... 17 11. Install ProofPlus in Macintosh ..................................................................................................................................... 19 12. Trial’s Limitations ........................................................................................................................................................ 20 13. Register ProofPlus ....................................................................................................................................................... 20 14. Unregister ProofPlus.................................................................................................................................................... 21 15. Uninstallation in Windows .......................................................................................................................................... 22 16. Uninstallation in Macintosh ........................................................................................................................................ 23 www.metadesignsolutions.com Page 3 ProofPlus User Manual 1. Introduction ProofPlus possesses the capability to add emailing features to your Adobe InDesign CS Suite. It also allows you to add watermarks to your documents. You can attach and send common file formats like PDF, JPEG and EPS, amongst others. Moreover, it can easily automate the whole process for you. ProofPlus is available for both Windows and the Macintosh platforms. ProofPlus offers ability in InDesign to define templates for Watermark, InDesign export format and templates for emails. These features can be combined to work together and automate your proofing workflow. 1.1. Key Features of ProofPlus Export and Send emails on one click Optional Watermark on attached EPS, PDF and JPEG files Option to set predefined body and subject text Choose transparency of watermark image Ability to set relative position of watermark Choose between default or custom email client Automatic Emails on document close Supports both Mac and Windows Email documents as an attachment in PDF, EPS or JPEG format. Save an email preset as your default preset. Email your document to multiple people at a time. Create a new email preset from the existing one with a single click. Supports inclusion of Watermark Style in many formats. Set watermark’s ratio on the document. Save a watermark preset as your default preset. 1.2. How ProofPlus can help you… Maintains accuracy and integrity of the published information. Be faster to market for a competitive advantage. Possesses the capability to add emailing features to Adobe InDesign. Enable you to include watermark for the document copyright authentication etc. Eliminates extra time consumption, as Emailing is just a single click away. www.metadesignsolutions.com Page 4 ProofPlus User Manual 2. Legal Disclaimer © 2006-2011 MetaDesign Solutions. All Rights Reserved. ProofPlus User Guide No part of this publication may be reproduced, stored in a retrieval system, or transmitted, in any form or by any means, electronic, mechanical, photocopying, recording, or otherwise, without the prior written permission of MetaDesign Solutions. The information in this book is furnished for informational use only and is subject to change without notice. The software described herein is furnished under a license agreement, and it may be used or copied only in accordance with the terms of the agreement. Adobe, InDesign, InCopy, Photoshop, and Illustrator are trademarks of Adobe Systems Incorporated. Apple, Mac, and Macintosh are trademarks of Apple Computer, Inc., registered in the U.S. and other countries. Microsoft, Windows, Windows XP, Windows Vista and Windows 7 are trademarks of Microsoft Corporation registered in the U.S. and/or other countries. All other trademarks are the property of their respective owners. Production Note This manual was created electronically using Microsoft Word. 3. About Company MetaDesign Solutions is a software development company which primarily develops editorial solutions for the print and the online media industry. This includes productivity tools and efficiency-enhancing plug-ins for Adobe InDesign, Illustrator & InCopy and Xtensions for Quark, all solutions being equally robust. MetaDesign has an international roster of customers that includes many of the world’s top book publishers and corporate clients. MetaDesign Solutions is located in Gurgaon, India. MetaDesign’s Productivity Plug-ins MetaDesign Solutions has created a number of productivity enhancing plug-ins for InDesign, InCopy and Illustrator that makes working with these applications easier, faster, and much more effective. For a full overview of these plug-ins, visit the page Products www.metadesignsolutions.com Page 5 ProofPlus User Manual 4. Links Company : http://metadesignsolutions.com/home.php Info : http://metadesignsolutions.com/products/proofplus.php Download Trial : http://metadesignsolutions.com/products/downloads.php Buy : ProofPlus 5. Supported Environment a) Operating System i) Windows XP/Vista/7 ii) Macintosh PowerPC/Intel b) InDesign Versions Supported i) CS4/CS5/CS5.5 6. Product Cost Product ProofPlus (InDesign) www.metadesignsolutions.com No. of Licenses Price (in USD) One or More $ 49.99 each Three or More $ 44.99 each Five or More $ 39.99 each Ten or More $ 34.99 each Page 6 ProofPlus User Manual 7. Watermark Styles Presets Watermarking is the process of embedding information (logo etc.) onto a document in a way that is difficult to remove. If the document is copied, then the information (watermark) also is carried in the copy. One application of watermarking is in copyright protection which is intended to prevent or deter unauthorized copying of the document. You may include several watermarks in your document as required and then send them to whomsoever with the emailing facility (Defined in Email Styles Presets section) as because of the watermark your document will remain copyright protected. Menu Bar: Choose ProofPlus Watermark Styles Functionalities: 7.1 Creating a New Watermark Style Preset Editing an Existing Watermark Style Applying Watermark Style Applying Multiple Watermark Style Copying Watermark Style Deleting a Watermark Style Creating a New Watermark Style Preset A New Watermark can be created by using the steps defined below. Step 1 In the Watermark Styles palette, either Click on New icon or open the palette menu and select ‘New Preset’. ProofPlus- Watermark Settings window pops up as displayed below: www.metadesignsolutions.com Page 7 ProofPlus User Manual Step 2 Step 3 Step 4 Step 5 Step 6 Step 7 Step 8 In the Name field enter the desired name. Click Browse and locate the file to include as watermark. Choose Document Ratio from 0 to 100, which is used to set the area covered by the watermark on the document. Set the Watermark’s Transparency Level from 0 to 100. Choose the watermark Position where exactly you want to place the watermark on your document. You can choose from the 9 pre-defined positions. Check the “Set as default watermark” check box to make the currently selected watermark as your default watermark. Click Save. The New watermark gets created and can be seen in the Watermark Styles palette. 7.2 Editing an Existing Watermark Style An already created watermark can be edited easily by using the steps defined below. Step 1 Step 2 In the Watermark Styles palette select the watermark to Edit. Either Click on Edit icon or open the palette menu and select ‘Edit Preset’. www.metadesignsolutions.com Page 8 ProofPlus User Manual Step 3 Step 4 7.3 ProofPlus- Watermark Settings window pops up. Make the required changes. Click Save to commit changes. Applying Watermark Style Applying the Watermark style can be accomplished by using the steps defined below. Step 1 Step 2 In the Watermark Styles palette select the watermark to Apply. Either Click on Apply icon or open the palette menu and select ‘Apply Preset’. A ProofPlus – Watermark Page Range window pops up. (if there are more than one pages) Step 3 Step 4 Select All Pages (to apply watermark on all pages of the document) or Range (to apply watermark on selected pages) option. Click Save. The Watermark gets apply. www.metadesignsolutions.com Page 9 ProofPlus User Manual 7.4 Applying Multiple Watermark Styles You can apply multiple different watermark styles on your document as per your requirement. The steps to apply another watermark style on the document when one watermark style is already applied are as defined below. 7.5 Step 1 Step 2 In the Watermark Styles palette select the watermark to Apply. Either Click on Apply icon or open the palette menu and select ‘Apply Preset’. A dialog appears as displayed Step 3 Click Yes to remove the already applied watermark styles or Click No to have both, the already applied as well as the new watermark style. Copying Watermark Style Existing watermark can be copied with just a single click and then desired changes can be done. To make a copy of an existing watermark follow the steps defined below. Step 1 Step 2 In the Watermark Styles palette select the watermark to Copy. Either Click on Copy icon or open the palette menu and select ‘Copy Preset’. A copy of the selected watermark gets created. www.metadesignsolutions.com Page 10 ProofPlus User Manual 7.6 Deleting a Watermark Style Deleting a watermark is also a single click activity. To delete a watermark follow the steps defined below. Step 1 Step 2 In the Watermark Styles palette select the watermark to Delete. Either Click on Delete icon or open the palette menu and select ‘Delete Preset’. The selected watermark gets deleted. www.metadesignsolutions.com Page 11 ProofPlus User Manual 8. Email Styles Presets It’s always desirable to add ease and comfort to everything we do. A regular practice for all InDesign professionals is to send their InDesign documents as emails. ProofPlus converts this desire into actual functionality by allowing the InDesign professionals to send emails directly from InDesign workspace itself to the concerned people. ProofPlus allows you to automate the process of sending emails. The automation process sends the documents as an attachment in the file formats like PDF, JPEG and EPS along with optional watermarks. You can predefine the subject and the body part of the emails and the recipients of the email. Menu Bar: Choose EmailPlus Email Styles Functionalities: 8.1 SMTP settings for ProofPlus Creating a New Email Style Preset Editing an Existing Email Style Preset Sending an Email Copying an Email Style Preset Deleting an Email Style Preset SMTP Settings for ProofPlus To send emails you first need to setup the SMTP settings which you can do in the Preferences window. To configure the SMTP settings, go to Edit->Preferences->ProofPlus (Please contact your concerned department to get this setting done) www.metadesignsolutions.com Page 12 ProofPlus User Manual 8.2 Creating a New Email Style Preset Step 1 In the Email Styles palette, either Click on New icon or open the palette menu and select ‘New Preset’. EmailPlus- Email Settings window pops up as displayed below. www.metadesignsolutions.com Page 13 ProofPlus User Manual Step 2 Step 3 Step 4 Step 5 Step 6 Step 7 Step 8 Step 9 Step 10 Step 11 Step 12 8.3 In the Name field enter the desired name. In the To field, enter the email address/s, to whom you want to send an email. In the CC field, enter the email address/s, to whom you want to send a Carbon Copy of the email. In the BCC field, enter the email address/s, to whom you want to send a Blind Carbon Copy of the email. In the Subject field, enter the subject line. From the Watermark drop down, select an additional watermark which you want to embed on the document other than the already applied ones. (Optional) In the Body field, write the body of the email. In the Signature field, write the text which you want to include in your email as your signature. Select the format PDF, JPEG and/or EPS in which you want to send your document as an attachment from the Send Attachment As section. Check the check box “Set as Default Preset” to make the selected email preset as your default one. Click OK. Your New Email Style Preset gets created and can be seen in the Email Styles palette. Editing an Existing Email Style Preset An already created Email Style Preset can be edited easily by using the steps defined below. Step 1 Step 2 In the Email Styles palette select the email to Edit. Either Click on Edit icon or open the palette menu and select ‘Edit Preset’. Step 3 Step 4 EmailPlus- Email Settings window pops up. Make the required changes. Click OK to commit changes. www.metadesignsolutions.com Page 14 ProofPlus User Manual 8.4 Sending an Email Sending an email is a single click activity whose steps are as defined below. Step 1 Step 2 In the Email Styles palette select the email to Send. Either Click on Send Email icon or open the palette menu and select ‘Send Email’. If all defined Email Settings will be correct then you’ll see a Sending Email dialog as displayed below Your email will get send to the defined addresses. www.metadesignsolutions.com Page 15 ProofPlus User Manual 8.5 Copying an Email Style Preset Existing Email Style can be copied with just a single click and then desired changes can be done. To make a copy of an existing Email Style follow the steps defined below. Step 1 Step 2 In the Email Styles palette select the Email to copy. Either Click on Copy icon or open the palette menu and select ‘Copy Preset’. A copy of the selected Email gets created. 8.6 Deleting an Email Style Preset Deleting an Email Style is also a single click activity. To delete a Email Style follow the steps defined below. Step 1 Step 2 In the Email Styles palette select the email to Delete. Either Click on Delete icon or open the palette menu and select ‘Delete Preset’. The selected email style gets deleted. www.metadesignsolutions.com Page 16 ProofPlus User Manual 9. Download ProofPlus To Download the installer of ProofPlus go to the below link: http://metadesignsolutions.com/products/downloads.php 10. Install ProofPlus in Windows Pre-Requisite: (1) Installer File “ProofPlus Installer CS4/CS5/CS55.exe” should be downloaded. (2) Make sure you are logged in as an Administrator of your system. (3) Make sure your InDesign is not running. Close it if Open. Step 1 Right click on the installer file and select ‘Run as..’ or ‘Run as administrator’ (options depend upon the Operating System in use) You’ll get a dialog box as displayed below: Step 2 Click Yes to continue. ProofPlus Setup Wizard dialog box appears as displayed below: www.metadesignsolutions.com Page 17 ProofPlus User Manual Step 3 Click Next to continue. License Agreement window appears as displayed below: Step 4 If you accept the terms, Click ‘I Agree’ and then on Install button. You will get a window acknowledging you for the successful installation of ProofPlus. Step 5 Click Finish. Your ProofPlus is now installed successfully. www.metadesignsolutions.com Page 18 ProofPlus User Manual 11. Install ProofPlus in Macintosh Pre-Requisite: (1) Installer File “ProofPlusMacCS4/CS5/CS55.dmg” should be downloaded. (2) Make sure your InDesign is not running. Close it if Open. Step 1 Double Click the “ProofPlusMacCS4/CS5/CS55.dmg” You’ll see the License Agreement window as displayed below Step 2 If you accept the terms, Click ‘ Agree’. You’ll get a file named “ProofPlusInstaller” Double Click the file “ProofPlusInstaller” You’ll see two Folders named “MetaDesign” and “ProofPlus” Copy both “MetaDesign” and “ProofPlus” Folders and Paste them in your InDesign’s Plug-Ins folder. Refer the Illustration displayed below. Step 3 Step 4 Your ProofPlus is now installed successfully. www.metadesignsolutions.com Page 19 ProofPlus User Manual 12. Trial’s Limitations Though all features and functionality of ProofPlus can be experienced using its Trial version but Trial version is limited to work for 7 Days only from the date of installation. To continue the experience of the full functionality Purchase your License for ProofPlus. 13. Register ProofPlus Pre-Requisite: 1) Make sure you are logged in as an Administrator of your system. 2) Make sure you are connected to Internet. 3) Make sure you are not behind any firewall. (If you are, please switch it off so that ProofPlus will be able to connect with its License server. You may turn On your Firewall after registering ProofPlus) Step 1 Open InDesign. You’ll get a ProofPlus-Registration dialog box (You can also open the same dialog box by clicking ProofPlus in the menu bar and then selecting Register ProofPlus in InDesign) as displayed below: Step 2 Enter your 25 alphanumeric License Key in the given box and then click Ok. You’ll get a dialog box as displayed below: On successful connection of ProofPlus with its License server, you’ll get a dialog box acknowledging you for the successful registration of your ProofPlus as displayed below: www.metadesignsolutions.com Page 20 ProofPlus User Manual 14. Unregister ProofPlus Please make sure that you have Unregistered your ProofPlus before formatting /selling your system, moving ProofPlus from where it was installed & registered to another system. As, if, it is not done, then in such a case you won't be able to Register your ProofPlus again on any system. Pre-Requisite: 1) Make sure you are logged in as an Administrator of your system. 2) Make sure you are connected to Internet. 3) Make sure you are not behind any firewall. (If you are, please switch it off so that ProofPlus will be able to connect with its License server. You may turn On your Firewall after registering ProofPlus) Step 1 Step 2 Open InDesign. In the Menu bar, Click ProofPlus->UnRegister ProofPlus. You’ll get a dialog box asking for your confirmation as displayed below: Step 3 Click Yes to continue. You’ll get a dialog box as displayed below: On successful connection of ProofPlus with its License server, you’ll get a dialog box acknowledging you for the successful Unregistration of your ProofPlus as displayed below: www.metadesignsolutions.com Page 21 ProofPlus User Manual 15. Uninstallation in Windows Uninstallation can be done very easily without hampering your other applications. To do so please follow the steps: Pre-Requisite: 1) Make sure your InDesign is closed. Step 1 Step 2 Step 3 Go to the folder where your ProofPlus is installed (The default location is: C:\Program Files\Adobe\<Application Folder (For eg. InDesign CS4, CS5 etc.>\Plug-ins\ProofPlus) Here you’ll find a file named ‘Uninst ProofPlus.exe’. Run the file. Uninstallation wizard appears as displayed below: Step 4 Click on Uninstall button. You will get a window acknowledging you for the successful Uninstallation of ProofPlus. Step 5 Click Finish. www.metadesignsolutions.com Page 22 ProofPlus User Manual 16. Uninstallation in Macintosh Pre-Requisite: 1) Make sure your InDesign is closed. Step 1 Go to the folder where your ProofPlus is installed (The default location is: Mac/Applications/<Application Folder (For eg. InDesign CS4, CS5 etc.>/Plug-ins/ProofPlus) Step 2 Step 3 Step 4 Delete the folder ProofPlus. On the same path, look for the folder MetaDesign. Open folder MetaDesign. Step 5 Delete the file ProofPlus.InDesignPlugin only from it. www.metadesignsolutions.com Page 23